本篇将涉及到的一些基础算法集中介绍一下。由于以贴代码为主,有些算法可能只提个名字,有些算法的原理可能会一两句话带过。
原来的VLPR工程中车牌识别的一些组件是分成好几个类的,现将它们全部塞到一个类CPlate中。这样虽有违C++ OOP的精神,但 “咣当”一下子将Plate.h复制过来感觉是很爽滴:
#pragma onceconst int W = 512;				// 预定义的归一化图像宽度
const int M = 16;				// 预定义最小图像块单元的宽度
const int N = 64;				// 预定义最小图像块单元的高度
const int I	= 12;				// 车牌定位扫描线之间的间隔
const int WW = 64;				// 最大字符宽度
const int HH = 116;				// 最大字符高度
const int WP = 384;				// 透视变换的车牌宽度
const int HP = 116;				// 透视变换的车牌高度
const int NN = 30;				// 行扫描时可能的闭合区域的最大值
const int SEG_LIMIT = 50;		// 行扫描时的长线段像素数最大值
const int NUM_SYMBOL = 12;		// 车牌中字符个数的最大值
const int NUM_CHARSET = 4;		// 车牌中字符集个数的最大值
const int NUM_OUTLINE = 800;	// 字符外周轮廓所包含点数的最大值
const int NUM_PLATE = 2;		// 同时悬挂的车牌块数的最大值typedef char				int8;
typedef unsigned char		uint8;
typedef short				int16;
typedef unsigned short		uint16;
typedef int					int32;
typedef unsigned int		uint32;
typedef __int64				int64;
typedef unsigned __int64	uint64;// 车牌背景色
enum
{BLACK,		// 黑色WHITE,		// 白色RED,		// 红色GREEN,		// 绿色BLUE,		// 蓝色YELLOW,		// 黄色
};// 车牌类型
enum
{PLATE_NONE,					// 无车牌PLATE_BLUE_WHITE,			// 蓝底白字PLATE_YELLOW_BLACK,			// 黄底黑字PLATE_YELLOW_BLACK2,		// 黄底黑字两行PLATE_MUCK,					// 渣土车PLATE_GREEN_BLACK,			// 绿底黑字PLATE_GREEN_YELLOW_BLACK,	// 绿/黄底黑字PLATE_WHITE_BLACK,			// 白底黑字
};// 汉字类型
enum
{HANZI_OLD,		// 汉字字体
};// 英数类型
enum
{ALPHA_OLD,		// 英数字体1, 蓝底白字、黄底黑字等车牌的英数字体ALPHA_NEW,		// 英数字体2,新能源车牌的英数字体
};// 分隔符类型
enum
{SEPTOR_NONE,	// 空白分隔符SEPTOR_DOT,		// 圆点分隔符SEPTOR_DASH,	// 横杠分隔符SEPTOR_PLUG,	// 插头分隔符
};// 像素点
typedef struct VECT
{int16 x;		// x坐标int16 y;		// y坐标int16 z;		// 用于存储二维坐标点的其他属性
} VECT;// 矩形框
typedef struct BOX
{int16 left;		// 左边界int16 right;	// 右边界int16 top;		// 上边界int16 bottom;	// 下边界
} BOX;// 范围
typedef struct BOUND
{int16 flags;	// 标志字int16 width;	// 方框宽度int16 height;	// 方框高度int16 xl;		// 最左边点的x坐标,等于方框左边界int16 yl;		// 最左边点的y坐标int16 xr;		// 最右边点的x坐标,等于方框右边界int16 yr;		// 最右边点的y坐标int16 xt;		// 最上边点的x坐标int16 yt;		// 最上边点的y坐标,等于方框上边界int16 xb;		// 最下边点的x坐标int16 yb;		// 最下边点的y坐标,等于方框下边界int16 xlc;		// 过中央横线最左边点的x坐标int16 ylc;		// 过中央横线最左边点的y坐标int16 xrc;		// 过中央横线最右边点的x坐标int16 yrc;		// 过中央横线最右边点的y坐标int16 xtc;		// 过中央竖线最上边点的x坐标int16 ytc;		// 过中央竖线最上边点的y坐标int16 xbc;		// 过中央竖线最下边点的x坐标int16 ybc;		// 过中央竖线最下边点的y坐标int16 xc;		// 中心点的x坐标int16 yc;		// 中心点的y坐标int16 nl;		// 轮廓左边段的点数int16 nr;		// 轮廓右边段的点数int16 nt;		// 轮廓上边段的点数int16 nb;		// 轮廓下边段的点数VECT* vl;		// 轮廓左边段的点数据VECT* vr;		// 轮廓右边段的点数据VECT* vt;		// 轮廓上边段的点数据VECT* vb;		// 轮廓下边段的点数据
} BOUND;// 单字符识别结果
typedef struct RESULT
{uint8 symbol;	// 字符uint8 score;	// 分值,满分为100int16 weight;	// 重量,越重越好
} RESULT;// 字符模板
typedef struct RASTER
{uint8 symbol;		// 字符uint8 reserved1;uint8 reserved2;uint8 reserved3;uint32 font[48];	// 宽32,高48
} RASTER;// 车牌参数
typedef struct PARAMS
{int num_row;				// 字符行数int num_charset;			// 字符集个数int alpha_style;			// 字母、数字样式int hanzi_style;			// 汉字样式int ratio0;					// 正常字符间距之间的比例的下限int ratio1;					// 正常字符间距之间的比例的上限,分隔点前、后两字符间距与正常字符间距的比例的下限int ratio2;					// 分隔点前、后两字符间距与正常字符间距的比例的上限,正常字符2倍间距与1倍间距的比例的下限int ratio3;					// 正常字符2倍间距与1倍间距的比例上限,分隔点前、后两字符加1字符间距与正常字符间距的比例的的下限int ratio4;					// 分隔点前、后两字符加1字符间距与正常字符间距的比例的的上限,正常字符3倍间距与1倍间距的比例的下限int ratio5;					// 正常字符3倍间距与1倍间距的比例的上限struct {int num_sym;				// 字符个数(不含分隔符)int septor_pos;				// 分隔符的位置int septor_style;			// 分隔符样式int back_color0;			// 分隔符前的背景颜色int back_color;				// 分隔符后的背景颜色int fore_color;				// 主要的字符颜色int fore_color1;			// 最末位字符颜色int width;					// 字符宽度 int height;					// 字符高度int x_space;				// 正常字符间距int x_dot_space;			// 分隔点前、后两字符间距int y_center;				// 中央y坐标int x_center[NUM_SYMBOL];	// 各字符中央x坐标int charset[NUM_SYMBOL];	// 各字符所属字符集int sequence[NUM_SYMBOL];	// 易识别字符的序号} row[2];						// 每行的参数			char chars[NUM_CHARSET][64];	// 字符集的定义
} PARAMS;// 扫描线
typedef struct LINES
{int row;	// 哪一行int num;	// xx中存储的点数int ct;		// 黑白线段数int x1;		// 有效起始点的序号int x2;		// 有效结束点的序号int *xx;	// 每个点的x坐标
} LINES;// 车牌识别结果的信息
typedef struct PLATE_INFO
{int num;							// 车牌块数int type[NUM_PLATE];				// 车牌类型uint8 avg_score[NUM_PLATE];			// 每个车牌识别结果的总评分(可信度)uint8 text[NUM_PLATE][12];			// 每个车牌的识别结果(以'\0'结束)uint8 score[NUM_PLATE][12];			// 每个车牌每个字符识别结果的评分(可信度)
} PLATE_INFO;class CPlate
{
public:CPlate(void);~CPlate(void);unsigned char *m_pOrg;			// 原始图像unsigned char *m_pRGB;			// RGB图像unsigned char *m_pHSV;			// HSV图像unsigned char *m_pGreen;		// 绿底,反相unsigned char *m_pBlue;			// 蓝底unsigned char *m_pYellow;		// 黄底,反相unsigned char *m_pWhite;		// 白底,反相unsigned char *m_pBlack;		// 黑底,也用作灰度图像unsigned char *m_pSharpen;		// 灰度图像锐化后unsigned char *m_pPlateRGB[NUM_PLATE];	// 车牌局部的彩色图像unsigned char *m_pPlateGray;	// 识别时用到的车牌图像之一unsigned char *m_pPlateColor;	// 识别时用到的车牌图像之二 unsigned char *m_pPlateMono[8]; // 识别时用到的单色车牌图像int m_nWidth;		// 归一化图像宽度int m_nHeight;		// 归一化图像高度int m_nOrgWidth;	// 原始图像宽度int m_nOrgHeight;	// 原始图像高度int *m_pCoord;		// 存储扫描线坐标点的缓冲区LINES *m_pLines;	// 存储扫描线内容的缓冲区public:static int GaussElimination(double *a, double *b, double *x, int n);static int FitHorizLine(VECT *pt, int n, int &k, int &b);static int FitVertLine(VECT *pt, int n, int &k, int &b);static int FindCrossPoint(int kh, int bh, int kv, int bv, VECT *pt);static int SetBound(int xc, int yc, int width, int height, BOUND *bound);static bool BoundEqual(BOUND *a, BOUND *b);static bool BoundIncluded(BOUND *a, BOUND *b);static BOUND* BoundCombine(BOUND *a, BOUND *b);static void BoundFindLeftSide(BOUND *bound, VECT* pt, int num);static void BoundFindRightSide(BOUND *bound, VECT* pt, int num);static int FindBound(BOUND *bound, BOX *box, VECT *pt, int num);static void RGB2Gray(void *src, void *dst, int width, int height);static void RGB2Blue(void *src, void *dst, int width, int height);static void RGB2Green(void *src, void *dst, int width, int height);static void RGB2Yellow(void *src, void *dst, int width, int height);static void RGB2Black(void *src, void *dst, int width, int height);static void RGB2White(void *src, void *dst, int width, int height);static void Invert(void *src, int width, int height);static void Copy(void *src, void *dst, int width, int height);static void MiddleFilter(void *src, int width, int height, int mono);static void Sharpen(void *src, void *dst, int width, int height);static void Binarize(void *src, void *dst, int width, int height, int threshold);static void Frame(void *src, int color, int width, int height);static void HorizLine(void *src, int color, int width, int y);static void VertLine(void *src, int color, int width, int height, int x);static void PerspectiveTransform(void *src, void *dst, int *factor, int src_x0, int src_y0, int src_width, int src_height, int dst_width, int dst_height);static int OTSU_Threshold(int *count, int &threshold, int &back, int &fore);static void StatsHistogram(void *src, int width, int height, int *count);static void StatsHistogram(void *src, int x, int y, int w, int h, int *count);static int FindOutline(void *src, int width, int height, int threshold, int xx, int *yy, int &yynum, VECT pt0, VECT *pt, BOX *box, bool box_init);static int FindOutlineLeftward(void *src, int width, int height, int threshold, VECT pt0, VECT *pt, BOX *box, BOUND *bound, bool box_init);static int FindOutlineRightward(void *src, int width, int height, int threshold, VECT pt0, VECT *pt, BOX *box, BOUND *bound, bool box_init);static int FindOutlineUpward(void *src, int width, int height, int threshold, VECT pt0, VECT *pt, BOX *box, BOUND *bound, bool box_init);static int FindOutlineDownward(void *src, int width, int height, int threshold, VECT pt0, VECT *pt, BOX *box, BOUND *bound, bool box_init);static int FindEdgeUpward(void *src, int threshold, BOUND *bound, VECT *pt);static int FindEdgeDownward(void *src, int threshold, BOUND *bound, VECT *pt);static int FindEdgeLeftward(void *src, int threshold, int kc, BOUND *bound, VECT *pt);static int FindEdgeRightward(void *src, int threshold, int kc, BOUND *bound, VECT *pt);static int EstimateHorizAngle(VECT *pt, int n, int &k, int &b);static int EstimateVertAngle(VECT *pt, int n, int &k, int &b);static int StatsLine(void *src, int width, int threshold, int *xx, bool sharpen);static int StatsVertLine(void *src, int width, int threshold, int *xx, BOX *box);static int DetermineLine(int row, int col, LINES *pline, bool sharpen);static int FindRasterSet(int plate, int charset, RASTER **ppRaster);static RESULT RecognizeSymbol(void *src, int threshold, int plate, int index, int &num, int &yt, int &yb, VECT *pt, BOUND *bound, int numRaster, RASTER **ppRaster);static RESULT MatchRaster(void *src, int width, int height, int x, int y, int w, int h, int numRaster, RASTER **ppRaster, bool narrow1);static int CompareColors(const void *a, const void *b);static int CompareBound_height(const void *a, const void *b);static int CompareBound_xc(const void *a, const void *b);static int CompareVect_x_Asc(const void *a, const void *b);static int CompareVect_x_Desc(const void *a, const void *b);static int CompareVect_x_Asc_y_Asc(const void *a, const void *b);static int CompareVect_x_Desc_y_Asc(const void *a, const void *b);static int CompareResult_Weight_Asc(const void *a, const void *b);public:int InputImage(unsigned char *src, int width, int height, int inversed);int RecognizePlate(PLATE_INFO *info);private:int ProcessLine(void *src0, void *src, int row, int width, int height,  int delta, LINES *pline, PLATE_INFO *info, int *plate, bool sharpen);int FindPlateArea(void *src0, void *src, int threshold, int row, int width, int height, LINES *pline, PLATE_INFO *info, int plate, int delta, bool sharpen);int FindEdge(int plate, BOUND *bound, PLATE_INFO *info);int WhatPlate(LINES *pline, int *plate, bool sharpen);int Recognize(int plate, PLATE_INFO *info);
};
同时悬挂的车牌块数NUM_PLATE,目前设定为2,专为解决这样的问题:

m_pGreen, m_pYellow等等那些图像缓冲区,是为了辅助识别不同类型的车牌而设置的。实际上它们不需要同时存在,也不需要搞成全局变量,只要在检测到是哪种车牌后转换为相应颜色的图像(局部变量)就够了。本设计如此,是因为需要在完成识别后在屏幕上显示出各种颜色的图像,便于调试。
.h中那一堆静态函数,就属于基础算法的范畴了。下面分为数学类、计算机图形学类和图像处理类进行说明。
纯数学或可归于数学的算法有高斯消去法求解线性方程组、最小二乘法曲线(横线和竖线)拟合、横竖两条直线求交点、双线性插值、逆透视变换等。本系统中除了高斯消去法求解线性方程组用double类型数据,其他数学相关算法全部用整型数进行运算。
// 高斯列主元消去法求解线性方程组
//
// a: 系数矩阵,N * N
// b: 常数矩阵,N
// x: 结果矩阵,N
// n: 阶数N
//
int CPlate::GaussElimination(double *a, double *b, double *x, int n)
{int m = n + 1;int i, j, k;double *p, *q, *r, *s;double t;double *ab = new double[m * n];// 将a, b拼成增广矩阵p = ab;q = a;r = b;for (i = 0; i < n; i++){for (j = 0; j < n; j++)  *p++ = *q++;*p++ = *r++;}p = ab;for (i = 0; i < n; i++, p += m){// 查找列主元int row = i;double max = 0;for (q = p + i, j = i; j < n; j++, q += m){t = fabs(*q);if (t > max){r = q;row = j;max = t;}}// 行交换if (row != i){for (q = p + i, k = i; k < m; k++, q++, r++){t = *q;*q = *r;*r = t;}}// 当前行除以列主元q = p + i;t = *q;for (k = i; k < m; k++, q++)  *q /= t;// 逐行消元for (j = i + 1; j < n; j++){q = p + i;r = ab + j * m + i;t = *r;for (k = i; k < m; k++, q++, r++)  *r -= *q * t;}}// 回代p = ab + (n - 2) * m;for (i = n - 1; i > 0; i--, p -= m){q = p + n;r = p + i;s = q + m;for (j = i; j > 0; j--, q -= m, r -= m){*q -= *s * *r;*r = 0;}}p = ab + n;for (i = 0; i < n; i++, x++, p += m) *x = *p;delete []ab;return 1;
}
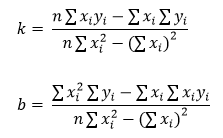
所谓横线和竖线,分别指接近于水平和竖直方向的线,这样分开来用整型数的斜率处理起来比较方便(因为与相应坐标轴的夹角在45度以下,斜率小于1.0)。对于倾斜不甚严重的车牌,上下边缘是横线,左右边缘是竖线。因为直线只是一次的函数,最小二乘拟合算法并不复杂,直接代入推导出的公式中计算即可。下面是针对y=kx+b的计算公式。在计算x=ky+b时,只需将其中的x, y互换就行了。
// y = kx + b 横线的拟合
// pt: 待拟合各点,不带小数
// n: 点的个数
// k: 横线y=kx+b的斜率,带16位小数
// b: 横线y=kx+b的截距,带16位小数
int CPlate::FitHorizLine(VECT *pt, int n, int &k, int &b)
{int64 sum_x = 0;int64 sum_y = 0;int64 sum_x_x = 0;int64 sum_x_y = 0;for (int i = 0; i < n; i++, pt++){sum_x += pt->x;sum_y += pt->y;sum_x_x += (int)pt->x * (int)pt->x;sum_x_y += (int)pt->x * (int)pt->y;}int64 tmp = n * sum_x_x - sum_x * sum_x;if (tmp == 0) tmp++; k = (int)((n * sum_x_y - sum_x * sum_y) * 65536 / tmp);b = (int)((sum_x_x * sum_y - sum_x_y * sum_x) * 65536 / tmp);return 1;
}// x = ky + b 竖线的拟合
// pt: 待拟合各点,不带小数
// n: 点的个数
// k: 竖线x=ky+b的斜率,带16位小数
// b: 竖线x=ky+b的截距,带16位小数
int CPlate::FitVertLine(VECT *pt, int n, int &k, int &b)
{int64 sum_x = 0;int64 sum_y = 0;int64 sum_x_y = 0;int64 sum_y_y = 0;for (int i = 0; i < n; i++, pt++){sum_x += pt->x;sum_y += pt->y;sum_x_y += (int)pt->x * (int)pt->y;sum_y_y += (int)pt->y * (int)pt->y;}int64 tmp = n * sum_y_y - sum_y * sum_y;if (tmp == 0) tmp++; k = (int)((n * sum_x_y - sum_x * sum_y) * 65536 / tmp);b = (int)((sum_y_y * sum_x - sum_x_y * sum_y) * 65536 / tmp);return 1;
}
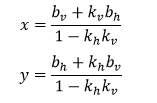
横竖两直线交点求解直接用如下推导出的公式。其中k, b的下标h, v分别表示横线和竖线。
// 求两条直线的交点
// kh: 横线y=kx+b的斜率,带16位小数
// bh: 横线y=kx+b的截距,带16位小数
// kv: 竖线x=ky+b的斜率,带16位小数
// bv: 竖线x=ky+b的截距,带16位小数
// pt: 交点,其坐标带4位小数
int CPlate::FindCrossPoint(int kh, int bh, int kv, int bv, VECT *pt)
{int64 tmp = 0x100000000LL - kh * kv;pt->x = (int16)(((int64)bv * 65536 + (int64)kv * bh) * 16 / tmp);pt->y = (int16)(((int64)bh * 65536 + (int64)kh * bv) * 16 / tmp);return 1;
}
简单解释一下Vect, Box, Bound, Outline, Edge这类指向性命名的含义。Vect其实就是具有某种属性的二维点,Box就是简单的二维矩形框,Bound是含有很多属性的范围(也是矩形),Outline是字符的轮廓(一系列的点),Edge是车牌边界(不等于车牌物理边框,比如上边界可能是一条最接近于通过所有字符上端的直线)。
Bound有一些成员函数,如判断两个范围是否相等,是否有包含关系,合并两个范围,计算一个点集的范围,等等。
// 初始化Bound
int CPlate::SetBound(int xc, int yc, int width, int height, BOUND *bound)
{int h_width = (width + 1) / 2;int h_height = (height + 1) / 2;bound->flags = 0;bound->xc = xc;bound->yc = yc;bound->width = width;bound->height = height;bound->xl = xc - h_width;bound->yl = yc;bound->xr = xc + h_width;bound->yr = yc;bound->xt = xc;bound->yt = yc - h_height;bound->xb = xc;bound->yb = yc + h_height;bound->xlc = bound->xl;bound->ylc = bound->yl;bound->xrc = bound->xr;bound->yrc = bound->yr;bound->xtc = bound->xt;bound->ytc = bound->yt;bound->xbc = bound->xb;bound->ybc = bound->yb;bound->nl = 0;bound->nr = 0;bound->nt = 0;bound->nb = 0;bound->vl = NULL;bound->vr = NULL;bound->vt = NULL;bound->vb = NULL;return 1;
}// a等于b?
bool CPlate::BoundEqual(BOUND *a, BOUND *b)
{return (abs(a->xc - b->xc) <= 1 && abs(a->yc - b->yc) <= 1 && abs(a->width - b->width) <= 2 && abs(a->height - b->height) <= 2);
}// a包含b?
bool CPlate::BoundIncluded(BOUND *a, BOUND *b)
{return (a->xl <= b->xl && a->xr >= b->xr && a->yt <= b->yt && a->yb >= b->yb);
}// a,b合并到a,并返回a
BOUND* CPlate::BoundCombine(BOUND *a, BOUND *b)
{if (b->xl < a->xl){a->xl = b->xl;a->yl = b->yl;}if (b->xr > a->xr){a->xr = b->xr;a->yr = b->yr;}if (b->yt < a->yt){a->xt = b->xt;a->yt = b->yt;}if (b->yb > a->yb){a->xb = b->xb;a->yb = b->yb;}if (b->xlc < a->xlc){a->xlc = b->xlc;a->ylc = b->ylc;}if (b->xrc > a->xrc){a->xrc = b->xrc;a->yrc = b->yrc;}if (b->ytc < a->ytc){a->xtc = b->xtc;a->ytc = b->ytc;}if (b->ybc > a->ybc){a->xbc = b->xbc;a->ybc = b->ybc;}a->xc = (a->xl + a->xr) / 2;a->yc = (a->yt + a->yb) / 2;a->width = a->xr - a->xl + 1;a->height = a->yb - a->yt + 1;return a;
}
请注意判断两个范围是否相等,并不要求严格相等,对应边相差一两个像素也可能是同一个范围。两个范围合并的操作不同于通常的求并集,而是找出一个正好能包含它们的范围。
// 在给定box内, 通过一个点集填充bound
int CPlate::FindBound(BOUND *bound, BOX *box, VECT *pt, int num)
{int i;VECT *p;bound->flags = 1;bound->xc = (box->left + box->right + 1) / 2;bound->yc = (box->top + box->bottom + 1) / 2;bound->width = box->right - box->left + 1;bound->height = box->bottom - box->top + 1;bound->xl = W;bound->yl = W;bound->xr = 0;bound->yr = 0;bound->xt = W;bound->yt = W;bound->xb = 0;bound->yb = 0;bound->xlc = W;bound->ylc = W;bound->xrc = 0;bound->yrc = 0;bound->xtc = W;bound->ytc = W;bound->xbc = 0;bound->ybc = 0;bound->vl = NULL;bound->vr = NULL;bound->vt = NULL;bound->vb = NULL;for (i = 0, p = pt; i < num; i++, p++){// 最左if (p->x < bound->xl || p->x == bound->xl && abs(p->y - bound->yc) < abs(bound->yl - bound->yc)){bound->xl = p->x;bound->yl = p->y;}// 最右if (p->x > bound->xr || p->x == bound->xr && abs(p->y - bound->yc) < abs(bound->yr - bound->yc)){bound->xr = p->x;bound->yr = p->y;}// 最上if (p->y < bound->yt || (p->y == bound->yt && abs(p->x - bound->xc) < abs(bound->xt - bound->xc))){bound->xt = p->x;bound->yt = p->y;}// 最下if (p->y > bound->yb || (p->y == bound->yb && abs(p->x - bound->xc) < abs(bound->xb - bound->xc))){bound->xb = p->x;bound->yb = p->y;}if (p->y - bound->yc >= -1 && p->y - bound->yc <= 1)	// 横向中线{if (p->x < bound->xlc)	//最左{bound->xlc = p->x;bound->ylc = p->y;}if (p->x > bound->xrc)	//最右{bound->xrc = p->x;bound->yrc = p->y;}}if (p->x - bound->xc >= -1 && p->x - bound->xc <= 1)	// 纵向中线{if (p->y < bound->ytc)	//最上{bound->xtc = p->x;bound->ytc = p->y;}if (p->y > bound->ybc)	//最下{bound->xbc = p->x;bound->ybc = p->y;}}}return 1;
}// 查找一个点集的左侧子集, 并填充bound
void CPlate::BoundFindLeftSide(BOUND *bound, VECT* pt, int num)
{int i;int x, y;VECT* pv;VECT *pbv;::qsort(pt, num, sizeof(VECT), CompareVect_x_Asc_y_Asc);x = bound->xr;y = -1;bound->nl = 0;if (bound->vl) delete []bound->vl;bound->vl = new VECT[num];for (i = 0, pv = pt, pbv = bound->vl; i < num; i++, pv++){if (pv->y != y){pbv->x = (pv->x - x < 3 ? pv->x : x);pbv->y = pv->y;pbv++;bound->nl++;if (pv->x - x < 3)  x = pv->x;y = pv->y;}}
}// 查找一个点集的右侧子集, 并填充bound
void CPlate::BoundFindRightSide(BOUND *bound, VECT* pt, int num)
{int i;int x, y;VECT* pv;VECT *pbv;::qsort(pt, num, sizeof(VECT), CompareVect_x_Desc_y_Asc);x = bound->xl;y = -1;bound->nr = 0;if (bound->vr) delete []bound->vr;bound->vr = new VECT[num];for (i = 0, pv = pt, pbv = bound->vr; i < num; i++, pv++){if (pv->y != y){pbv->x = (pv->x - x > -3 ? pv->x : x);pbv->y = pv->y;pbv++;bound->nr++;if (pv->x - x > -3)  x = pv->x;y = pv->y;}}
}
查找一个点集的左、右侧子集,关键是将原点集按照一定规则来排序。以查找左侧子集为例,需将原点集按y从小到大为第一顺序、x从小到大为第二顺序的规则来排序。排序用到系统函数qsort()。其排序函数为
// 按y从小到大、x从小到大排序
int CPlate::CompareVect_x_Asc_y_Asc(const void *a, const void *b)
{return (((int)((VECT *)a)->y * 65536 + ((VECT *)a)->x) - ((int)((VECT *)b)->y * 65536 + ((VECT *)b)->x));
}
y放在int的高位字,x放在int的低位字,这种组合体现了先y后x的思想。
这里稍作解释,在后面算法的应用中,所谓点集一般就是字符轮廓,所谓左、右侧子集一般就是左、右两侧的部分轮廓。从这些部分的轮廓上向左或向右发出射线,不会被字符自己本身挡住。例如下图中红色部分是左侧轮廓,绿色部分是右侧轮廓。

轮廓提取采用经典的8连通域边界跟踪算法。跟踪顺序规定如下:
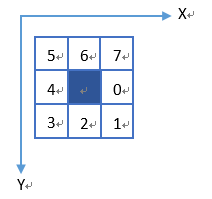
下列代码中的常量dx, dy体现了跟踪顺序。dq则为对应像素点在图像缓冲区中的指针变化量。
// 给定起点和阈值,在灰度图像上寻找字符轮廓
//
// src:       -I-  图像数据指针
// width:     -I-  图像宽度
// threshold: -I-  背景与前景分割的参考阈值
// xx:        -I-  指定统计列所经过点的横坐标
// yy:        -O-  指定统计列所经过点的纵坐标
// yynum:     -O-  指定统计列所经过点的个数
// pt0:       -I-  寻找的参考起点(必须是字符边缘上的前景点)
// pt:        -O-  轮廓点数据缓冲区指针
// box:       -I-  返回的轮廓边框(四至)
//
// 返回值: 非零值为找到的轮廓点数,0表示没有成功找到轮廓
// 当返回0时,通过指针传回的pt及box无效
//
int CPlate::FindOutline(void *src, int width, int height, int threshold, int xx, int *yy, int &yynum, VECT pt0, VECT *pt, BOX *box, bool box_init)
{int i;int d, d0;int x, y;int x1, y1;int w, h;int px, py;int ctt;int ctn;int done;int loop;int found;int turn;int back, fore;uint8 *p, *q[8];BOX box0;int count[256];const int dx[8] = {1, 1, 0, -1, -1, -1, 0, 1};const int dy[8] = {0, 1, 1, 1, 0, -1, -1, -1};int dq[8] = {1, width + 1, width, width - 1, -1, -width - 1, -width, -width + 1}; if (box_init){memcpy(&box0, box, sizeof(BOX));}else{box0.left = 0;box0.top = 0;box0.right = 32767;box0.bottom = 32767;}ctt = 0;loop = 0;turn = 0;yynum = 0;box->left = box->right = pt0.x;box->top = box->bottom = pt0.y;p = (uint8 *)src + pt0.y * width + pt0.x;for (i = 0; i < 8; i++)  q[i] = p + dq[i];// 查找第一点的出发方向for (i = 4, found = 0; i < 12 && !found; i++){int m = (i - 1) & 7;int n = i & 7;if (*q[m] <= threshold && *q[n] > threshold){d = n;found = 1;}}if (!found) goto _exit; d0 = d;px = pt0.x;py = pt0.y;// 查找整个字符的轮廓for (x = pt0.x, y = pt0.y, ctt = 0, ctn = 0, done = 0; !done && ctt < NUM_OUTLINE && ctn < NUM_OUTLINE; ){for (i = 6, found = 0; i < 12 && !found; i++){int m = (d + i - 1) & 7;int n = (d + i) & 7;if (*q[m] <= threshold && *q[n] > threshold){d = n;found = 1;}}// 处理毛刺if (!found){d = (d + 4) & 7;		// 掉头if (ctt >= 6){ctt -= 6;pt -= 6;loop++;}else if (ctt >= 4){ctt -= 4;pt -= 4;loop++;}else  goto _exit; // 防止死循环if (loop > 10){ctt = -1;goto _exit; }}if (!box_init || (box_init && x >= box0.left && x <= box0.right && y >= box0.top && y <= box0.bottom)){pt->x = x;pt->y = y;if (x < box->left)  box->left = x;else if (x > box->right)  box->right = x;if (y < box->top)  box->top = y;else if (y > box->bottom)  box->bottom = y;if (x == xx && yy != NULL && yynum < 16)  yy[yynum++] = y;pt++;ctt++;ctn = 0;}else{ctn++;}x += dx[d];y += dy[d];for (i = 0; i < 8; i++)  q[i] += dq[d];if (x == pt0.x && y == pt0.y)  done = 1;if (x < 2 || y < 2 || x >= width - 2 || y >= height - 2)done = 1;if (d0 != d)  turn++;d0 = d;}_exit:return (done && found && ctt > 8 ? ctt : 0);
}
边界跟踪算法通常是针对二值图像。本算法虽然是输入灰度图像,但需要给定背景与前景分割的参考阈值,实际上内部还是二值图像的用法。本系统很多算法用以灰度图像加分割阈值作为参数输入进行二值图像处理,可以通过多次尝试找到最佳阈值。
上述边界跟踪算法需要给定一个位于轮廓上的起始点。从轮廓之外出发搜索字符并提取其轮廓,可以先找到轮廓上的一个点,然后简单调用上述边界跟踪算法即可。例如从字符右边的远处开始向左搜索字符并提取其轮廓,代码如下:
int CPlate::FindOutlineLeftward(void *src, int width, int height, int threshold, VECT pt0, VECT *pt, BOX *box, BOUND *bound, bool box_init)
{int num = 0;int yynum = 0;uint8 *p = (uint8 *)src + pt0.y * width + pt0.x;for ( ; *p < threshold && pt0.x > 50; pt0.x--, p--);if (pt0.x > 50){num = FindOutline(src, width, height, threshold, 0, NULL, yynum, pt0, pt, box, box_init);if (num > 0)  FindBound(bound, box, pt, num);}return num;
}
为了便于搜索车牌边界Edge,不同类型车牌的图像,无论原来是白字还是黑字,都要变换为车牌背景暗、字亮的灰度图像。如下图每行中间和最右的图像,都满足这样的条件。Edge搜索算法基于背景暗、字亮的前提条件。

搜索车牌边界需要对四边分别进行。搜索车牌某条边界,都会进行从里向外和从外向里两种搜索方式,然后择优录取。
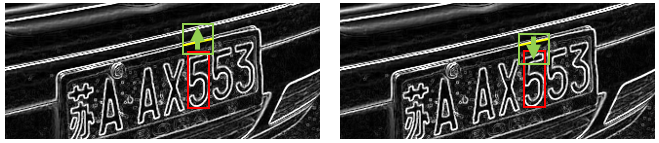
以从给定范围(某字符bound)向上搜索车牌边界为例。上图左边示意从里向外(自下而上),右边示意从外向里(自上而下)。红色框示意给定bound,绿色框示意搜索范围。搜索范围的宽度(x方向)为bound宽度的9/8,深度为bound高度的1/2。搜索的起点则有差别,从里向外的情形中位于bound上缘附近,从外向里的情形中位于bound上缘往上1/4高度。从左向右按列进行搜索。每一列搜索时先跳过前景色(亮),再跳过背景色(暗),到达新的前景色(亮)则认为找到了车牌边界(图中黄色部分)。代码如下:
int CPlate::FindEdgeUpward(void *src, int threshold, BOUND *bound, VECT *pt)
{int i, j;int x, y;int x0, y0;int ct, ct1;int ratio0, ratio;bool found;uint8 *p, *p0;VECT *ppt;VECT *pt1 = new VECT[NUM_OUTLINE];ct = 0;ratio0 = 0;ppt = pt1;if (1)  // 从里向外查找{ct1 = 0;x0 = bound->xc - bound->width * 9 / 16;y0 = bound->yt + 2;for (i = -bound->width / 8, x = x0, p0 = (uint8 *)src + y0 * W + x0; i < bound->width; i++, x++, p0++) {for (j = bound->height / 2, y = y0, p = p0; j < bound->height && *p >= threshold; j++, y--, p-= W);for (found = false; j < bound->height && *p < threshold; j++, y--, p-= W);if (j < bound->height){ppt->x = x;ppt->y = y;ppt++;ct1++;}}ratio = ct1 * 100 / (bound->width * 9 / 8);if (ratio > ratio0){ratio0 = ratio;ct = ct1;memcpy(pt, pt1, ct1 * sizeof(VECT));}}if (2)  // 从外向里查找{ct1 = 0;x0 = bound->xc - bound->width * 9 / 16;y0 = bound->yt - bound->height / 2 + 2;for (i = -bound->width / 8, x = x0, p0 = (uint8 *)src + y0 * W + x0; i < bound->width; i++, x++, p0++) {for (j = bound->height / 2, y = y0, p = p0; j < bound->height && *p < threshold; j++, y++, p += W);for (found = false; j < bound->height && *p >= threshold; j++, y++, p += W);if (j < bound->height){ppt->x = x;ppt->y = y - 1;ppt++;ct1++;}}ratio = ct1 * 100 / (bound->width * 9 / 8);if (ratio > ratio0){ratio0 = ratio;ct = ct1;memcpy(pt, pt1, ct1 * sizeof(VECT));}}delete []pt1;return ct;
}
向左和向右搜索车牌边界相对来说更困难一些,因为车牌的左右边缘较短,更易受干扰。算法中增加了从字符左侧或右侧轮廓出发从里向外搜索、上下扫描方向分为自上而下和自下而上的设计,以及对倾斜因素的应对。从给定范围(某字符bound)向左搜索车牌边界的代码如下:
int CPlate::FindEdgeLeftward(void *src, int threshold, int kc, BOUND *bound, VECT *pt)
{int i, j;int x, y;int x0, y0;int b;int inc;int ct, ct1;int ratio0, ratio;bool found;bool leaning;uint8 *p, *p0;VECT *ppt;VECT *pt1 = new VECT[NUM_OUTLINE];ct = 0;if (bound->nl > 0){ppt = pt;for (i = 0; i < bound->nl; i++) {x0 = bound->vl[i].x + 2;y0 = bound->vl[i].y;p0 = (uint8 *)src + y0 * W + x0;for (j = -bound->width / 4, x = x0, p = p0; j < bound->width && *p >= threshold; j++, x--, p--);for (found = false; j < bound->width && *p < threshold; j++, x--, p--);if (j < bound->width){ppt->x = x;ppt->y = y0;ppt++;ct++;}}}else{ppt = pt1;ratio0 = 0;leaning = (abs(kc) > 2000);if (1)	// 自里而外,自下而上{	x0 = bound->xl - 2;y0 = bound->yb;if (leaning)  b = y0 + x0 * 65536 / kc;for (i = bound->height, y = y0, p0 = (uint8 *)src + y * W, ct1 = 0; i > 0; i--, y--, p0 -= W) {if (leaning)  x0 = kc * (b - y) >> 16;for (j = bound->width / 4, x = x0, p = p0 + x0; j < bound->width && *p >= threshold; j++, x--, p--);for (found = false; j < bound->width && *p < threshold; j++, x--, p--);if (j < bound->width){ppt->x = x;ppt->y = y;ppt++;ct1++;}}ratio = ct1 * 100 / bound->height;if (ratio > ratio0){ratio0 = ratio;ct = ct1;memcpy(pt, pt1, ct1 * sizeof(VECT));}}if (2)	// 自里而外,自上而下{x0 = bound->xl - 2;y0 = bound->yt;if (leaning)  b = y0 + x0 * 65536 / kc;for (i = 0, y = y0, p0 = (uint8 *)src + y * W, ct1 = 0; i < bound->height; i++, y++, p0 += W) {if (leaning)  x0 = kc * (b - y) >> 16;for (j = bound->width / 4, x = x0, p = p0 + x0; j < bound->width && *p >= threshold; j++, x--, p--);for (found = false; j < bound->width && *p < threshold; j++, x--, p--);if (j < bound->width){ppt->x = x;ppt->y = y;ppt++;ct1++;}}ratio = ct1 * 100 / bound->height;if (ratio > ratio0){ratio0 = ratio;ct = ct1;memcpy(pt, pt1, ct1 * sizeof(VECT));}}if (3)	// 自外而里,自下而上{	x0 = bound->xl - bound->width/2;y0 = bound->yb;if (leaning)  b = y0 + x0 * 65536 / kc;for (i = bound->height, y = y0, p0 = (uint8 *)src + y * W, ct1 = 0; i > 0; i--, y--, p0 -= W) {if (leaning)  x0 = kc * (b - y) >> 16;for (j = bound->width / 4, x = x0, p = p0 + x0; j < bound->width && *p < threshold; j++, x++, p++);for (found = false; j < bound->width && *p >= threshold; j++, x++, p++);if (j < bound->width){ppt->x = x - 1;ppt->y = y;ppt++;ct1++;}}ratio = ct1 * 100 / bound->height;if (ratio > ratio0){ratio0 = ratio;ct = ct1;memcpy(pt, pt1, ct1 * sizeof(VECT));}}if (4)	// 自外而里,自上而下{x0 = bound->xl - bound->width/2;y0 = bound->yt;if (leaning)  b = y0 + x0 * 65536 / kc;for (i = 0, y = y0, p0 = (uint8 *)src + y * W, ct1 = 0; i < bound->height; i++, y++, p0 += W) {if (leaning)  x0 = kc * (b - y) >> 16;for (j = bound->width / 4, x = x0, p = p0 + x0; j < bound->width && *p < threshold; j++, x++, p++);for (found = false; j < bound->width && *p >= threshold; j++, x++, p++);if (j < bound->width){ppt->x = x - 1;ppt->y = y;ppt++;ct1++;}}ratio = ct1 * 100 / bound->height;if (ratio > ratio0){ratio0 = ratio;ct = ct1;memcpy(pt, pt1, ct1 * sizeof(VECT));}}}delete []pt1;return ct > 2 ? ct : 0;
}
搜索到的车牌边界数据是一系列点。它们有可能含有一些干扰点。为了去伪存真,调用横线或竖线的拟合算法,不断地将误差大的点拎出去,然后再次对剩余的点做拟合、筛选,如此循环,直至符合预设条件。这实际上是聚类算法的应用。以下代码用于从车牌上、下边界的点集计算相应横线的k, b。从误差为不大于5个像素的条件开始拟合、筛选,直至误差不大于2个像素。
int CPlate::EstimateHorizAngle(VECT *pt, int n, int &k, int &b)
{int i;int ct;int ctt;VECT *pt1 = new VECT[NUM_OUTLINE];memcpy(pt1, pt, n * sizeof(VECT));int ct0;int err = 5;ct = n;ctt= 0;k = 0;b = 0;do{ct0 = ct;FitHorizLine(pt1, ct, k, b);ctt = 0;for (i = 0; i < n; i++){int e = (int)labs(((k * pt[i].x + b) - pt[i].y * 65536 + 16384) / 32768);if (e <= err){pt1[ctt].x = pt[i].x;pt1[ctt].y = pt[i].y;ctt++;}}ct = ctt;err--;} while (err > 2 && ct > 1 && ct0 != ct);delete []pt1;return ctt;
}
好了,终于轮到图像处理类的算法了。涉及到的算法有颜色空间转换、直方图与二值化、滤波、锐化、缩放、透视变换等,字符识别也归在图像处理这个大筐子中吧。
RGB到HSV颜色空间的变换,标准算法如下:
设 (R, G, B) 分别是一个颜色的红、绿和蓝坐标,它们的值是在 0 到 1 之间的实数。设 max 等于 R, G, B 中的最大者,min 等于这些值中的最小者。要找到在 HSV 空间中的 (H, S, V) 值,这里的 H ∈ [0, 360)是色相角,而 S, V ∈ [0,1] 是饱和度和亮度,计算过程的伪代码如下:
H = 0
if G == max, H = 2 + (B-R)/(max-min)
if B == max, H = 4 + (R-G)/(max-min)
if R == max, H = 6+ (G-B)/(max-min) H = H * 60
if H > 360, H = H - 360 V=max
S=(max-min)/max
在本系统中,HSV三个分量都采用字节型。对色相H来说,红色的中心是0,绿色的中心是85(对应120度角),蓝色的中心是170(对应240度角)。摘取RGB到HSV的转换代码片段如下:
int vmax = max(max(r, g), b);int vmin = min(min(r, g), b);int h = 0;int s = vmax - vmin;if (s > 0){if (vmax == b) h = (340 + 85 * (r - g) / s) >> 1;else if (vmax == g) h = (170 + 85 * (b - r) / s) >> 1;else h = (510 + 85 * (g - b) / s) >> 1;} *hsv++ = (uint8)vmax; // V*hsv++ = (uint8)s; // S*hsv++ = (uint8)h; // H (强制类型转换只保留最低字节)
RGB转灰度算法,采用公式Gray = 0.3R + 0.59G + 0.11B:
void CPlate::RGB2Gray(void *src, void *dst, int width, int height)
{int i;int n = width * height;uint8 *p = (uint8 *)src;uint8 *q = (uint8 *)dst;for (i = 0; i < n; i++){int b = *p++;int g = *p++;int r = *p++;*q++ = (uint8)((r * 19661 + g * 38666 + b * 7209) >> 16);}
}
另需要转换为其它的一些“灰度”图像。这些图像的目标是使车牌背景色较暗,字符色较亮。必要时需进行反相。例如转为黄色“灰度”图像的代码如下,其中有反相操作:
void CPlate::RGB2Yellow(void *src, void *dst, int width, int height)
{int i;int n = width * height;uint8 *p = (uint8 *)src;uint8 *q = (uint8 *)dst;for (i = 0; i < n; i++){int b = *p++;int g = *p++;int r = *p++;*q++ = (uint8)(255 - min(max(r + g - b, 0), 255));}
}
滤波算法采用3x3近似模板的高斯滤波:
// Gauss滤波
//      |1 2 1|
// 1/16 |2 4 2|
//      |1 2 1|
void CPlate::Filter(void *src, int width, int height, int mono)
{int i, j;uint8 *p, *p1, *p2;p1 = (uint8 *)src;p = p1 + width;p2 = p + width;for (i = 1; i < height - 1; i++){p++;  p1++;  p2++;for (j = 1; j < width - 1; j++, p++, p1++, p2++){int sum = p1[-1] + 2 * p1[0] + p1[1] + 2 * p[-1] + 4 * p[0] + 2 * p[1] + p2[-1] + 2 * p2[0] + p2[1];sum >>= 4;if (sum > 255)  sum = 255;*p = (mono ? sum / 128 * 255 : sum);}p++;  p1++;  p2++;}
}
边缘检测算法采用3x3Sobel算子:
// Sobel边缘检测
//      |-1 -2 -1|         |-1  0  1|
// Gx = | 0  0  0|,   Gy = |-2  0  2|
//      | 1  2  1|         |-1  0  1|
void CPlate::Sharpen(void *src, void *dst, int width, int height)
{ int i, j;uint8 *p, *p1, *p2, *q;memcpy(dst, src, width * height);for (i = 2, p = (uint8 *)src + width, q = (uint8 *)dst + width; i < height; i++, p++, q++){for (j = 2, p++, p1 = p - width, p2 = p + width, q++; j < width; j++, p++, p1++, p2++, q++){int sx = p2[-1] + 2 * p2[0] + p2[1] - p1[-1] - 2 * p1[0] - p1[1];int sy = p1[1] + 2 * p[1] + p2[1] - p1[-1] - 2 * p[-1] - p2[-1];int s = (labs(sx) + labs(sy)) >> 1;if (s > 255) s = 255;*q = s;}}
}
图像缩放主要用到双线性插值算法。在后面的逆透视变换代码中也用到了双线性插值算法,此处不重复贴代码了。
逆透视变换在本系统中的作用非常重要,对于由于拍摄视角和焦距造成的车牌倾斜和畸变起到矫正作用。变换的计算本身比较简单,难点在于系数矩阵的计算。下面推导一下逆透视变换系数的求取过程。
设一个点在真实世界中的坐标为(U, V, W),摄像投影后的坐标为(X, Y, Z),透视变换矩阵为A,则透视变换的数学表达式为
![]()
逆透视变换的数学表达式为
![]()
A'为逆变换矩阵。
因为图像都在二维平面,真实世界的车牌也平面化,为了将问题简化,U, V都除以W而变成u, v,X, Y都除以Z而变成x, y,A'也因为系数变化而变成一个新的矩阵,且其最末项为1。将逆透视变换的数学表达式重写为
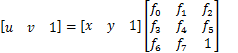
展开后得
![]()
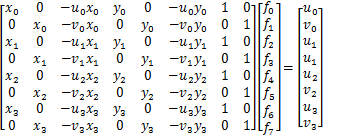
![]()
4个点可得8个方程,求出f0~f7 这8个未知数:
计算逆透视变换系数并执行变换的代码片段如下:
VECT cross[4]; // 变换前车牌的4个顶点,坐标带4位小数… … // 取得4个顶点double times = (double)m_nOrgWidth / (m_nWidth * 16);int factor[8]; // 变换系数,带18位小数double x[4], y[4]; // 变换后车牌的4个顶点double a[8][8], b[8], f[8];double u[4], v[4];x[0] = 0; y[0] = 0;x[1] = (WP - 1); y[1] = 0;x[2] = 0; y[2] = (HP - 1);x[3] = (WP - 1); y[3] = (HP - 1);for (i = 0; i < 4; i++){u[i] = (double)cross[i].x * times;v[i] = (double)cross[i].y * times;a[i*2][0] = x[i];a[i*2][1] = 0;a[i*2][2] = -x[i] * u[i];a[i*2][3] = y[i];a[i*2][4] = 0;a[i*2][5] = -y[i] * u[i];a[i*2][6] = 1;a[i*2][7] = 0;b[i*2] = u[i];a[i*2+1][0] = 0;a[i*2+1][1] = x[i];a[i*2+1][2] = -x[i] * v[i];a[i*2+1][3] = 0;a[i*2+1][4] = y[i];a[i*2+1][5] = -y[i] * v[i];a[i*2+1][6] = 0;a[i*2+1][7] = 1;b[i*2+1] = v[i];}GaussElimination((double *)a, b, f, 8);for (i = 0; i < 8; i++) factor[i] = (int)(f[i] * 262144);PerspectiveTransform(m_pOrg, m_pPlateRGB[info->num], factor, 0, 0, m_nOrgWidth, m_nOrgHeight, WP, HP);
以下是逆透视变换的代码。内部是坐标矩阵与系数矩阵相乘,以及双线性插值处理。
// 逆透视变换
//
// src: 源图像
// dst: 目标图像
// factor: 变换系数(8个),为14.18格式的定点小数
// src_x0: 源图像中的起点x坐标
// src_y0: 源图像中的起点y坐标
// src_width: 源图像宽度
// src_height: 源图像高度
// dst_width: 目标图像宽度
// dst_height: 目标图像高度
//
void CPlate::PerspectiveTransform(void *src, void *dst, int *factor, int src_x0, int src_y0, int src_width, int src_height, int dst_width, int dst_height)
{int i, j;uint8 *q = (uint8 *)dst;for (i = 0; i < dst_height; i++){for (j = 0; j < dst_width; j++){// (j, i) --> (x, y)int tmp = factor[2] * j + factor[5] * i + 262144;int x = (int)((int64)(factor[0] * j + factor[3] * i + factor[6]) * 65536 / tmp);int y = (int)((int64)(factor[1] * j + factor[4] * i + factor[7]) * 65536 / tmp);// x与临近比例系数int zx = (x >> 16) + src_x0;int dx1 = x & 0xffff; int dx2 = 65536 - dx1; // y与临近比例系数int zy = (y >> 16) + src_y0;int dy1 = y & 0xffff; int dy2 = 65536 - dy1; // 四邻比例系数int f11 = dx2 + dy2;int f12 = dx1 + dy2;int f21 = dx2 + dy1;int f22 = dx1 + dy1;// 四邻点数据指针,需保证不超出原始图像数据范围uint8 *p11 = (uint8 *)src + (zy * src_width + zx) * 3;uint8 *p12 = p11 + (zx < src_width - 3 ? 3 : 0);uint8 *p21 = p11 + (zy < src_height - 3 ? src_width * 3 : 0);uint8 *p22 = p21 + (zx < src_width - 3 ? 3 : 0);// 采用四邻点比例法生成新像素值*q++ = (uint8)((*p11++ * f11 + *p12++ * f12 + *p21++ *f21 + *p22++ *f22) >> 18);*q++ = (uint8)((*p11++ * f11 + *p12++ * f12 + *p21++ *f21 + *p22++ *f22) >> 18);*q++ = (uint8)((*p11++ * f11 + *p12++ * f12 + *p21++ *f21 + *p22++ *f22) >> 18);}}
}