超像素SLIC算法源码阅读
- 超像素SLIC算法源码阅读
- SLIC简介
- 源码阅读
- 实验结果
- 其他超像素算法对比
超像素SLIC算法源码阅读
SLIC简介
SLIC的全称Simple Linear Iterative Clustering,即简单线性迭代聚类,论文和代码链接如下:
论文传送门:SLIC Superpixels Comparedto State-of-the-Art Superpixel Methods
代码传送门:superpixels-revisited,这个Github项目是Superpixels: An Evaluation of the State-of-the-Art的作者的开源项目,对比了几乎所有有开源代码的超像素算法,本文的代码就是来自于此。
超像素的目的一般是为了降低后续图像处理的复杂度,SLIC定义的好的超像素算法要求是:(1)超像素的边界能够粘附图像边界;(2)计算速度应该快:(3)用于分割时应该能够提高分割质量
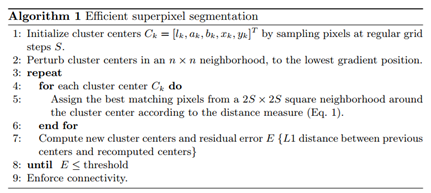
SLIC的算法流程如下:
(1)将图像分割成 S × S S×S S×S个格子,每个格子中心生成一个聚类中心
(2)将聚类中心移动到格子中心的八邻域像素中梯度最低的像素位置(避免将超像素定义在边缘上,减少噪声接种的机会)
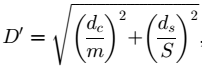
(3)合并每一个像素和最近的聚类中心(这一步和kmeans不同的是,这里是遍历每一个聚类中心周围 2 S 2S 2S区域的像素点,而kmeans的方法是直接求距离某个像素最近的聚类中心,这种方法可以减少计算量同时使得算法复杂度与像素数量无关(这里我其实不太理解))。这里距离 D D D的定义是lab颜色空间和xy坐标空间五维空间的加权距离 d e = ( l j − l i ) 2 + ( a j − a i ) 2 + ( b j − b i ) 2 d_e=\sqrt{(l_j-l_i)^2+(a_j-a_i)^2+(b_j-b_i)^2} de=(lj−li)2+(aj−ai)2+(bj−bi)2 d s = ( x j − x i ) 2 + ( y j − y i ) 2 d_s=\sqrt{(x_j-x_i)^2+(y_j-y_i)^2} ds=(xj−xi)2+(yj−yi)2 D = d e 2 + N d s 2 D=\sqrt{d_e^2+Nd_s^2} D=de2+Nds2
(4)遍历所有聚类中心后,重新跟新每个聚类中心的位置(这里和kmeans算法一致了),然后 进行迭代
(5)迭代完成后进行连通域加强并且去除面积过小的超像素
源码阅读
函数DoSuperpixelSegmentation_ForGivenSuperpixelSize是主程序,其步骤大概就是将RGB图像转到Lab色域——计算Lab色域的梯度——初始化网格中心——将聚类中心初始化到网格中心的八邻域像素——聚类迭代——对联通域加强。
void SLIC::DoSuperpixelSegmentation_ForGivenSuperpixelSize(const unsigned int*	      ubuff,//原始图像const int	              width,//宽度const int	              height,//高度int*&	                  klabels,//输出的label,其实记录的是边界的位int&	                  numlabels,//输出的label的数量const int&	              superpixelsize,//一个label的像素大小const double&             compactness,//紧密度的参数const bool&               perturbseeds,//注意这是个bool变量const int                 iterations)//迭代次数
{//------------------------------------------------const int STEP = sqrt(double(superpixelsize))+0.5;//步长大小,其实就是画网格时,网格的间距//------------------------------------------------vector<double> kseedsl(0);vector<double> kseedsa(0);vector<double> kseedsb(0);vector<double> kseedsx(0);vector<double> kseedsy(0);//--------------------------------------------------m_width  = width;m_height = height;int sz = m_width*m_height;//整个像素大小//klabels.resize( sz, -1 );//--------------------------------------------------klabels = new int[sz];//一个数组for( int s = 0; s < sz; s++ ) klabels[s] = -1;//--------------------------------------------------if(1)//LAB, the default option{DoRGBtoLABConversion(ubuff, m_lvec, m_avec, m_bvec);//将颜色空间从RGB转到Lab}else//RGB{m_lvec = new double[sz]; m_avec = new double[sz]; m_bvec = new double[sz];for( int i = 0; i < sz; i++ ){m_lvec[i] = ubuff[i] >> 16 & 0xff;m_avec[i] = ubuff[i] >>  8 & 0xff;m_bvec[i] = ubuff[i]       & 0xff;}}//--------------------------------------------------vector<double> edgemag(0);if(perturbseeds) DetectLabEdges(m_lvec, m_avec, m_bvec, m_width, m_height, edgemag);//求颜色的边界,perturb是干扰的意思,这个是用来求八领域里面最小梯度的梯度的梯度值就是从这里来的//kseedsl这些值放进去之前都是零,运行完这个函数之后就是有值的了GetLABXYSeeds_ForGivenStepSize(kseedsl, kseedsa, kseedsb, kseedsx, kseedsy, STEP, perturbseeds, edgemag);//这个应该是初始化的过程,建立网格,并且在网格中心的八领域里面寻找seedPerformSuperpixelSLIC(kseedsl, kseedsa, kseedsb, kseedsx, kseedsy, klabels, STEP, edgemag, compactness, iterations);//基于Kmeans算法进行迭代numlabels = kseedsl.size();int* nlabels = new int[sz];EnforceLabelConnectivity(klabels, m_width, m_height, nlabels, numlabels, double(sz)/double(STEP*STEP));{for(int i = 0; i < sz; i++ ) klabels[i] = nlabels[i];}if(nlabels) delete [] nlabels;
}
函数GetLABXYSeeds_ForGivenStepSize主要是完成了网格中心的初始化
void SLIC::GetLABXYSeeds_ForGivenStepSize(vector<double>&				kseedsl,vector<double>&				kseedsa,vector<double>&				kseedsb,vector<double>&				kseedsx,vector<double>&				kseedsy,const int&					STEP,//STEP这个值指的是网格间的间距是多少,即一步可以跨多长const bool&					perturbseeds,const vector<double>&       edgemag)
{const bool hexgrid = false;int numseeds(0);int n(0);//int xstrips = m_width/STEP;//int ystrips = m_height/STEP;int xstrips = (0.5+double(m_width)/double(STEP));//这里指的是有多少个步长,+0.5是为了进行四舍五入int ystrips = (0.5+double(m_height)/double(STEP));int xerr = m_width  - STEP*xstrips;if(xerr < 0){xstrips--;xerr = m_width - STEP*xstrips;}//划分网格的时候有可能会多一步,需要保证网格划分在图像内int yerr = m_height - STEP*ystrips;if(yerr < 0){ystrips--;yerr = m_height- STEP*ystrips;}double xerrperstrip = double(xerr)/double(xstrips);//每一步所包含的误差是多少double yerrperstrip = double(yerr)/double(ystrips);int xoff = STEP/2;//这个应是用来寻找中心点的位置int yoff = STEP/2;//-------------------------numseeds = xstrips*ystrips;//一共会有多少个种子点//-------------------------kseedsl.resize(numseeds);kseedsa.resize(numseeds);kseedsb.resize(numseeds);kseedsx.resize(numseeds);kseedsy.resize(numseeds);for( int y = 0; y < ystrips; y++ ){int ye = y*yerrperstrip;for( int x = 0; x < xstrips; x++ ){int xe = x*xerrperstrip;//到这个格子累计x的误差int seedx = (x*STEP+xoff+xe);//确定准确的每个种子点的x的位置if(hexgrid){ seedx = x*STEP+(xoff<<(y&0x1))+xe; seedx = min(m_width-1,seedx); }//for hex grid samplingint seedy = (y*STEP+yoff+ye);int i = seedy*m_width + seedx;//转化成在整个坐标中的位置kseedsl[n] = m_lvec[i];kseedsa[n] = m_avec[i];kseedsb[n] = m_bvec[i];kseedsx[n] = seedx;kseedsy[n] = seedy;n++;}}if(perturbseeds){PerturbSeeds(kseedsl, kseedsa, kseedsb, kseedsx, kseedsy, edgemag);}
}
函数PerturbSeeds是将聚类中心调整到8邻域像素中梯度最小的像素上,
void SLIC::PerturbSeeds(vector<double>&				kseedsl,vector<double>&				kseedsa,vector<double>&				kseedsb,vector<double>&				kseedsx,vector<double>&				kseedsy,const vector<double>&       edges)
{const int dx8[8] = {-1, -1,  0,  1, 1, 1, 0, -1};//像素的八领域const int dy8[8] = { 0, -1, -1, -1, 0, 1, 1,  1};int numseeds = kseedsl.size();//点的数量for( int n = 0; n < numseeds; n++ ){int ox = kseedsx[n];//original xint oy = kseedsy[n];//original yint oind = oy*m_width + ox;//转化成数组里面的下标int storeind = oind;for( int i = 0; i < 8; i++ ){int nx = ox+dx8[i];//new xint ny = oy+dy8[i];//new yif( nx >= 0 && nx < m_width && ny >= 0 && ny < m_height){int nind = ny*m_width + nx;if( edges[nind] < edges[storeind]){storeind = nind;//记录最小梯度的位置}}}if(storeind != oind){kseedsx[n] = storeind%m_width;kseedsy[n] = storeind/m_width;kseedsl[n] = m_lvec[storeind];kseedsa[n] = m_avec[storeind];kseedsb[n] = m_bvec[storeind];}}
}
函数PerformSuperpixelSLIC是完成整个迭代过程,其实就是一个kmeans算法的实现过程
void SLIC::PerformSuperpixelSLIC(vector<double>&				kseedsl,vector<double>&				kseedsa,vector<double>&				kseedsb,vector<double>&				kseedsx,vector<double>&				kseedsy,int*&					klabels,const int&				STEP,const vector<double>&       edgemag,const double&				M,const int               iterations)
{int sz = m_width*m_height;const int numk = kseedsl.size();//----------------int offset = STEP;//网络线之间的间距//if(STEP < 8) offset = STEP*1.5;//to prevent a crash due to a very small step size//----------------vector<double> clustersize(numk, 0);vector<double> inv(numk, 0);//to store 1/clustersize[k] valuesvector<double> sigmal(numk, 0);vector<double> sigmaa(numk, 0);vector<double> sigmab(numk, 0);vector<double> sigmax(numk, 0);vector<double> sigmay(numk, 0);vector<double> distvec(sz, DBL_MAX);//存储距离最近的seed的距离double invwt = 1.0/((STEP/M)*(STEP/M));//这个invwet其实是权衡颜色距离和空间距离的一个权重,因此参数M也就是一个权重int x1, y1, x2, y2;double l, a, b;double dist;double distxy;for( int itr = 0; itr < iterations; itr++ )//限制迭代次数{distvec.assign(sz, DBL_MAX);for( int n = 0; n < numk; n++ )//遍历所有的种子点{y1 = max(0.0, kseedsy[n]-offset);y2 = min((double)m_height, kseedsy[n]+offset);x1 = max(0.0, kseedsx[n]-offset);x2 = min((double)m_width, kseedsx[n]+offset);//限制邻域的范围(seedx + offset, seedy - offsetfor( int y = y1; y < y2; y++ )//在邻域内搜索{for( int x = x1; x < x2; x++ ){int i = y*m_width + x;l = m_lvec[i];a = m_avec[i];b = m_bvec[i];dist =	(l - kseedsl[n])*(l - kseedsl[n]) +(a - kseedsa[n])*(a - kseedsa[n]) +(b - kseedsb[n])*(b - kseedsb[n]);//颜色空间距离distxy =  (x - kseedsx[n])*(x - kseedsx[n]) +(y - kseedsy[n])*(y - kseedsy[n]);//xy空间距离//------------------------------------------------------------------------dist += distxy*invwt;//dist = sqrt(dist) + sqrt(distxy*invwt);//this is more exact//------------------------------------------------------------------------if( dist < distvec[i] ){distvec[i] = dist;//赋值距离klabels[i]  = n;//赋值label}}}}//-----------------------------------------------------------------// Recalculate the centroid and store in the seed values//-----------------------------------------------------------------//instead of reassigning memory on each iteration, just reset.sigmal.assign(numk, 0);sigmaa.assign(numk, 0);sigmab.assign(numk, 0);sigmax.assign(numk, 0);sigmay.assign(numk, 0);clustersize.assign(numk, 0);//------------------------------------//edgesum.assign(numk, 0);//------------------------------------{int ind(0);for( int r = 0; r < m_height; r++ ){for( int c = 0; c < m_width; c++ ){sigmal[klabels[ind]] += m_lvec[ind];//klabel[ind]是这个点属于那个seed,sigmal[klabel[ind]]是这个seed的l颜色域的累加和,m_lvec[ind]就是这个点l的颜色域的值sigmaa[klabels[ind]] += m_avec[ind];sigmab[klabels[ind]] += m_bvec[ind];sigmax[klabels[ind]] += c;sigmay[klabels[ind]] += r;//------------------------------------//edgesum[klabels[ind]] += edgemag[ind];//------------------------------------clustersize[klabels[ind]] += 1.0;//统计这个seed一共有多少个像素点ind++;}}}{for( int k = 0; k < numk; k++ ){if( clustersize[k] <= 0 ) clustersize[k] = 1;inv[k] = 1.0/clustersize[k];//computing inverse now to multiply, than divide later}}{for( int k = 0; k < numk; k++ ){kseedsl[k] = sigmal[k]*inv[k];//重新分配这个seed的颜色域,然后再循环到重新开始计算距离什么的kseedsa[k] = sigmaa[k]*inv[k];kseedsb[k] = sigmab[k]*inv[k];kseedsx[k] = sigmax[k]*inv[k];kseedsy[k] = sigmay[k]*inv[k];//------------------------------------//edgesum[k] *= inv[k];//------------------------------------}}}
}
函数EnforceLabelConnectivity实现了连通区域的重新赋值,之前所有的label值是聚类中心的值,通过这个函数将其统一超像素的编号,从0开始一直到最后一个超像素,然后会统计每个超像素所占的像素,如果太小的话会进行合并
void SLIC::EnforceLabelConnectivity(const int*					labels,//input labels that need to be corrected to remove stray labelsconst int					width,const int					height,int*&						nlabels,//new labelsint&						numlabels,//the number of labels changes in the end if segments are removedconst int&					K) //the number of superpixels desired by the user
{
//	const int dx8[8] = {-1, -1,  0,  1, 1, 1, 0, -1};
//	const int dy8[8] = { 0, -1, -1, -1, 0, 1, 1,  1};const int dx4[4] = {-1,  0,  1,  0};const int dy4[4] = { 0, -1,  0,  1};//四邻域const int sz = width*height;const int SUPSZ = sz/K;//每个小网格像素的大小//nlabels.resize(sz, -1);for( int i = 0; i < sz; i++ ) nlabels[i] = -1;//nlabels为经过这个函数处理输出的数组int label(0);int* xvec = new int[sz];int* yvec = new int[sz];//这连个数组都有整个图片那么大int oindex(0);int adjlabel(0);//adjacent labelfor( int j = 0; j < height; j++ )//遍历每一个像素{for( int k = 0; k < width; k++ ){if( 0 > nlabels[oindex] )//nlabels小于零应该就是还没有处理过的像素{nlabels[oindex] = label;//oindex为0时候,label也为0//--------------------// Start a new segment//--------------------xvec[0] = k;//这里存储的是像素的坐标yvec[0] = j;//-------------------------------------------------------// Quickly find an adjacent label for use later if needed//-------------------------------------------------------{for( int n = 0; n < 4; n++ ){int x = xvec[0] + dx4[n];int y = yvec[0] + dy4[n];if( (x >= 0 && x < width) && (y >= 0 && y < height) )//在图像范围内{int nindex = y*width + x;//这个是四邻域像素if(nlabels[nindex] >= 0) adjlabel = nlabels[nindex];//查看邻域里面是否有大于等于0的nlabels,如果有的话就是adjlabel}}}int count(1);for( int c = 0; c < count; c++ ){for( int n = 0; n < 4; n++ )//又是一个四邻域{int x = xvec[c] + dx4[n];int y = yvec[c] + dy4[n];if( (x >= 0 && x < width) && (y >= 0 && y < height) ){int nindex = y*width + x;if( 0 > nlabels[nindex] && labels[oindex] == labels[nindex] ) //这个邻域像素没有处理过 && 这个邻域像素的label和中心像素的label一致{xvec[count] = x;yvec[count] = y;//把坐标存进去,就是记录下有哪些坐标nlabels[nindex] = label;//向领域像素扩展count++;//因为这个count会一直增加,因此邻域也会一直扩展,知道周围没有邻域像素可以再扩izhan了为止}}}}//-------------------------------------------------------// If segment size is less then a limit, assign an// adjacent label found before, and decrement label count.//-------------------------------------------------------if(count <= SUPSZ >> 2)//这个区域太小{for( int c = 0; c < count; c++ ){int ind = yvec[c]*width+xvec[c];nlabels[ind] = adjlabel;}label--;}label++;}oindex++;}}numlabels = label;if(xvec) delete [] xvec;if(yvec) delete [] yvec;
}
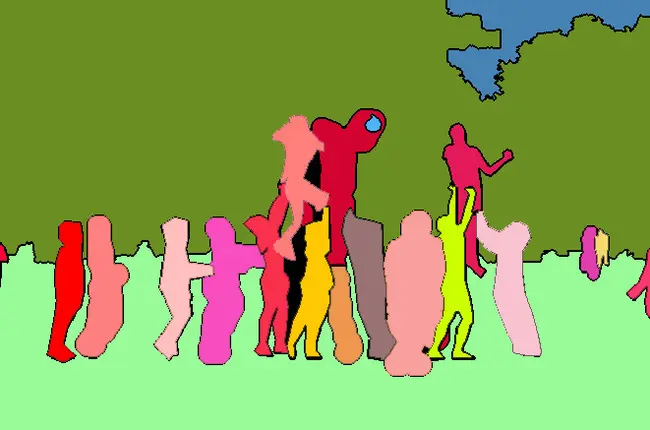
实验结果
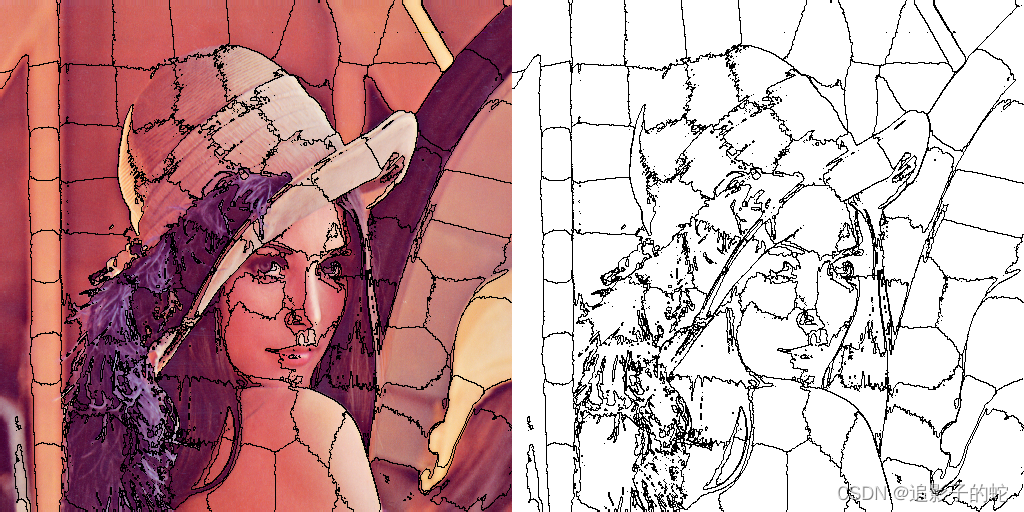
最后的实验结果如下:

如果注释掉EnforceLabelConnectivity函数里面去除小区域的代码块的结果是

所以还是加上比较好,SLIC只能整体效果看上去还是不错哈,单张图片耗时0.0845s,速度也比较快。
其他超像素算法对比
这里我顺便跑了下这个项目里的其他超像素算法,以好有个对比
(1) Felzenswalb & Huttenlocher (P. F. Felzenswalb, D. P. Huttenlocher. Efficient graph-based image segmentation. International Journal of Computer Vision, 59(2), 2004.)
单张图片耗时:0.0653s

(2) Constant Intensity Superpixels/Compact Superpixels (O. Veksler, Y. Boykov, P. Mehrani. Superpixels and supervoxels in anenergy optimization framework. European Conference on Computer Vision, pages 211–224, 2010.)
单张图片耗时:0.0468s

(3) Entropy Rate Superpixels (M. Y. Lui, O. Tuzel, S. Ramalingam, R. Chellappa. Entropy rate superpixel segmentation. Conference on Computer Vision and Pattern Recognition, pages 2097–2104, 2011.)
单张图片耗时:0.786s

(4) Pseudo Boolean Superpixels (Superpixels via pseudo-boolean optimization. Y. Zhang, R. Hartley, J. Mashford, and S. Burn. In International Conference on Computer Vision, 2011.)
单张图片耗时:0.0255s

(5) Contour Relaxed Superpixels ( C. Conrad, M. Mertz, R. Mester. Contour-relaxed superpixels. Energy Minimization Methods in Computer Vision and Pattern Recognition, volume 8081 of Lecture Notes in Computer Science, pages 280–293, 2013.)
单张图片耗时:0.430s

(6) Superpixels Extracted via Energy-Driven Sampling (M. van den Bergh, X. Boix, G. Roig, B. de Capitani, L. van Gool. SEEDS: Superpixels extracted via energy-driven sampling. European Conference on Computer Vision, pages 13–26, 2012.)
单张图片耗时:0.0819s

(7) VLFeat ( A. Vedaldi, B. Fulkerson. VLFeat: An Open and Portable Library of Computer Vision Algorithms.\url{http://www.vlfeat.org/, 2008.)
单张图片耗时:0.630s(这个结果应该是我参数没有设好)

(8) SNN
2018年好像又出了一个SNN专门用来生成超像素的深度神经网络框架,是基于SLIC的,但不管是效果还是速度都比SLIC要好。
总结
通过上面的退比可以发现同样的图片SLIC单张图片耗时0.0845ms,在所有算法中算比较快的,从结果来看,效果比较看上去是比较好的,与其有类似效果的有Contour Relaxed Superpixels算法,但是耗时高达400ms,但是超像素的结果对比不能仅仅从上看去的效果进行比较,本文开始的的简介中所提到的两篇文章都有定义超像素效果优良的衡量标准,如果需要详细对比各个算法间的好坏的话还是需要去细读论文和源码。