车牌图片端到端识别
- 一、前言
- 二、数据集处理
- 三、crnn模型文件
- 四、训练验证代码
- 五、测试代码
- 六、代码搬自
一、前言
本文主要记录了使用crnn 对车牌图片做端到端识别,即不用对车牌字符做逐个字符分割识别,车牌第一个字符为汉字,共有31个,第2个字符为去除了“O”和“I”这2个大写字母,工24个大写字母,其余5位均为24个大写字母+10个阿拉伯数字的形式,再加上使用CRNN,需要有空白字符,放在第65位,共有66个字符
二、数据集处理
本文使用的数据集为人工生成,这方面网上很多
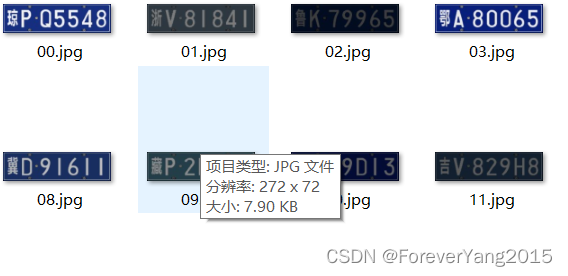
分辨率(h,w)为(72,272),训练集共有50000张,测试集共有10000张图片

train_label.txt和test_label.txt 为车牌的汉字字符标签
如 train_plate文件夹中 03.jpg车牌为鄂A80065,则train_label.txt中的第4行为鄂A80065 , 故需要getTxt.py将汉字标签转换为数字类别标签,生成train.txt和test.txt
import osroot = "."ch_1 = ["京","津","冀","晋","蒙","辽","吉","黑","沪","苏","浙","皖","闽","赣","鲁","豫","鄂","湘","粤","桂","琼","渝","川","贵","云","藏","陕","甘","青","宁","新"]
ch_2 = [ "A","B","C","D","E","F","G" , "H" , "J" ,"K" ,"L","M","N","P","Q" , "R","S","T" , "U","V","W","X","Y","Z" ]
ch_3 = ch_1+ch_2+[str(i) for i in range(10)]+[" ",] if os.path.exists("test.txt"): os.remove("test.txt")
if os.path.exists("train.txt"): os.remove("train.txt")def getTrainTxt( train_label , train_txt  , f_path ):f = open( train_label, "r" , encoding='UTF-8' )i = 0train_info = []for line in f.readlines():if len(line) <2 : continueline = line.rstrip("\n").strip(" ")  #7位字符if i <10:jpg = "0{}.jpg".format( i )else:jpg = "{}.jpg".format( i )i+=1pad_info = [jpg, ]for j , e in enumerate( line ):if j==0:pad_info.append(  ch_3.index( e ) )elif j==1:pad_info.append(  ch_3.index( e ) )else:pad_info.append(  ch_3.index( e ) ) train_info.append( pad_info )with open(train_txt,"a") as ftxt:for e in train_info:s = f_pathfor d in e:s+= str(d)+" "ftxt.write( s[:-1]+"\n"  ) getTrainTxt( "train_label.txt" , "train.txt" ,"train_plate/"  )
getTrainTxt( "test_label.txt" , "test.txt" ,  "test_plate/" )

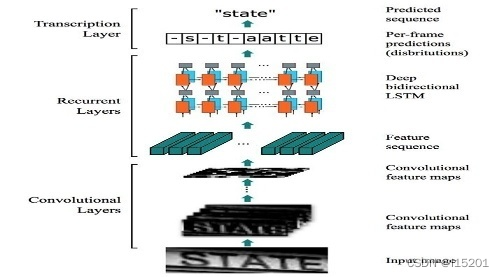
三、crnn模型文件
crnn模型将图像原始(h,w)为(72,272),按高度缩放为32的比例缩放为(32,120),并且转为单通道图像,文字识别不需要颜色信息,不一定要32,48,64都可,只是此处实验定为32 , 输出变换为[seq,batch,类别总数] , seq表示该批次图片最多输出seq个字符 , batch为批次大小,类别总数为66
#crnn.py
import argparse,os
import torch
import torch.nn as nnclass BidirectionalLSTM(nn.Module):def __init__(self, nInput_size, nHidden,nOut):super(BidirectionalLSTM, self).__init__()self.lstm = nn.LSTM(nInput_size, nHidden, bidirectional=True)self.linear = nn.Linear(nHidden * 2, nOut)def forward(self, input):recurrent, (hidden,cell)= self.lstm(input)T, b, h = recurrent.size()t_rec = recurrent.view(T * b, h)output = self.linear(t_rec)  # [T * b, nOut]output = output.view(T, b, -1) #输出变换为[seq,batch,类别总数]return outputclass CNN(nn.Module):def __init__(self,imageHeight,nChannel):super(CNN,self).__init__()assert imageHeight % 32 == 0,'image Height has to be a multiple of 32'self.depth_conv0 = nn.Conv2d(in_channels=nChannel,out_channels=nChannel,kernel_size=3,stride=1,padding=1,groups=nChannel)self.point_conv0 = nn.Conv2d(in_channels=nChannel,out_channels=64,kernel_size=1,stride=1,padding=0,groups=1)self.relu0 = nn.ReLU(inplace=True)self.pool0 = nn.MaxPool2d(kernel_size=2,stride=2)self.depth_conv1 = nn.Conv2d(in_channels=64,out_channels=64,kernel_size=3,stride=1,padding=1,groups=64)self.point_conv1 = nn.Conv2d(in_channels=64,out_channels=128,kernel_size=1,stride=1,padding=0,groups=1)self.relu1 = nn.ReLU(inplace=True)self.pool1 = nn.MaxPool2d(kernel_size=2,stride=2)self.depth_conv2 = nn.Conv2d(in_channels=128,out_channels=128,kernel_size=3,stride=1,padding=1,groups=128)self.point_conv2 = nn.Conv2d(in_channels=128,out_channels=256,kernel_size=1,stride=1,padding=0,groups=1)self.batchNorm2 = nn.BatchNorm2d(256)self.relu2 = nn.ReLU(inplace=True)self.depth_conv3 = nn.Conv2d(in_channels=256, out_channels=256, kernel_size=3, stride=1, padding=1, groups=256)self.point_conv3 = nn.Conv2d(in_channels=256, out_channels=256, kernel_size=1, stride=1, padding=0, groups=1)self.relu3 = nn.ReLU(inplace=True)self.pool3 = nn.MaxPool2d(kernel_size=(2,2),stride=(2,1),padding=(0,1))self.depth_conv4 = nn.Conv2d(in_channels=256, out_channels=256, kernel_size=3, stride=1, padding=1, groups=256)self.point_conv4 = nn.Conv2d(in_channels=256, out_channels=512, kernel_size=1, stride=1, padding=0, groups=1)self.batchNorm4 = nn.BatchNorm2d(512)self.relu4 = nn.ReLU(inplace=True)self.depth_conv5 = nn.Conv2d(in_channels=512, out_channels=512, kernel_size=3, stride=1, padding=1, groups=512)self.point_conv5 = nn.Conv2d(in_channels=512, out_channels=512, kernel_size=1, stride=1, padding=0, groups=1)self.relu5 = nn.ReLU(inplace=True)self.pool5 = nn.MaxPool2d(kernel_size=(2,2),stride=(2,1),padding=(0,1))#self.conv6 = nn.Conv2d(in_channels=512, out_channels=512, kernel_size=2, stride=1, padding=0)self.depth_conv6 = nn.Conv2d(in_channels=512, out_channels=512, kernel_size=2, stride=1, padding=0, groups=512)self.point_conv6 = nn.Conv2d(in_channels=512, out_channels=512, kernel_size=1, stride=1, padding=0, groups=1)self.batchNorm6 = nn.BatchNorm2d(512)self.relu6= nn.ReLU(inplace=True)def forward(self,input):depth0 = self.depth_conv0(input)point0 = self.point_conv0(depth0)relu0 = self.relu0(point0)pool0 = self.pool0(relu0)# print(pool0.size())depth1 = self.depth_conv1(pool0)point1 = self.point_conv1(depth1)relu1 = self.relu1(point1)pool1 = self.pool1(relu1)#print(pool1.size())depth2 = self.depth_conv2(pool1)point2 = self.point_conv2(depth2)batchNormal2 = self.batchNorm2(point2)relu2 = self.relu2(batchNormal2)#print(relu2.size())depth3 = self.depth_conv3(relu2)point3 = self.point_conv3(depth3)relu3 = self.relu3(point3)pool3 = self.pool3(relu3)#print(pool3.size())depth4 = self.depth_conv4(pool3)point4 = self.point_conv4(depth4)batchNormal4 = self.batchNorm4(point4)relu4 = self.relu4(batchNormal4)#print(relu4.size())depth5 = self.depth_conv5(relu4)point5 = self.point_conv5(depth5)relu5 = self.relu5(point5)pool5 = self.pool5(relu5)#print(pool5.size())depth6 = self.depth_conv6(pool5)point6 = self.point_conv6(depth6)batchNormal6 = self.batchNorm6(point6)relu6 = self.relu6(batchNormal6)#print(relu6.size())return relu6class CRNN(nn.Module):def __init__(self,imgHeight, nChannel, nClass, nHidden):super(CRNN,self).__init__()self.cnn = nn.Sequential(CNN(imgHeight, nChannel))self.lstm = nn.Sequential(BidirectionalLSTM(512, nHidden, nHidden),BidirectionalLSTM(nHidden, nHidden, nClass),)def forward(self,input):conv = self.cnn(input)# pytorch框架输出结构为BCHWbatch,channel,height,width = conv.size()assert  height==1,"the output height must be 1."# 将height==1的维度去掉-->BCWconv = conv.squeeze(dim=2)# 调整各个维度的位置(B,C,W)->(W,B,C),对应lstm的输入(seq,batch,input_size)conv = conv.permute(2,0,1)output = self.lstm(conv)return  outputif __name__=="__main__":x = torch.rand(1,1, 32 , 120 )model =  CRNN(imgHeight=32,nChannel=1,nClass=66,nHidden=256)y = model(x)print(  y.shape )
四、训练验证代码
需要注意的是需要修改代码中的总类别数
train() 中的n_class = 66
train() 中的loss_func = torch.nn.CTCLoss(blank=n_class-1)
decode(preds) 中的if preds[i] != 65 and ((i == 65) or (i != 65 and preds[i] != preds[i-1])):
import os
import torch
import cv2
from torchvision import transforms
from torch.utils.data import Dataset,DataLoader
from crnn import CRNN
import time# 调整图像大小和归一化操作
class resizeAndNormalize():def __init__(self,size,interpolation=cv2.INTER_LINEAR):# 注意对于opencv,size的格式是(w,h)self.size = sizeself.interpolation = interpolation# ToTensor属于类  """Convert a ``PIL Image`` or ``numpy.ndarray`` to tensor.self.toTensor = transforms.ToTensor()def __call__(self, image):# (x,y) 对于opencv来说,图像宽对应x轴,高对应y轴image = cv2.resize(image,self.size,interpolation=self.interpolation)#转为tensor的数据结构image = self.toTensor(image)#对图像进行归一化操作image = image.sub_(0.5).div_(0.5)return imageclass CRNNDataSet(Dataset):def __init__(self,imageRoot,labelRoot):self.image_root = imageRootself.image_dict = self.readfile(labelRoot)self.image_name = [fileName for fileName,_ in self.image_dict.items()]def __getitem__(self, index):image_path = os.path.join(self.image_root,self.image_name[index])keys = self.image_dict.get(self.image_name[index])label = [int(x) for x in keys]image = cv2.imread(image_path,cv2.IMREAD_GRAYSCALE)# if image is None:#     return None,None(height,width) = image.shapesize_height = 32  #由于crnn网络输入图像的高为32,故需要resize原始图像的heightratio = 32/float(height)size_width = int(ratio * width)transform = resizeAndNormalize((size_width,size_height))#图像预处理image = transform(image)#标签格式转换为IntTensorlabel = torch.IntTensor(label)return image,labeldef __len__(self):return len(self.image_name)def readfile(self,fileName):res = []with open(fileName, 'r') as f:lines = f.readlines()for line in lines:res.append(line.strip())dic = {}total = 0for line in res:part = line.split(' ')#由于会存在训练过程中取图像的时候图像不存在导致异常,所以在初始化的时候就判断图像是否存在if  not os.path.exists(os.path.join(self.image_root, part[0])):print(os.path.join(self.image_root, part[0]))total += 1else:dic[part[0]] = part[1:]print(total)return dictrainData = CRNNDataSet(imageRoot="D:\other\carPad\data\\",labelRoot="D:\other\carPad\\data\\train.txt")trainLoader = DataLoader(dataset=trainData,batch_size=32,shuffle=True,num_workers=0)valData = CRNNDataSet(imageRoot="D:\other\carPad\data\\",labelRoot="D:\other\carPad\\data\\test.txt")valLoader = DataLoader(dataset=valData,batch_size=100,shuffle=True,num_workers=1)def decode(preds):pred = []for i in range(len(preds)):if preds[i] != 65 and ((i == 65) or (i != 65 and preds[i] != preds[i-1])):  # 注意,修改为 总类别数-1,总类别数是包含空白的,66-1=5pred.append(int(preds[i]))return preddef val(model, loss_function, max_iteration,use_gpu=True):# 将模式切换为验证评估模式model.eval()k = 0totalloss = 0correct_num = 0total_num = 0val_iter = iter(valLoader)max_iter = min(max_iteration,len(valLoader))for i in range(max_iter):k = k + 1data,label = val_iter.next()labels = torch.IntTensor([])for j in range(label.size(0)):labels = torch.cat((labels,label[j]),0)if torch.cuda.is_available() and use_gpu:data = data.cuda()output = model(data)input_lengths = torch.IntTensor([output.size(0)] * int(output.size(1)))target_lengths = torch.IntTensor([label.size(1)] * int(label.size(0)))loss = loss_function(output,labels,input_lengths,target_lengths) /  label.size(0)totalloss += float(loss)pred_label = output.max(2)[1]pred_label = pred_label.transpose(1,0).contiguous().view(-1)pred = decode(pred_label)total_num += len(pred)for x,y in zip(pred,labels):if int(x) == int(y):correct_num += 1accuracy = correct_num / float(total_num) * 100test_loss = totalloss / kprint('Test loss : %.3f , accuary : %.3f%%' % (test_loss, accuracy))def train():use_gpu =  False # Truelearning_rate = 0.001weight_decay = 1e-4max_epoch = 10modelpath = './pytorch-crnn.pth'#char_set = open('../train/char_std_5990.txt','r',encoding='utf-8').readlines()#char_set = ''.join([ch.strip('\n') for ch in char_set[1:]] +['卍'])n_class =  66  #len(char_set)  #注意,需更改为总类别数model =  CRNN(imgHeight=32,nChannel=1,nClass=n_class,nHidden=256)if torch.cuda.is_available() and use_gpu:model.cuda()loss_func = torch.nn.CTCLoss(blank=n_class-1)   # 注意,这里的CTCLoss中的 blank是指空白字符的位置,在这里是第65个,也即最后一个optimizer = torch.optim.Adam(model.parameters(),lr=learning_rate,weight_decay=weight_decay)if os.path.exists(modelpath):print("load model from %s" % modelpath)model.load_state_dict(torch.load(modelpath))print("done!")lossTotal = 0.0k = 0printInterval = 100  #每隔多少步打印一次训练的lossvalinterval = 1000   #每隔多少步做一次测试集测试,输出测试准确率start_time = time.time()for epoch in range(max_epoch):for i,(data,label) in enumerate(trainLoader):k = k + 1#开启训练模式model.train()labels = torch.IntTensor([])for j in range(label.size(0)):labels = torch.cat((labels,label[j]),0)if torch.cuda.is_available and use_gpu:data = data.cuda()loss_func = loss_func.cuda()labels = labels.cuda()output = model(data)#log_probs = output#example 建议使用这样,貌似直接把output送进去loss fun也没发现什么问题#log_probs = output.log_softmax(2).detach().requires_grad_()  #注意 detach 要去掉好像log_probs = output.log_softmax(2).requires_grad_()targets = labelsinput_lengths = torch.IntTensor([output.size(0)] * int(output.size(1)))target_lengths = torch.IntTensor([label.size(1)] * int(label.size(0)))#forward(self, log_probs, targets, input_lengths, target_lengths)loss = loss_func(log_probs,targets,input_lengths,target_lengths) / label.size(0)lossTotal += float(loss)if k % printInterval == 0:print("[%d/%d] [%d/%d] loss:%f" % (epoch, max_epoch, i + 1, len(trainLoader), lossTotal/printInterval))lossTotal = 0.0torch.save(model.state_dict(), './pytorch-crnn.pth')optimizer.zero_grad()loss.backward()optimizer.step()if k % valinterval == 0:val(model,loss_func , 10000)end_time = time.time()print("takes {}s".format((end_time - start_time)))if __name__ == '__main__':train()
五、测试代码
需要调整:
decode(preds,char_set)中的
if preds[i] != 65 and ((i == 65) or (i != 65 and preds[i] != preds[i-1])):
import os
# os.environ['CUDA_VISIBLE_DEVICES'] = '7'
import torch
#from config import opt
from crnn import CRNN
from PIL import Image
from torchvision import transformsclass resizeNormalize(object):def __init__(self, size, interpolation=Image.BILINEAR):self.size = sizeself.interpolation = interpolationself.toTensor = transforms.ToTensor()def __call__(self, img):img = img.resize(self.size, self.interpolation)img = self.toTensor(img)img.sub_(0.5).div_(0.5)return imgdef decode(preds,char_set):pred_text = ''for i in range(len(preds)):if preds[i] != 65 and ((i == 65) or (i != 65 and preds[i] != preds[i-1])):  #5989 需改为 包含空白的总字数-1pred_text += char_set[int(preds[i]) ]  #这里不需减1的,因为空白字符在最后return pred_text# test if crnn workif __name__ == '__main__':imagepath = '../data/test_plate/06.jpg'img_h = 32   #opt.img_h  图高度限制32,可以自行设置use_gpu = False  # opt.use_gpu 是否使用gpumodelpath = './pytorch-crnn.pth'#modelpath = '../train/models/pytorch-crnn.pth'# modelpath = opt.modelpath#char_set = open('char_std_5990.txt', 'r', encoding='utf-8').readlines()#char_set = ''.join([ch.strip('\n') for ch in char_set[1:]] + ['卍'])ch_1 = ["京","津","冀","晋","蒙","辽","吉","黑","沪","苏","浙","皖","闽", "赣","鲁","豫","鄂","湘","粤","桂","琼","渝","川","贵","云","藏","陕","甘","青","宁","新"]ch_2 = [ "A","B","C","D","E","F","G" , "H" , "J" ,"K" ,"L","M","N","P","Q" , "R","S","T" , "U","V","W","X","Y","Z"  ] char_set = ch_1+ch_2+[str(i) for i in range(10)]+[ " " , ]  #最后加上空白字符,空白是放最后,包含空白是66个字符,空白位置在第65n_class = len(char_set)print(n_class)#from crnn_new import crnnmodel =  CRNN(img_h, 1, n_class, 256)if os.path.exists(modelpath):print('Load model from "%s" ...' % modelpath)model.load_state_dict(torch.load(modelpath))print('Done!')if torch.cuda.is_available and use_gpu:model.cuda()image = Image.open(imagepath).convert('L')(w,h) = image.sizesize_h = 32ratio = size_h / float(h)size_w = int(w * ratio)# keep the ratiotransform = resizeNormalize((size_w, size_h))image = transform(image)image = image.unsqueeze(0)if torch.cuda.is_available and use_gpu:image = image.cuda()model.eval()preds = model(image)preds = preds.max(2)preds = preds[1]preds = preds.squeeze()pred_text = decode(preds,char_set)print('predict == >',pred_text )
实测效果:

还是挺准确的
六、代码搬自
链接: 点击这里