CRNN代码笔记
主要由五个模块组成:
- 数据集的加载与切分
- CRNN代码复现
- 训练过程
- 预测过程
- 训练过程中对的评估
文章目录
- CRNN代码笔记
- 数据集的加载与切分
- RCNN模型构建
- 训练部分
- 训练辅助函数
- 注意
- 超参数设置
- 判断cuda是否可用,是则基于GPU训练,否则用cpu训练
- 设置训练数据加载器、验证数据加载器,常规操作
- collate_fn用法
- 实例化CRNN模型,加载模型参数,并运行至可用设备(CPU or GPU)
- 定义优化方法、损失函数
- 开始训练
- 预测部分
- 超参数设置
- 判断cuda是否可用,否则用cpu预测
- 设置预测数据加载器,常规操作
- 实例化CRNN模型,加载模型参数,并运行至可用设备(CPU or GPU)
- 实例化进度条,用于查看预测进度
- 执行预测
- 结果展示
- 验证部分
数据集的加载与切分
import os
import globimport torch
from torch.utils.data import Dataset
from scipy import signal
from scipy.io import wavfile
import cv2
from PIL import Image
import numpy as np
class Synth90kDataset(Dataset):CHARS = '0123456789abcdefghijklmnopqrstuvwxyz'CHAR2LABEL = {char: i + 1 for i, char in enumerate(CHARS)}LABEL2CHAR = {label: char for char, label in CHAR2LABEL.items()}def __init__(self, root_dir=None, mode=None, paths=None, img_height=32, img_width=100):if root_dir and mode and not paths:paths, texts = self._load_from_raw_files(root_dir, mode)elif not root_dir and not mode and paths:texts = Noneself.paths = pathsself.texts = textsself.img_height = img_heightself.img_width = img_widthdef _load_from_raw_files(self, root_dir, mode):mapping = {}with open(os.path.join(root_dir, 'lexicon.txt'), 'r') as fr:for i, line in enumerate(fr.readlines()):mapping[i] = line.strip()paths_file = Noneif mode == 'train':paths_file = 'train.txt'elif mode == 'dev':paths_file = 'val.txt'elif mode == 'test':paths_file = 'test.txt'paths = []texts = []with open(os.path.join(root_dir, paths_file), 'r') as fr:for line in fr.readlines():path, index_str = line.strip().split(' ')path = os.path.join(root_dir, path)index = int(index_str)text = mapping[index]paths.append(path)texts.append(text)return paths, textsdef __len__(self):return len(self.paths)def __getitem__(self, index):path = self.paths[index]try:image = Image.open(path).convert('L') # grey-scaleexcept IOError:print('Corrupted image for %d' % index)return self[index + 1]image = image.resize((self.img_width, self.img_height), resample=Image.BILINEAR)image = np.array(image)image = image.reshape((1, self.img_height, self.img_width))image = (image / 127.5) - 1.0image = torch.FloatTensor(image)if self.texts: #或者图片所对应的labeltext = self.texts[index]target = [self.CHAR2LABEL[c] for c in text]target_length = [len(target)]target = torch.LongTensor(target)target_length = torch.LongTensor(target_length)# 如果DataLoader不设置collate_fn,则此处返回值为迭代DataLoader时取到的值return image, target, target_lengthelse: # 测试模式不需要labelreturn imagedef synth90k_collate_fn(batch):# zip(*batch)拆包images, targets, target_lengths = zip(*batch)# stack就是向量堆叠的意思。一定是扩张一个维度,然后在扩张的维度上,把多个张量纳入仅一个张量。想象向上摞面包片,摞的操作即是stack,0轴即按块stackimages = torch.stack(images, 0)# cat是指向量拼接的意思。一定不扩张维度,想象把两个长条向量cat成一个更长的向量。targets = torch.cat(targets, 0)target_lengths = torch.cat(target_lengths, 0)# 此处返回的数据即使train_loader每次取到的数据,迭代train_loader,每次都会取到三个值,即此处返回值。return images, targets, target_lengths
from torch.utils.data import DataLoader
from config import train_config as config
img_width = config['img_width']
img_height = config['img_height']
data_dir = config['data_dir']
train_batch_size = config['train_batch_size']
cpu_workers = config['cpu_workers']
train_dataset = Synth90kDataset(root_dir=data_dir, mode='train',img_height=img_height, img_width=img_width)
train_loader = DataLoader(dataset=train_dataset,batch_size=train_batch_size,shuffle=True,num_workers=cpu_workers,collate_fn=synth90k_collate_fn)
train_data = train_dataset.__getitem__(2)
print(f'train_data的类型是:{type(train_data)}')
print(f'train_data的长度是:{len(train_data)}')
train_data的类型是:<class 'tuple'>
train_data的长度是:3
train_data
(tensor([[[0.3804, 0.3804, 0.4196, ..., 0.4824, 0.4745, 0.4745],[0.5451, 0.5451, 0.5451, ..., 0.4902, 0.4902, 0.4902],[0.4824, 0.4824, 0.4667, ..., 0.4902, 0.4824, 0.4824],...,[0.4353, 0.4353, 0.4196, ..., 0.5059, 0.5059, 0.5059],[0.6078, 0.6078, 0.6078, ..., 0.4902, 0.4824, 0.4824],[0.3255, 0.3255, 0.3804, ..., 0.4667, 0.4745, 0.4745]]]),tensor([19, 28, 29]),tensor([3]))
img = train_data[0]
label_idx = train_data[1]
label_length = train_data[2]
print(f'img的类型是:{type(img)}')
print(f'img的shape是:{img.shape}')
print('img matrix如下:')
print(img)
img的类型是:<class 'torch.Tensor'>
img的shape是:torch.Size([1, 32, 100])
img matrix如下:
tensor([[[0.3804, 0.3804, 0.4196,  ..., 0.4824, 0.4745, 0.4745],[0.5451, 0.5451, 0.5451,  ..., 0.4902, 0.4902, 0.4902],[0.4824, 0.4824, 0.4667,  ..., 0.4902, 0.4824, 0.4824],...,[0.4353, 0.4353, 0.4196,  ..., 0.5059, 0.5059, 0.5059],[0.6078, 0.6078, 0.6078,  ..., 0.4902, 0.4824, 0.4824],[0.3255, 0.3255, 0.3804,  ..., 0.4667, 0.4745, 0.4745]]])
import matplotlib.pyplot as plt
img = np.transpose(img, (1, 2, 0))
plt.imshow(img)
plt.show()
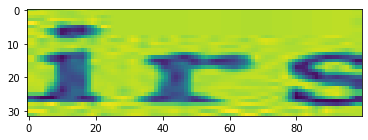
chars = '0123456789abcdefghijklmnopqrstuvwxyz'
label = ''
for idx in label_idx:label += chars[idx-1]
print(f'label为:{label}')
label为:irs
CHARS = '0123456789abcdefghijklmnopqrstuvwxyz'
CHAR2LABEL = {char: i + 1 for i, char in enumerate(CHARS)}
LABEL2CHAR = {label: char for char, label in CHAR2LABEL.items()}
print(CHAR2LABEL)
print(LABEL2CHAR)
{'0': 1, '1': 2, '2': 3, '3': 4, '4': 5, '5': 6, '6': 7, '7': 8, '8': 9, '9': 10, 'a': 11, 'b': 12, 'c': 13, 'd': 14, 'e': 15, 'f': 16, 'g': 17, 'h': 18, 'i': 19, 'j': 20, 'k': 21, 'l': 22, 'm': 23, 'n': 24, 'o': 25, 'p': 26, 'q': 27, 'r': 28, 's': 29, 't': 30, 'u': 31, 'v': 32, 'w': 33, 'x': 34, 'y': 35, 'z': 36}
{1: '0', 2: '1', 3: '2', 4: '3', 5: '4', 6: '5', 7: '6', 8: '7', 9: '8', 10: '9', 11: 'a', 12: 'b', 13: 'c', 14: 'd', 15: 'e', 16: 'f', 17: 'g', 18: 'h', 19: 'i', 20: 'j', 21: 'k', 22: 'l', 23: 'm', 24: 'n', 25: 'o', 26: 'p', 27: 'q', 28: 'r', 29: 's', 30: 't', 31: 'u', 32: 'v', 33: 'w', 34: 'x', 35: 'y', 36: 'z'}
RCNN模型构建
import torch.nn as nn
from config import train_config as config
from dataset import Synth90kDataset, synth90k_collate_fn
from torchsummary import summary
import torch
class CRNN(nn.Module):def __init__(self, img_channel, img_height, img_width, num_class,map_to_seq_hidden=64, rnn_hidden=256, leaky_relu=False):super(CRNN, self).__init__()self.cnn, (output_channel, output_height, output_width) = \self._cnn_backbone(img_channel, img_height, img_width, leaky_relu)self.map_to_seq = nn.Linear(output_channel * output_height, map_to_seq_hidden)self.rnn1 = nn.LSTM(map_to_seq_hidden, rnn_hidden, bidirectional=True)#bidirectional是否使用双向的LSTM # 如果接双向lstm输出,则要 *2,固定用法self.rnn2 = nn.LSTM(2 * rnn_hidden, rnn_hidden, bidirectional=True)# 全连接层 self.dense = nn.Linear(2 * rnn_hidden, num_class)# CNN主干网络, 传入图像深度,高度和宽度,以及是否使用leaky_relu激活函数def _cnn_backbone(self, img_channel, img_height, img_width, leaky_relu):assert img_height % 16 == 0 # 确保高度是16的倍数,宽度是4的倍数assert img_width % 4 == 0# 超参设置channels = [img_channel, 64, 128, 256, 256, 512, 512, 512]kernel_sizes = [3, 3, 3, 3, 3, 3, 2]strides = [1, 1, 1, 1, 1, 1, 1]paddings = [1, 1, 1, 1, 1, 1, 0]cnn = nn.Sequential()def conv_relu(i, batch_norm=False): # 实现计算的整体模块,表示进行第i次卷积# shape of input: (batch, input_channel, height, width)input_channel = channels[i]output_channel = channels[i+1]cnn.add_module(f'conv{i}',nn.Conv2d(input_channel, output_channel, kernel_sizes[i], strides[i], paddings[i]))if batch_norm:cnn.add_module(f'batchnorm{i}', nn.BatchNorm2d(output_channel))relu = nn.LeakyReLU(0.2, inplace=True) if leaky_relu else nn.ReLU(inplace=True)cnn.add_module(f'relu{i}', relu)# size of image: (channel, height, width) = (img_channel, img_height, img_width)conv_relu(0)cnn.add_module('pooling0', nn.MaxPool2d(kernel_size=2, stride=2))# (64, img_height // 2, img_width // 2)conv_relu(1)cnn.add_module('pooling1', nn.MaxPool2d(kernel_size=2, stride=2))# (128, img_height // 4, img_width // 4)conv_relu(2)conv_relu(3)cnn.add_module('pooling2',nn.MaxPool2d(kernel_size=(2, 1))) # (256, img_height // 8, img_width // 4)conv_relu(4, batch_norm=True)conv_relu(5, batch_norm=True)cnn.add_module('pooling3',nn.MaxPool2d(kernel_size=(2, 1))) # (512, img_height // 16, img_width // 4)conv_relu(6) # (512, img_height // 16 - 1, img_width // 4 - 1)output_channel, output_height, output_width = \channels[-1], img_height // 16 - 1, img_width // 4 - 1return cnn, (output_channel, output_height, output_width)# CNN+LSTM前向计算def forward(self, images):# shape of images: (batch, channel, height, width)conv = self.cnn(images)batch, channel, height, width = conv.size()conv = conv.view(batch, channel * height, width)conv = conv.permute(2, 0, 1) # (width, batch, feature) 进行维度转换# 卷积接全连接。全连接输入形状为(width, batch, channel*height),# 输出形状为(width, batch, hidden_layer),分别对应时序长度,batch,特征数,符合LSTM输入要求seq = self.map_to_seq(conv)recurrent, _ = self.rnn1(seq) # 两次LSTMrecurrent, _ = self.rnn2(recurrent)output = self.dense(recurrent)return output # shape: (seq_len, batch, num_class) 时间步的长度,batch, 不同字符取值的概率值img_width = config['img_width']
img_height = config['img_height']
data_dir = config['data_dir']num_class = len(Synth90kDataset.LABEL2CHAR) + 1 # 1代表由一个blank的空白占位符
# 实例化我们的CRNN
crnn = CRNN(1, img_height, img_width, num_class,map_to_seq_hidden=config['map_to_seq_hidden'],rnn_hidden=config['rnn_hidden'],leaky_relu=config['leaky_relu'])
device = torch.device('cuda' if torch.cuda.is_available() else 'cpu')
print(f'device: {device}')
device: cuda
crnn.to(device)
CRNN((cnn): Sequential((conv0): Conv2d(1, 64, kernel_size=(3, 3), stride=(1, 1), padding=(1, 1))(relu0): ReLU(inplace=True)(pooling0): MaxPool2d(kernel_size=2, stride=2, padding=0, dilation=1, ceil_mode=False)(conv1): Conv2d(64, 128, kernel_size=(3, 3), stride=(1, 1), padding=(1, 1))(relu1): ReLU(inplace=True)(pooling1): MaxPool2d(kernel_size=2, stride=2, padding=0, dilation=1, ceil_mode=False)(conv2): Conv2d(128, 256, kernel_size=(3, 3), stride=(1, 1), padding=(1, 1))(relu2): ReLU(inplace=True)(conv3): Conv2d(256, 256, kernel_size=(3, 3), stride=(1, 1), padding=(1, 1))(relu3): ReLU(inplace=True)(pooling2): MaxPool2d(kernel_size=(2, 1), stride=(2, 1), padding=0, dilation=1, ceil_mode=False)(conv4): Conv2d(256, 512, kernel_size=(3, 3), stride=(1, 1), padding=(1, 1))(batchnorm4): BatchNorm2d(512, eps=1e-05, momentum=0.1, affine=True, track_running_stats=True)(relu4): ReLU(inplace=True)(conv5): Conv2d(512, 512, kernel_size=(3, 3), stride=(1, 1), padding=(1, 1))(batchnorm5): BatchNorm2d(512, eps=1e-05, momentum=0.1, affine=True, track_running_stats=True)(relu5): ReLU(inplace=True)(pooling3): MaxPool2d(kernel_size=(2, 1), stride=(2, 1), padding=0, dilation=1, ceil_mode=False)(conv6): Conv2d(512, 512, kernel_size=(2, 2), stride=(1, 1))(relu6): ReLU(inplace=True))(map_to_seq): Linear(in_features=512, out_features=64, bias=True)(rnn1): LSTM(64, 256, bidirectional=True)(rnn2): LSTM(512, 256, bidirectional=True)(dense): Linear(in_features=512, out_features=37, bias=True)
)
训练部分
import osimport cv2
import torch
from torch.utils.data import DataLoader
import torch.optim as optim
from torch.nn import CTCLossfrom dataset import Synth90kDataset, synth90k_collate_fn
from model import CRNN
from evaluate import evaluate
from config import train_config as config
训练辅助函数
注意
- 尺度
- images: (N, C, H, W) -> (32, 1, 32, 100)
- targets:(X, ),一维向量,长度不固定。32个batch标签(向量)拼接成一个长向量,target_lengths指定切割位置
- logits:(T, N, n_class) -> (24, 32, 37) T代表时间步的长度, N为 batchsize
- input_lengths: (N,) -> (32, ), 向量中每一个值表识相应batch输入序列长度,为T即24,表示输入序列长度固定为24
- target_lengths: (N, ) ->(32, ), 向量中每一个值表示相应batch训练图像label长度,长度不固定
- CTCLoss函数使用说明。
- 获取CTCLoss()对象
ctc_loss = nn.CTCLoss(blank=len(CHARS)-1, reduction='mean')
-
blank:空白标签所在的label值,默认为0,需要根据实际的标签定义进行设定;
-
reduction:处理output losses的方式,string类型,可选’none’ 、 ‘mean’ 及 ‘sum’,'none’表示对output losses不做任何处理,‘mean’ 则对output losses取平均值处理,‘sum’则是对output losses求和处理,默认为’mean’ 。
- 在迭代中调用CTCLoss()对象计算损失值
loss = ctc_loss(log_probs, targets, input_lengths, target_lengths)
-
log_probs:shape为(T, N, C)的模型输出张量,其中,T表示CTCLoss的输入长度也即输出序列长度,N表示训练的batch size长度,C则表示包含有空白标签的所有要预测的字符集总长度,log_probs一般需要经过torch.nn.functional.log_softmax处理后再送入到CTCLoss中;
-
targets:shape为(N, S) 或(sum(target_lengths))的张量,其中第一种类型,N表示训练的batch size长度,S则为标签长度,第二种类型,则为所有标签长度之和,但是需要注意的是targets不能包含有空白标签;
-
input_lengths:shape为(N)的张量或元组,但每一个元素的长度必须等于T即输出序列长度,一般来说模型输出序列固定后则该张量或元组的元素值均相同;
-
target_lengths:shape为(N)的张量或元组,其每一个元素指示每个训练输入序列的标签长度,但标签长度是可以变化的;
def train_batch(crnn, data, optimizer, criterion, device): # 训练过程中最核心的一部分crnn.train() # 表示bn操作images, targets, target_lengths = [d.to(device) for d in data] # 有batch个logits = crnn(images) # 进行CNN LSTM 操作log_probs = torch.nn.functional.log_softmax(logits, dim=2) # 进行函数操作batch_size = images.size(0)input_lengths = torch.LongTensor([logits.size(0)] * batch_size)target_lengths = torch.flatten(target_lengths)# CTCloss的计算loss = criterion(log_probs, targets, input_lengths, target_lengths)optimizer.zero_grad()loss.backward()optimizer.step()return loss.item()
超参数设置
epochs = config['epochs']
train_batch_size = config['train_batch_size']
eval_batch_size = config['eval_batch_size']
lr = config['lr']
show_interval = config['show_interval'] # 每隔多少次,打印信息
valid_interval = config['valid_interval'] # 多大的间隔进行一次验证
save_interval = config['save_interval'] # 多大间隔保存模型
cpu_workers = config['cpu_workers']
reload_checkpoint = config['reload_checkpoint'] # 加载保存好的模型参数
valid_max_iter = config['valid_max_iter']img_width = config['img_width']
img_height = config['img_height']
data_dir = config['data_dir']num_class = len(Synth90kDataset.LABEL2CHAR) + 1  #能识别字符的个数
判断cuda是否可用,是则基于GPU训练,否则用cpu训练
device = torch.device('cuda' if torch.cuda.is_available() else 'cpu')
print(f'device: {device}')
device: cuda
设置训练数据加载器、验证数据加载器,常规操作
collate_fn用法
- 把list类型batch(若不加此操作,原先一个batch中的多个sample是在list中的)转换成Tensor,加速运算。
- 经collate_fn处理,返回符合需求的数据及相应尺度。
- 满足CTC的size要求
train_dataset = Synth90kDataset(root_dir=data_dir, mode='train',img_height=img_height, img_width=img_width)
valid_dataset = Synth90kDataset(root_dir=data_dir, mode='dev',img_height=img_height, img_width=img_width)train_loader = DataLoader(dataset=train_dataset,batch_size=train_batch_size,shuffle=True,num_workers=cpu_workers,collate_fn=synth90k_collate_fn)
valid_loader = DataLoader(dataset=valid_dataset,batch_size=eval_batch_size,shuffle=True,num_workers=cpu_workers,collate_fn=synth90k_collate_fn)
实例化CRNN模型,加载模型参数,并运行至可用设备(CPU or GPU)
crnn = CRNN(1, img_height, img_width, num_class,map_to_seq_hidden=config['map_to_seq_hidden'],rnn_hidden=config['rnn_hidden'],leaky_relu=config['leaky_relu'])
if reload_checkpoint:crnn.load_state_dict(torch.load(reload_checkpoint, map_location=device))
crnn.to(device)
CRNN((cnn): Sequential((conv0): Conv2d(1, 64, kernel_size=(3, 3), stride=(1, 1), padding=(1, 1))(relu0): ReLU(inplace=True)(pooling0): MaxPool2d(kernel_size=2, stride=2, padding=0, dilation=1, ceil_mode=False)(conv1): Conv2d(64, 128, kernel_size=(3, 3), stride=(1, 1), padding=(1, 1))(relu1): ReLU(inplace=True)(pooling1): MaxPool2d(kernel_size=2, stride=2, padding=0, dilation=1, ceil_mode=False)(conv2): Conv2d(128, 256, kernel_size=(3, 3), stride=(1, 1), padding=(1, 1))(relu2): ReLU(inplace=True)(conv3): Conv2d(256, 256, kernel_size=(3, 3), stride=(1, 1), padding=(1, 1))(relu3): ReLU(inplace=True)(pooling2): MaxPool2d(kernel_size=(2, 1), stride=(2, 1), padding=0, dilation=1, ceil_mode=False)(conv4): Conv2d(256, 512, kernel_size=(3, 3), stride=(1, 1), padding=(1, 1))(batchnorm4): BatchNorm2d(512, eps=1e-05, momentum=0.1, affine=True, track_running_stats=True)(relu4): ReLU(inplace=True)(conv5): Conv2d(512, 512, kernel_size=(3, 3), stride=(1, 1), padding=(1, 1))(batchnorm5): BatchNorm2d(512, eps=1e-05, momentum=0.1, affine=True, track_running_stats=True)(relu5): ReLU(inplace=True)(pooling3): MaxPool2d(kernel_size=(2, 1), stride=(2, 1), padding=0, dilation=1, ceil_mode=False)(conv6): Conv2d(512, 512, kernel_size=(2, 2), stride=(1, 1))(relu6): ReLU(inplace=True))(map_to_seq): Linear(in_features=512, out_features=64, bias=True)(rnn1): LSTM(64, 256, bidirectional=True)(rnn2): LSTM(512, 256, bidirectional=True)(dense): Linear(in_features=512, out_features=37, bias=True)
)
定义优化方法、损失函数
CTC 的全称是Connectionist Temporal Classification,中文名称是“连接时序分类”,这个方法主要是解决神经网络label 和output 不对齐的问题(Alignment problem),其优点是不用强制对齐标签且标签可变长,仅需输入序列和监督标签序列即可进行训练,目前,该方法主要应用于场景文本识别(scene text recognition)、语音识别(speech recognition)及手写字识别(handwriting recognition)等工程场景。以往我们在百度上搜索pytorch + ctc loss得到的结果基本上warp-ctc的使用方法,warp-ctc是百度开源的一个可以应用在CPU和GPU上高效并行的CTC代码库,但是为了在pytorch上使用warp-ctc我们不仅需要编译其源代码还需要进行安装配置,使用起来着实麻烦。而在Pytorch 1.0.x版本内早就有内置ctc loss接口了,我们完全可以直接使用
optimizer = optim.RMSprop(crnn.parameters(), lr=lr)
criterion = CTCLoss(reduction='sum')
criterion.to(device)
CTCLoss()
assert save_interval % valid_interval == 0
i = 1
开始训练
for epoch in range(1, epochs + 1):print(f'epoch: {epoch}')tot_train_loss = 0.tot_train_count = 0for train_data in train_loader:loss = train_batch(crnn, train_data, optimizer, criterion, device)train_size = train_data[0].size(0)tot_train_loss += losstot_train_count += train_sizeif i % show_interval == 0: # 打印间隔print('train_batch_loss[', i, ']: ', loss / train_size)if i % valid_interval == 0: # 验证间隔evaluation = evaluate(crnn, valid_loader, criterion,decode_method=config['decode_method'],beam_size=config['beam_size'])print('valid_evaluation: loss={loss}, acc={acc}'.format(**evaluation))if i % save_interval == 0: # 自动保存间隔prefix = 'crnn'loss = evaluation['loss']save_model_path = os.path.join(config['checkpoints_dir'],f'{prefix}_{i:06}_loss{loss}.pt')torch.save(crnn.state_dict(), save_model_path)print('save model at ', save_model_path)i += 1print('train_loss: ', tot_train_loss / tot_train_count)
预测部分
import globfrom docopt import docopt
import torch
from tqdm import tqdm
from torch.utils.data import DataLoaderfrom config import common_config as config
from dataset import Synth90kDataset, synth90k_collate_fn
from model import CRNN
from ctc_decoder import ctc_decode
超参数设置
images_dir = '../demo/*.jpg'images_path = glob.glob(images_dir)
reload_checkpoint = '../checkpoints/crnn_synth90k.pt'
batch_size = 256
decode_method = 'beam_search'
beam_size = 10 # size越大,表示准确率越高,时间复杂度也相应越大img_height = 32
img_width = 100num_class = len(Synth90kDataset.LABEL2CHAR) + 1
判断cuda是否可用,否则用cpu预测
device = torch.device('cuda' if torch.cuda.is_available() else 'cpu')
print(f'device: {device}')
device: cuda
设置预测数据加载器,常规操作
predict_dataset = Synth90kDataset(paths=images_path,img_height=img_height, img_width=img_width)predict_loader = DataLoader(dataset=predict_dataset,batch_size=batch_size,shuffle=False)
实例化CRNN模型,加载模型参数,并运行至可用设备(CPU or GPU)
crnn = CRNN(1, img_height, img_width, num_class,map_to_seq_hidden=config['map_to_seq_hidden'],rnn_hidden=config['rnn_hidden'],leaky_relu=config['leaky_relu'])
crnn.load_state_dict(torch.load(reload_checkpoint, map_location=device))
crnn.to(device)
CRNN((cnn): Sequential((conv0): Conv2d(1, 64, kernel_size=(3, 3), stride=(1, 1), padding=(1, 1))(relu0): ReLU(inplace=True)(pooling0): MaxPool2d(kernel_size=2, stride=2, padding=0, dilation=1, ceil_mode=False)(conv1): Conv2d(64, 128, kernel_size=(3, 3), stride=(1, 1), padding=(1, 1))(relu1): ReLU(inplace=True)(pooling1): MaxPool2d(kernel_size=2, stride=2, padding=0, dilation=1, ceil_mode=False)(conv2): Conv2d(128, 256, kernel_size=(3, 3), stride=(1, 1), padding=(1, 1))(relu2): ReLU(inplace=True)(conv3): Conv2d(256, 256, kernel_size=(3, 3), stride=(1, 1), padding=(1, 1))(relu3): ReLU(inplace=True)(pooling2): MaxPool2d(kernel_size=(2, 1), stride=(2, 1), padding=0, dilation=1, ceil_mode=False)(conv4): Conv2d(256, 512, kernel_size=(3, 3), stride=(1, 1), padding=(1, 1))(batchnorm4): BatchNorm2d(512, eps=1e-05, momentum=0.1, affine=True, track_running_stats=True)(relu4): ReLU(inplace=True)(conv5): Conv2d(512, 512, kernel_size=(3, 3), stride=(1, 1), padding=(1, 1))(batchnorm5): BatchNorm2d(512, eps=1e-05, momentum=0.1, affine=True, track_running_stats=True)(relu5): ReLU(inplace=True)(pooling3): MaxPool2d(kernel_size=(2, 1), stride=(2, 1), padding=0, dilation=1, ceil_mode=False)(conv6): Conv2d(512, 512, kernel_size=(2, 2), stride=(1, 1))(relu6): ReLU(inplace=True))(map_to_seq): Linear(in_features=512, out_features=64, bias=True)(rnn1): LSTM(64, 256, bidirectional=True)(rnn2): LSTM(512, 256, bidirectional=True)(dense): Linear(in_features=512, out_features=37, bias=True)
)
实例化进度条,用于查看预测进度
pbar = tqdm(total=len(predict_loader), desc="Predict")
all_preds = []
Predict: 0%| | 0/1 [00:00<?, ?it/s]
执行预测
with torch.no_grad():for data in predict_loader:device = 'cuda' if next(crnn.parameters()).is_cuda else 'cpu'images = data.to(device)logits = crnn(images)log_probs = torch.nn.functional.log_softmax(logits, dim=2)preds = ctc_decode(log_probs, method=decode_method, beam_size=beam_size,label2char=Synth90kDataset.LABEL2CHAR)all_preds += predspbar.update(1)pbar.close()
Predict: 100%|███████████████████████████████████████████████████████████████████████████| 1/1 [00:00<00:00, 1.96it/s]
结果展示
def show_result(paths, preds):print('\n===== result =====')for path, pred in zip(paths, preds):text = ''.join(pred)print(f'{path} > {text}')
show_result(images_path, preds)
===== result =====
../demo\14e214d430ea1bd5a9c043fcd56ad27.jpg > csxdziszentlosts
../demo\170_READING_62745.jpg > reading
../demo\178_Showtime_70541.jpg > showtime
../demo\78_Novel_52433.jpg > novel
验证部分
import torch
from torch.utils.data import DataLoader
from torch.nn import CTCLoss
from tqdm import tqdmfrom dataset import Synth90kDataset, synth90k_collate_fn
from model import CRNN
from ctc_decoder import ctc_decode
from config import evaluate_config as configtorch.backends.cudnn.enabled = False
def evaluate(crnn, dataloader, criterion,max_iter=None, decode_method='beam_search', beam_size=10):crnn.eval()tot_count = 0tot_loss = 0tot_correct = 0wrong_cases = []pbar_total = max_iter if max_iter else len(dataloader)pbar = tqdm(total=pbar_total, desc="Evaluate")with torch.no_grad():for i, data in enumerate(dataloader):if max_iter and i >= max_iter:breakdevice = 'cuda' if next(crnn.parameters()).is_cuda else 'cpu'images, targets, target_lengths = [d.to(device) for d in data]logits = crnn(images)log_probs = torch.nn.functional.log_softmax(logits, dim=2) # 为后期计算CTCloss进行辅助batch_size = images.size(0)input_lengths = torch.LongTensor([logits.size(0)] * batch_size)loss = criterion(log_probs, targets, input_lengths, target_lengths)preds = ctc_decode(log_probs, method=decode_method, beam_size=beam_size)reals = targets.cpu().numpy().tolist()target_lengths = target_lengths.cpu().numpy().tolist()tot_count += batch_sizetot_loss += loss.item()target_length_counter = 0for pred, target_length in zip(preds, target_lengths):real = reals[target_length_counter:target_length_counter + target_length]target_length_counter += target_lengthif pred == real:tot_correct += 1else:wrong_cases.append((real, pred))pbar.update(1)pbar.close()evaluation = {'loss': tot_loss / tot_count,'acc': tot_correct / tot_count,'wrong_cases': wrong_cases}return evaluation
def main():eval_batch_size = config['eval_batch_size']cpu_workers = config['cpu_workers']reload_checkpoint = '../checkpoints/crnn_synth90k.pt'img_height = config['img_height']img_width = config['img_width']device = torch.device('cuda' if torch.cuda.is_available() else 'cpu')print(f'device: {device}')test_dataset = Synth90kDataset(root_dir=config['data_dir'], mode='test',img_height=img_height, img_width=img_width)test_loader = DataLoader(dataset=test_dataset,batch_size=eval_batch_size,shuffle=False,num_workers=cpu_workers,collate_fn=synth90k_collate_fn)num_class = len(Synth90kDataset.LABEL2CHAR) + 1crnn = CRNN(1, img_height, img_width, num_class,map_to_seq_hidden=config['map_to_seq_hidden'],rnn_hidden=config['rnn_hidden'],leaky_relu=config['leaky_relu'])crnn.load_state_dict(torch.load(reload_checkpoint, map_location=device))crnn.to(device)criterion = CTCLoss(reduction='sum')criterion.to(device)evaluation = evaluate(crnn, test_loader, criterion,decode_method=config['decode_method'],beam_size=config['beam_size'])print('test_evaluation: loss={loss}, acc={acc}'.format(**evaluation))main()
Evaluate: 0%| | 0/1 [00:00<?, ?it/s]device: cpuEvaluate: 100%|███████████████████████████████████████████████████████████████████████████████████████████████████| 1/1 [00:05<00:00, 5.22s/it]test_evaluation: loss=0.2696375235533103, acc=0.9615384615384616