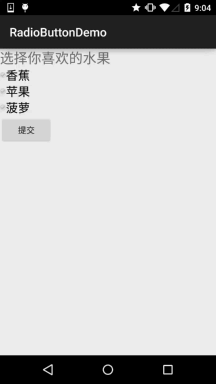
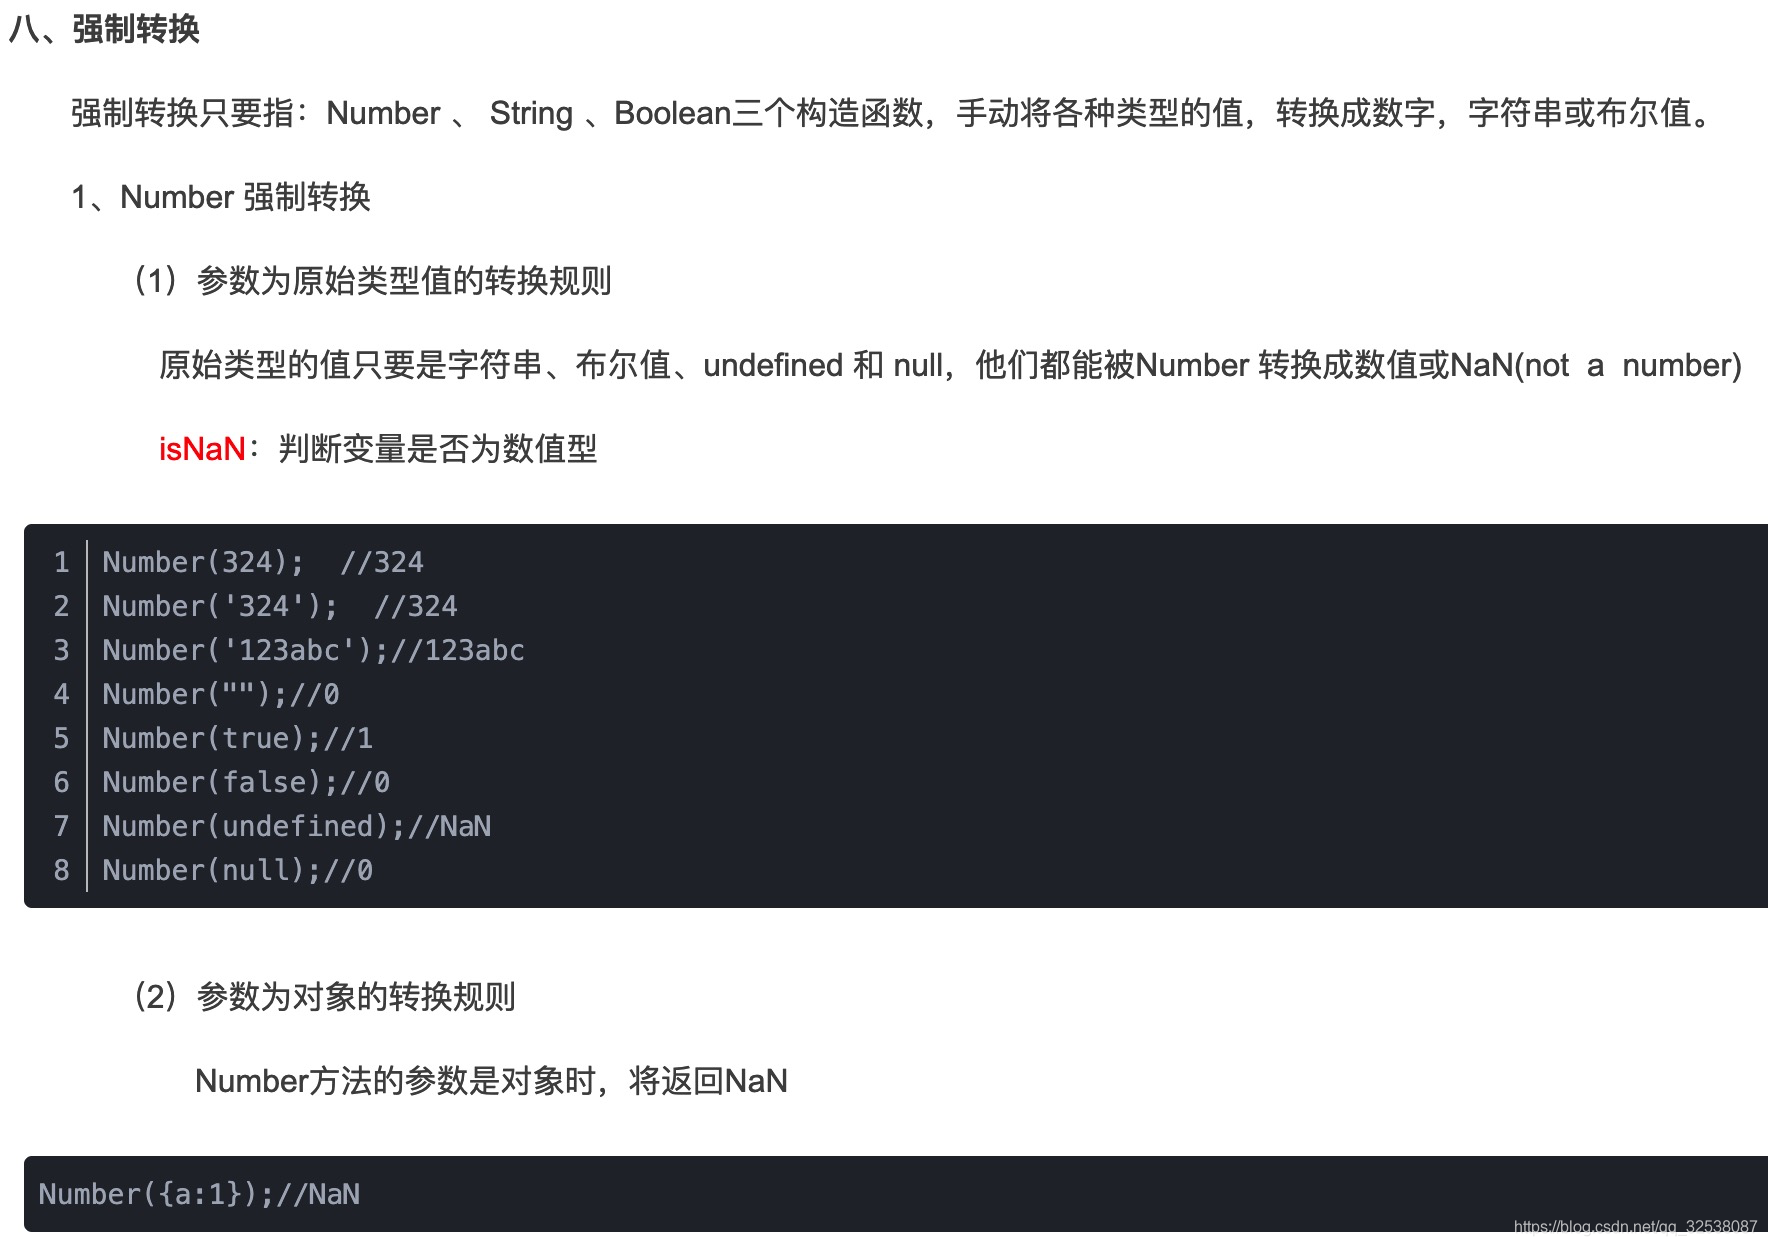
一:单选按钮
单选按钮类:RadioButton
android:checked="true"设置默认选中
单选按钮控件通常与RadioGroup搭配使用。
RadioGroup是LinearLayout的子类,用于将多个单选按钮组合为一组。
同一按钮组内的单选按钮只能有一个被选中。
二:多选按钮
用法基本与Button相同
CheckBox对象.isChecked()方法可以用来判断复选按钮是否选中
效果图(单选多选写在一个项目里边,用了一个页面跳转):
项目目录:


多选按钮,两种形式


代码:
activity_main.xml
<LinearLayout xmlns:android="http://schemas.android.com/apk/res/android"xmlns:tools="http://schemas.android.com/tools"android:id="@+id/LinearLayout1"android:layout_width="match_parent"android:layout_height="match_parent"android:orientation="vertical"tools:context="${relativePackage}.${activityClass}" ><Buttonandroid:id="@+id/button1"android:layout_width="match_parent"android:layout_height="wrap_content"android:text="RadioActivity单选" /><Buttonandroid:id="@+id/button2"android:layout_width="match_parent"android:layout_height="wrap_content"android:text="CheckActivity多选" /></LinearLayout>
MainActivity.java
package com.example.radioandcheckdemo;import android.app.Activity;
import android.content.Intent;
import android.os.Bundle;
import android.view.Menu;
import android.view.MenuItem;
import android.view.View;
import android.view.View.OnClickListener;
import android.widget.Button;public class MainActivity extends Activity implements OnClickListener{private Button button1;private Button button2;@Overrideprotected void onCreate(Bundle savedInstanceState) {super.onCreate(savedInstanceState);setContentView(R.layout.activity_main);button1 = (Button) findViewById(R.id.button1);button2 = (Button) findViewById(R.id.button2);button1.setOnClickListener(this);button2.setOnClickListener(this);}@Overridepublic void onClick(View v) {Intent intent = new Intent();switch (v.getId()) {case R.id.button1://跳转页面intent.setClass(MainActivity.this, RadioActivity.class);startActivity(intent);break;case R.id.button2://跳转页面intent.setClass(MainActivity.this, CheckActivity.class);startActivity(intent);default:break;}}
}
activity_radio.xml
<LinearLayout xmlns:android="http://schemas.android.com/apk/res/android"xmlns:tools="http://schemas.android.com/tools"android:id="@+id/LinearLayout1"android:layout_width="match_parent"android:layout_height="match_parent"android:orientation="vertical"android:layout_margin="20sp"tools:context="${relativePackage}.${activityClass}" ><TextViewandroid:layout_width="wrap_content"android:layout_height="wrap_content"android:text="@string/hello_world" /><!-- 单选android:checked="true"设置默认选中--><RadioGroupandroid:id="@+id/group1"android:orientation="horizontal"android:layout_width="match_parent"android:layout_height="wrap_content" ><RadioButton android:id="@+id/radio1"android:layout_width="wrap_content"android:layout_height="wrap_content"android:checked="true"android:text="男"/><RadioButton android:id="@+id/radio2"android:layout_width="wrap_content"android:layout_height="wrap_content"android:text="女"/></RadioGroup><!-- 分界线 --><Viewandroid:layout_width="match_parent"android:layout_height="2sp"android:background="@android:color/holo_blue_dark"android:layout_marginTop="10sp"android:layout_marginBottom="10sp" /><TextView android:id="@+id/text1"android:layout_width="match_parent"android:layout_height="wrap_content"android:textSize="18sp"android:text="你吃饭了吗?"/><RadioGroupandroid:id="@+id/group2"android:layout_width="match_parent"android:layout_height="wrap_content" ><RadioButton android:id="@+id/radio3"android:layout_width="wrap_content"android:layout_height="wrap_content"android:text="吃了"/><RadioButton android:id="@+id/radio4"android:layout_width="wrap_content"android:layout_height="wrap_content"android:text="没吃"/></RadioGroup></LinearLayout>
RadioActivity.java
package com.example.radioandcheckdemo;import android.app.Activity;
import android.os.Bundle;
import android.widget.RadioButton;
import android.widget.RadioGroup;
import android.widget.RadioGroup.OnCheckedChangeListener;
import android.widget.Toast;public class RadioActivity extends Activity implements OnCheckedChangeListener {private RadioGroup group1;private RadioGroup group2;@Overrideprotected void onCreate(Bundle savedInstanceState) {super.onCreate(savedInstanceState);setContentView(R.layout.activity_radio);group1 = (RadioGroup) findViewById(R.id.group1); group2 = (RadioGroup) findViewById(R.id.group2); group1.setOnCheckedChangeListener(this);group2.setOnCheckedChangeListener(this);}@Overridepublic void onCheckedChanged(RadioGroup group, int checkedId) {//显示值的几种方法//checkedId选中RadioButton的id/*switch (checkedId) {case R.id.radio1:Toast.makeText(this, "男", Toast.LENGTH_LONG).show();break;case R.id.radio2:Toast.makeText(this, "女", Toast.LENGTH_LONG).show();break;case R.id.radio3:Toast.makeText(this, "吃了", Toast.LENGTH_LONG).show();break;case R.id.radio4:Toast.makeText(this, "没吃", Toast.LENGTH_LONG).show();break;default:break;}*///找到点击的RadioButton//RadioButton radio = (RadioButton) findViewById(checkedId);//取出RadioButton中的值//String str = radio.getText().toString();//弹框显示选中的值//Toast.makeText(this, str, Toast.LENGTH_LONG).show();//两组数据同时显示//根据RadioGroup取出数据,没有选中返回-1String str = "";int buttonId = group1.getCheckedRadioButtonId();if(buttonId != -1){RadioButton radio = (RadioButton) findViewById(buttonId);str = "你的性别是" + radio.getText().toString();			}else{str = "你没有选择性别";}buttonId = group2.getCheckedRadioButtonId();if(buttonId != -1){RadioButton radio = (RadioButton) findViewById(buttonId);str += ",   你吃饭了吗?"+radio.getText().toString();}Toast.makeText(this, str, Toast.LENGTH_LONG).show();}
}
activity_check.xml
<LinearLayout xmlns:android="http://schemas.android.com/apk/res/android"xmlns:tools="http://schemas.android.com/tools"android:id="@+id/LinearLayout1"android:layout_width="match_parent"android:layout_height="match_parent"android:orientation="vertical"tools:context="${relativePackage}.${activityClass}" ><TextViewandroid:layout_width="wrap_content"android:layout_height="wrap_content"android:text="选择所学课程:" /><CheckBoxandroid:id="@+id/check1"android:layout_width="wrap_content"android:layout_height="wrap_content"android:text="HTML" /><CheckBoxandroid:id="@+id/check2"android:layout_width="wrap_content"android:layout_height="wrap_content"android:text="C" /><CheckBoxandroid:id="@+id/check3"android:layout_width="wrap_content"android:layout_height="wrap_content"android:text="php" /><CheckBoxandroid:id="@+id/check4"android:layout_width="wrap_content"android:layout_height="wrap_content"android:text="java" /><Buttonandroid:id="@+id/button1"android:layout_width="match_parent"android:layout_height="wrap_content"android:text="提交" /></LinearLayout>
CheckActivity.java
package com.example.radioandcheckdemo;import android.app.Activity;
import android.os.Bundle;
import android.view.Menu;
import android.view.MenuItem;
import android.view.View;
import android.view.View.OnClickListener;
import android.widget.Button;
import android.widget.CheckBox;
import android.widget.CompoundButton;
import android.widget.CompoundButton.OnCheckedChangeListener;
import android.widget.Toast;public class CheckActivity extends Activity {private CheckBox check1;private CheckBox check2;private CheckBox check3;private CheckBox check4;private Button button1;private OnCheckedChangeListener listenter = new OnCheckedChangeListener() {@Overridepublic void onCheckedChanged(CompoundButton buttonView, boolean isChecked) {//选中多选框CheckBox check = (CheckBox)buttonView;//取出当前勾选值String str = check.getText().toString();//判断是否勾选状态if(isChecked){str = "你学了"+str;}else{str = "你没学"+str;}Toast.makeText(CheckActivity.this, str, Toast.LENGTH_LONG).show();}};@Overrideprotected void onCreate(Bundle savedInstanceState) {super.onCreate(savedInstanceState);setContentView(R.layout.activity_check);check1 = (CheckBox) findViewById(R.id.check1);check2 = (CheckBox) findViewById(R.id.check2);check3 = (CheckBox) findViewById(R.id.check3);check4 = (CheckBox) findViewById(R.id.check4);button1 = (Button) findViewById(R.id.button1);//多选框点击事件/*check1.setOnCheckedChangeListener(listenter);check2.setOnCheckedChangeListener(listenter);check3.setOnCheckedChangeListener(listenter);check4.setOnCheckedChangeListener(listenter);*///提交按钮点击事件button1.setOnClickListener(new OnClickListener() {@Overridepublic void onClick(View v) {String str = "我学过了";boolean f = false;if(check1.isChecked()){str += check1.getText()+",";f = true;}if(check2.isChecked()){str += check2.getText()+",";f = true;}if(check3.isChecked()){str += check3.getText()+",";f = true;}if(check4.isChecked()){str += check4.getText()+",";f = true;}if(f){str = str.substring(0, str.length()-1);}Toast.makeText(CheckActivity.this, str, Toast.LENGTH_LONG).show();}});}
}