消息中心的设计与实现
一、引言
运用场景:
1、消息的主动提醒(客户端被动接收)
2、客户模块(及时通讯)
3、单一登录(一个账号只能在一个设备登录)
消息中心的实现方案:
1、客户端轮询
2、TCP长连接(常用)
Java的长连接的方案
Java - Blocking I/O - JDK1.0 (同步阻塞式IO)
Java - Non Blocking I/O - JDK1.4(同步非阻塞式IO)
第三方的组织 - Mina、Netty(NIO)
Java - Async I/O -JDK1.7(异步非阻塞式IO)
二、BIO的实现点对点发送消息
服务器
public class Server {public static void main(String[] args) throws IOException {//创建Socket服务对象ServerSocket serverSocket = new ServerSocket(8888);//服务端要接收客户端的连接 - 阻塞式的final Socket socket = serverSocket.accept();//一旦有客户端连接,该方法就会返回连接该客户端的Socket对象,如果没有客户端连接,就会一直阻塞System.out.println("有一个客户端连接!");Scanner scanner = new Scanner(System.in);//开了一个子线程监听客户端的发送消息new Thread(){@Overridepublic void run() {while(true) {//获得客户端的请求try {InputStream in = socket.getInputStream();byte[] bytes = new byte[10 * 1024];int len = 0;//read方法是一个阻塞式的方法,如果没有客户端的消息,线程会阻塞在该方法上len = in.read(bytes);System.out.println("获取到客户端的请求数据:" + new String(bytes, 0, len));} catch (IOException e) {e.printStackTrace();}}}}.start();while (true) {//返回客户端的响应System.out.println("请输入发送的内容:");String content = scanner.next();OutputStream out = socket.getOutputStream();out.write(content.getBytes());}}
}
客户端
public class Client {public static void main(String[] args) throws IOException {//创建客户端的socket对象,并且连接服务器final Socket socket = new Socket("127.0.0.1", 8888);Scanner scanner = new Scanner(System.in);//开启子线程接收服务器的响应new Thread(){@Overridepublic void run() {while(true) {//接收响应InputStream in = null;try {in = socket.getInputStream();byte[] bytes = new byte[10 * 1024];int len = in.read(bytes);System.out.println("接收到服务器的响应:" + new String(bytes, 0, len));} catch (IOException e) {e.printStackTrace();}}}}.start();while (true) {//发消息System.out.println("请输入发送的内容:");String content = scanner.next();OutputStream out = socket.getOutputStream();out.write(content.getBytes());out.flush();}}
}
群发服务器
public class Server {public static List<Socket> socketList = new ArrayList<Socket>();public static void main(String[] args) throws IOException {//创建Socket服务对象ServerSocket serverSocket = new ServerSocket(8888);//服务端要接收客户端的连接 - 阻塞式的//死循环反复监听客户端的连接while (true) {final Socket socket = serverSocket.accept();//一旦有客户端连接,该方法就会返回连接该客户端的Socket对象,如果没有客户端连接,就会一直阻塞//保存当前的连接对象socketList.add(socket);System.out.println("有一个客户端连接!");//开了一个子线程监听客户端的发送消息new Thread() {@Overridepublic void run() {//获得客户端的请求try {while (true) {InputStream in = socket.getInputStream();byte[] bytes = new byte[10 * 1024];int len = 0;//read方法是一个阻塞式的方法,如果没有客户端的消息,线程会阻塞在该方法上len = in.read(bytes);String content = new String(bytes, 0, len);System.out.println("获取到客户端的请求数据:" + content + ", 并且将数据群发给其他的客户端!");//群发给其他的客户端for (Socket sock : socketList) {if (sock != socket) {//不发送给自己sock.getOutputStream().write(content.getBytes());}}}} catch (IOException e) {e.printStackTrace();}}}.start();}}
}
群发客户端
public class Client {public static void main(String[] args) throws IOException {//创建客户端的socket对象,并且连接服务器final Socket socket = new Socket("127.0.0.1", 8888);Scanner scanner = new Scanner(System.in);//开启子线程接收服务器的响应new Thread(){@Overridepublic void run() {try {while(true) {//接收响应InputStream in = socket.getInputStream();byte[] bytes = new byte[10 * 1024];int len = in.read(bytes);System.out.println("接收到服务器的响应:" + new String(bytes, 0, len));}} catch (IOException e) {e.printStackTrace();}}}.start();while (true) {//发消息System.out.println("请输入发送的内容:");String content = scanner.next();OutputStream out = socket.getOutputStream();out.write(content.getBytes());out.flush();}}
}
三、NIO的介绍与使用
BIO:
ServerSocket - 服务端
Socket - 连接对象
byte[] - 传递的数据类型
NIO:
ServerSocketChannel -
SocketChannel -
ByteBuffer - 本质还是byte数组
Selector - 多路复用器
多路复用器 (非阻塞)
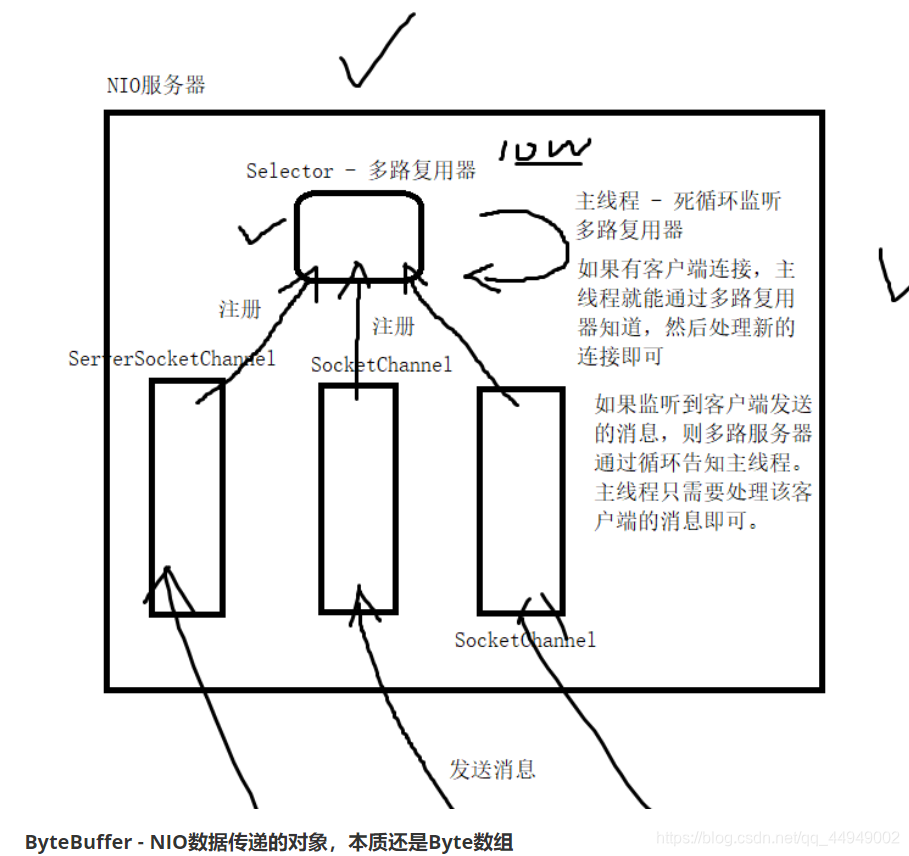

ByteBuffer - NIO数据传递的对象,本质还是Byte数组
[外链图片转存失败,源站可能有防盗链机制,建议将图片保存下来直接上传(img-qRPPExJe-1629036777488)(img/image-20200724113948220.png)]
使用NIO编写一个本地的文件拷贝
/*** 文件拷贝的demo - NIO*/
public class Demo {public static void main(String[] args)  {try (FileChannel inChannel = new FileInputStream("C:\\Users\\Ken\\Pictures\\Saved Pictures\\奥格瑞玛.jpg").getChannel();FileChannel outChannel = new FileOutputStream("C:\\Users\\Ken\\Desktop\\a.jpg").getChannel();) {//准备ByteBufferByteBuffer byteBuffer = ByteBuffer.allocate(10 * 1024);//位置为0  容量最大 界限指到容量//循环写入数据到byteBufferwhile (inChannel.read(byteBuffer) != -1) {//byteBuffer  位置指向写入的数据的末端 容量最大 界限指到容量byteBuffer.flip();//将界限移动到位置的地方,位置重置为0 -- 为读取数据做准备//读取byteBuffer的数据,写入输出管道outChannel.write(byteBuffer);//重置byteBufferbyteBuffer.clear(); // 将界限移动到容量的位置,位置重置为0 -- 为写入数据做准备}} catch (Exception e) {e.printStackTrace();}}
}
使用NIO实现一个消息群发的功能
服务器
public class NioServer {public static void main(String[] args) throws IOException {List<SocketChannel> socketChannels = new ArrayList<>();//创建一个服务端的ChannelServerSocketChannel serverSocketChannel = ServerSocketChannel.open();//绑定端口serverSocketChannel.bind(new InetSocketAddress(9999));//设置Channel的类型serverSocketChannel.configureBlocking(false);//设置当前Channel为非阻塞模式//创建一个多路复用器Selector selector = Selector.open();//将Channel注册到多路复用器上serverSocketChannel.register(selector, SelectionKey.OP_ACCEPT);//注册到多路复用器,注册的动作为(等待客户端连接)//主线程轮询多路复用器while(true){//询问多路复用器是否有准备好的动作int select = selector.select();if(select > 0){//有客户端进行了某些操作//SelectionKey - 封装(channel, 动作)Set<SelectionKey> selectionKeys = selector.selectedKeys();//从多路复用器中,返回有动作的Channel集合//循环处理channelfor (SelectionKey selectionKey : new HashSet<>(selectionKeys)) {//从集合中移除该channelselectionKeys.remove(selectionKey);//判断当前发生了什么动作if (selectionKey.isAcceptable()){//说明有一个新的客户端连接了!ServerSocketChannel serverChannel = (ServerSocketChannel) selectionKey.channel();//等待客户端连接SocketChannel socketChannel = serverChannel.accept();System.out.println("接收到客户端的连接!!!!");//将客户端的Channel注册到多路复用器上socketChannel.configureBlocking(false);//非阻塞模式socketChannel.register(selector, SelectionKey.OP_READ);//注册多路复用器//保存管理客户端的Channel集合socketChannels.add(socketChannel);} else if(selectionKey.isReadable()){//说明有一个客户端发送了消息SocketChannel socketChannel = (SocketChannel) selectionKey.channel();//读取channel中的数据ByteBuffer byteBuffer = ByteBuffer.allocate(10 * 1024);socketChannel.read(byteBuffer);//群发for (SocketChannel otherChannel : socketChannels) {if (otherChannel != socketChannel) {//排除本人byteBuffer.flip();//bytebuffer读取准备otherChannel.write(byteBuffer);}}byteBuffer.flip();byte[] bytes = byteBuffer.array();System.out.println("接收到客户端的数据:" + new String(bytes) + ", 群发给其他的客户端");}}}}}
}
客户端
public class NioClient {public static void main(String[] args) throws IOException {SocketChannel socketChannel = SocketChannel.open();socketChannel.connect(new InetSocketAddress("127.0.0.1", 9999));socketChannel.configureBlocking(true);//设置为阻塞模式//开启子线程处理服务器的读请求new Thread(() -> {try {while (true) {ByteBuffer byteBuffer = ByteBuffer.allocate(10 * 1024);socketChannel.read(byteBuffer);//打印数据byteBuffer.flip();byte[] array = byteBuffer.array();System.out.println("读取到服务器的消息:" + new String(array));}} catch (Exception e){System.out.println("服务器读取异常!");}}).start();//主线程本身 - 死循环 写入Scanner scanner = new Scanner(System.in);while(true){System.out.println("请输入需要群发的消息:");String content = scanner.next();//String -> byte[] -> ByteBufferByteBuffer byteBuffer = ByteBuffer.allocate(1024 * 10);byteBuffer.put(content.getBytes(), 0, content.getBytes().length);byteBuffer.flip();socketChannel.write(byteBuffer);}}
}
四、Netty的基本使用
1、添加依赖
<dependency><groupId>io.netty</groupId><artifactId>netty-all</artifactId><version>4.1.49.Final</version>
</dependency>
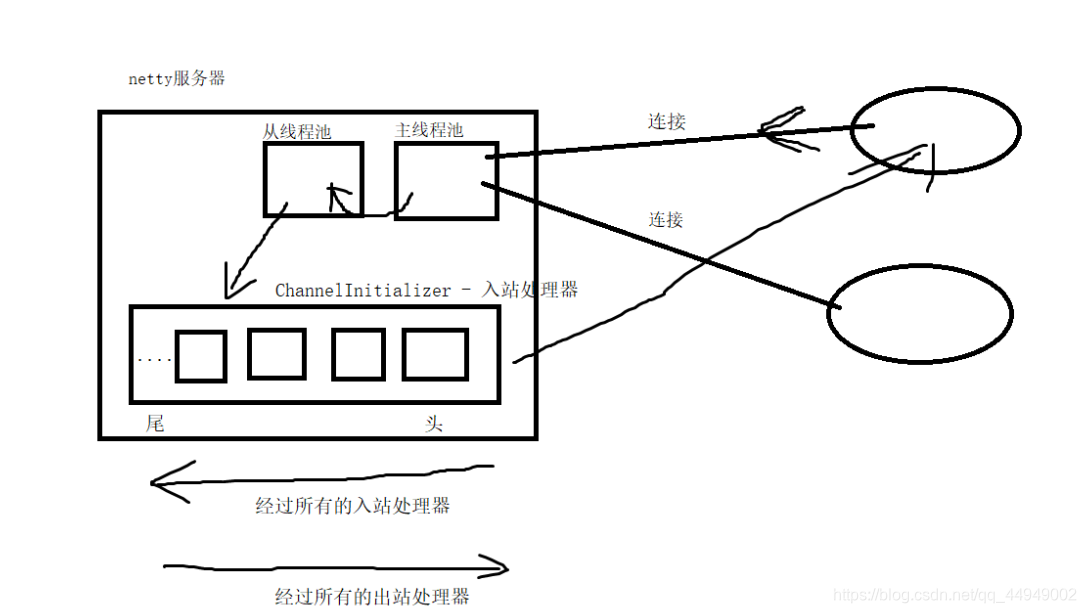
Netty线程模型
* Netty的线程模型
* 1、单线程模型 - 1个线程处理所有客户端的连接和数据读取
* 2、多线程模型 - 1个线程处理客户端的连接、线程池处理客户端数据的读写
* 3、主从线程池模型 - 主线程池处理客户端的连接、从线程池处理客户端数据的读写
4.1 Netty的ChannelHandler
入站消息处理器:ChannelInboundHandlerAdapter(SimpleChannelInboundHandler)
出站消息处理器:ChannelOutboundHandlerAdapter
处理器链:
编解码器:
什么是编解码器?
编解码器就是netty用来对消息格式转换的工具类
本质上编解码器就是入站出站消息的处理器。解码器 -> 入站消息,编码器 -> 出站消息
常用的编码解码器
StringDecoder - String的解码器
StringEncoder - String的编码器
LineBasedFrameDecoder - 按照行进行拆包的解码器
TCP的拆包和粘包
什么是拆包?-在一个TCP请求中,一个完整的消息,可能被拆分成多个消息处理
什么是粘包?-在一个TCP请求中,多个消息可能被粘在一起,成为一个消息处理
4.2 Netty对Http协议的支持
什么是HTTP协议?
本质上就是一个按照固定规则编写的字符串(请求行、请求头、请求体,响应码,响应头,响应体)
Netty处理Http请求的编解码器
Http服务端使用:
HttpRequestDecoder - Http请求的解码器
HttpResponseEncoder - Http响应的编码器
HttpServerCodec - 上面两个编解码器的集合体Http客户端使用:
HttpRequestEncoder - Http请求的编码器
HttpResponseDocoder - Http响应的解码器
HttpClientCodec - 上面两个编解码器的集合体
使用了HttpServerCodec 之后,消息就会被拆解成为:
HttpRequest(请求行、请求头)、HttpContent、LastHttpContent(请求体)
Netty编写Http文件服务器
package com.qf.httpfileserver;import io.netty.bootstrap.ServerBootstrap;
import io.netty.channel.Channel;
import io.netty.channel.ChannelInitializer;
import io.netty.channel.ChannelPipeline;
import io.netty.channel.EventLoopGroup;
import io.netty.channel.nio.NioEventLoopGroup;
import io.netty.channel.socket.nio.NioServerSocketChannel;
import io.netty.handler.codec.http.HttpObjectAggregator;
import io.netty.handler.codec.http.HttpServerCodec;
import io.netty.handler.stream.ChunkedWriteHandler;/*** 基于Netty实现的一个HTTP文件服务器*/
public class HttpFileServer {public static void main(String[] args) {EventLoopGroup master = new NioEventLoopGroup();EventLoopGroup slave = new NioEventLoopGroup();ServerBootstrap serverBootstrap = new ServerBootstrap().group(master, slave).channel(NioServerSocketChannel.class).childHandler(new ChannelInitializer() {@Overrideprotected void initChannel(Channel ch) throws Exception {//自定义处理器ChannelPipeline pipeline = ch.pipeline();//添加分片文件处理的编码器pipeline.addLast(new ChunkedWriteHandler());//Http服务器使用//一旦使用了Http的编解码器,后续的消息就会变成3个对象,HttpRequest,HttpContent(N个),LastHttpContentpipeline.addLast(new HttpServerCodec());//这是一个Http请求的聚合器,该聚合器会将所有的HttpRequest、HttpContent、LastHttpContent聚合成为一个FullHttpRequest对象pipeline.addLast(new HttpObjectAggregator(10 * 1024 * 1024));pipeline.addLast(new MyFileChannelHandler());}});//绑定端口try {serverBootstrap.bind(8080).sync();System.out.println("端口绑定成功,服务已经启动!");} catch (InterruptedException e) {e.printStackTrace();}}
}
package com.qf.httpfileserver;import io.netty.channel.ChannelFuture;
import io.netty.channel.ChannelFutureListener;
import io.netty.channel.ChannelHandlerContext;
import io.netty.channel.SimpleChannelInboundHandler;
import io.netty.handler.codec.http.*;
import io.netty.handler.stream.ChunkedFile;import java.io.File;
import java.io.IOException;
import java.net.URLDecoder;
import java.nio.charset.Charset;
import java.util.Arrays;/*** Http请求处理器*/
public class MyFileChannelHandler extends SimpleChannelInboundHandler<FullHttpRequest> {//本地开发的路径urlprivate String path = "C:\\worker\\Linux";@Overrideprotected void channelRead0(ChannelHandlerContext ctx, FullHttpRequest request) throws Exception {//获得请求类型HttpMethod method = request.method();//只接受Get请求if (!method.name().equalsIgnoreCase("GET")) {//非GET请求setError(ctx, "请求类型异常!");return;}//获得请求的URLString uri = request.uri();//解码uri = URLDecoder.decode(uri, "UTF-8");System.out.println("请求的url:" + uri);//判断请求的uri是否存在File file = new File(path, uri);if (!file.exists()){//请求的路径不存在setError(ctx, "请求的路径不存在,请不要乱来!");return;}//判断请求的文件类型if(file.isFile()){//请求的是文件,进行下载fileHandler(ctx, file);} else {//请求的是文件夹,返回该文件夹下的文件列表dirHandler(ctx, file, uri);}}/*** 文件的处理方式* @param ctx* @param file*/private void fileHandler(ChannelHandlerContext ctx, File file){//下载该文件 - 读取该文件//编写响应行 响应头FullHttpResponse response = new DefaultFullHttpResponse(HttpVersion.HTTP_1_1, HttpResponseStatus.OK);//响应体的内容if (file.getName().endsWith(".jpg") || file.getName().endsWith(".png")) {response.headers().add("Content-Type", "image/jpeg");} else {response.headers().add("Content-Type", "application/octet-stream");}//响应体的大小response.headers().add("Content-Length", file.length());//返回响应头和响应码给客户端ctx.writeAndFlush(response);//下载的文件(响应体)分块传递给客户端try {ChunkedFile cFile = new ChunkedFile(file, 1024 * 10);ChannelFuture channelFuture = ctx.writeAndFlush(cFile);channelFuture.addListener(new ChannelFutureListener() {@Overridepublic void operationComplete(ChannelFuture future) throws Exception {if (future.isSuccess()){System.out.println("文件下载完成!");ctx.close();}}});} catch (IOException e) {e.printStackTrace();}}/*** 路径的处理方式*/private void dirHandler(ChannelHandlerContext ctx, File file, String uri){StringBuilder sb = new StringBuilder();sb.append("<ul>");//获取该路径下的所有子文件File[] files = file.listFiles();Arrays.stream(files).forEach(f -> {sb.append("<li><a href='").append(uri.equals("/") ? "" : uri).append("/").append(f.getName()).append("'>").append("(").append(f.isFile() ? "文件" : "文件夹").append(")").append(f.getName()).append("</a></li>");});sb.append("</ul>");//响应给客户端FullHttpResponse response = new DefaultFullHttpResponse(HttpVersion.HTTP_1_1, HttpResponseStatus.OK);response.headers().add("Content-Type", "text/html;charset=utf-8");response.content().writeBytes(sb.toString().getBytes(Charset.forName("UTF-8")));//返回响应ctx.writeAndFlush(response);//关闭连接ctx.close();}/*** 返回错误页面*/private void setError(ChannelHandlerContext ctx, String errorMsg) {//响应给客户端FullHttpResponse response = new DefaultFullHttpResponse(HttpVersion.HTTP_1_1, HttpResponseStatus.BAD_REQUEST);response.headers().add("Content-Type", "text/html;charset=utf-8");response.content().writeBytes(errorMsg.getBytes(Charset.forName("UTF-8")));//返回响应ctx.writeAndFlush(response);//关闭连接ctx.close();}
}
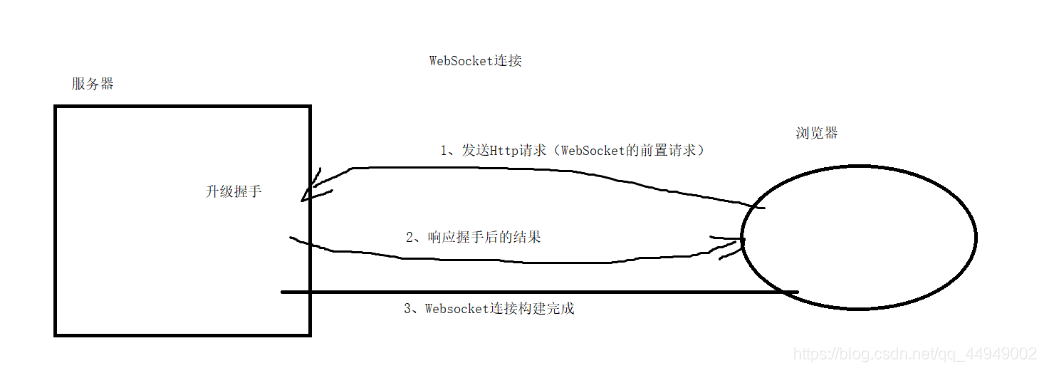
4.3 Netty对WebSocket协议的支持
什么是WebSocket协议?
WebSocket是一种基于TCP协议的长连接协议,简单来说,就是客户端和服务器可以随意发送消息。
优势:可以直接在浏览器和服务器之间构建长连接(也支持程序和程序之间构建长连接)
WebSocket协议的构建构成
WebSocket的数据帧
数据帧:
文本帧
二进制帧
文本+二进制帧状态帧:
ping帧
pong帧
close帧
Netty搭建一个WebSocket服务器
服务端:
package com.qf.websocket;import io.netty.bootstrap.ServerBootstrap;
import io.netty.channel.Channel;
import io.netty.channel.ChannelInitializer;
import io.netty.channel.ChannelPipeline;
import io.netty.channel.EventLoopGroup;
import io.netty.channel.nio.NioEventLoopGroup;
import io.netty.channel.socket.nio.NioServerSocketChannel;
import io.netty.handler.codec.http.HttpObjectAggregator;
import io.netty.handler.codec.http.HttpServerCodec;
import io.netty.handler.codec.http.websocketx.WebSocketServerProtocolHandler;public class WebSocketServer {public static void main(String[] args) {EventLoopGroup master = new NioEventLoopGroup();EventLoopGroup slave = new NioEventLoopGroup();ServerBootstrap serverBootstrap = new ServerBootstrap().group(master, slave).channel(NioServerSocketChannel.class).childHandler(new ChannelInitializer() {@Overrideprotected void initChannel(Channel ch) throws Exception {//自定义处理器ChannelPipeline pipeline = ch.pipeline();//Http服务器使用//一旦使用了Http的编解码器,后续的消息就会变成3个对象,HttpRequest,HttpContent(N个),LastHttpContentpipeline.addLast(new HttpServerCodec());//这是一个Http请求的聚合器,该聚合器会将所有的HttpRequest、HttpContent、LastHttpContent聚合成为一个FullHttpRequest对象pipeline.addLast(new HttpObjectAggregator(10 * 1024 * 1024));//WebSocket升级握手的编解码器//该编解码器的作用//1、进行websocket的握手升级//2、自动处理客户端发送的所有状态帧pipeline.addLast(new WebSocketServerProtocolHandler("/"));//后续的消息,都是数据帧pipeline.addLast(new MyWebSocketHandler());}});//绑定端口try {serverBootstrap.bind(8080).sync();System.out.println("端口绑定成功,服务已经启动!");} catch (InterruptedException e) {e.printStackTrace();}}
}
客户端(浏览器):
var ws;//连接服务器
function conn(){if(window.WebSocket){//浏览器支持WebSocket协议ws = new WebSocket("ws://127.0.0.1:8080/");//设置websocket的回调方法ws.onopen = function (){//websocket连接成功后触发console.log("服务器连接成功!");$("#chatlist").append("<font color='green'>服务器连接成功!</font><br/>");}ws.onerror = function(){//连接异常时触发console.log("服务器连接异常!!");$("#chatlist").append("<font color='red'>服务器连接异常!</font><br/>");}ws.onclose = function(){//连接关闭时触发console.log("服务器连接已经关闭!!");$("#chatlist").append("<font color='red'>服务器连接关闭!</font><br/>");}ws.onmessage = function(data){//服务器给客户端发消息时触发console.log("接收到服务器的消息:" + data.data);$("#chatlist").append("<font color='blueviolet'>服务器:" + data.data + "</font><br/>");}} else {alert("骚瑞,浏览器不支持WebSocket协议,请换个电脑!");}
}/*** 发送消息给服务器*/
function sendMsg(){var text = $("#sendInput").val();$("#sendInput").val("");//将内容写入div$("#chatlist").append("<font color='blue'>我:" + text + "</font><br/>");ws.send(text);
}
客户端的重连与心跳机制:
重连的实现:
//重连方法
function reconn(){console.log("重新连接服务器!!!");setTimeout(function(){//重连conn();}, 10000);
}......
ws.onclose = function(){//连接关闭时触发console.log("服务器连接已经关闭!!");//开始重连reconn();
}
心跳的实现:
1、什么时候发送心跳?
2、如何循环发送心跳?
3、如果收不到心跳回复,如何关闭连接进行重连?
4、在线要发送心跳,离线就停止发送心跳
//定时关闭方法
var closeTimeout;
function closeConn(){closeTimeout = setTimeout(function(){//关闭服务器的连接ws.close();}, 10000);
}//心跳的实现
var heartTimeout;
function heart(){//循环发送心跳heartTimeout = setTimeout(function(){console.log("发送心跳信息.....");ws.send("heart");heart();}, 5000);}...
//设置websocket的回调方法
ws.onopen = function (){//websocket连接成功后触发console.log("服务器连接成功!");//开始发送心跳heart();//定时关闭连接closeConn();
}...
ws.onclose = function(){//连接关闭时触发console.log("服务器连接已经关闭!!");//停止心跳发送if(heartTimeout){clearTimeout(heartTimeout);}
}
4.4 Netty的集群构建
Netty集群的搭建:
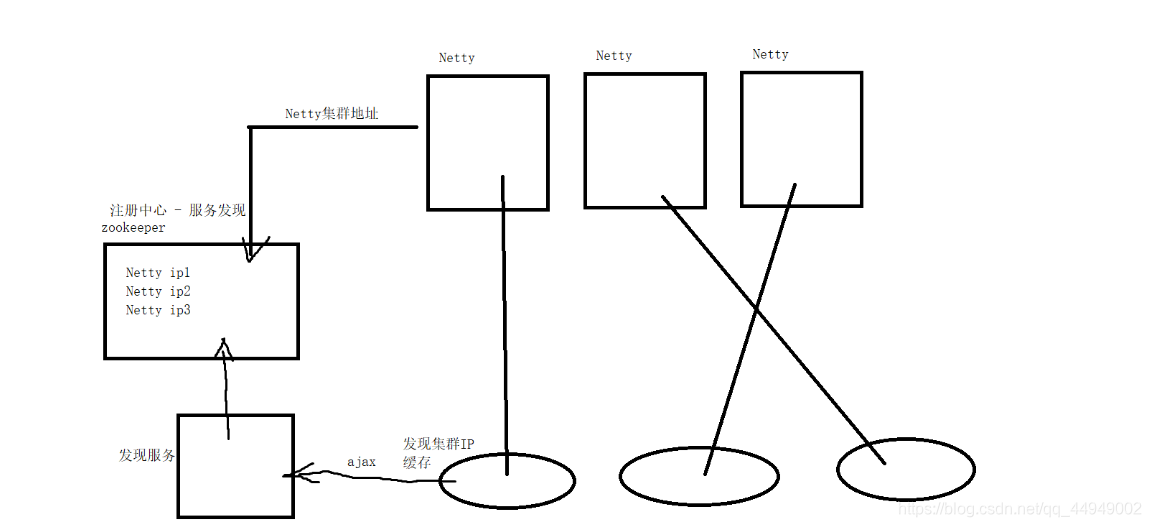
Netty服务器Channel管理的方案:

Netty集群发行消息的方案:
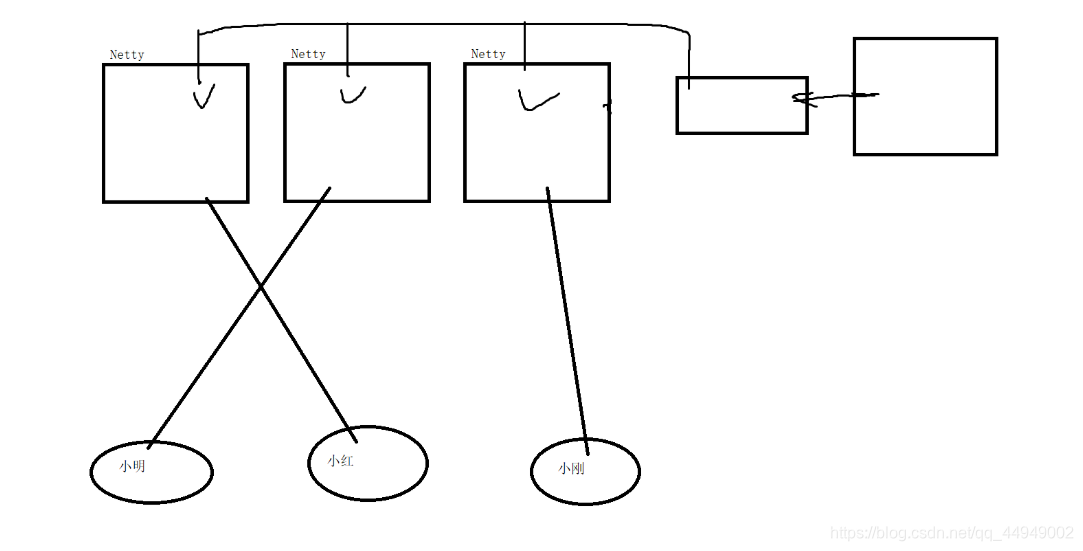
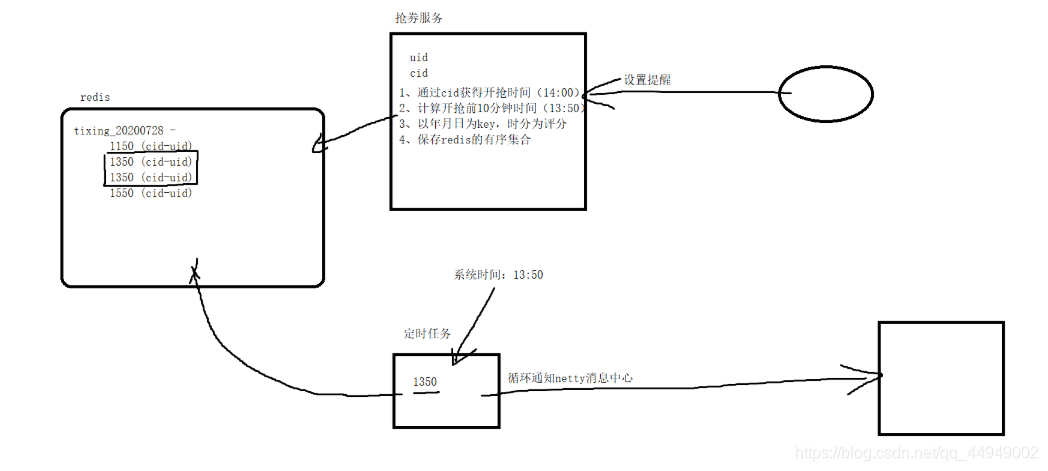
五、消息中心的设计方案与实现