0.简介
快过年了,这里打算以这一篇博文作为结尾,来迎向2022春节。同时也希望新的一年能够继续不断提升自我。
1. 系统介绍
本文提出了一种紧耦合的雷达视觉惯导SLAM系统,可以实时高精度鲁棒的进行状态估计和建图。
LVI-SAM构建在因子图之上,由两个子系统组成:
- 一个视觉惯导系统
- 一个激光惯导系统。
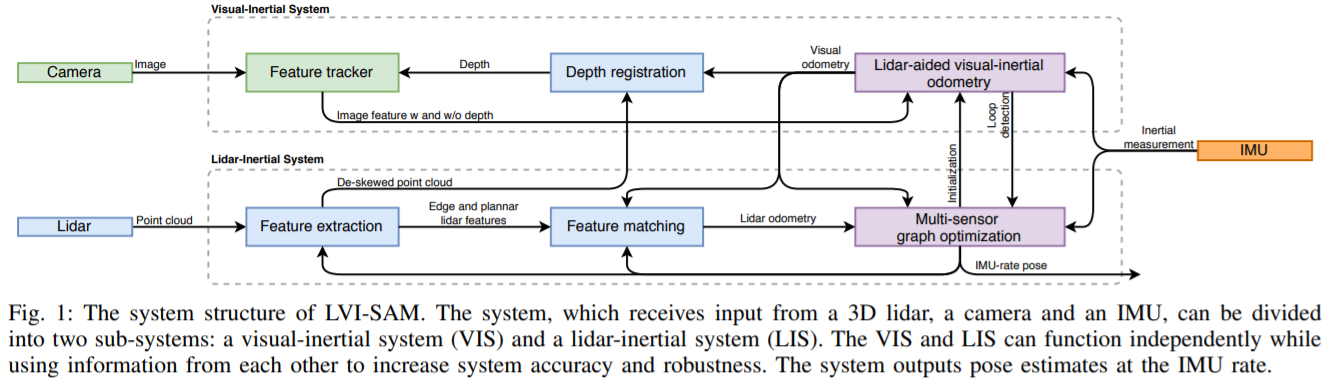
下面是LVI-SAM的整体流程图,通过视觉里程计和激光里程计两个子系统紧耦合的方法组成该系统。下面是该融合系统核心点:
- 视觉惯导系统利用 激 光 惯 导 的 估 计 来 做 初 始 化 \color{red}{激光惯导的估计来做初始化} 激光惯导的估计来做初始化。
- 视觉惯导系统利用激光雷达的测量给 视 觉 特 征 提 供 深 度 来 提 升 精 度 \color{red}{视觉特征提供深度来提升精度} 视觉特征提供深度来提升精度。
- 同时激光惯导系统利用 视 觉 惯 导 的 估 计 值 作 为 初 值 来 做 帧 的 匹 配 \color{red}{视觉惯导的估计值作为初值来做帧的匹配} 视觉惯导的估计值作为初值来做帧的匹配。
- 利用 视 觉 做 闭 环 检 测 , 把 检 测 的 结 果 给 激 光 惯 导 系 统 来 做 优 化 \color{red}{视觉做闭环检测,把检测的结果给激光惯导系统来做优化} 视觉做闭环检测,把检测的结果给激光惯导系统来做优化。
LVI-SAM中提到的紧耦合雷达视觉惯导里程计,LIS系统和VIS系统可以独立的运行(当一个系统失败的时候),也可以耦合在一起(当检测到很多特征点的时候)。
这样的设计可以有效地避免激光雷达子系统或者视觉子系统失效时带来的失效问题,极大的提升了系统在缺少纹理或者特征场景中的鲁棒性。因为单纯基于雷达的SLAM系统虽然可以获取很长范围的环境的细节,但是在缺少结构信息的场景中很容易失效。例如长走廊或者是开阔的广场。
基于视觉的方法在纹理信息丰富的场景中表现良好,而且很容易做场景重识别。但是他们对光照的变化,快速运动和初始化很敏感。因此,激光和视觉经常和惯导融合来提升他们的精度和鲁棒性。惯导可以帮助去除点云的运动畸变,而且在缺少特征的环境中撑一小段时间,同时可以帮助视觉系统恢复尺度信息。
2. 详细阐述
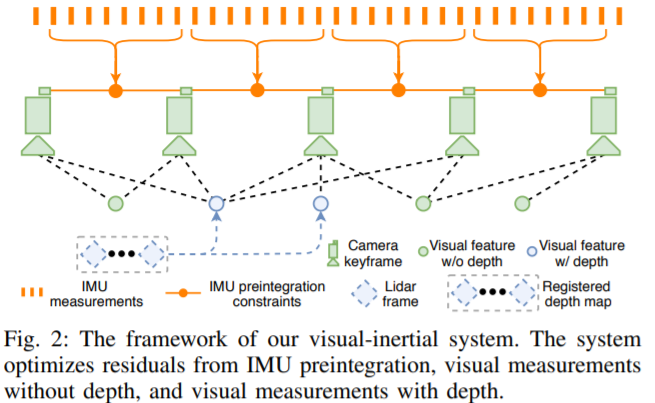
视觉惯导系统执行利用雷达帧恢复深度的视觉特征的跟踪,其中图像和IMU为必选输入项,而雷达里程计的系统状态量是可选输入项。通过优化视觉重投影误差和imu测量误差的视觉里程计为激光雷达的scan-matching提供初值。之后把约束加入到因子图中。当利用imu把点云的畸变去除后,激光惯导系统检测点云的边缘和平面特征,并和保存在滑窗中的features map对齐,通过最小化检测到的线面特征到特征图的距离得到激光里程计。LIS系统估计得到的系统状态量可以传到VIS系统中做初始化。
对于闭环,候选的匹配帧通过视觉的词袋模型得到,在LIS系统中做优化。来自视觉里程计,激光里程计,imu预积分和闭环的约束都会放到因子图中,因子图保存在一个滑窗中来实时的执行。利用iSAM2来优化因子图中IMU预积分,视觉里程计,激光里程计和闭环的约束的残差。最后,优化得到的IMU的bias用来递推给出IMU频率的位姿。
2.1 激光惯导参与视觉惯导初始化
在LVI-SAM中视觉部分是VINS-MONO,这一块初始化操作通过视觉特征利用角点检测器,利用KLT光流算法进行跟踪后,在VINS-MONO中是采用SFM来实现逆深度化的。但是在LVI-SAM中是视觉里程计对齐激光帧的点云得到一个稀疏的深度图来得到特征的深度完成视觉惯导初始化。
基于优化的VIO系统由于很强的非线性导致初始化发散。初始化的质量取决于两个主要因素:初始化的传感器运动和IMU参数的精度。在实际的实验中,我们发现VINS很容易在系统速度很小或者匀速的时候初始化失败(这一块在VINS-FUSION中有所改善)。这是由于加速度激励不够大导致尺度不可观。IMU的参数包含渐变的bias和高斯白噪声。他影响这加速度和角速度的测量,在初始化的时候好的初值可以帮助系统快速的优化。
在VINS-MONO中状态 x x x由如下公式推出 x = [ R , p , v , b ] x=[R,p,v,b] x=[R,p,v,b],其中 R R R是SO3的旋转矩阵, p p p是当前机器人位置, v v v表示当前速度, b b b表示imu的加速度偏置和陀螺仪偏置。而为了改善VIS初始化的鲁棒性,文中利用LIS系统来估计系统的状态 x x x和imu的偏置 b b b。因为直接可以通过雷达的观测得到深度信息。我们首先初始化LIS系统获得 x x x和 b b b,并将其作为VIS初始值,这很有效的改善初始化的速度和鲁棒性。
// 3.1.提取当前图像帧的特征点数据map<int, vector<pair<int, Eigen::Matrix<double, 8, 1>>>> image;for (unsigned int i = 0; i < img_msg->points.size(); i++){int v = img_msg->channels[0].values[i] + 0.5;int feature_id = v / NUM_OF_CAM;int camera_id = v % NUM_OF_CAM;// 归一化坐标double x = img_msg->points[i].x;double y = img_msg->points[i].y;double z = img_msg->points[i].z;// 像素坐标double p_u = img_msg->channels[1].values[i];double p_v = img_msg->channels[2].values[i];// 特征点速度(归一化平面)double velocity_x = img_msg->channels[3].values[i];double velocity_y = img_msg->channels[4].values[i];// 深度(通过激光点云得到的)double depth = img_msg->channels[5].values[i];ROS_ASSERT(z == 1);Eigen::Matrix<double, 8, 1> xyz_uv_velocity_depth;xyz_uv_velocity_depth << x, y, z, p_u, p_v, velocity_x, velocity_y, depth;image[feature_id].emplace_back(camera_id, xyz_uv_velocity_depth);}// 3.2.从激光里程计中获取先验位姿// Get initialization info from lidar odometryvector<float> initialization_info;m_odom.lock();initialization_info = odomRegister->getOdometry(odomQueue, img_msg->header.stamp.toSec() + estimator.td);m_odom.unlock();// 3.3.处理图像数据(初始化, 非线性优化)estimator.processImage(image, initialization_info, img_msg->header);
然后在processImage函数中存在initialStructure用于初始化,此处传入了image和initialization_info参数
// 视觉惯导联合初始化
bool Estimator::initialStructure()
{// Lidar initialization{bool lidar_info_available = true;// clear key frame in the container        for (map<double, ImageFrame>::iterator frame_it = all_image_frame.begin(); frame_it != all_image_frame.end(); frame_it++)frame_it->second.is_key_frame = false;// check if lidar info in the window is validfor (int i = 0; i <= WINDOW_SIZE; i++){if (all_image_frame[Headers[i].stamp.toSec()].reset_id < 0 || all_image_frame[Headers[i].stamp.toSec()].reset_id != all_image_frame[Headers[0].stamp.toSec()].reset_id){// lidar odometry not available (id=-1) or lidar odometry relocated due to pose correctionlidar_info_available = false;ROS_INFO("Lidar initialization info not enough.");break;}}if (lidar_info_available == true){// Update statefor (int i = 0; i <= WINDOW_SIZE; i++){Ps[i] = all_image_frame[Headers[i].stamp.toSec()].T;Rs[i] = all_image_frame[Headers[i].stamp.toSec()].R;Vs[i] = all_image_frame[Headers[i].stamp.toSec()].V;Bas[i] = all_image_frame[Headers[i].stamp.toSec()].Ba;Bgs[i] = all_image_frame[Headers[i].stamp.toSec()].Bg;pre_integrations[i]->repropagate(Bas[i], Bgs[i]);all_image_frame[Headers[i].stamp.toSec()].is_key_frame = true;}// update gravityg = Eigen::Vector3d(0, 0, all_image_frame[Headers[0].stamp.toSec()].gravity);// reset all featuresVectorXd dep = f_manager.getDepthVector();for (int i = 0; i < dep.size(); i++)dep[i] = -1;f_manager.clearDepth(dep);// triangulate all featuresVector3d TIC_TMP[NUM_OF_CAM];for(int i = 0; i < NUM_OF_CAM; i++)TIC_TMP[i].setZero();ric[0] = RIC[0];f_manager.setRic(ric);f_manager.triangulate(Ps, &(TIC_TMP[0]), &(RIC[0]));return true;}}
........
此处的all_image_frame类型为ImageFrame,具体函数如下面的code:
class ImageFrame
{public:ImageFrame(){};ImageFrame(const map<int, vector<pair<int, Eigen::Matrix<double, 8, 1>>>>& _points, const vector<float> &_lidar_initialization_info,double _t):t{_t}, is_key_frame{false}, reset_id{-1}, gravity{9.805}{points = _points;// reset id in case lidar odometry relocatereset_id = (int)round(_lidar_initialization_info[0]);// PoseT.x() = _lidar_initialization_info[1];T.y() = _lidar_initialization_info[2];T.z() = _lidar_initialization_info[3];// RotationEigen::Quaterniond Q = Eigen::Quaterniond(_lidar_initialization_info[7],_lidar_initialization_info[4],_lidar_initialization_info[5],_lidar_initialization_info[6]);R = Q.normalized().toRotationMatrix();// VelocityV.x() = _lidar_initialization_info[8];V.y() = _lidar_initialization_info[9];V.z() = _lidar_initialization_info[10];// Acceleration biasBa.x() = _lidar_initialization_info[11];Ba.y() = _lidar_initialization_info[12];Ba.z() = _lidar_initialization_info[13];// Gyroscope biasBg.x() = _lidar_initialization_info[14];Bg.y() = _lidar_initialization_info[15];Bg.z() = _lidar_initialization_info[16];// Gravitygravity = _lidar_initialization_info[17];};map<int, vector<pair<int, Eigen::Matrix<double, 8, 1>> > > points;double t;IntegrationBase *pre_integration; // imu预积分bool is_key_frame; // 是否在滑动窗口内// Lidar odometry infoint reset_id;// 通过视觉得到的预积分Vector3d T; // p^c0_ckMatrix3d R; // q^c0_bkVector3d V;Vector3d Ba;Vector3d Bg;double gravity;
};
2.2 激光雷达给视觉提高深度
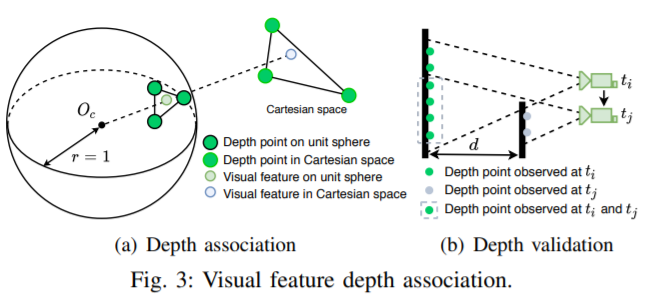
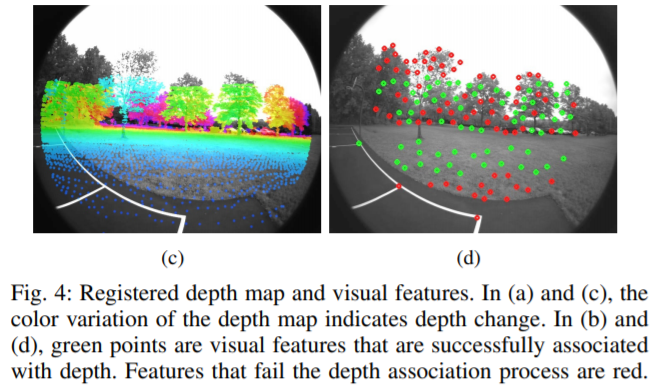
根据VIS初始化的结果,我们利用视觉里程计对齐视觉帧和雷达帧。由于当前的3D lidar扫描的是稀疏的点,我们把多帧激光点云组合起来得到一个稠密的深度图。为了把特征和深度值关联起来,我们把视觉特征和雷达点投影到以相机为圆心的单位圆上。然后对深度点进行降采样并利用极坐标进行保存保证点的密度是常数的。我们利用二维的KD-tree(极坐标)来找视觉特征点周围最近的三个点,最后特征点的深度计算的是相机中心和特征点的连线的长度,这条线和三个深度点得到的平面在笛卡尔坐标系中有交点。通过检查和特征点最近的三个深度点之间的距离来进一步验证关联的特征深度,如果最大距离大于2m,就不对该特征点进行数据关联。
 sensor_msgs::ChannelFloat32 get_depth(const ros::Time& stamp_cur, const cv::Mat& imageCur, const pcl::PointCloud<PointType>::Ptr& depthCloud,const camodocal::CameraPtr& camera_model ,const vector<geometry_msgs::Point32>& features_2d) // 去畸变后的归一化坐标 xy1{// 0.1 initialize depth for return 深度通道, 用于作为结果返回sensor_msgs::ChannelFloat32 depth_of_point;depth_of_point.name = "depth";depth_of_point.values.resize(features_2d.size(), -1);// 0.2  check if depthCloud availableif (depthCloud->size() == 0)return depth_of_point;// 0.3 监听tf,获取图像输入时刻的"vins_world","vins_body_ros"之前的坐标系转换try{listener.waitForTransform("vins_world", "vins_body_ros", stamp_cur, ros::Duration(0.01));listener.lookupTransform("vins_world", "vins_body_ros", stamp_cur, transform);} catch (tf::TransformException ex){// ROS_ERROR("image no tf");return depth_of_point;}double xCur, yCur, zCur, rollCur, pitchCur, yawCur;xCur = transform.getOrigin().x();yCur = transform.getOrigin().y();zCur = transform.getOrigin().z();tf::Matrix3x3 m(transform.getRotation());m.getRPY(rollCur, pitchCur, yawCur);Eigen::Affine3f transNow = pcl::getTransformation(xCur, yCur, zCur, rollCur, pitchCur, yawCur);// 0.4 通过相机的全局位姿,把激光点云转换到图像的坐标系中pcl::PointCloud<PointType>::Ptr depth_cloud_local(new pcl::PointCloud<PointType>());pcl::transformPointCloud(*depthCloud, *depth_cloud_local, transNow.inverse());// 0.5 特征点投影到单位球上,把点的表示转到ros标准下pcl::PointCloud<PointType>::Ptr features_3d_sphere(new pcl::PointCloud<PointType>());for (int i = 0; i < (int)features_2d.size(); ++i){// normalize 2d feature to a unit sphereEigen::Vector3f feature_cur(features_2d[i].x, features_2d[i].y, features_2d[i].z); // z always equal to 1feature_cur.normalize();// convert to ROS standardPointType p;p.x =  feature_cur(2);p.y = -feature_cur(0);p.z = -feature_cur(1);p.intensity = -1; // intensity will be used to save depthfeatures_3d_sphere->push_back(p);}// 3. 求出激光点云中所有满足要求点的距离,保存在rangeImage中float bin_res = 180.0 / (float)num_bins; // currently only cover the space in front of lidar (-90 ~ 90)cv::Mat rangeImage = cv::Mat(num_bins, num_bins, CV_32F, cv::Scalar::all(FLT_MAX));for (int i = 0; i < (int)depth_cloud_local->size(); ++i){PointType p = depth_cloud_local->points[i];// filter points not in camera viewif (p.x < 0 || abs(p.y / p.x) > 10 || abs(p.z / p.x) > 10)continue;// find row id in range imagefloat row_angle = atan2(p.z, sqrt(p.x * p.x + p.y * p.y)) * 180.0 / M_PI + 90.0; // degrees, bottom -> up, 0 -> 360int row_id = round(row_angle / bin_res);// find column id in range imagefloat col_angle = atan2(p.x, p.y) * 180.0 / M_PI; // degrees, left -> right, 0 -> 360int col_id = round(col_angle / bin_res);// id may be out of boundaryif (row_id < 0 || row_id >= num_bins || col_id < 0 || col_id >= num_bins)continue;// only keep points that's closerfloat dist = pointDistance(p);if (dist < rangeImage.at<float>(row_id, col_id)){rangeImage.at<float>(row_id, col_id) = dist;pointsArray[row_id][col_id] = p;}}// 4. 发布处理后的激光点云(应该是为了rviz显示)pcl::PointCloud<PointType>::Ptr depth_cloud_local_filter2(new pcl::PointCloud<PointType>());for (int i = 0; i < num_bins; ++i){for (int j = 0; j < num_bins; ++j){if (rangeImage.at<float>(i, j) != FLT_MAX)depth_cloud_local_filter2->push_back(pointsArray[i][j]);}}*depth_cloud_local = *depth_cloud_local_filter2;publishCloud(&pub_depth_cloud, depth_cloud_local, stamp_cur, "vins_body_ros");// 5. 过滤后的激光点云投影在单位球上,如果过滤后点云过少就不进行后续处理pcl::PointCloud<PointType>::Ptr depth_cloud_unit_sphere(new pcl::PointCloud<PointType>());for (int i = 0; i < (int)depth_cloud_local->size(); ++i){PointType p = depth_cloud_local->points[i];float range = pointDistance(p);p.x /= range;p.y /= range;p.z /= range;p.intensity = range;depth_cloud_unit_sphere->push_back(p);}if (depth_cloud_unit_sphere->size() < 10)return depth_of_point;// 6. 把处理后的激光点云加入KD-tree中pcl::KdTreeFLANN<PointType>::Ptr kdtree(new pcl::KdTreeFLANN<PointType>());kdtree->setInputCloud(depth_cloud_unit_sphere);// 7. 计算特征点的深度。在单位球上找到3个最近的激光点云,并且最远距离小于dist_sq_threshold,使用两个向量叉积计算出平面的法向量,然后求解点到面的距离svector<int> pointSearchInd;vector<float> pointSearchSqDis;float dist_sq_threshold = pow(sin(bin_res / 180.0 * M_PI) * 5.0, 2);for (int i = 0; i < (int)features_3d_sphere->size(); ++i){kdtree->nearestKSearch(features_3d_sphere->points[i], 3, pointSearchInd, pointSearchSqDis);if (pointSearchInd.size() == 3 && pointSearchSqDis[2] < dist_sq_threshold){float r1 = depth_cloud_unit_sphere->points[pointSearchInd[0]].intensity;Eigen::Vector3f A(depth_cloud_unit_sphere->points[pointSearchInd[0]].x * r1,depth_cloud_unit_sphere->points[pointSearchInd[0]].y * r1,depth_cloud_unit_sphere->points[pointSearchInd[0]].z * r1);float r2 = depth_cloud_unit_sphere->points[pointSearchInd[1]].intensity;Eigen::Vector3f B(depth_cloud_unit_sphere->points[pointSearchInd[1]].x * r2,depth_cloud_unit_sphere->points[pointSearchInd[1]].y * r2,depth_cloud_unit_sphere->points[pointSearchInd[1]].z * r2);float r3 = depth_cloud_unit_sphere->points[pointSearchInd[2]].intensity;Eigen::Vector3f C(depth_cloud_unit_sphere->points[pointSearchInd[2]].x * r3,depth_cloud_unit_sphere->points[pointSearchInd[2]].y * r3,depth_cloud_unit_sphere->points[pointSearchInd[2]].z * r3);// https://math.stackexchange.com/questions/100439/determine-where-a-vector-will-intersect-a-planeEigen::Vector3f V(features_3d_sphere->points[i].x,features_3d_sphere->points[i].y,features_3d_sphere->points[i].z);Eigen::Vector3f N = (A - B).cross(B - C);float s = (N(0) * A(0) + N(1) * A(1) + N(2) * A(2)) / (N(0) * V(0) + N(1) * V(1) + N(2) * V(2));float min_depth = min(r1, min(r2, r3));float max_depth = max(r1, max(r2, r3));if (max_depth - min_depth > 2 || s <= 0.5){continue;} else if (s - max_depth > 0) {s = max_depth;} else if (s - min_depth < 0) {s = min_depth;}// convert feature into cartesian space if depth is availablefeatures_3d_sphere->points[i].x *= s;features_3d_sphere->points[i].y *= s;features_3d_sphere->points[i].z *= s;// the obtained depth here is for unit sphere, VINS estimator needs depth for normalized feature (by value z), (lidar x = camera z)features_3d_sphere->points[i].intensity = features_3d_sphere->points[i].x;}}
...........
2.3 激光雷达使用视觉作为初值来做帧间匹配
文中发现初始值对于连续的扫描匹配有着重要的作用,对IMU原始值积分得到两个雷达关键帧的位置和姿态信息作为scan-match的初值。一旦LIS系统初始化完成,我们估计因子图中的IMU的bias,机器人的位姿,速度。然后把这些量传到VIS系统中完成其初始化。
在LIS系统初始化完成之后,我们可以通过两个途径得到Scan-match的初值:IMU的积分和VIS系统。当VIS系统的里程计可以输出位姿时以他为初值,如果VIS系统报告失效的时候,我们利用IMU的积分作为初值。这个过程在纹理丰富和缺乏纹理的环境中都增加了初值的精度和鲁棒性。
// 计算点云的先验位姿 (通过imu或者vins odom)void updateInitialGuess(){static Eigen::Affine3f lastImuTransformation; // 上一帧的imu位姿// 第一帧点云, 直接使用imu初始化// system initializationif (cloudKeyPoses3D->points.empty()){// 1.第一帧点云的先验位姿 (直接使用imu的rpy)transformTobeMapped[0] = cloudInfo.imuRollInit;transformTobeMapped[1] = cloudInfo.imuPitchInit;transformTobeMapped[2] = cloudInfo.imuYawInit;if (!useImuHeadingInitialization)transformTobeMapped[2] = 0;// 保存下来, 给下一帧使用lastImuTransformation = pcl::getTransformation(0, 0, 0, cloudInfo.imuRollInit, cloudInfo.imuPitchInit, cloudInfo.imuYawInit); // save imu before return;return;}// use VINS odometry estimation for pose guessstatic int odomResetId = 0;static bool lastVinsTransAvailable = false;static Eigen::Affine3f lastVinsTransformation; // 上一帧的vins odomif (cloudInfo.odomAvailable == true && cloudInfo.odomResetId == odomResetId){// ROS_INFO("Using VINS initial guess");if (lastVinsTransAvailable == false){// vins重新启动了, 保存vins重启后的第一帧odom// ROS_INFO("Initializing VINS initial guess");lastVinsTransformation = pcl::getTransformation(cloudInfo.odomX, cloudInfo.odomY, cloudInfo.odomZ, cloudInfo.odomRoll, cloudInfo.odomPitch, cloudInfo.odomYaw);lastVinsTransAvailable = true;} else {// 2.通过vins odom计算点云的先验位姿// ROS_INFO("Obtaining VINS incremental guess");Eigen::Affine3f transBack = pcl::getTransformation(cloudInfo.odomX, cloudInfo.odomY, cloudInfo.odomZ, cloudInfo.odomRoll, cloudInfo.odomPitch, cloudInfo.odomYaw);Eigen::Affine3f transIncre = lastVinsTransformation.inverse() * transBack;Eigen::Affine3f transTobe = trans2Affine3f(transformTobeMapped);Eigen::Affine3f transFinal = transTobe * transIncre;pcl::getTranslationAndEulerAngles(transFinal, transformTobeMapped[3], transformTobeMapped[4], transformTobeMapped[5], transformTobeMapped[0], transformTobeMapped[1], transformTobeMapped[2]);// 保存下来, 为下一帧使用lastVinsTransformation = pcl::getTransformation(cloudInfo.odomX, cloudInfo.odomY, cloudInfo.odomZ, cloudInfo.odomRoll, cloudInfo.odomPitch, cloudInfo.odomYaw);lastImuTransformation = pcl::getTransformation(0, 0, 0, cloudInfo.imuRollInit, cloudInfo.imuPitchInit, cloudInfo.imuYawInit); // save imu before return;return;}} else {// vins跟丢了, 准备重启// ROS_WARN("VINS failure detected.");lastVinsTransAvailable = false;odomResetId = cloudInfo.odomResetId;}// use imu incremental estimation for pose guess (only rotation)if (cloudInfo.imuAvailable == true){// 3.vins odom无法使用, 只能使用imu来计算点云的先验 (只更新rpy)// ROS_INFO("Using IMU initial guess");Eigen::Affine3f transBack = pcl::getTransformation(0, 0, 0, cloudInfo.imuRollInit, cloudInfo.imuPitchInit, cloudInfo.imuYawInit);Eigen::Affine3f transIncre = lastImuTransformation.inverse() * transBack;Eigen::Affine3f transTobe = trans2Affine3f(transformTobeMapped);Eigen::Affine3f transFinal = transTobe * transIncre;pcl::getTranslationAndEulerAngles(transFinal, transformTobeMapped[3], transformTobeMapped[4], transformTobeMapped[5], transformTobeMapped[0], transformTobeMapped[1], transformTobeMapped[2]);// 保存下来, 给下一帧使用lastImuTransformation = pcl::getTransformation(0, 0, 0, cloudInfo.imuRollInit, cloudInfo.imuPitchInit, cloudInfo.imuYawInit); // save imu before return;return;}}