微信搜索《Java鱼仔》,每天一个知识点不错过
每天一个知识点
什么是接口的幂等性,如何实现接口幂等性?
(一)幂等性概念
幂等性原本是数学上的概念,用在接口上就可以理解为:同一个接口,多次发出同一个请求,必须保证操作只执行一次。
调用接口发生异常并且重复尝试时,总是会造成系统所无法承受的损失,所以必须阻止这种现象的发生。
比如下面这些情况,如果没有实现接口幂等性会有很严重的后果:
支付接口,重复支付会导致多次扣钱
订单接口,同一个订单可能会多次创建。
(二)幂等性的解决方案
唯一索引
使用唯一索引可以避免脏数据的添加,当插入重复数据时数据库会抛异常,保证了数据的唯一性。
乐观锁
这里的乐观锁指的是用乐观锁的原理去实现,为数据字段增加一个version字段,当数据需要更新时,先去数据库里获取此时的version版本号
select version from tablename where xxx
更新数据时首先和版本号作对比,如果不相等说明已经有其他的请求去更新数据了,提示更新失败。
update tablename set count=count+1,version=version+1 where version=#{version}
悲观锁
乐观锁可以实现的往往用悲观锁也能实现,在获取数据时进行加锁,当同时有多个重复请求时其他请求都无法进行操作
分布式锁
幂等的本质是分布式锁的问题,分布式锁正常可以通过redis或zookeeper实现;在分布式环境下,锁定全局唯一资源,使请求串行化,实际表现为互斥锁,防止重复,解决幂等。
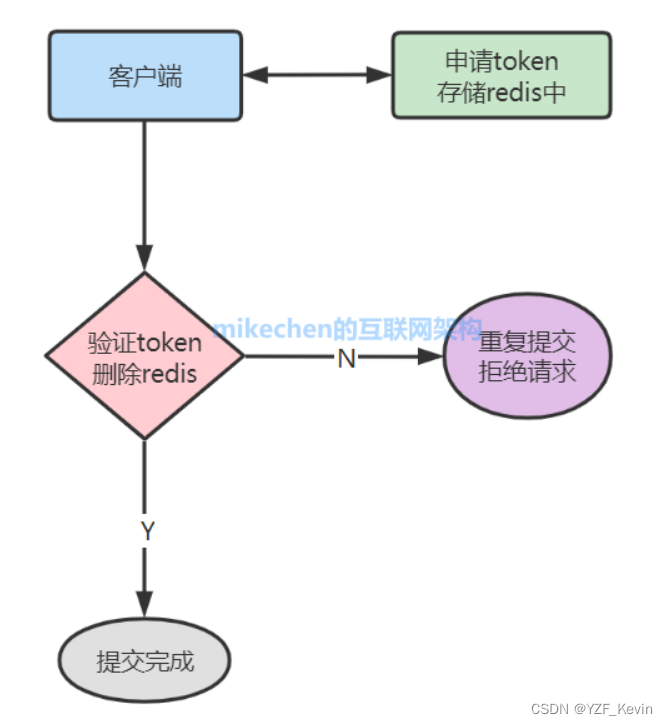
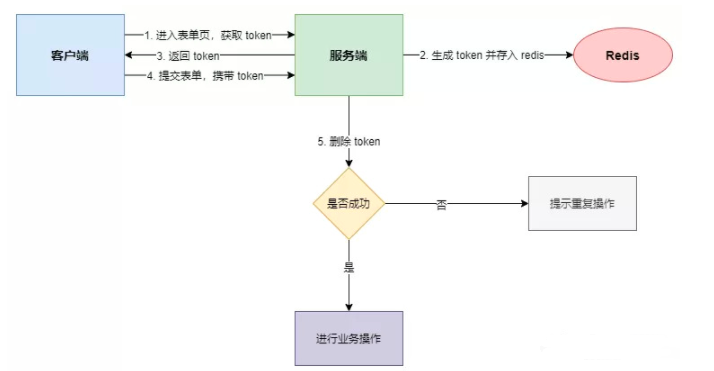
token机制
token机制的核心思想是为每一次操作生成一个唯一性的凭证,也就是token。一个token在操作的每一个阶段只有一次执行权,一旦执行成功则保存执行结果。对重复的请求,返回同一个结果。token机制的应用十分广泛。
(三)token机制的实现
这里展示通过token机制实现接口幂等性的案例:github文末自取
首先引入需要的依赖:
<dependency><groupId>org.springframework.boot</groupId><artifactId>spring-boot-starter-data-redis</artifactId>
</dependency>
<dependency><groupId>org.apache.commons</groupId><artifactId>commons-lang3</artifactId><version>3.4</version>
</dependency>
<dependency><groupId>org.springframework.boot</groupId><artifactId>spring-boot-starter-web</artifactId>
</dependency>
3.1、配置请求的方法体和枚举类
首先配置一下通用的请求返回体
public class Response {private int status;private String msg;private Object data;//省略get、set、toString、无参有参构造方法
}
以及返回code
public enum ResponseCode {// 通用模块 1xxxxILLEGAL_ARGUMENT(10000, "参数不合法"),REPETITIVE_OPERATION(10001, "请勿重复操作"),;ResponseCode(Integer code, String msg) {this.code = code;this.msg = msg;}private Integer code;private String msg;public Integer getCode() {return code;}public void setCode(Integer code) {this.code = code;}public String getMsg() {return msg;}public void setMsg(String msg) {this.msg = msg;}
}
3.2 自定义异常以及配置全局异常类
public class ServiceException extends RuntimeException{private String code;private String msg;//省略get、set、toString以及构造方法
}
配置全局异常捕获器
@ControllerAdvice
public class MyControllerAdvice {@ResponseBody@ExceptionHandler(ServiceException.class)public Response serviceExceptionHandler(ServiceException exception){Response response=new Response(Integer.valueOf(exception.getCode()),exception.getMsg(),null);return response;}
}
3.3 编写创建Token和验证Token的接口以及实现类
@Service
public interface TokenService {public Response createToken();public Response checkToken(HttpServletRequest request);
}
具体实现类,核心的业务逻辑都写在注释中了
@Service
public class TokenServiceImpl implements TokenService {@Autowiredprivate RedisTemplate redisTemplate;@Overridepublic Response createToken() {//生成uuid当作tokenString token = UUID.randomUUID().toString().replaceAll("-","");//将生成的token存入redis中redisTemplate.opsForValue().set(token,token);//返回正确的结果信息Response response=new Response(0,token.toString(),null);return response;}@Overridepublic Response checkToken(HttpServletRequest request) {//从请求头中获取tokenString token=request.getHeader("token");if (StringUtils.isBlank(token)){//如果请求头token为空就从参数中获取token=request.getParameter("token");//如果都为空抛出参数异常的错误if (StringUtils.isBlank(token)){throw new ServiceException(ResponseCode.ILLEGAL_ARGUMENT.getCode().toString(),ResponseCode.ILLEGAL_ARGUMENT.getMsg());}}//如果redis中不包含该token,说明token已经被删除了,抛出请求重复异常if (!redisTemplate.hasKey(token)){throw new ServiceException(ResponseCode.REPETITIVE_OPERATION.getCode().toString(),ResponseCode.REPETITIVE_OPERATION.getMsg());}//删除tokenBoolean del=redisTemplate.delete(token);//如果删除不成功(已经被其他请求删除),抛出请求重复异常if (!del){throw new ServiceException(ResponseCode.REPETITIVE_OPERATION.getCode().toString(),ResponseCode.REPETITIVE_OPERATION.getMsg());}return new Response(0,"校验成功",null);}
}
3.4 配置自定义注解
这是比较重要的一步,通过自定义注解在需要实现接口幂等性的方法上添加此注解,实现token验证
@Target({ElementType.METHOD})
@Retention(RetentionPolicy.RUNTIME)
public @interface ApiIdempotent {
}
接口拦截器
public class ApiIdempotentInterceptor implements HandlerInterceptor {@Autowiredprivate TokenService tokenService;@Overridepublic boolean preHandle(HttpServletRequest request, HttpServletResponse response, Object handler) throws Exception {if (!(handler instanceof HandlerMethod)) {return true;}HandlerMethod handlerMethod= (HandlerMethod) handler;Method method=handlerMethod.getMethod();ApiIdempotent methodAnnotation=method.getAnnotation(ApiIdempotent.class);if (methodAnnotation != null){// 校验通过放行,校验不通过全局异常捕获后输出返回结果tokenService.checkToken(request);}return true;}@Overridepublic void postHandle(HttpServletRequest request, HttpServletResponse response, Object handler, ModelAndView modelAndView) throws Exception {}@Overridepublic void afterCompletion(HttpServletRequest request, HttpServletResponse response, Object handler, Exception ex) throws Exception {}
}
3.5 配置拦截器以及redis
配置webConfig,添加拦截器
@Configuration
public class WebConfig implements WebMvcConfigurer {@Overridepublic void addInterceptors(InterceptorRegistry registry) {registry.addInterceptor(apiIdempotentInterceptor());}@Beanpublic ApiIdempotentInterceptor apiIdempotentInterceptor() {return new ApiIdempotentInterceptor();}
}
配置redis,使得中文可以正常传输
@Configuration
public class RedisConfig {//自定义的redistemplate@Bean(name = "redisTemplate")public RedisTemplate<String,Object> redisTemplate(RedisConnectionFactory factory){//创建一个RedisTemplate对象,为了方便返回key为string,value为ObjectRedisTemplate<String,Object> template = new RedisTemplate<>();template.setConnectionFactory(factory);//设置json序列化配置Jackson2JsonRedisSerializer jackson2JsonRedisSerializer=newJackson2JsonRedisSerializer(Object.class);ObjectMapper objectMapper=new ObjectMapper();objectMapper.setVisibility(PropertyAccessor.ALL, JsonAutoDetect.Visibility.ANY);objectMapper.activateDefaultTyping(LaissezFaireSubTypeValidator.instance);//string的序列化StringRedisSerializer stringRedisSerializer=new StringRedisSerializer();//key采用string的序列化方式template.setKeySerializer(stringRedisSerializer);//value采用jackson的序列化方式template.setValueSerializer(jackson2JsonRedisSerializer);//hashkey采用string的序列化方式template.setHashKeySerializer(stringRedisSerializer);//hashvalue采用jackson的序列化方式template.setHashValueSerializer(jackson2JsonRedisSerializer);template.afterPropertiesSet();return template;}
}
最后是controller
@RestController
@RequestMapping("/token")
public class TokenController {@Autowiredprivate TokenService tokenService;@GetMappingpublic Response token(){return tokenService.createToken();}@PostMapping("checktoken")public Response checktoken(HttpServletRequest request){return tokenService.checkToken(request);}
}
其余代码在文末github链接上自取
(四)结果验证
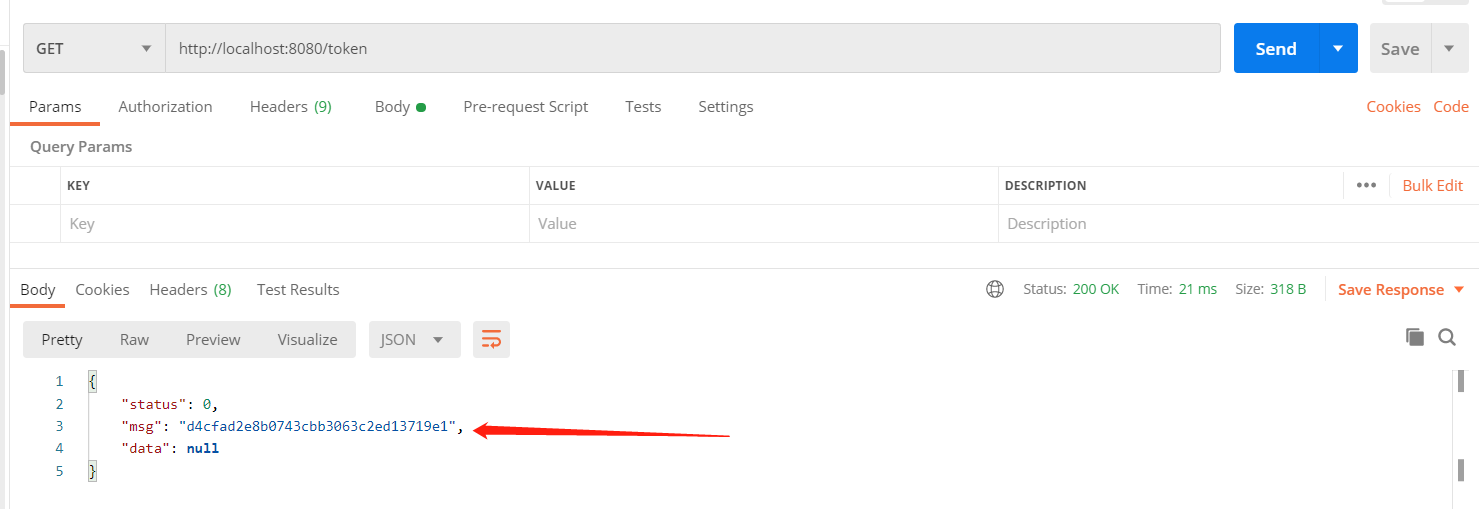
首先通过token接口创建一个token出来,此时redis中也存在了改token
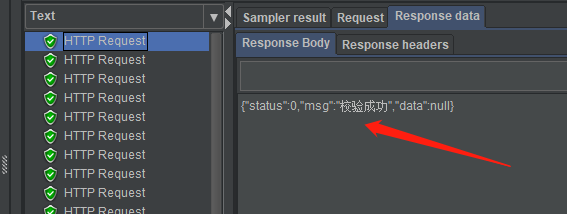
在jmeter中同时运行50个请求,我们可以观察到,只有第一个请求校验成功,后续的请求均提示请勿重复操作。

jmeter压测文件(Token Plan.jmx)和代码自取:github自取