转载请注明出处 :Spring Boot使用spring-data-jpa配置Mysql多数据源
我们在之前的文章中已经学习了Spring Boot中使用mysql数据库
在单数据源的情况下,Spring Boot的配置非常简单,只需要在application.properties文件中配置连接参数即可。
但是往往随着业务量发展,我们通常会进行数据库拆分或是引入其他数据库,从而我们需要配置多个数据源,下面基于之前的Spring-data-jpa例子分别介绍多数据源的配置方式。
目前有需求是会使用两个mysql的数据源。
注意,本文使用于 Spring Boot 2.0之前的版本,2.0之后的版本有部分区别,可查看文后说明。
记录配置步骤如下:
检查需要的包
如果没有则在pom.xml中补全。
<!-- Use MySQL Connector-J --><dependency><groupId>mysql</groupId><artifactId>mysql-connector-java</artifactId></dependency>
<!-- JPA Data (We are going to use Repositories, Entities, Hibernate, etc...) --><dependency><groupId>org.springframework.boot</groupId><artifactId>spring-boot-starter-data-jpa</artifactId></dependency>
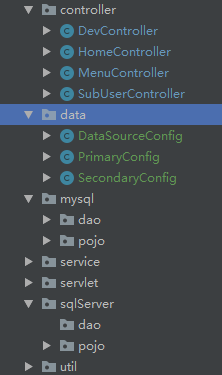
目录结构
目录结构很重要,尤其是多数据源的情况下。

本次结构如图
定义DataSourceConfig
package com.biologic.util;import javax.sql.DataSource;import org.springframework.beans.factory.annotation.Qualifier;
import org.springframework.boot.autoconfigure.jdbc.DataSourceBuilder;
import org.springframework.boot.context.properties.ConfigurationProperties;
import org.springframework.context.annotation.Bean;
import org.springframework.context.annotation.Configuration;
import org.springframework.context.annotation.Primary;@Configuration
public class MysqlDataSourceConfig {@Bean(name = "primaryDataSource")@Qualifier("primaryDataSource")@ConfigurationProperties(prefix = "spring.datasource.primary")public DataSource primaryDataSource() {return DataSourceBuilder.create().build();}@Bean(name = "secondaryDataSource")@Qualifier("secondaryDataSource")@Primary@ConfigurationProperties(prefix = "spring.datasource.secondary")public DataSource secondaryDataSource() {return DataSourceBuilder.create().build();}}
参数配置
对应的application.properties配置如下:
# 通用部分设置
spring.jpa.database=MYSQL
spring.jpa.show-sql=true
spring.jpa.hibernate.ddl-auto=update
spring.jpa.properties.hibernate.dialect=org.hibernate.dialect.MySQL5Dialect#primary数据库
spring.datasource.primary.url=jdbc:mysql://localhost:3306/test1
spring.datasource.primary.username=root
spring.datasource.primary.password=root
spring.datasource.primary.driver-class-name=com.mysql.jdbc.Driver#secondary数据库
spring.datasource.secondary.url=jdbc:mysql://localhost:3306/test2
spring.datasource.secondary.username=root
spring.datasource.secondary.password=root
spring.datasource.secondary.driver-class-name=com.mysql.jdbc.Driver
第一个数据源配置
新增对第一数据源的JPA配置,注意两处注释的地方,用于指定数据源对应的Entity实体和Repository定义位置,用@Primary区分主数据源。
package com.example.demo.mysql.config;import java.util.HashMap;
import java.util.Map;import javax.persistence.EntityManager;
import javax.sql.DataSource;import org.springframework.beans.factory.annotation.Autowired;
import org.springframework.beans.factory.annotation.Qualifier;
import org.springframework.boot.autoconfigure.orm.jpa.JpaProperties;
import org.springframework.boot.orm.jpa.EntityManagerFactoryBuilder;
import org.springframework.context.annotation.Bean;
import org.springframework.context.annotation.Configuration;
import org.springframework.context.annotation.Primary;
import org.springframework.data.jpa.repository.config.EnableJpaRepositories;
import org.springframework.orm.jpa.JpaTransactionManager;
import org.springframework.orm.jpa.LocalContainerEntityManagerFactoryBean;
import org.springframework.orm.jpa.vendor.Database;
import org.springframework.transaction.PlatformTransactionManager;
import org.springframework.transaction.annotation.EnableTransactionManagement;@Configuration
@EnableTransactionManagement
@EnableJpaRepositories(entityManagerFactoryRef="entityManagerFactoryPrimary",transactionManagerRef="transactionManagerPrimary",basePackages= { "com.example.demo.mysql.reposity.primary" }) //设置Repository所在位置public class MysqlPrimaryConfig {@Autowired @Qualifier("primaryDataSource")private DataSource primaryDataSource;@Primary@Bean(name = "entityManagerPrimary")public EntityManager entityManager(EntityManagerFactoryBuilder builder) {return entityManagerFactoryPrimary(builder).getObject().createEntityManager();}@Primary@Bean(name = "entityManagerFactoryPrimary")public LocalContainerEntityManagerFactoryBean entityManagerFactoryPrimary (EntityManagerFactoryBuilder builder) {return builder.dataSource(primaryDataSource).properties(getVendorProperties(primaryDataSource)).packages("com.example.demo.mysql.entity.primary") //设置实体类所在位置.persistenceUnit("primaryPersistenceUnit").build();}@Autowiredprivate JpaProperties jpaProperties;private Map<String, String> getVendorProperties(DataSource dataSource) {jpaProperties.setDatabase(Database.MYSQL);Map<String,String> map = new HashMap<>();map.put("hibernate.dialect","org.hibernate.dialect.MySQL5Dialect");map.put("hibernate.hbm2ddl.auto","update");map.put("hibernate.physical_naming_strategy","org.hibernate.boot.model.naming.PhysicalNamingStrategyStandardImpl");jpaProperties.setProperties(map);return  jpaProperties.getHibernateProperties(dataSource);}@Primary@Bean(name = "transactionManagerPrimary")public PlatformTransactionManager transactionManagerPrimary(EntityManagerFactoryBuilder builder) {return new JpaTransactionManager(entityManagerFactoryPrimary(builder).getObject());}}
第二个数据源配置
新增对第二数据源的JPA配置,内容与第一数据源类似,只是修改repository和entity保存的路径,具体如下:
package com.example.demo.mysql.config;import java.util.HashMap;
import java.util.Map;import javax.persistence.EntityManager;
import javax.sql.DataSource;import org.springframework.beans.factory.annotation.Autowired;
import org.springframework.beans.factory.annotation.Qualifier;
import org.springframework.boot.autoconfigure.orm.jpa.JpaProperties;
import org.springframework.boot.orm.jpa.EntityManagerFactoryBuilder;
import org.springframework.context.annotation.Bean;
import org.springframework.context.annotation.Configuration;
import org.springframework.data.jpa.repository.config.EnableJpaRepositories;
import org.springframework.orm.jpa.JpaTransactionManager;
import org.springframework.orm.jpa.LocalContainerEntityManagerFactoryBean;
import org.springframework.orm.jpa.vendor.Database;
import org.springframework.transaction.PlatformTransactionManager;
import org.springframework.transaction.annotation.EnableTransactionManagement;@Configuration
@EnableTransactionManagement
@EnableJpaRepositories(entityManagerFactoryRef="entityManagerFactorySecondary",transactionManagerRef="transactionManagerSecondary",basePackages= { "com.example.demo.mysql.reposity.secondary" }) //设置Repository所在位置
public class MysqlSecondaryConfig {@Autowired @Qualifier("secondaryDataSource")private DataSource secondaryDataSource;@Bean(name = "entityManagerSecondary")public EntityManager entityManager(EntityManagerFactoryBuilder builder) {return entityManagerFactoryPrimary(builder).getObject().createEntityManager();}@Bean(name = "entityManagerFactorySecondary")public LocalContainerEntityManagerFactoryBean entityManagerFactoryPrimary (EntityManagerFactoryBuilder builder) {return builder.dataSource(secondaryDataSource).properties(getVendorProperties(secondaryDataSource)).packages("com.example.demo.mysql.entity.secondary") //设置实体类所在位置.persistenceUnit("secondaryPersistenceUnit").build();}@Autowiredprivate JpaProperties jpaProperties;private Map<String, String> getVendorProperties(DataSource dataSource) {jpaProperties.setDatabase(Database.MYSQL);Map<String,String> map = new HashMap<>();map.put("hibernate.dialect","org.hibernate.dialect.MySQL5Dialect");map.put("hibernate.hbm2ddl.auto","update");map.put("hibernate.physical_naming_strategy","org.hibernate.boot.model.naming.PhysicalNamingStrategyStandardImpl");jpaProperties.setProperties(map);return  jpaProperties.getHibernateProperties(dataSource);}@Bean(name = "transactionManagerSecondary")public PlatformTransactionManager transactionManagerPrimary(EntityManagerFactoryBuilder builder) {return new JpaTransactionManager(entityManagerFactoryPrimary(builder).getObject());}}
创建实体和Repository接口
完成了以上配置之后,
主数据源的实体位于: com.biologic.entity.mysqlprimary
主数据源的数据访问对象位于:com.biologic.api.repository.mysqlprimary
第二数据源的实体位于: com.biologic.entity.mysqlsecondary
第二数据源的数据访问接口位于:com.biologic.api.repository.mysqlsecondary
分别在这些package下创建各自的实体和数据访问接口
主数据源下,创建User实体和对应的Repository接口
User.java
package com.example.demo.mysql.entity.primary;import javax.persistence.Column;
import javax.persistence.Entity;
import javax.persistence.GeneratedValue;
import javax.persistence.Id;@Entity
public class User {@Id@GeneratedValueprivate Long id;@Column(nullable = false)private String name;@Column(nullable = false)private Integer age;public User(){}public User(String name, Integer age) {this.name = name;this.age = age;}public Long getId() {return id;}public void setId(Long id) {this.id = id;}public String getName() {return name;}public void setName(String name) {this.name = name;}public Integer getAge() {return age;}public void setAge(Integer age) {this.age = age;}}
UserRepository.java
package com.example.demo.mysql.reposity.primary;import org.springframework.data.jpa.repository.JpaRepository;
import org.springframework.stereotype.Repository;import com.example.demo.mysql.entity.primary.User;@Repository
public interface UserMysqlRepository extends JpaRepository<User, Long> {}
第二数据源下,创建Message实体和对应的Repository接口
Message.java
package com.example.demo.mysql.entity.secondary;import javax.persistence.Column;
import javax.persistence.Entity;
import javax.persistence.GeneratedValue;
import javax.persistence.Id;@Entity
public class Message {@Id@GeneratedValueprivate Long id;@Column(nullable = false)private String name;@Column(nullable = false)private String content;public Message() {}public Message(String name, String content) {this.name = name;this.content = content;}public Long getId() {return id;}public void setId(Long id) {this.id = id;}public String getName() {return name;}public void setName(String name) {this.name = name;}public String getContent() {return content;}public void setContent(String content) {this.content = content;}}
MessageRepository.java
package com.example.demo.mysql.reposity.secondary;import org.springframework.data.jpa.repository.JpaRepository;
import org.springframework.stereotype.Repository;import com.example.demo.mysql.entity.secondary.Message;@Repository
public interface MessageRepository extends JpaRepository<Message, Long> {}
测试使用
Controller方式
package com.example.demo.api;import org.springframework.beans.factory.annotation.Autowired;
import org.springframework.web.bind.annotation.RequestMapping;
import org.springframework.web.bind.annotation.RestController;import com.example.demo.mysql.entity.primary.User;
import com.example.demo.mysql.entity.secondary.Message;
import com.example.demo.mysql.reposity.primary.UserMysqlRepository;
import com.example.demo.mysql.reposity.secondary.MessageRepository;@RestController
public class HelloWorldController {@Autowiredprivate UserMysqlRepository userMysqlRepository;@Autowiredprivate MessageRepository messageRepository;@RequestMapping("/hello")public int index() {userMysqlRepository.save(new User("aaa", 10));userMysqlRepository.save(new User("bbb", 20));userMysqlRepository.save(new User("ccc", 30));userMysqlRepository.save(new User("ddd", 40));userMysqlRepository.save(new User("eee", 50));System.out.println(userMysqlRepository.findAll().size());messageRepository.save(new Message("o1", "aaaaaaaaaa"));messageRepository.save(new Message("o2", "bbbbbbbbbb"));messageRepository.save(new Message("o3", "cccccccccc"));return userMysqlRepository.findAll().size() + messageRepository.findAll().size();}
}
ApplicationTests方式
测试用例来验证使用这两个针对不同数据源的配置进行数据操作。
@RunWith(SpringJUnit4ClassRunner.class)
@SpringApplicationConfiguration(Application.class)
public class ApplicationTests {@Autowiredprivate UserRepository userRepository;@Autowiredprivate MessageRepository messageRepository;@Testpublic void test() throws Exception {userRepository.save(new User("aaa", 10));userRepository.save(new User("bbb", 20));userRepository.save(new User("ccc", 30));userRepository.save(new User("ddd", 40));userRepository.save(new User("eee", 50));Assert.assertEquals(5, userRepository.findAll().size());messageRepository.save(new Message("o1", "aaaaaaaaaa"));messageRepository.save(new Message("o2", "bbbbbbbbbb"));messageRepository.save(new Message("o3", "cccccccccc"));Assert.assertEquals(3, messageRepository.findAll().size());}}
注意事项:版本问题
主要记录spring boot升级2.0后报的错,即springboot1.*正常,测试版本为1.5.4
不同点一:getVendorProperties调用不同
2.0之前的调用类型为DataSource
private Map getVendorProperties(DataSource dataSource) {return jpaProperties.getHibernateProperties(dataSource);}
2.0之后的调用类型为HiberateSettings
public Map<String, Object> getVerdorProperties(){return jpaProperties.getHibernateProperties(new HibernateSettings());}
不同点二:数据库注入方式不同
2.0之前为
@Autowired@Qualifier("primaryDataSource")private DataSource primaryDataSource;@Bean@Primary@Qualifier("primaryDataSource")@ConfigurationProperties(prefix = "spring.datasource.primary")public DataSource DataSource1() {return DataSourceBuilder.create().build();}
2.0之后为
@Bean@Primary@Qualifier("primaryDataSource")@ConfigurationProperties(prefix = "spring.datasource.primary")public DataSourceProperties primaryDataSourceProperties(){return new DataSourceProperties();}@Bean@Primary@Qualifier("primaryDataSource")@ConfigurationProperties(prefix = "spring.datasource.primary")public DataSource primaryDataSource(){return primaryDataSourceProperties().initializeDataSourceBuilder().build();}@Autowired@Qualifier("primaryDataSource")private DataSource primaryDataSource;
数据库注入方式如果不修改的话报错为
java.lang.IllegalArgumentException: jdbcUrl is required with driverClassName
HibernateSettings类其实就是配置列名生成策略的,如果已经在yml里配置过了,这里直接new 一个空类过去就行了
spring: datasource: primary: url: jdbc:mysql://localhost:3306/company?autoReconnect=true&useUnicode=true username: root password: root secondary: url: jdbc:mysql://localhost:3306/com1?autoReconnect=true&useUnicode=true username: root password: root jpa: database: mysql generate-ddl: true show-sql: true hibernate: ddl-auto: update naming: physical-strategy: org.springframework.boot.orm.jpa.hibernate.SpringPhysicalNamingStrategy
Spring Boot 2.1.0参见上文代码,引进了HibernateProperties。
同时,在Spring Boot 2.1.0中默认的mysql-connector-java版本为8.0.13,连接低版本mysql配置上比较繁琐,建议在配置文件中手动指定相应版本,如本文中指定5.1.46这个版本。
runtimeOnly(‘mysql:mysql-connector-java:5.1.46’)
注意事项 : 是否需要exclude自动HibernateJpaAutoConfiguration等
在配置正确的情况下,不需要exclude任何配置即可配置成功。
但是网上很多帖子说需要
配置
spring.autoconfigure.exclude: org.springframework.boot.autoconfigure.jdbc.DataSourceAutoConfiguration, org.springframework.boot.autoconfigure.jdbc.DataSourceTransactionManagerAutoConfiguration,org.springframework.boot.autoconfigure.orm.jpa.HibernateJpaAutoConfiguration
或者
这样的配置可能导致报错
Description:Field jpaProperties in com.biologic.util.MysqlPrimaryConfig required a bean of type 'org.springframework.boot.autoconfigure.orm.jpa.JpaProperties' that could not be found.Action:Consider defining a bean of type 'org.springframework.boot.autoconfigure.orm.jpa.JpaProperties' in your configuration.
可能遇到的问题–No bean named ‘entityManagerFactory’ available
2018-12-17 15:01:57.618 WARN 26428 --- [ main] ationConfigEmbeddedWebApplicationContext : Exception encountered during context initialization - cancelling refresh attempt: org.springframework.beans.factory.BeanCreationException: Error creating bean with name 'messageRepository': Cannot create inner bean '(inner bean)#7348e75e' of type [org.springframework.orm.jpa.SharedEntityManagerCreator] while setting bean property 'entityManager'; nested exception is org.springframework.beans.factory.BeanCreationException: Error creating bean with name '(inner bean)#7348e75e': Cannot resolve reference to bean 'entityManagerFactory' while setting constructor argument; nested exception is org.springframework.beans.factory.NoSuchBeanDefinitionException: No bean named 'entityManagerFactory' available
正常情况下 只要在MysqlPrimaryConfig配置了@Primary参数,就会自动成为entityManagerFactory。
如果报这个错,需要检查是否加了@Primary,@Primary是否在其他配置中重复。
以及MysqlPrimaryConfig是否加了@Configuration的标记,以及整个项目的包扫描情况,确保MysqlPrimaryConfig被扫描到。
没有正确加载配置和扫描包导致的错误还有如下几种报错:
Description:
Cannot determine embedded database driver class for database type NONE
Action:
If you want an embedded database please put a supported one on the classpath. If you have database settings to be loaded from a particular profile you may need to active it (the profiles "dev" are currently active).
not managed type
At least one JPA metamodel must be present!
关键时候可以尝试强制加载包, 在启动文件加入
@ComponentScan("com.biologic.entity")
注意事项,mongodb多数据源与mysql多数据源同时配置
项目中同时配置了mongodb和mysql甚至redis,会导致配置加载十分混乱。
导致各种奇怪的异常
Multiple Spring Data modules found, entering strict repository configuration mode
此时 项目会进入严格的参数配置模式,要求每种模式都有具体的指向。
比如
@EnableJpaRepositories(basePackages = "com.acme.repositories.jpa")
@EnableMongoRepositories(basePackages = "com.acme.repositories.mongo")
以及
配置文件中
spring.data.redis.repositories.enabled = false
尤其是 目录结构需要规划好。
可用源码下载
https://download.csdn.net/download/q383965374/10856658
参考链接:
https://www.cnblogs.com/sxdcgaq8080/p/7978205.html
转载请注明出处 :Spring Boot使用spring-data-jpa配置Mysql多数据源






![window10c语言下载,[下载备用]Windows 10多国语言包和独立语言包下载](https://img-blog.csdnimg.cn/img_convert/e20d15c2634b43144f206d61c9f8f9d0.png)
