1. 参考资料
工具包GIT地址 : https://github.com/Juniper/netconf-java
使用教程 : https://www.juniper.net/documentation/cn/zh/software/junos/netconf-java-toolkit/topics/task/netconf-java-toolkit-program-creating-and-executing.html
2. 下载&编译工具包
# 1. 下载git地址中的工具包到本地, 用IDEA打开处理
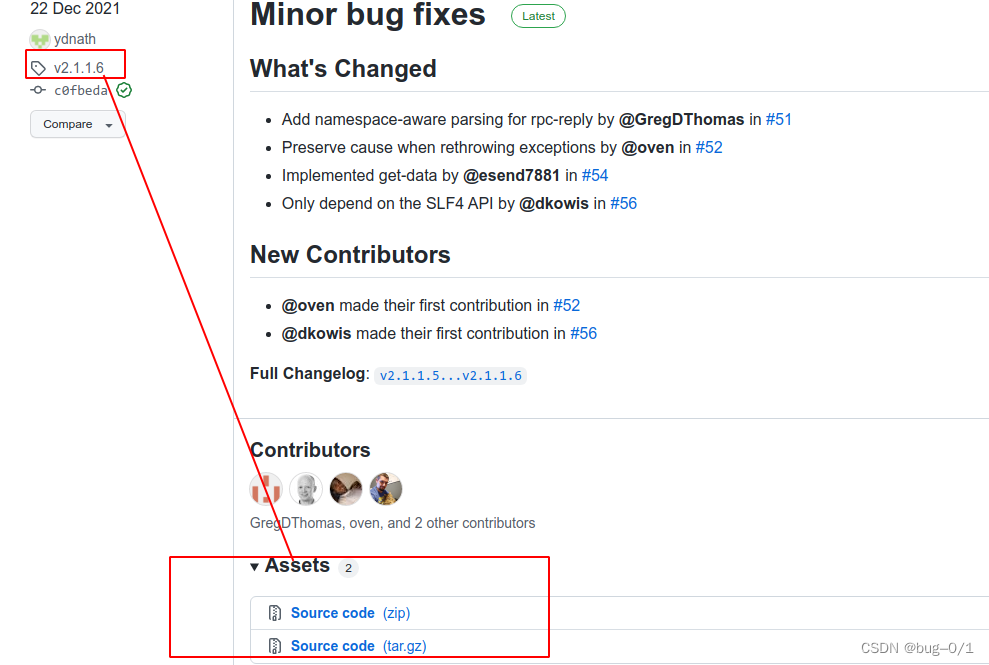
- 此处为v2.1.1版本
- https://github.com/Juniper/netconf-java/releases# 2. 添加maven配置, 打包处理, 配置如下
- 将如下配置 到maven 的plugin中 解决不能将依赖打进来的问题
- 生成的jar包保存 `netconf-java-2.1.1.6-SNAPSHOT-jar-with-dependencies.jar`
<!-- Maven Assembly Plugin -->
<plugin><groupId>org.apache.maven.plugins</groupId><artifactId>maven-assembly-plugin</artifactId><version>2.4.1</version><configuration><!-- get all project dependencies --><descriptorRefs><descriptorRef>jar-with-dependencies</descriptorRef></descriptorRefs></configuration><executions><execution><id>make-assembly</id><!-- bind to the packaging phase --><phase>package</phase><goals><goal>single</goal></goals></execution></executions>
</plugin>
3. 添加jar包到自己的类路径
# 在自己的项目中将该打包好的jar包右键选择 As a library
4. 编写工具类 NetconfUtils
# 编写该工具类
- NetconfUtils
import net.juniper.netconf.Device;
import net.juniper.netconf.NetconfException;
import net.juniper.netconf.XML;public class NetconfUtils {private static final String HOSTNAME = "10.10.10.10";private static final String USERNAME = "admin";private static final String PASSWORD = "123456";private static final int NETCONF_PORT = 830;/*** 要发送的xml报文 例如:* <get>* <filter type="subtree">* <users xmlns="http://netconfcentral.org/ns/user">* <user>* <name>admin</name>* </user>* </users>* </filter>* </get>** @param xmlContent* @return*/public static XML send(String xmlContent) throws NetconfException {Device device = null;XML xmlReply = null;try {device = Device.builder().hostName(HOSTNAME).userName(USERNAME).password(PASSWORD).port(NETCONF_PORT).strictHostKeyChecking(false).hostKeysFileName(null).build();device.connect();xmlReply = device.executeRPC(xmlContent);device.close();} catch (Exception e) {e.printStackTrace();throw new NetconfException("报文发送失败");} finally {if (null != device) {device.close();}}return xmlReply;}public static XML send(String deviceHOSTNAME, String deviceUSERNAME, String devicePASSWORD, int deviceNETCONFPORT, String xmlContent) throws NetconfException {Device device = null;XML xmlReply = null;try {device = Device.builder().hostName(deviceHOSTNAME).userName(deviceUSERNAME).password(devicePASSWORD).port(deviceNETCONFPORT).strictHostKeyChecking(false).hostKeysFileName(null).build();device.connect();xmlReply = device.executeRPC(xmlContent);device.close();} catch (Exception e) {e.printStackTrace();throw new NetconfException("报文发送失败");} finally {if (null != device) {device.close();}}return xmlReply;}}
5. 使用Test
使用之前打开对应设备的netconf功能
@Slf4j
public class TestMain {/*** 非启动Spring框架时取消slf4J的日志显示*/static {LoggerContext loggerContext = (LoggerContext) LoggerFactory.getILoggerFactory();List<Logger> loggerList = loggerContext.getLoggerList();loggerList.forEach(logger -> {logger.setLevel(Level.ERROR);});}@Testpublic void test() throws NetconfException {XML send = NetconfUtils.send("<get>\n" +"<filter type=\"subtree\">\n" +"<users xmlns=\"http://netconfcentral.org/ns/user\">\n" +"<user>\n" +"<name>admin</name>\n" +"</user>\n" +"</users>\n" +"</filter>\n" +"</get>");System.out.println(send);}}
结果
<rpc-reply xmlns="urn:ietf:params:xml:ns:netconf:base:1.0" xmlns:nc="urn:ietf:params:xml:ns:netconf:base:1.0" last-modified="2022-04-28T14:54:59Z" message-id="2"><data><users xmlns="http://netconfcentral.org/ns/user"><user><name>admin</name><password>$1$ROky/q82$GKYA8rTVFVyYjLb8Sh27E1</password><description/><group-id>Super</group-id></user></users></data>
</rpc-reply>