使用 命令行/WinForm 来打包Unity可执行程序
- 前言
- 一、编辑Editor打包工具
- 1.编辑打包脚本
- 2.Unity编辑器中样式
- 二、命令行调用Unity打包函数
- 1.Unity命令行常用参数
- 2.命令行调用静态打包函数
- 三、使用WinForm创建可视化操作界面
- 1.可视化界面
- 2.代码详细:
- ①CmdHelper类:
- ②打包EXE的ButtonClick1:
- ③完整代码:
- 四、运行效果
- 五、参考资料
- 总结和展望
前言
各位Unity开发者都一定被漫长的项目打包过程折磨过,同时公司的Git库一般都不上传各种日志文档和环境配置,克隆下来打开再打包可执行程序繁琐又耗时,这些对测试人员进行打包测试非常的不友好。
是否可以开发一款软件,让测试人员在GIT库上克隆仓库后可以直接进行打包,不再需要打开Unity来打包呢?
因此我想到了使用命令行来对Unity进行打包,再用WinForm套了个外壳,让操作更符合人的习惯。
一、编辑Editor打包工具
1.编辑打包脚本
在项目目录下新建一个C#脚本文件,命名为BuildScript,可以在该脚本中修改需要打包的场景,打包的目标路径和打包之后的程序名。
BuildScript代码如下:
using UnityEditor;
using UnityEngine;public class BuildScript
{private static string[] scenes = { "Assets/Scenes/SampleScene.unity" };         //要打包的场景private static string Path = "Build";                                           //打包的目标路径,默认为父路径下的Build文件夹private static string GameName = "MyGame";                                      //打包后的程序名/// <summary>/// 打包成EXE/// </summary>[MenuItem("Build/Build EXE")]public static void BuildEXE(){string WindowsPath = "/Windows/";BuildPipeline.BuildPlayer(scenes, Path + WindowsPath + GameName + ".exe", BuildTarget.StandaloneWindows, BuildOptions.None);Debug.Log(Path + WindowsPath + GameName + ".exe"+"已生成");}/// <summary>/// 打包成APK/// </summary>[MenuItem("Build/Build APK")]public static void BuildAPK(){string AndroidPath = "/Android/";BuildPipeline.BuildPlayer(scenes, Path + AndroidPath + GameName + ".apk", BuildTarget.Android, BuildOptions.None);}
}
2.Unity编辑器中样式
保存BuildScript脚本之后,回到 Unity 点击菜单栏 Build-Build EXE或Build-Build APK 即可进行打包。

二、命令行调用Unity打包函数
1.Unity命令行常用参数
可以查看:Unity命令行官方文档
-batchmode
在 批处理模式下运行Unity,它不会弹出窗口。当脚本代码在执行过程中发生异常或其他操作失败时Unity将立即退出,并返回代码为1。
-quit
命令执行完毕后将退出Unity编辑器。请注意,这可能会导致错误消息被隐藏(但他们将显示在Editor.log文件)
-buildWindowsPlayer
构建一个32位的Windows平台的exe(例如:-buildWindowsPlayer path/to/your/build.exe)
-buildWindows64Player
构建一个64位的Windows平台的exe(例如:-buildWindows64Player path/to/your/build.exe)
-importPackage
导入一个的package,不会显示导入对话框
-createProject
根据提供的路径建立一个空项目
-projectPath
打开指定路径的项目
-logFile
指定输出的日志文件
-nographics
当运行在批处理模式,不会初始化显卡设备,不需要GPU参与;但如果你需要执行光照烘焙等操作,则不能使用这个参数,因为它需要GPU运算。
-executeMethod
在Unity启动的同时会执行静态方法。也就是说,使用executeMethod我们需要在编辑文件夹有一个脚本并且类里有一个静态函数。
-single-instance
在同一时间只允许一个游戏实例运行。如果另一个实例已在运行,然后再次通过-single-instance启动它的话会调节到现有的这个实例。
-nolog
不产生输出日志。 通常output_log.txt被写在游戏输出目录下的*_Data文件夹中
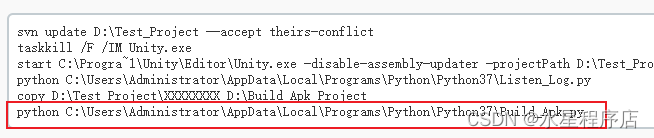
2.命令行调用静态打包函数
在编译器所在目录下:

使用命令行输入,其中 “C:\Unity Project\PureMVC_study2” 是工程所在的目录,
-executeMethod BuildScript.BuildEXE是调用BuildScript中的静态方法BuildEXE。
Unity.exe -batchmode -nographics -quit -projectPath "C:\Unity Project\PureMVC_study2" -executeMethod BuildScript.BuildEXE
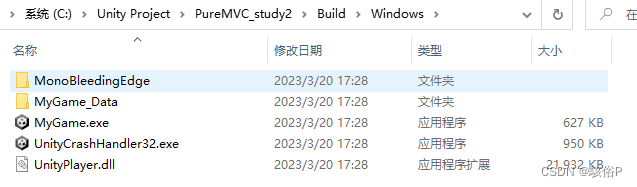
命令行执行完毕后会在工程目录下的Build文件夹中生成EXE文件。
注意:一个Unity工程只能打开一个实例,所以如果我们已经手动用Unity打开了工程,此时执行该命令是会报错的。请确保已关闭相应的工程。

三、使用WinForm创建可视化操作界面
此处可能用Python来写会更轻量快捷,因本人Python能力有限,故用C#来编写WinForm可视化界面。
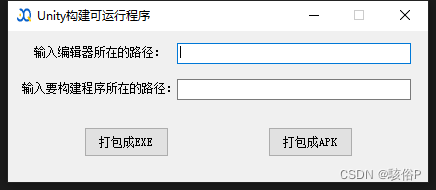
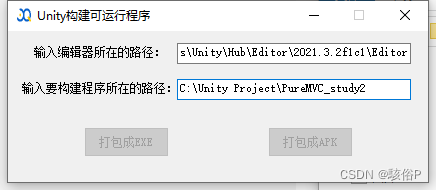
1.可视化界面
可视化界面如下:
2.代码详细:
①CmdHelper类:
该类下RunCmd方法实现了调用CMD命令窗口
public class CmdHelper{private static string CmdPath = @"C:\Windows\System32\cmd.exe";/// <summary>/// 执行cmd命令/// 多命令请使用批处理命令连接符:/// <![CDATA[/// &:同时执行两个命令/// |:将上一个命令的输出,作为下一个命令的输入/// &&:当&&前的命令成功时,才执行&&后的命令/// ||:当||前的命令失败时,才执行||后的命令]]>/// 其他请百度/// </summary>/// <param name="cmd"></param>/// <param name="output"></param>public static void RunCmd(string cmd, out string output){cmd = cmd.Trim().TrimEnd('&') + "&exit";//说明:不管命令是否成功均执行exit命令,否则当调用ReadToEnd()方法时,会处于假死状态using (Process p = new Process()){p.StartInfo.FileName = CmdPath;p.StartInfo.UseShellExecute = false; //是否使用操作系统shell启动p.StartInfo.RedirectStandardInput = true; //接受来自调用程序的输入信息p.StartInfo.RedirectStandardOutput = true; //由调用程序获取输出信息p.StartInfo.RedirectStandardError = true; //重定向标准错误输出p.StartInfo.CreateNoWindow = true; //不显示程序窗口p.Start();//启动程序//向cmd窗口写入命令p.StandardInput.WriteLine(cmd);p.StandardInput.AutoFlush = true;//获取cmd窗口的输出信息output = p.StandardOutput.ReadToEnd();p.WaitForExit();//等待程序执行完退出进程p.Close();}}}
②打包EXE的ButtonClick1:
private void button1_Click(object sender, EventArgs e){MessageBox.Show("EXE正在打包中");string EditorPath = textBox1.Text; //编辑器地址string GamePath = textBox2.Text; //要打包的程序地址string cmd = @"cd " + EditorPath + "&&" + "Unity.exe -batchmode -nographics -quit -projectPath \"" + GamePath + "\" -executeMethod BuildScript.BuildEXE";GamePath = textBox1.Text;string output = "";CmdHelper.RunCmd(cmd, out output);MessageBox.Show("EXE打包完成");}
点击ButtonClick1可以成功打包EXE。但此时有一个影响用户体验的地方,在点击ButtonClick1之后窗口会卡死,无法对窗口拖动和缩放,只有在打包运行完后才恢复正常。经过查询发现是线程卡死问题,所以可以新建一个线程来异步执行这一段代码,从而不影响主窗口的正常使用。修改完代码如下:
private void button1_Click(object sender, EventArgs e){Task.Run(async () =>{MessageBox.Show("EXE正在打包中");string EditorPath = textBox1.Text; //编辑器地址string GamePath = textBox2.Text; //要打包的程序地址string cmd = @"cd " + EditorPath + "&&" + "Unity.exe -batchmode -nographics -quit -projectPath \"" + GamePath + "\" -executeMethod BuildScript.BuildEXE";GamePath = textBox1.Text;string output = "";CmdHelper.RunCmd(cmd, out output);MessageBox.Show("EXE打包完成");});}
主窗口在打包时可以正常拖动缩放,但需要注意的是上文所提到的
“一个Unity工程只能打开一个实例,所以如果我们已经手动用Unity打开了工程,此时执行该命令是会报错的。请确保已关闭相应的工程 ”
在我们使用命令行打包的时候本质上其实也是手动打开了Unity,所以我们需要禁止用户在打包的过程中重复对按钮进行点击。
这里我想到了修改button的enable属性,但直接在这段异步线程代码中修改enable属性是行不通的,程序虽然不会报错,但异步操作中的代码不会运行。因为C#只有主线程才能访问控件。从 .NET Framework 2.0 类库开始,.NET框架就对于 WinForm 中采用多线程调用窗体控件进行了安全性检测,就是说我从另外一个不是主线程的线程去调用窗体控件的话,就会出现异常。
以下有两个解决办法:
一是直接设置 System.Windows.Forms.Control.CheckForIllegalCrossThreadCalls = false; 这种方法简单粗暴,但十分不推荐使用,因为可能会导致不安全。
二是使用委托,使用Invoke方法来访问UI线程,以此对enable属性进行操作。这种方法安全可靠,值得推荐。修改完后代码如下:
private void button1_Click(object sender, EventArgs e){Task.Run(async () =>{// 访问UI线程button1.Invoke((MethodInvoker)delegate{// 更改Enabled属性button1.Enabled = false;});button2.Invoke((MethodInvoker)delegate{// 更改Enabled属性button2.Enabled = false;});MessageBox.Show("EXE正在打包中");string EditorPath = textBox1.Text; //编辑器地址string GamePath = textBox2.Text; //要打包的程序地址string cmd = @"cd " + EditorPath + "&&" + "Unity.exe -batchmode -nographics -quit -projectPath \"" + GamePath + "\" -executeMethod BuildScript.BuildEXE";GamePath = textBox1.Text;string output = "";CmdHelper.RunCmd(cmd, out output);MessageBox.Show("EXE打包完成");button1.Invoke((MethodInvoker)delegate{// 更改Enabled属性button1.Enabled = true;});button2.Invoke((MethodInvoker)delegate{// 更改Enabled属性button2.Enabled = true;});});}
③完整代码:
using System;
using System.Diagnostics;
using System.Threading.Tasks;
using System.Windows.Forms;namespace AutoBuild
{public partial class Form1 : Form{//string  cmd = "cd C:\Program Files\Unity\Hub\Editor\2021.3.20f1c1\Editor && Unity.exe -batchmode -nographics -quit -projectPath ""C:\Unity Project\PureMVC_study2"" -executeMethod BuildScript.BuildEXE"public string GamePath = "";delegate void MyDele();public Form1(){InitializeComponent();//Control.CheckForIllegalCrossThreadCalls = false;	// 这句代码就是关闭了安全检查}private void button1_Click(object sender, EventArgs e){Task.Run(async () =>{// 访问UI线程button1.Invoke((MethodInvoker)delegate{// 更改Enabled属性button1.Enabled = false;});button2.Invoke((MethodInvoker)delegate{// 更改Enabled属性button2.Enabled = false;});//button1.Enabled = false;                //一个Unity工程只能打开一个实例,所以不能同时打包多种可运行程序,这里禁止按键的点击防止用户多次点击打包//button2.Enabled = false;MessageBox.Show("EXE正在打包中");string EditorPath = textBox1.Text;      //编辑器地址string GamePath = textBox2.Text;        //要打包的程序地址string cmd = @"cd " + EditorPath + "&&" + "Unity.exe -batchmode -nographics -quit -projectPath \"" + GamePath + "\" -executeMethod BuildScript.BuildEXE";GamePath = textBox1.Text;string output = "";CmdHelper.RunCmd(cmd, out output);MessageBox.Show("EXE打包完成");button1.Invoke((MethodInvoker)delegate{// 更改Enabled属性button1.Enabled = true;});button2.Invoke((MethodInvoker)delegate{// 更改Enabled属性button2.Enabled = true;});//button1.Enabled = true;//button2.Enabled = true;});}private void button2_Click(object sender, EventArgs e){Task.Run(async () =>{// 访问UI线程button1.Invoke((MethodInvoker)delegate{// 更改Enabled属性button1.Enabled = false;});button2.Invoke((MethodInvoker)delegate{// 更改Enabled属性button2.Enabled = false;});//button1.Enabled = false;                //一个Unity工程只能打开一个实例,所以不能同时打包多种可运行程序,这里禁止按键的点击防止用户多次点击打包//button2.Enabled = false;MessageBox.Show("APK正在打包中");string EditorPath = textBox1.Text;string GamePath = textBox2.Text;string cmd = @"cd " + EditorPath + "&&" + "Unity.exe -batchmode -nographics -quit -projectPath \"" + GamePath + "\" -executeMethod BuildScript.BuildAPK";GamePath = textBox1.Text;string output = "";CmdHelper.RunCmd(cmd, out output);MessageBox.Show("APK打包完成");button1.Invoke((MethodInvoker)delegate{// 更改Enabled属性button1.Enabled = true;});button2.Invoke((MethodInvoker)delegate{// 更改Enabled属性button2.Enabled = true;});//button1.Enabled = true;//button2.Enabled = true;});}public class CmdHelper{private static string CmdPath = @"C:\Windows\System32\cmd.exe";/// <summary>/// 执行cmd命令/// 多命令请使用批处理命令连接符:/// <![CDATA[/// &:同时执行两个命令/// |:将上一个命令的输出,作为下一个命令的输入/// &&:当&&前的命令成功时,才执行&&后的命令/// ||:当||前的命令失败时,才执行||后的命令]]>/// 其他请百度/// </summary>/// <param name="cmd"></param>/// <param name="output"></param>public static void RunCmd(string cmd, out string output){cmd = cmd.Trim().TrimEnd('&') + "&exit";//说明:不管命令是否成功均执行exit命令,否则当调用ReadToEnd()方法时,会处于假死状态using (Process p = new Process()){p.StartInfo.FileName = CmdPath;p.StartInfo.UseShellExecute = false;        //是否使用操作系统shell启动p.StartInfo.RedirectStandardInput = true;   //接受来自调用程序的输入信息p.StartInfo.RedirectStandardOutput = true;  //由调用程序获取输出信息p.StartInfo.RedirectStandardError = true;   //重定向标准错误输出p.StartInfo.CreateNoWindow = true;          //不显示程序窗口p.Start();//启动程序//向cmd窗口写入命令p.StandardInput.WriteLine(cmd);p.StandardInput.AutoFlush = true;//获取cmd窗口的输出信息output = p.StandardOutput.ReadToEnd();p.WaitForExit();//等待程序执行完退出进程p.Close();}}}private void label2_Click(object sender, EventArgs e){}}
}
四、运行效果
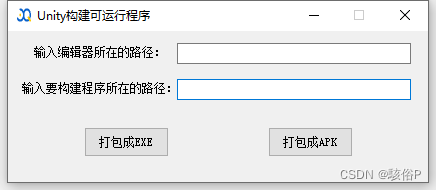
1.初始界面
2.输入相关路径,点击打包:
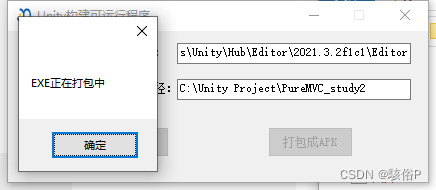
3.打包过程中禁止用户再次点击打包,但可对主窗口进行拖动缩放操作:
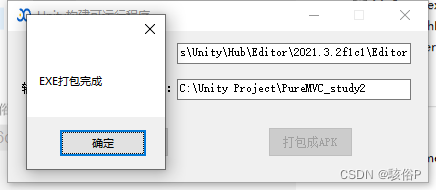
4.打包完成弹出打包完成窗口:
5.打包后的EXE和APK文件:


五、参考资料
CSDN博客_Unity 工具 之 Jenkins 打包自动化工具的下载/安装/基本操作/任务创建执行/Unity打包自动化简单搭建的相关整理
博客园_C#程序调用cmd.exe执行命令
CSDN博客_解决C#跨线程调用窗体控件的问题
Unity官方文档
总结和展望
本文探究了使用命令行来对Unity进行打包,同时使用WinForm构建了一个可视化界面以供用户使用。
本项目还有点缺陷,开发者需要在项目里写好BuildScript,外部才能运行其中的静态打包方法,未来希望可以直接在WinForm上对BuildScriot中的保存场景、项目名称进行修改,直接插入项目中,无需提前写好BuildScript.