Glide的with,load,into
在Glide的常规使用中,我们是这样使用的:
protected void onCreate(Bundle savedInstanceState) {super.onCreate(savedInstanceState);setContentView(R.layout.activity_main);ImageView imageView = findViewById(R.id.image); // 同学们:获取ImageView控件而已// TODO 常规方式Glide.with(this).load(URL).into(imageView);
为了便于分析,把Glide的使用拆分开:
...
RequestManager requestManager = Glide.with(this.getApplicationContext());
RequestBuilder requestBuilder = requestManager.load(URL); // URL === StringBitmapDecoder;
requestBuilder.into(imageView);
...
接下来,将拆分开,分别分析Glide的with,load,into方法.
一.glide.with()
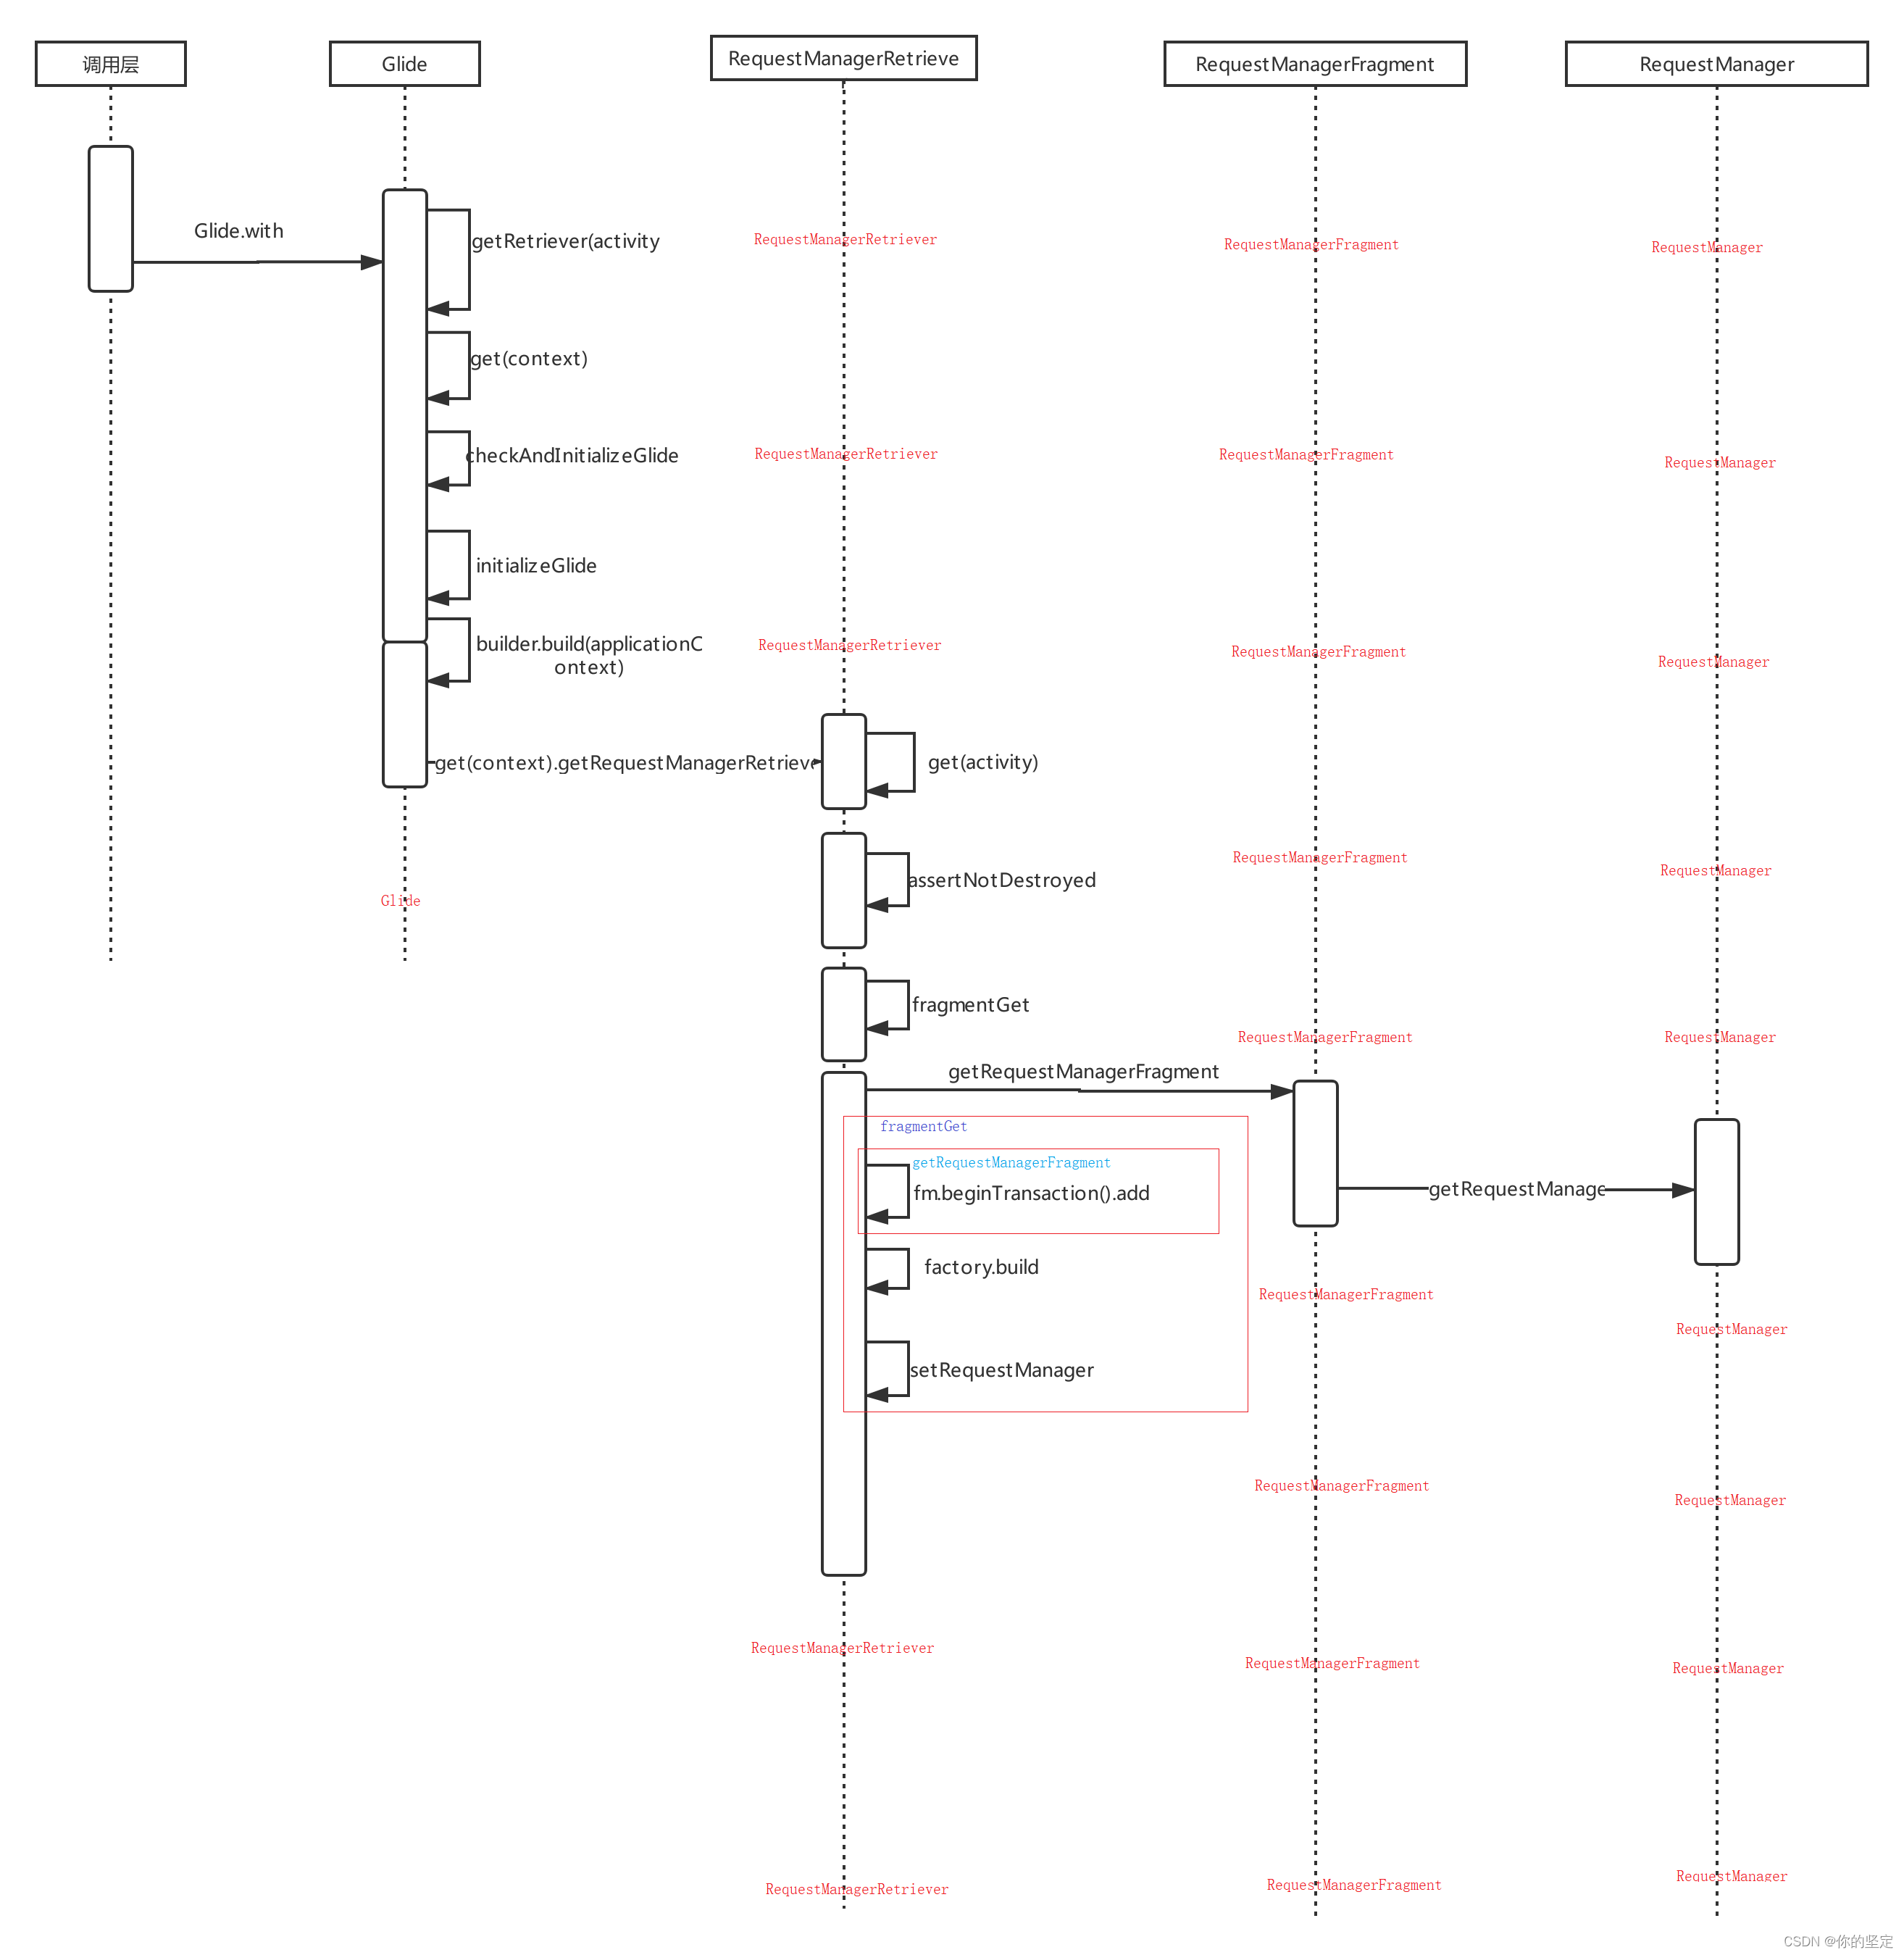
Glide的with方法在上一篇Glide的生命周期监控中分析过,简单总结就是通过一个隐形fragment来监听生命周期,直接上偷师来的时序图:
[外链图片转存失败,源站可能有防盗链机制,建议将图片保存下来直接上传(img-Se5rygPe-1648402159965)(E:%5Cdownload%5Cweiyun%5CGilde_with%20-%20%E5%89%AF%E6%9C%AC.png)]
因为在上一篇着重分析过,这一篇就不再分析。
二. requestBuilder.load()
load的流程相对简单
时序图:
load函数有众多的重载,从参数为String类型的load函数着手分析:
RequestManager.java:
public RequestBuilder<Drawable> load(@Nullable String string) {return asDrawable().load(string);
}
RequestManager.java
public RequestBuilder<Drawable> asDrawable() {return as(Drawable.class);
}
RequestManager.java:
public <ResourceType> RequestBuilder<ResourceType> as(@NonNull Class<ResourceType> resourceClass) {return new RequestBuilder<>(glide, this, resourceClass, context);
}
public RequestBuilder<TranscodeType> load(@Nullable String string) {return loadGeneric(string);
}
通过代码 ,可以看得到requestBuilder.load()的流程还是相对简单好多的
RequestBuilder:
private RequestBuilder<TranscodeType> loadGeneric(@Nullable Object model) {this.model = model;isModelSet = true;return this;
}
requestBuilder.load()的目的比较简单 , 就是生成一个requestBuilder
三.requestBuilder.into()
into()的流程是这三个流程中最为复杂的那一个。
先梳理into()的主线流程
public ViewTarget<ImageView, TranscodeType> into(@NonNull ImageView view) {Util.assertMainThread();Preconditions.checkNotNull(view); // 常规的检查 确保view不为空BaseRequestOptions<?> requestOptions = this;if (!requestOptions.isTransformationSet()&& requestOptions.isTransformationAllowed()&& view.getScaleType() != null) {// Clone in this method so that if we use this RequestBuilder to load into a View and then// into a different target, we don't retain the transformation applied based on the previous// View's scale type.switch (view.getScaleType()) {case CENTER_CROP:requestOptions = requestOptions.clone().optionalCenterCrop(); //注释1 支线流程break;case CENTER_INSIDE:// requestOptions = requestOptions.clone().optionalCenterInside();//注释1 支线流程break;case FIT_CENTER:case FIT_START:case FIT_END:requestOptions = requestOptions.clone().optionalFitCenter(); //注释1 支线流程,很少见给imgeView设置scaletypebreak;case FIT_XY:requestOptions = requestOptions.clone().optionalCenterInside();//注释1 支线流程break;case CENTER:case MATRIX:default:// Do nothing.}}// 这一步属于主线流程 return into(glideContext.buildImageViewTarget(view, transcodeClass),/*targetListener=*/ null,requestOptions,Executors.mainThreadExecutor());}
1、我们关注主线流程 ,在注释1处会根据imgeView的scaletype标记 ,去执行一些操作。
在into函数中的返回 return into(
glideContext.buildImageViewTarget(view, transcodeClass),
/targetListener=/ null,
requestOptions,
Executors.mainThreadExecutor()); 是我们需要关注的主线,根据以上代码可以看出从这里开始将开始一大堆流程,但所有最终所有流程走完,就会回到这里。
2、接下来这分析上面返回的into():
private <Y extends Target<TranscodeType>> Y into(@NonNull Y target,@Nullable RequestListener<TranscodeType> targetListener,BaseRequestOptions<?> options,Executor callbackExecutor) {// 常规操作 进行检查 Preconditions.checkNotNull(target);if (!isModelSet) {throw new IllegalArgumentException("You must call #load() before calling #into()");}// 主线流程 注释1 : Requset requset = new SingleRequest()Request request = buildRequest(target, targetListener, options, callbackExecutor);// 支线流程 检测处理上一个请求的状态Request previous = target.getRequest();if (request.isEquivalentTo(previous)&& !isSkipMemoryCacheWithCompletePreviousRequest(options, previous)) {// If the request is completed, beginning again will ensure the result is re-delivered,// triggering RequestListeners and Targets. If the request is failed, beginning again will// restart the request, giving it another chance to complete. If the request is already// running, we can let it continue running without interruption.if (!Preconditions.checkNotNull(previous).isRunning()) {// Use the previous request rather than the new one to allow for optimizations like skipping// setting placeholders, tracking and un-tracking Targets, and obtaining View dimensions// that are done in the individual Request.previous.begin();}return target;}requestManager.clear(target);target.setRequest(request);// 主线流程 注释2 在这里会把我们刚才得到的SingleRequest作为参数传进去requestManager.track(target, request);return target;}
在上面中的 注释1 :Request request = buildRequest(target, targetListener, options, callbackExecutor); 是主线流程 ,其中Request 是一个接口:
public interface Request {/** Starts an asynchronous load. */void begin();void clear();void pause();boolean isRunning();boolean isComplete();boolean isCleared();boolean isAnyResourceSet();boolean isEquivalentTo(Request other);
}
而buildRequst()会给他返回一个继承了当前接口的类型:SingleRequest, 为了 方便梳理 可以这样纪录: Requset requset = new SingleRequest(),在注释2处 又是主线流程 , 在这里会把我们刚才得到的SingleRequest作为参数传进去:
synchronized void track(@NonNull Target<?> target, @NonNull Request request) {targetTracker.track(target);// 注释1 这是将要分析的主线 requestTracker.runRequest(request);
}
继续跟进分析主线流程 requestTracker.runRequest(request); :
public void runRequest(@NonNull Request request) {requests.add(request);   // 添加到等待队列 if (!isPaused) {   // 如果没有被暂停(例如activity不可见了 执行了onStop()) ,就开始执行请求request.begin();   // 注释1  主线流程 begin} else {request.clear();   // 清除这个请求 if (Log.isLoggable(TAG, Log.VERBOSE)) {Log.v(TAG, "Paused, delaying request");}pendingRequests.add(request);  // 把这个请求加到 等待队列}
}
如上代码中会去请求进行处理,这里需要了解一下Glide的请求队列:
当我们在load.into();方法时,所有的请求都会被添加到一个叫RequestTracker的队列中,这个队列有两个,一个是运行时队列,一个是等待队列;
如果当前页面停止,onStop方法被调用,所有的运行中的请求都会被停止,并且全部添加到等待队列中; Android开发之Glide - 简书 (jianshu.com)
当开始运行时,又会把所有等待队列中的请求放到运行队列中去!
队列的维护:
RequestManager with = Glide.with(this);
通过这句代码,创建了一个RequestManager,并在Glide.with方法中,为传入的this(Activity) 创建一个无UI的Fragment,并将Fragment的生命周期绑定到ReuqestManager上。
当Activity触发了onStop等方法时,则会隐式的调用fragment的onStop方法,再通过fragment 的onStop 调用RequestManager的onStop方法,以此来管理两个请求队列中的请求;
在了解玩Glide的请求队列后,我们回到对主线流程的分析 : 在注释1处的 request.begin(), request是一个接口,begin()是接口的一个抽象方法, 但是从之前的分析可以得知 ,在这里的request的类型 是他的实现类SingleRequest,这里的begin() 也自然是它的方法:
3.SingleRequest.begin()
public void begin() {synchronized (requestLock) {assertNotCallingCallbacks();stateVerifier.throwIfRecycled();startTime = LogTime.getLogTime();if (model == null) {if (Util.isValidDimensions(overrideWidth, overrideHeight)) {width = overrideWidth;height = overrideHeight;}// Only log at more verbose log levels if the user has set a fallback drawable, because// fallback Drawables indicate the user expects null models occasionally.int logLevel = getFallbackDrawable() == null ? Log.WARN : Log.DEBUG;onLoadFailed(new GlideException("Received null model"), logLevel);return;}// 正在运行 抛出异常if (status == Status.RUNNING) {throw new IllegalArgumentException("Cannot restart a running request");}// If we're restarted after we're complete (usually via something like a notifyDataSetChanged// that starts an identical request into the same Target or View), we can simply use the// resource and size we retrieved the last time around and skip obtaining a new size, starting// a new load etc. This does mean that users who want to restart a load because they expect// that the view size has changed will need to explicitly clear the View or Target before// starting the new load.// 完成了 则通知已完成if (status == Status.COMPLETE) {onResourceReady(resource, DataSource.MEMORY_CACHE);return;}// Restarts for requests that are neither complete nor running can be treated as new requests// and can run again from the beginning.status = Status.WAITING_FOR_SIZE;  // 如果用户没有指定宽和高 ,在这里先测量 然后自己指定if (Util.isValidDimensions(overrideWidth, overrideHeight)) {// 主线流程 注释1 onSizeReady(overrideWidth, overrideHeight);} else {target.getSize(this);}if ((status == Status.RUNNING || status == Status.WAITING_FOR_SIZE)&& canNotifyStatusChanged()) {target.onLoadStarted(getPlaceholderDrawable());}if (IS_VERBOSE_LOGGABLE) {logV("finished run method in " + LogTime.getElapsedMillis(startTime));}}
}
在得到宽和高后 ,主线流程回到注释1处: onSizeReady(overrideWidth, overrideHeight) :
public void onSizeReady(int width, int height) {stateVerifier.throwIfRecycled();synchronized (requestLock) {  // 防止多线程并发造成的问题if (IS_VERBOSE_LOGGABLE) {logV("Got onSizeReady in " + LogTime.getElapsedMillis(startTime));}if (status != Status.WAITING_FOR_SIZE) {return;}status = Status.RUNNING;float sizeMultiplier = requestOptions.getSizeMultiplier();this.width = maybeApplySizeMultiplier(width, sizeMultiplier);this.height = maybeApplySizeMultiplier(height, sizeMultiplier);if (IS_VERBOSE_LOGGABLE) {logV("finished setup for calling load in " + LogTime.getElapsedMillis(startTime));}// 主线流程 注释1  engine.loadloadStatus =engine.load(glideContext,model,requestOptions.getSignature(),this.width,this.height,requestOptions.getResourceClass(),transcodeClass,priority,requestOptions.getDiskCacheStrategy(),requestOptions.getTransformations(),requestOptions.isTransformationRequired(),requestOptions.isScaleOnlyOrNoTransform(),requestOptions.getOptions(),requestOptions.isMemoryCacheable(),requestOptions.getUseUnlimitedSourceGeneratorsPool(),requestOptions.getUseAnimationPool(),requestOptions.getOnlyRetrieveFromCache(),this,callbackExecutor);// This is a hack that's only useful for testing right now where loads complete synchronously// even though under any executor running on any thread but the main thread, the load would// have completed asynchronously.if (status != Status.RUNNING) {loadStatus = null;}if (IS_VERBOSE_LOGGABLE) {logV("finished onSizeReady in " + LogTime.getElapsedMillis(startTime));}}
}
在注释1处会 走到主线流程 engine.load( ):
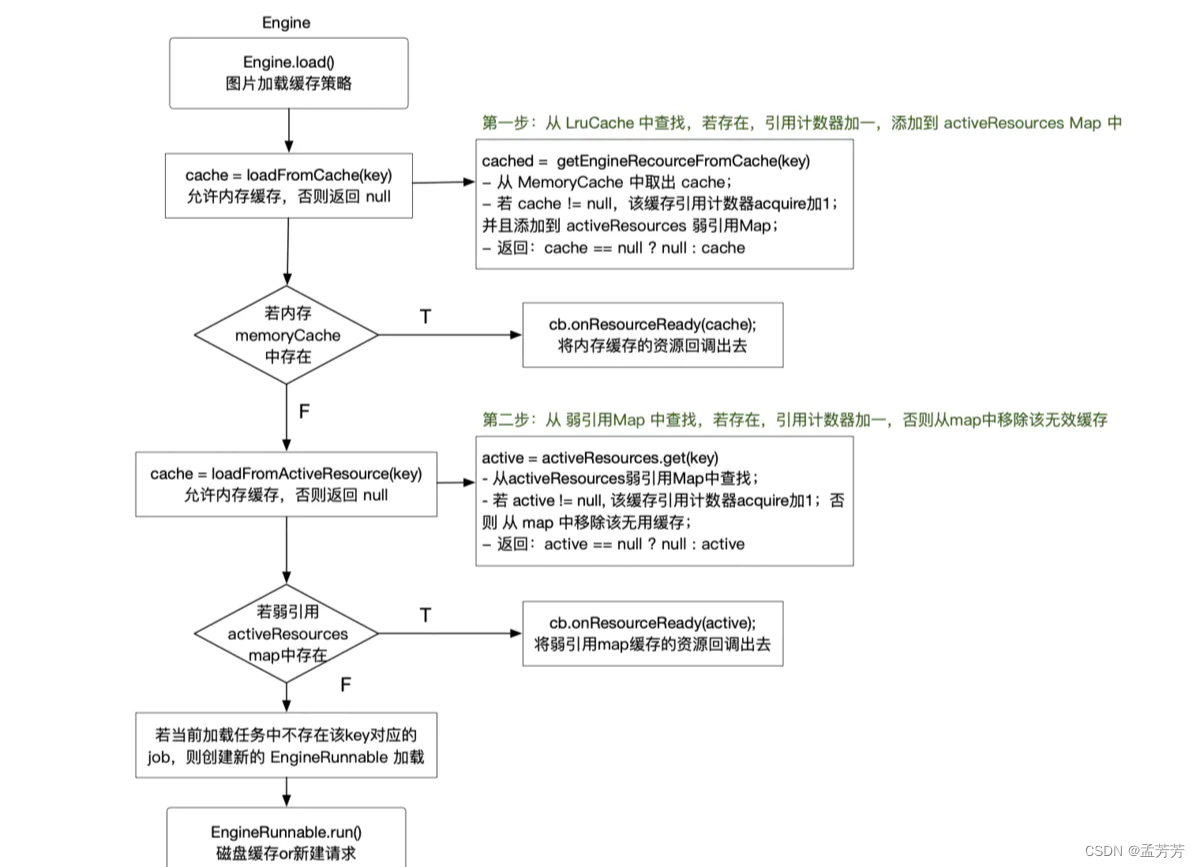
public <R> LoadStatus load(GlideContext glideContext,Object model,Key signature,int width,int height,Class<?> resourceClass,Class<R> transcodeClass,Priority priority,DiskCacheStrategy diskCacheStrategy,Map<Class<?>, Transformation<?>> transformations,boolean isTransformationRequired,boolean isScaleOnlyOrNoTransform,Options options,boolean isMemoryCacheable,boolean useUnlimitedSourceExecutorPool,boolean useAnimationPool,boolean onlyRetrieveFromCache,ResourceCallback cb,Executor callbackExecutor) {long startTime = VERBOSE_IS_LOGGABLE ? LogTime.getLogTime() : 0;// 注释1 这个key适用于标识一张图片,key具有唯一性,主要是为了方便 Glide的缓存机制。从buildKey的参数中可以看到,这里用了诸多数据来得到图片的身份证:key。EngineKey key =keyFactory.buildKey(model,signature,width,height,transformations,resourceClass,transcodeClass,options);EngineResource<?> memoryResource;synchronized (this) {  // 主线流程 注释2 : 先去查找活动缓存和内存缓存memoryResource = loadFromMemory(key, isMemoryCacheable, startTime);if (memoryResource == null) { // 注释3  如果活动缓存和内存缓存没有查找到 return waitForExistingOrStartNewJob(glideContext,model,signature,width,height,resourceClass,transcodeClass,priority,diskCacheStrategy,transformations,isTransformationRequired,isScaleOnlyOrNoTransform,options,isMemoryCacheable,useUnlimitedSourceExecutorPool,useAnimationPool,onlyRetrieveFromCache,cb,callbackExecutor,key,startTime);}}// Avoid calling back while holding the engine lock, doing so makes it easier for callers to// deadlock.cb.onResourceReady(memoryResource, DataSource.MEMORY_CACHE); // 缓存命中了直接返回return null;
}
在上面代码注释1处,会根据图片的诸多信息生成该图片的身份标识 key,通过这个key方便Glide的缓存机制发挥自己的作用,在注释2处 会进入到我们要分析的主线流程 memoryResource = loadFromMemory(key, isMemoryCacheable, startTime); 去缓存中查找我们图片
4.memoryResource = loadFromMemory(key, isMemoryCacheable, startTime);
private EngineResource<?> loadFromMemory(EngineKey key, boolean isMemoryCacheable, long startTime) {if (!isMemoryCacheable) {return null;}// 注释1 先到运行时缓存的 一级缓存:活动缓存中找图片资源EngineResource<?> active = loadFromActiveResources(key);if (active != null) {if (VERBOSE_IS_LOGGABLE) {logWithTimeAndKey("Loaded resource from active resources", startTime, key);}return active;}//  注释2 如果运行时缓存的一级缓存没有找到,再到运行时缓存的二级缓存: 内存缓存查找图片资源EngineResource<?> cached = loadFromCache(key);if (cached != null) {if (VERBOSE_IS_LOGGABLE) {logWithTimeAndKey("Loaded resource from cache", startTime, key);}return cached;}return null;
}
如上代码中,会在两个缓存中查找,如果找到了 就返回缓存中的图片资源,要是没有找到,就会执行上文load()代码 注释3 的waitForExistingOrStartNewJob():
private <R> LoadStatus waitForExistingOrStartNewJob(GlideContext glideContext,Object model,Key signature,int width,int height,Class<?> resourceClass,Class<R> transcodeClass,Priority priority,DiskCacheStrategy diskCacheStrategy,Map<Class<?>, Transformation<?>> transformations,boolean isTransformationRequired,boolean isScaleOnlyOrNoTransform,Options options,boolean isMemoryCacheable,boolean useUnlimitedSourceExecutorPool,boolean useAnimationPool,boolean onlyRetrieveFromCache,ResourceCallback cb,Executor callbackExecutor,EngineKey key,long startTime) {// 注释1 : 检测该key的任务 有没有正在运行 EngineJob<?> current = jobs.get(key, onlyRetrieveFromCache);if (current != null) {current.addCallback(cb, callbackExecutor);if (VERBOSE_IS_LOGGABLE) {logWithTimeAndKey("Added to existing load", startTime, key);}return new LoadStatus(cb, current);}// 注释2 :engineJob 是一个线程池的大管家EngineJob<R> engineJob =engineJobFactory.build(key,isMemoryCacheable,useUnlimitedSourceExecutorPool,useAnimationPool,onlyRetrieveFromCache);// 注释3 : 要执行的任务DecodeJob<R> decodeJob =decodeJobFactory.build(glideContext,model,key,signature,width,height,resourceClass,transcodeClass,priority,diskCacheStrategy,transformations,isTransformationRequired,isScaleOnlyOrNoTransform,onlyRetrieveFromCache,options,engineJob);jobs.put(key, engineJob);engineJob.addCallback(cb, callbackExecutor);// 注释4  在这里把 要执行的任务交给线程池大管家去处理 engineJob.start(decodeJob);if (VERBOSE_IS_LOGGABLE) {logWithTimeAndKey("Started new load", startTime, key);}return new LoadStatus(cb, engineJob);
}
观察上面的代码,在注释以处 ,确定该key的任务只要与一个在执行,在注释三处,生成了将要交给线程池大管家的任务,在注释4 处,正式把任务交给线程池大管家处理。因为DecodeJob最终是交给线程池的,所以毋庸置疑,DecodeJob肯定实现Runnable接口,并实现了Runnable接口的run方法,先忽略线程池的相关逻辑,run方法里面肯定有重要的主线流程,接下来就分析run方法:
class DecodeJob<R>implements DataFetcherGenerator.FetcherReadyCallback,Runnable,Comparable<DecodeJob<?>>,Poolable {...@Overridepublic void run() {// This should be much more fine grained, but since Java's thread pool implementation silently// swallows all otherwise fatal exceptions, this will at least make it obvious to developers// that something is failing.GlideTrace.beginSectionFormat("DecodeJob#run(model=%s)", model);// Methods in the try statement can invalidate currentFetcher, so set a local variable here to// ensure that the fetcher is cleaned up either way.DataFetcher<?> localFetcher = currentFetcher;try {if (isCancelled) {notifyFailed();return;}// 主线流程 注释1 重点关注runWrapped();} catch (CallbackException e) {// If a callback not controlled by Glide throws an exception, we should avoid the Glide// specific debug logic below.throw e;} catch (Throwable t) {// Catch Throwable and not Exception to handle OOMs. Throwables are swallowed by our// usage of .submit() in GlideExecutor so we're not silently hiding crashes by doing this. We// are however ensuring that our callbacks are always notified when a load fails. Without this// notification, uncaught throwables never notify the corresponding callbacks, which can cause// loads to silently hang forever, a case that's especially bad for users using Futures on// background threads.if (Log.isLoggable(TAG, Log.DEBUG)) {Log.d(TAG,"DecodeJob threw unexpectedly" + ", isCancelled: " + isCancelled + ", stage: " + stage,t);}// When we're encoding we've already notified our callback and it isn't safe to do so again.if (stage != Stage.ENCODE) {throwables.add(t);notifyFailed();}if (!isCancelled) {throw t;}throw t;} finally {// Keeping track of the fetcher here and calling cleanup is excessively paranoid, we call// close in all cases anyway.if (localFetcher != null) {localFetcher.cleanup();}GlideTrace.endSection();}}... }
在上面的的代码中的主线流程是 注释1 处的runWrapped();:
private void runWrapped() {switch (runReason) { case INITIALIZE:stage = getNextStage(Stage.INITIALIZE);   注释1 这里的runReason和我们使用Glide时 配置的策略有关先不关注currentGenerator = getNextGenerator();  // 注释2 这个是主线流程 需要重点关注        currentGenerator  = new SourceGenerator ()runGenerators();  // 注释3  主线流程break;case SWITCH_TO_SOURCE_SERVICE:runGenerators();break;case DECODE_DATA:decodeFromRetrievedData();break;default:throw new IllegalStateException("Unrecognized run reason: " + runReason);}
}
在上面的代码中 currentGenerator = getNextGenerator() 为主线流程 重点关注:
private DataFetcherGenerator getNextGenerator() {switch (stage) {case RESOURCE_CACHE:return new ResourceCacheGenerator(decodeHelper, this);case DATA_CACHE:return new DataCacheGenerator(decodeHelper, this);case SOURCE:    // 我们没有配置任何缓存策略 则会进入这个分支return new SourceGenerator(decodeHelper, this);case FINISHED:return null;default:throw new IllegalStateException("Unrecognized stage: " + stage);}
}
在上面代码中 假如没有配置任何缓存策略 则会进入到 case SOURCE: 分支 返回 SourceGenerator(decodeHelper, this); 所以在上一步的代码分析 runWrapped() 中的注释2 中currentGenerator 为SourceGenerator 类型,为了方便记录 我们这样表示 currentGenerator = new
SourceGenerator ()
5.currentGenerator = new SourceGenerator ():
继续回到 runWrapped() 中,为方便分析,把上面的代码拿下来 :
private void runWrapped() {switch (runReason) { case INITIALIZE:stage = getNextStage(Stage.INITIALIZE);   注释1 这里的runReason和我们使用Glide时 配置的策略有关先不关注currentGenerator = getNextGenerator();  // 注释2 这个是主线流程 需要重点关注        currentGenerator  = new SourceGenerator ()runGenerators();  // 注释3  主线流程break;case SWITCH_TO_SOURCE_SERVICE:runGenerators();break;case DECODE_DATA:decodeFromRetrievedData();break;default:throw new IllegalStateException("Unrecognized run reason: " + runReason);}
}
在上面代码中 注释 1 注释2 处的流程 已经简单的分析过 ,接下来进入到 注释3处的主线流程:
private void runGenerators() {currentThread = Thread.currentThread();startFetchTime = LogTime.getLogTime();boolean isStarted = false;while (!isCancelled&& currentGenerator != null&& !(isStarted = currentGenerator.startNext())) {  // 注释1 主线流程  currentGenerator是我们之前埋下的伏笔 SourceGenerator stage = getNextStage(stage);currentGenerator = getNextGenerator();if (stage == Stage.SOURCE) {reschedule();return;}}// We've run out of stages and generators, give up.if ((stage == Stage.FINISHED || isCancelled) && !isStarted) {notifyFailed();}// Otherwise a generator started a new load and we expect to be called back in// onDataFetcherReady.
}
6.currentGenerator.startNext()
经过上面的分析可以得知 currentGenerator.startNext() 其实就是SourceGenerator 调用自己的startNext方法:
SourceGenerator.java@Override
public boolean startNext() {if (dataToCache != null) {Object data = dataToCache;dataToCache = null;cacheData(data);}if (sourceCacheGenerator != null && sourceCacheGenerator.startNext()) {return true;}sourceCacheGenerator = null;loadData = null;boolean started = false;// 注释1  主线流程 while (!started && hasNextModelLoader()) {loadData = helper.getLoadData().get(loadDataListIndex++);// 注释2 既然是请网络上请求数据,那么从 getLoadData() 着手分析if (loadData != null&& (helper.getDiskCacheStrategy().isDataCacheable(loadData.fetcher.getDataSource())|| helper.hasLoadPath(loadData.fetcher.getDataClass()))) {started = true;startNextLoad(loadData);}}return started;
}
List<LoadData<?>> getLoadData() {if (!isLoadDataSet) {isLoadDataSet = true;loadData.clear();List<ModelLoader<Object, ?>> modelLoaders = glideContext.getRegistry().getModelLoaders(model);//noinspection ForLoopReplaceableByForEach to improve perffor (int i = 0, size = modelLoaders.size(); i < size; i++) {ModelLoader<Object, ?> modelLoader = modelLoaders.get(i);LoadData<?> current = modelLoader.buildLoadData(model, width, height, options);  // 注释1 主线流程  :buildLoadData()if (current != null) {loadData.add(current);}}}return loadData;
}
HttpGlideUrlLoader.java
public LoadData<InputStream> buildLoadData(@NonNull GlideUrl model, int width, int height, @NonNull Options options) {// GlideUrls memoize parsed URLs so caching them saves a few object instantiations and time// spent parsing urls.GlideUrl url = model;if (modelCache != null) {url = modelCache.get(model, 0, 0);if (url == null) {modelCache.put(model, 0, 0, model);url = model;}}int timeout = options.get(TIMEOUT);return new LoadData<>(url, new HttpUrlFetcher(url, timeout)); // 注释1  主线流程  需要注意的是 new HttpUrlFetcher(url, timeout) 里面// 封装就是我们苦苦寻找的进行网络请求的地方
}
以上代码中 找到了进行网络请求的封装类,这也只是封装起来,在哪里触发这个封装类进行网络请求呢?这需要回到之前的.currentGenerator.startNext() :
SourceGenerator.java@Override
public boolean startNext() {if (dataToCache != null) {Object data = dataToCache;dataToCache = null;cacheData(data);}if (sourceCacheGenerator != null && sourceCacheGenerator.startNext()) {return true;}sourceCacheGenerator = null;loadData = null;boolean started = false;// 注释1  主线流程 while (!started && hasNextModelLoader()) {loadData = helper.getLoadData().get(loadDataListIndex++);// 注释2 进过之前的分析 可以得知loadData 就是一个封装了网络请求信息的																		 // HttpUrlFetcher类if (loadData != null&& (helper.getDiskCacheStrategy().isDataCacheable(loadData.fetcher.getDataSource())|| helper.hasLoadPath(loadData.fetcher.getDataClass()))) {started = true;startNextLoad(loadData);  // 注释3  把之前生成的HttpUrlFetcher对象交给 startNextLoad}}return started;
}
如上代码中,将会把生成的的HttpUrlFetcher对象交给 startNextLoad处理:
SourceGenerator.javaprivate void startNextLoad(final LoadData<?> toStart) {loadData.fetcher.loadData(  // 注释1 主线流程helper.getPriority(),new DataCallback<Object>() {@Overridepublic void onDataReady(@Nullable Object data) {if (isCurrentRequest(toStart)) {onDataReadyInternal(toStart, data);}}@Overridepublic void onLoadFailed(@NonNull Exception e) {if (isCurrentRequest(toStart)) {onLoadFailedInternal(toStart, e);}}});
}
HttpUrlFetcher.java@Override
public void loadData(@NonNull Priority priority, @NonNull DataCallback<? super InputStream> callback) {long startTime = LogTime.getLogTime();try {InputStream result = loadDataWithRedirects(glideUrl.toURL(), 0, null, glideUrl.getHeaders()); // 注释1  主线流程callback.onDataReady(result);} catch (IOException e) {if (Log.isLoggable(TAG, Log.DEBUG)) {Log.d(TAG, "Failed to load data for url", e);}callback.onLoadFailed(e);} finally {if (Log.isLoggable(TAG, Log.VERBOSE)) {Log.v(TAG, "Finished http url fetcher fetch in " + LogTime.getElapsedMillis(startTime));}}
}
private InputStream loadDataWithRedirects(URL url, int redirects, URL lastUrl, Map<String, String> headers) throws IOException {if (redirects >= MAXIMUM_REDIRECTS) {throw new HttpException("Too many (> " + MAXIMUM_REDIRECTS + ") redirects!");} else {// Comparing the URLs using .equals performs additional network I/O and is generally broken.// See http://michaelscharf.blogspot.com/2006/11/javaneturlequals-and-hashcode-make.html.try {if (lastUrl != null && url.toURI().equals(lastUrl.toURI())) {throw new HttpException("In re-direct loop");}} catch (URISyntaxException e) {// Do nothing, this is best effort.}}// 构建http网络请求urlConnection = connectionFactory.build(url);for (Map.Entry<String, String> headerEntry : headers.entrySet()) {urlConnection.addRequestProperty(headerEntry.getKey(), headerEntry.getValue());}urlConnection.setConnectTimeout(timeout);urlConnection.setReadTimeout(timeout);urlConnection.setUseCaches(false);urlConnection.setDoInput(true);// Stop the urlConnection instance of HttpUrlConnection from following redirects so that// redirects will be handled by recursive calls to this method, loadDataWithRedirects.urlConnection.setInstanceFollowRedirects(false);// Connect explicitly to avoid errors in decoders if connection fails.urlConnection.connect();// Set the stream so that it's closed in cleanup to avoid resource leaks. See #2352.stream = urlConnection.getInputStream();if (isCancelled) {return null;}final int statusCode = urlConnection.getResponseCode();if (isHttpOk(statusCode)) {return getStreamForSuccessfulRequest(urlConnection);} else if (isHttpRedirect(statusCode)) {String redirectUrlString = urlConnection.getHeaderField("Location");if (TextUtils.isEmpty(redirectUrlString)) {throw new HttpException("Received empty or null redirect url");}URL redirectUrl = new URL(url, redirectUrlString);// Closing the stream specifically is required to avoid leaking ResponseBodys in addition// to disconnecting the url connection below. See #2352.cleanup();return loadDataWithRedirects(redirectUrl, redirects + 1, url, headers);} else if (statusCode == INVALID_STATUS_CODE) {throw new HttpException(statusCode);} else {throw new HttpException(urlConnection.getResponseMessage(), statusCode);}
}
如上代码中会构建出http网络请求,然后返回InputStream流。接下来回到 HttpUrlFetcher的loadData方法:
HttpUrlFetcher.java@Override
public void loadData(@NonNull Priority priority, @NonNull DataCallback<? super InputStream> callback) {long startTime = LogTime.getLogTime();try {InputStream result = loadDataWithRedirects(glideUrl.toURL(), 0, null, glideUrl.getHeaders()); // 在这里拿到InputStream流,里面包																									// 含请求得到的图片数据信息callback.onDataReady(result); // 主线流程 注释1 把得到的InputStream回调回去 } catch (IOException e) {if (Log.isLoggable(TAG, Log.DEBUG)) {Log.d(TAG, "Failed to load data for url", e);}callback.onLoadFailed(e);} finally {if (Log.isLoggable(TAG, Log.VERBOSE)) {Log.v(TAG, "Finished http url fetcher fetch in " + LogTime.getElapsedMillis(startTime));}}
}
void onDataReadyInternal(LoadData<?> loadData, Object data) {DiskCacheStrategy diskCacheStrategy = this.helper.getDiskCacheStrategy();if (data != null && diskCacheStrategy.isDataCacheable(loadData.fetcher.getDataSource())) {this.dataToCache = data;this.cb.reschedule();} else {// 主线流程 注释1 在这里把 key data 和回调了 回去this.cb.onDataFetcherReady(loadData.sourceKey, data, loadData.fetcher, loadData.fetcher.getDataSource(), this.originalKey);}}
DecodeJob.javapublic void onDataFetcherReady(Key sourceKey, Object data, DataFetcher<?> fetcher, DataSource dataSource, Key attemptedKey) {this.currentSourceKey = sourceKey;this.currentData = data;this.currentFetcher = fetcher;this.currentDataSource = dataSource;this.currentAttemptingKey = attemptedKey;if (Thread.currentThread() != currentThread) {runReason = RunReason.DECODE_DATA;callback.reschedule(this);} else {GlideTrace.beginSection("DecodeJob.decodeFromRetrievedData");try {decodeFromRetrievedData(); // 注释1 主线流程 } finally {GlideTrace.endSection();}}
}
上面代码中的主线流程为 : decodeFromRetrievedData():
private void decodeFromRetrievedData() {if (Log.isLoggable(TAG, Log.VERBOSE)) {logWithTimeAndKey("Retrieved data",startFetchTime,"data: "+ currentData+ ", cache key: "+ currentSourceKey+ ", fetcher: "+ currentFetcher);}Resource<R> resource = null;try {resource = decodeFromData(currentFetcher, currentData, currentDataSource);  // 注释1  主线流程 } catch (GlideException e) {e.setLoggingDetails(currentAttemptingKey, currentDataSource);throwables.add(e);}if (resource != null) {notifyEncodeAndRelease(resource, currentDataSource);} else {runGenerators();}
}
private <Data> Resource<R> decodeFromData(DataFetcher<?> fetcher, Data data, DataSource dataSource) throws GlideException {try {if (data == null) {return null;}long startTime = LogTime.getLogTime();Resource<R> result = decodeFromFetcher(data, dataSource); // 注释1  主线流程if (Log.isLoggable(TAG, Log.VERBOSE)) {logWithTimeAndKey("Decoded result " + result, startTime);}return result;} finally {fetcher.cleanup();}
}
@SuppressWarnings("unchecked")
private <Data> Resource<R> decodeFromFetcher(Data data, DataSource dataSource)throws GlideException {LoadPath<Data, ?, R> path = decodeHelper.getLoadPath((Class<Data>) data.getClass());return runLoadPath(data, dataSource, path);  // 主线流程 注释1 runLoadPath 参数dataSource里面封装着 请求回来后的InputStream
}
private <Data, ResourceType> Resource<R> runLoadPath(Data data, DataSource dataSource, LoadPath<Data, ResourceType, R> path)throws GlideException {Options options = getOptionsWithHardwareConfig(dataSource);DataRewinder<Data> rewinder = glideContext.getRegistry().getRewinder(data);try {// ResourceType in DecodeCallback below is required for compilation to work with gradle.// 主线流程 注释1return path.load(rewinder, options, width, height, new DecodeCallback<ResourceType>(dataSource));} finally {rewinder.cleanup();}
}
LoadPath.javapublic Resource<Transcode> load(DataRewinder<Data> rewinder,@NonNull Options options,int width,int height,DecodePath.DecodeCallback<ResourceType> decodeCallback)throws GlideException {List<Throwable> throwables = Preconditions.checkNotNull(listPool.acquire());try {return loadWithExceptionList(rewinder, options, width, height, decodeCallback, throwables); // 主线流程  注释1 } finally {listPool.release(throwables);}
}
private Resource<Transcode> loadWithExceptionList(DataRewinder<Data> rewinder,@NonNull Options options,int width,int height,DecodePath.DecodeCallback<ResourceType> decodeCallback,List<Throwable> exceptions)throws GlideException {Resource<Transcode> result = null;//noinspection ForLoopReplaceableByForEach to improve perffor (int i = 0, size = decodePaths.size(); i < size; i++) {DecodePath<Data, ResourceType, Transcode> path = decodePaths.get(i);try {result = path.decode(rewinder, width, height, options, decodeCallback); // 主线流程 注释1 把InputStream 转换成Bitmap} catch (GlideException e) {exceptions.add(e);}if (result != null) {break;}}
如上代码中 在注释1 处 result = path.decode(rewinder, width, height, options, decodeCallback); 是一个重要的步骤,接下来注重到的分析:
DecodePath.javapublic Resource<Transcode> decode(DataRewinder<DataType> rewinder,int width,int height,@NonNull Options options,DecodeCallback<ResourceType> callback)throws GlideException {Resource<ResourceType> decoded = decodeResource(rewinder, width, height, options); // 注释1 主线  把InputStream转成bitmapResource<ResourceType> transformed = callback.onResourceDecoded(decoded); // 注释2  回调回去return transcoder.transcode(transformed, options);
}
先来分析生成bitmap的步骤: Resource decoded = decodeResource(rewinder, width, height, options); :
DecodePath.javaprivate Resource<ResourceType> decodeResource(DataRewinder<DataType> rewinder, int width, int height, @NonNull Options options)throws GlideException {List<Throwable> exceptions = Preconditions.checkNotNull(listPool.acquire());try {return decodeResourceWithList(rewinder, width, height, options, exceptions);  // 注释1 主线流程 } finally {listPool.release(exceptions);}
}
DecodePath.javaprivate Resource<ResourceType> decodeResourceWithList(DataRewinder<DataType> rewinder,int width,int height,@NonNull Options options,List<Throwable> exceptions)throws GlideException {Resource<ResourceType> result = null;//noinspection ForLoopReplaceableByForEach to improve perffor (int i = 0, size = decoders.size(); i < size; i++) {ResourceDecoder<DataType, ResourceType> decoder = decoders.get(i);try {DataType data = rewinder.rewindAndGet();if (decoder.handles(data, options)) {data = rewinder.rewindAndGet();result = decoder.decode(data, width, height, options); // 注释1 主线流程 把数据 宽高 和一些选项传进去 }// Some decoders throw unexpectedly. If they do, we shouldn't fail the entire load path, but// instead log and continue. See #2406 for an example.} catch (IOException | RuntimeException | OutOfMemoryError e) {if (Log.isLoggable(TAG, Log.VERBOSE)) {Log.v(TAG, "Failed to decode data for " + decoder, e);}exceptions.add(e);}if (result != null) {break;}}
StreamBitmapDecoder.javapublic Resource<Bitmap> decode(@NonNull InputStream source, int width, int height, @NonNull Options options)throws IOException {// Use to fix the mark limit to avoid allocating buffers that fit entire images.final RecyclableBufferedInputStream bufferedStream;final boolean ownsBufferedStream;if (source instanceof RecyclableBufferedInputStream) {bufferedStream = (RecyclableBufferedInputStream) source;ownsBufferedStream = false;} else {bufferedStream = new RecyclableBufferedInputStream(source, byteArrayPool);ownsBufferedStream = true;}// Use to retrieve exceptions thrown while reading.// TODO(#126): when the framework no longer returns partially decoded Bitmaps or provides a// way to determine if a Bitmap is partially decoded, consider removing.ExceptionCatchingInputStream exceptionStream =ExceptionCatchingInputStream.obtain(bufferedStream);// Use to read data.// Ensures that we can always reset after reading an image header so that we can still// attempt to decode the full image even when the header decode fails and/or overflows our read// buffer. See #283.MarkEnforcingInputStream invalidatingStream = new MarkEnforcingInputStream(exceptionStream);UntrustedCallbacks callbacks = new UntrustedCallbacks(bufferedStream, exceptionStream);try {return downsampler.decode(invalidatingStream, width, height, options, callbacks);} finally {exceptionStream.release();if (ownsBufferedStream) {bufferedStream.release();}}
}
在上面的代码中,我们注意到他的返回值 已经是bitmap了,就说明了 在这里面 就已经把InputStream处理成了Bitmap类型了,据图细节 不在深究。接下来回到DecodePath的decode方法中:
DecodePath.javapublic Resource<Transcode> decode(DataRewinder<DataType> rewinder,int width,int height,@NonNull Options options,DecodeCallback<ResourceType> callback)throws GlideException {// 把inputStream  --  >  bitmapResource<ResourceType> decoded = decodeResource(rewinder, width, height, options); // 注释1 主线  把InputStream转成bitmapResource<ResourceType> transformed = callback.onResourceDecoded(decoded); // 注释2  回调回去 decoded 是bitmapreturn transcoder.transcode(transformed, options);
}
上面代码注释1处的 把InputStream转成bitmap 的流程已经分析过,接下来分析注释2 处的回调过程: Resource transformed = callback.onResourceDecoded(decoded); 需要注意的是 decoded 是bitmap
private final class DecodeCallback<Z> implements DecodePath.DecodeCallback<Z> {private final DataSource dataSource;@SyntheticDecodeCallback(DataSource dataSource) {this.dataSource = dataSource;}@NonNull@Overridepublic Resource<Z> onResourceDecoded(@NonNull Resource<Z> decoded) {  // 注释1  主线流程return DecodeJob.this.onResourceDecoded(dataSource, decoded);}
}
回调的过程 非常的繁琐 ,我们直接来到回调的终点:
Engin.javapublic synchronized void onEngineJobComplete(EngineJob<?> engineJob, Key key, EngineResource<?> resource) {// A null resource indicates that the load failed, usually due to an exception.if (resource != null && resource.isMemoryCacheable()) {activeResources.activate(key, resource); // 主线流程 注释1 将资源存到活动缓存中 这样的话下一次可以直接从缓存中得到图片资源}jobs.removeIfCurrent(key, engineJob);}private void onResourceReady(Resource<R> resource, R result, DataSource dataSource) {// We must call isFirstReadyResource before setting status.boolean isFirstResource = isFirstReadyResource();status = Status.COMPLETE;this.resource = resource;if (glideContext.getLogLevel() <= Log.DEBUG) {Log.d(GLIDE_TAG,"Finished loading "+ result.getClass().getSimpleName()+ " from "+ dataSource+ " for "+ model+ " with size ["+ width+ "x"+ height+ "] in "+ LogTime.getElapsedMillis(startTime)+ " ms");}isCallingCallbacks = true;try {boolean anyListenerHandledUpdatingTarget = false;if (requestListeners != null) {for (RequestListener<R> listener : requestListeners) {anyListenerHandledUpdatingTarget |=listener.onResourceReady(result, model, target, dataSource, isFirstResource);}}anyListenerHandledUpdatingTarget |=targetListener != null&& targetListener.onResourceReady(result, model, target, dataSource, isFirstResource);if (!anyListenerHandledUpdatingTarget) {Transition<? super R> animation = animationFactory.build(dataSource, isFirstResource);target.onResourceReady(result, animation); // 注释1 主线流程 设置 图片显示}} finally {isCallingCallbacks = false;}notifyLoadSuccess();
}
public void onResourceReady(@NonNull Z resource, @Nullable Transition<? super Z> transition) {if (transition == null || !transition.transition(resource, this)) {setResourceInternal(resource);  // 主线流程 注释1 } else {maybeUpdateAnimatable(resource);}
}
private void setResourceInternal(@Nullable Z resource) {// Order matters here. Set the resource first to make sure that the Drawable has a valid and// non-null Callback before starting it.setResource(resource);  // 主线流程 注释1 maybeUpdateAnimatable(resource);
}
protected void setResource(@Nullable Drawable resource) {view.setImageDrawable(resource); // 终于等到你 : 把图片资源设置给view
}
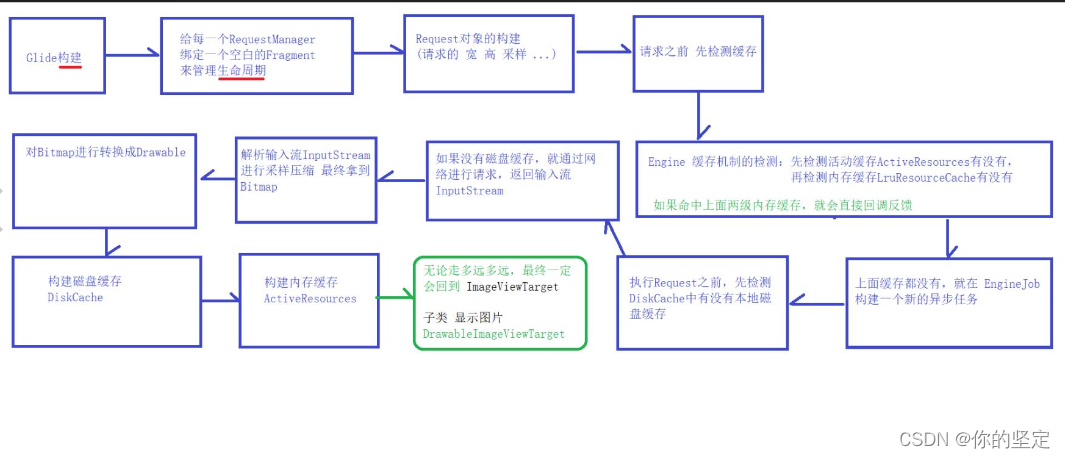
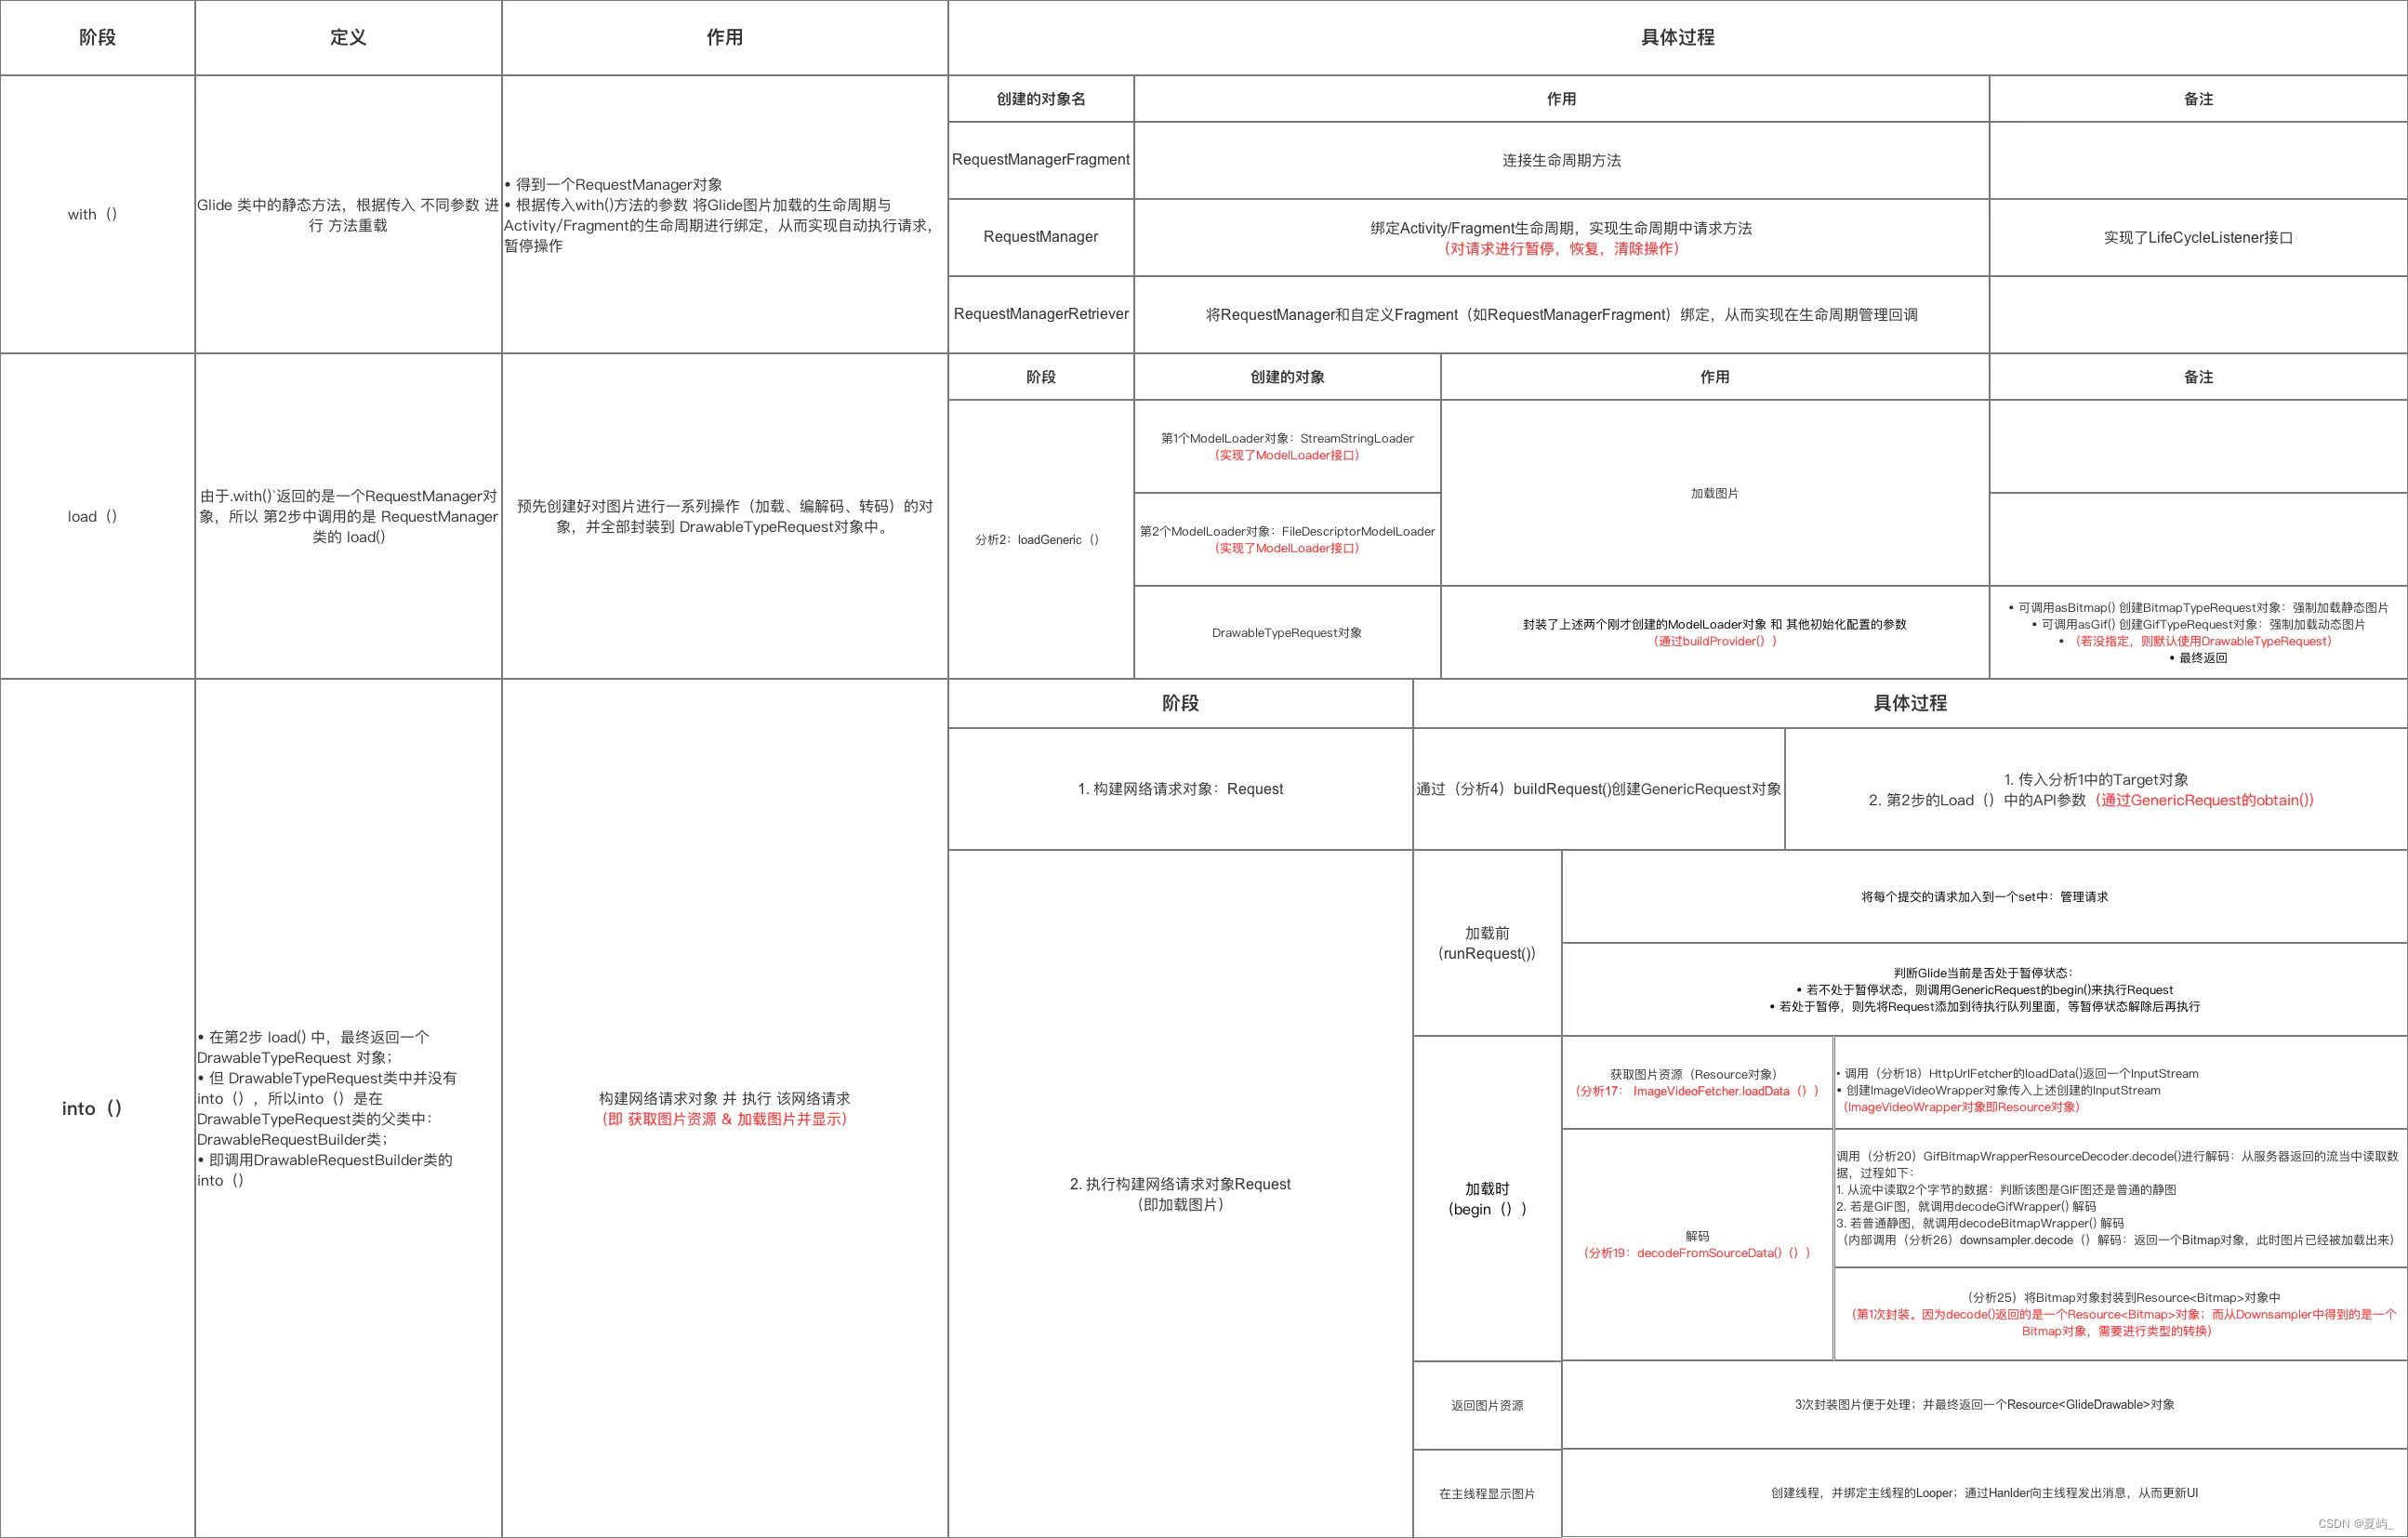
下面附上流程图:

下面附上思考的问题:
0.项目中大量的使用了Glide,偶尔会出现内存溢出问题,请说说大概是什么原因?
答:???
答:尽量在with的时候,传入有生命周期的作用域(非Application作用域),尽量避免使用了Application作用域,因为Application作用域不会对页面绑定生命周期机制,就回收不及时释放操作等....1.使用Glide为什么要加入网络权限? <uses-permission android:name="android.permission.INTERNET" />
答:???
答:等待队列/运行队列 执行Request ---> 活动缓存 --->内存缓存 ---> jobs.get检测执行的任务有没有执行完成 ---> HttpUrlFetcher.HttpURLConnection2.使用Glide时,with函数在子线程中,会有什么问题?
答:???
答:子线程,不会去添加 生命周期机制, 主线程才会添加 空白的Fragment 去监听 Activity Fragment 的变化。3.使用Glide时,with函数传入Application后,Glide内部会怎么处理?
答:???
答:在MainActivity中,MainActivity销毁了,并会让Glide生命周期机制处理回收,只有在整个APP应用都没有的时候,跟随着销毁(上节课 ApplicationLIfecycle add onStart  onDestroy 什么事情都没有做)。4.Glide源码里面的缓存,为什么要有 活动缓存 还需要 有内存缓存(高频)?
答: 如果只有一个 内存缓存的话,因为当内存缓存采用的LRU算法,缓存中能放的图片数量是一个固定的,采用淘汰最早使用的  算法,这样的话,当有一张新的图片进来的时候,会淘汰最晚使用的那个,但是玩意 被淘汰的那张图片还在acticity中显示,就这样被淘汰掉会导致一些错误,所以在activity和 内存缓存之间还需要一个 不采用lru算法的缓存.

![[软件更新]gladder2.0.3.3](http://hiphotos.baidu.com/iroy930/pic/item/47837a635750edfbe7113aaa.jpg)