目录
前言
1--Pytorch模型转换为Onnx模型
2--Onnx模型可视化及测试
2-1--可视化Onnx模型
2-2--测试Onnx模型
3--Onnx模型转换为Tensor RT推理模型
4--基于Tensor RT使用推理引擎实现语义分割
前言
基于Tensor RT的模型转换流程:Pytorch → Onnx → Tensor RT;本笔记基于 Tensor RT 官方 Github 仓库的语义分割 Demo(Tensor RT 官方Demo链接) 进行实现,首先将训练好的 Pytorch 模型转换为 Onnx 模型,之后基于Tensor RT将 Onnx 模型转换为推理引擎 engine,最后使用Tensor RT的推理引擎 engine 实现语义分割。
1--Pytorch模型转换为Onnx模型
利用 torch.hub.load() 加载预训练的 FCN-ResNet101 模型,利用 torch.onnx.export()导出Onnx模型;
from PIL import Image
from io import BytesIO
import requests
import matplotlib.pyplot as plt
import torch
import torch.nn as nn
import numpy as np# 下载并保存网络输入的图片
download_image = "./input.ppm" # 保存的路径,保存为ppm格式
response = requests.get("https://pytorch.org/assets/images/deeplab1.png") # 下载图片
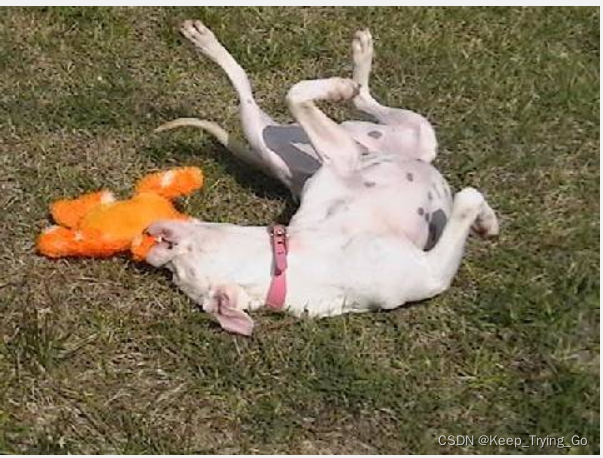
with Image.open(BytesIO(response.content)) as img:ppm = Image.new("RGB", img.size, (255, 255, 255))ppm.paste(img, mask=img.split()[3])ppm.save(download_image) # 保存图片plt.imshow(Image.open(download_image))
plt.show()# 创建并导出模型
output_onnx="./fcn-resnet101.onnx" # 导出的Onnx模型路径
class FCN_ResNet101(nn.Module): # 定义模型def __init__(self):super(FCN_ResNet101, self).__init__()# 下载并导入 fcn_resnet101 模型self.model = torch.hub.load('pytorch/vision:v0.6.0', 'fcn_resnet101', pretrained=True)def forward(self, inputs):x = self.model(inputs)['out']x = x.argmax(1, keepdims=True) # 增加 argmax 模块,组成最终的模型return xmodel = FCN_ResNet101()
model.eval()# 定义网络的输入
input_tensor = torch.rand(4, 3, 224, 224) # 导出Onnx模型
torch.onnx.export(model, input_tensor, output_onnx,opset_version=12,do_constant_folding=True,input_names=["input"],output_names=["output"],dynamic_axes={"input": {0: "batch", 2: "height", 3: "width"},"output": {0: "batch", 2: "height", 3: "width"}},verbose=False)上面利用 torch.hub.load() 下载预训练模型时,因网速的原因可能会比较慢,可根据链接(红框)下载对应的模型放置到本地相应的路径(绿框)当中,以节省时间。

2--Onnx模型可视化及测试
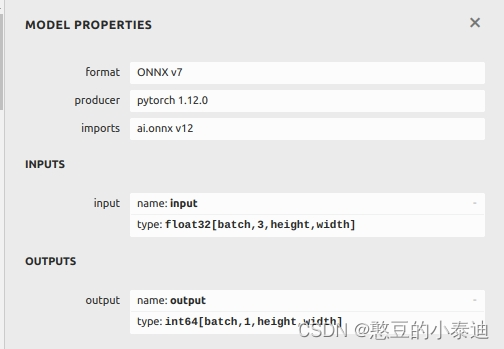
2-1--可视化Onnx模型
利用 netron 第三方库可视化导出的 Onnx 模型,以查看模型的输入输出维度;
# 终端依次执行
pip install netronpythonimport netronnetron.start("./fcn-resnet101.onnx")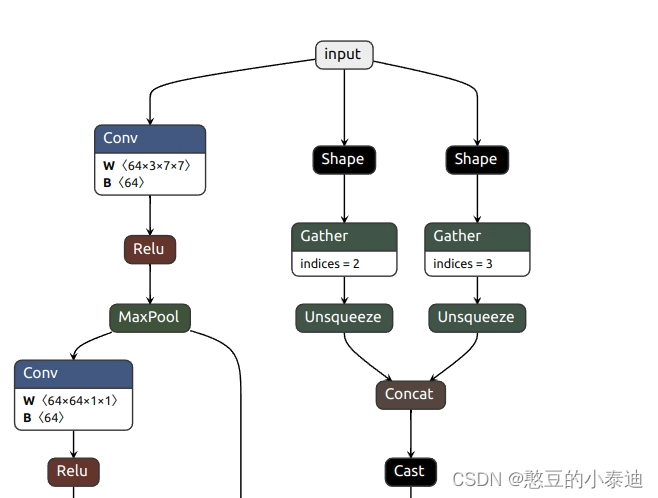
2-2--测试Onnx模型
使用 Onnxruntime 测试导出的 Onnx 推理模型,参考Tensor RT官方 Demo 设计相应的前处理和后处理函数;
import numpy as np
from PIL import Image
import onnx
import matplotlib.pyplot as plt
import onnxruntime# 前处理
def preprocess(image):# Mean normalizationmean = np.array([0.485, 0.456, 0.406]).astype('float32')stddev = np.array([0.229, 0.224, 0.225]).astype('float32')data = (np.asarray(image).astype('float32') / float(255.0) - mean) / stddev# Switch from HWC to to CHW orderreturn np.moveaxis(data, 2, 0)# 后处理
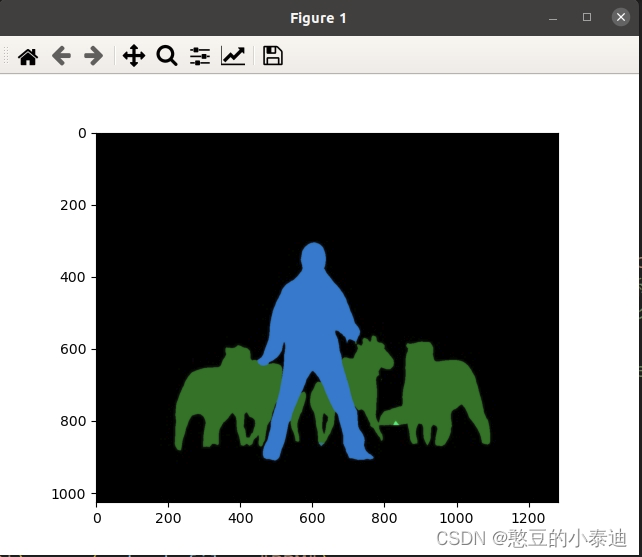
def postprocess(data):num_classes = 21# create a color palette, selecting a color for each classpalette = np.array([2 ** 25 - 1, 2 ** 15 - 1, 2 ** 21 - 1])colors = np.array([palette*i%255 for i in range(num_classes)]).astype("uint8")# plot the segmentation predictions for 21 classes in different colorsimg = Image.fromarray(data.astype('uint8'), mode='P')img.putpalette(colors)return imgif __name__ == "__main__":# 加载并可视化网络输入input_file = "./input.ppm" with Image.open(input_file) as img:input_image = preprocess(img) # 前处理image_width = img.widthimage_height = img.heightplt.imshow(Image.open(input_file)) plt.show()# 调整输入图片的维度,以适配Onnx模型 input_data = input_image[np.newaxis, :]# 导入Onnx模型Onnx_file = "./fcn-resnet101.onnx"Model = onnx.load(Onnx_file)onnx.checker.check_model(Model) # 验证Onnx模型是否准确# 使用onnxruntime推理model = onnxruntime.InferenceSession(Onnx_file, providers=['TensorrtExecutionProvider', 'CUDAExecutionProvider', 'CPUExecutionProvider'])input_name = model.get_inputs()[0].name # 对应可视化onnx模型时,网络的输入名称: inputoutput_name = model.get_outputs()[0].name # 对应可视化onnx模型时,网络的输出名称: outputprint(input_name)output = model.run([output_name], {input_name:input_data}) # onnxruntime的输入input_data需要为numpy类型,Tensor类型会报错# 后处理output = postprocess(np.reshape(output, (image_height, image_width)))# 保存并可视化推理结果output_file = "output_onnx.ppm"output.convert('RGB').save(output_file, "PPM")plt.imshow(Image.open(output_file))plt.show()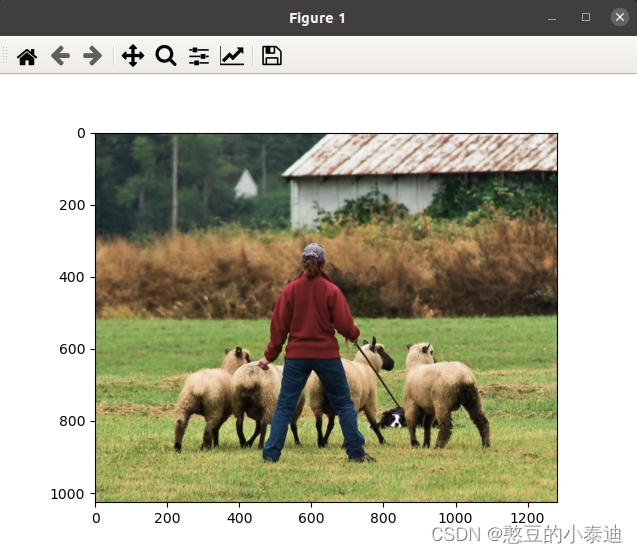
3--Onnx模型转换为Tensor RT推理模型
基于 Tensor RT 将导出的 Onnx 模型转换为推理模型 Engine,这里博主基于 Tensor RT 8.2.5.1 提供的 trtexec 可执行文件;
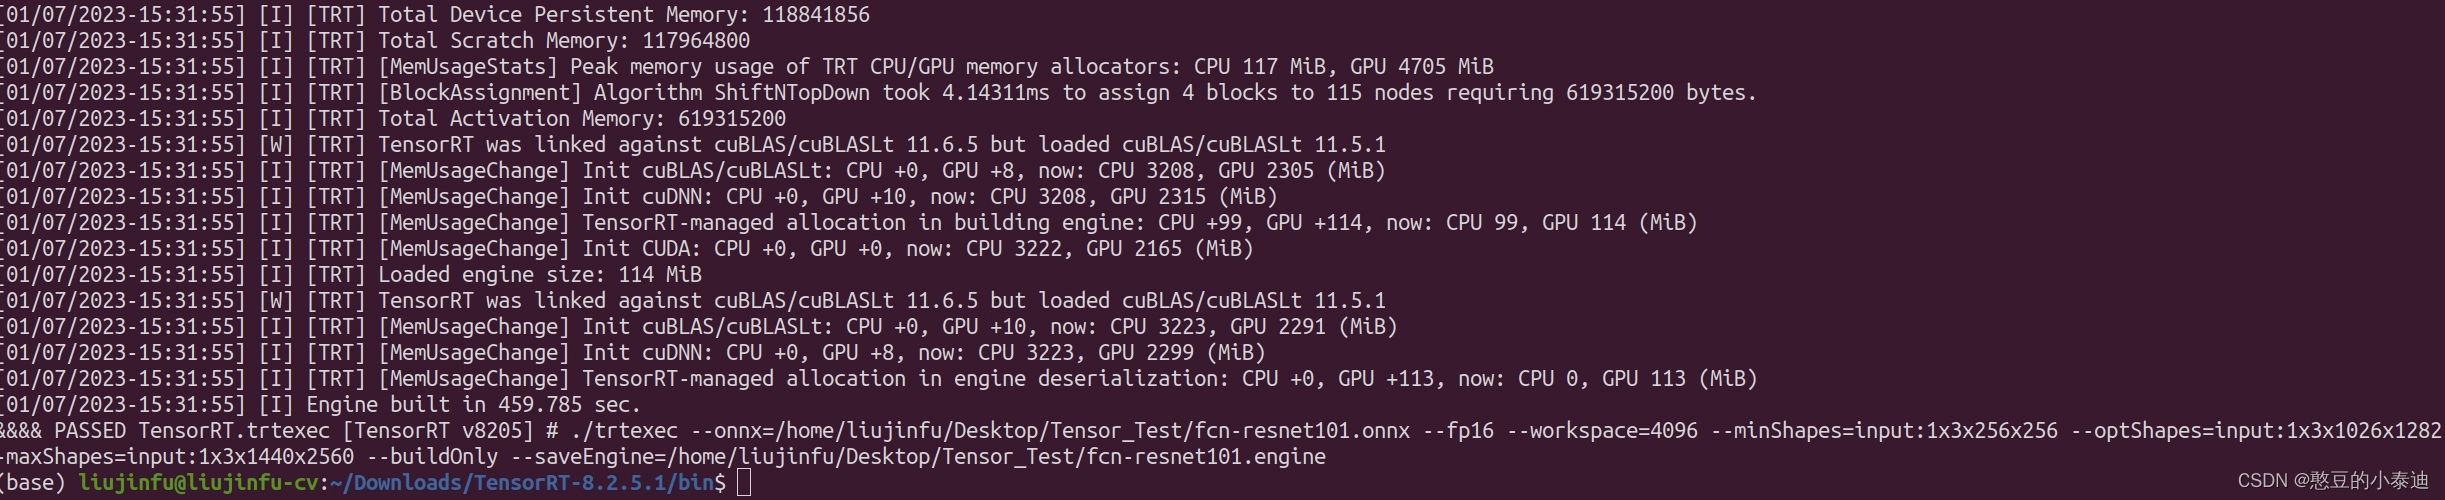
./trtexec --onnx=/path/fcn-resnet101.onnx --fp16 --workspace=4096 --minShapes=input:1x3x256x256 --optShapes=input:1x3x1026x1282 --maxShapes=input:1x3x1440x2560 --buildOnly --saveEngine=/path/fcn-resnet101.engine
--onnx 和 --saveEngine 需根据实际设置正确的模型路径;之前的Tensor RT 7.x 版本将--workspace设置为64,当使用Tensor RT 8.x 版本时,workspace的空间将不足会出现上图的错误,因此需将 --workspace=64 设置为 --workspace=4096;
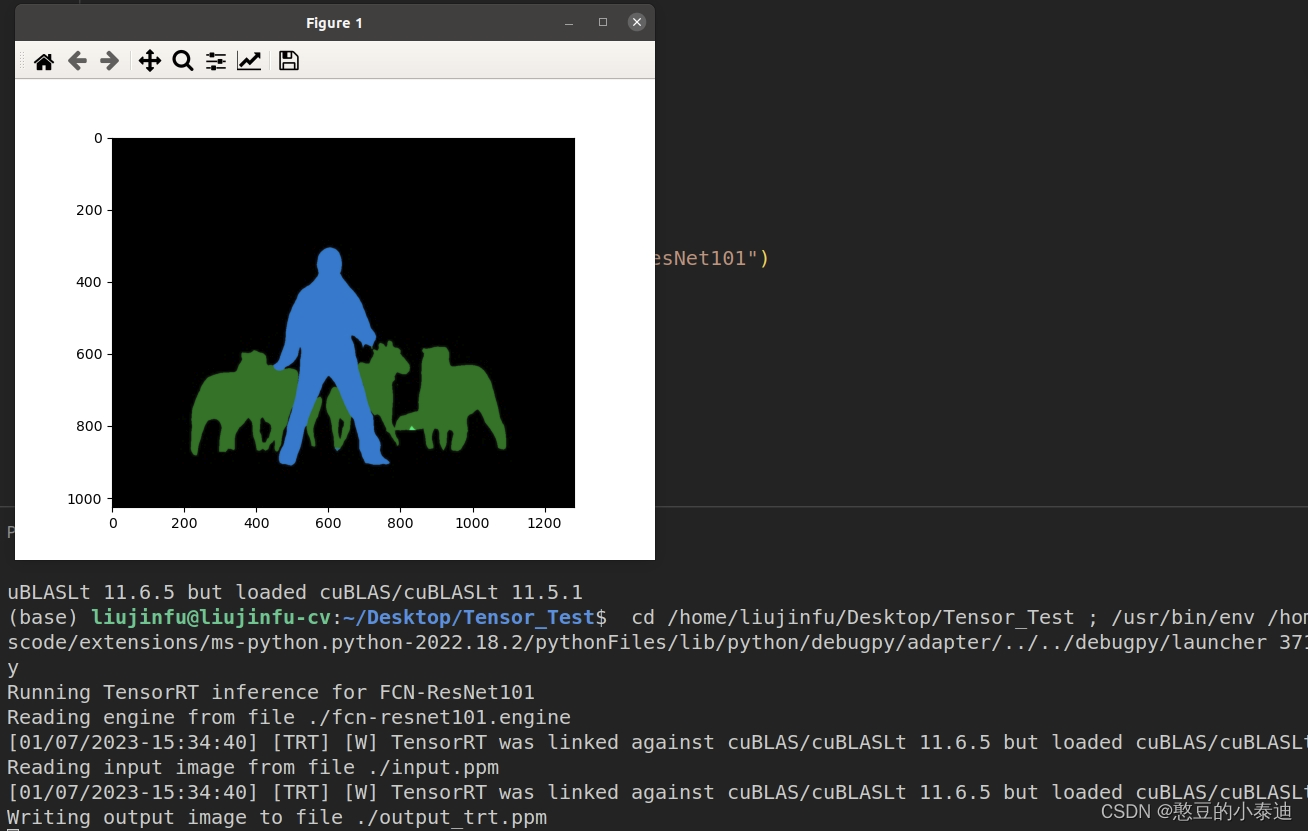
4--基于Tensor RT使用推理引擎实现语义分割
基于Tensor RT加载 Fcn-resnet101.engine 推理引擎,设计相应的前处理和后处理函数,实现语义分割;
import numpy as np
import os
import pycuda.driver as cuda
import pycuda.autoinit
import tensorrt as trtimport matplotlib.pyplot as plt
from PIL import Image# 前处理
def preprocess(image):# 均值归一化(Mean normalization)mean = np.array([0.485, 0.456, 0.406]).astype('float32')stddev = np.array([0.229, 0.224, 0.225]).astype('float32')data = (np.asarray(image).astype('float32') / float(255.0) - mean) / stddev# H×W×C -> C×H×Wreturn np.moveaxis(data, 2, 0) # 将维度2移动到维度0,不是交换# 后处理
def postprocess(data):num_classes = 21# 创建一个调色板,为每一个类选择一种颜色palette = np.array([2 ** 25 - 1, 2 ** 15 - 1, 2 ** 21 - 1])colors = np.array([palette*i%255 for i in range(num_classes)]).astype("uint8")# 上色img = Image.fromarray(data.astype('uint8'), mode='P')img.putpalette(colors)return img# 导入推理引擎engine
def load_engine(engine_file_path):assert os.path.exists(engine_file_path) # 推理引擎 engine 存在print("Reading engine from file {}".format(engine_file_path))with open(engine_file_path, "rb") as f, trt.Runtime(TRT_LOGGER) as runtime:return runtime.deserialize_cuda_engine(f.read()) # 反序列化加载引擎def infer(engine, input_file, output_file):print("Reading input image from file {}".format(input_file))with Image.open(input_file) as img: # 读取网络输入的图片input_image = preprocess(img) # 前处理image_width = img.widthimage_height = img.heightwith engine.create_execution_context() as context: # 构建 Context,用于计算的 GPU 上下文,类比 cpu 上的进程概念,是执行推理引擎的主体。# Set input shape based on image dimensions for inferencecontext.set_binding_shape(engine.get_binding_index("input"), (1, 3, image_height, image_width))# engine.get_binding_index("input"): 返回的索引index为0,即网络的输入# context.set_binding_shape: 执行上下文绑定,在索引0设置维度大小# 分配内存缓冲区bindings = []for binding in engine:binding_idx = engine.get_binding_index(binding) # 遍历获取对应的索引,例如input对应0,output对应1size = trt.volume(context.get_binding_shape(binding_idx))# context.get_binding_shape(binding_idx): 获取对应索引的Shape,例如input的Shape为(1, 3, H, W)# trt.volume(shape): 根据shape计算分配内存 dtype = trt.nptype(engine.get_binding_dtype(binding))# engine.get_binding_dtype(binding): 获取对应index或name的类型# trt.nptype(): 映射到numpy类型if engine.binding_is_input(binding): # 当前index为网络的输入inputinput_buffer = np.ascontiguousarray(input_image) # 将内存不连续存储的数组转换为内存连续存储的数组,运行速度更快input_memory = cuda.mem_alloc(input_image.nbytes) # cuda.mem_alloc()申请内存bindings.append(int(input_memory))else:output_buffer = cuda.pagelocked_empty(size, dtype)output_memory = cuda.mem_alloc(output_buffer.nbytes)bindings.append(int(output_memory))stream = cuda.Stream() # 创建Cuda流# 拷贝数据到GPU (host -> device)cuda.memcpy_htod_async(input_memory, input_buffer, stream) # 异步拷贝数据# 推理context.execute_async_v2(bindings=bindings, stream_handle=stream.handle)# 将GPU得到的推理结果 拷贝到主机(device -> host)cuda.memcpy_dtoh_async(output_buffer, output_memory, stream)# 同步Cuda流stream.synchronize()# 执行后处理,先把内存中的推理result 还原成 imagewith postprocess(np.reshape(output_buffer, (image_height, image_width))) as img:print("Writing output image to file {}".format(output_file))img.convert('RGB').save(output_file, "PPM")if __name__ == "__main__":TRT_LOGGER = trt.Logger() # 创建日志记录器engine_file = "./fcn-resnet101.engine"input_file  = "./input.ppm"output_file = "./output_trt.ppm"plt.imshow(Image.open(input_file))plt.show()print("Running TensorRT inference for FCN-ResNet101")with load_engine(engine_file) as engine: # 调用定义的load_engine()函数,通过反序列化加载推理引擎infer(engine, input_file, output_file)plt.imshow(Image.open(output_file))plt.show()