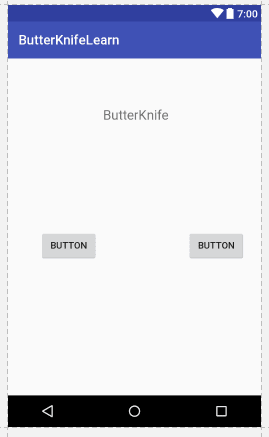
ButterKnife黄油刀
1、强大的View绑定和Click事件处理功能,简化代码,提升开发效率
2、方便的处理Adapter里的ViewHolder绑定问题
3、运行时不会影响APP效率,使用配置方便
4、代码清晰,可读性强
怎么配置
在android Studio项目中配置使用ButterKnife
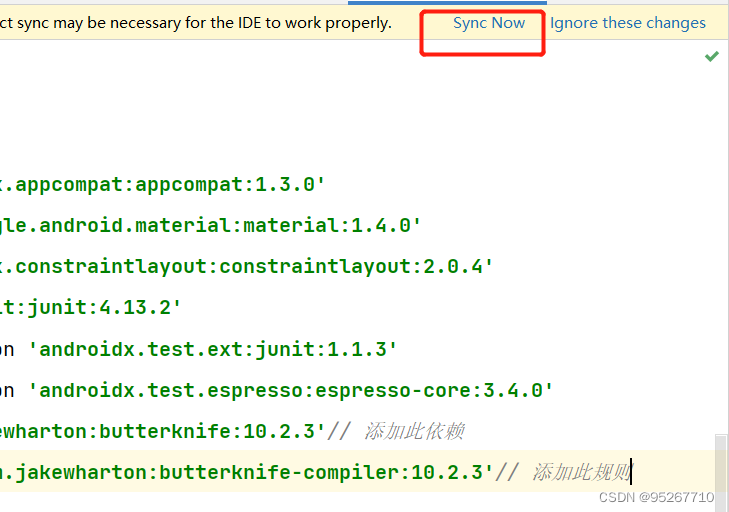
Step one:在Project的 build.gradle 中添加如下代码:

implementation 'com.jakewharton:butterknife:10.2.3'// 添加此依赖annotationProcessor 'com.jakewharton:butterknife-compiler:10.2.3'// 添加此规则
使用黄油刀实现案例
动画
配置文件
drawable
cxkzdh.xml
<?xml version="1.0" encoding="utf-8"?>
<animation-list xmlns:android="http://schemas.android.com/apk/res/android"android:oneshot="false"><itemandroid:drawable="@mipmap/cxk0"android:duration="80" /><itemandroid:drawable="@mipmap/cxk1"android:duration="80" /><itemandroid:drawable="@mipmap/cxk2"android:duration="80" />.....<itemandroid:drawable="@mipmap/cxk53"android:duration="80" /><itemandroid:drawable="@mipmap/cxk54"android:duration="80" /><itemandroid:drawable="@mipmap/cxk55"android:duration="80" />
</animation-list>
zhuan.xml
<?xml version="1.0" encoding="utf-8"?>
<animation-list xmlns:android="http://schemas.android.com/apk/res/android"><itemandroid:drawable="@mipmap/img_zhuan1"android:duration="80"/><itemandroid:drawable="@mipmap/img_zhuan2"android:duration="80"/><itemandroid:drawable="@mipmap/img_zhuan3"android:duration="80"/><itemandroid:drawable="@mipmap/img_zhuan4"android:duration="80"/><itemandroid:drawable="@mipmap/img_zhuan5"android:duration="80"/></animation-list>
anim
sfdj.xml
<?xml version="1.0" encoding="utf-8"?>
<scale xmlns:android="http://schemas.android.com/apk/res/android"android:interpolator="@android:anim/accelerate_interpolator"android:fromXScale="0.2"android:toXScale="1.5"android:fromYScale="0.2"android:toYScale="1.5"android:pivotX="50%"android:pivotY="50%"android:duration="2000"/>
tnbj.xml
<?xml version="1.0" encoding="utf-8"?><alpha xmlns:android="http://schemas.android.com/apk/res/android"
android:interpolator="@android:anim/accelerate_decelerate_interpolator"
android:fromAlpha="1.0"
android:toAlpha="0.0"
android:duration="3000"/>
wybj.xml
<?xml version="1.0" encoding="utf-8"?>
<translate xmlns:android="http://schemas.android.com/apk/res/android"android:interpolator="@android:anim/accelerate_decelerate_interpolator"android:fromXDelta="0"android:toXDelta="0"android:fromYDelta="0"android:toYDelta="666"android:duration="3000"/>
xzbj.xml
<?xml version="1.0" encoding="utf-8"?>
<rotate xmlns:android="http://schemas.android.com/apk/res/android"android:interpolator="@android:anim/accelerate_decelerate_interpolator"android:fromDegrees="0"android:toDegrees="360"android:duration="1000"android:repeatCount="1"android:pivotX="50%"android:pivotY="50%"android:repeatMode="reverse"/>
zhbj.xml
<?xml version="1.0" encoding="utf-8"?>
<set xmlns:android="http://schemas.android.com/apk/res/android"android:interpolator="@android:anim/decelerate_interpolator"android:shareInterpolator="true"><scaleandroid:fromXScale="0.2"android:toXScale="1.5"android:fromYScale="0.2"android:toYScale="1.5"android:pivotX="50%"android:pivotY="50%"android:duration="3000"/><rotateandroid:fromDegrees="0"android:toDegrees="360"android:repeatCount="1"android:duration="1000"android:repeatMode="reverse"android:pivotX="50%"android:pivotY="50%"/></set>
java
MainACtivity
package com.example.myapplication;import androidx.annotation.BinderThread;
import androidx.appcompat.app.AppCompatActivity;import android.content.Intent;
import android.os.Bundle;
import android.widget.Button;import butterknife.BindView;
import butterknife.ButterKnife;
import butterknife.OnClick;public class MainActivity extends AppCompatActivity {@BindView(R.id.bt_main2)Button main2;@BindView(R.id.bt_main3)Button main3;@BindView(R.id.bt_main4)Button main4;@Overrideprotected void onCreate(Bundle savedInstanceState) {super.onCreate(savedInstanceState);setContentView(R.layout.activity_main);ButterKnife.bind(MainActivity.this);}//跳转到帧动画@OnClick(R.id.bt_main2)public void setMain2 (){Intent intent = new Intent(MainActivity.this,MainActivity2.class);startActivity(intent);}//跳转到补间动画@OnClick(R.id.bt_main3)public void setMain3 (){Intent intent = new Intent(MainActivity.this,MainActivity3.class);startActivity(intent);}//跳转到属性动画@OnClick(R.id.bt_main4)public void setMain4 (){Intent intent = new Intent(MainActivity.this,MainActivity4.class);startActivity(intent);}
}
MainACtivity2
package com.example.myapplication;import androidx.appcompat.app.AppCompatActivity;import android.graphics.drawable.AnimationDrawable;
import android.os.Bundle;
import android.view.animation.Animation;
import android.widget.Button;
import android.widget.ImageView;import butterknife.BindView;
import butterknife.ButterKnife;
import butterknife.OnClick;public class MainActivity2 extends AppCompatActivity {@BindView(R.id.bt_ks)Button ksbf;@BindView(R.id.bt_zt)Button ztbf;@BindView(R.id.iv_zdh)ImageView zdh;public AnimationDrawable anim;@Overrideprotected void onCreate(Bundle savedInstanceState) {super.onCreate(savedInstanceState);setContentView(R.layout.activity_main2);ButterKnife.bind(MainActivity2.this);anim= (AnimationDrawable) zdh.getBackground();}@OnClick(R.id.bt_zt)//暂停public void stop(){anim.stop();}@OnClick(R.id.bt_ks)//播放public void start(){anim.start();}
}
MainACtivity3
package com.example.myapplication;import androidx.appcompat.app.AppCompatActivity;import android.os.Bundle;
import android.view.animation.Animation;
import android.view.animation.AnimationUtils;
import android.widget.Button;
import android.widget.ImageView;import butterknife.BindView;
import butterknife.ButterKnife;
import butterknife.OnClick;public class MainActivity3 extends AppCompatActivity {@BindView(R.id.tb_tmjb)Button tmjb;@BindView(R.id.tb_sfjb)Button sfjb;@BindView(R.id.tb_wyjb)Button wyjb;@BindView(R.id.tb_xzjb)Button xzjb;@BindView(R.id.tb_zhjb)Button zhjb;@BindView(R.id.iv_ngm)ImageView ngm;@Overrideprotected void onCreate(Bundle savedInstanceState) {super.onCreate(savedInstanceState);setContentView(R.layout.activity_main3);ButterKnife.bind(MainActivity3.this);}//透明渐变@OnClick(R.id.tb_tmjb)public void ann1() {Animation animation = AnimationUtils.loadAnimation(MainActivity3.this, R.anim.tmbj);ngm.startAnimation(animation);}//缩放渐变@OnClick(R.id.tb_sfjb)public void ann2(){Animation animation = AnimationUtils.loadAnimation(MainActivity3.this, R.anim.sfbj);ngm.startAnimation(animation);}//移动渐变@OnClick(R.id.tb_wyjb)public void ann3(){Animation animation = AnimationUtils.loadAnimation(MainActivity3.this, R.anim.wybj);ngm.startAnimation(animation);}//旋转渐变@OnClick(R.id.tb_xzjb)public void ann4(){Animation animation = AnimationUtils.loadAnimation(MainActivity3.this, R.anim.xzbj);ngm.startAnimation(animation);}//旋转和缩放组合渐变@OnClick(R.id.tb_zhjb)public void ann5(){Animation animation = AnimationUtils.loadAnimation(MainActivity3.this, R.anim.zhbj);ngm.startAnimation(animation);}}
MainACtivity4
package com.example.myapplication;import androidx.appcompat.app.AppCompatActivity;import android.animation.AnimatorSet;
import android.animation.ValueAnimator;
import android.graphics.drawable.AnimationDrawable;
import android.os.Bundle;
import android.view.View;
import android.view.animation.DecelerateInterpolator;
import android.view.animation.LinearInterpolator;
import android.widget.Button;
import android.widget.ImageView;
import android.widget.LinearLayout;import butterknife.BindView;
import butterknife.ButterKnife;
import butterknife.OnClick;public class MainActivity4 extends AppCompatActivity {public AnimationDrawable anmd;@BindView(R.id.bt_tm)Button bt_tm;@BindView(R.id.bt_sf)Button bt_sf;@BindView(R.id.bt_yd)Button bt_yd;@BindView(R.id.bt_xz)Button bt_xz;@BindView(R.id.iv_zdh)ImageView iv_zdh;@BindView(R.id.li_root)LinearLayout li_root;@Overrideprotected void onCreate(Bundle savedInstanceState) {super.onCreate(savedInstanceState);setContentView(R.layout.activity_main4);ButterKnife.bind(MainActivity4.this);}//设置透明旋转@OnClick(R.id.bt_tm)public void settm() {//设置旋转角度ValueAnimator rValue = ValueAnimator.ofInt(0, 360);//设置时间rValue.setDuration(2000l);rValue.addUpdateListener(new ValueAnimator.AnimatorUpdateListener() {@Overridepublic void onAnimationUpdate(ValueAnimator valueAnimator) {int rotavalue = (int) valueAnimator.getAnimatedValue();iv_zdh.setRotation(rotavalue);float fractionValue = valueAnimator.getAnimatedFraction();iv_zdh.setAlpha(fractionValue);}});//对UI页面的属性进行修改rValue.setInterpolator(new DecelerateInterpolator());rValue.start();}//设置缩放@OnClick(R.id.bt_sf)public void setsf() {final float scale = 0.5f;AnimatorSet scalesSet = new AnimatorSet();//设置缩小区间ValueAnimator valueAnimatorSmall = ValueAnimator.ofFloat(1.f, scale);//设置显示时间valueAnimatorSmall.setDuration(1000);//设置放大区间ValueAnimator valueAnimatorLarge = ValueAnimator.ofFloat(scale, 2.0f);//设置时间valueAnimatorLarge.setDuration(1000);//对缩小时的 X Y 的大小设置valueAnimatorSmall.addUpdateListener(new ValueAnimator.AnimatorUpdateListener() {@Overridepublic void onAnimationUpdate(ValueAnimator valueAnimator) {float small = (float) valueAnimator.getAnimatedValue();iv_zdh.setScaleX(small);iv_zdh.setScaleY(small);}});//对放大时的 X Y 的大小设置valueAnimatorLarge.addUpdateListener(new ValueAnimator.AnimatorUpdateListener() {@Overridepublic void onAnimationUpdate(ValueAnimator valueAnimator) {float large = (float) valueAnimator.getAnimatedValue();iv_zdh.setScaleX(large);iv_zdh.setScaleY(large);}});scalesSet.play(valueAnimatorLarge).after(valueAnimatorSmall);scalesSet.start();}//设置移动@OnClick(R.id.bt_yd)public void setyd() {//获取总布局的款和高//定义属性动画的方法//按轨迹 方程来运动int width = li_root.getWidth();int heighr = li_root.getHeight();//创建运动区间ValueAnimator valueAnimator = ValueAnimator.ofInt(0, heighr);//执行时间valueAnimator.setDuration(3000L);valueAnimator.addUpdateListener(new ValueAnimator.AnimatorUpdateListener() {@Overridepublic void onAnimationUpdate(ValueAnimator animator) {//int y = (int) animator.getAnimatedValue();int x = width / 2;moveView(iv_zdh, x, y);}});valueAnimator.setInterpolator(new LinearInterpolator());valueAnimator.start();}//设置旋转@OnClick(R.id.bt_xz)public void setxz() {anmd= (AnimationDrawable) iv_zdh.getBackground();anmd.start();//得到页面的宽高int width = li_root.getWidth();int height = li_root.getHeight();//半径final int R = width / 4;//设置区间ValueAnimator tValue = ValueAnimator.ofFloat(0, (float) (2.0f * Math.PI));//设置显示时间tValue.setDuration(1000);tValue.addUpdateListener(new ValueAnimator.AnimatorUpdateListener() {@Overridepublic void onAnimationUpdate(ValueAnimator valueAnimator) {//圆的参数方程 x = R * cos(t)float t = (float) valueAnimator.getAnimatedValue();int x = (int) (R * Math.sin(t) + width / 2);int y = (int) (R * Math.cos(t) + height / 2);moveView(iv_zdh, x, y);}});tValue.setInterpolator(new DecelerateInterpolator());tValue.start();}//定义一个修改ImageView 位置的方法private void moveView(View view, int rawX, int rawY) {int left = rawX - iv_zdh.getWidth() / 2;int top = rawY - iv_zdh.getHeight();int width = left + view.getWidth();int height = top + view.getHeight();view.layout(left, top, width, height);}
}
xml
activity_main
<?xml version="1.0" encoding="utf-8"?>
<LinearLayout xmlns:android="http://schemas.android.com/apk/res/android"xmlns:app="http://schemas.android.com/apk/res-auto"xmlns:tools="http://schemas.android.com/tools"android:layout_width="match_parent"android:layout_height="match_parent"android:orientation="vertical"tools:context=".MainActivity"><Buttonandroid:id="@+id/bt_main2"android:layout_width="match_parent"android:layout_height="wrap_content"android:text="MainActivity2"/><Buttonandroid:id="@+id/bt_main3"android:layout_width="match_parent"android:layout_height="wrap_content"android:text="MainActivity3"/><Buttonandroid:id="@+id/bt_main4"android:layout_width="match_parent"android:layout_height="wrap_content"android:text="MainActivity4"/>
</LinearLayout>
activity_main2
<?xml version="1.0" encoding="utf-8"?>
<LinearLayout xmlns:android="http://schemas.android.com/apk/res/android"xmlns:tools="http://schemas.android.com/tools"android:orientation="vertical"android:gravity="center"android:layout_margin="30dp"android:layout_width="match_parent"android:layout_height="match_parent"tools:context=".MainActivity2"><ImageViewandroid:id="@+id/iv_zdh"android:layout_width="match_parent"android:layout_height="wrap_content"android:background="@drawable/cxkzdh"/><Buttonandroid:id="@+id/bt_ks"android:layout_width="match_parent"android:layout_height="wrap_content"android:text="开始"/><Buttonandroid:id="@+id/bt_zt"android:layout_width="match_parent"android:layout_height="wrap_content"android:text="暂停"/></LinearLayout>
activity_main3
<?xml version="1.0" encoding="utf-8"?>
<LinearLayout xmlns:android="http://schemas.android.com/apk/res/android"xmlns:app="http://schemas.android.com/apk/res-auto"xmlns:tools="http://schemas.android.com/tools"android:layout_width="match_parent"android:layout_height="match_parent"android:orientation="vertical"tools:context=".MainActivity3"><Buttonandroid:id="@+id/tb_tmjb"android:layout_width="wrap_content"android:layout_height="wrap_content"android:text="透明渐变"/><Buttonandroid:id="@+id/tb_sfjb"android:layout_width="wrap_content"android:layout_height="wrap_content"android:text="缩放渐变"/><Buttonandroid:id="@+id/tb_wyjb"android:layout_width="wrap_content"android:layout_height="wrap_content"android:text="位移渐变"/><Buttonandroid:id="@+id/tb_xzjb"android:layout_width="wrap_content"android:layout_height="wrap_content"android:text="旋转渐变"/><Buttonandroid:id="@+id/tb_zhjb"android:layout_width="wrap_content"android:layout_height="wrap_content"android:text="渐变结合"/><ImageViewandroid:id="@+id/iv_ngm"android:layout_width="wrap_content"android:layout_height="wrap_content"android:background="@mipmap/ngm"/>
</LinearLayout>
activity_main4
<?xml version="1.0" encoding="utf-8"?>
<LinearLayout xmlns:android="http://schemas.android.com/apk/res/android"xmlns:app="http://schemas.android.com/apk/res-auto"xmlns:tools="http://schemas.android.com/tools"android:layout_width="match_parent"android:id="@+id/li_root"android:layout_height="match_parent"android:orientation="vertical"tools:context=".MainActivity4"><Buttonandroid:id="@+id/bt_tm"android:layout_width="wrap_content"android:layout_height="wrap_content"android:text="透明"/><Buttonandroid:id="@+id/bt_sf"android:layout_width="wrap_content"android:layout_height="wrap_content"android:text="缩放"/><Buttonandroid:id="@+id/bt_yd"android:layout_width="wrap_content"android:layout_height="wrap_content"android:text="移动"/><Buttonandroid:id="@+id/bt_xz"android:layout_width="wrap_content"android:layout_height="wrap_content"android:text="旋转"/><ImageViewandroid:id="@+id/iv_zdh"android:layout_width="35dp"android:layout_height="35dp"android:background="@drawable/zhuan"/>
</LinearLayout>
android:layout_height="wrap_content"android:text="缩放"/><Buttonandroid:id="@+id/bt_yd"android:layout_width="wrap_content"android:layout_height="wrap_content"android:text="移动"/><Buttonandroid:id="@+id/bt_xz"android:layout_width="wrap_content"android:layout_height="wrap_content"android:text="旋转"/><ImageViewandroid:id="@+id/iv_zdh"android:layout_width="35dp"android:layout_height="35dp"android:background="@drawable/zhuan"/>