转载请标明出处:http://blog.csdn.net/donkor_/article/details/77879630
前言:
ButterKnife是一个专注于Android系统的View注入框架,以前总是要写很多findViewById来找到View对象,有了ButterKnife可以很轻松的省去这些步骤。是大神JakeWharton的力作,目前使用很广。最重要的一点,使用ButterKnife对性能基本没有损失,因为ButterKnife用到的注解并不是在运行时反射的,而是在编译的时候生成新的class。项目集成起来也是特别方便,使用起来也是特别简单。
通过学习本文,学会如何在项目中使用ButterKnife。本文包含以下要点:
- 前言
- 简单介绍
- ButterKnife的优势
- 基本配置
- ButterKnife的注册与绑定
- ButterKnife使用心得与注意事项
- 在Activity中绑定ButterKnife
- 在Fragment中绑定ButterKnife
- 在Adapter中绑定ButterKnife
- ButterKnife的基本使用
- 绑定View
- 绑定资源
- 事件绑定
- 绑定监听
- 使用findById
- 设置多个view的属性
- 使用注意事项
- 更多绑定注解
- 更多事件注解
- ButterKnife的代码混淆
- Butterknife插件:zelezny
- 插件安装
- 插件使用
ButterKnife项目地址:https://github.com/JakeWharton/butterknife
▲ ButterKnife的优势:
1、强大的View绑定和Click事件处理功能,简化代码,提升开发效率
2、方便的处理Adapter里的ViewHolder绑定问题
3、运行时不会影响APP效率,使用配置方便
4、代码清晰,可读性强
基本配置
在android Studio项目中配置使用ButterKnife
- Step one:在Project的 build.gradle 中添加如下代码:
buildscript {repositories {jcenter()}dependencies {classpath 'com.android.tools.build:gradle:2.3.3'classpath 'com.jakewharton:butterknife-gradle-plugin:8.8.1'  //添加这一行}
}- Step two:在App的 build.gradle 中添加如下代码:
apply plugin: 'com.jakewharton.butterknife'- dependencies中添加:
compile 'com.jakewharton:butterknife:8.8.1'
annotationProcessor 'com.jakewharton:butterknife-compiler:8.8.1'
构建环境特别简单,接下来看看如何使用
ButterKnife的注册与绑定
▲ ButterKnife使用心得与注意事项:
1、在Activity 类中绑定 :ButterKnife.bind(this);必须在setContentView();之后绑定;且父类bind绑定后,子类不需要再bind。
2、在非Activity 类(eg:Fragment、ViewHold)中绑定: ButterKnife.bind(this,view);这里的this不能替换成getActivity()。
3、在Activity中不需要做解绑操作,在Fragment 中必须在onDestroyView()中做解绑操作。
4、使用ButterKnife修饰的方法和控件,不能用private or static 修饰,否则会报错。错误: @BindView fields must not be private or static. (com.zyj.wifi.ButterknifeActivity.button1)
5、setContentView()不能通过注解实现。(其他的有些注解框架可以)
6、使用Activity为根视图绑定任意对象时,如果你使用类似MVC的设计模式你可以在Activity 调用ButterKnife.bind(this, activity),来绑定Controller。
7、使用ButterKnife.bind(this,view)绑定一个view的子节点字段。如果你在子View的布局里或者自定义view的构造方法里 使用了inflate,你可以立刻调用此方法。或者,从XML inflate来的自定义view类型可以在onFinishInflate回调方法中使用它。
▲ 在Activity中绑定ButterKnife:
由于每次都要在Activity中的onCreate绑定Activity,所以个人建议写一个BaseActivity完成绑定,子类继承即可。绑定Activity 必须在setContentView之后。使用ButterKnife.bind(this)进行绑定。代码如下:
public class MainActivity extends AppCompatActivity{  @Override  protected void onCreate(Bundle savedInstanceState) {  super.onCreate(savedInstanceState);  setContentView(R.layout.activity_main);  //绑定初始化ButterKnife  ButterKnife.bind(this);  }
}
▲ 在Fragment中绑定ButterKnife:
Fragment的生命周期不同于activity。在onCreateView中绑定一个Fragment时,在onDestroyView中将视图设置为null。当你调用bind来为你绑定一个Fragment时,Butter Knife会返回一个Unbinder的实例。在适当的生命周期(onDestroyView)回调中调用它的unbind方法进行Fragment解绑。使用ButterKnife.bind(this, view)进行绑定。代码如下:
public class ButterknifeFragment extends Fragment{  private Unbinder unbinder;  @Override  public View onCreateView(LayoutInflater inflater, ViewGroup container,  Bundle savedInstanceState) {  View view = inflater.inflate(R.layout.fragment, container, false);  //返回一个Unbinder值(进行解绑),注意这里的this不能使用getActivity()  unbinder = ButterKnife.bind(this, view);  return view;  }  /** * onDestroyView中进行解绑操作 */  @Override  public void onDestroyView() {  super.onDestroyView();  unbinder.unbind();  }
}
▲ 在Adapter中绑定ButterKnife:
在Adapter的ViewHolder中使用,将ViewHolder加一个构造方法,在new ViewHolder的时候把view传递进去。使用ButterKnife.bind(this, view)进行绑定,代码如下:
public class MyAdapter extends BaseAdapter {  @Override   public View getView(int position, View view, ViewGroup parent) {  ViewHolder holder;  if (view != null) {  holder = (ViewHolder) view.getTag();  } else {  view = inflater.inflate(R.layout.testlayout, parent, false);  holder = new ViewHolder(view);  view.setTag(holder);  }  holder.name.setText("Donkor");  holder.job.setText("Android");// etc...  return view;  }  static class ViewHolder {  @BindView(R.id.title) TextView name;  @BindView(R.id.job) TextView job;  public ViewHolder(View view) {  ButterKnife.bind(this, view);  }  }
}
ButterKnife的基本使用
▲ 绑定View:
- 控件id 注解: @BindView()
@BindView( R2.id.button)
public Button button; - 布局内多个控件id 注解: @BindViews()
public class MainActivity extends AppCompatActivity {  @BindViews({ R2.id.button1, R2.id.button2,  R2.id.button3})  public List<Button> buttonList ;  @Override  protected void onCreate(Bundle savedInstanceState) {  super.onCreate(savedInstanceState);  setContentView(R.layout.activity_main);  ButterKnife.bind(this);  buttonList.get( 0 ).setText( "hello 1 ");  buttonList.get( 1 ).setText( "hello 2 ");  buttonList.get( 2 ).setText( "hello 3 ");  }
}
▲ 绑定资源:
- 绑定string 字符串:@BindString()
public class MainActivity extends AppCompatActivity {  @BindView(R2.id.button) //绑定button 控件  public Button button ;  @BindString(R2.string.app_name)  //绑定资源文件中string字符串  String str;  @Override  protected void onCreate(Bundle savedInstanceState) {  super.onCreate(savedInstanceState);  setContentView(R.layout.activity_main);  //绑定activity  ButterKnife.bind( this ) ;  button.setText( str );  }
} - 绑定string里面array数组:@BindArray()
<resources>  <string name="app_name">城市</string>  <string-array name="city">  <item>北京市</item>  <item>天津市</item>  <item>哈尔滨市</item>  <item>大连市</item>  <item>香港市</item>  </string-array>  </resources>  ------------------------------------------------------------------------------public class MainActivity  extends AppCompatActivity {  @BindView(R2.id.button) //绑定button 控件  public Button button ;  @BindString(R2.string.app_name)  //绑定资源文件中string字符串  String str;  @BindArray(R2.array.city)  //绑定string里面array数组  String [] citys ;  @Override  protected void onCreate(Bundle savedInstanceState) {  super.onCreate(savedInstanceState);  setContentView(R.layout.activity_main);  //绑定activity  ButterKnife.bind( this ) ;  button.setText(citys[0]);  }
} - 绑定Bitmap 资源:@BindBitmap( )
public class MainActivity extends AppCompatActivity { @BindView( R2.id.imageView ) //绑定ImageView 控件 public ImageView imageView ; @BindBitmap( R2.mipmap.bm)//绑定Bitmap 资源 public Bitmap bitmap ; @Override protected void onCreate(Bundle savedInstanceState) { super.onCreate(savedInstanceState); setContentView(R.layout.activity_main); //绑定activity ButterKnife.bind( this ) ; imageView.setImageBitmap(bitmap); } } - 绑定一个颜色值:@BindColor( )
public class MainActivity extends AppCompatActivity {  @BindView( R2.id.button)  //绑定一个控件  public Button button;  @BindColor( R2.color.colorAccent ) //具体色值在color文件中  int black ;  //绑定一个颜色值  @Override  protected void onCreate(Bundle savedInstanceState) {  super.onCreate(savedInstanceState);  setContentView(R.layout.activity_main);  //绑定activity  ButterKnife.bind( this ) ;  button.setTextColor(  black );  }
}
▲ 事件绑定:
绑定点击事件:
绑定控件点击事件:@OnClick( )
绑定控件长按事件:@OnLongClick( )
public class MainActivity extends AppCompatActivity {  @OnClick(R2.id.button1 )   //给 button1 设置一个点击事件  public void showToast(){  Toast.makeText(this, "is a click", Toast.LENGTH_SHORT).show();  }  @OnLongClick( R2.id.button1 )    //给 button1 设置一个长按事件  public boolean showToast2(){  Toast.makeText(this, "is a long click", Toast.LENGTH_SHORT).show();  return true ;  }  @Override  protected void onCreate(Bundle savedInstanceState) {  super.onCreate(savedInstanceState);  setContentView(R.layout.activity_main);  //绑定activity  ButterKnife.bind( this ) ;  }
} - 指定多个id绑定事件:
public class MainActivity extends AppCompatActivity {  //Tip:当涉及绑定多个id事件时,我们可以使用Android studio的Butterknife//插件zelezny快速自动生成的,之后在下面会有介绍安装插件与使用  @OnClick({R.id.ll_product_name, R.id.ll_product_lilv, R.id.ll_product_qixian, R.id.ll_product_repayment_methods})  public void onViewClicked(View view) {  switch (view.getId()) {  case R.id.ll_product_name:  System.out.print("我是点击事件1");  break;  case R.id.ll_product_lilv:  System.out.print("我是点击事件2");  break;  case R.id.ll_product_qixian:  System.out.print("我是点击事件3");  break;  case R.id.ll_product_repayment_methods:  System.out.print("我是点击事件4");  break;  }  }  @Override  protected void onCreate(Bundle savedInstanceState) {  super.onCreate(savedInstanceState);  setContentView(R.layout.activity_main);  //绑定activity  ButterKnife.bind( this ) ;  }
}
通过上面的例子可以看出多条点击事件是没有用R2的方式,如果一定要使用R2的写法,可以单一逐次写,正确的写法如下:
public class MainActivity extends AppCompatActivity {    @OnClick(R2.id.ll_product_name)    public void onViewClicked1(View view) {    System.out.print("我是点击事件1");               }    @OnClick(R2.id.ll_product_lilv)    public void onViewClicked2(View view) {    System.out.print("我是点击事件2");     }   @OnClick(R2.id.ll_product_qixian)    public void onViewClicked3(View view) {    System.out.print("我是点击事件3");               }    @OnClick(R2.id.ll_product_repayment_methods)    public void onViewClicked4(View view) {    System.out.print("我是点击事件4");               }    @Override    protected void onCreate(Bundle savedInstanceState) {    super.onCreate(savedInstanceState);    setContentView(R.layout.activity_main);    //绑定activity    ButterKnife.bind( this ) ;    }
}
- 自定义View使用绑定事件
不用指定id,直接注解OnClick。看代码觉得好像跟实现点击事件的方法类似。实际上并没有实现OnClickListener接口。代码如下:
public class MyButton extends Button {  @OnClick  public void onClick() {}
}
▲ 绑定监听:
- Listeners可以自动配置到方法中
@OnClick(R.id.submit)
public void submit(View view) {  // TODO submit data to server...
} - 对监听器方法的所有参数都是可选的
@OnClick(R.id.submit)
public void submit() {  // TODO submit data to server...
} - 自定义一个特定类型,它将自动被转换
@OnClick(R.id.submit) public void sayHi(Button button) {//看括号内参数的变化就明白了 button.setText("Hello!"); } - 在单个绑定中指定多个id,用于公共事件处理。这里举例点击事件。其他的事件监听同样也是可以的。
@OnClick(R.id.submitCode,R.id.submitFile,R.id.submitTest) public void sayHi(Button button) {//多个控件对应公共事件button.setText("Success!"); } - 自定义视图可以通过不指定ID来绑定到它们自己的监听器。
public class FancyButton extends Button {  @OnClick  public void onClick() {  // TODO do something!  }
}- Listener中多方法注解
方法注解,其对应的监听器有多个回调,可用于绑定到其中任何一个。每个注解都有一个它绑定的默认回调。使用回调参数指定一个替换。以Spinner为例。
原本代码:
Spinner s=new Spinner(this); //原始方法:Spinner 条目选择监听事件 正常写法 s.setOnItemSelectedListener(new AdapterView.OnItemSelectedListener(){ @Override public void onItemSelected(AdapterView<?> parent, View view, int position, long id) { } @Override public void onNothingSelected(AdapterView<?> parent) { } }); 通过 Butter Knife 注解方式
public class MainActivity extends AppCompatActivity {  /*利用注解对Spinner item  作选择监听事件处理方式*/  @OnItemSelected(R.id.my_spiner)//默认callback为ITEM_SELECTED  void onItemSelected(int position) {  Toast.makeText(this, "position: " + position, Toast.LENGTH_SHORT).show();  }  /* * 注解onNothingSelected,需要在注解参数添加一个callback, * 注意的是Spinner中只要有数据,默认都会选中第0个数据,所以想进入到onNothingSelected()方法,就需要把Adapter中的数据都清空 */  @OnItemSelected(value = R.id.my_spiner, callback = OnItemSelected.Callback.NOTHING_SELECTED)  void onNothingSelected() {  Toast.makeText(this, "Nothing", Toast.LENGTH_SHORT).show();  }  @Override  protected void onCreate(Bundle savedInstanceState) {  super.onCreate(savedInstanceState);  setContentView(R.layout.activity_main);  //绑定activity  ButterKnife.bind( this ) ;  Spinner s=new Spinner(this);  }
} - @OnCheckedChanged监听的使用
原方法应是:setOnCheckedChangeListener()。使用栗子
<?xml version="1.0" encoding="utf-8"?>
<LinearLayout xmlns:android="http://schemas.android.com/apk/res/android"  android:layout_width="match_parent"  android:layout_height="match_parent"  android:orientation="vertical">  <RadioGroup  android:id="@+id/rg_main"  android:layout_width="fill_parent"  android:layout_height="48dp"  android:layout_alignParentBottom="true"  android:background="@color/white"  android:orientation="horizontal">  <RadioButton  android:id="@+id/rg_home"  android:layout_width="match_parent"  android:layout_height="match_parent"  android:focusable="false"  android:text="@string/nav_one" />  <RadioButton  android:id="@+id/rg_wealth"  android:layout_width="match_parent"  android:layout_height="match_parent"  android:focusable="false"  android:text="@string/nav_two" />  <RadioButton  android:id="@+id/rg_account"  android:layout_width="match_parent"  android:layout_height="match_parent"  android:focusable="false"  android:text="@string/nav_four" />  </RadioGroup>  </LinearLayout>  -------------------------------------------------------------------------@OnCheckedChanged({R.id.rg_home,R.id.rg_wealth,R.id.rg_account})  public void OnCheckedChangeListener(CompoundButton view, boolean ischanged ){  switch (view.getId()) {  case R.id.rg_home:  if (ischanged){//注意:这里一定要有这个判断,只有对应该id的按钮被点击了,ischanged状态发生改变,才会执行下面的内容  //这里写你的按钮变化状态的UI及相关逻辑  }  break;  case R.id.rg_wealth:  if (ischanged) {  //这里写你的按钮变化状态的UI及相关逻辑  }  break;  case R.id.rg_account:  if (ischanged) {  //这里写你的按钮变化状态的UI及相关逻辑  }  break;  default:  break;  }  }
▲ 使用findById:
Butter Knife仍然包含了findById()方法,用于仍需从一个view ,Activity,或者Dialog上初始化view的时候,并且它可以自动转换类型。
View view = LayoutInflater.from(context).inflate(R.layout.thing, null);
TextView firstName = ButterKnife.findById(view, R.id.first_name);
TextView lastName = ButterKnife.findById(view, R.id.last_name);
ImageView iv = ButterKnife.findById(view, R.id.iv);
▲ 设置多个view的属性:
- apply()
作用:允许您立即对列表中的所有视图进行操作。
- Action和Setter接口
作用:Action和Setter接口允许指定简单的行为。
public class MainActivity extends AppCompatActivity {  @BindViews({R2.id.first_name, R2.id.middle_name, R2.id.last_name})  List<EditText> nameViews;  @Override  protected void onCreate(Bundle savedInstanceState) {  super.onCreate(savedInstanceState);  setContentView(R.layout.activity_main);  //绑定activity  ButterKnife.bind(this);  //设置多个view的属性  //方式1:传递值  ButterKnife.apply(nameViews, DISABLE);  //方式2:指定值  ButterKnife.apply(nameViews, ENABLED, false);  方式3 设置View的Property  ButterKnife.apply(nameViews, View.ALPHA, 0.0f);//一个Android属性也可以用于应用的方法。  }  /* * Action接口设置属性 */  static final ButterKnife.Action<View> DISABLE = new ButterKnife.Action<View>() {  @Override  public void apply(View view, int index) {  view.setEnabled(false);//目的是使多个view都具备此属性  }  };  /* * Setter接口设置属性 */  static final ButterKnife.Setter<View, Boolean> ENABLED = new ButterKnife.Setter<View, Boolean>() {  @Override  public void set(View view, Boolean value, int index) {  view.setEnabled(value);//目的是使多个view都具备此属性,可变boolean值是可以传递的  }  };
}
▲ 使用注意事项:
- ButterKinfe的注解标签因版本不同而有所变化。
8.0.0之前的Bind标签在8.0.0之后变成了BindView,而8.7.0之后在绑定view时,要用R2.id.XXX而不再是常用的R.id.XXX了。
具体变化情况和查看gitHub上的提交日志:
https://github.com/JakeWharton/butterknife/blob/master/CHANGELOG.md#version-800-2016-04-25
- 默认情况下,@bind和 listener 的绑定是必需的。如果无法找到目标视图,将抛出一个异常。
要抑制此行为并创建可选绑定,可以将@Nullable注解添加到字段中,或将@Optional注解添加到方法。
任何被命名为@Nullable的注解都可以用于成员变量。建议使用android的”support-annotations”库中的@Nullable注解。
@Nullable
@BindView(R.id.might_not_be_there)
TextView mightNotBeThere;  @Optional
@OnClick(R.id.maybe_missing)
public void onMaybeMissingClicked() {  // TODO ...
}
▲ 更多绑定注解:
@BindView—->绑定一个view;id为一个view 变量
@BindViews —-> 绑定多个view;id为一个view的list变量
@BindArray—-> 绑定string里面array数组;@BindArray(R.array.city ) String[] citys ;
@BindBitmap—->绑定图片资源为Bitmap;@BindBitmap( R.mipmap.wifi ) Bitmap bitmap;
@BindBool —->绑定boolean值
@BindColor —->绑定color;@BindColor(R.color.colorAccent) int black;
@BindDimen —->绑定Dimen;@BindDimen(R.dimen.borth_width) int mBorderWidth;
@BindDrawable —-> 绑定Drawable;@BindDrawable(R.drawable.test_pic) Drawable mTestPic;
@BindFloat —->绑定float
@BindInt —->绑定int
@BindString —->绑定一个String id为一个String变量;@BindString( R.string.app_name ) String meg;
▲ 更多事件注解:
@OnClick—->点击事件
@OnCheckedChanged —->选中,取消选中
@OnEditorAction —->软键盘的功能键
@OnFocusChange —->焦点改变
@OnItemClick item—->被点击(注意这里有坑,如果item里面有Button等这些有点击的控件事件的,需要设置这些控件属性focusable为false)
@OnItemLongClick item—->长按(返回真可以拦截onItemClick)
@OnItemSelected —->item被选择事件
@OnLongClick —->长按事件
@OnPageChange —->页面改变事件
@OnTextChanged —->EditText里面的文本变化事件
@OnTouch —->触摸事件
@Optional —->选择性注入,如果当前对象不存在,就会抛出一个异常,为了压制这个异常,可以在变量或者方法上加入一下注解,让注入变成选择性的,如果目标View存在,则注入, 不存在,则什么事情都不做
//Test @Optional
@Optional
@OnCheckedChanged(R.id.cb_test)
public void onCheckedChanged(CompoundButton buttonView,boolean isChecked){  if(isChecked){  tvTest.setText("被选中...");  }else{  tvTest.setText("被取消...");  }
}
ButterKnife的代码混淆
在混淆文件中,添加如下代码:
-keep class butterknife.** { *; }
-dontwarn butterknife.internal.**
-keep class **$$ViewBinder { *; }

-keepclasseswithmembernames class * {
    @butterknife.* <fields>;
}  -keepclasseswithmembernames class * {
    @butterknife.* <methods>;
}
Butterknife插件:zelezny
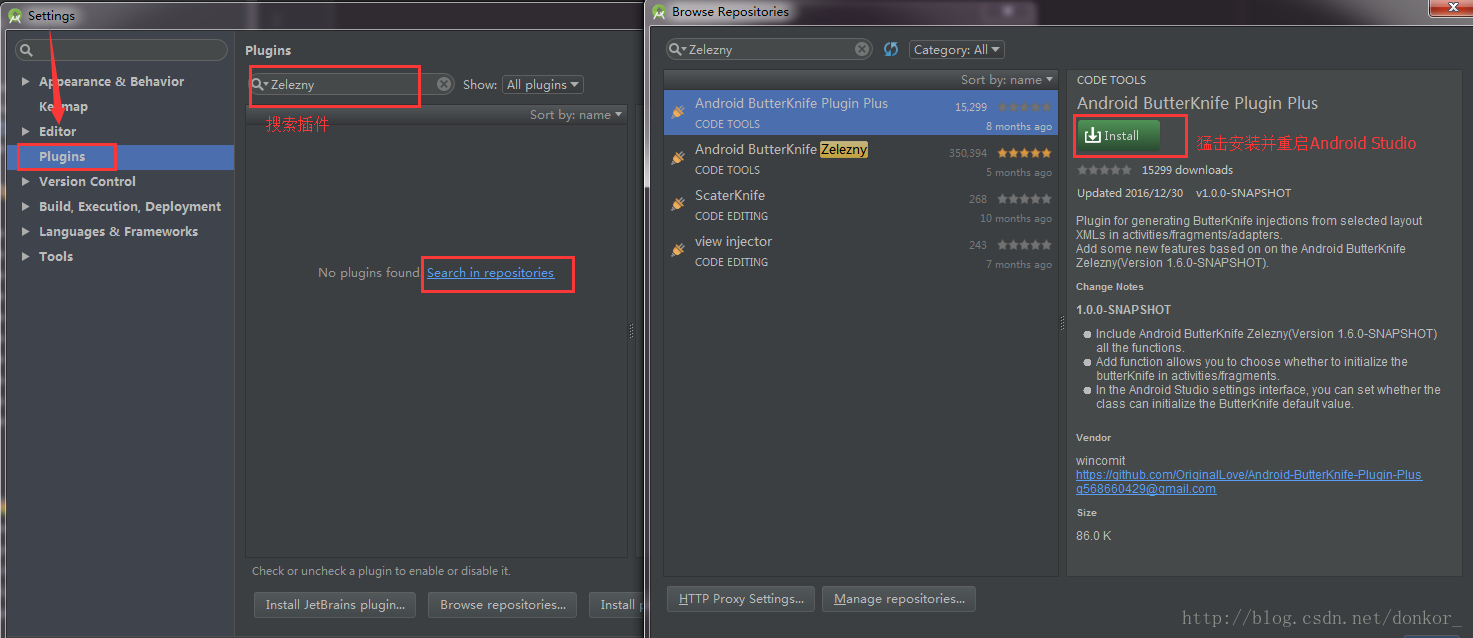
- 插件安装:
工具栏File 找到Settings…或者使用快捷点Ctrl+Alt+s 打开。搜索zelezny下载插件并安装,重启Android Studio
- 插件使用:
安装完成插件后,会提示重启AS,重启完后,可以写一个布局并且新建一个代码类测试下。测试的过程中要注意的是,需要将光标移到setContentView(R.layout.acty_login),将光标放到R.layout.acty_login,然后右键Generate就有了。这里引用一张gif效果图,更直观表现出插件带来的优势。对于多个需要绑定的id,省下了需要自己手动敲打代码的时间。
About me
Email :donkor@yeah.net
Android开发交流QQ群 : 537891203