SSM框架整合+简单案例实现
文章目录
- 前言
- 一、Spring+SpringMVC+Mybatis框架整合
- 1.建立一个新的web项目
- 2.所需jar包
- 3.建立数据库表与实体类之间的映射
- 4.web.xml
- 5.数据库信息db.properties
- 6.Spring与Mybatis的整合
- 7.SpringMVC基本配置
- 二、整合测试
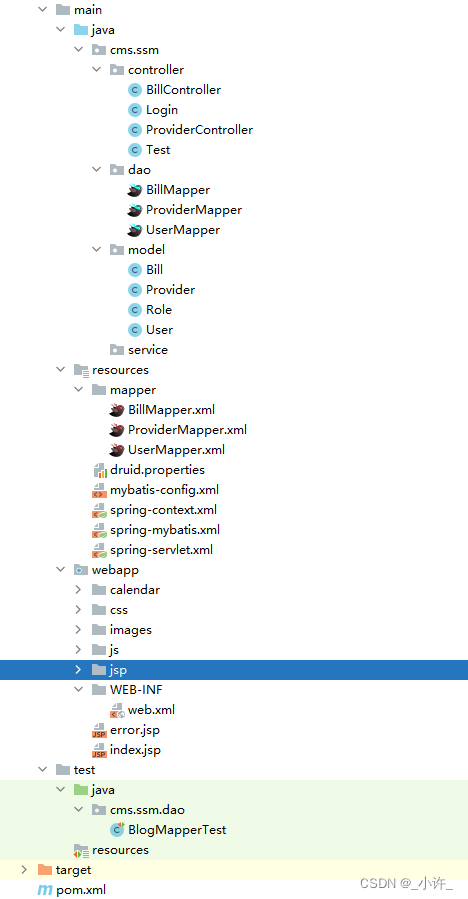
- 1.结构展示
- 2.studentMapper.xml
- 3.studentMapper.java接口
- 4.StudentService接口
- 5.StudentServiceImpl
- 6.StudentController
- 7.测试结果
前言
本文分为两个部分,第一部分为SSM框架整合,第二部分为测试整合框架,想看如何整合框架的朋友看完第一部分就可以离开了
在SSM框架的整合中,我们以Spring老大哥为基准,将各种需要交由Spring进行统一管理。
提示:以下是本篇文章正文内容,下面案例可供参考
一、Spring+SpringMVC+Mybatis框架整合
1.建立一个新的web项目

2.所需jar包
commons-dbcp-1.4.jar
commons-logging-1.1.1.jar
commons-pool-1.6.jar
log4j-1.2.17.jar
mybatis-3.5.6.jar
mybatis-spring-1.3.1.jar
mysql-connector-java-5.1.46.jar
spring-aop-4.3.9.RELEASE.jar
spring-beans-4.3.9.RELEASE.jar
spring-context-4.3.9.RELEASE.jar
spring-context-support-4.3.9.RELEASE.jar
spring-core-4.3.9.RELEASE.jar
spring-expression-4.3.9.RELEASE.jar
spring-jdbc-4.3.9.RELEASE.jar
spring-tx-4.3.9.RELEASE.jar
spring-web-4.3.9.RELEASE.jar
spring-webmvc-4.3.9.RELEASE.jar
3.建立数据库表与实体类之间的映射
表:
Stuednt实体类:
package org.lanqiao.entity;public class Student {private int stuNo;private String stuName;private int stuAge;public Student() {super();// TODO Auto-generated constructor stub}public Student(int stuNo, String stuName, int stuAge) {super();this.stuNo = stuNo;this.stuName = stuName;this.stuAge = stuAge;}public int getStuNo() {return stuNo;}public void setStuNo(int stuNo) {this.stuNo = stuNo;}public String getStuName() {return stuName;}public void setStuName(String stuName) {this.stuName = stuName;}public int getStuAge() {return stuAge;}public void setStuAge(int stuAge) {this.stuAge = stuAge;}}4.web.xml
<?xml version="1.0" encoding="UTF-8"?>
<web-app xmlns:xsi="http://www.w3.org/2001/XMLSchema-instance" xmlns="http://xmlns.jcp.org/xml/ns/javaee" xsi:schemaLocation="http://xmlns.jcp.org/xml/ns/javaee http://xmlns.jcp.org/xml/ns/javaee/web-app_3_1.xsd" id="WebApp_ID" version="3.1"><display-name>NewSSMProject</display-name><welcome-file-list><welcome-file>index.jsp</welcome-file></welcome-file-list><!-- Spring --><context-param><param-name>contextConfigLocation</param-name><param-value>classpath:applicationContext.xml</param-value></context-param><listener><listener-class>org.springframework.web.context.ContextLoaderListener</listener-class></listener><!-- SpringMVC --><servlet><servlet-name>springDispatcherServlet</servlet-name><servlet-class>org.springframework.web.servlet.DispatcherServlet</servlet-class><init-param><param-name>contextConfigLocation</param-name><param-value>classpath:applicationContext-controller.xml</param-value></init-param><load-on-startup>1</load-on-startup></servlet><servlet-mapping><servlet-name>springDispatcherServlet</servlet-name><url-pattern>/</url-pattern></servlet-mapping></web-app>
5.数据库信息db.properties
jdbc.driver=com.mysql.jdbc.Driver
jdbc.url=jdbc:mysql://localhost:3306/wxfwgl?useSSL=false
jdbc.user=root
jdbc.password=root
6.Spring与Mybatis的整合
applicationContext.xml
<?xml version="1.0" encoding="UTF-8"?>
<beans xmlns="http://www.springframework.org/schema/beans"xmlns:xsi="http://www.w3.org/2001/XMLSchema-instance"xmlns:context="http://www.springframework.org/schema/context"xsi:schemaLocation="http://www.springframework.org/schema/beans http://www.springframework.org/schema/beans/spring-beans.xsdhttp://www.springframework.org/schema/context http://www.springframework.org/schema/context/spring-context-4.3.xsd"><!-- 整合Spring与Mybatis --><!-- 加载db.properties --><bean id="config" class="org.springframework.beans.factory.config.PreferencesPlaceholderConfigurer"><property name="locations"><array><value>classpath:db.properties</value></array></property></bean><!-- 连接池 --><bean id="dataSource" class="org.apache.commons.dbcp.BasicDataSource"><property name="driverClassName" value="${jdbc.driver}"></property><property name="url" value="${jdbc.url}"></property><property name="username" value="${jdbc.user}"></property><property name="password" value="${jdbc.password}"></property></bean><!-- sqlSessionFactory --><bean id="sqlSessionFactory" class="org.mybatis.spring.SqlSessionFactoryBean"><property name="dataSource" ref="dataSource"></property><!-- 加载mapper文件 --><property name="mapperLocations" value="classpath:org/lanqiao/mapper/*.xml" ></property></bean><!-- 以扫描包的方式生成mapper对象 --><bean id="mappers" class="org.mybatis.spring.mapper.MapperScannerConfigurer"><property name="sqlSessionFactoryBeanName" value="sqlSessionFactory"></property><property name="basePackage" value="org.lanqiao.mapper"></property></bean>
</beans>
7.SpringMVC基本配置
applicationContext-controller.xml:
<?xml version="1.0" encoding="UTF-8"?>
<beans xmlns="http://www.springframework.org/schema/beans"xmlns:xsi="http://www.w3.org/2001/XMLSchema-instance"xmlns:mvc="http://www.springframework.org/schema/mvc"xmlns:context="http://www.springframework.org/schema/context"xsi:schemaLocation="http://www.springframework.org/schema/mvc http://www.springframework.org/schema/mvc/spring-mvc-4.3.xsdhttp://www.springframework.org/schema/beans http://www.springframework.org/schema/beans/spring-beans.xsdhttp://www.springframework.org/schema/context http://www.springframework.org/schema/context/spring-context-4.3.xsd"><!-- 配置视图解析器 --><bean class="org.springframework.web.servlet.view.InternalResourceViewResolver"><property name="prefix" value="/views/"></property><property name="suffix" value=".jsp"></property></bean><mvc:annotation-driven></mvc:annotation-driven></beans>
整合完毕,开始测试整合SSM的效果,我们对其进行一个简单实现
二、整合测试
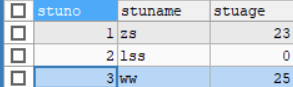
我们实现一个点击超链接,显示学生信息的效果来测验框架的整合
1.结构展示

2.studentMapper.xml
<?xml version="1.0" encoding="UTF-8" ?>
<!DOCTYPE mapper
PUBLIC "-//mybatis.org//DTD Mapper 3.0//EN"
"http://mybatis.org/dtd/mybatis-3-mapper.dtd"><!-- namespace:该mapper.xml映射文件的唯一标识 -->
<mapper namespace="org.lanqiao.mapper.StudentMapper"><select id="queryStudentByStuno" parameterType="int" resultType="org.lanqiao.entity.Student">select * from student where stuno = ${stuno}</select></mapper>
3.studentMapper.java接口
package org.lanqiao.mapper;import org.lanqiao.entity.Student;public interface StudentMapper {Student queryStudentByStuno(int stuno);
}
4.StudentService接口
package org.lanqiao.service;import org.lanqiao.entity.Student;
import org.springframework.stereotype.Service;public interface StudentService {Student queryStudentByStuno(int stuno);
}
5.StudentServiceImpl
package org.lanqiao.serviceImpl;import org.lanqiao.entity.Student;
import org.lanqiao.mapper.StudentMapper;
import org.lanqiao.service.StudentService;
import org.springframework.beans.factory.annotation.Autowired;
import org.springframework.stereotype.Service;@Service
public class StudentServiceImpl implements StudentService {@AutowiredStudentMapper studentMapper;@Overridepublic Student queryStudentByStuno(int stuno) {Student student = studentMapper.queryStudentByStuno(stuno);return student;}
}
在applicationContext.xml文件对其进行扫描
<context:component-scan base-package="org.lanqiao.serviceImpl"></context:component-scan>
6.StudentController
package org.lanqiao.controller;import org.lanqiao.entity.Student;
import org.lanqiao.service.StudentService;
import org.springframework.beans.factory.annotation.Autowired;
import org.springframework.stereotype.Controller;
import org.springframework.ui.Model;
import org.springframework.web.bind.annotation.PathVariable;
import org.springframework.web.bind.annotation.RequestMapping;@RequestMapping("controller")
@Controller
public class StudentController {@AutowiredStudentService studentService;@RequestMapping("queryStudentByStuno/{stuno}")public String queryStudentByStuno(@PathVariable("stuno") Integer stuno,Model model) {Student student = studentService.queryStudentByStuno(1);model.addAttribute("student", student);return "result";}}
在applicationContext-controller.xml文件中对其进行扫描
<context:component-scan base-package="org.lanqiao.controller"></context:component-scan>
7.测试结果
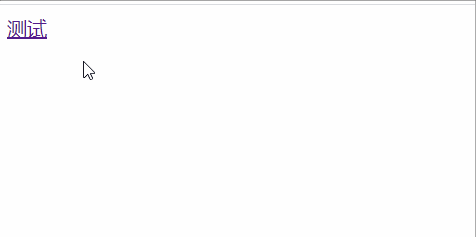
小测试成功,框架整合完毕