简介
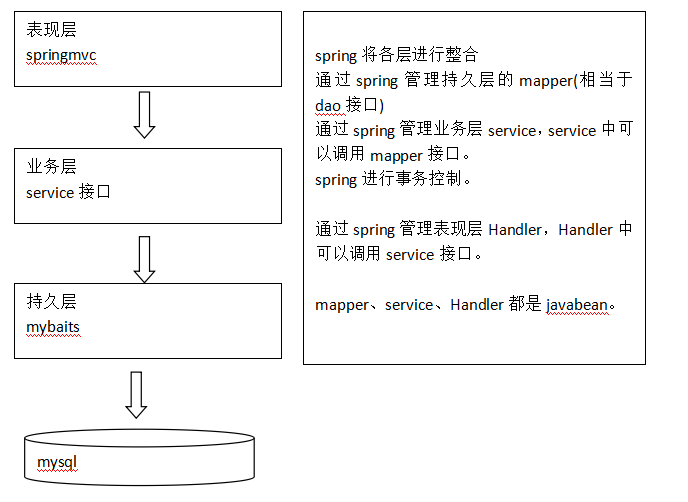
Spring+SpringMVC+MyBatis框架(SSM)是比较热门的中小型企业级项目开发的框架,对于新手来说也是比较容易学习入门的。虽说容易,但在框架搭建过程中仍然遇到了许多问题,因此用实例记录下来吧。
实例
第一步——导包
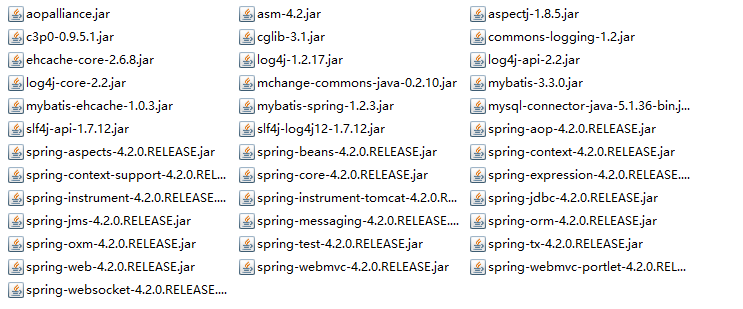
Spring框架包及其依赖包
MyBatis框架包及其依赖包
MyBatis-EhCache架包
C3P0架包
MySql数据库驱动包
项目架包如下:
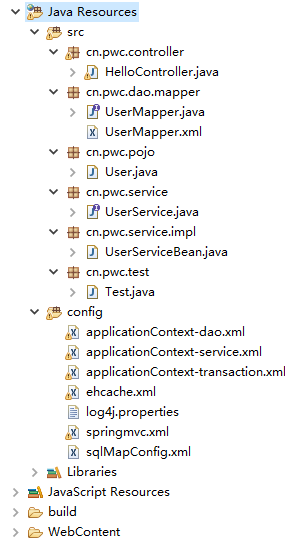
项目结构如下:
第二步——整合Dao层(Spring+MyBatis)
sqlMapConfig.xml
<?xml version="1.0" encoding="UTF-8" ?>
<!DOCTYPE configuration
PUBLIC "-//mybatis.org//DTD Config 3.0//EN"
"http://mybatis.org/dtd/mybatis-3-config.dtd">
<configuration><settings><setting name="cacheEnabled" value="true"/></settings>
</configuration>
因为MyBatis交给Spring管理,因此Mapper在Spring中配置,这里的配置只打开二级缓存
applicationContext-dao.xml
<bean id="dataSource" class="com.mchange.v2.c3p0.ComboPooledDataSource"><property name="driverClass" value="com.mysql.jdbc.Driver" /><property name="jdbcUrl" value="jdbc:mysql://localhost:3306/db_pwc" /><property name="user" value="pwc" /><property name="password" value="123456" /><property name="maxPoolSize" value="20" /><property name="minPoolSize" value="1" /><property name="initialPoolSize" value="3" /><property name="maxIdleTime" value="15" /></bean><bean id="sqlSessionFactory" class="org.mybatis.spring.SqlSessionFactoryBean"><property name="configLocation" value="classpath:sqlMapConfig.xml" /><property name="dataSource" ref="dataSource" /></bean><bean class="org.mybatis.spring.mapper.MapperScannerConfigurer"><property name="basePackage" value="cn.pwc.dao.mapper" /><property name="sqlSessionFactoryBeanName" value="sqlSessionFactory" /></bean></beans>1.该配置自动扫描单例化采用代理方式的Mapper,单例化的Mapper的bean名为Mapper接口第一个字母为小写的名。
2.千万要注意sqlSessionFactory的bean中的configLocation属性,其value值务必记得加上classpath:前缀,不然无法加载MyBatis配置文件
第二步——整合Service层(Spring)
业务接口和业务实现
UserService.java
package cn.pwc.service;
import java.util.List;
import cn.pwc.pojo.User;public interface UserService {public void add(User user) throws Exception;public void delete(User user) throws Exception;public User getUserById(int id) throws Exception;public List<User> listUserByAge(int age) throws Exception;
}
UserServiceBean.java
package cn.pwc.service.impl;
import java.util.List;
import javax.annotation.Resource;
import org.springframework.stereotype.Service;
import org.springframework.transaction.annotation.Transactional;
import cn.pwc.dao.mapper.UserMapper;
import cn.pwc.pojo.User;
import cn.pwc.service.UserService;@Service @Transactional
public class UserServiceBean implements UserService{@Resource(name="userMapper")private UserMapper mapper;@Overridepublic void add(User user) throws Exception {mapper.insert(user);}@Overridepublic void delete(User user) throws Exception {mapper.deleteById(user.getId());}@Overridepublic User getUserById(int id) throws Exception {User user=null;user=mapper.findById(id);if(user==null){throw new Exception("User is not existed!");}return user;}@Overridepublic List<User> listUserByAge(int age) throws Exception {List<User> list=null;list=mapper.findByAge(age);if(list==null){throw new Exception("List is empty!");}return list;}
}
本实例采用自动扫描加载的方式,因此该业务bean需注解@Service
本实例交由Spring管理事务,因此该业务bean需注解@Transactional
applicationContext-service.xml
<context:component-scan base-package="cn.pwc.service" />第三步——添加事务管理
applicationContext-transaction.xml
<bean id="txManager"class="org.springframework.jdbc.datasource.DataSourceTransactionManager"><property name="dataSource" ref="dataSource" /></bean><tx:annotation-driven transaction-manager="txManager" />第四步——整合视图层(SpringMVC)
springmvc.xml
    <context:component-scan base-package="cn.pwc.controller"/><mvc:annotation-driven /><bean
        class="org.springframework.web.servlet.view.InternalResourceViewResolver"><property name="prefix" value="/" /><property name="suffix" value=".jsp" /></bean>
采用mvc:annotation-driven标签自动装载视图控制器处理器解析器等
视图Controller(HelloController.java)
package cn.pwc.controller;import javax.annotation.Resource;import org.springframework.stereotype.Controller;
import org.springframework.web.bind.annotation.RequestMapping;
import org.springframework.web.servlet.ModelAndView;import cn.pwc.pojo.User;
import cn.pwc.service.UserService;@Controller
public class HelloController {@Resource(name="userServiceBean")private UserService service;@RequestMapping("/hello")public ModelAndView sayHello(){User user=null;User user2=null;User user3=null;try {user = service.getUserById(1);user2=service.getUserById(1);user3=service.getUserById(1);System.out.println("OK!");} catch (Exception e) {e.printStackTrace();}ModelAndView view=new ModelAndView("hello");view.addObject("user", user);return view;}
}
该Controller类需注解@Controller
视图控制方法需注解@RequestMapping,作为url请求处理方法
第五步——将所有配置装载到Spring容器中
web.xml
<?xml version="1.0" encoding="UTF-8"?>
<web-app xmlns:xsi="http://www.w3.org/2001/XMLSchema-instance"xmlns="http://java.sun.com/xml/ns/javaee"xsi:schemaLocation="http://java.sun.com/xml/ns/javaee http://java.sun.com/xml/ns/javaee/web-app_3_0.xsd"id="WebApp_ID" version="3.0"><listener><listener-class>org.springframework.web.context.ContextLoaderListener</listener-class></listener><context-param><param-name>contextConfigLocation</param-name><param-value>classpath:applicationContext-*.xml</param-value></context-param><servlet><servlet-name>springMVC</servlet-name><servlet-class>org.springframework.web.servlet.DispatcherServlet</servlet-class><init-param><param-name>contextConfigLocation</param-name><param-value>classpath:springmvc.xml</param-value></init-param></servlet><servlet-mapping><servlet-name>springMVC</servlet-name><url-pattern>/</url-pattern></servlet-mapping></web-app>
务必注意servlet-mapping中url-pattern属性值不能为/*
加载的配置文件路径必须有classpath:前缀
测试

版权声明:本文为博主原创文章,未经博主允许不得转载。