目录描述
- 一、创建web项目(使用idea maven)
- 二、使用maven添加依赖
- 1、在pom.xml中添加项目所需的所有依赖
- 2、添加tomcat运行驱动
- 三、建立整体项目架构
- 四、搭建mybatis
- 1、编写mybatis-config.xml
- 2、编写数据库连接配置文件
- 3、编写spring-mybatis.xml
- 4、编写pojo和dao层
- 5、编写映射文件
- 五、搭建spring
- 1、spring-context.xml
- 六、DAO层测试
- 七、搭建SpringMVC
- 1、编写spring-mvc.xml
- 2、编写Service层
- 3、测试Service层
- 4、编写web.xml
- 5、编写Controller层
- 八、编写页面
- 九、运行
- 1、配置tomcat
- 2、运行
一、创建web项目(使用idea maven)
都会
二、使用maven添加依赖
1、在pom.xml中添加项目所需的所有依赖
<!-- mysql驱动--><groupId>mysql</groupId><artifactId>mysql-connector-java</artifactId><version>5.1.47</version></dependency><!-- mybatis驱动--><dependency><groupId>org.mybatis</groupId><artifactId>mybatis</artifactId><version>3.4.6</version></dependency><!-- lombok --><dependency><groupId>org.projectlombok</groupId><artifactId>lombok</artifactId><version>1.18.12</version><scope>provided</scope></dependency><!--spring依赖--><dependency><groupId>org.springframework</groupId><artifactId>spring-context</artifactId><version>5.3.13</version></dependency><dependency><groupId>org.springframework</groupId><artifactId>spring-aspects</artifactId><version>5.3.13</version></dependency><!--持久化支持依赖--><dependency><groupId>org.springframework</groupId><artifactId>spring-jdbc</artifactId><version>5.3.13</version></dependency><!--spring 整合mybatis依赖--><dependency><groupId>org.mybatis</groupId><artifactId>mybatis-spring</artifactId><version>2.0.6</version></dependency><!--德鲁伊数据库连接池--><!-- https://mvnrepository.com/artifact/com.alibaba/druid --><dependency><groupId>com.alibaba</groupId><artifactId>druid</artifactId><version>1.1.10</version></dependency><!--单元测试--><dependency><groupId>org.springframework</groupId><artifactId>spring-test</artifactId><version>5.3.13</version></dependency><!--junit--><dependency><groupId>junit</groupId><artifactId>junit</artifactId><version>4.13.1</version><scope>test</scope></dependency><!-- Servlet 依赖--><dependency><groupId>javax.servlet</groupId><artifactId>jsp-api</artifactId><version>2.0</version><scope>provided</scope></dependency><dependency><groupId>javax.servlet</groupId><artifactId>javax.servlet-api</artifactId><version>4.0.1</version><scope>provided</scope></dependency><!--分页插件 PageHelper--><dependency><groupId>com.github.pagehelper</groupId><artifactId>pagehelper</artifactId><version>5.1.10</version></dependency><dependency><groupId>com.github.3tty0n</groupId><artifactId>jwt-scala_2.12</artifactId><version>1.3.0</version></dependency><dependency><groupId>com.github.3tty0n</groupId><artifactId>jwt-scala_2.11</artifactId><version>1.3.0</version></dependency><!--SPRING-MVC依赖--><!-- https://mvnrepository.com/artifact/org.springframework/spring-webmvc --><dependency><groupId>org.springframework</groupId><artifactId>spring-webmvc</artifactId><version>5.3.13</version></dependency><!-- https://mvnrepository.com/artifact/org.springframework/spring-web --><dependency><groupId>org.springframework</groupId><artifactId>spring-web</artifactId><version>5.3.13</version></dependency><!--JSON 将json类型转换成对象--><dependency><groupId>com.fasterxml.jackson.core</groupId><artifactId>jackson-databind</artifactId><version>2.13.0</version></dependency><dependency><groupId>org.junit.jupiter</groupId><artifactId>junit-jupiter</artifactId><version>RELEASE</version><scope>compile</scope></dependency><dependency><groupId>junit</groupId><artifactId>junit</artifactId><version>4.13.1</version><scope>compile</scope></dependency></dependencies>
2、添加tomcat运行驱动
<!--添加运行tomcat的插件--><plugin><!-- https://mvnrepository.com/artifact/org.apache.tomcat.maven/tomcat7-maven-plugin --><groupId>org.apache.tomcat.maven</groupId><artifactId>tomcat7-maven-plugin</artifactId><version>2.1</version></plugin>
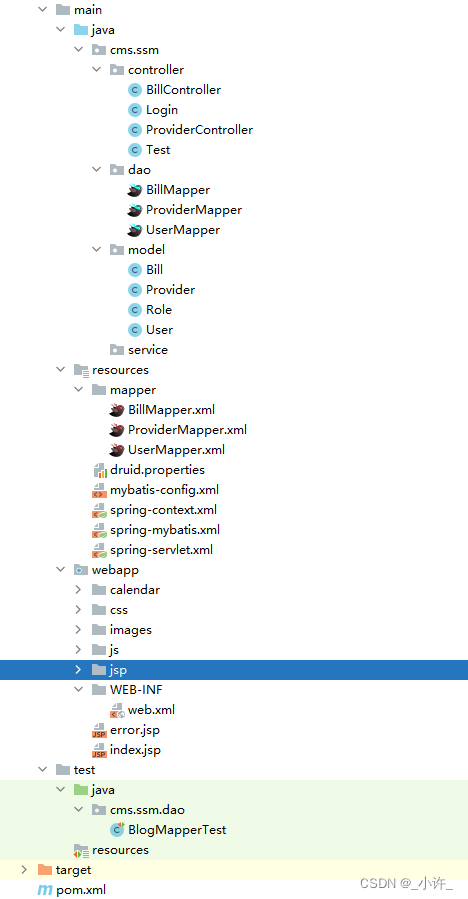
三、建立整体项目架构

四、搭建mybatis
1、编写mybatis-config.xml
空文件
<?xml version="1.0" encoding="utf-8"?>
<!DOCTYPE configuration PUBLIC "-//mybatis.org//DTD Config 3.0//EN""http://mybatis.org/dtd/mybatis-3-config.dtd">
<configuration></configuration>
其实可以省略。
2、编写数据库连接配置文件
druid.url=jdbc:mysql://localhost:3306/biology?characterEncoding=utf-8&useSSL=false&serverTimezone=UTC&rewriteBatchedStatements=true
druid.driver=com.mysql.jdbc.Driver
druid.username=root
druid.password=123456
druid.pool.init=2
druid.pool.minIdle=3
druid.pool.maxActive=20
druid.pool.timeout=30000
3、编写spring-mybatis.xml
<?xml version="1.0" encoding="UTF-8"?>
<beans xmlns="http://www.springframework.org/schema/beans"xmlns:context="http://www.springframework.org/schema/context"xmlns:aop="http://www.springframework.org/schema/aop"xmlns:tx="http://www.springframework.org/schema/tx"xmlns:xsi="http://www.w3.org/2001/XMLSchema-instance"xsi:schemaLocation="http://www.springframework.org/schema/beanshttp://www.springframework.org/schema/beans/spring-beans.xsdhttp://www.springframework.org/schema/contexthttp://www.springframework.org/schema/context/spring-context.xsdhttp://www.springframework.org/schema/aophttp://www.springframework.org/schema/aop/spring-aop.xsdhttp://www.springframework.org/schema/txhttp://www.springframework.org/schema/tx/spring-tx.xsd"><!--加载druid.properties属性文件--><context:property-placeholder location="classpath:druid.properties"/><bean id="dataSource" class="com.alibaba.druid.pool.DruidDataSource"><property name="url" value="${druid.url}"/><property name="driverClassName" value="${druid.driver}"/><property name="username" value="${druid.username}"/><property name="password" value="${druid.password}"/><property name="initialSize" value="${druid.pool.init}"/><property name="maxActive" value="${druid.pool.maxActive}"/><property name="minIdle" value="${druid.pool.minIdle}"/><property name="maxWait" value="${druid.pool.timeout}"/></bean><!--依赖Spring容器完成Mybatis的SqlSession对象的创建--><bean id="sqlSessionFactory" class="org.mybatis.spring.SqlSessionFactoryBean"><!--配置数据源--><property name="dataSource" ref="dataSource"/><!--配置Mapper文件路径--><property name="mapperLocations" value="classpath:mappers/*.xml"/><!--自动取别名 即类名 !可选!--><property name="typeAliasesPackage" value="com.atmae.pojo"/><!--配置mybatis-config主配置文件 !可选!--><property name="configLocation" value="classpath:mybatis-config.xml"/></bean><!--配置dao包中所有Dao接口,通过sqlSessionFactory获取SelSession,然后创建所有Dao接口对象 存储spring容器--><bean class="org.mybatis.spring.mapper.MapperScannerConfigurer"><property name="sqlSessionFactoryBeanName" value="sqlSessionFactory"/><property name="basePackage" value="com.atmae.dao"/></bean><!--spring提供的事务管理类配置给spring容器--><bean id="transactionManager" class="org.springframework.jdbc.datasource.DataSourceTransactionManager"><property name="dataSource" ref="dataSource"/></bean><!--通过spring jdbc提供的tx标签 声明事务管理策略--><tx:advice id="txAdvice" transaction-manager="transactionManager"><tx:attributes><tx:method name="insert*" isolation="REPEATABLE_READ" propagation="REQUIRED"/><tx:method name="query*" isolation="REPEATABLE_READ" propagation="SUPPORTS"/></tx:attributes></tx:advice><!--将事务管理策略以AOP配置 应用于Service中--><aop:config><aop:pointcut id="crud" expression="execution(* com.atmae.service.*.*(..))"/><aop:advisor advice-ref="txAdvice" pointcut-ref="crud"/></aop:config>
</beans>
4、编写pojo和dao层
POJO:
package com.atmae.pojo;import lombok.AllArgsConstructor;
import lombok.Data;
import lombok.NoArgsConstructor;
import lombok.ToString;@Data
@AllArgsConstructor
@NoArgsConstructor
@ToString
public class User {private int userId;private String userName;private String userPassword;private String userEmail;
}
DAO:
package com.atmae.dao;import com.atmae.pojo.User;public interface UserDao {public User queryUserByName(String name);
}
5、编写映射文件
<?xml version="1.0" encoding="UTF-8" ?>
<!DOCTYPE mapper  PUBLIC "-//mybatis.org//DTD Mapper 3.0//EN""http://mybatis.org/dtd/mybatis-3-mapper.dtd">
<mapper namespace="com.atmae.dao.UserDao"><resultMap id="userMap" type="User"><id column="id" property="userId"/><result column="username" property="userName"/><result column="password" property="userPassword"/><result column="email" property="userEmail"/></resultMap><select id="queryUserByName" resultMap="userMap">select id,username,password,emailfrom t_userwhere username=#{userName}</select>
</mapper>
五、搭建spring
1、spring-context.xml
<?xml version="1.0" encoding="UTF-8"?>
<beans xmlns="http://www.springframework.org/schema/beans"xmlns:context="http://www.springframework.org/schema/context"xmlns:xsi="http://www.w3.org/2001/XMLSchema-instance"xsi:schemaLocation="http://www.springframework.org/schema/beanshttp://www.springframework.org/schema/beans/spring-beans.xsdhttp://www.springframework.org/schema/contexthttp://www.springframework.org/schema/context/spring-context.xsd"><!--声明使用注解配置--><context:annotation-config/><!--声明Spring工厂注解扫描的包--><context:component-scan base-package="com.atmae"/>
</beans>
六、DAO层测试
package com.atmae.test;import com.atmae.dao.UserDao;
import com.atmae.pojo.User;
import org.junit.Test;
import org.junit.runner.RunWith;
import org.springframework.test.context.ContextConfiguration;
import org.springframework.test.context.junit4.SpringJUnit4ClassRunner;import javax.annotation.Resource;@RunWith(SpringJUnit4ClassRunner.class)
@ContextConfiguration({"classpath:spring-context.xml","classpath:spring-mvc.xml","classpath:spring-mybatis.xml"})
/*** RunWith:自动创建Spring应用上下文* ContextConfiguration:当一个类添加了注解@Component,那么他就自动变成了一个bean,就不需要再Spring配置文件中显示的配置了。*/
public class UserDaoTest {/*** Resource:自动装配*/@Resourceprivate UserDao userDao;@Testpublic void queryUserByName() {User user = userDao.queryUserByName("Admin");System.out.println(user);}
}
七、搭建SpringMVC
1、编写spring-mvc.xml
<?xml version="1.0" encoding="UTF-8"?>
<beans xmlns="http://www.springframework.org/schema/beans"xmlns:mvc="http://www.springframework.org/schema/mvc"xmlns:xsi="http://www.w3.org/2001/XMLSchema-instance"xsi:schemaLocation="http://www.springframework.org/schema/beanshttp://www.springframework.org/schema/beans/spring-beans.xsdhttp://www.springframework.org/schema/mvchttp://www.springframework.org/schema/mvc/spring-mvc.xsd"><!--声明MVC使用注解配置--><mvc:annotation-driven/></beans>
2、编写Service层
UserService接口:
package com.atmae.service;import com.atmae.pojo.User;public interface UserService {public User checkLogin(String userName, String UserPassword);
}
UserServiceImpl实现类:
package com.atmae.service.impl;import com.atmae.dao.UserDao;
import com.atmae.pojo.User;
import com.atmae.service.UserService;
import org.springframework.stereotype.Service;
import org.springframework.transaction.annotation.Transactional;import javax.annotation.Resource;@Service
public class UserServiceImpl implements UserService {@Resourceprivate UserDao userDao;/*** Transactional:添加事务管理*/@Transactionalpublic User checkLogin(String userName, String UserPassword) {User user = userDao.queryUserByName(userName);if (user!=null&&user.getUserPassword().equals(UserPassword)) {return user;} else {return null;}}
}
3、测试Service层
package com.atmae.test;import com.atmae.pojo.User;
import com.atmae.service.UserService;
import org.junit.Test;
import org.junit.runner.RunWith;
import org.springframework.test.context.ContextConfiguration;
import org.springframework.test.context.junit4.SpringJUnit4ClassRunner;import javax.annotation.Resource;import static org.junit.Assert.*;@RunWith(SpringJUnit4ClassRunner.class)
@ContextConfiguration({"classpath:spring-context.xml", "classpath:spring-mybatis.xml", "classpath:spring-mvc.xml"})
public class UserServiceTest {@ResourceUserService userService;@Testpublic void checkLogin() {User user = userService.checkLogin("Admin", "666666");assertNotNull(user);}
}
4、编写web.xml
<?xml version="1.0" encoding="UTF-8"?>
<!--Licensed to the Apache Software Foundation (ASF) under one or morecontributor license agreements.  See the NOTICE file distributed withthis work for additional information regarding copyright ownership.The ASF licenses this file to You under the Apache License, Version 2.0(the "License"); you may not use this file except in compliance withthe License.  You may obtain a copy of the License athttp://www.apache.org/licenses/LICENSE-2.0Unless required by applicable law or agreed to in writing, softwaredistributed under the License is distributed on an "AS IS" BASIS,WITHOUT WARRANTIES OR CONDITIONS OF ANY KIND, either express or implied.See the License for the specific language governing permissions andlimitations under the License.
--><!--- This is the Cocoon web-app configurations file-- $Id$-->
<web-app version="2.4"xmlns="http://java.sun.com/xml/ns/j2ee"xmlns:xsi="http://www.w3.org/2001/XMLSchema-instance"xsi:schemaLocation="http://java.sun.com/xml/ns/j2ee http://java.sun.com/xml/ns/j2ee/web-app_2_4.xsd"><servlet><servlet-name>springmvc</servlet-name><servlet-class>org.springframework.web.servlet.DispatcherServlet</servlet-class><init-param><param-name>contextConfigLocation</param-name><!--加载 三个文件 spring-mvc /context / mybatis--><param-value>classpath:spring-*.xml</param-value></init-param><load-on-startup>1</load-on-startup></servlet><servlet-mapping><servlet-name>springmvc</servlet-name><url-pattern>/</url-pattern></servlet-mapping></web-app>
5、编写Controller层
userController:
package com.atmae.controller;import com.atmae.pojo.User;
import com.atmae.service.UserService;
import org.springframework.stereotype.Controller;
import org.springframework.web.bind.annotation.RequestMapping;import javax.annotation.Resource;
import javax.servlet.http.HttpServletRequest;@Controller
@RequestMapping("/user")
public class UserController {@Resourceprivate UserService userService;@RequestMapping("/login")public String login(String userName, String userPassword, HttpServletRequest request){User user=userService.checkLogin(userName,userPassword);if (user==null){request.getSession().setAttribute("tips","用户名或者密码错误!");return "/login.jsp";}else{request.getSession().setAttribute("user",user);return "/index.jsp";}}
}
八、编写页面
<%--Created by IntelliJ IDEA.User: MaeDate: 2021/12/12Time: 11:32To change this template use File | Settings | File Templates.
--%>
<%@ page contentType="text/html;charset=UTF-8" language="java" %>
<html>
<head><title>Index</title>
</head>
<body>
<h1>${user.userName}</h1>
</body>
</html>
<%--Created by IntelliJ IDEA.User: MaeDate: 2021/12/12Time: 11:35To change this template use File | Settings | File Templates.
--%>
<%@ page contentType="text/html;charset=UTF-8" language="java" %>
<html>
<head><base href="${pageContext.request.contextPath}/"><title>Login</title>
</head>
<body>
<h1>${tips}</h1>
<form action="user/login" method="post"><p>账号:<input type="text" name="userName"/></p><p>密码:<input type="password" name="userPassword"></p><p>登录:<input type="submit" value="Login"></p>
</form>
</body>
</html>
九、运行
1、配置tomcat

2、运行