Gram矩阵在风格迁移中的使用
- 1、格拉姆矩阵的定义
- 2、风格迁移的任务描述
- 3、格拉姆矩阵的使用方法
- 3、实现过程
- 4、总结
- 5、参考文献
1、格拉姆矩阵的定义
1) 什么是格拉姆矩阵:
在内积空间中,一组向量[v1, v2, … , vn]的格拉姆矩阵(Gram Matrix)是内积的埃尔米特矩阵,其元素由 G i j = ⟨ v i , v j ⟩ G_{ij}=\langle v_i,v_j \rangle Gij=⟨vi,vj⟩给出。
对于一个给定的矩阵 A A A(我问题的出发点是图像处理),矩阵 A T A A^TA ATA是列向量的格拉姆矩阵,矩阵 A A T AA^T AAT是行向量的格拉姆矩阵。
2)格拉姆矩阵具有什么样的作用
按照我的理解,使用格拉姆矩阵就是对于一个向量,去计算与其转置向量的内积,从而得到该向量的格拉姆矩阵,而这个格拉姆矩阵具有的特点就是:对称。一个 n n n维的向量可以得到 n ∗ n n*n n∗n维的格拉姆矩阵,其中每一个元素都可以表示为特征 i i i与特征 j j j的相关性(特征 i i i的出现与特征 j j j的出现是否存在关联,是否成正比?),而矩阵对角线上的元素可以表示为某个特征 i i i在整个图像中的强度(特征 i i i是否在图像中占据了主导因素)。
2、风格迁移的任务描述
1)什么是风格迁移
当我们同时得到两张图片,一张是风格图片 style image,另一张是内容图片 content image,现在需要得到一张风格化图片 stylized image。风格化图片的特点就在于,它具有内容图片的主要内容(比如人物特征、景物等),但是具有风格图片的美术风格。
在我所调研的几篇论文中,因为都将CNN网络应用到了风格迁移任务,所以要介绍一下CNN网络中是怎么定义内容与风格的。
【2】内容:如果说两张图片在内容上是近似的,这指的是,在使用CNN网络进行图片识别的时候,图片的深层特征 high-level features 在欧氏距离上接近;
【2】风格:如果说两张图片在风格上是近似的,这指的是,在使用CNN网络进行图片识别的时候,图片的浅层特征 low-level features 在欧氏距离上接近;

【1】上图是一个很明显可以反映出“浅层特征”和“深层特征”不同特点的图片。这里采用了图片重构的方法,将输入图片经过CNN网络,再从不同网络层的输出信息来重构图片。从图片中可以看出,上半部分为风格图片,下半部分为内容图片。随着网络卷积层的不断深入,特征也逐渐从“浅层特征”变成了深层特征。明显可以观察到,自左而右,在重构房屋图片的过程中,一开始可以高精度、几乎无损失还原出房屋的图片,在深层网络的适合,大量局部的细节丢失,但是房屋轮廓结构信息得到很好的保留;而在风格图片的重构过程中,一开始的重构图片完全看不出任何细节内容(没有月亮的形态、没有古堡),主要都是图片的颜色纹理,但是随着网络的深入,可以看出原图所具有的城堡、月亮的形态。
2)风格迁移常见的网络架构
从我调研的论文中,选择两个经典的“风格迁移”网络架构进行介绍。
结构一

【3】在这篇论文中,最终目的是,用户可以通过调整参数,不断调整最终生成的风格化图片,从而控制风格的强度(纹理是不是足够明显),从而得到用户最偏爱的风格化图片。
步骤:
a. 首先损失函数调整参数会被传入到网络中,网络将会预测出合适的初始化参数,传入到风格迁移网络;
b. 然后风格迁移后的图片、原始图片以及风格图片被传入到分类器中,这些图片的表征信息将被用来计算风格损失(风格化图片和风格图片)和内容损失(风格化图片和原始图片);
c. 随后,每一层都会计算损失函数,通过初始化的输入调整参数进行调整,从而得到最后的损失函数。
结构二
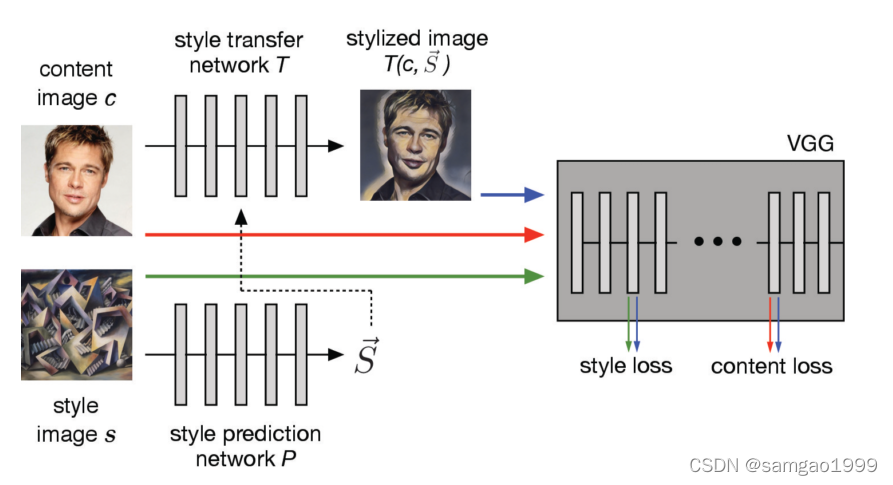
【2】在这篇论文中,作者研究了研究了一个算法可以高度使用到神经网络的可迁移性和快速性来实现对于任意内容-风格样本对进行迁移的方法。
步骤:
a. 首先损失函数调整参数会被传入到网络中,网络将会预测出合适的初始化参数,传入到风格迁移网络;
b. 然后风格迁移后的图片、原始图片以及风格图片被传入到分类器中,这些图片的表征信息将被用来计算风格损失(风格化图片和风格图片)和内容损失(风格化图片和原始图片);
c. 随后,每一层都会计算损失函数,通过初始化的输入调整参数进行调整,从而得到最后的损失函数。
3、格拉姆矩阵的使用方法
1)用于多滤波器输出空间数据的平均相关性
【2】绘画风格(绘画的艺术风格)可能可以由纹理特征来表示,假设纹理特征是空间上同质的,这表明由格拉姆矩阵表示的低阶空间数据可以在一个网络层给出的表征中,表示出不同滤波器输出空间数据的平均相关性。
S S S – 浅层网络层
G [ f l ( x ) ] G[f_l(x)] G[fl(x)] – l l l层结果的格拉姆矩阵
公式: L s ( x , s ) = ∑ i ∈ S 1 n i ∣ ∣ G [ f i ( x ) ] − G [ f i ( s ) ] ∣ ∣ F 2 L_s(x,s)=\sum_{i\in S}\frac{1}{n_i}||G[f_i(x)]-G[f_i(s)]||^2_F Ls(x,s)=∑i∈Sni1∣∣G[fi(x)]−G[fi(s)]∣∣F2
格拉姆矩阵是一种对称的矩阵,可以在一个层的输出中,计算不同滤波器的空间相关性
2)用格拉姆矩阵定义一个特征空间
【1】为了得到输入图片的风格信息,我们使用了一个特征空间来获取纹理信息,这个特征空间中包含了不同滤波器的响应之间的相互关系,这些相应关系是有gram矩阵计算得出的。
l l l – 特定网络层
i , j i,j i,j – 向量化的特征序列
公式: G i j l = ∑ k F i k l F j k l G_{ij}^l=\sum_{k}F_{ik}^lF_{jk}^l Gijl=∑kFiklFjkl
通过使用多网络层的特征之间的相关性,我们得到了输入数据稳定、多尺度的表征信息,通过该方法可以学习到图片的纹理特征,但是不会关注到全局的内容信息。
3、实现过程
【4】
加载VGG预训练模型
# move the model to GPU, if available
device = torch.device("cuda" if torch.cuda.is_available() else "cpu")
vgg.to(device)
加载图像
def load_image(img_path, max_size=400, shape=None):''' Load in and transform an image, making sure the imageis <= 400 pixels in the x-y dims.'''image = Image.open(img_path).convert('RGB')# large images will slow down processingif max(image.size) > max_size:size = max_sizeelse:size = max(image.size)if shape is not None:size = shapein_transform = transforms.Compose([transforms.Resize(size),transforms.ToTensor(),transforms.Normalize((0.485, 0.456, 0.406),(0.229, 0.224, 0.225))])# discard the transparent, alpha channel (that's the :3) and add the batch dimensionimage = in_transform(image)[:3,:,:].unsqueeze(0)return image
# helper function for un-normalizing an image
# and converting it from a Tensor image to a NumPy image for display
def im_convert(tensor):""" Display a tensor as an image. """image = tensor.to("cpu").clone().detach()image = image.numpy().squeeze()image = image.transpose(1,2,0)image = image * np.array((0.229, 0.224, 0.225)) + np.array((0.485, 0.456, 0.406))image = image.clip(0, 1)
return image
# load in content and style image, using shape parameter to make both content and style of same shape to make processing easier
content = load_image("C:\\Users\\vprayagala2\\Pictures\\Content_Img.jpg",shape=[400,400]).to(device)
style = load_image("C:\\Users\\vprayagala2\\Pictures\\Style_Img.jpg", shape=[400,400]).to(device)
# display the images
fig, (ax1, ax2) = plt.subplots(1, 2, figsize=(20, 10))
# content and style ims side-by-side
ax1.imshow(im_convert(content))
ax2.imshow(im_convert(style))
提取图像中的特征
def get_features(image, model, layers=None):
""" Run an image forward through a model and get the features for
a set of layers. Default layers are for VGGNet matching Gatys et al (2016)
"""
## Need the layers for the content and style representations of an image
# As mentioned, conv4_2 is content representation
# Conv1_1 thru conv5_1 is for style representation
if layers is None:layers = {'0': 'conv1_1','5': 'conv2_1','10': 'conv3_1','19': 'conv4_1','21': 'conv4_2',  ## content representation is output of this layer'28': 'conv5_1'}
features = {}
x = image
# model._modules is a dictionary holding each module in the model
for name, layer in model._modules.items():x = layer(x)
if name in layers:features[layers[name]] = x
return features
# get content and style features only once before training
content_features = get_features(content, vgg)
style_features = get_features(style, vgg)
格拉姆矩阵
def gram_matrix(tensor):""" Calculate the Gram Matrix of a given tensorGram Matrix: https://en.wikipedia.org/wiki/Gramian_matrix"""# get the batch_size, depth, height, and width of the Tensor_, d, h, w = tensor.size()# reshape so we're multiplying the features for each channeltensor = tensor.view(d, h * w)# calculate the gram matrixgram = torch.mm(tensor, tensor.t())return gram
计算内容损失和风格损失
# for displaying the target image, intermittently
show_every = 400
# iteration hyperparameters
optimizer = optim.Adam([target], lr=0.003)
steps = 2000  # decide how many iterations to update your image (5000)
for ii in range(1, steps+1):
# get the features from your target image
target_features = get_features(target, vgg)
# the content loss
content_loss = torch.mean((target_features['conv4_2'] - content_features['conv4_2'])**2)
# the style loss
# initialize the style loss to 0
style_loss = 0
# then add to it for each layer's gram matrix loss
for layer in style_weights:
# get the "target" style representation for the layer
target_feature = target_features[layer]
target_gram = gram_matrix(target_feature)
_, d, h, w = target_feature.shape
# get the "style" style representation
style_gram = style_grams[layer]
# the style loss for one layer, weighted appropriately
layer_style_loss = style_weights[layer] * torch.mean((target_gram - style_gram)**2)
# add to the style loss
style_loss += layer_style_loss / (d * h * w)
# calculate the *total* loss
total_loss = content_weight * content_loss + style_weight * style_loss
# update your target image
optimizer.zero_grad()
total_loss.backward()
optimizer.step()
# display intermediate images and print the loss
if  ii % show_every == 0:
print('Total loss: ', total_loss.item())
plt.imshow(im_convert(target))
plt.show()
# display content and final, target image
fig, (ax1, ax2) = plt.subplots(1, 2, figsize=(20, 10))
ax1.imshow(im_convert(content))
ax2.imshow(im_convert(target))
4、总结
通过使用格拉姆矩阵,其高效使用到不同节点的输出信息,可以非常便捷地将找个模块插入到成熟的神经网络框架中,并且实现特征向量的格拉姆矩阵运算;
格拉姆矩阵经常用于浅层的神经网络中,因为浅层网络主要提取了全局的风格特征,而没有关注到比较高层次的结构化语义信息,此时对于浅层特征使用格拉姆矩阵,可以描述浅层特征相互之间、空间性的相互关系,构建出一个可以使用到后续网络的特征空间(纹理信息)。
5、参考文献
【1】“Image Style Transfer Using Convolutional Neural Networks”, Leon A. Gatys, Alexander S. Ecker, Matthias Bethge
【2】“Exploring the structure of a real-time, arbitrary neural artistic stylization network”, Golnaz Ghiasi, Honglak Lee, Manjunath Kudlur, Vincent Dumoulin, Jonathon Shlens
【3】“Adjustable Real-time Style Transfer”, Mohammad Babaeizadeh, Golnaz Ghiasi
【4】“Style Transfer of Images with CNN in PyTorch”, Vijay Prayagala