一、Android应用安装有如下四种方式
1 系统应用安装――开机时完成,没有安装界面
2.网络下载应用安装――通过market应用完成,没有安装界面
3.ADB工具安装――没有安装界面。
4. 第三方应用安装――通过SD卡里的APK文件安装,有安装界面,由packageinstaller.apk应用处理安装及卸载过程的界面。
二、安装相关
1、应用安装的流程及路径
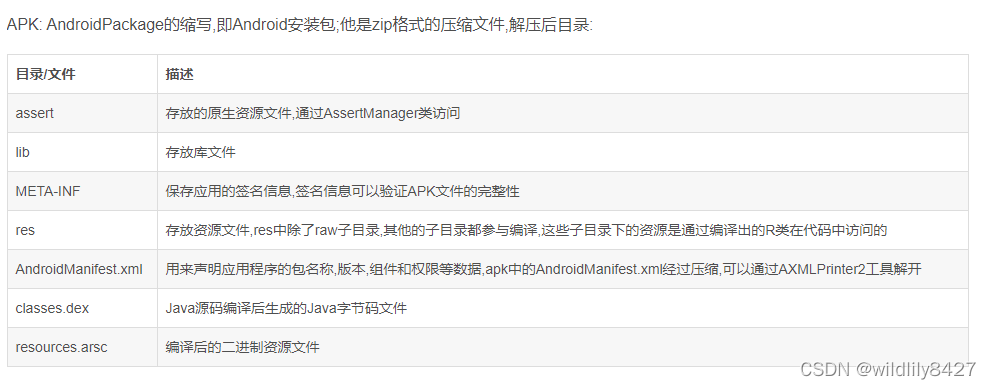
(1)应用安装涉及到如下几个目录:
system/app
系统自带的应用程序,无法删除
(2)data/app
用户程序安装的目录,有删除权限。
(3)安装时把apk文件复制到此目录
(4)data/data
存放应用程序的数据
(5)Data/dalvik-cache
将apk中的dex文件安装到dalvik-cache目录下(dex文件是dalvik虚拟机的可执行文件,其大小约为原始apk文件大小的四分之一)
2、安装过程:复制APK安装包到data/app目录下,解压并扫描安装包,把dex文件(Dalvik字节码)保存到dalvik-cache目录,并data/data目录下创建对应的应用数据目录。
3、 卸载过程:删除安装过程中在上述三个目录下创建的文件及目录。
三、代码调用流程(第三方应用安装)
1、安装apk应用代码:
  //MainActivity.javavoid install thirdAPK() {Log.d(TAG,"path===========" + this.getFilesDir());File file = new File(this.getFilesDir() + "/apk"+"/AlgoTestSigned.apk");Log.d(TAG,"file.path ============" + file.getAbsolutePath());Intent intent_apk = new Intent(Intent.ACTION_VIEW);if (Build.VERSION.SDK_INT > 24) {//大于7.0使用此方法Log.d(TAG,"testtest ===== sdk > 24");Uri apkUri = FileProvider.getUriForFile(this, "com.htkj.photo.fileprovider", file);intent_apk.setDataAndType(apkUri, "application/vnd.android.package-archive");} else {Log.d(TAG,"testtest ===== sdk < 24");// 由于没有在Activity环境下启动Activity,设置下面的标签intent_apk.setDataAndType(Uri.fromFile(file),"application/vnd.android.package-archive");}intent_apk.addFlags(Intent.FLAG_ACTIVITY_NEW_TASK);intent_apk.addFlags(Intent.FLAG_GRANT_READ_URI_PERMISSION);startActivity(intent_apk);
}//AndroidMenifest.xml
<manifest>...<application>...<activity android:name=".MainActivity"android:label="@string/app_name"android:launchMode="singleTask"android:theme="@style/AppTheme.NoActionBar"><intent-filter><action android:name="android.intent.action.MAIN" /><category android:name="android.intent.category.LAUNCHER" /></intent-filter></activity><provider<!--android:authorities="包名.fileprovider"-->android:authorities="com.htkj.photo.fileprovider"android:name="androidx.core.content.FileProvider"android:exported="false"android:grantUriPermissions="true"><meta-dataandroid:name="android.support.FILE_PROVIDER_PATHS"android:resource="@xml/path"></meta-data></provider>...</application>...<!--安装第三方apk,报错日志com.android.packageinstaller E/InstallStart: Requesting uid 10105 needs to declare permission android.permission.REQUEST_INSTALL_PACKAGES,添加下面权限--><uses-permission android:name="android.permission.REQUEST_INSTALL_PACKAGES"/>
</manifest>//在ret下面新建xml文件夹,新建path.xml文件
<?xml version="1.0" encoding="utf-8"?>
<paths><files-pathname="/AlgoTestSigned.apk"path="/apk"></files-path>
</paths>
path.xml文件注意问题:
(1)name字段应该可以随便定义(不确定)。
(2)path定义需要根据待装apk路径定义。例如,我的待装apk放到的完成路径为
/data/user/0/com.htkj.photo/files/apk/AlgoTestSigned.apk,标签files-path 的路径与java代码中 this.getFilesDir()获取的值相同均为“ /data/user/0/com.htkj.photo/files”,因此path至为“/apk”补全路径。
所有path标签如下:
<?xml version="1.0" encoding="utf-8"?>
<resources xmlns:android="http://schemas.android.com/apk/res/android"><paths><external-pathname="external_storage_root"path=""><!--Environment.getExternalStorageDirectory()--><!--/storage/emulated/0--><!--存储的根目录--></external-path><files-path><!--context.getFilesDir()--><!--内部存储的files目录--><!--/data/user/0/com.stone.testdemo/files--></files-path><cache-path><!--context.getCacheDir()--><!--内部存储的cache目录--><!--/data/user/0/com.stone.testdemo/cache--></cache-path><external-files-path><!--ContextCompat.getExternalFilesDirs--><!--外部私有存储的files目录--><!--/storage/emulated/0/Android/data/com.stone.testdemo/files--></external-files-path><external-cache-path><!--ContextCompat.getExternalCacheDirs--><!--外部私有存储的cache目录--><!--/storage/emulated/0/Android/data/com.stone.testdemo/cache--></external-cache-path><external-media-path><!--context.getExternalMediaDir--><!--/storage/emulated/0/Android/media/com.stone.testdemo--></external-media-path></paths>
</resources>
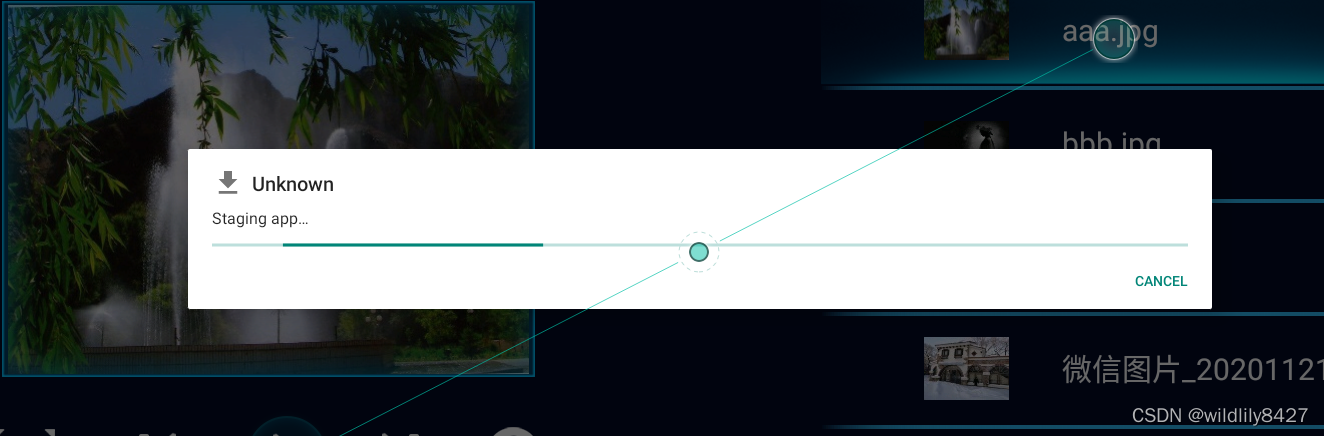
开始安装后,首先进入PackageInstallerActivity界面
2021-12-22 09:27:18.744 5175-5729/system_process I/ActivityTaskManager: Displayed com.android.packageinstaller/.InstallStaging: +199ms
2021-12-22 09:27:18.783 14141-14141/com.android.packageinstaller W/ActivityThread: handleWindowVisibility: no activity for token android.os.BinderProxy@863c479
2021-12-22 09:27:18.796 5175-9721/system_process I/ActivityTaskManager: START u0 {act=android.intent.action.VIEW dat=file:///data/user_de/0/com.android.packageinstaller/no_backup/package6786596049368288088.apk flg=0x10000 cmp=com.android.packageinstaller/.PackageInstallerActivity (has extras)} from uid 10037
2、升级流程
上述代码运行之后,跳转到PackageInstallerActivity界面,代码首先跳转到InstallStaging.java类中
// ../packages/apps/PackageInstaller/src/com/android/packageinstalle/InstallStaging.java
/*** If a package gets installed from an content URI this step loads the package and turns it into* and installation from a file. Then it re-starts the installation as usual.*/
public class InstallStaging extends Activity {private static final String LOG_TAG = InstallStaging.class.getSimpleName();private static final String STAGED_FILE = "STAGED_FILE";/** Currently running task that loads the file from the content URI into a file */private @Nullable StagingAsyncTask mStagingTask;/** The file the package is in */private @Nullable File mStagedFile;@Overrideprotected void onCreate(@Nullable Bundle savedInstanceState) {super.onCreate(savedInstanceState);setContentView(R.layout.install_staging);if (savedInstanceState != null) {mStagedFile = new File(savedInstanceState.getString(STAGED_FILE));if (!mStagedFile.exists()) {mStagedFile = null;}}findViewById(R.id.cancel_button).setOnClickListener(view -> {if (mStagingTask != null) {mStagingTask.cancel(true);}setResult(RESULT_CANCELED);finish();});}@Overrideprotected void onResume() {super.onResume();// This is the first onResume in a single life of the activityif (mStagingTask == null) {// File does not exist, or became invalidif (mStagedFile == null) {// Create file delayed to be able to show errortry {//这里不懂,后面分析mStagedFile = TemporaryFileManager.getStagedFile(this);} catch (IOException e) {showError();return;}}mStagingTask = new StagingAsyncTask();mStagingTask.execute(getIntent().getData());}}@Overrideprotected void onSaveInstanceState(Bundle outState) {super.onSaveInstanceState(outState);outState.putString(STAGED_FILE, mStagedFile.getPath());}@Overrideprotected void onDestroy() {if (mStagingTask != null) {mStagingTask.cancel(true);}super.onDestroy();}/*** Show an error message and set result as error.*/private void showError() {(new ErrorDialog()).showAllowingStateLoss(getFragmentManager(), "error");Intent result = new Intent();result.putExtra(Intent.EXTRA_INSTALL_RESULT,PackageManager.INSTALL_FAILED_INVALID_APK);setResult(RESULT_FIRST_USER, result);}/*** Dialog for errors while staging.*/public static class ErrorDialog extends DialogFragment {private Activity mActivity;@Overridepublic void onAttach(Context context) {super.onAttach(context);mActivity = (Activity) context;}@Overridepublic Dialog onCreateDialog(Bundle savedInstanceState) {AlertDialog alertDialog = new AlertDialog.Builder(mActivity).setMessage(R.string.Parse_error_dlg_text).setPositiveButton(R.string.ok,(dialog, which) -> mActivity.finish()).create();alertDialog.setCanceledOnTouchOutside(false);return alertDialog;}@Overridepublic void onCancel(DialogInterface dialog) {super.onCancel(dialog);mActivity.finish();}}private final class StagingAsyncTask extends AsyncTask<Uri, Void, Boolean> {@Overrideprotected Boolean doInBackground(Uri... params) {if (params == null || params.length <= 0) {return false;}Uri packageUri = params[0];try (InputStream in = getContentResolver().openInputStream(packageUri)) {// Despite the comments in ContentResolver#openInputStream the returned stream can// be null.if (in == null) {return false;}try (OutputStream out = new FileOutputStream(mStagedFile)) {byte[] buffer = new byte[1024 * 1024];int bytesRead;while ((bytesRead = in.read(buffer)) >= 0) {// Be nice and respond to a cancellationif (isCancelled()) {return false;}out.write(buffer, 0, bytesRead);}}} catch (IOException | SecurityException | IllegalStateException e) {Log.w(LOG_TAG, "Error staging apk from content URI", e);return false;}return true;}@Overrideprotected void onPostExecute(Boolean success) {if (success) {// Now start the installation again from a fileIntent installIntent = new Intent(getIntent());//打开DeleteStagedFileOnResult.java类installIntent.setClass(InstallStaging.this, DeleteStagedFileOnResult.class);installIntent.setData(Uri.fromFile(mStagedFile));if (installIntent.getBooleanExtra(Intent.EXTRA_RETURN_RESULT, false)) {installIntent.addFlags(Intent.FLAG_ACTIVITY_FORWARD_RESULT);}installIntent.addFlags(Intent.FLAG_ACTIVITY_NO_ANIMATION);startActivity(installIntent);InstallStaging.this.finish();} else {showError();}}}
}// ../packages/apps/PackageInstaller/src/com/android/packageinstaller/DeleteStagedFileOnResult.java
public class DeleteStagedFileOnResult extends Activity {@Overrideprotected void onCreate(@Nullable Bundle savedInstanceState) {super.onCreate(savedInstanceState);if (savedInstanceState == null) {Intent installIntent = new Intent(getIntent());//透传intent打开PackageInstallerActivity.java类installIntent.setClass(this, PackageInstallerActivity.class);installIntent.setFlags(Intent.FLAG_ACTIVITY_NO_ANIMATION);startActivityForResult(installIntent, 0);}}@Overrideprotected void onActivityResult(int requestCode, int resultCode, Intent data) {File sourceFile = new File(getIntent().getData().getPath());sourceFile.delete();setResult(resultCode, data);finish();}
}
InstallStaging.java中主要工作:开启AsyncTask 读取 apk文件,然后 启动了activity DeleteStagedFileOnResult,这是个跳板页面,里面直接透传 intent 启动了 PackageInstallerActivity。
// ../frameworks/base/core/java/android/content/pm/PackageInstaller.java
//../packages/apps/PackageInstaller/src/com/android/packageinstaller/PackageInstallerActivity.java
@Overrideprotected void onCreate(Bundle icicle) {super.onCreate(null);...//解析apkboolean wasSetUp = processPackageUri(packageUri);if (!wasSetUp) {return;}bindUi(R.layout.install_confirm, false);checkIfAllowedAndInitiateInstall();...
}//“未知来源apk”升级提示界面
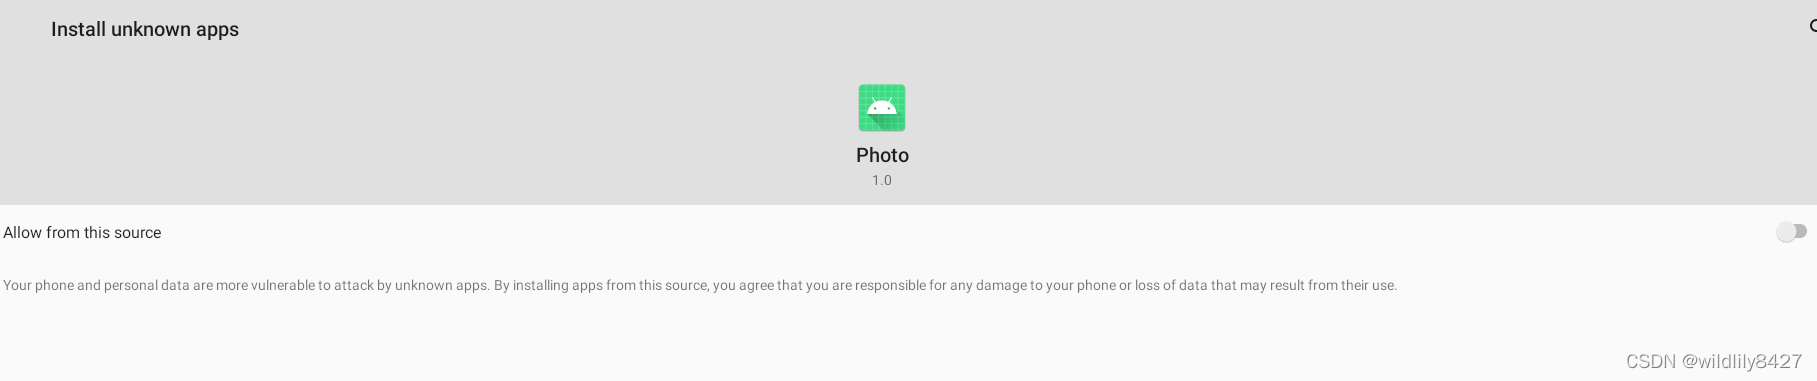
private void bindUi(int layout, boolean enableOk) {setContentView(layout);mOk = (Button) findViewById(R.id.ok_button);mCancel = (Button)findViewById(R.id.cancel_button);mOk.setOnClickListener(this);mCancel.setOnClickListener(this);mEnableOk = enableOk;mOk.setEnabled(enableOk);PackageUtil.initSnippetForNewApp(this, mAppSnippet, R.id.app_snippet);}/*** Check if it is allowed to install the package and initiate install if allowed. If not allowed* show the appropriate dialog.* 检查是否允许未知来源apk安装,允许则安装,不允许,跳转到设置界面。*/private void checkIfAllowedAndInitiateInstall() {...if (mAllowUnknownSources || !isInstallRequestFromUnknownSource(getIntent())) {initiateInstall();} else {// Check for unknown sources restrictionfinal int unknownSourcesRestrictionSource = mUserManager.getUserRestrictionSource(UserManager.DISALLOW_INSTALL_UNKNOWN_SOURCES, Process.myUserHandle());if ((unknownSourcesRestrictionSource & UserManager.RESTRICTION_SOURCE_SYSTEM) != 0) {showDialogInner(DLG_UNKNOWN_SOURCES_RESTRICTED_FOR_USER);} else if (unknownSourcesRestrictionSource != UserManager.RESTRICTION_NOT_SET) {startActivity(new Intent(Settings.ACTION_SHOW_ADMIN_SUPPORT_DETAILS));finish();} else {handleUnknownSources();}}...}//界面跳转到安装提示界面
private void initiateInstall() {...startInstallConfirm();...
}public void onClick(View v) {...startInstall();...
}//进到InstallInstalling类
private void startInstall() {...Intent newIntent = new Intent();newIntent.setClass(this, InstallInstalling.class);startActivity(newIntent);finish();...
}整体逻辑:
(1) 在 PackageInstallerActivity 的 onCreate() 初始化mPm、mInstaller;
(2) 使用 PackageUtil.getPackageInfo() 解析APK权限信息(可用于安装前展示给用户),注意参数flags 是 PackageManager.GET_PERMISSIONS;使用PackageUtil.getAppSnippet()获取apk摘要:图标、名字;
(3) 然后使用 checkIfAllowedAndInitiateInstall() 是检查APK来源,展示"未知来源APK安装"的对话框,当点击"settings"按钮后跳转到设置页;
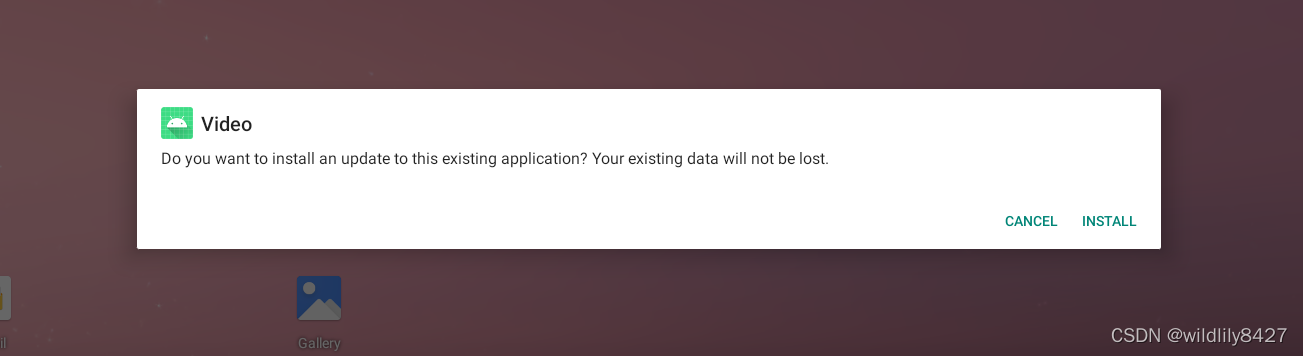
(4) 打开允许未知来源安装 后回到 PackageInstallerActivity,在 onActivityResult()中,展示"确认安装"提示,点击”安装“,跳转 InstallInstalling - 开始安装。
//../packages/apps/PackageInstaller/src/com/android/packageinstaller/InstallInstalling.java
public class InstallInstalling extends Activity {@Overrideprotected void onCreate(@Nullable Bundle savedInstanceState) {ApplicationInfo appInfo = getIntent().getParcelableExtra(PackageUtil.INTENT_ATTR_APPLICATION_INFO);mPackageURI = getIntent().getData();...PackageInstaller.SessionParams params = new PackageInstaller.SessionParams(PackageInstaller.SessionParams.MODE_FULL_INSTALL);...//安装结果监听。在收到安装结果的广播后 会调用此 ObservermInstallId = InstallEventReceiver.addObserver(this, EventResultPersister.GENERATE_NEW_ID,this::launchFinishBasedOnResult);...//IPC:PackageInstaller 内部会通过 IPackageInstaller 走到PackageInstallerService 的 createSession 方法来创建mSessionId = getPackageManager().getPackageInstaller().createSession(params);}@Overrideprotected void onResume() {super.onResume();// This is the first onResume in a single life of the activityif (mInstallingTask == null) {PackageInstaller installer = getPackageManager().getPackageInstaller();PackageInstaller.SessionInfo sessionInfo = installer.getSessionInfo(mSessionId);if (sessionInfo != null && !sessionInfo.isActive()) {mInstallingTask = new InstallingAsyncTask();mInstallingTask.execute();} else {// we will receive a broadcast when the install is finishedmCancelButton.setEnabled(false);setFinishOnTouchOutside(false);}}}/*** Send the package to the package installer and then register a event result observer that* will call {@link #launchFinishBasedOnResult(int, int, String)}*/private final class InstallingAsyncTask extends AsyncTask<Void, Void,PackageInstaller.Session> {volatile boolean isDone;@Overrideprotected PackageInstaller.Session doInBackground(Void... params) {PackageInstaller.Session session;try {session = getPackageManager().getPackageInstaller().openSession(mSessionId);} catch (IOException e) {return null;}session.setStagingProgress(0);try {File file = new File(mPackageURI.getPath());try (InputStream in = new FileInputStream(file)) {long sizeBytes = file.length();try (OutputStream out = session.openWrite("PackageInstaller", 0, sizeBytes)) {byte[] buffer = new byte[1024 * 1024];while (true) {int numRead = in.read(buffer);if (numRead == -1) {session.fsync(out);break;}if (isCancelled()) {session.close();break;}out.write(buffer, 0, numRead);if (sizeBytes > 0) {float fraction = ((float) numRead / (float) sizeBytes);session.addProgress(fraction);}}}}return session;} catch (IOException | SecurityException e) {Log.e(LOG_TAG, "Could not write package", e);session.close();return null;} finally {synchronized (this) {isDone = true;notifyAll();}}}@Overrideprotected void onPostExecute(PackageInstaller.Session session) {if (session != null) {Intent broadcastIntent = new Intent(BROADCAST_ACTION);broadcastIntent.setFlags(Intent.FLAG_RECEIVER_FOREGROUND);broadcastIntent.setPackage( getPackageManager().getPermissionControllerPackageName());broadcastIntent.putExtra(EventResultPersister.EXTRA_ID, mInstallId);PendingIntent pendingIntent = PendingIntent.getBroadcast(InstallInstalling.this,mInstallId,broadcastIntent,PendingIntent.FLAG_UPDATE_CURRENT);session.commit(pendingIntent.getIntentSender());mCancelButton.setEnabled(false);setFinishOnTouchOutside(false);} else {getPackageManager().getPackageInstaller().abandonSession(mSessionId);if (!isCancelled()) {launchFailure(PackageManager.INSTALL_FAILED_INVALID_APK, null);}}}}
}
安装流程:
(1) onCreate 中通过 PackageInstaller 创建Session 并返回 mSessionId;
(2) onResume 中开启InstallingAsyncTask,把包信息写入mSessionId对应的session,然后提交;
(3) onCreate 中添加了 安装结果的监听,在收到安装结果的广播后 会调用此 跳转到对应结果页面;
InstallInstalling.java 类onCreate() 中,PackageInstaller,APK安装器,是在ApplicationPackageManager的 getPackageInstaller()中创建:
// ../frameworks/base/core/java/android/app/ApplicationPackageManager.java@Overridepublic PackageInstaller getPackageInstaller() {synchronized (mLock) {if (mInstaller == null) {try {// mPM.getPackageInstaller() 获取的 IPackageInstaller实例的封装,而 IPackageInstaller 在系统服务端的具体实现是 PackageInstallerService。mInstaller = new PackageInstaller(mPM.getPackageInstaller(),mContext.getPackageName(), mContext.getUserId());} catch (RemoteException e) {throw e.rethrowFromSystemServer();}}return mInstaller;}}// ../frameworks/base/core/java/android/content/pm/PackageInstaller.java/** {@hide} */public PackageInstaller(IPackageInstaller installer,String installerPackageName, int userId) {mInstaller = installer;mInstallerPackageName = installerPackageName;mUserId = userId;}public int createSession(@NonNull SessionParams params) throws IOException {try {final String installerPackage;if (params.installerPackageName == null) {installerPackage = mInstallerPackageName;} else {installerPackage = params.installerPackageName;}return mInstaller.createSession(params, installerPackage, mUserId);} catch (RuntimeException e) {ExceptionUtils.maybeUnwrapIOException(e);throw e;} catch (RemoteException e) {throw e.rethrowFromSystemServer();}}
mInstaller = new PackageInstaller(mPM.getPackageInstaller(),mContext.getPackageName(),mContext.getUserId())中
mPM.getPackageInstaller() 获取的 IPackageInstaller实例的封装,而 IPackageInstaller 在系统服务端的具体实现是 PackageInstallerService。
且 PackageInstallerService 的实例是在 PMS 的构造方法中创建的,初始化时会读取 /data/system 目录下的 install_sessions.xml 文件,这个文件中保存了系统中未完成的 Install Session。PMS 会根据文件的内容创建 PackageInstallerSession 对象并插入到 mSessions 中。
//../frameworks/base/services/core/java/com/android/server/pm/PackageManagerService.java
final PackageInstallerService mInstallerService;mInstallerService = new PackageInstallerService(context, this);@Overridepublic void systemReady() {mInstallerService.systemReady();}//../frameworks/base/services/core/java/com/android/server/pm/PackageInstallerService.javapublic void systemReady() {synchronized (mSessions) {readSessionsLocked();// Ignore stages and icons claimed by active sessionsfor (int i = 0; i < mSessions.size(); i++) {final PackageInstallerSession session = mSessions.valueAt(i);unclaimedIcons.remove(buildAppIconFile(session.sessionId));}}}@GuardedBy("mSessions")private final SparseArray<PackageInstallerSession> mSessions = new SparseArray<>();@GuardedBy("mSessions")private void readSessionsLocked() {if (valid) {mSessions.put(session.sessionId, session);} else {// Since this is early during boot we don't send// any observer events about the session, but we// keep details around for dumpsys.addHistoricalSessionLocked(session);}mAllocatedSessions.put(session.sessionId, true);}@Overridepublic IPackageInstallerSession openSession(int sessionId) {try {return openSessionInternal(sessionId);} catch (IOException e) {throw ExceptionUtils.wrap(e);}}private IPackageInstallerSession openSessionInternal(int sessionId) throws IOException {synchronized (mSessions) {final PackageInstallerSession session = mSessions.get(sessionId);if (session == null || !isCallingUidOwner(session)) {throw new SecurityException("Caller has no access to session " + sessionId);}session.open();return session;}}
PackageInstaller 提供了 应用安装、更新、移除的能力,当然具体实现是 IPC 到了 PackageInstallerService中。
Session,是与 mSessionId绑定的安装会话,代表一个进行中的安装。Session类是对 IPackageInstaller.openSession(sessionId) 获取的 PackageInstallerSession(系统服务端)的封装。调用位置在InstallInstalling.java 类InstallingAsyncTask()方法中。Session 管理安装的参数,并提供将安装包临时复制到特定路径(data/app-staging)的能力。
Session的创建和打开 具体实现是在 PackageInstallerService中,主要是 初始化apk的安装信息及环境,并创建一个sessionId,将安装Session与sessionId 进行绑定。(代码较多,就不放了)
我们重点看 把包信息写入mSessionId对应的session,然后提交,回到 InstallInstalling 中,看到在 InstallingAsyncTask 中执行了对 APK包文件 的读取和写入操作,写入的输出流是 通过Session获取,也即是把 将APK文件写入了Session 。完成后 又调用了 session.commit(),具体实现是在PackageInstallerSession, 来看看:
//../packages/apps/PackageInstaller/src/com/android/packageinstaller/InstallInstalling.javaprivate final class InstallingAsyncTask extends AsyncTask<Void, Void,PackageInstaller.Session> {PackageInstaller.Session session;try {session =  getPackageManager().getPackageInstaller().openSession(mSessionId);} catch (IOException e) {return null;}@Overrideprotected void onPostExecute(PackageInstaller.Session session) {session.commit(pendingIntent.getIntentSender());}}//../frameworks/base/core/java/android/content/pm/PackageInstaller.javaprivate IPackageInstallerSession mSession;/** {@hide} */public Session(IPackageInstallerSession session) {mSession = session;}public void commit(@NonNull IntentSender statusReceiver) {try {mSession.commit(statusReceiver, false);} catch (RemoteException e) {throw e.rethrowFromSystemServer();}}// ../frameworks/base/core/java/android/content/pm/IPackageInstallerSession.aidl//实现类 ../frameworks/base/services/core/java/com/android/server/pm/PackageInstallerSession.java@Overridepublic void commit(@NonNull IntentSender statusReceiver, boolean forTransfer) {...mHandler.obtainMessage(MSG_COMMIT).sendToTarget();...}private final Handler.Callback mHandlerCallback = new Handler.Callback() {@Overridepublic boolean handleMessage(Message msg) {switch (msg.what) {...case MSG_COMMIT:synchronized (mLock) {try {commitLocked();} catch (PackageManagerException e) {final String completeMsg = ExceptionUtils.getCompleteMessage(e);Slog.e(TAG,"Commit of session " + sessionId + " failed: " + completeMsg);destroyInternal();dispatchSessionFinished(e.error, completeMsg, null);}}break;...}return true;}};private final PackageManagerService mPm;
@GuardedBy("mLock")
private void commitLocked() throws PackageManagerException {...final IPackageInstallObserver2 localObserver = new IPackageInstallObserver2.Stub() {@Overridepublic void onUserActionRequired(Intent intent) {throw new IllegalStateException();}@Overridepublic void onPackageInstalled(String basePackageName, int returnCode, String msg,Bundle extras) {destroyInternal();dispatchSessionFinished(returnCode, msg, extras);}};//安装走到了 PMS 中mPm.installStage(mPackageName, stageDir, localObserver, params,mInstallerPackageName, mInstallerUid, user, mSigningDetails);
}
最后,安装过程走到了 PMS 的 installStage()。
目前为止,只是通过 PackageInstaller 维持了安装 Session,把安装包写入到 Session中,真正的安装过程是 PMS 来执行。
//../frameworks/base/services/core/java/com/android/server/pm/PackageManagerService.java```java
void installStage(String packageName, File stagedDir,IPackageInstallObserver2 observer, PackageInstaller.SessionParams sessionParams,String installerPackageName, int installerUid, UserHandle user,PackageParser.SigningDetails signingDetails) {final Message msg = mHandler.obtainMessage(INIT_COPY);final int installReason = fixUpInstallReason(installerPackageName, installerUid,sessionParams.installReason);final InstallParams params = new InstallParams(origin, null, observer,sessionParams.installFlags, installerPackageName, sessionParams.volumeUuid,verificationInfo, user, sessionParams.abiOverride,sessionParams.grantedRuntimePermissions, signingDetails, installReason);params.setTraceMethod("installStage").setTraceCookie(System.identityHashCode(params));msg.obj = params;Trace.asyncTraceBegin(TRACE_TAG_PACKAGE_MANAGER, "installStage",System.identityHashCode(msg.obj));Trace.asyncTraceBegin(TRACE_TAG_PACKAGE_MANAGER, "queueInstall",System.identityHashCode(msg.obj));mHandler.sendMessage(msg);
}void doHandleMessage(Message msg) {case INIT_COPY:mPendingInstalls.add(idx, params);mHandler.sendEmptyMessage(MCS_BOUND);break;case MCS_BOUND:HandlerParams params = mPendingInstalls.get(0);params.startCopy();break;}final boolean startCopy() {handleStartCopy();handleReturnCode();}public void handleStartCopy() throws RemoteException {int ret = PackageManager.INSTALL_SUCCEEDED;...PackageInfoLite pkgLite = null;//解析包 返回最小的细节:pkgName、versionCode、安装所需空间大小、获取安装位置等pkgLite = mContainerService.getMinimalPackageInfo(origin.resolvedPath, installFlags,packageAbiOverride);...if (ret == PackageManager.INSTALL_SUCCEEDED) {//以下是 获取安装位置失败情况int loc = pkgLite.recommendedInstallLocation;if (loc == PackageHelper.RECOMMEND_FAILED_INVALID_LOCATION) {ret = PackageManager.INSTALL_FAILED_INVALID_INSTALL_LOCATION;} else if (loc == PackageHelper.RECOMMEND_FAILED_ALREADY_EXISTS) {ret = PackageManager.INSTALL_FAILED_ALREADY_EXISTS;} else if (loc == PackageHelper.RECOMMEND_FAILED_INSUFFICIENT_STORAGE) {ret = PackageManager.INSTALL_FAILED_INSUFFICIENT_STORAGE;} else if (loc == PackageHelper.RECOMMEND_FAILED_INVALID_APK) {ret = PackageManager.INSTALL_FAILED_INVALID_APK;} else if (loc == PackageHelper.RECOMMEND_FAILED_INVALID_URI) {ret = PackageManager.INSTALL_FAILED_INVALID_URI;} else if (loc == PackageHelper.RECOMMEND_MEDIA_UNAVAILABLE) {ret = PackageManager.INSTALL_FAILED_MEDIA_UNAVAILABLE;} ...}final InstallArgs args = createInstallArgs(this);mArgs = args;ret = args.copyApk(mContainerService, true);mRet = ret;}//解析包返回最小的细节:pkgName、versionCode、安装所需空间大小;确认包安装位置;校验APK完整性。获取结果mRet。int copyApk(IMediaContainerService imcs, boolean temp) throws RemoteException {Trace.traceBegin(TRACE_TAG_PACKAGE_MANAGER, "copyApk");try {return doCopyApk(imcs, temp);} finally {Trace.traceEnd(TRACE_TAG_PACKAGE_MANAGER);}}private int doCopyApk(IMediaContainerService imcs, boolean temp) throws RemoteException      {//获取拷贝文件路径:/data/apptry {final boolean isEphemeral = (installFlags & PackageManager.INSTALL_INSTANT_APP) != 0;final File tempDir =mInstallerService.allocateStageDirLegacy(volumeUuid, isEphemeral);codeFile = tempDir;resourceFile = tempDir;} catch (IOException e) {Slog.w(TAG, "Failed to create copy file: " + e);return PackageManager.INSTALL_FAILED_INSUFFICIENT_STORAGE;}//拷贝apkint ret = PackageManager.INSTALL_SUCCEEDED;ret = imcs.copyPackage(origin.file.getAbsolutePath(), target);if (ret != PackageManager.INSTALL_SUCCEEDED) {Slog.e(TAG, "Failed to copy package");return ret;}//拷贝Native代码 即 .so文件final File libraryRoot = new File(codeFile, LIB_DIR_NAME);NativeLibraryHelper.Handle handle = null;try {handle = NativeLibraryHelper.Handle.create(codeFile);ret = NativeLibraryHelper.copyNativeBinariesWithOverride(handle, libraryRoot,abiOverride);} catch (IOException e) {Slog.e(TAG, "Copying native libraries failed", e);ret = PackageManager.INSTALL_FAILED_INTERNAL_ERROR;} finally {IoUtils.closeQuietly(handle);}return ret;
}
在FileInstallArgs中的copyApk()走到doCopyApk(),先获取了拷贝文件路径:/data/app,使用PackageManagerServiceUtils.copyPackage()进行APK拷贝,接着是 .so文件的拷贝。也就是说,把发送到 Session暂存目录 data/app-staging 的APK 拷贝到了 /data/app。然后看 handleReturnCode(),
 @Overridevoid handleReturnCode() {// If mArgs is null, then MCS couldn't be reached. When it// reconnects, it will try again to install. At that point, this// will succeed.if (mArgs != null) {processPendingInstall(mArgs, mRet);}}private void processPendingInstall(final InstallArgs args, final int currentStatus) {installPackageTracedLI(args, res);Message msg = mHandler.obtainMessage(POST_INSTALL, token, 0);mHandler.sendMessage(msg);
}private void installPackageTracedLI(InstallArgs args, PackageInstalledInfo res) {installPackageLI(args, res);
}private void installPackageLI(InstallArgs args, PackageInstalledInfo res) {}void doHandleMessage(Message msg) {case POST_INSTALL: handlePackagePostInstall(parentRes, grantPermissions, killApp,virtualPreload, grantedPermissions, didRestore,args.installerPackageName, args.observer);break;
}
mHandler 使用 PMS的 handlePackagePostInstall()方法处理 POST_INSTALL:
根据安装结果 发送 Intent.ACTION_PACKAGE_ADDED 等广播,桌面Launcher 收到广播后就会在桌上增加App的Icon
调用 PackageInstallSession 中保存的IPackageInstallObserver2实例的onPackageInstalled()方法,最后发送安装成功的通知显示在通知栏,通过 IntentSender 发送 在 InstallInstalling 中就定义好的广播,最后 InstallInstalling页面 根据结果展示 安装成功/安装失败 。
还有一些安装过程解析apk,apk校验等细节过程,后面需要再那恭喜看吧,内容太多。具体看下面的链接。
https://blog.csdn.net/u010479969/article/details/48292237
本文借鉴链接:
https://mp.weixin.qq.com/s/eACbMYJ042YKglg7fpEb2w
安全提醒界面
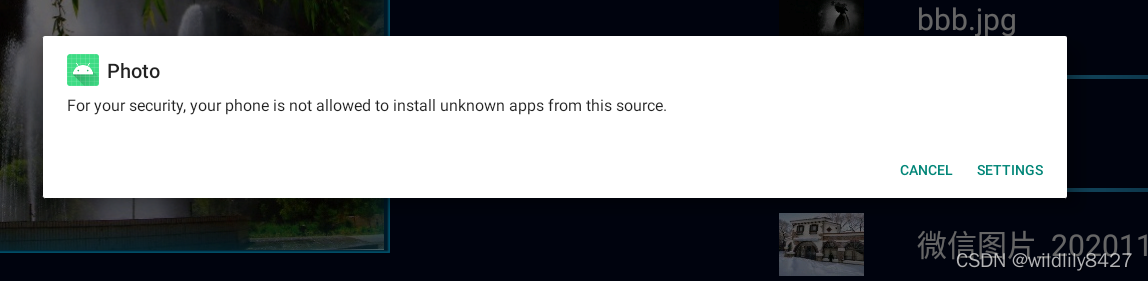
设置界面打开 安全开关
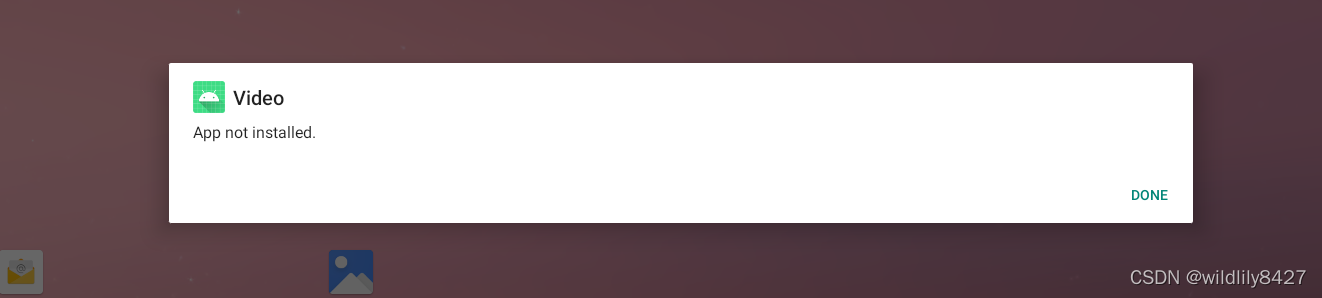
安装失败