1、Kong的概述

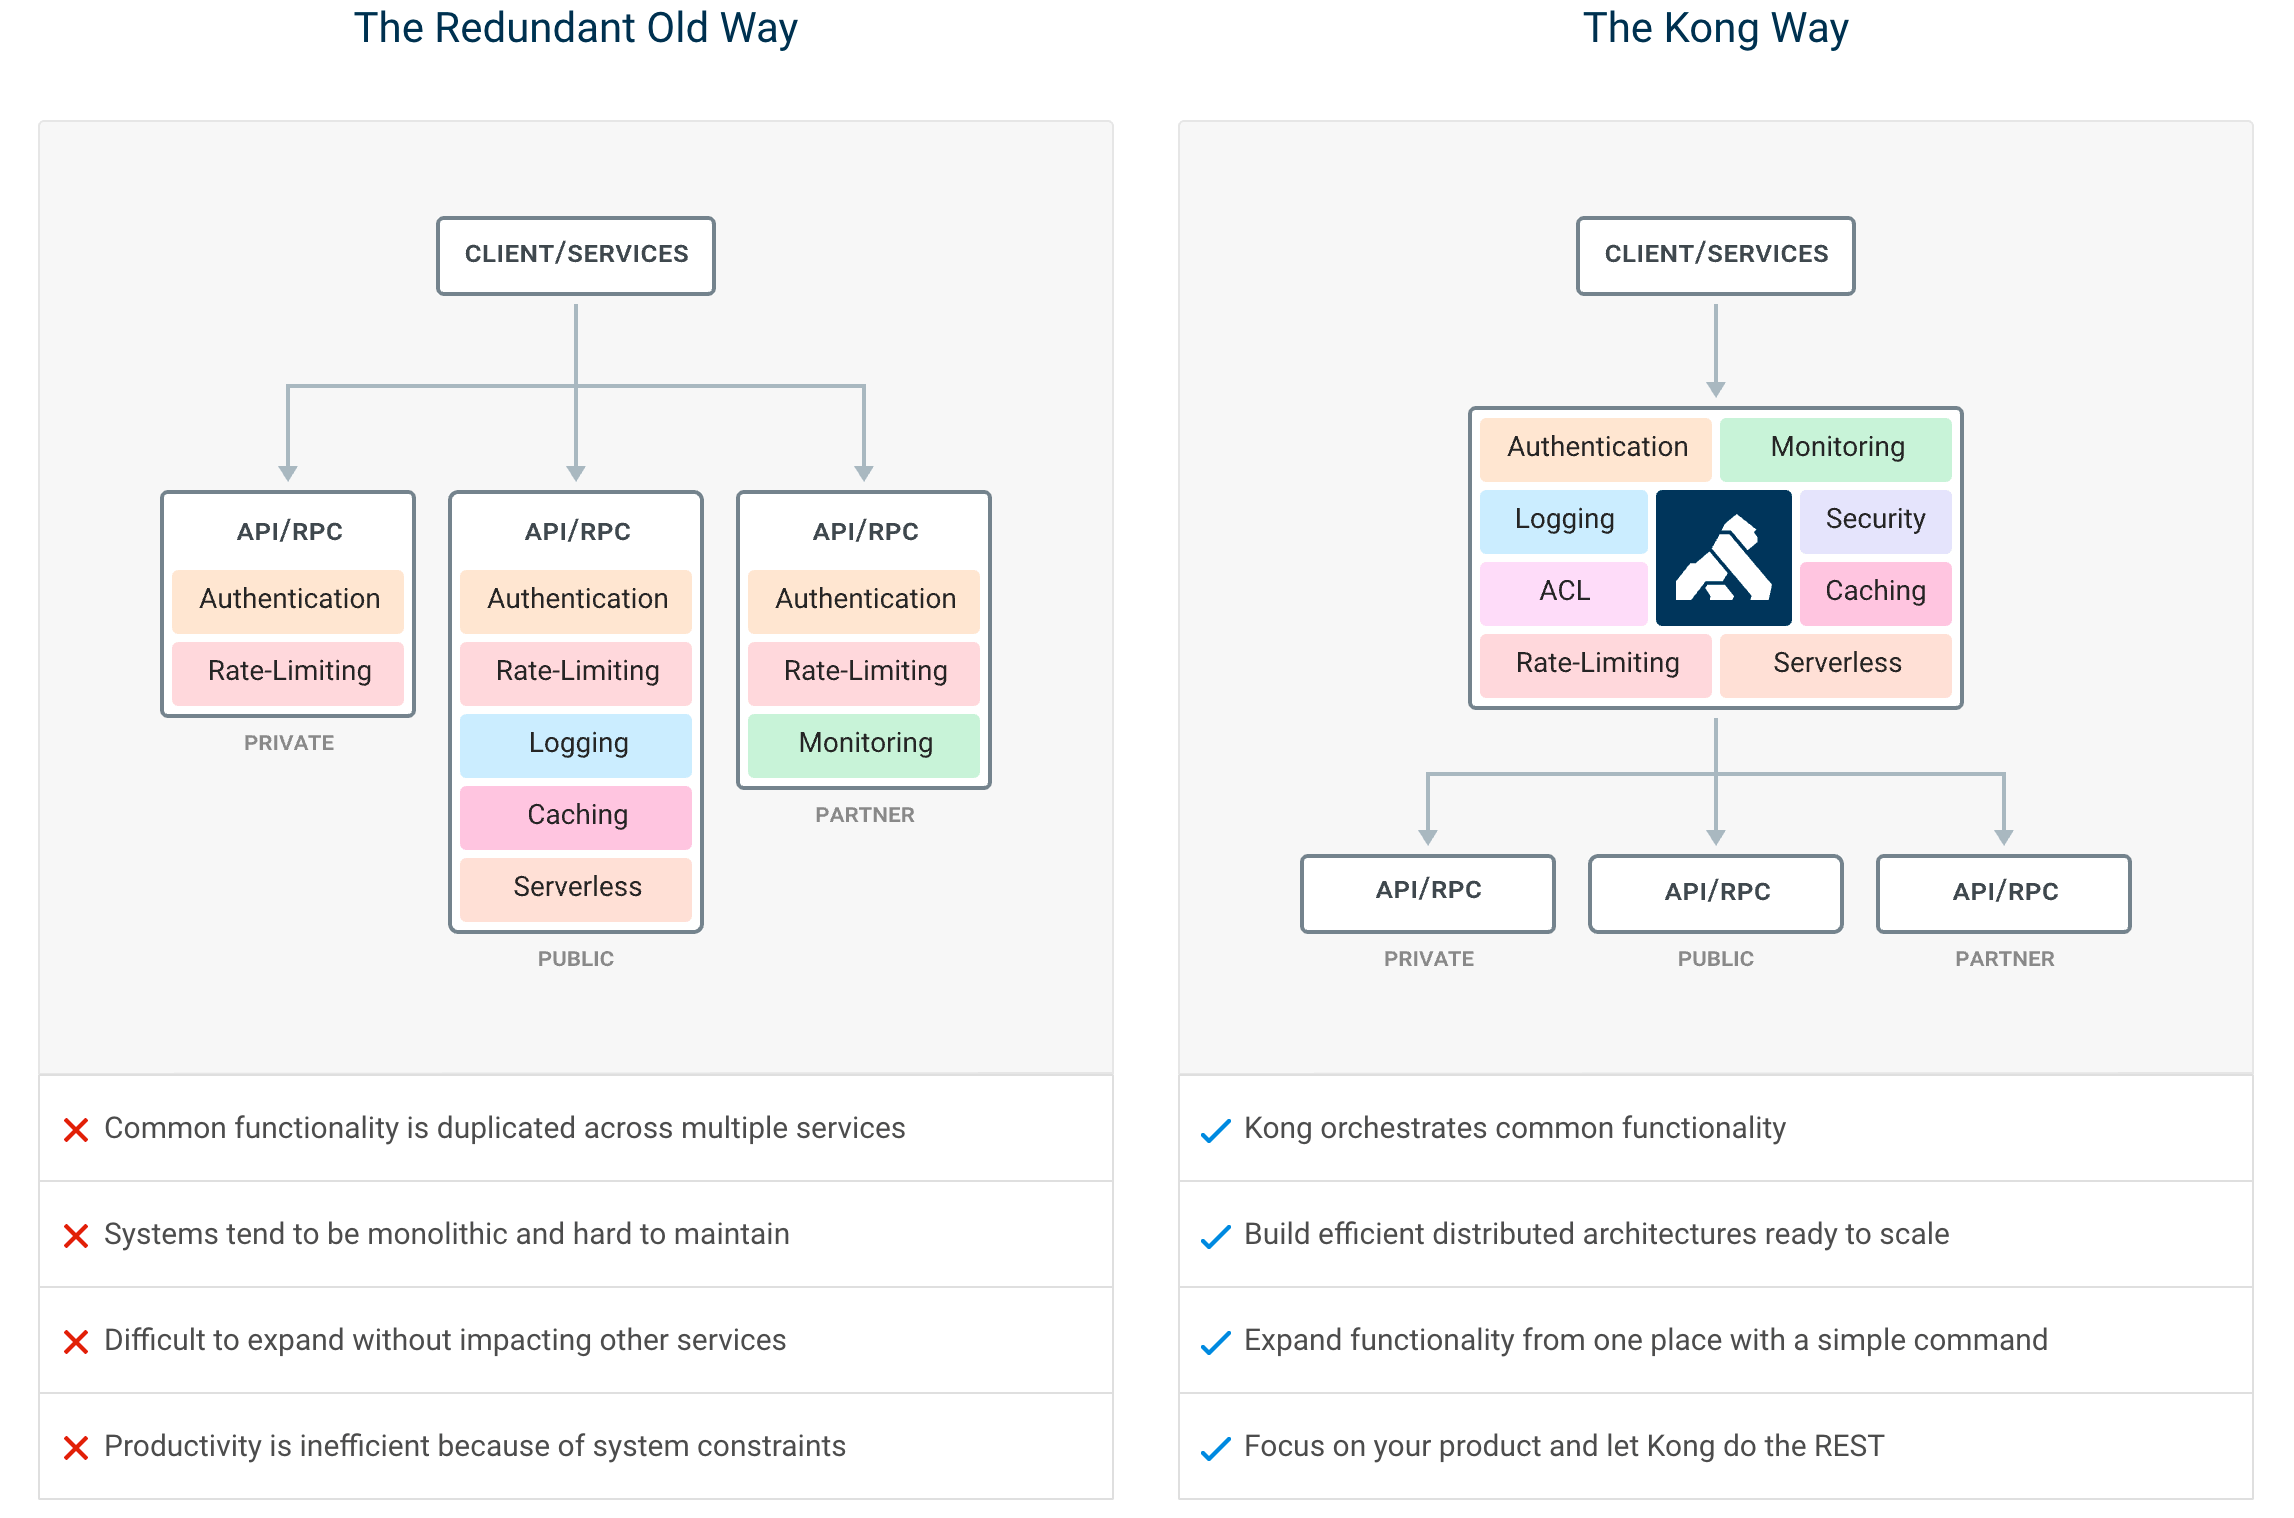
Kong是一个clould-native、快速的、可扩展的、分布式的微服务抽象层(也称为API网关、API中间件或在某些情况下称为服务网格)框架。Kong作为开源项目在2015年推出,它的核心价值是高性能和可扩展性。Kong被广泛用于从初创企业到全球5000家公司以及政府组织的生产环境中。
如果构建Web、移动或IoT(物联网)应用,可能最终需要使用通用的功能来实现这些应用。Kong充当微服务请求的网关(或侧车),通过插件能够提供负载平衡、日志记录、身份验证、速率限制、转换等能力。

2、功能特性
- 云本土化(Cloud-Native):Kong可以在Kubernetes或物理环境上运行;
- 动态负载平衡(Dynamic Load Balancing):跨多个上游服务的负载平衡业务。
- 基于哈希的负载平衡(Hash-based Load Balancing):一致的散列/粘性会话的负载平衡。
- 断路器(Circuit-Breaker):智能跟踪不健康的上游服务。
- 健康检查(Health Checks):主动和被动监控您的上游服务。
- 服务发现(Service Discovery):解决如Consul等第三方DNS解析器的SRV记录。
- 无服务器(Serverless):从Kong中直接调用和保证AWS或OpenWhisk函数安全。
- WebSockets:通过WebSockets与上游服务进行通信。
- OAuth2.0:轻松的向API中添加OAuth2.0认证。
- 日志记录(Logging):通过HTTP、TCP、UDP记录请求或者相应的日志,存储在磁盘中。
- 安全(Security):ACL,Bot检测,IPs白名单/黑名单等。
- 系统日志(Syslog):记录信息到系统日志。
- SSL:为基础服务或API设置特定的SSL证书。
- 监视(Monitoring):能够实时对关键负载和性能指标进行监控。
- 转发代理(Forward Proxy):使端口连接到中间透明的HTTP代理。
- 认证(Authentications):支持HMAC,JWT和BASIC方式进行认证等等。
- 速率限制(Rate-limiting):基于多个变量的阻塞和节流请求。
- 转换(Transformations):添加、删除或操作HTTP请求和响应。
- 缓存(Caching):在代理层进行缓存和服务响应。
- 命令行工具(CLI):能够通过命令行控制Kong的集群。
- REST API:可以通过REST API灵活的操作Kong。
- GEO复制:在不同的区域,配置总是最新的。
- 故障检测与恢复(Failure Detection & Recovery):如果Cassandra节点失效,Kong并不会受影响。
- 群集(Clustering):所有的Kong节点会自动加入群集,并更新各个节点上的配置。
- 可扩展性(Scalability):通过添加节点,实现水平缩放。
- 性能(Performance):通过缩放和使用Nigix,Kong能够轻松处理负载。
- 插件(Plugins):基于插件的可扩展体系结构,能够方便的向Kong和API添加功能。
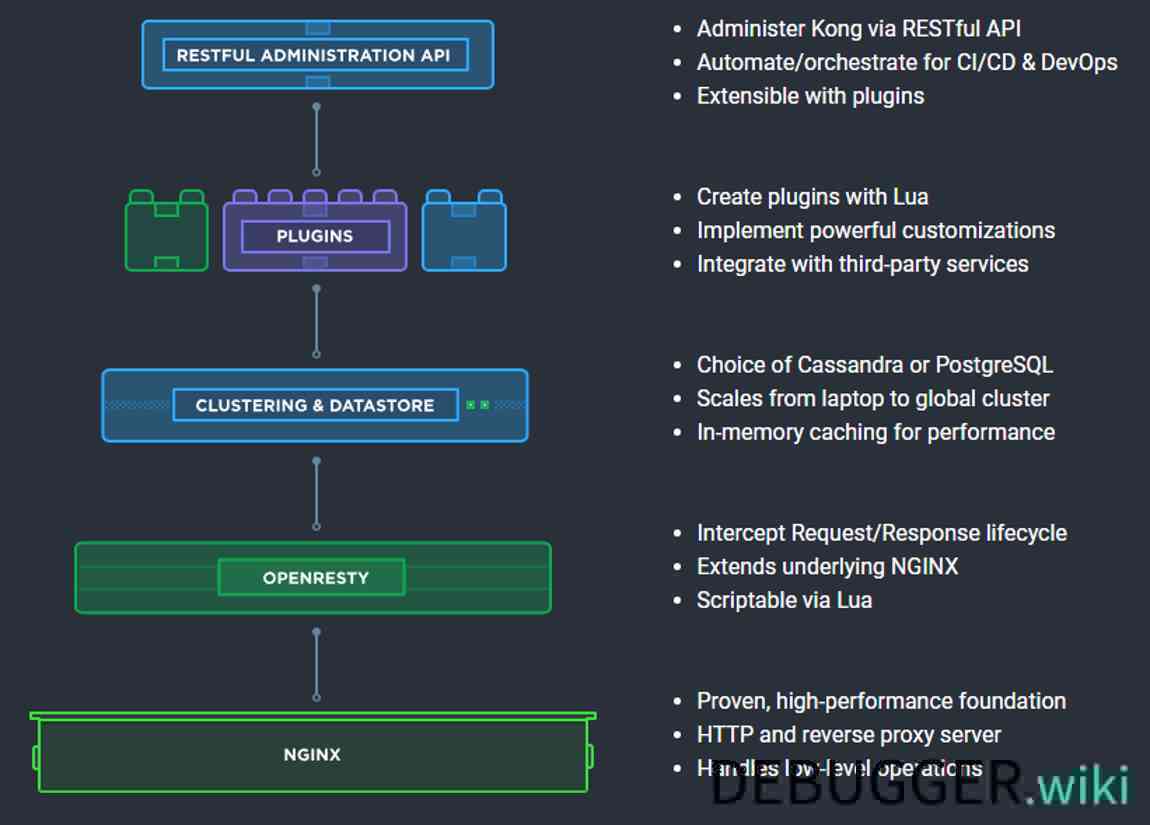
3、Kong依赖的技术
Kong部署在Nginx和Apache Cassandra或PostgreSQL等可靠技术之上,并提供了易于使用的RESTful API来操作和配置系统。下面是Kong的技术逻辑图。基于这些技术,Kong提供相关的特性支持:
- Nginx
- 经过验证的高性能基础;
- HTTP和反向代理服务器;
- 处理低层级的操作。
- OpenRestry
- 支持Lua脚本;
- 拦截请求/响应生命周期;
- 基于Nginx进行扩展。
- Clustering&Datastore
- 支持Cassandra或PostgreSQL数据库;
- 内存级的缓存;
- 支持水平扩展。
- Plugins
- 使用Lua创建插件;
- 功能强大的定制能力;
- 与第三方服务实现集成。
- Restful Administration API
- 通过Restful API管理Kong;
- 支持CI/CD&DevOps;
- 基于插件的可扩展。
实践Kong for Kubernetes
Kong之前都是使用Admin API来进行管理的,Kong主要暴露两个端口管理端口8001和代理端口8000,管理Kong主要的是为上游服务配置Service、Routes、Plugins、Consumer等实体资源,Kong按照这些配置规则进行对上游服务的请求进行路由分发和控制。在Kubernetes集群环境下,Admin API方式不是很适应Kubernetes声明式管理方式。所以Kong在Kubernetes集群环境下推出Kong Ingress Controller。Kong Ingress Controller定义了四个CRDs(CustomResourceDefinitions),基本上涵盖了原Admin API的各个方面。

- kongconsumers:Kong的用户,给不同的API用户提供不同的消费者身份。
- kongcredentials:Kong用户的认证凭证。
- kongingresses:定义代理行为规则,是对Ingress的补充配置。
- kongplugins:插件的配置。
Kong创建的CRDs:[root@localhost konga]# kubectl get crds
NAME                                          CREATED AT
kongclusterplugins.configuration.konghq.com   2020-08-12T13:16:56Z
kongconsumers.configuration.konghq.com        2020-08-12T13:16:56Z
kongcredentials.configuration.konghq.com      2020-08-12T13:16:56Z
kongingresses.configuration.konghq.com        2020-08-12T13:16:56Z
kongplugins.configuration.konghq.com          2020-08-12T13:16:56Z
先决条件

- Kubernetes集群:您可以使用Minikube或GKE集群。Kong与Kubernetes的所有发行版兼容。
- kubectl访问权限:您应该已经
kubectl安装并配置为与Kubernetes集群通信。
为Kubernetes安装Kong
使用以下安装方法之一安装Kong for Kubernetes:
- YAML清单
- helm
- Kustomize
YAML清单

要通过部署Kong kubectl,请使用:
kubectl apply -f https://bit.ly/kong-ingress-dbless
重要!这不是生产级部署。根据您的用例调整“参数”:
- 副本:确保您正在运行Kong的多个实例,以防止由于单个节点故障而造成的中断。
- 性能优化:调整Kong的内存设置,并根据使用情况定制部署。
- 负载均衡器:确保在Kong前面运行基于4层或TCP的均衡器。这使Kong可以提供TLS证书并与证书管理器集成。
helm部署
Kong有一个官方的Helm Chart。要将Kong部署到带有Helm的Kubernetes集群上,请使用:

$ helm repo add kong https://charts.konghq.com
$ helm repo update# Helm 2
$ helm install kong/kong# Helm 3
$ helm install kong/kong --generate-name --set ingressController.installCRDs=false
Kustomize
可以使用Kubernetes的kustomize声明性地修补Kong的Kubernetes清单。远程定制构建的一个示例是:
kustomize build github.com/kong/kubernetes-ingress-controller/deploy/manifests/base
在Kong的存储库中可以使用Kustomization 进行不同类型的部署。
使用托管的Kubernetes云产品
如果您正在使用云提供商将Kong安装在托管的Kubernetes产品上,例如Google Kubernetes Engine(GKE),Amazon EKS(EKS),Azure Kubernetes Service(AKS)等,请确保已设置Kubernetes群集在云提供程序上,并已kubectl在您的工作站上进行了配置。
一旦您配置了Kubernetes集群并配置了kubectl,任何云提供商的安装都将使用上述方法之一(YAML manifests,Helm Chart或Kustomize)来安装Kong。
每个云提供商在允许如何配置特定资源(例如负载均衡器,存储卷等)方面都有一些细微的不同。我们建议您参考其文档来调整这些设置。
关于Kong的数据库使用
如果您使用的是数据库,我们建议您在Kubernetes内部以内存模式(也称为无DB)运行Kong,因为所有配置都存储在Kubernetes控制面板中。此设置简化了Kong的操作,因此无需担心数据库的设置,备份,可用性,安全性等。如果您决定使用数据库,建议您在Kubernetes之外运行数据库。您可以从云提供商使用Amazon RDS之类的服务或类似的托管Postgres服务来自动执行数据库操作。
我们不建议在Kubernetes部署中将Kong与Cassandra一起使用,因为Kong的Cassandra使用所涵盖的功能是通过Kubernetes中的其他方式处理的。
当前采用yaml清单方式实践
下载官方yaml 文件
通过浏览器打开官方下载地址https://bit.ly/kong-ingress-dbless,下载对应的yaml文件
wget https://raw.githubusercontent.com/Kong/kubernetes-ingress-controller/master/deploy/single/all-in-one-dbless.yaml修改yaml文件
当前我们deployment配置的kong 最新版本默认没有用数据库,前面[关于kong的数据库使用]章节,我们已经说明。
当前kong:2.1,kong-ingress-controller:0.9.1版本,为适应当前环境,我们修改了如下的配置,漏掉的位置会在yaml 文件中进行标识
- 修改service配置为NodePort,默认是LoadBalancer
- 默认只开通了8444接口,对与接入不方便,修改成添加8001端口,KONG_ADMIN_LISTEN :value: 0.0.0.0:8001, 0.0.0.0:8444 ssl 参数
- 对应的service 里面也增加的8001端口进行对我映射
整体配置文件如下:
[root@localhost kong-gateway]# cat kong-all-in-one-dbless.yaml
apiVersion: v1
kind: Namespace
metadata:name: kong
---
apiVersion: apiextensions.k8s.io/v1beta1
kind: CustomResourceDefinition
metadata:name: kongclusterplugins.configuration.konghq.com
spec:additionalPrinterColumns:- JSONPath: .plugindescription: Name of the pluginname: Plugin-Typetype: string- JSONPath: .metadata.creationTimestampdescription: Agename: Agetype: date- JSONPath: .disableddescription: Indicates if the plugin is disabledname: Disabledpriority: 1type: boolean- JSONPath: .configdescription: Configuration of the pluginname: Configpriority: 1type: stringgroup: configuration.konghq.comnames:kind: KongClusterPluginplural: kongclusterpluginsshortNames:- kcpscope: Clustervalidation:openAPIV3Schema:properties:config:type: objectconfigFrom:properties:secretKeyRef:properties:key:type: stringname:type: stringnamespace:type: stringrequired:- name- namespace- keytype: objecttype: objectdisabled:type: booleanplugin:type: stringprotocols:items:enum:- http- https- grpc- grpcs- tcp- tlstype: stringtype: arrayrun_on:enum:- first- second- alltype: stringrequired:- pluginversion: v1
---
apiVersion: apiextensions.k8s.io/v1beta1
kind: CustomResourceDefinition
metadata:name: kongconsumers.configuration.konghq.com
spec:additionalPrinterColumns:- JSONPath: .usernamedescription: Username of a Kong Consumername: Usernametype: string- JSONPath: .metadata.creationTimestampdescription: Agename: Agetype: dategroup: configuration.konghq.comnames:kind: KongConsumerplural: kongconsumersshortNames:- kcscope: Namespacedvalidation:openAPIV3Schema:properties:credentials:items:type: stringtype: arraycustom_id:type: stringusername:type: stringversion: v1
---
apiVersion: apiextensions.k8s.io/v1beta1
kind: CustomResourceDefinition
metadata:name: kongcredentials.configuration.konghq.com
spec:additionalPrinterColumns:- JSONPath: .typedescription: Type of credentialname: Credential-typetype: string- JSONPath: .metadata.creationTimestampdescription: Agename: Agetype: date- JSONPath: .consumerRefdescription: Owner of the credentialname: Consumer-Reftype: stringgroup: configuration.konghq.comnames:kind: KongCredentialplural: kongcredentialsscope: Namespacedvalidation:openAPIV3Schema:properties:consumerRef:type: stringtype:type: stringrequired:- consumerRef- typeversion: v1
---
apiVersion: apiextensions.k8s.io/v1beta1
kind: CustomResourceDefinition
metadata:name: kongingresses.configuration.konghq.com
spec:group: configuration.konghq.comnames:kind: KongIngressplural: kongingressesshortNames:- kiscope: Namespacedvalidation:openAPIV3Schema:properties:proxy:properties:connect_timeout:minimum: 0type: integerpath:pattern: ^/.*$type: stringprotocol:enum:- http- https- grpc- grpcs- tcp- tlstype: stringread_timeout:minimum: 0type: integerretries:minimum: 0type: integerwrite_timeout:minimum: 0type: integertype: objectroute:properties:headers:additionalProperties:items:type: stringtype: arraytype: objecthttps_redirect_status_code:type: integermethods:items:type: stringtype: arraypath_handling:enum:- v0- v1type: stringpreserve_host:type: booleanprotocols:items:enum:- http- https- grpc- grpcs- tcp- tlstype: stringtype: arrayregex_priority:type: integerstrip_path:type: booleanupstream:properties:algorithm:enum:- round-robin- consistent-hashing- least-connectionstype: stringhash_fallback:type: stringhash_fallback_header:type: stringhash_on:type: stringhash_on_cookie:type: stringhash_on_cookie_path:type: stringhash_on_header:type: stringhealthchecks:properties:active:properties:concurrency:minimum: 1type: integerhealthy:properties:http_statuses:items:type: integertype: arrayinterval:minimum: 0type: integersuccesses:minimum: 0type: integertype: objecthttp_path:pattern: ^/.*$type: stringtimeout:minimum: 0type: integerunhealthy:properties:http_failures:minimum: 0type: integerhttp_statuses:items:type: integertype: arrayinterval:minimum: 0type: integertcp_failures:minimum: 0type: integertimeout:minimum: 0type: integertype: objecttype: objectpassive:properties:healthy:properties:http_statuses:items:type: integertype: arrayinterval:minimum: 0type: integersuccesses:minimum: 0type: integertype: objectunhealthy:properties:http_failures:minimum: 0type: integerhttp_statuses:items:type: integertype: arrayinterval:minimum: 0type: integertcp_failures:minimum: 0type: integertimeout:minimum: 0type: integertype: objecttype: objectthreshold:type: integertype: objecthost_header:type: stringslots:minimum: 10type: integertype: objectversion: v1
---
apiVersion: apiextensions.k8s.io/v1beta1
kind: CustomResourceDefinition
metadata:name: kongplugins.configuration.konghq.com
spec:additionalPrinterColumns:- JSONPath: .plugindescription: Name of the pluginname: Plugin-Typetype: string- JSONPath: .metadata.creationTimestampdescription: Agename: Agetype: date- JSONPath: .disableddescription: Indicates if the plugin is disabledname: Disabledpriority: 1type: boolean- JSONPath: .configdescription: Configuration of the pluginname: Configpriority: 1type: stringgroup: configuration.konghq.comnames:kind: KongPluginplural: kongpluginsshortNames:- kpscope: Namespacedvalidation:openAPIV3Schema:properties:config:type: objectconfigFrom:properties:secretKeyRef:properties:key:type: stringname:type: stringrequired:- name- keytype: objecttype: objectdisabled:type: booleanplugin:type: stringprotocols:items:enum:- http- https- grpc- grpcs- tcp- tlstype: stringtype: arrayrun_on:enum:- first- second- alltype: stringrequired:- pluginversion: v1
---
apiVersion: apiextensions.k8s.io/v1beta1
kind: CustomResourceDefinition
metadata:name: tcpingresses.configuration.konghq.com
spec:additionalPrinterColumns:- JSONPath: .status.loadBalancer.ingress[*].ipdescription: Address of the load balancername: Addresstype: string- JSONPath: .metadata.creationTimestampdescription: Agename: Agetype: dategroup: configuration.konghq.comnames:kind: TCPIngressplural: tcpingressesscope: Namespacedsubresources:status: {}validation:openAPIV3Schema:properties:apiVersion:type: stringkind:type: stringmetadata:type: objectspec:properties:rules:items:properties:backend:properties:serviceName:type: stringservicePort:format: int32type: integertype: objecthost:type: stringport:format: int32type: integertype: objecttype: arraytls:items:properties:hosts:items:type: stringtype: arraysecretName:type: stringtype: objecttype: arraytype: objectstatus:type: objectversion: v1beta1
status:acceptedNames:kind: ""plural: ""conditions: []storedVersions: []
---
apiVersion: v1
kind: ServiceAccount
metadata:name: kong-serviceaccountnamespace: kong
---
apiVersion: rbac.authorization.k8s.io/v1beta1
kind: ClusterRole
metadata:name: kong-ingress-clusterrole
rules:
- apiGroups:- ""resources:- endpoints- nodes- pods- secretsverbs:- list- watch
- apiGroups:- ""resources:- nodesverbs:- get
- apiGroups:- ""resources:- servicesverbs:- get- list- watch
- apiGroups:- networking.k8s.io- extensions- networking.internal.knative.devresources:- ingressesverbs:- get- list- watch
- apiGroups:- ""resources:- eventsverbs:- create- patch
- apiGroups:- networking.k8s.io- extensions- networking.internal.knative.devresources:- ingresses/statusverbs:- update
- apiGroups:- configuration.konghq.comresources:- tcpingresses/statusverbs:- update
- apiGroups:- configuration.konghq.comresources:- kongplugins- kongclusterplugins- kongcredentials- kongconsumers- kongingresses- tcpingressesverbs:- get- list- watch
- apiGroups:- ""resources:- configmapsverbs:- create- get- update
---
apiVersion: rbac.authorization.k8s.io/v1beta1
kind: ClusterRoleBinding
metadata:name: kong-ingress-clusterrole-nisa-binding
roleRef:apiGroup: rbac.authorization.k8s.iokind: ClusterRolename: kong-ingress-clusterrole
subjects:
- kind: ServiceAccountname: kong-serviceaccountnamespace: kong
---
apiVersion: v1
kind: Service
metadata:annotations:service.beta.kubernetes.io/aws-load-balancer-backend-protocol: tcpservice.beta.kubernetes.io/aws-load-balancer-type: nlbname: kong-proxynamespace: kong
spec:ports:- name: proxyport: 80protocol: TCPtargetPort: 8000- name: proxy-sslport: 443protocol: TCPtargetPort: 8443- name: kong-adminport: 8001protocol: TCPtargetPort: 8001- name: kong-admin-sslport: 8444protocol: TCPtargetPort: 8444selector:app: ingress-kongtype: NodePort
---
apiVersion: v1
kind: Service
metadata:name: kong-validation-webhooknamespace: kong
spec:ports:- name: webhookport: 443protocol: TCPtargetPort: 8080selector:app: ingress-kong
---
apiVersion: apps/v1
kind: Deployment
metadata:labels:app: ingress-kongname: ingress-kongnamespace: kong
spec:replicas: 3selector:matchLabels:app: ingress-kongtemplate:metadata:annotations:kuma.io/gateway: enabledprometheus.io/port: "8100"prometheus.io/scrape: "true"traffic.sidecar.istio.io/includeInboundPorts: ""labels:app: ingress-kongspec:containers:- env:- name: KONG_PROXY_LISTENvalue: 0.0.0.0:8000, 0.0.0.0:8443 ssl http2- name: KONG_ADMIN_LISTENvalue: 0.0.0.0:8001, 0.0.0.0:8444 ssl- name: KONG_STATUS_LISTENvalue: 0.0.0.0:8100- name: KONG_DATABASEvalue: "off"- name: KONG_NGINX_WORKER_PROCESSESvalue: "1"- name: KONG_ADMIN_ACCESS_LOGvalue: /dev/stdout- name: KONG_ADMIN_ERROR_LOGvalue: /dev/stderr- name: KONG_PROXY_ERROR_LOGvalue: /dev/stderrimage: kong:2.1lifecycle:preStop:exec:command:- /bin/sh- -c- kong quitlivenessProbe:failureThreshold: 3httpGet:path: /statusport: 8100scheme: HTTPinitialDelaySeconds: 5periodSeconds: 10successThreshold: 1timeoutSeconds: 1name: proxyports:- containerPort: 8000name: proxyprotocol: TCP- containerPort: 8443name: proxy-sslprotocol: TCP- containerPort: 8100name: metricsprotocol: TCPreadinessProbe:failureThreshold: 3httpGet:path: /statusport: 8100scheme: HTTPinitialDelaySeconds: 5periodSeconds: 10successThreshold: 1timeoutSeconds: 1securityContext:runAsUser: 1000- env:- name: CONTROLLER_KONG_ADMIN_URLvalue: https://127.0.0.1:8444- name: CONTROLLER_KONG_ADMIN_TLS_SKIP_VERIFYvalue: "true"- name: CONTROLLER_PUBLISH_SERVICEvalue: kong/kong-proxy- name: POD_NAMEvalueFrom:fieldRef:apiVersion: v1fieldPath: metadata.name- name: POD_NAMESPACEvalueFrom:fieldRef:apiVersion: v1fieldPath: metadata.namespaceimage: kong-docker-kubernetes-ingress-controller.bintray.io/kong-ingress-controller:0.9.1imagePullPolicy: IfNotPresentlivenessProbe:failureThreshold: 3httpGet:path: /healthzport: 10254scheme: HTTPinitialDelaySeconds: 5periodSeconds: 10successThreshold: 1timeoutSeconds: 1name: ingress-controllerports:- containerPort: 8080name: webhookprotocol: TCPreadinessProbe:failureThreshold: 3httpGet:path: /healthzport: 10254scheme: HTTPinitialDelaySeconds: 5periodSeconds: 10successThreshold: 1timeoutSeconds: 1serviceAccountName: kong-serviceaccount
执行该yaml 文件
[root@localhost kong-gateway]# kubectl apply -f all-in-one-dbless.yaml
namespace/kong created
customresourcedefinition.apiextensions.k8s.io/kongclusterplugins.configuration.konghq.com created
customresourcedefinition.apiextensions.k8s.io/kongconsumers.configuration.konghq.com created
customresourcedefinition.apiextensions.k8s.io/kongcredentials.configuration.konghq.com created
customresourcedefinition.apiextensions.k8s.io/kongingresses.configuration.konghq.com created
customresourcedefinition.apiextensions.k8s.io/kongplugins.configuration.konghq.com created
customresourcedefinition.apiextensions.k8s.io/tcpingresses.configuration.konghq.com created
serviceaccount/kong-serviceaccount created
clusterrole.rbac.authorization.k8s.io/kong-ingress-clusterrole created
clusterrolebinding.rbac.authorization.k8s.io/kong-ingress-clusterrole-nisa-binding created
service/kong-proxy created
service/kong-validation-webhook created
deployment.apps/ingress-kong created
查看启动情况
[root@localhost kong-gateway]# kubectl get po -n kong -l app=ingress-kong
NAME                            READY   STATUS    RESTARTS   AGE
ingress-kong-5f8b45fbff-4cdtv   2/2     Running   2          20m
ingress-kong-5f8b45fbff-mkkq9   2/2     Running   2          20m
ingress-kong-5f8b45fbff-qt8tw   2/2     Running   1          12h
[root@localhost kong-gateway]# kubectl get svc -n kong
NAME                              TYPE        CLUSTER-IP      EXTERNAL-IP   PORT(S)                                                    AGE
service/kong-proxy                NodePort    10.97.22.195    <none>        80:32284/TCP,443:32083/TCP,8001:32704/TCP,8444:30658/TCP   39h
service/kong-validation-webhook   ClusterIP   10.101.75.177   <none>        443/TCP
开放kong-proxy对外8001接口ingress配置文件
当前配置文件时为了开放kong-proxy-admin的接口,可以让用户使用ingress域名进行访问,限制kong admin管理接口为8001和8443
[root@localhost kong-gateway]# cat kong-proxy-admin.ingress-demo.yaml
apiVersion: extensions/v1beta1
kind: Ingress
metadata:labels:ingresscontroller: kongannotations:kubernetes.io/ingress.class: kong name: kong-proxynamespace: kong
spec:rules:- host: kong-proxy-admin.mydomain.comhttp:paths:- backend:serviceName: kong-proxyservicePort: 8001 path: /
[root@localhost kong-gateway]# kubectl get ing -n kong
kong-proxy <none> kong-proxy-admin.mydomain.com 172.18.0.2 80 10h[root@localhost kong-gateway]# kubectl describe ing -n kong kong-proxy
Name: kong-proxy
Namespace: kong
Address: 172.18.0.2
Default backend: default-http-backend:80 (<error: endpoints "default-http-backend" not found>)
Rules:Host Path Backends---- ---- --------kong-proxy-admin.mydomain.com / kong-proxy:8001 (10.244.0.20:8001,10.244.0.21:8001,10.244.0.22:8001)
Annotations: kubernetes.io/ingress.class: kong
Events: <none>安装Konga 管理UI
Kong 企业版提供了管理UI,开源版本是没有的。但是有很多的开源的管理 UI ,其中比较好用的是Konga。项目地址:https://github.com/pantsel/konga
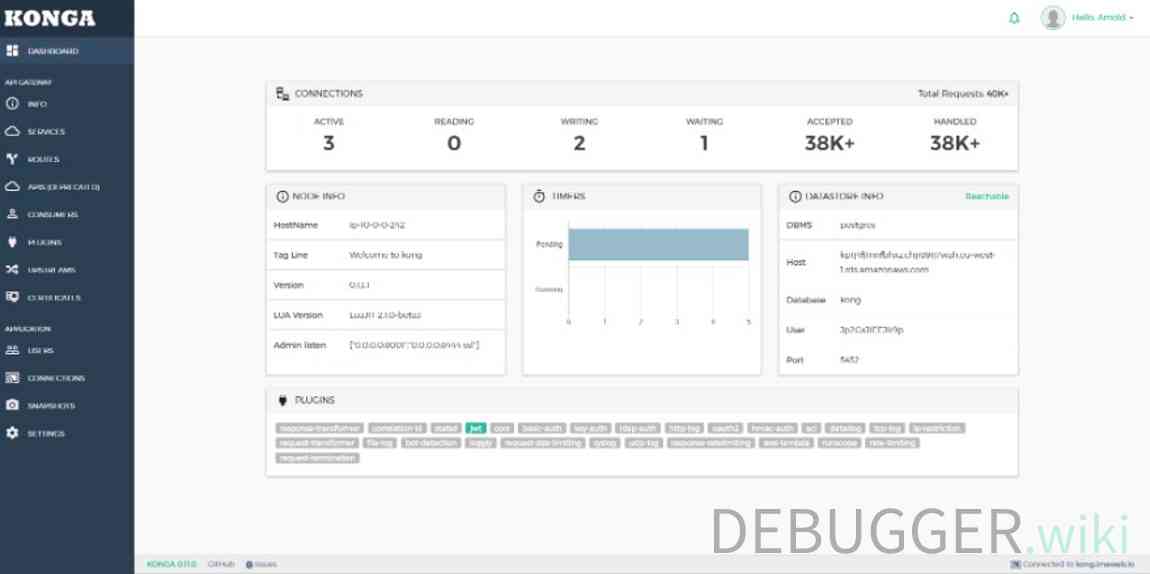
Konga 特性
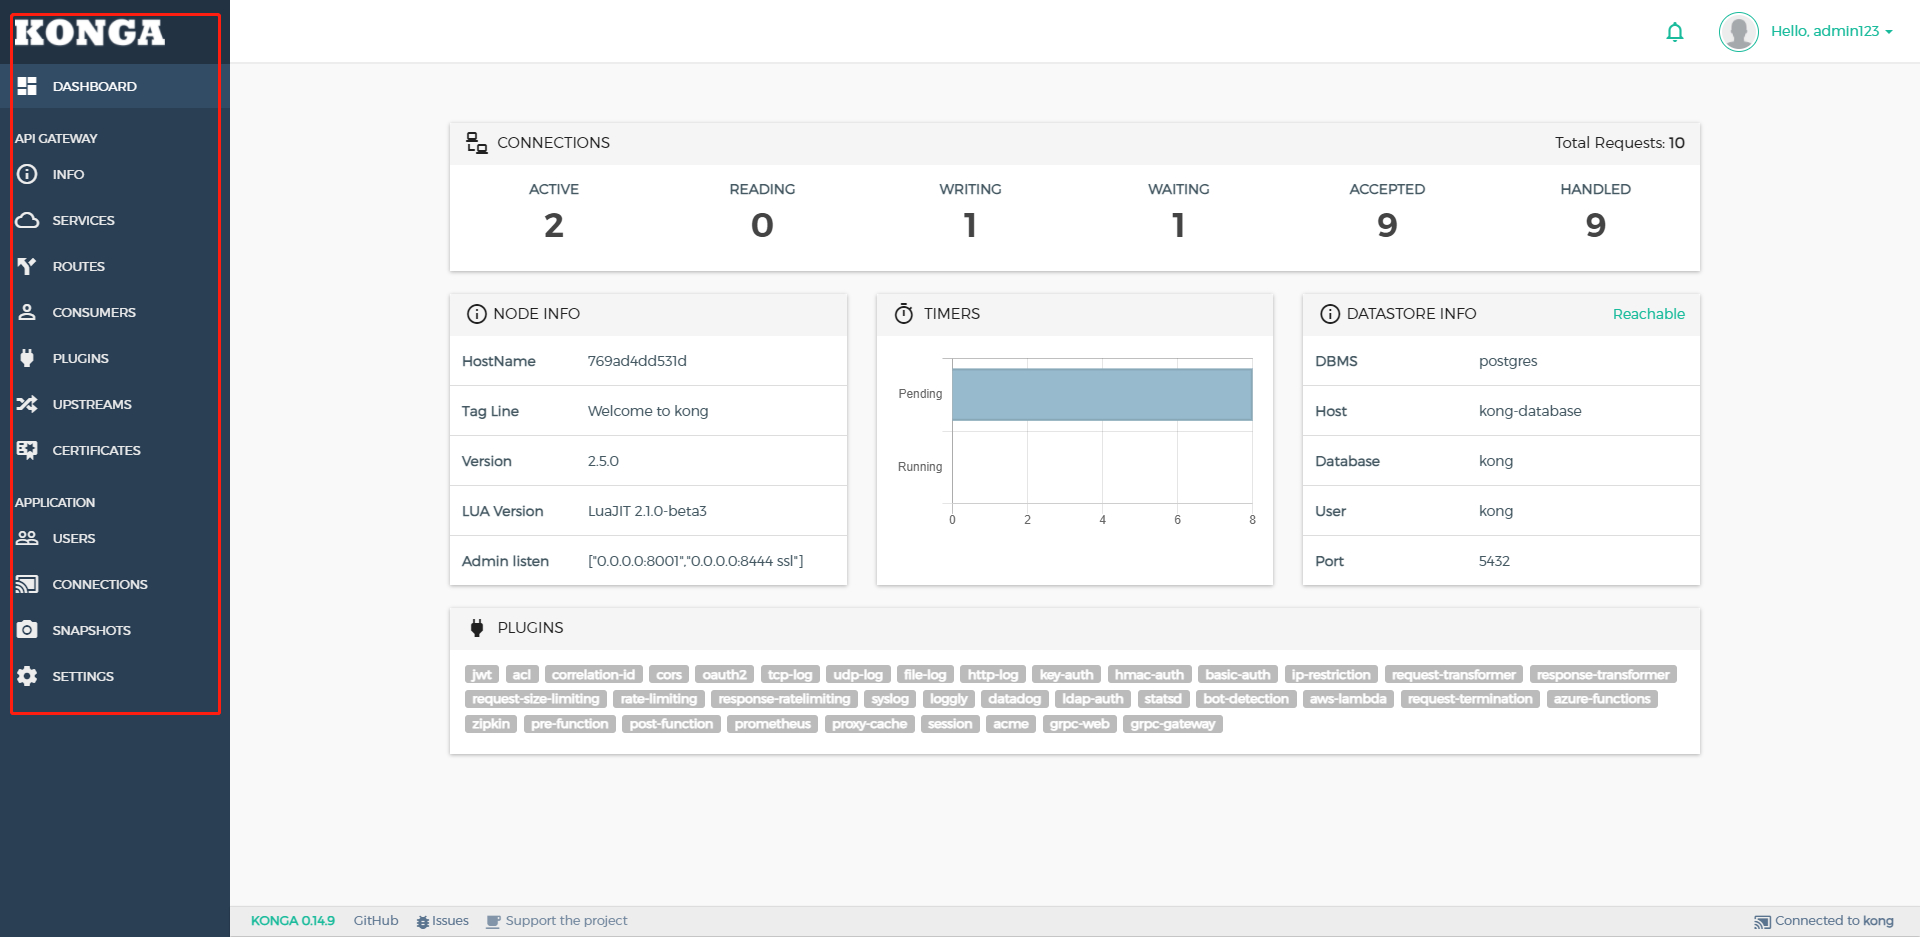
Konga 主要是用 AngularJS 写的,运行于nodejs服务端。具有以下特性:
- 管理所有Kong Admin API对象。
- 支持从远程源(数据库,文件,API等)导入使用者。
- 管理多个Kong节点。使用快照备份,还原和迁移Kong节点。
- 使用运行状况检查监视节点和API状态。
- 支持电子邮件和闲置通知。
- 支持多用户。
- 易于数据库集成(MySQL,postgresSQL,MongoDB,SQL Server)。
Kubernetes安装Konga数据库postgres
-
我们今天通过Kubernetes来安装Konga。安装步骤同样遵循先配置postgres数据库,初始化数据库,启动容器的流程
-
第二步配置konga 容器,然后连接postgres数据库,启动konga
-
配置konga连接kong admin 8001或者8444端口,配置kong的参数
Kubernetes 部署 Konga数据库容器postgres
要在Kubernetes上部署PostgreSQL,我们需要遵循以下步骤:
- Postgres Docker映像
- 用于存储Postgres配置的配置映射
- 永久存储量
- PostgreSQL部署
- PostgreSQL服务
PostgreSQL Docker映像
我们正在使用公共注册表中的PostgreSQL 10.4 Docker映像。该映像将提供提供PostgreSQL自定义配置/环境变量(如用户名,密码,数据库名称和路径等)的功能。
PostgreSQL配置的配置映射
我们将使用配置映射来存储PostgreSQL相关信息。在这里,我们在配置映射中使用数据库,用户和密码,部署模板中的PostgreSQL pod将使用该数据库,用户和密码。
文件:postgres-configmap.yaml
[root@localhost postgres]# cat postgres-configmap.yaml
apiVersion: v1
kind: ConfigMap
metadata:name: postgres-confignamespace: konglabels:app: postgres
data:POSTGRES_DB: postgresdbPOSTGRES_USER: adminPOSTGRES_PASSWORD: admin
创建Postgres配置资源
$ kubectl create -f postgres-configmap.yaml
永久存储量StorageClass
众所周知,容器本质上是短暂的。容器实例终止后,由容器或容器中生成的所有数据都将丢失。
为了保存数据,我们将在Kubernetes中使用持久卷和持久卷声明资源将数据存储在持久存储中。
当前我们配置了StorageClass 动态存储使用,会在下面进行调用,不过配置Deployment模式不支持直接挂载StorageClass ,需要将控制器修改成StatefulSet 模式进行挂载。
PostgreSQL部署
用于部署PostgreSQL容器的PostgreSQL清单使用PostgreSQL 10.4映像。它使用的是PostgreSQL配置,例如用户名,密码和我们之前创建的configmap中的数据库名。它还会挂载从持久卷创建的卷,并声明使PostgreSQL容器的数据持久化。
[root@localhost postgres]# cat postgres-statefulSet.yaml
apiVersion: apps/v1
kind: StatefulSet
metadata:name: postgresnamespace: kong
spec:serviceName: postgresreplicas: 1selector:matchLabels:app: postgres template:metadata:labels:app: postgresspec:containers:- name: postgresimage: postgres:10.4 imagePullPolicy: "IfNotPresent"ports:- containerPort: 5432envFrom:- configMapRef:name: postgres-configvolumeMounts:- mountPath: /var/lib/postgresql/dataname: postgredbvolumeClaimTemplates:- metadata:name: postgredbspec:accessModes: [ "ReadWriteOnce" ]resources:requests:storage: 5GistorageClassName: "standard"
创建Postgres部署
$ kubectl create -f postgres-deployment.yaml
PostgreSQL Service
要访问部署或容器,我们需要配置PostgreSQL服务。Kubernetes提供了不同类型的服务,例如ClusterIP,NodePort和LoadBalancer。
使用ClusterIP,我们可以在Kubernetes中访问PostgreSQL服务。NodePort可以在Kubernetes节点上公开服务端点。为了从外部访问PostgreSQL,我们需要使用Load Balancer服务类型,该服务类型可以在外部公开该服务。
文件:postgres-service.yaml
[root@localhost postgres]# cat postgres-service.yaml
apiVersion: v1
kind: Service
metadata:name: postgresnamespace: konglabels:app: postgres
spec:type: NodePortports:- port: 5432selector:app: postgres
创建Postgres服务
$ kubectl create -f postgres-service.yaml
连接到PostgreSQL
为了连接PostgreSQL,我们需要从服务部署中获取Node端口。
[root@localhost postgres]# kubectl get svc postgres -n kong
NAME       TYPE       CLUSTER-IP      EXTERNAL-IP   PORT(S)          AGE
postgres   NodePort   10.98.211.186   <none>        5432:30761/TCP   14h
我们需要使用端口31070从kubernetes集群中存在的机器/节点连接到PostgreSQL,并使用前面configmap中给出的凭据。
$ psql -h localhost -U admin --password -p 30761 postgresdb
# 通过psql 命令进行连接
PostgreSQL结论
与仅使用虚拟机时相比,在Kubernetes上运行PostgreSQL有助于以更好的方式利用资源。Kubernetes还使用同一虚拟机或Kubernetes集群中的PostgreSQL提供其他应用程序的隔离。
是否可以使用StatefulSets吗?
在Kubernetes中,需要StatefulSets来扩展有状态的应用程序。可以使用StatefulSets通过单个命令轻松扩展PostgreSQL。
Kubernetes安装Konga
-
我们今天通过Kubernetes来安装Konga。安装步骤同样遵循先配置postgres数据库,初始化数据库,启动容器的流程
-
第二步配置konga 容器,然后连接postgres数据库,启动konga
-
配置konga连接kong admin 8001或者8444端口,配置kong的参数
配置konga Secret加密信息
创建配置konga Secret加密信息连接PostgreSQL数据库。
[root@localhost konga]# cat konga-creds.yaml
apiVersion: v1
kind: Secret
metadata:name: kongcredsnamespace: kong
type: Opaque
data:username: YWRtaW4= password: YWRtaW4= postgresdbname: cG9zdGdyZXNkYg==
#your secret in base64 echo -n 'admin' | base64 YWRtaW4=
[root@localhost konga]# kubectl get secret -n kong
NAME TYPE DATA AGE
kongcreds Opaque 3 26h
配置konga Deployment Pod
通过Konga Deployment 引用secret 配置文件,同时在配置连接地址时,设置成service 内部dns 域名连接,具体配置文件如下:
[root@localhost konga]# cat konga-deployment.yaml
apiVersion: apps/v1
kind: Deployment
metadata:name: konganamespace: kong
spec:replicas: 1selector:matchLabels:app: kongatemplate:metadata:labels:name: kongaapp: kongaspec:containers:- name: kongaimage: pantsel/konga:latest env:- name: DB_ADAPTERvalue: postgres- name: DB_HOSTvalue: postgres.kong.svc.cluster.local.- name: DB_USERvalueFrom:secretKeyRef:name: kongcredskey: username- name: DB_PASSWORDvalueFrom:secretKeyRef:name: kongcredskey: password- name: DB_DATABASEvalue: postgresdb- name: TOKEN_SECRETvalue: somesecretstringports:- containerPort: 1337protocol: TCP
---
apiVersion: v1
kind: Service
metadata:labels:app: konganame: konga-svcnamespace: kong
spec:ports:- protocol: TCPport: 443targetPort: 1337selector:app: konga
配置konga Ingress 域名对外
[root@localhost konga]# cat konga-admin-ingress-demo.yaml
apiVersion: extensions/v1beta1
kind: Ingress
metadata:labels:ingresscontroller: kongannotations:kubernetes.io/ingress.class: kong name: kong-adminnamespace: kong
spec:rules:- host: konga-admin.mydomain.comhttp:paths:- backend:serviceName: konga-svcservicePort: 443path: /
测试访问konga 页面
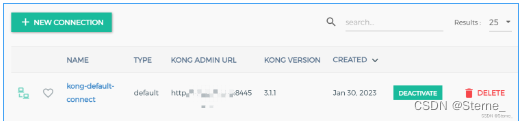
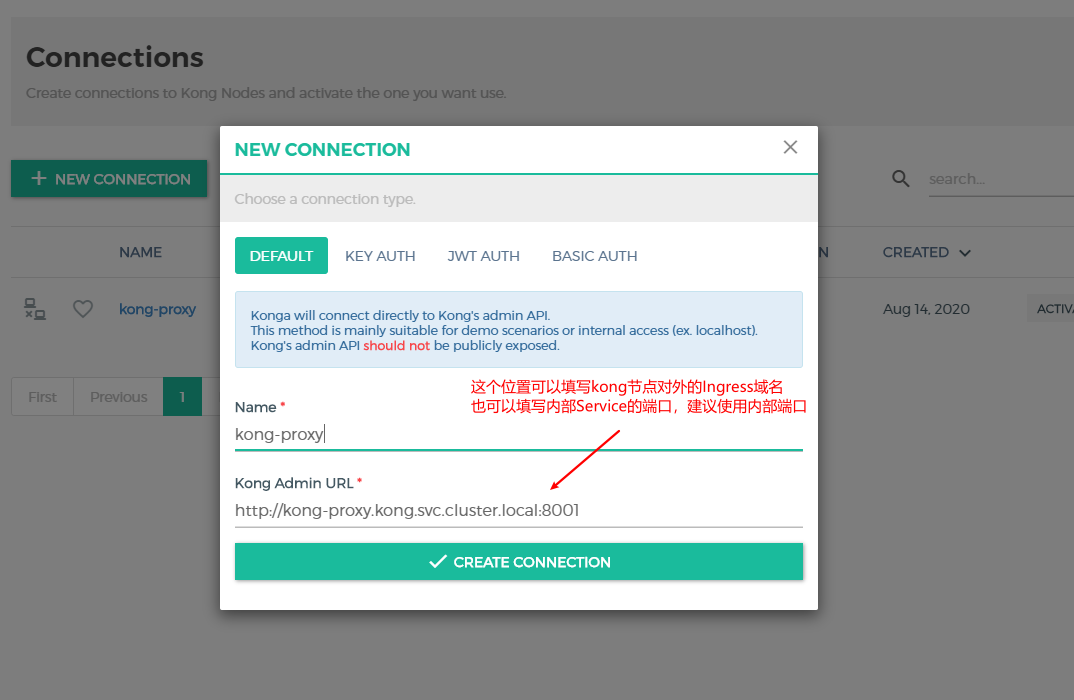
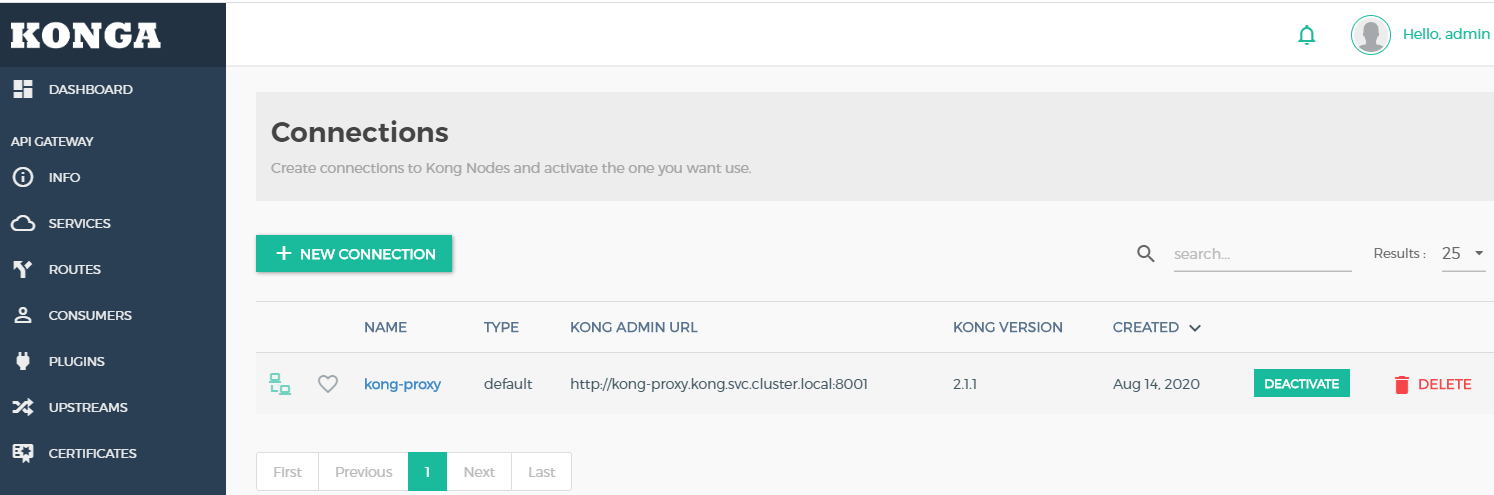
通过Ingress 域名 konga-admin.mydomain.com访问,首先会进行管理员账号和密码创建,然后进入Connections 界面 连接对应kong节点。
注意当前我没有使用Ingress 域名,是直接使用端口映射进去的,生产情况下建议使用Ingress 域名。
- 登入Konga 界面
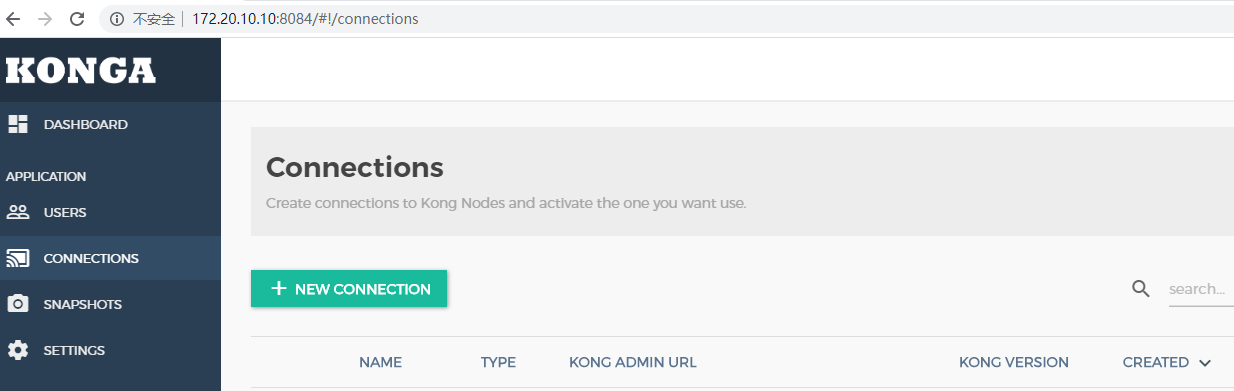
- 创建一个新的Kong 节点连接
- 创建成功之后点击连接
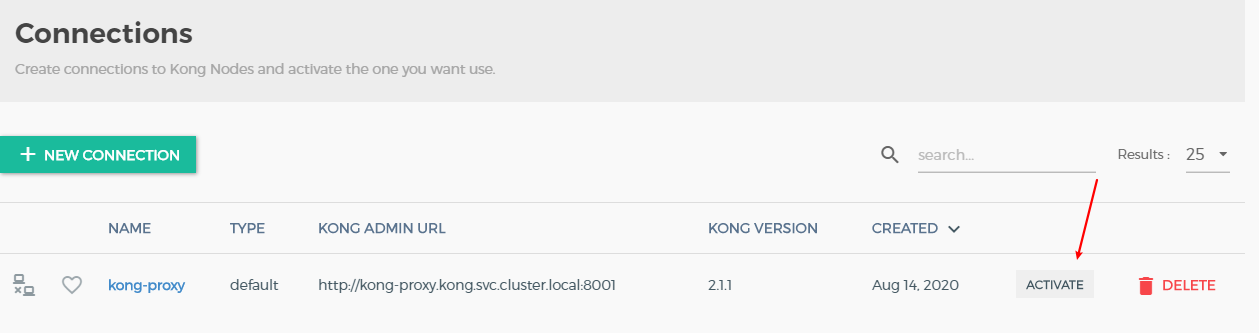
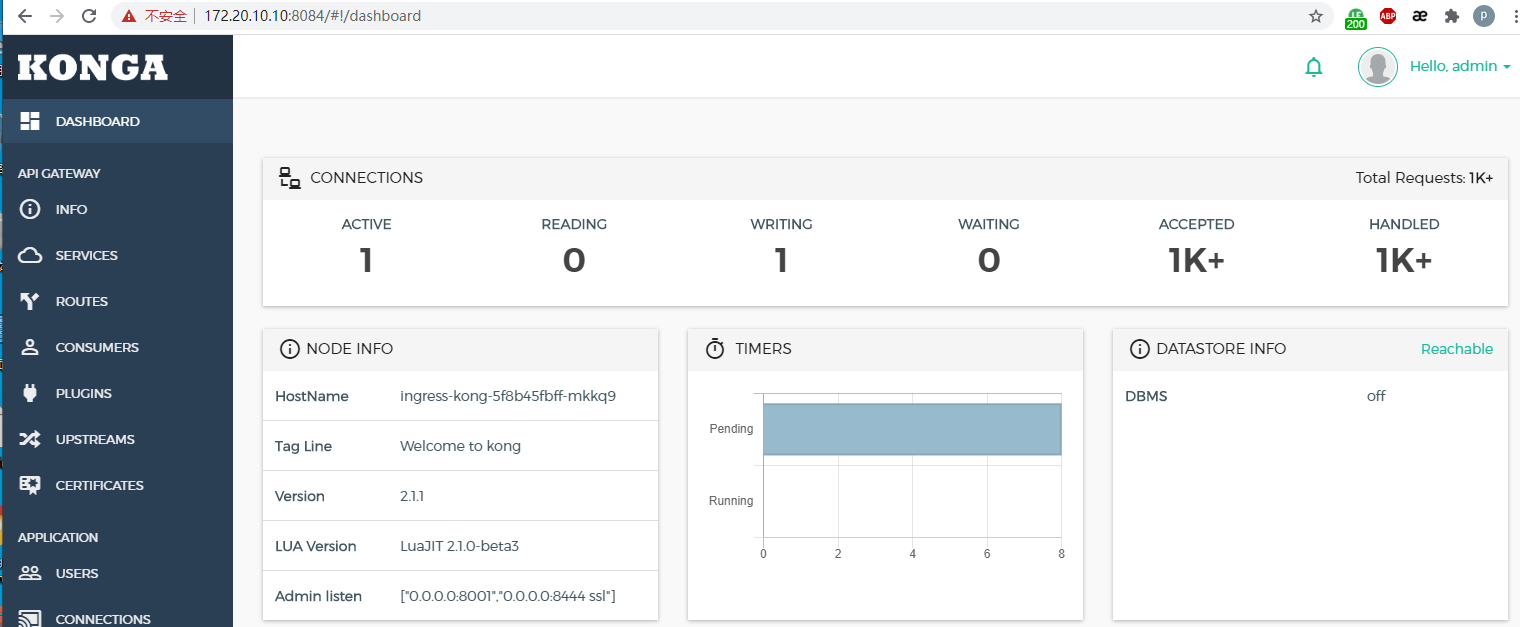
- 连接成功之后,可以看到整体的kong节点的配置和概况
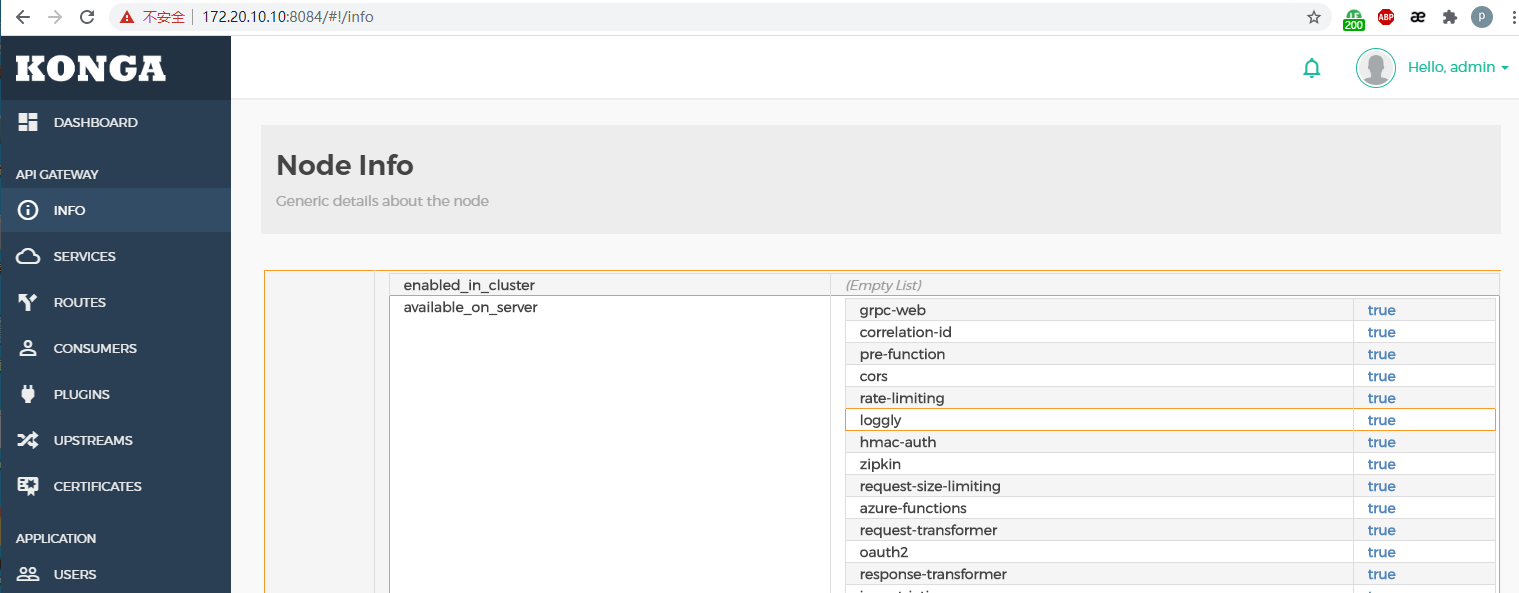
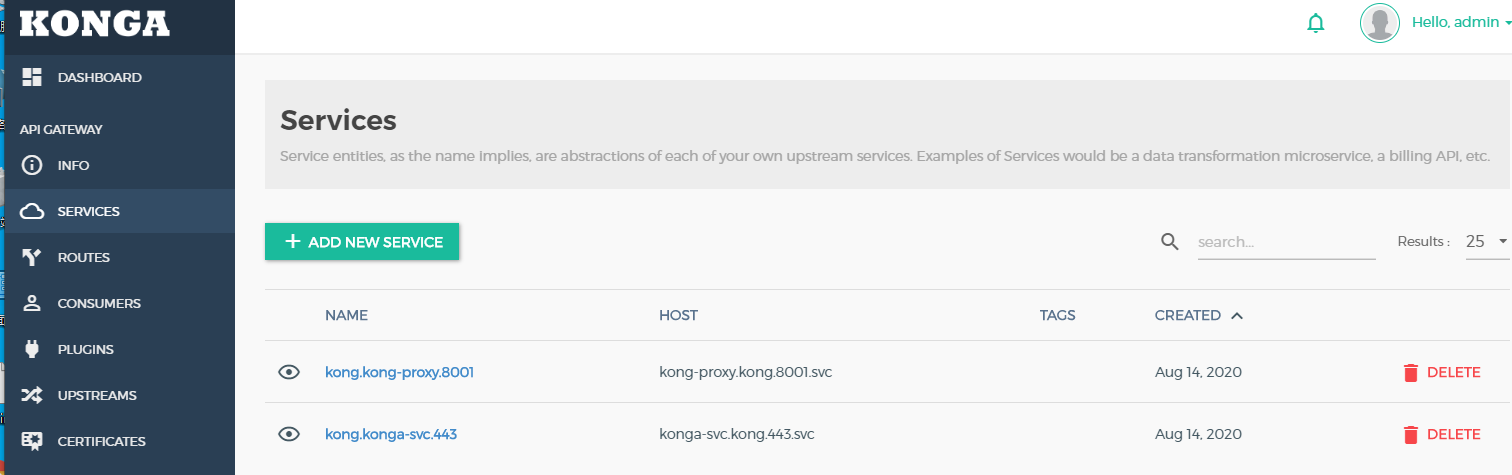
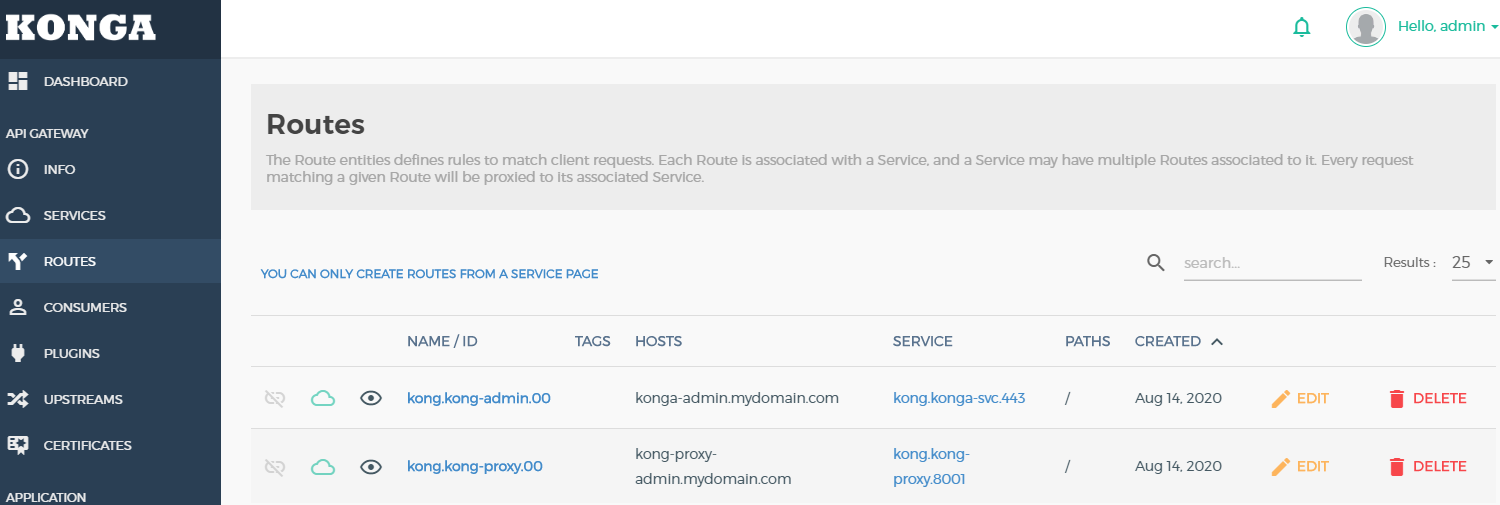
- 因为我之前创建了两个Ingress 映射域名,所以在konga service选项和Routes选项会展示出来
- 配置好konga管理后台之后,我们可以通过konga 后台直接对kong进行管理,图形化界面创建Service和Routes 或者其他功能和参数的修改,都可以在konga web 界面进行操作。本章到这里也就告一段落了,后面我会介绍下关于kong节点的配置文件。
Kong API Gateway 配置文件详解
配置文件这块转载该博客,https://linuxops.org/blog/kong/config.html
下面介绍的配置文件,可以直接在自定义镜像修改对应的配置,也可以在konga web界面进行修改。
两个主要组件
- Kong Server,基于 nginx 的服务器,用来接收 API 请求。下面主要是对配置文件进行详解。后面也可以通过Kong API Gateway 管理API详解,对kong进行操作。Kong 功能强大注意还是因为它支持强大的插件功能。
- Apache Cassandra,用来存储操作数据。
一、前言
Kong配置文件是Kong服务的核心文件,它配置了Kong以怎么的方式运行,并且依赖于这个配置生成Nginx的配置文件,本文通过解读Kong配置文件,以了解Kong的运行和配置。
在成功安装Kong以后,会有一个名为kong.conf.default默认的配置文件示例,如果是通过包管理器安装的,通常位于/etc/kong/kong.conf.default,我们要将其复制为kong.conf以便于我们修改使用他。
在Kong的配置文件中,约定了以下的几条规则:
- 配置文件中以
#开头的行均为注释行,程序不会读取这些内容。 - 在官方提供的默认配置文件中,以
#开头的有值的配置项目均为默认配置。 - 所有的配置项,均可以在系统环境变量中配置,但是必须要加上
KONG_为前缀。 - 值为布尔型的配置,可以使用
on/off或者true/false。 - 值为列表的,必须使用半角逗号分割。
Kong的配置,大概分为几种,分别是:
- 常规配置:配置服务运行目录,插件加载,日志等等
- NGINX配置:配置Nginx注入,例如监听IP和端口配置等等,用于Kong在启动的时候生成Nginx配置文件
- 数据库存储配置:配数据库类型,地址、用户名密码等等信息
- 数据库缓存配置:配置数据的缓存规则,Kong会缓存诸如API信息、用户、凭证等信息,以减少访问数据库次数提高性能
- DNS解析器配置:默认情况会使用系统设置,如
hosts和resolv.conf的配置,你也可以通过DNS的解析器配置来修改 - 其他杂项配置:继承自lua-nginx模块的其他设置允许更多的灵活性和高级用法。
下面我们一个模块一个模块解释一下各项的配置。
二、常规配置
在常规配置中,主要是控制Kong一些运行时的一些配置,主要有如下配置:
| 配置项 | 默认值 | 说明 |
|---|---|---|
| prefix | /usr/local/kong/ | 配置Kong的工作目录,相当于Nginx的工作目录,这个目录存放运行时的临时文件和日志,包括Kong启动的时候自动生成的Nginx的配置文件。 每一个Kong经常必须有一个单独的工作目录 |
| log_level | notice | Nginx的日志级别。日志存放/logs/error.log |
| proxy_access_log | logs/access.log | 代理端口请求的日志文件,可以设置为off来关闭日志的记录,也可以通过设置绝对路径也可以设置相对路径。 如果设置了相对路径,则日志文件会保存在的目录下 |
| proxy_error_log | logs/error.log | 代理端口请求的错误日志文件,可以设置为off来关闭日志的记录,也可以通过设置绝对路径也可以设置相对路径。 如果设置了相对路径,则日志文件会保存在的目录下 |
| admin_access_log | logs/admin_access.log | Kong管理的API端口请求的日志文件,可以设置为off来关闭日志的记录,也可以通过设置绝对路径也可以设置相对路径。 如果设置了相对路径,则日志文件会保存在的目录下 |
| admin_error_log | logs/error.log | Kong管理的API端口请求的错误日志文件,可以设置为off来关闭日志的记录,也可以通过设置绝对路径也可以设置相对路径。 如果设置了相对路径,则日志文件会保存在的目录下 |
| plugins | bundled | Kong启动的时候加载的插件,如果多个必须要使用半角逗号分割。默认情况下,只有捆绑官方发行版本的插件通过 bundled 这个值来加载。 加载插件只是Kong在启动的时候载入插件的代码,但是并不会使用它,如果要使用他,还必须要通过管理API来配置 当然,如果你不想加载任何插件,可以使用off来关闭它,值得强调的一点bundled值可以和其他插件名称一起使用,bundled并不是一个插件名称,它代表了随官方发行的所有插件。 |
| anonymous_reports | on | 如果Kong进程发生了错误,会以匿名的方式将错误提交给Kong官方, 以帮助改善Kong。 |
在常规的配置中,主要配置了Kong运行的目录日志等信息。
无论如何,配置的文件或者目录Kong必须要用权限访问,否则会报错。
三、Nginx注入配置
Kong基于Nginx,当然需要配置Nginx来满足Kong的运行要求,Kong提供了Nginx的注入配置,使得我们更轻松控制。
在Nginx注入配置中,有如下配置:
| 配置项 | 默认值 | 说明 |
|---|---|---|
| proxy_listen | 0.0.0.0:8000, 0.0.0.0:8443 ssl | 配置Kong代理监听的地址和端口,这个是Kong的入口,API调用都将通过这个端口请求。这个配置和Ngxin中的配置一致,通过SSL可以指定接受https的请求 支持IPv4和IPv6 |
| admin_listen | 127.0.0.1:8001, 127.0.0.1:8444 ssl | 配置Kong的管理API监听的端口,和proxy_listen配置一样,但是这个配置不建议监听在公网IP上。 |
| nginx_user | nobody nobody | 配置Nginx的用户名和用户组,和Nginx的配置规则一样 |
| nginx_worker_processes | auto | 设置Nginx的进程书,通常等于CPU核心数 |
| nginx_daemon | on | 是否以daemon的方式运行Ngxin |
| mem_cache_size | 128m | 内存的缓存大小,可以使用k和m为单位 |
| ssl_cipher_suite | modern | 定义Nginx提供的TLS密码,可以配置的值有:modern,intermediate, old, custom. |
| ssl_ciphers | 定义Nginx提供的TLS密码的列表,参考Nginx的配置 | |
| ssl_cert | 配置SSL证书的crt路径,必须是要绝对路径 | |
| ssl_cert_key | 设置SSL证书的key文件,必须是绝对路径 | |
| client_ssl | off | ..... |
| client_ssl_cert | ..... | |
| client_ssl_cert_key | ..... | |
| admin_ssl_cert | ..... | |
| admin_ssl_cert_key | ..... | |
| headers | server_tokens, latency_tokens | 设置再相应客户端时候应该注入的头部,可以设置的值如下: - server_tokens: 注入'Via'和'Server'头部. - latency_tokens: 注入'X-Kong-Proxy-Latency'和'X-Kong-Upstream-Latency' 头部. - X-Kong-<header-name>: 只有在适当的时候注入特定的头部 这个配置可以被设置为off。当然,即便设置了off以后,插件依然可以注入头部 |
| trusted_ips | 定义可信的IP地址段,通常不建议在此处限制请求,应该再插件中过滤 | |
| real_ip_header | X-Real-IP | 获取客户端真实的IP,将值通过同步的形式传递给后端 |
| real_ip_recursive | off | 这个值在Nginx配置中设置了同名的ngx_http_realip_module指令 |
| client_max_body_size | 0 | 配置Nginx接受客户端最大的body长度,如果超过此配置 将返回413。 设置为0则不检查长度 |
| client_body_buffer_size | 8k | 设置读取缓冲区大小,如果超过内存缓冲区大小,那么NGINX会缓存在磁盘中,降低性能。 |
| error_default_type | text/plain | 当请求' Accept '头丢失,Nginx返回请求错误时使用的默认MIME类型。可以配置的值为: text/plain,text/html, application/json, application/xml. |
在Nginx注入配置中,配置了Nginx的基本的参数,这些参数大部分和NGINX的配置值是一样的,可以通过Nginx的配置文档了解一下。
四、 数据库存储配置
数据库配置的模块配置数据库相关的连接信息等等。主要有如下配置:
| 配置项 | 默认值 | 说明 |
|---|---|---|
| database | postgres | 设置数据库类型,Kong支持两种数据库,一种是postgres,一种是cassandra |
| PostgreSQL配置 | 如果database设置为postgres以下配置生效 | |
| pg_host | 127.0.0.1 | 设置PostgreSQL的连接地址 |
| pg_port | 5432 | 设置PostgreSQL的端口 |
| pg_user | kong | 设置PostgreSQL的用户名 |
| pg_password | 设置PostgreSQL的密码 | |
| pg_database | kong | 设置数据库名称 |
| pg_ssl | off | 是否开启ssl连接 |
| pg_ssl_verify | off | 如果启用了' pg_ssl ',则切换服务器证书验证。 |
| cassandra配置 | 如果database设置为cassandra以下配置生效 | |
| cassandra_contact_points | 127.0.0.1 | ..... |
| cassandra_port | 9042 | ..... |
| cassandra_keyspace | kong | ..... |
| cassandra_timeout | 5000 | ..... |
| cassandra_ssl | off | ..... |
| cassandra_ssl_verify | off | ..... |
| cassandra_username | kong | ..... |
| cassandra_password | ..... | |
| cassandra_consistency | ONE | ..... |
| cassandra_lb_policy | RoundRobin | ..... |
| cassandra_local_datacenter | ..... | |
| cassandra_repl_strategy | SimpleStrategy | ..... |
| cassandra_repl_factor | 1 | ..... |
| cassandra_data_centers | dc1:2,dc2:3 | ..... |
| cassandra_schema_consensus_timeout | 10000 | ..... |
推荐使用PostgreSQL数据库作为生产环境的存储,PostgreSQL具有良好的性能和稳定性,是一个非常优秀的开源数据库。
五、 数据库缓存配置
在上一节中,配置了Kong持久化存储,显然如果每次的请求都需要去查询数据库中的相关信息那无疑是非常消耗资源,性能和稳定性也会大大降低,作为一个API网关肯定是不能忍的,解决这个问题的办法就是缓存,Kong将数据缓存在内存中,这样会大大提高性能,本节介绍Kong的缓存配置。
| 配置项 | 默认值 | 说明 |
|---|---|---|
| db_update_frequency | 5 | 节点更新数据库的时间,以秒为单位。 这个配置设置了节点查询数据库的时间,假如有3台Kong服务器节点ABC,如果再A节点增加了一个API网关,那么B和C节点最多需要等待db_update_frequency时间才能被更新到。 |
| db_update_propagation | 0 | 数据库节点的更新时间。 如果使用了Cassandra数据库集群,那么如果数据库有更新,最多需要db_update_propagation时间来同步所有的数据库副本。 如果使用PostgreSQL或者单数据库,这个值可以被设置为0 |
| db_cache_ttl | 0 | 缓存生效时间,单位秒。如果设置为0表示永不过期 Kong从数据库中读取数据并且缓存,在ttl过期后会删除这个缓存然后再一次读取数据库并缓存 |
| db_resurrect_ttl | 30 | 缓存刷新时间,单位秒。当数据存储中的陈旧实体无法刷新时(例如,数据存储不可访问),应该对其进行恢复。当这个TTL过期时,将尝试刷新陈旧的实体。 |
六、 DNS解析器配置
默认情况下,DNS解析器将使用标准配置文件/etc/hosts和/etc/resolv.conf。如果设置了环境变量LOCALDOMAIN和RES_OPTIONS,那么后一个文件中的设置将被覆盖。
| 配置项 | 默认值 | 说明 |
|---|---|---|
| dns_resolver | 配置DNS服务器列表,用半角逗号分割,每个条目使用ip[:port]的格式,这个配置仅提供给Kong使用,不会覆盖节点系统的配置,如果没有配置则使用系统的设置。接受IPv4和IPv6的地址。 | |
| dns_hostsfile | /etc/hosts | 配置Kong的hosts文件,这个配置同样仅提供给Kong使用,不会覆盖节点系统的配置。 需要说明的是这个文件仅读取一次,读取的内容会缓存再内存中,如果修改了此文件,必须要重启Kong才能生效。 |
| dns_order | LAST,SRV,A,CNAME | 解析不同记录类型的顺序。“LAST”类型表示最后一次成功查找的类型(用于指定的名称) |
| dns_stale_ttl | 4 | 配置DNS记录缓存过期时间 |
| dns_not_found_ttl | 30 | 这个配置值不知道该如何理解?? |
| dns_error_ttl | 1 | ..... |
| dns_no_sync | off | 如果启用了该项,那么在DNS缓存过期之后,每一次请求都会发起DNS查询。在禁用此项时,那么相同的域名多次请求会同步到一个查询中共享返回值。 |
在DNS配置中,我们基本上不需要更改,官网的配置给出了最优的配置。如果我们需要在host文件中定义后端绑定的域名,一定要在编辑hosts文件后重载Kong的配置,或者重启Kong,无论hosts的文件是否是/etc/hosts,否则都不会生效的。
七、 其他杂项配置
杂项配置基本上关于LUA的配置,如果不熟悉请不要修改,按照官方默认即可。
| 配置项 | 默认值 | 说明 |
|---|---|---|
| lua_ssl_trusted_certificate | .... | |
| lua_ssl_verify_depth | 1 | .... |
| lua_package_path | ./?.lua;./?/init.lua; | .... |
| lua_package_cpath | .... | |
| lua_socket_pool_size | 30 | .... |
Kong基本功能说明
基础功能(konga为例)
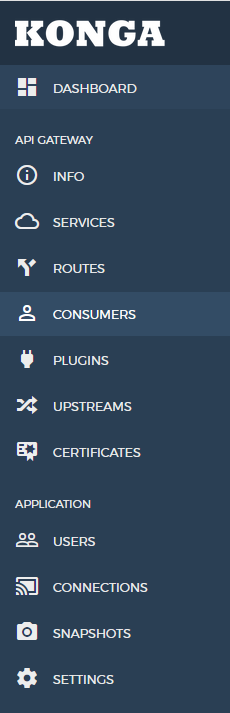
应用级菜单
- Connections Kong连接,用于配置Kong的AdminAPI地址,配置成功之后,将会开启Kong级菜单。
- Snapshots 快照,用于存储Kong节点快照,可快速恢复节点配置。
API网关菜单
- Consumers API网关消费者,用于各类认证以及限流控制等;
- Services 服务,用于配置上游服务的信息,主要包括服务名称、上游的Host以及Port等;
- Routes 路由,用于配置下游的路由信息,定义服务的出口路径,主要包括路由名称、Host、Path、Methods以及Http/Https等;
- Plugins 插件,可配置于Service或Route,主要包括认证、安全、限流、监控、日志以及自定义几大模块,官方提供了较为全面的基础插件功能;
- Upstreams 类nginx中的Upstream,用于配置上游的服务信息;
- Certificates 证书管理。
服务配置
1.添加服务: Services -> Create Services 实例:
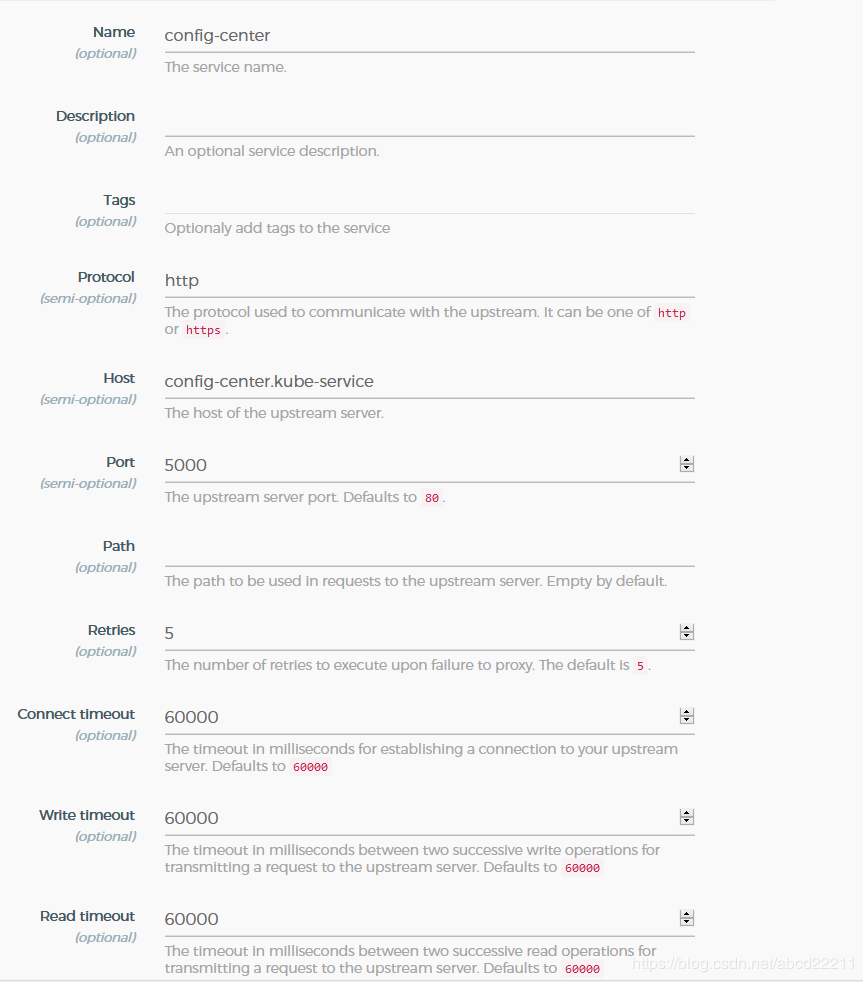
说明:由于这里的Kong部署在K8S环境中,所以可以直接使用K8S中的服务名+端口号来定义服务的Host和Port。
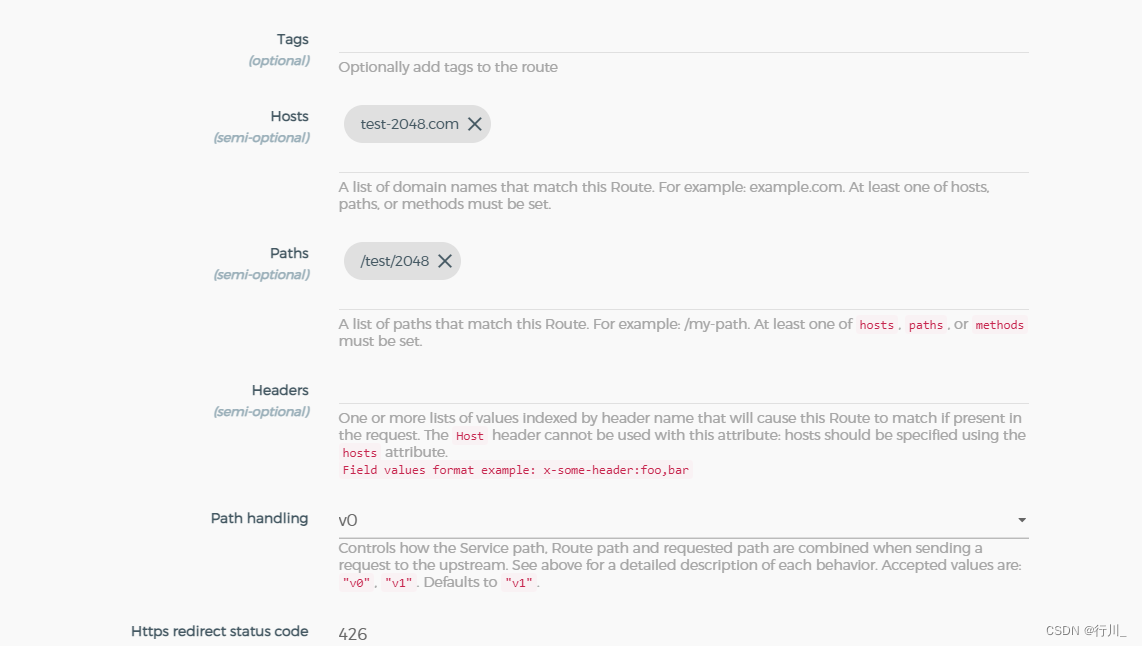
2.添加路由: Services -> Service Detail -> Routes -> Add Route 实例:
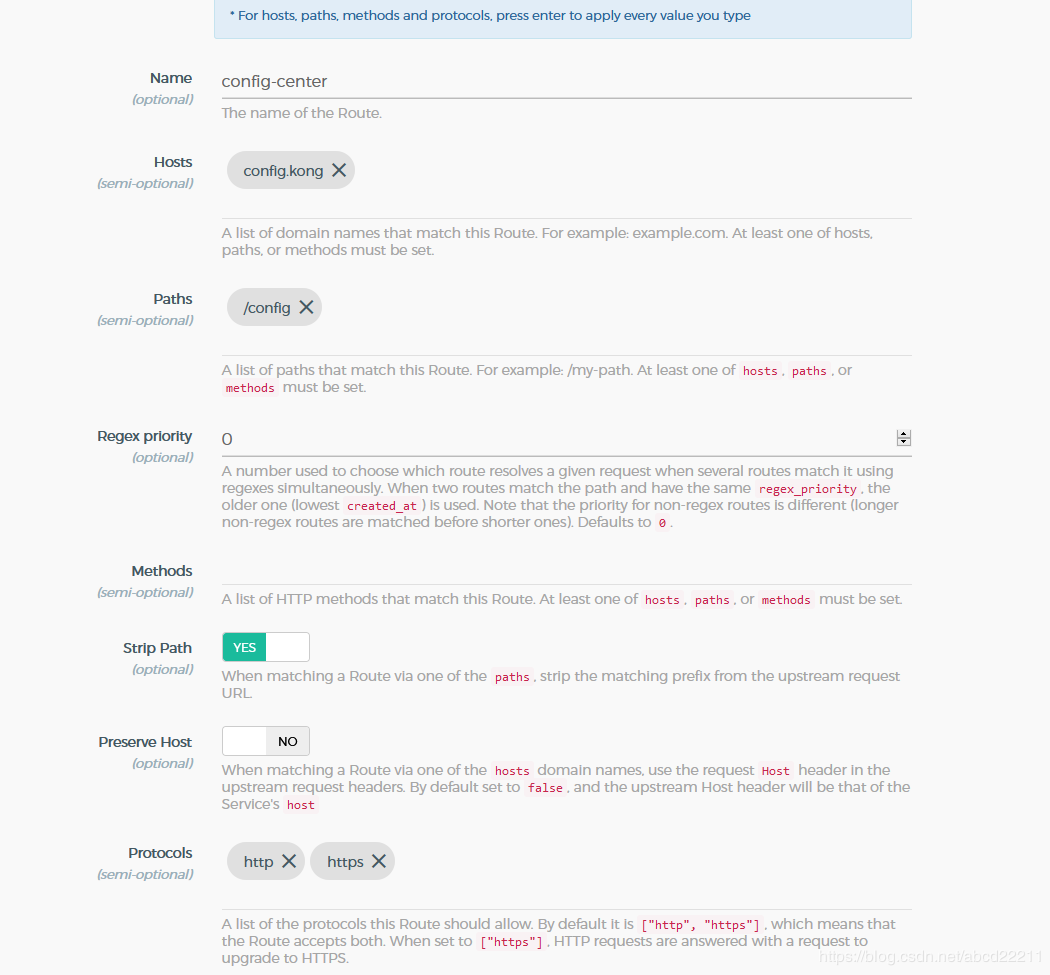
配置完成之后,我们就可以访问我们的服务了。
# https://192.168.0.231:31617/config 或 http://192.168.0.231:32740/config Host: config.kong
> curl -ik -H "Host":"config.kong" https://192.168.0.231:31617/config/basic/dev
HTTP/1.1 200 OK
Content-Type: application/json; charset=utf-8
Transfer-Encoding: chunked
Connection: keep-alive
Date: Thu, 17 Oct 2019 02:05:16 GMT
Server: Kestrel
X-Kong-Upstream-Latency: 3
X-Kong-Proxy-Latency: 10007
Via: kong/1.3.0{"logLevel":"Debug",...}
复制代码
插件配置
插件添加有两个入口: 1.服务插件 Servcies -> Service Detail -> Plugins -> Add Plugin 2.路由插件 Routes -> Route Detail -> Plugins -> Add Plugin
认证
1.Basic 认证Header: Authorization Basic base64(username:password)2.Jwt认证支持三种认证参数传递:uri param,cookie and header,可自定义键名key claim一般为issjwt生成 & 校验:https://jwt.io/3.OAuth2认证认证地址:oauth2/authorize获取token地址: oauth2/token刷新token地址: oauth2/token安全
1. Acl 访问控制列表2. Cors 跨域资源共享3. Ip Restriction IP限制4. Bot Detection 机器人检测限流
1. Rate Limiting 速率限制2. Response Ratelimiting 响应速率限制3. Request Size Limiting 请求大小限制4. Request Termination 请求阻断/终止