关系型数据库存储在磁盘当中,非关系型数据库存储在内存中
Jedis
第一步:导入依赖包
<dependencies><dependency><groupId>redis.clients</groupId><artifactId>jedis</artifactId><version>3.7.0</version></dependency><dependency><groupId>org.junit.jupiter</groupId><artifactId>junit-jupiter</artifactId><version>5.7.0</version><scope>test</scope></dependency><dependency><groupId>org.slf4j</groupId><artifactId>slf4j-nop</artifactId><version>1.7.2</version></dependency></dependencies>第二步:建立连接
private Jedis jedis;@BeforeEachvoid setUp(){//建立连接jedis=new Jedis("localhost",6379);//设置密码(window端我没有设置密码)//jedis.auth("123456");//选择库jedis.select(0);}第三步:操作库
@Testvoid testString(){//插入数据String result = jedis.set("name", "张三");System.out.println("result="+result);//获取数据String name = jedis.get("name");System.out.println("name="+name);}第四步:关闭资源
@AfterEachvoid tearDown(){//释放资源if (jedis!=null){jedis.close();}}jedis本身线程不安全,频繁的创建和销毁连接是有性能损耗的,推荐使用Jedis连接池代替Jedis直连方式
Jedis连接池
public class JedisConnectionFactory {private static final JedisPool jedisPool;static {//配置连接池JedisPoolConfig jedisPoolConfig = new JedisPoolConfig();//最大连接jedisPoolConfig.setMaxTotal(8);//设置最大空闲连接jedisPoolConfig.setMaxIdle(8);//设置最小空闲连接jedisPoolConfig.setMinIdle(0);//设置无连接时等待时间jedisPoolConfig.setMaxWaitMillis(1000);//创建连接池jedisPool=new JedisPool(jedisPoolConfig,"localhost",6379,1000);}//获取对象public static Jedis getJedis(){return jedisPool.getResource();}
}
上面第二步中建立连接修改为
//建立连接//jedis=new Jedis("localhost",6379);jedis= JedisConnectionFactory.getJedis();SpringDataRedis
第一步:引入spring-boot-starter-data-redis依赖
<!--redis依赖--><dependency><groupId>org.springframework.boot</groupId><artifactId>spring-boot-starter-data-redis</artifactId></dependency><!--commons-pool依赖--><dependency><groupId>org.apache.commons</groupId><artifactId>commons-pool2</artifactId></dependency><parent><groupId>org.springframework.boot</groupId><artifactId>spring-boot-starter-parent</artifactId><version>2.5.7</version><relativePath/> <!-- lookup parent from repository --></parent>第二步:在application.yaml配置Redis信息,需要把版本号降低为2.5.7
spring:redis:port: 6379lettuce:pool:max-active: 8max-idle: 8min-idle: 0max-wait: 1000mshost: 127.0.0.1
第三步:注入RedisTemplate
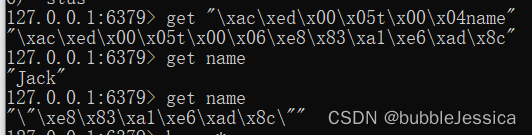
@Autowiredprivate RedisTemplate redisTemplate;@Testvoid testString() {//写入一条String数据redisTemplate.opsForValue().set("name", "胡歌");//获取String数据Object name = redisTemplate.opsForValue().get("name");System.out.println("name=" + name);}执行成功通过,但是redis数据获取name,并不是胡歌,而是Jack,实际上它存进去了,只不过name被序列化了
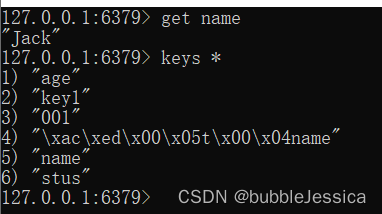
RedisTemplate可以接收任意Object作为值写入Redis,只不过写入前会把Object序列化为字节形式,默认采用JDK序列化,得到结果如下:
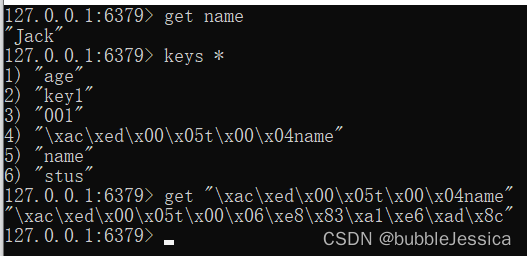
缺点:可读性差、内存占用较大
解决方法:定义RedisConfig类
package com.huhu.redis.config;import org.springframework.context.annotation.Bean;
import org.springframework.context.annotation.Configuration;
import org.springframework.data.redis.connection.RedisConnectionFactory;
import org.springframework.data.redis.core.RedisTemplate;
import org.springframework.data.redis.serializer.GenericJackson2JsonRedisSerializer;
import org.springframework.data.redis.serializer.RedisSerializer;@Configuration
public class RedisConfig {@Beanpublic RedisTemplate<String,Object> redisTemplate(RedisConnectionFactory connectionFactory){//创建RedisTemplate对象RedisTemplate<String, Object> template = new RedisTemplate<>();//设置连接工厂template.setConnectionFactory(connectionFactory);//创建JSON序列化工具GenericJackson2JsonRedisSerializer jsonRedisSerializer = new GenericJackson2JsonRedisSerializer();//设置Key的序列化template.setKeySerializer(RedisSerializer.string());template.setHashKeySerializer(RedisSerializer.string());//设置Value的序列化template.setValueSerializer(jsonRedisSerializer);template.setHashValueSerializer(jsonRedisSerializer);//返回return template;}
}
package com.huhu;import org.junit.jupiter.api.Test;
import org.springframework.beans.factory.annotation.Autowired;
import org.springframework.boot.test.context.SpringBootTest;
import org.springframework.data.redis.core.RedisTemplate;@SpringBootTest
class RedisDemoApplicationTests {@Autowiredprivate RedisTemplate redisTemplate;@Testvoid testString() {//写入一条String数据redisTemplate.opsForValue().set("name", "胡歌");//获取String数据Object name = redisTemplate.opsForValue().get("name");System.out.println("name=" + name);}}
运行报错原因:没有导入Jackson依赖

<!--Jackson依赖--><dependency><groupId>com.fasterxml.jackson.core</groupId><artifactId>jackson-databind</artifactId></dependency>导入依赖后运行成功,并且之前name的值Jack已经被替代了
StringRedisTemplate
Java序列化就是指把Java对象转换为字节序列的过程 Java反序列化就是指把字节序列恢复为Java对象的过程。
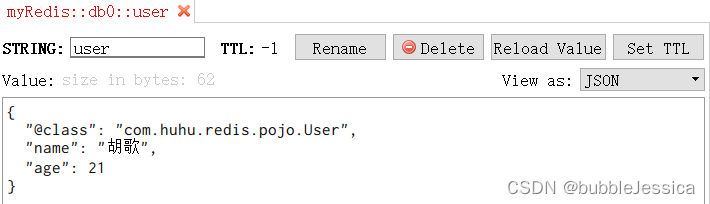
为了在反序列化时知道对象的类型,JSON序列化器会将类的class类型写入json结果中,存入Redis,会带来额外的内存开销
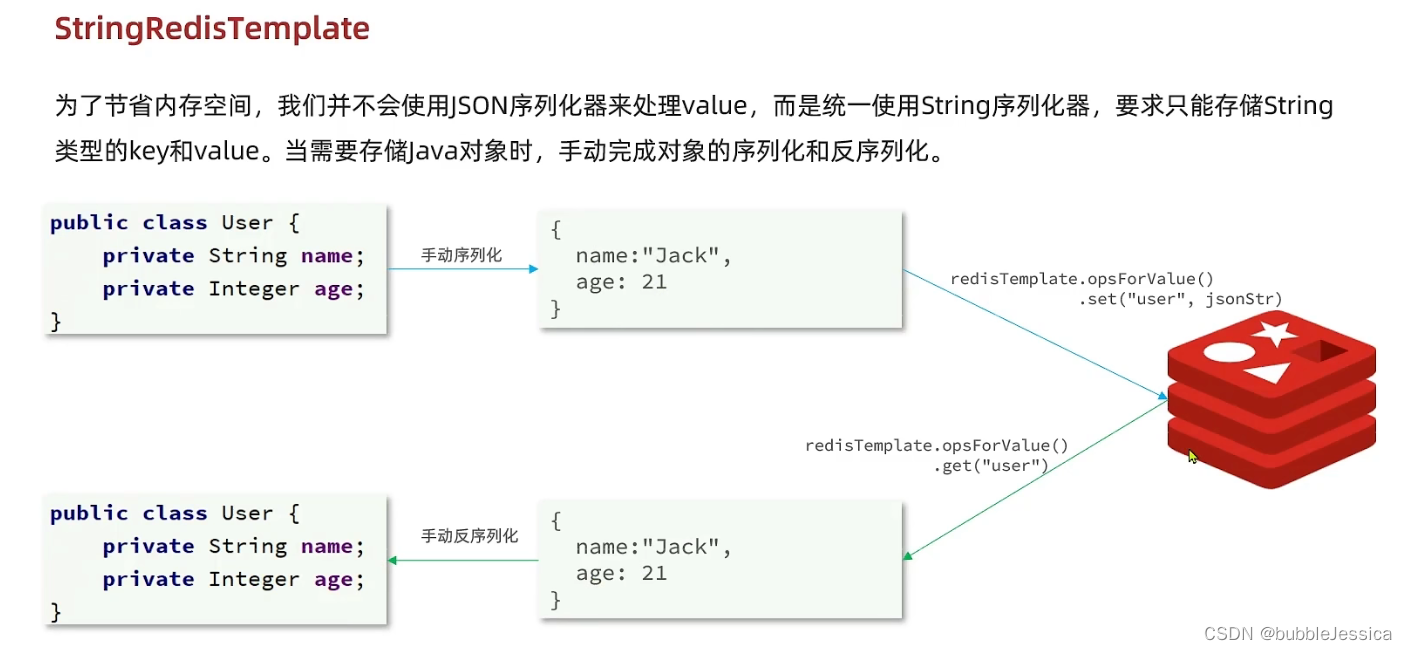
Spring默认提供了一个StringRedisTemplate类,它的key和value的序列化方式默认就是string方式
@Autowiredprivate StringRedisTemplate stringRedisTemplate;@Testvoid testString() {//写入一条String数据stringRedisTemplate.opsForValue().set("name", "胡歌");//获取String数据Object name = stringRedisTemplate.opsForValue().get("name");System.out.println("name=" + name);}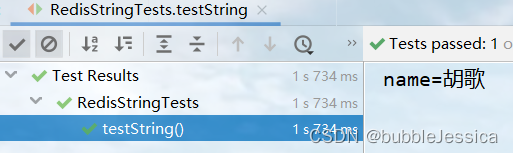

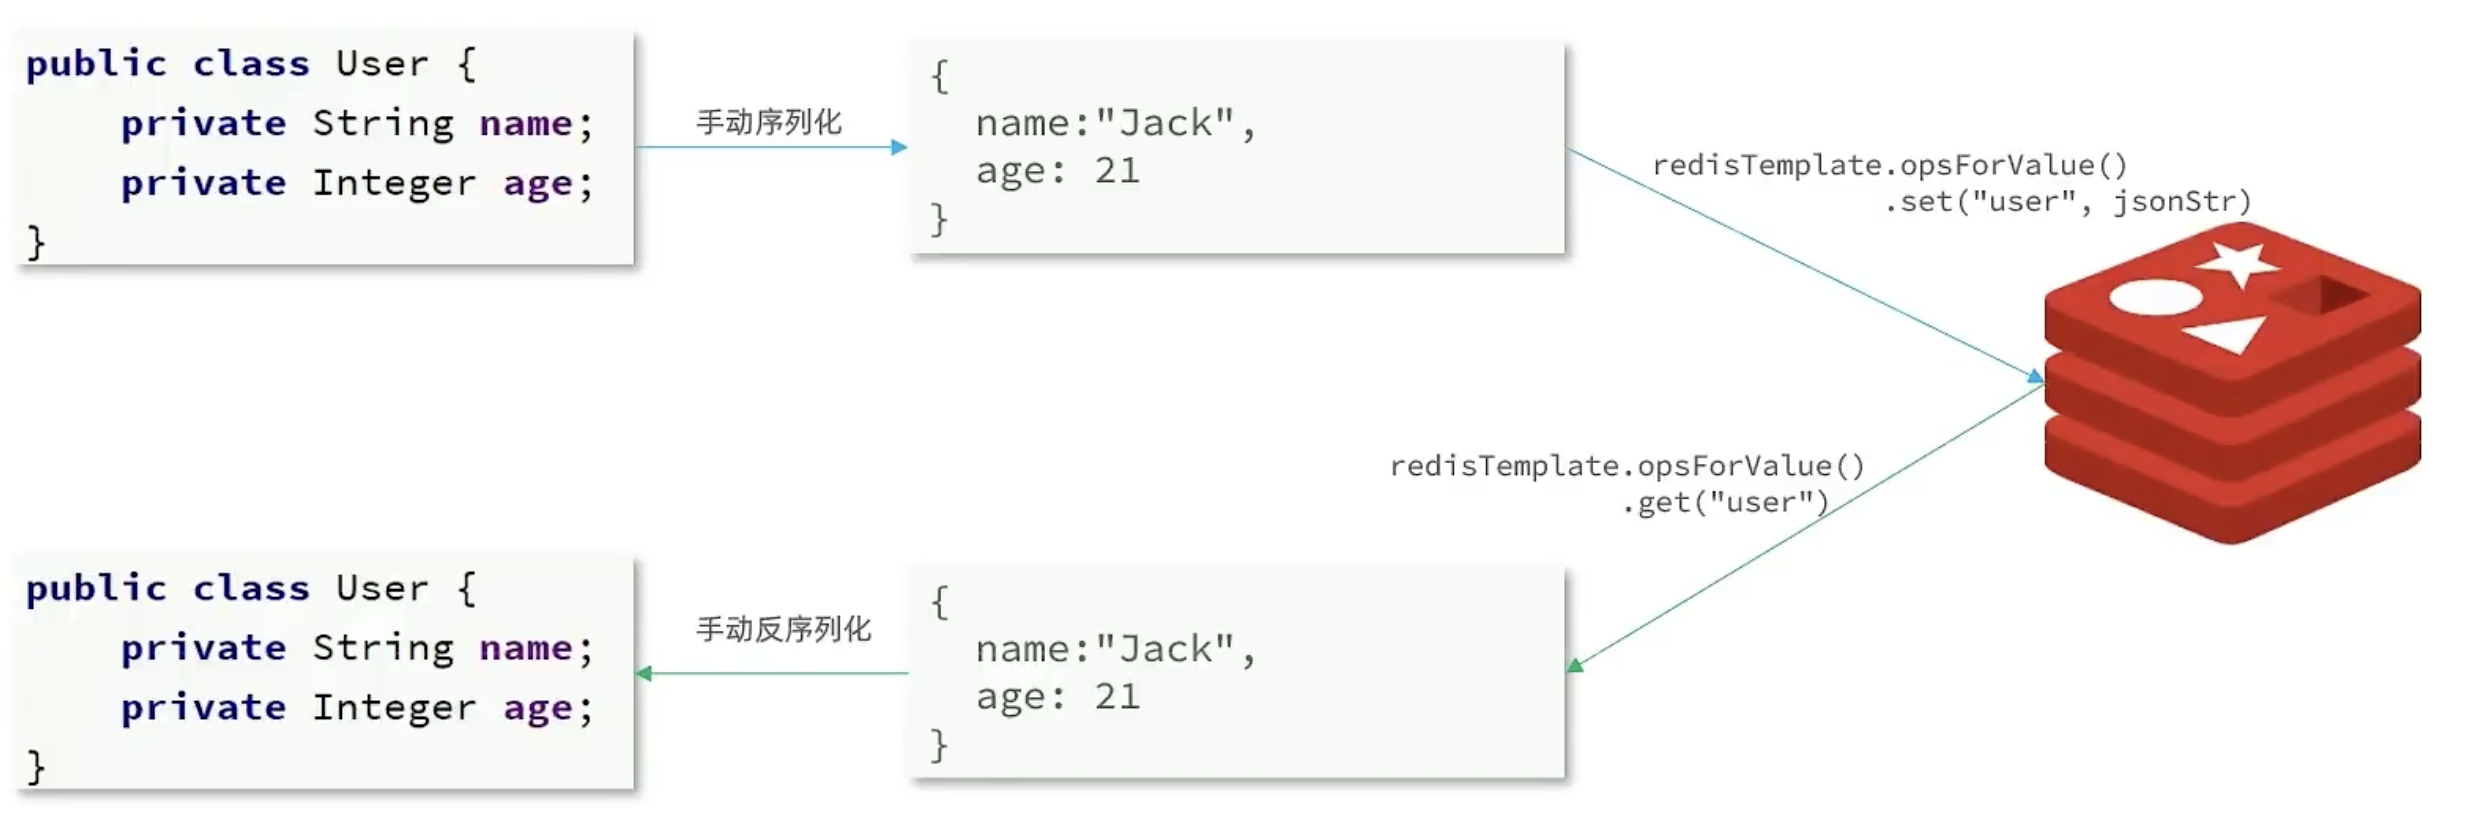
手动序列化和手动反序列化
private static final ObjectMapper mapper=new ObjectMapper();@Testvoid testSaveUser() throws JsonProcessingException {//创建对象User user=new User("胡歌",21);//手动序列化String json = mapper.writeValueAsString(user);//写入数据stringRedisTemplate.opsForValue().set("user:200",json);//获取数据String jsonUser = stringRedisTemplate.opsForValue().get("user:200");//手动反序列化User user1 = mapper.readValue(jsonUser, User.class);System.out.println("use1r="+user1);}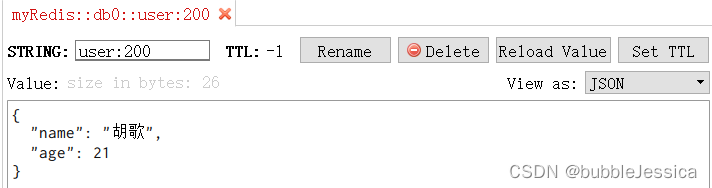
RedisTemplate操作hash类型(注意方法)
@Testvoid testHash(){stringRedisTemplate.opsForHash().put("user:400","name","虎哥");stringRedisTemplate.opsForHash().put("user:400","age","21");Map<Object, Object> entries = stringRedisTemplate.opsForHash().entries("user:400");System.out.println("entries="+entries);}


![[Redis]Redis客户端](https://img-blog.csdnimg.cn/87164364e11142fb9022bc10ecd36fd9.png)