文章目录
- 1. 前言
- 2. 概念介绍
- 2.1 拷贝 / 克隆的概念
- 2.2 为什么需要拷贝方法?
- 2.3 什么是浅拷贝?浅拷贝和深拷贝的区别是什么?
- 3. 深拷贝的实现方式
- 3.1 手动深拷贝
- 3.2 序列化方式
- 3.2.1 自定义序列化工具函数
- 3.2.2 commons-lang3 的序列化工具类
- 3.2.3 JSON 序列化
- 4. 总结
- 5. 课后题
- 5.1 亲手尝试
- 5.1.1 实现浅拷贝
- 5.1.2 实现深拷贝
- 6. 个人感悟/总结
- 6.1.1 原文摘录
- 6.1.2 自我感悟
没有智慧的头脑,就像没有蜡烛的灯笼。 ——托尔斯泰
1. 前言
《手册》第 10 页有关于 Object 的 clone 问题的描述 1:
【推荐】慎用 Object 的 clone 方法来拷贝对象。
说明:对象 clone 方法默认是浅拷贝,若想实现深拷贝需覆写 clone 方法实现域对象的深度遍历式拷贝。
那么我们要思考几个问题:
- 什么是浅拷贝?
- 浅拷贝和深拷贝的区别是什么?
- 拷贝的目的是什么?
- 拷贝的使用场景是什么?
- 如何实现深拷贝?
网上也有很多介绍浅拷贝和深拷贝的文章,但文章质量参差不齐,有些文章读完仍然对概念得理解非常含糊。读完这些文章对拷贝的使用场景,对深拷贝的实现方式等都无法有全面和深刻的理解。
为此本节将带着大家系统地研究这上述问题,以便大家未来遇到类似问题时可以举一反三,灵活迁移。
2. 概念介绍
2.1 拷贝 / 克隆的概念
我们先研究第 1 个问题:什么是拷贝?
维基百科对 “克隆” 的描述如下 2:
克隆 (英语: Clone) 在广义上是指利用生物技术由无性生殖产生与原原个体有完全相同基因组之后代的过程。
在园艺学上,克隆指通过营养繁殖产生的单一植株的后代,很多植物都是通过克隆这样的无性繁殖方式从单一植株获得大量的子代个体。
在生物学上,是指选择性地复制出一段 DNA 序列(分子克隆)、细胞(细胞克隆)或个体(个体克隆)。
克隆一个生物体意味着创造一个与原先的生物体具有完全一样的遗传信息的新生物体。
计算机中的拷贝或克隆和上述概念很类似,可以类比理解。
对象的拷贝,就是根据原来的对象 “复制” 一份属性、状态一致的新的对象。
2.2 为什么需要拷贝方法?
我们思考第 2 个问题:为什么需要拷贝呢?
我们来看下面的订单类和商品类。
订单类( Order ):
@Data
public class Order {private Long id;private String orderNo;private List<Item> itemList;
}
商品类( Item ):
@Data
public class Item {private Long id;private Long itemId;private String name;private String desc;// 省略其他
}
如果我们查询得到 1 个订单对象,该对象包括 6 个商品对象。
如果我们还需要构造多个新的订单对象,属性和上述订单对象非常相似,只是订单号不同或者商品略有区别。
这时如果有一个 “复制” 方法,可以将订单复制一个副本,而且修改副本中的订单号和商品列表 ( itemList ) 不影响原始对象,是不是很方便?
另外一个非常典型的场景是在多线程中。如果只用一个主线程,在主线程中修改订单号分别调用 doSomeThing 函数,想分别打印 first 和 second 两个订单编号字符串。
@Slf4j
public class CloneDemo { public static void main(String[] args) {Order order = OrderMocker.mock();order.setOrderNo("first");doSomeThing(order);order.setOrderNo("second");doSomeThing(order);}private static void doSomeThing(Order order) {try {TimeUnit.SECONDS.sleep(1L);} catch (InterruptedException e) {e.printStackTrace();}System.out.println(order.getOrderNo());}
}
运行程序后输出的结果的确是: first、second。
但在多线程环境中,如果我们不通过克隆构造新的对象,线程池中两个线程会公用同一个对象,后面对订单号的修改将影响到其它线程。
@Slf4j
public class CloneDemo {public static void main(String[] args) {ExecutorService executorService = Executors.newFixedThreadPool(5);Order order = OrderMocker.mock();order.setOrderNo("first");executorService.execute(() -> doSomeThing(order));order.setOrderNo("second");executorService.execute(() -> doSomeThing(order));}private static void doSomeThing(Order order) {try {TimeUnit.SECONDS.sleep(1L);} catch (InterruptedException e) {e.printStackTrace();}System.out.println(order.getOrderNo());}
}
输出的结果是: second、second。
因此如果能够克隆一个新的对象,并且对新对象的修改不影响原始对象,就能实现我们期待的效果。
2.3 什么是浅拷贝?浅拷贝和深拷贝的区别是什么?
通过前言部分的介绍,我们知道 Object 的 clone 函数默认是浅拷贝。
按照惯例我们进入源码,看看是否能够得到我们想要的答案:
/*** Creates and returns a copy of this object.  The precise meaning* of "copy" may depend on the class of the object. The general* intent is that, for any object {@code x}, the expression:* <blockquote>* <pre>* x.clone() != x</pre></blockquote>* will be true, and that the expression:* <blockquote>* <pre>* x.clone().getClass() == x.getClass()</pre></blockquote>* will be {@code true}, but these are not absolute requirements.* While it is typically the case that:* <blockquote>* <pre>* x.clone().equals(x)</pre></blockquote>* will be {@code true}, this is not an absolute requirement.* <p>* By convention, the returned object should be obtained by calling* {@code super.clone}.  If a class and all of its superclasses (except* {@code Object}) obey this convention, it will be the case that* {@code x.clone().getClass() == x.getClass()}.* <p>* By convention, the object returned by this method should be independent* of this object (which is being cloned).  To achieve this independence,* it may be necessary to modify one or more fields of the object returned* by {@code super.clone} before returning it.  Typically, this means* copying any mutable objects that comprise the internal "deep structure"* of the object being cloned and replacing the references to these* objects with references to the copies.  If a class contains only* primitive fields or references to immutable objects, then it is usually* the case that no fields in the object returned by {@code super.clone}* need to be modified.* <p>* The method {@code clone} for class {@code Object} performs a* specific cloning operation. First, if the class of this object does* not implement the interface {@code Cloneable}, then a* {@code CloneNotSupportedException} is thrown. Note that all arrays* are considered to implement the interface {@code Cloneable} and that* the return type of the {@code clone} method of an array type {@code T[]}* is {@code T[]} where T is any reference or primitive type.* Otherwise, this method creates a new instance of the class of this* object and initializes all its fields with exactly the contents of* the corresponding fields of this object, as if by assignment; the* contents of the fields are not themselves cloned. Thus, this method* performs a "shallow copy" of this object, not a "deep copy" operation.* <p>* The class {@code Object} does not itself implement the interface* {@code Cloneable}, so calling the {@code clone} method on an object* whose class is {@code Object} will result in throwing an* exception at run time.** @return     a clone of this instance.* @throws  CloneNotSupportedException  if the object's class does not*               support the {@code Cloneable} interface. Subclasses*               that override the {@code clone} method can also*               throw this exception to indicate that an instance cannot*               be cloned.* @see java.lang.Cloneable*/
protected native Object clone() throws CloneNotSupportedException;
该函数给出了非常详尽的介绍。下面给出一些要点的翻译:
该方法是创建对象的副本。这就意味着 “副本” 依赖于该对象的类型。
对于任何对象而言,一般来说下面的表达式成立:
x.clone() != x的结果为true。
x.clone().getClass() == x.getClass()的结果为true。但是这些也不是强制的要求。
x.clone().equals(x)的结果也是true。这也不是强制要求。按照惯例,返回对象应该通过调用
super.clone函数来构造。如果一个类和它的所有父类(除了Object)都遵循这个约定,那么x.clone().getClass() == x.getClass()将成立。按照惯例,返回的对象应该和原始对象是独立的。
为了实现这种独立性,后续应该在调用
super.clone得到拷贝对象并返回之前,应该对内部深层次的可变对象创建副本并指向克隆对象的对应属性的引用。如果一个类只包含基本类型的属性或者指向不可变对象的引用,这种情况下,
super.clone返回的对象不需要被修改。如果调用
clone函数的类没有实现Cloneable接口将会抛出CloneNotSupportedException。注意所有的数组对象都默认实现了
Cloneable接口。该函数会创建该类的新实例,并初始化所有属性对象。属性对象本身并不会自动调用
clone。因此此方法实现的是浅拷贝而不是深拷贝。
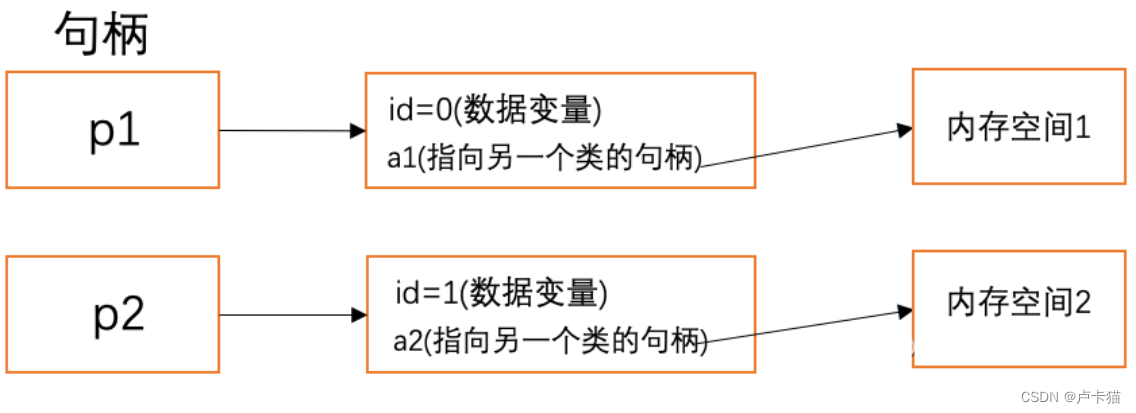
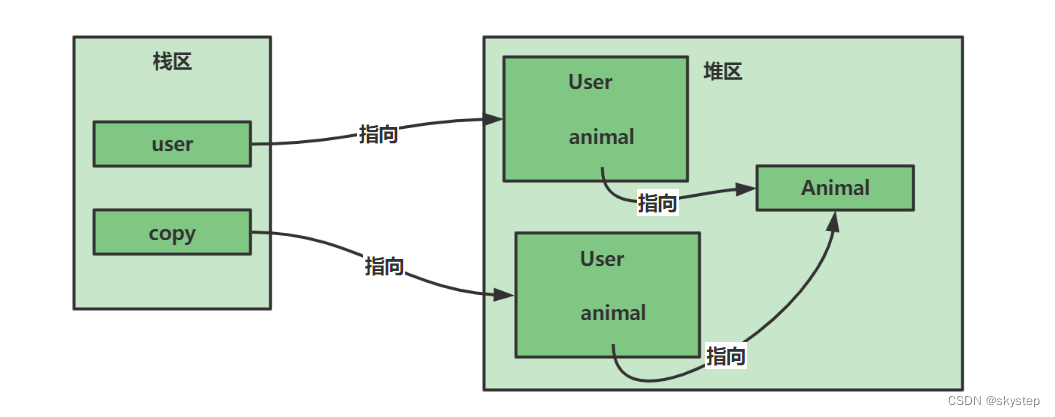
因此我们可以了解到,浅拷贝将返回该类的新的实例,该实例的引用类型对象共享。
深拷贝也会返回该类的新的实例,但是该实例的引用类型属性也是拷贝的新对象。
如果用一句话来描述,浅拷贝和深拷贝的主要区别在于对于引用类型是否共享。
为了更好地理解浅拷贝,我们给出一个示例:
@Data
public class Order implements Cloneable {private Long id;private String orderNo;private List<Item> itemList;@Overridepublic Order clone() {try {return (Order)super.clone();} catch (CloneNotSupportedException ignore) {// 不会调到这里}return null;}
}
通过 Object 类的 clone 函数的注释我们了解到:如果调用 clone 函数的类没有实现 Cloneable 接口将会抛出 CloneNotSupportedException 。
因此要实现 Cloneable 接口。
重写 clone 函数是为了供外部使用,因此定义为 public 。
返回值类型定义为客户端直接需要的对象类型(本类)。
这体现了《Effective Java》的 Item 11 中所提到的 3:
Never make the client do anything the library can do for the client.
不要让客户端去做任何类库可以替它完成的事。
我们为上述浅拷贝编写测试代码:
public class OrderMocker {public static Order mock() {Order order = new Order();order.setId(1L);order.setOrderNo("abcdefg");List<Item> items = new ArrayList<>();Item item = new Item();item.setId(0L);item.setItemId(0L);item.setName("《阿里巴巴Java开发手册》详解慕课专栏");item.setDesc("精品推荐");items.add(item);order.setItemList(items);return order;}
}
@Testpublic void shallowClone() {Order order = OrderMocker.mock();Order cloneOrder = order.clone();assertFalse(order == cloneOrder);assertTrue(order.getItemList() == cloneOrder.getItemList());}
该单元测试可以通过,从而证实了 clone 函数的注释,证实了浅拷贝的表现。
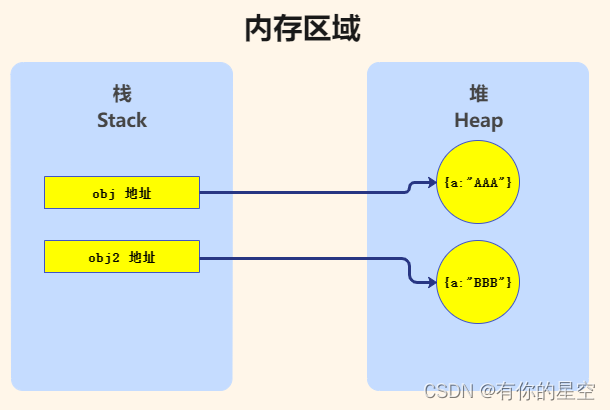
即浅拷贝后,原对象的订单列表和克隆对象的订单列表地址相同。
因此如果使用浅拷贝,修改拷贝订单的商品列表,那么原始订单对象的商品列表也会受到影响。
为了更形象地理解浅拷贝和深拷贝的概念,我们以文件夹进行类比:
浅拷贝:同一个文件夹的两个快捷方式,虽然是两个不同的快捷方式,但是指向的文件夹是同一个,不管是通过哪个快捷方式进入,对该文件夹下的文件修改,相互影响。
深拷贝:我们复制某个文件夹(含里面的内容)在另外一个目录进行粘贴,就可得到具有相同内容的新目录,对新文件夹修改不影响原始文件夹。
3. 深拷贝的实现方式
虽然浅拷贝能够实现拷贝的功能,但是浅拷贝的引用类型成员变量是共享的,修改极可能导致相互影响。
业务开发中使用深拷贝更多一些,那么实现深拷贝有哪些方式呢?
3.1 手动深拷贝
@Data
public class Order implements Cloneable {private Long id;private String orderNo;private List<Item> itemList;@Overridepublic Order clone() {try {Order order = (Order) super.clone();if (id != null) {order.id = new Long(id);}if (orderNo != null) {order.orderNo = new String(orderNo);}if (itemList != null) {List<Item> items = new ArrayList<>();for (Item each : itemList) {Item item = new Item();Long id = each.getId();if(id != null){item.setId(new Long(id));}Long itemId = each.getItemId();if(itemId != null){item.setItemId(new Long(itemId));}String name = each.getName();if(name != null){item.setName(new String(name));}String desc = each.getDesc();if(desc != null){item.setDesc(new String(desc));}items.add(item);}order.setItemList(items);}return order;} catch (CloneNotSupportedException ignore) {}return null;}
}
深拷贝也调用 super.clone 是为了支撑 x.clone().getClass() == x.getClass() 。
写好代码后,通过调用 Order 类的 clone 函数即可实现深拷贝。
由于克隆的对象和内部的引用类型的属性全部都是依据原始对象新建的对象,因此如果修改拷贝对象的商品列表,原始订单对象的商品列表并不会受到影响。
通过下面的单元测试来验证:
@Test
public void deepClone() {Order order = OrderMocker.mock();Order cloneOrder = (Order) order.clone();assertFalse(order == cloneOrder);assertFalse(order.getItemList() == cloneOrder.getItemList());
}
该单测可顺利通过。
3.2 序列化方式
前面章节我们讲到了序列化和反序列化的知识,讲到了序列化的主要使用场景包括深拷贝。
序列化通过将原始对象转化为字节流,再从字节流重建新的 Java 对象,因此原始对象和反序列化后的对象修改互不影响。
因此可以使用之前讲到的序列化和反序列化方式来实现深拷贝。
3.2.1 自定义序列化工具函数
如果我们不想为了深拷贝这一项功能就依赖新的 jar 包,可以在自己项目中借助对象输入和输出流编写拷贝工具函数。
示例代码如下:
/*** JDK序列化方式深拷贝*/public static <T> T deepClone(T origin) throws IOException, ClassNotFoundException {ByteArrayOutputStream outputStream = new ByteArrayOutputStream();try (ObjectOutputStream objectOutputStream = new ObjectOutputStream(outputStream);) {objectOutputStream.writeObject(origin);objectOutputStream.flush();}byte[] bytes = outputStream.toByteArray();try (ByteArrayInputStream inputStream = new ByteArrayInputStream(bytes);) {return JdkSerialUtil.readObject(inputStream);}}
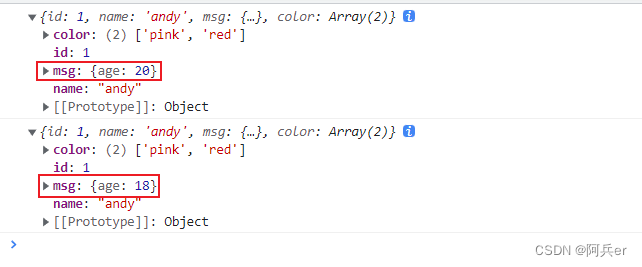
我们可通过调试查看克隆对象和原始对象。
下图中我们可以清晰地看到,通过此方法克隆得到的新的对象是一个全新的对象。
需要注意的是:正如前面章节所讲,Java 序列化需要实现 Serializable 接口,而且效率不是特别高。
3.2.2 commons-lang3 的序列化工具类
我们可以利用项目中引用的常见工具包的工具类实现深拷贝,避免重复造轮子。
可以使用 commons-lang3 (3.7 版本)的序列化工具类: org.apache.commons.lang3.SerializationUtils#clone。
@Test
public void serialUtil() {Order order = OrderMocker.mock();// 使用方式Order cloneOrder = SerializationUtils.clone(order);assertFalse(order == cloneOrder);assertFalse(order.getItemList() == cloneOrder.getItemList());
}
前面反复提到过,我们学习知识不仅要知其然,而且要知其所以然。
那么它是如何实现深拷贝的呢?
按照惯例我们打开源码:
/*** <p>Deep clone an {@code Object} using serialization.</p>** <p>This is many times slower than writing clone methods by hand* on all objects in your object graph. However, for complex object* graphs, or for those that don't support deep cloning this can* be a simple alternative implementation. Of course all the objects* must be {@code Serializable}.</p>** @param <T> the type of the object involved* @param object  the {@code Serializable} object to clone* @return the cloned object* @throws SerializationException (runtime) if the serialization fails*/
public static <T extends Serializable> T clone(final T object) {if (object == null) {return null;}final byte[] objectData = serialize(object);final ByteArrayInputStream bais = new ByteArrayInputStream(objectData);try (ClassLoaderAwareObjectInputStream in = new ClassLoaderAwareObjectInputStream(bais,object.getClass().getClassLoader())) {/** when we serialize and deserialize an object,* it is reasonable to assume the deserialized object* is of the same type as the original serialized object*/@SuppressWarnings("unchecked") // see abovefinal T readObject = (T) in.readObject();return readObject;} catch (final ClassNotFoundException ex) {throw new SerializationException("ClassNotFoundException while reading cloned object data", ex);} catch (final IOException ex) {throw new SerializationException("IOException while reading or closing cloned object data", ex);}
}
通过其返回值的泛型描述 `` 可以断定参数对象需要实现序列化接口。
该函数注释也给出了性能说明,该深拷贝方法性能不如直接手动写 clone 方法效率高。
大家可以进到该方法的子函数中查看更多细节。
通过源码的分析我们发现,该克隆函数本质上也是通过 Java 序列化和反序列化方式实现。
3.2.3 JSON 序列化
我们还可以通过 JSON 序列化方式实现深拷贝。
下面我们利用 Google 的 Gson 库(2.8.5 版本),实现基于 JSON 的深拷贝:
首先我们将深拷贝方法封装到拷贝工具类中:
/*** Gson方式实现深拷贝*/
public static <T> T deepCloneByGson(T origin, Class<T> clazz) {Gson gson = new Gson();return gson.fromJson(gson.toJson(origin), clazz);
}
使用时直接调用封装的工具方法即可:
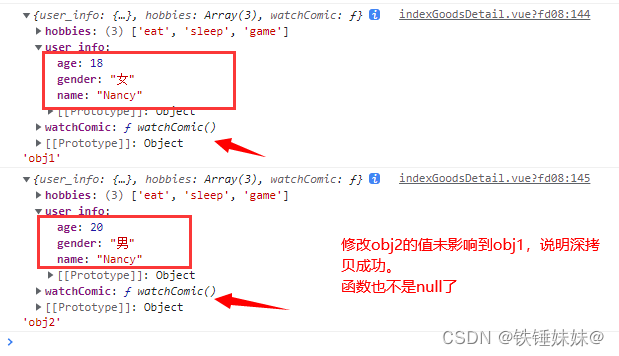
@Testpublic void withGson() {Order order = OrderMocker.mock();// gson序列化方式Order cloneOrder = CloneUtil.deepCloneByGson(order, Order.class);assertFalse(order == cloneOrder);assertFalse(order.getItemList() == cloneOrder.getItemList());}
使用 JSON 序列化方式实现深拷贝的好处是,性能比 Java 序列化方式更好,更重要的是不要求序列化对象以及成员属性(嵌套)都要实现序列化接口。
我们也可以使用前面讲到的 Hessian 和 Kryo 序列化来实现,请大家自行封装。
上面通过 Gson 实现的深拷贝工具方法封装,再次体现了 “不要让客户端去做任何类库可以替它完成的事” 的原则。
这点也和《重构 - 改善既有代码的设计》 第一版 10.13 封装向下转型的重构方案一致。
最后,建议不管采取哪种或者哪几种深拷贝方式,都尽量将其封装到项目的克隆工具类中,方便复用。
4. 总结
本节重点讲述了浅拷贝和深拷贝的概念,它们的主要区别,以及浅拷贝和深拷贝的实现方式。
5. 课后题
请自定义一个类,编写代码分别实现浅拷贝和深拷贝。
5.1 亲手尝试
5.1.1 实现浅拷贝
创建商品类Goods
@Data
public class Goods implements Cloneable {private Long id;private String title;private String desc;private List<GoodsSku> goodsSkuList;@Overridepublic Goods clone() {try {return (Goods)super.clone();} catch (CloneNotSupportedException ignore) {// 不会调到这里}return null;}
}
创建商品属性类GoodsSku
@Data
public class GoodsSku {private Long id;private Long GoodsId;private String name;}
之后再创建mock Goods对象的工具类
public class GoodsMocker {public static Goods mock() {Goods goods = new Goods();goods.setId(1L);goods.setTitle("Asus/华硕天选");goods.setDesc("Asus/华硕天选 FA506 锐龙8核 吃鸡学生游戏手提笔记本电脑144Hz");List<GoodsSku> goodsSkuList = new ArrayList<>();GoodsSku goodsSku = new GoodsSku();goodsSku.setId(0L);goodsSku.setGoodsId(1L);goodsSku.setName("512G SDD+16G大内存+AMD R7-4800H");goodsSkuList.add(goodsSku);goods.setGoodsSkuList(goodsSkuList);return goods;}
}
单元测试代码:
public class Test04 {@Testpublic void shallowClone() {Goods goods = GoodsMocker.mock();Goods cloneGoods = goods.clone();Assert.assertFalse(goods == cloneGoods);Assert.assertTrue(goods.getGoodsSkuList() == cloneGoods.getGoodsSkuList());}}
运行单测,结果通过,如图。
5.1.2 实现深拷贝
修改Goods的clone()方法:
@Overridepublic Goods clone() {try {Goods goods = (Goods)super.clone();if (id !=null) {goods.id = new Long(id);}if (title != null) {goods.title = title;}if (desc != null) {goods.desc = desc;}if (goodsSkuList!=null) {List<GoodsSku> goodsSkus = new ArrayList<>();for (GoodsSku each : goodsSkuList) {GoodsSku goodsSku = new GoodsSku();Long id = each.getId();if (id != null) {goodsSku.setId(id);}Long goodsId = each.getGoodsId();if (goodsId != null) {goodsSku.setGoodsId(goodsId);}String name = each.getName();if (name != null) {goodsSku.setName(name);}goodsSkus.add(goodsSku);} // end forgoods.setGoodsSkuList(goodsSkus);}return goods;} catch (CloneNotSupportedException ignore) {// 不会调到这里}return null;}
单元测试代码:
public class Test04 {@Testpublic void shallowClone() {Goods goods = GoodsMocker.mock();Goods cloneGoods = goods.clone();Assert.assertFalse(goods == cloneGoods);Assert.assertFalse(goods.getGoodsSkuList() == cloneGoods.getGoodsSkuList());}}
运行单测结果如图,通过!
6. 个人感悟/总结
6.1.1 原文摘录
- 在多线程环境中,如果我们不通过克隆构造新的对象,线程池中两个线程会公用同一个对象,后面对订单号的修改将影响到其它线程。因此如果能够克隆一个新的对象,并且对新对象的修改不影响原始对象,就能实现我们期待的效果。
- 浅拷贝将返回该类的新的实例,该实例的引用类型对象共享。深拷贝也会返回该类的新的实例,但是该实例的引用类型属性也是拷贝的新对象。
- 浅拷贝和深拷贝的主要区别在于对于引用类型是否共享。
- Never make the client do anything the library can do for the client.—— 不要让客户端去做任何类库可以替它完成的事。
- 项目中引用的常见工具包的工具类实现深拷贝,避免重复造轮子
6.1.2 自我感悟
- 浅拷贝最外层基本类型只是传值,外层的引用类型仍然指向原始对象。深拷贝是通过序列化等方式整个对象图,即对象的引用关系(包含引用类型属性)都创建为新对象。 实际使用要根据场景来,比如你编写一个函数,参数为一个 List 类型,如果你不使用克隆,那么对这个集合的增删,将影响到上层调用者。因此需要进行拷贝。因为字符串是不可变的,所以浅拷贝就可以满足。 List 这种类型,如果采用浅拷贝,取出里面的cat 修改属性,也会影响到调用方,如果想完全互不影响,可以使用深拷贝。