【齐天的博客】转载请注明出处(万分感谢!):
https://blog.csdn.net/qijinglai/article/details/80685226
关联文章:
Android多线程(Handler篇)
Android多线程(AsyncTask篇)
Android多线程(HandlerThread篇)
Android多线程(IntentService篇)
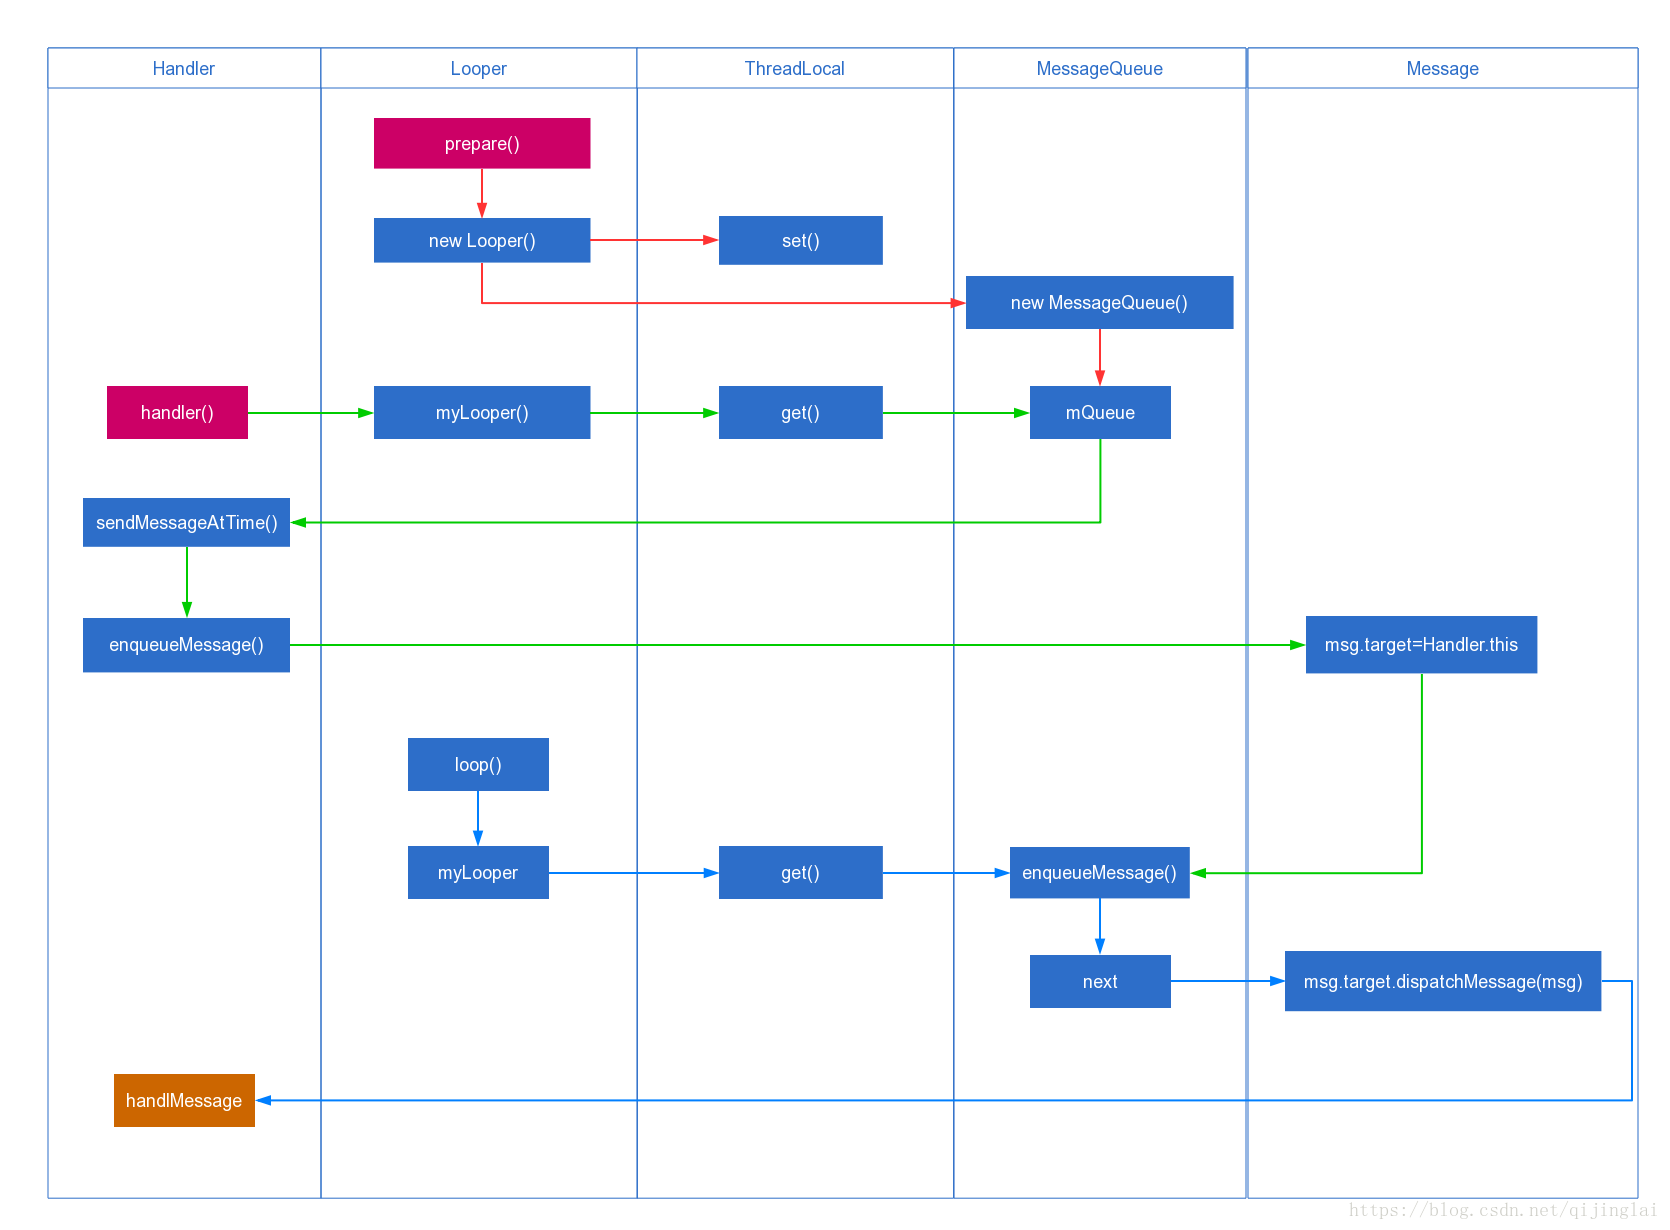
先放流程图:
由于Android中的耗时操作不能放入主线程中,所以实现多线程是必须的。今天的主角是Handler,本文将从使用及源码来分析探索其奥秘。
使用
步骤:
- 创建Handler对象,实现handlMessage()方法
- 创建Runnable线程
- 此时产生一个Looper,并自动创建一个消息队列MessageQueue()
- Looper轮询MessageQueue交给Handler
- Handler做处理
其中1、2、5为使用步骤,其他在后面分析源码时会讲到
使用方法
public class MainActivity extends AppCompatActivity {@SuppressLint("HandlerLeak")Handler handler = new Handler(){@Overridepublic void handleMessage(Message msg) {super.handleMessage(msg);switch (msg.what){case 1:
//                    处理事件break;}}};@Overrideprotected void onCreate(Bundle savedInstanceState) {super.onCreate(savedInstanceState);setContentView(R.layout.activity_main);new Thread(new Runnable() {@Overridepublic void run() {
//                耗时操作Message message = new Message();message.what = 1;handler.sendMessage(message);}}).start();}
}
使用就写这么多,接下来重点分析Handler原理。
原理分析
首先列一下将会讲到的几个对象
- ThreadLocal
- Looper
- MessageQueue
- Handler
- Message
ThreadLocal
关于他我看了几篇博客,很大一部分写的是错的,所以
注意:
- 他并不是解决共享对象的多线程访问问题的!!!
- 他并没有创建对象的拷贝或副本!!!
目的:他只是为了保证每个线程都拥有同一个类的不同对象
实质:每个线程里都new了同一个类的对象
作用:你或许觉得这样做很傻,但是如果使用全局变量就要考虑线程安全问题,而线程安全是以消耗性能为前提的,所以这种设计可以说很巧妙
场景:每个线程都需要相同类型的对象,又各自独立,并且与他相关的操作不少时,如,Looper,ActivityThread,AMS 等
private static final ThreadLocal tSession = new ThreadLocal();
public static Session getSession() throws Exception{Session s = tSession.get();try{if(s==null){s = getSessionFactory.openSession();tSession.set(s);}}catch(Exception e){}return s;
}
我们看一下ThreadLocal的源码,主要分析get()和set()
public T get() {Thread t = Thread.currentThread();ThreadLocalMap map = getMap(t);if (map != null) {ThreadLocalMap.Entry e = map.getEntry(this);if (e != null) {@SuppressWarnings("unchecked")T result = (T)e.value;return result;}}return setInitialValue();}public void set(T value) {Thread t = Thread.currentThread();ThreadLocalMap map = getMap(t);if (map != null)map.set(this, value);elsecreateMap(t, value);}ThreadLocalMap getMap(Thread t) {return t.threadLocals;}
set、get操作的都是ThreadLocalMap,key=当前线程,value=线程局部变量缓存值。可以看到get()实际上都是调用getMap(传入当前线程)来取得当前线程的ThreadLocalMap对象
- set(),实际上是调用了ThreadLocalMap的set(),ThreadLocalMap的set()涉及到哈希散列算法,我会在之后博客里详细分析这里先不提算法的事。
- get(),从当前线程中获取ThreadLocalMap,查询当前ThreadLocal变量实例对应的Entry,如果不为null,获取value,如果map为null,走初始化方法
由此看出不是如很多博主写的各线程用了同一个对象又相互独立那么神奇,只不过是用线程当做键在其中维护了一个私有变量而已。得到ThreadLocalMap后如何得到维护的变量呢,在这一句
ThreadLocalMap.Entry e = map.getEntry(this);
//this指代的ThreadLocal对象
所以过程就很清晰了,我们来总结一下:
- 声明一个全局公用的ThreadLocal实例作为key
- 在线程中new一个或取出已经存了的对象作为value
- 将此key-value放入ThreadLocalMap中
- 将当前线程作为key,ThreadLocalMap作为值放入ThreadLocal中
比较绕多读几遍就能明白了,再放一张图加深理解

Looper
两件事
- 创建消息队列
- 在队列中循环取消息
两个方法
- prepare()
- loop()
两个作用
- 保证当前线程只有一个looper和一个MessageQueue
- 从MessageQueue中取消息交给target的dispatchMessage
下面我们分析源码
#####构造方法
private Looper(boolean quitAllowed) {mQueue = new MessageQueue(quitAllowed);mThread = Thread.currentThread();}
很容易看出当Looper构造时创建了一个消息队列
#####prepare()方法
private static void prepare(boolean quitAllowed) {if (sThreadLocal.get() != null) {throw new RuntimeException("Only one Looper may be created per thread");}sThreadLocal.set(new Looper(quitAllowed));}
通过前面ThreadLocal的分析可知sThreadLocal.get()得到了Looper对象,当Looper存在是报错,不存在是创建一个存入ThreadLocal中,保证线程里有且只有一个Looper对象。
#####loop()
/*** Run the message queue in this thread. Be sure to call* {@link #quit()} to end the loop.*/public static void loop() {final Looper me = myLooper();if (me == null) {throw new RuntimeException("No Looper; Looper.prepare() wasn't called on this thread.");}final MessageQueue queue = me.mQueue;// Make sure the identity of this thread is that of the local process,// and keep track of what that identity token actually is.Binder.clearCallingIdentity();final long ident = Binder.clearCallingIdentity();for (;;) {Message msg = queue.next(); // might blockif (msg == null) {// No message indicates that the message queue is quitting.return;}// This must be in a local variable, in case a UI event sets the loggerfinal Printer logging = me.mLogging;if (logging != null) {logging.println(">>>>> Dispatching to " + msg.target + " " +msg.callback + ": " + msg.what);}final long slowDispatchThresholdMs = me.mSlowDispatchThresholdMs;final long traceTag = me.mTraceTag;if (traceTag != 0 && Trace.isTagEnabled(traceTag)) {Trace.traceBegin(traceTag, msg.target.getTraceName(msg));}final long start = (slowDispatchThresholdMs == 0) ? 0 : SystemClock.uptimeMillis();final long end;try {msg.target.dispatchMessage(msg);end = (slowDispatchThresholdMs == 0) ? 0 : SystemClock.uptimeMillis();} finally {if (traceTag != 0) {Trace.traceEnd(traceTag);}}if (slowDispatchThresholdMs > 0) {final long time = end - start;if (time > slowDispatchThresholdMs) {Slog.w(TAG, "Dispatch took " + time + "ms on "+ Thread.currentThread().getName() + ", h=" +msg.target + " cb=" + msg.callback + " msg=" + msg.what);}}if (logging != null) {logging.println("<<<<< Finished to " + msg.target + " " + msg.callback);}// Make sure that during the course of dispatching the// identity of the thread wasn't corrupted.final long newIdent = Binder.clearCallingIdentity();if (ident != newIdent) {Log.wtf(TAG, "Thread identity changed from 0x"+ Long.toHexString(ident) + " to 0x"+ Long.toHexString(newIdent) + " while dispatching to "+ msg.target.getClass().getName() + " "+ msg.callback + " what=" + msg.what);}msg.recycleUnchecked();}}
1)拿到ThreadLocal中的Looper,若没有则prepare()
2)拿到Looper的MessageQueue
3)进入死循环,调用msg.target.dispatchMessage(msg),发给Handler
4)释放资源
MessageQueue
一个单链表结构的消息队列
Handler
#####构造函数
public Handler(Callback callback, boolean async) {if (FIND_POTENTIAL_LEAKS) {final Class<? extends Handler> klass = getClass();if ((klass.isAnonymousClass() || klass.isMemberClass() || klass.isLocalClass()) &&(klass.getModifiers() & Modifier.STATIC) == 0) {Log.w(TAG, "The following Handler class should be static or leaks might occur: " +klass.getCanonicalName());}}mLooper = Looper.myLooper();if (mLooper == null) {throw new RuntimeException("Can't create handler inside thread that has not called Looper.prepare()");}mQueue = mLooper.mQueue;mCallback = callback;mAsynchronous = async;}
构造时通过Looper.myLooper获取当前线程保存的Looper实例,再获取这个Looper的MessageQueue
#####发送消息
public final boolean sendMessage(Message msg){return sendMessageDelayed(msg, 0);}/*** Sends a Message containing only the what value.* * @return Returns true if the message was successfully placed in to the * message queue. Returns false on failure, usually because the* looper processing the message queue is exiting.*/public final boolean sendEmptyMessage(int what){return sendEmptyMessageDelayed(what, 0);}/*** Sends a Message containing only the what value, to be delivered* after the specified amount of time elapses.* @see #sendMessageDelayed(android.os.Message, long) * * @return Returns true if the message was successfully placed in to the * message queue. Returns false on failure, usually because the* looper processing the message queue is exiting.*/public final boolean sendEmptyMessageDelayed(int what, long delayMillis) {Message msg = Message.obtain();msg.what = what;return sendMessageDelayed(msg, delayMillis);}
发送消息时所有方法都实际调用了sendMessageAtTime
public boolean sendMessageAtTime(Message msg, long uptimeMillis) {MessageQueue queue = mQueue;if (queue == null) {RuntimeException e = new RuntimeException(this + " sendMessageAtTime() called with no mQueue");Log.w("Looper", e.getMessage(), e);return false;}return enqueueMessage(queue, msg, uptimeMillis);}
是获取MessageQueue调用enqueueMessage();
#####接下来看enqueueMessage中
private boolean enqueueMessage(MessageQueue queue, Message msg, long uptimeMillis) {msg.target = this;if (mAsynchronous) {msg.setAsynchronous(true);}return queue.enqueueMessage(msg, uptimeMillis);}
将msg的target属性赋值为Handler自己,实现了Message与Handler的绑定,并调用了MessageQueue中的enqueueMessage()方法
boolean enqueueMessage(Message msg, long when) {if (msg.target == null) {throw new IllegalArgumentException("Message must have a target.");}if (msg.isInUse()) {throw new IllegalStateException(msg + " This message is already in use.");}synchronized (this) {if (mQuitting) {IllegalStateException e = new IllegalStateException(msg.target + " sending message to a Handler on a dead thread");Log.w(TAG, e.getMessage(), e);msg.recycle();return false;}msg.markInUse();msg.when = when;Message p = mMessages;boolean needWake;if (p == null || when == 0 || when < p.when) {// New head, wake up the event queue if blocked.msg.next = p;mMessages = msg;needWake = mBlocked;} else {// Inserted within the middle of the queue. Usually we don't have to wake// up the event queue unless there is a barrier at the head of the queue// and the message is the earliest asynchronous message in the queue.needWake = mBlocked && p.target == null && msg.isAsynchronous();Message prev;for (;;) {prev = p;p = p.next;if (p == null || when < p.when) {break;}if (needWake && p.isAsynchronous()) {needWake = false;}}msg.next = p; // invariant: p == prev.nextprev.next = msg;}// We can assume mPtr != 0 because mQuitting is false.if (needWake) {nativeWake(mPtr);}}return true;}
对前一个方法进行补充,把msg放入MessageQueue中,这时候轮询取消息(在前面Looper已经分析),调用dispatchMessage()
public void dispatchMessage(Message msg) {if (msg.callback != null) {handleCallback(msg);} else {if (mCallback != null) {if (mCallback.handleMessage(msg)) {return;}}handleMessage(msg);}}
最终调用handlerMessage()方法
/*** Subclasses must implement this to receive messages.*/public void handleMessage(Message msg) {}一个空方法,在这里处理操作,end
##总结
- Looper.prepare()在本线程中存入ThreadLocalMap中一个Looper并创建一个MessageQueue对象
- Looper.loop()循环取Message中的消息,回调msg.target.dispatchMessage(msg)
- Handler构造得到Looper并与MessageQueue关联
- Handler.sendMessage会给msg.target赋值为自己并加入MessageQueue中
- 重写handlMessage()处理