创建react应用程序
The React team said that there are no new features in React 17, but react@17.0.0-rc.0 comes with the power to lazy load and deep integrate multiple versions of React. This no-feature is larger than any feature, which is a stepping stone for a paradigm that allows modern new apps to coexist with existing legacy ones.
React团队表示,React 17中没有新功能,但是react@17.0.0-rc.0具有延迟加载和深度集成多个版本的React的能力。 这种无功能大于任何功能,这是使现代新应用程序与现有旧应用程序共存的范例的垫脚石。
This hybrid approach is meant to be an escape hatch, not the norm. Using a single version of React is the best practice, which removes a lot of complexity and saves you from multiple package downloading. However, this is still a powerful alternative in an environment with legacy code.
这种混合方法是要逃脱,而不是规范。 最佳实践是使用React的单个版本,这消除了很多复杂性,并使您免于多次下载软件包的麻烦。 但是,在具有遗留代码的环境中,这仍然是一个强大的替代方案。
In 5 Steps to Turn a Random React Application Into a Micro Front-End, we have drawn the above architecture diagram that launches multiple React applications, legacy and new, that work together as one application. Does it sound like a different option for a similar problem?
在将随机React应用程序转变为微型前端的5个步骤中 ,我们绘制了以上架构图,该架构图启动了多个React应用程序(旧版和新版),它们可以作为一个应用程序一起工作。 听起来像是解决类似问题的另一种选择?
Our example is inspired by Demo of Gradual React Upgrades. We will refer to it as The Demo.
我们的示例受Demo of Gradual React Upgrades启发。 我们将其称为The Demo 。
Based on our tryout, there are six steps to create a multi-version React application.
根据我们的试用,有六个步骤来创建一个多版本的React应用程序。
步骤1:将新代码移至Src /现代目录 (Step 1: Move New Code to Src/Modern Directory)
As always, we start with the Create React App.
与往常一样,我们从Create React App开始 。
npx create-react-app my-app
cd my-app
npm start
Since we are going to put multiple React apps into the same repository, we need to set up namespaces. Here is the directory structure.
由于我们要将多个React应用程序放入同一个存储库,因此我们需要设置名称空间。 这是目录结构。
src
 ├─ modern // new code: React 17
 ├─ legacy // legacy code: React 16.3.1 - could be lower version
 └─ shared // shared code - common source
We move everything in src to src/modern.
我们将src所有内容移动到src/modern 。
$ ls
App.css          index.css        App.js
index.js         serviceWorker.js. App.test.js
logo.svg         setupTests.js
In addition, copy package.json to src/modern, and make some modifications:
另外,将package.json复制到src/modern ,并进行一些修改:
{"name": "react-app-modern","version": "0.1.0","private": true,"dependencies": {"@testing-library/jest-dom": "^4.2.4","@testing-library/react": "^9.5.0","@testing-library/user-event": "^7.2.1","react": "17.0.0-rc.0","react-dom": "17.0.0-rc.0"}
}
At line 2, change it to a proper name. Keep all dependencies, and remove the rest of the sections.
在第2行,将其更改为专有名称。 保留所有依赖项 ,然后删除其余部分。
At line 9 and line 10, React versions has been upgraded to 17.0.0-rc.0.
在第9行和第10行,React版本已升级到17.0.0-rc.0 。
The react-scripts package is removed from the dependencies list.
react-scripts包已从依赖项列表中删除。
步骤2:将旧版代码移至src /旧版目录 (Step 2: Move Legacy Code to src/legacy Directory)
The legacy code is put under src/legacy.
遗留代码放在src/legacy 。
$ ls
App.css          index.css        App.js
index.js         serviceWorker.js. App.test.js
logo.svg         setupTests.js
{"name": "react-app3-modern","version": "0.1.0","private": true,"dependencies": {"@testing-library/jest-dom": "^4.2.4","@testing-library/react": "^9.5.0","@testing-library/user-event": "^7.2.1","react": "^16.13.1","react-dom": "^16.13.1"}
}At line 2, change it to a proper name. Keep all dependencies and remove the rest of the sections.
在第2行,将其更改为专有名称。 保留所有依赖性,并删除其余部分。
At line 9 and line 10, the React versions has been kept to 16.13.1.
在第9行和第10行,React版本保持在16.13.1 。
Thereact-scripts package is removed from the dependencies list.
react-scripts包已从依赖项列表中删除。
步骤3:更改Root package.json (Step 3: Change Root package.json)
The following root package.json is copied and adapted from The Demo. The previously removed sections are put back here, with a lot more things.
以下根package.json从The Demo复制并改编而成。 先前删除的部分将放回此处,还有更多内容。
{"name": "react-app-shell","version": "0.1.0","private": true,"dependencies": {"react-scripts": "3.4.1"},"scripts": {"postinstall": "run-s install:*","install:legacy": "cd src/legacy && npm install","install:modern": "cd src/modern && npm install","copy:legacy": "cpx 'src/shared/**' 'src/legacy/shared/'","copy:modern": "cpx 'src/shared/**' 'src/modern/shared/'","watch:legacy": "cpx 'src/shared/**' 'src/legacy/shared/' --watch --no-initial","watch:modern": "cpx 'src/shared/**' 'src/modern/shared/' --watch --no-initial","prebuild": "run-p copy:*","prestart": "run-p copy:*","start": "run-p start-app watch:*","start-app": "react-scripts start","build": "react-scripts build","eject": "react-scripts eject"},"eslintConfig": {"extends": "react-app"},"browserslist": {"production": [">0.2%","not dead","not op_mini all"],"development": ["last 1 chrome version","last 1 firefox version","last 1 safari version"]},"devDependencies": {"cpx": "1.5.0","npm-run-all": "4.1.5"}
}
At line 2, change it to a proper name.
在第2行,将其更改为专有名称。
Lines 5 - 7 are dependencies which include the build dependencies (react-scripts) and possibly React-agnostic libraries (redux in The Demo).
第5-7行是依赖关系,其中包括构建依赖关系( react-scripts )以及可能与React无关的库( The Demo redux )。
Lines 38 - 41 are some help utilities for copy files (cpx) and parallel/sequentially running tools (npm-run-all).
第38至41行是一些帮助实用程序,用于复制文件( cpx )和并行/顺序运行的工具( npm-run-all )。
These utilities are used in scripts (lines 8 - 22), which copies shared files to both modern and legacy directories, and installs, builds and watches them. If you want to create a different directory structure, these scripts need to be adjusted.
这些实用程序用在scripts (第8-22行),该scripts将shared文件复制到modern目录和legacy目录中,并安装,构建和监视它们。 如果要创建其他目录结构,则需要调整这些脚本。
Lines 23 - 25 are for eslintConfig.
第23至25行用于eslintConfig 。
Lines 26 - 37 are for browserslist.
第26-37行用于browserslist 。
Run install i. It generates src/modern/node_modules and src/modern/node_modules.
运行install i 。 它生成src/modern/node_modules和src/modern/node_modules 。
步骤4:设置环境文件 (Step 4: Set Up Environment Files)
As VSCode starts to show 5K changes and eslint displays errors for node_modules, we need to set up a few environment files.
至于VSCode开始显现5K变化和eslint显示错误的node_modules ,我们需要设置一些环境文件。
Configure .env to enable eslint for static code analysis:
配置.env以启用eslint进行静态代码分析:
EXTEND_ESLINT=trueConfigure .eslintignore to ignore eslint errors for these directories:
配置.eslintignore以忽略以下目录的eslint错误:
node_modules
build
src/*/shared
Configure .gitignore to exclude these directories/files for source code control:
配置.gitignore以排除以下目录/文件以进行源代码控制:
node_modules
build
.DS_Store
src/*/shared
Now it shows changes of 32 files. Things are in good shape.
现在,它显示了32个文件的更改。 情况良好。
步骤5:设定src / index.js (Step 5: Set Up src/index.js)
We invoke npm start, and get the following error:
我们调用npm start ,并得到以下错误:
Could not find a required file.
  Name: index.js
  Searched in: /Users/fuje/app/react-app4/src
Okay, we need to set up src/index.js, which points to src/modern/index.js.
好的,我们需要设置src/index.js ,它指向src/modern/index.js 。
import './modern/index';Try again with npm start. We see this familiar Create React App:
使用npm start再试一次。 我们看到了这个熟悉的Create React App:

步骤6:在旧版应用程序和新应用程序之间架起一座桥梁 (Step 6: Build a Bridge Between Legacy and New Apps)
We have one version of React running. Since the goal is to mix legacy and new apps, the legacy app needs to be loaded into the new app.
我们有一个版本的React运行。 由于目标是混合旧应用程序和新应用程序,因此需要将旧应用程序加载到新应用程序中。
import React, { Suspense } from 'react';
import logo from './logo.svg';
import './App.css';const App2 = React.lazy(() => import('../legacy/App'));function App() {return (<div className="App"><header className="App-header"><img src={logo} className="App-logo" alt="logo" /><p>This is the modern App to load legacy React.</p><aclassName="App-link"href="https://reactjs.org"target="_blank"rel="noopener noreferrer">Learn React</a><Suspense fallback={() => null}><App2 /></Suspense></header></div>);
}export default App;
At line 5, the legacy app is lazy-loaded, and it is used at lines 22 - 24.
在第5行,旧版应用程序被延迟加载,并在第22-24行使用。
The text in line 13 is modified to show that it’s from the modern app.
第13行中的文本已修改为显示它来自现代应用程序。
Run npm start, we see the modern app running together with the legacy React.
运行npm start ,我们将看到现代应用程序与旧版React一起运行。

So far, so good.
到目前为止,一切都很好。
We add useState hook into src/legacy/App.js:
我们将useState钩子添加到src/legacy/App.js :
import React, { useState } from 'react';
import logo from './logo.svg';
import './App.css';const App = () => {const [value, setValue] = useState(0);return (<div className="App"><header className="App-header"><img src={logo} className="App-logo" alt="logo" /><p>Edit <code>src/App.js</code> and save to reload.</p><aclassName="App-link"href="https://reactjs.org"target="_blank"rel="noopener noreferrer">Learn React</a><button onClick={() => setValue(value + 1)}>Click me {value} times</button></header></div>);
}export default App;
Lines 22-24 create a button to be clicked.
第22-24行创建了一个要单击的按钮。
Then we encounter the following error:
然后我们遇到以下错误:

Oh, what happened?
哦!发生了什么?
A bridge between legacy and new apps needs to be built.
需要在旧版和新版应用程序之间架起一座桥梁。
import React, { Suspense } from 'react';
import logo from './logo.svg';
import './App.css';
import lazyLegacyRoot from './lazyLegacyRoot';const App2 = lazyLegacyRoot(() => import('../legacy/App'));function App() {return (<div className="App"><header className="App-header"><img src={logo} className="App-logo" alt="logo" /><p>This is the modern App to load legacy React.</p><aclassName="App-link"href="https://reactjs.org"target="_blank"rel="noopener noreferrer">Learn React</a><Suspense fallback={() => null}><App2 /></Suspense></header></div>);
}export default App;
Instead of calling React.lazy, line 6 calls lazyLegacyRoot, which is defined inside src/modern/lazyLegacyRoot.js:
第6行没有调用React.lazy ,而是调用了lazyLegacyRoot ,它在src/modern/lazyLegacyRoot.js定义:
import React, {useRef, useLayoutEffect} from 'react';let rendererModule = {status: 'pending',promise: null,result: null,
};export default function lazyLegacyRoot(getLegacyComponent) {let componentModule = {status: 'pending',promise: null,result: null,};return function Wrapper(props) {const createLegacyRoot = readModule(rendererModule, () =>import('../legacy/createLegacyRoot')).default;const Component = readModule(componentModule, getLegacyComponent).default;const containerRef = useRef(null);const rootRef = useRef(null);// Create/unmount.useLayoutEffect(() => {if (!rootRef.current) {rootRef.current = createLegacyRoot(containerRef.current);}const root = rootRef.current;return () => {root.unmount();};}, [createLegacyRoot]);// Mount/update.useLayoutEffect(() => {if (rootRef.current) {rootRef.current.render(Component, props);}}, [Component, props]);return <div style={{display: 'contents'}} ref={containerRef} />;};
}// This is similar to React.lazy, but implemented manually.
// We use this to Suspend rendering of this component until
// we fetch the component and the legacy React to render it.
function readModule(record, createPromise) {if (record.status === 'fulfilled') {return record.result;}if (record.status === 'rejected') {throw record.result;}if (!record.promise) {record.promise = createPromise().then(value => {if (record.status === 'pending') {record.status = 'fulfilled';record.promise = null;record.result = value;}},error => {if (record.status === 'pending') {record.status = 'rejected';record.promise = null;record.result = error;}});}throw record.promise;
}
This is one end of the bridge. At lines 17-19, it dynamically imports createLegacyRoot from the legacy code. Then calls two useLayoutEffect (lines 25-33 are for creating, lines 36-40 are for updating) to re-render the code with the new version React.
这是桥的一端。 在第17-19行,它从旧版代码动态导入createLegacyRoot 。 然后调用两个useLayoutEffect (第25-33行用于创建,第36-40行用于更新)以使用新版本的React重新渲染代码。
useLayoutEffect’s signature is identical to useEffect, but it fires synchronously after all DOM mutations. Updates scheduled inside useLayoutEffect will be flushed synchronously before the browser has a chance to paint.
useLayoutEffect的签名与useEffect相同,但是在所有DOM突变后都会同步触发。 在浏览器有机会绘制之前,在useLayoutEffect内部计划的更新将被同步刷新。
Let’s see the other end of the bridge:
让我们看一下桥的另一端:
import React from 'react';
import ReactDOM from 'react-dom';// Note: this is a semi-private API, but it's ok to use itexport default function createLegacyRoot(container) {return {render(Component, props) {ReactDOM.render(<Component {...props} />, container);},unmount() {ReactDOM.unmountComponentAtNode(container);},};
}
Lines 8-10 defines a method to render.
第8-10行定义了一种渲染方法。
Line 11-13 defines a method to unmount.
第11-13行定义了一种卸载方法。
With the two ends of the bridge, we make the multi-version React app work properly:
通过桥接的两端,我们使多版本React应用程序能够正常工作:

演示 (The Demo)
The demo can be downloaded and run:
The demo可以下载并运行:
git clone https://github.com/reactjs/react-gradual-upgrade-demo.git
cd react-gradual-upgrade-demo
npm i
npm start
It includes two routes:
它包括两条路线:
- The Home route: It shows the new app only. The visible components are rendered by React 17. 本地路线:仅显示新应用。 可见组件由React 17渲染。

- The About Route: It shows a UI mixed with the legacy and new app. The components outside of the dotted lines are rendered by React 17, and the components inside of the dotted lines are rendered by React 16.8.6. 关于路线:它显示了一个界面,其中包含旧版和新版应用程序。 虚线外部的组件由React 17呈现,而虚线内部的组件由React 16.8.6呈现。

The demo is more advanced than the example we described here. It shows how to share a theme as a global context and how to share a Redux store (for counter) between apps. It also shares useTime hook and the clock display. It is worthwhile to download The demo and take a deep dive into it.
The demo比我们在此描述的示例更高级。 它显示了如何将主题共享为全局上下文,以及如何在应用程序之间共享Redux存储(用于计数器)。 它还共享useTime挂钩和时钟显示。 值得下载The demo并进行深入研究。
Try out the six steps we summarized to create your own multi-version React application. React 17 provides the capability of lazy load and deep integration of multiple versions of React.
试试我们总结的六个步骤,以创建您自己的多版本React应用程序。 React 17提供了延迟加载和深度集成多个版本的React的功能。
结论 (Conclusion)
React 17 is here. It changes synthetic React events, as well as some other features. Read this for more information.
React 17在这里。 它更改了合成的React事件以及其他一些功能。 阅读此以获得更多信息。
React 17 is a major release. We need to move to React 17 to access the capability to not move so fast in the future. Cool?
React 17是一个主要版本。 我们需要移至React 17来获得将来不会如此快地移动的功能。 凉?
Thanks for reading. I hope this was helpful. You can see my other Medium publications here.
谢谢阅读。 我希望这可以帮到你。 您可以在这里查看我的其他Medium出版物。
翻译自: https://medium.com/better-programming/6-steps-to-create-a-multi-version-react-application-1c3e5b5df7e9
创建react应用程序
相关文章
你真的懂package.json吗
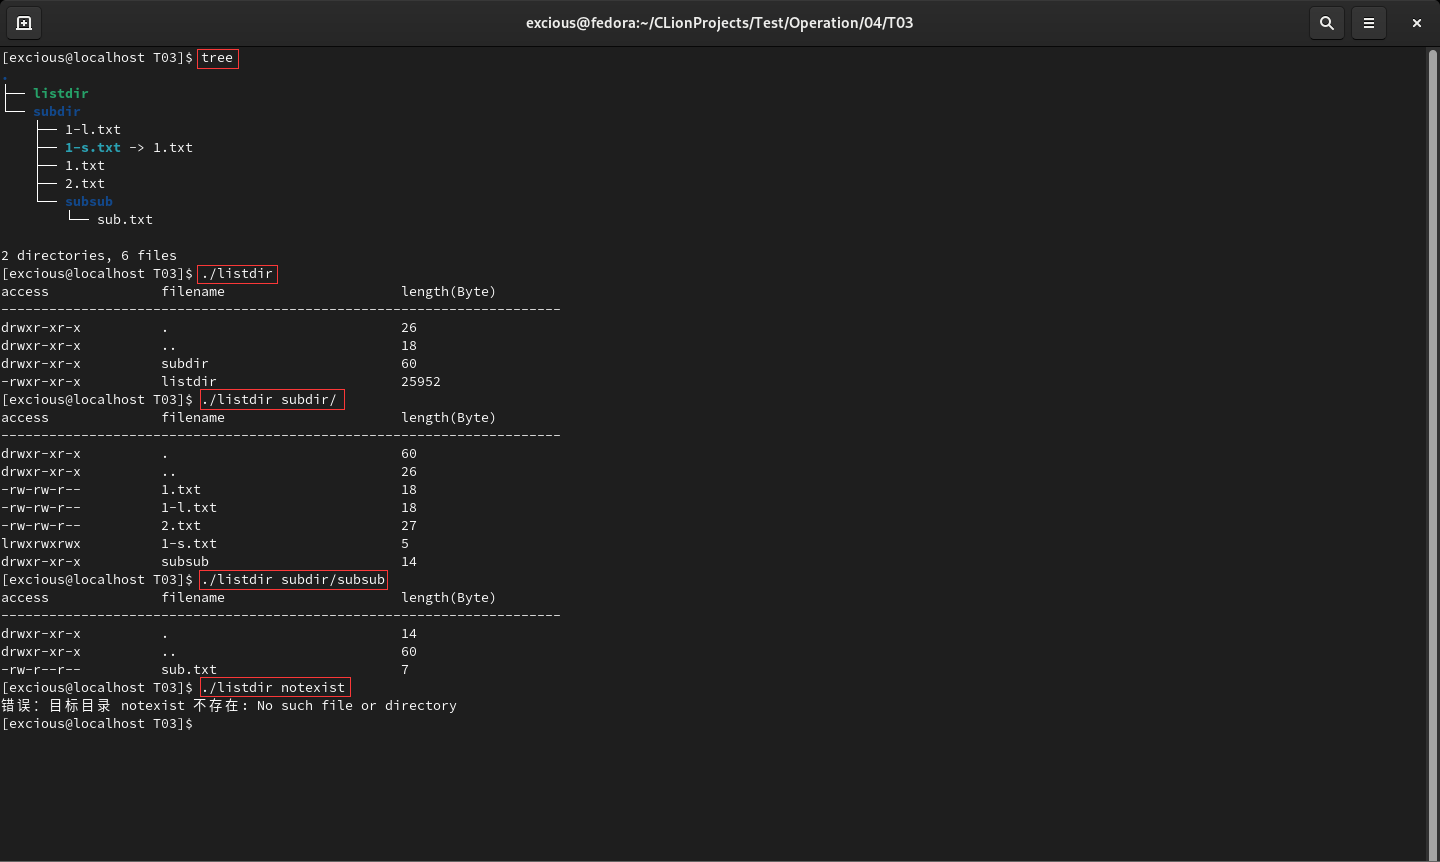
《Linux编程》上机作业 ·004【文件I/O操作】

CPU比GPU训练神经网络快十几倍,英特尔:别用矩阵运算了

用于基于 CNT 的射频辐射热计开发研究的 CPX-VF 探针台

ProJet 3510 CPX蜡模3D打印机在珠宝行业成功应用

基于 CNT 的射频辐射热计开发研究的 CPX-VF 低温探针台

Parker驱动器维修COMPAX控制器维修CPX0200H
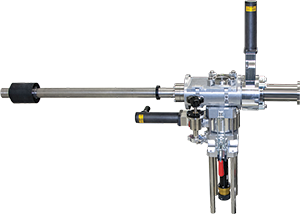
用于 CPX、CPX-VF 和 CRX-VF 探针台的新手提箱选项

GE IC697CPX935 CPU模块PDF帅

micropython仿真器_microbit/cpx 的 python模拟器:Device Simulator Express


Win10强制更新关闭方法

Win10强制更新禁不掉的解决方法

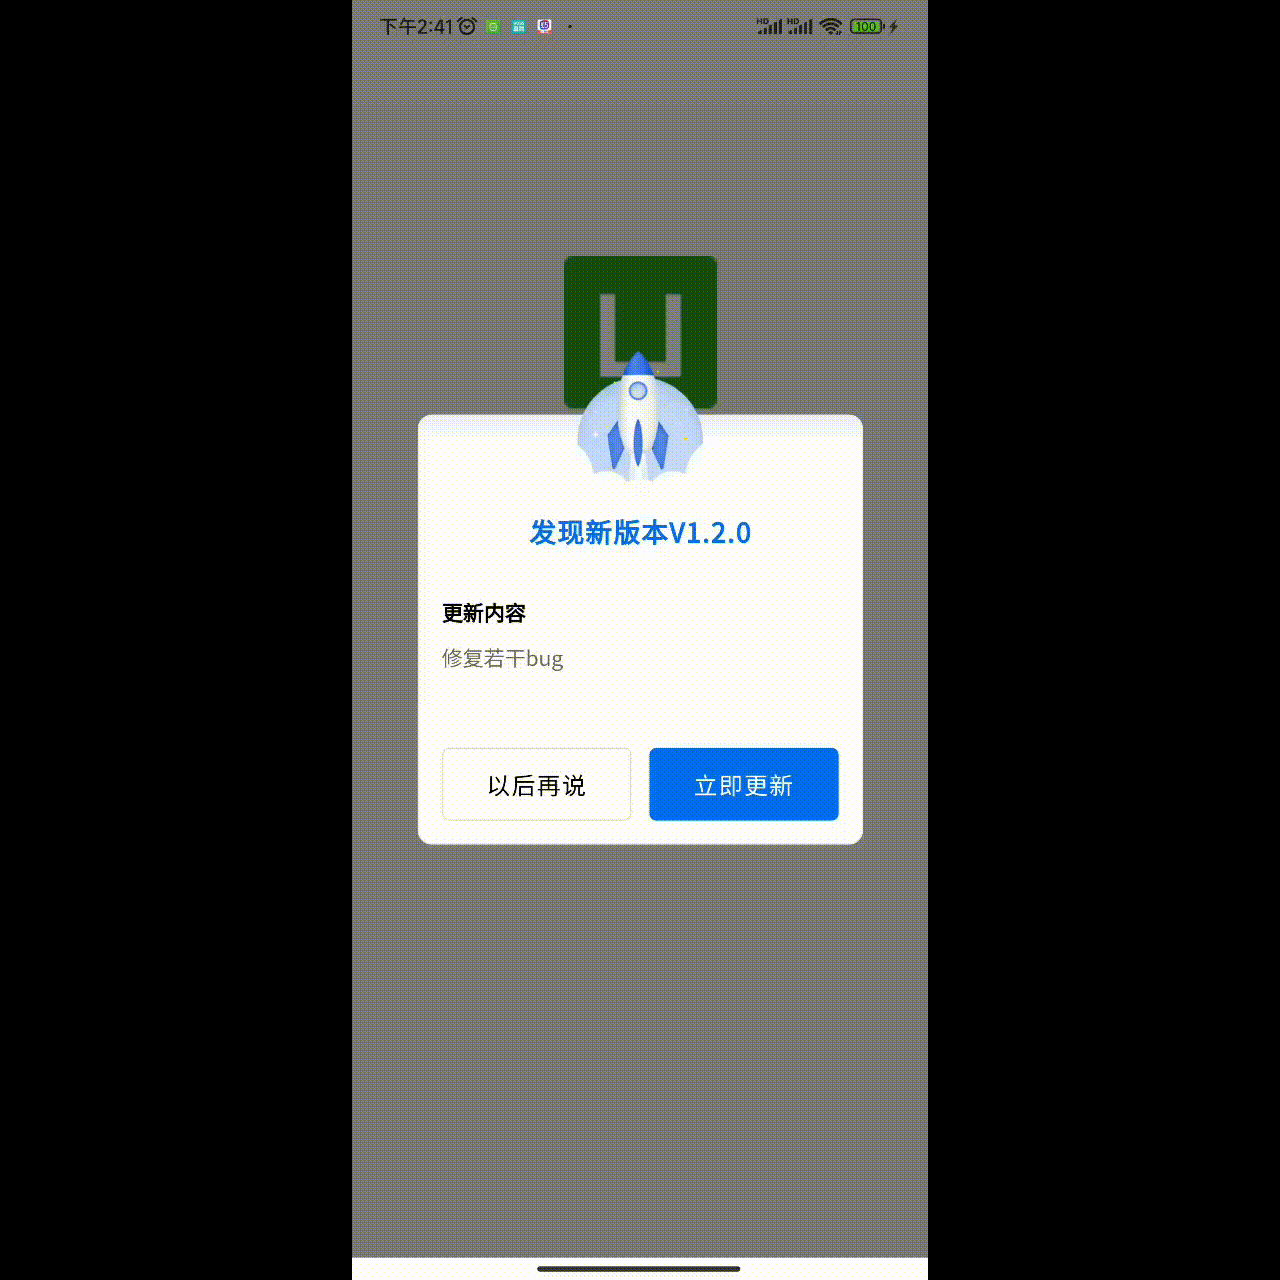
uniapp APP端在线升级功能实现讲解——强制或可选升级,下载进度显示
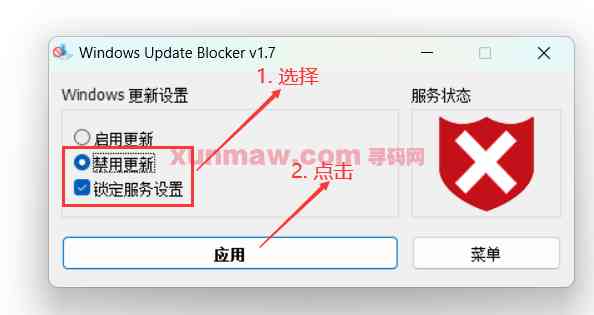
Windows如何一键永远禁止系统更新?
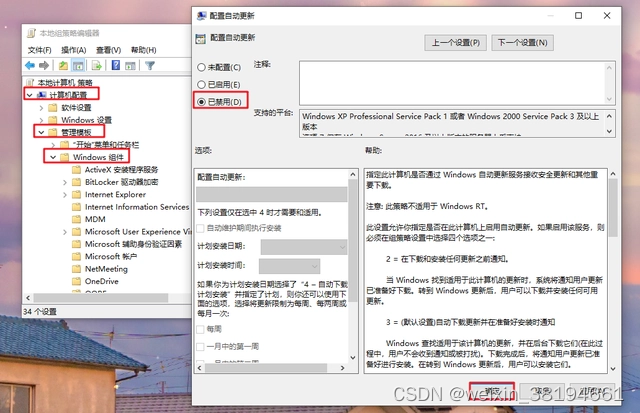
win10总强制更新?教你永久关闭

解决Xshell/Xftp强制升级无法进入问题
杰理强制升级工具4.0使用和原理解析