原文链接:https://www.jianshu.com/p/52b86c774b0b
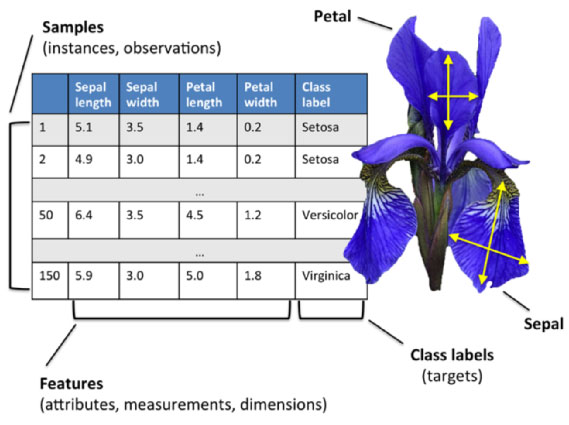
Iris 鸢尾花数据集是一个经典数据集,在统计学习和机器学习领域都经常被用作示例。数据集内包含 3 类共 150 条记录,每类各 50 个数据,每条记录都有 4 项特征:花萼长度、花萼宽度、花瓣长度、花瓣宽度,可以通过这4个特征预测鸢尾花卉属于(iris-setosa, iris-versicolour, iris-virginica)中的哪一品种。
据说在现实中,这三种花的基本判别依据其实是种子(因为花瓣非常容易枯萎)。
0 准备数据
下面对 iris 进行探索性分析,首先导入相关包和数据集:
# 导入相关包
import numpy as np
import pandas as pd
from pandas import plotting%matplotlib inline
import matplotlib.pyplot as plt
plt.style.use('seaborn')import seaborn as sns
sns.set_style("whitegrid")from sklearn.linear_model import LogisticRegression
from sklearn.model_selection import train_test_split
from sklearn.preprocessing import LabelEncoder
from sklearn.neighbors import KNeighborsClassifier
from sklearn import svm
from sklearn import metrics
from sklearn.tree import DecisionTreeClassifier
# 导入数据集
iris = pd.read_csv('F:\pydata\dataset\kaggle\iris.csv', usecols=[1, 2, 3, 4, 5])
查看数据集信息:
iris.info()
<class 'pandas.core.frame.DataFrame'>
RangeIndex: 150 entries, 0 to 149
Data columns (total 5 columns):
SepalLengthCm    150 non-null float64
SepalWidthCm     150 non-null float64
PetalLengthCm    150 non-null float64
PetalWidthCm     150 non-null float64
Species          150 non-null object
dtypes: float64(4), object(1)
memory usage: 5.9+ KB
查看数据集的头 5 条记录:
iris.head()

1 探索性分析
先查看数据集各特征列的摘要统计信息:
iris.describe()

通过Violinplot 和 Pointplot,分别从数据分布和斜率,观察各特征与品种之间的关系:
# 设置颜色主题
antV = ['#1890FF', '#2FC25B', '#FACC14', '#223273', '#8543E0', '#13C2C2', '#3436c7', '#F04864']
# 绘制  Violinplot
f, axes = plt.subplots(2, 2, figsize=(8, 8), sharex=True)
sns.despine(left=True)sns.violinplot(x='Species', y='SepalLengthCm', data=iris, palette=antV, ax=axes[0, 0])
sns.violinplot(x='Species', y='SepalWidthCm', data=iris, palette=antV, ax=axes[0, 1])
sns.violinplot(x='Species', y='PetalLengthCm', data=iris, palette=antV, ax=axes[1, 0])
sns.violinplot(x='Species', y='PetalWidthCm', data=iris, palette=antV, ax=axes[1, 1])plt.show()

# 绘制  pointplot
f, axes = plt.subplots(2, 2, figsize=(8, 8), sharex=True)
sns.despine(left=True)sns.pointplot(x='Species', y='SepalLengthCm', data=iris, color=antV[0], ax=axes[0, 0])
sns.pointplot(x='Species', y='SepalWidthCm', data=iris, color=antV[0], ax=axes[0, 1])
sns.pointplot(x='Species', y='PetalLengthCm', data=iris, color=antV[0], ax=axes[1, 0])
sns.pointplot(x='Species', y='PetalWidthCm', data=iris, color=antV[0], ax=axes[1, 1])plt.show()

生成各特征之间关系的矩阵图:
g = sns.pairplot(data=iris, palette=antV, hue= 'Species')

使用 Andrews Curves 将每个多变量观测值转换为曲线并表示傅立叶级数的系数,这对于检测时间序列数据中的异常值很有用。
Andrews Curves 是一种通过将每个观察映射到函数来可视化多维数据的方法。
plt.subplots(figsize = (10,8))
plotting.andrews_curves(iris, 'Species', colormap='cool')plt.show()

下面分别基于花萼和花瓣做线性回归的可视化:
g = sns.lmplot(data=iris, x='SepalWidthCm', y='SepalLengthCm', palette=antV, hue='Species')

g = sns.lmplot(data=iris, x='PetalWidthCm', y='PetalLengthCm', palette=antV, hue='Species')

最后,通过热图找出数据集中不同特征之间的相关性,高正值或负值表明特征具有高度相关性:
fig=plt.gcf()
fig.set_size_inches(12, 8)
fig=sns.heatmap(iris.corr(), annot=True, cmap='GnBu', linewidths=1, linecolor='k', square=True, mask=False, vmin=-1, vmax=1, cbar_kws={"orientation": "vertical"}, cbar=True)

从热图可看出,花萼的宽度和长度不相关,而花瓣的宽度和长度则高度相关。
2 机器学习
接下来,通过机器学习,以花萼和花瓣的尺寸为根据,预测其品种。
在进行机器学习之前,将数据集拆分为训练和测试数据集。首先,使用标签编码将 3 种鸢尾花的品种名称转换为分类值(0, 1, 2)。
# 载入特征和标签集
X = iris[['SepalLengthCm', 'SepalWidthCm', 'PetalLengthCm', 'PetalWidthCm']]
y = iris['Species']
# 对标签集进行编码
encoder = LabelEncoder()
y = encoder.fit_transform(y)
print(y)
[0 0 0 0 0 0 0 0 0 0 0 0 0 0 0 0 0 0 0 0 0 0 0 0 0 0 0 0 0 0 0 0 0 0 0 0 00 0 0 0 0 0 0 0 0 0 0 0 0 1 1 1 1 1 1 1 1 1 1 1 1 1 1 1 1 1 1 1 1 1 1 1 11 1 1 1 1 1 1 1 1 1 1 1 1 1 1 1 1 1 1 1 1 1 1 1 1 1 2 2 2 2 2 2 2 2 2 2 22 2 2 2 2 2 2 2 2 2 2 2 2 2 2 2 2 2 2 2 2 2 2 2 2 2 2 2 2 2 2 2 2 2 2 2 22 2]
接着,将数据集以 7: 3 的比例,拆分为训练数据和测试数据:
train_X, test_X, train_y, test_y = train_test_split(X, y, test_size = 0.3, random_state = 101)
print(train_X.shape, train_y.shape, test_X.shape, test_y.shape)
(105, 4) (105,) (45, 4) (45,)
检查不同模型的准确性:
# Support Vector Machine
model = svm.SVC()
model.fit(train_X, train_y)
prediction = model.predict(test_X)
print('The accuracy of the SVM is: {0}'.format(metrics.accuracy_score(prediction,test_y)))
The accuracy of the SVM is: 1.0
# Logistic Regression
model = LogisticRegression()
model.fit(train_X, train_y)
prediction = model.predict(test_X)
print('The accuracy of the Logistic Regression is: {0}'.format(metrics.accuracy_score(prediction,test_y)))
The accuracy of the Logistic Regression is: 0.9555555555555556
# Decision Tree
model=DecisionTreeClassifier()
model.fit(train_X, train_y)
prediction = model.predict(test_X)
print('The accuracy of the Decision Tree is: {0}'.format(metrics.accuracy_score(prediction,test_y)))
The accuracy of the Decision Tree is: 0.9555555555555556
# K-Nearest Neighbours
model=KNeighborsClassifier(n_neighbors=3)
model.fit(train_X, train_y)
prediction = model.predict(test_X)
print('The accuracy of the KNN is: {0}'.format(metrics.accuracy_score(prediction,test_y)))
The accuracy of the KNN is: 1.0
上面使用了数据集的所有特征,下面将分别使用花瓣和花萼的尺寸:
petal = iris[['PetalLengthCm', 'PetalWidthCm', 'Species']]
train_p,test_p=train_test_split(petal,test_size=0.3,random_state=0)
train_x_p=train_p[['PetalWidthCm','PetalLengthCm']]
train_y_p=train_p.Species
test_x_p=test_p[['PetalWidthCm','PetalLengthCm']]
test_y_p=test_p.Speciessepal = iris[['SepalLengthCm', 'SepalWidthCm', 'Species']]
train_s,test_s=train_test_split(sepal,test_size=0.3,random_state=0)
train_x_s=train_s[['SepalWidthCm','SepalLengthCm']]
train_y_s=train_s.Species
test_x_s=test_s[['SepalWidthCm','SepalLengthCm']]
test_y_s=test_s.Species
model=svm.SVC()model.fit(train_x_p,train_y_p)
prediction=model.predict(test_x_p)
print('The accuracy of the SVM using Petals is: {0}'.format(metrics.accuracy_score(prediction,test_y_p)))model.fit(train_x_s,train_y_s)
prediction=model.predict(test_x_s)
print('The accuracy of the SVM using Sepal is: {0}'.format(metrics.accuracy_score(prediction,test_y_s)))
The accuracy of the SVM using Petals is: 0.9777777777777777
The accuracy of the SVM using Sepal is: 0.8
model = LogisticRegression()model.fit(train_x_p, train_y_p)
prediction = model.predict(test_x_p)
print('The accuracy of the Logistic Regression using Petals is: {0}'.format(metrics.accuracy_score(prediction,test_y_p)))model.fit(train_x_s, train_y_s)
prediction = model.predict(test_x_s)
print('The accuracy of the Logistic Regression using Sepals is: {0}'.format(metrics.accuracy_score(prediction,test_y_s)))
The accuracy of the Logistic Regression using Petals is: 0.6888888888888889
The accuracy of the Logistic Regression using Sepals is: 0.6444444444444445
model=DecisionTreeClassifier()model.fit(train_x_p, train_y_p)
prediction = model.predict(test_x_p)
print('The accuracy of the Decision Tree using Petals is: {0}'.format(metrics.accuracy_score(prediction,test_y_p)))model.fit(train_x_s, train_y_s)
prediction = model.predict(test_x_s)
print('The accuracy of the Decision Tree using Sepals is: {0}'.format(metrics.accuracy_score(prediction,test_y_s)))
The accuracy of the Decision Tree using Petals is: 0.9555555555555556
The accuracy of the Decision Tree using Sepals is: 0.6666666666666666
model=KNeighborsClassifier(n_neighbors=3) model.fit(train_x_p, train_y_p)
prediction = model.predict(test_x_p)
print('The accuracy of the KNN using Petals is: {0}'.format(metrics.accuracy_score(prediction,test_y_p)))model.fit(train_x_s, train_y_s)
prediction = model.predict(test_x_s)
print('The accuracy of the KNN using Sepals is: {0}'.format(metrics.accuracy_score(prediction,test_y_s)))
The accuracy of the KNN using Petals is: 0.9777777777777777
The accuracy of the KNN using Sepals is: 0.7333333333333333
从中不难看出,使用花瓣的尺寸来训练数据较花萼更准确。正如在探索性分析的热图中所看到的那样,花萼的宽度和长度之间的相关性非常低,而花瓣的宽度和长度之间的相关性非常高。