★★★ 本文源自AI Studio社区精品项目,【点击此处】查看更多精品内容 >>>
模仿学习– 生成式对抗模仿学习
1. 模仿学习
模仿学习(imitation learning)不是强化学习,而是强化学习的一种替代品。模仿学习与强化学习有相同的目的:两者的目的都是学习策略网络,从而控制智能体。模仿学习与强化学习有不同的原理:模仿学习向人类专家学习,目标是让策略网络做出的决策与人类专家相同;而强化学习利用环境反馈的奖励改进策略,目标是让累计奖励(即回报)最大化。
虽然强化学习不需要有监督学习中的标签数据,但它十分依赖奖励函数的设置。有时在奖励函数上做一些微小的改动,训练出来的策略就会有天差地别。在很多现实场景中,奖励函数并未给定,或者奖励信号极其稀疏,此时随机设计奖励函数将无法保证强化学习训练出来的策略满足实际需要。例如,对于无人驾驶车辆智能体的规控,其观测是当前的环境感知恢复的 3D 局部环境,动作是车辆接下来数秒的具体路径规划,那么奖励是什么?如果只是规定正常行驶而不发生碰撞的奖励为+1,发生碰撞为-100,那么智能体学习的结果则很可能是找个地方停滞不前。具体能帮助无人驾驶小车规控的奖励函数往往需要专家的精心设计和调试。
假设存在一个专家智能体,其策略可以看成最优策略,我们就可以直接模仿这个专家在环境中交互的状态动作数据来训练一个策略,并且不需要用到环境提供的奖励信号。模仿学习(imitation learning)研究的便是这一类问题,在模仿学习的框架下,专家能够提供一系列状态动作对,表示专家在环境下做出了的动作,而模仿者的任务则是利用这些专家数据进行训练,无须奖励信号就可以达到一个接近专家的策略。
目前常见的模仿学习的方法基本上可以分为 3 类:
- 行为克隆(behavior cloning,BC)
- 逆强化学习(inverse reinforcement learning,IRL)
- 生成式对抗模仿学习(generative adversarial imitation learning,GAIL)
其中逆向强化学习(inverse reinforcement learning,缩写 IRL)非常有名,但由于其计算复杂度较高,在今天已经不常用了。此外,我们在【强化学习】模仿学习:行为克隆项目中对行为克隆进行了简单的介绍,本项目将对生成式对抗模仿学习进行简单介绍。
2.生成式对抗模仿学习
-
生成式对抗模仿学习(generative adversarial imitation learning,GAIL)是 2016 年由斯坦福大学研究团队提出的基于生成式对抗网络的模仿学习,它诠释了生成式对抗网络的本质其实就是模仿学习。
-
GAIL实质上是模仿了专家策略的占用度量 ρ E ( s , a ) \rho _E\left( s,a \right) ρE(s,a),即尽量使得策略在环境中的所有状态动作对 ( s , a ) \left( s,a \right) (s,a)的占用度量和专家策略的占用度量 ρ E ( s , a ) \rho _E\left( s,a \right) ρE(s,a)一致。为了达成这个目标,策略需要和环境进行交互,收集下一个状态的信息并进一步做出动作。这一点和BC(行为克隆)不同,BC 完全不需要和环境交互。
-
GAIL的设计基于生成对抗网络(generative adversarial network, 缩写GAN)。生成器(generator)和判别器(discriminator)各是一个神经网络。生成器负责生成假的样本,而判别器负责判定一个样本是真是假。举个例子,在人脸数据集上训练生成器和判别器,那么生成器的目标是生成假的人脸图片,可以骗过判别器;而判别器的目标是判断一张图片是真实的还是生成的。理想情况下,当训练结束的时候,判别器的分类准确率是50%,意味着生成器的输出已经以假乱真。
-
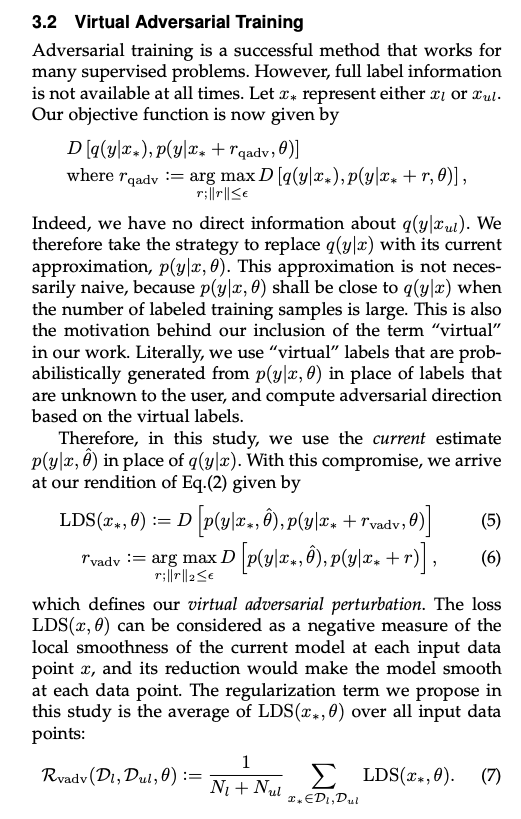
GAIL 算法中有一个判别器和一个策略,策略就相当于是生成式对抗网络中的生成器(generator),给定一个状态,策略会输出这个状态下应该采取的动作,而判别器(discriminator) D D D将状态动作对 ( s , a ) \left( s,a \right) (s,a)作为输入,输出一个0到1之间的实数,表示判别器认为该状态动作对是来自智能体策略而非专家的概率。判别器的目标是尽量将专家数据的输出靠近0,将模仿者策略的输出靠近1,这样就可以将两组数据分辨开来。于是,判别器的损失函数为
L ( ϕ ) = − E ρ π [ log D ϕ ( s , a ) ] − E ρ π [ log ( 1 − D ϕ ( s , a ) ) ] \mathbb{L}\left( \phi \right) =-E_{\rho _{\pi}}\left[ \log D_{\phi}\left( s,a \right) \right] -E_{\rho _{\pi}}\left[ \log \left( 1-D_{\phi}\left( s,a \right) \right) \right] L(ϕ)=−Eρπ[logDϕ(s,a)]−Eρπ[log(1−Dϕ(s,a))]
其中 ϕ \phi ϕ是判别器的参数。有了判别器 D D D之后,模仿者策略的目标就是其交互产生的轨迹能被判别器误认为专家轨迹。于是,我们可以用判别器 D D D的输出来作为奖励函数来训练模仿者策略。具体来说,若模仿者策略在环境中采样到状态 s s s,并且采取动作 a a a,此时该状态动作对 D D D会输入到判别器 D D D中,输出 D ( s , a ) D(s,a) D(s,a)的值,然后将奖励设置为$r\left( s,a \right) =-\log D\left( s,a \right) $。于是,我们可以用任意强化学习算法,使用这些数据继续训练模仿者策略。最后,在对抗过程不断进行后,模仿者策略生成的数据分布将接近真实的专家数据分布,达到模仿学习的目标。
占用度量表示策略会访问到的状态或状态动作对的(折扣)概率分布,已经证明占用度量和策略是一一对应的。强化学习的策略在训练中会不断更新,其对应的数据分布(即占用度量)也会相应地改变。
3. 代码实践
3.1 训练PPO智能体
行为克隆需要专家数据,我们使用基于CartPole-v0环境训练一个专家,即ppo智能体。详细的训练过程可参考:【强化学习】PPO算法
3.1.1 加载环境
import paddle
import paddle.nn.functional as F
import paddle.nn as nn
import gym
import matplotlib.pyplot as plt
from matplotlib import animation
from tqdm import tqdm
import numpy as np
import random
/opt/conda/envs/python35-paddle120-env/lib/python3.7/site-packages/matplotlib/__init__.py:107: DeprecationWarning: Using or importing the ABCs from 'collections' instead of from 'collections.abc' is deprecated, and in 3.8 it will stop workingfrom collections import MutableMapping
/opt/conda/envs/python35-paddle120-env/lib/python3.7/site-packages/matplotlib/rcsetup.py:20: DeprecationWarning: Using or importing the ABCs from 'collections' instead of from 'collections.abc' is deprecated, and in 3.8 it will stop workingfrom collections import Iterable, Mapping
/opt/conda/envs/python35-paddle120-env/lib/python3.7/site-packages/matplotlib/colors.py:53: DeprecationWarning: Using or importing the ABCs from 'collections' instead of from 'collections.abc' is deprecated, and in 3.8 it will stop workingfrom collections import Sized
3.1.2 定义策略网络和价值网络
# 策略网络
class PolicyNet(paddle.nn.Layer):def __init__(self, state_dim, hidden_dim, action_dim):super(PolicyNet, self).__init__()self.fc1 = paddle.nn.Linear(state_dim, hidden_dim)self.fc2 = paddle.nn.Linear(hidden_dim, action_dim)def forward(self, x):x = F.relu(self.fc1(x))return F.softmax(self.fc2(x))# 价值网络
class ValueNet(paddle.nn.Layer):def __init__(self, state_dim, hidden_dim):super(ValueNet, self).__init__()self.fc1 = paddle.nn.Linear(state_dim, hidden_dim)self.fc2 = paddle.nn.Linear(hidden_dim, 1)def forward(self, x):x = F.relu(self.fc1(x))return self.fc2(x)
3.1.3 定义PPO智能体
- paddle_gather函数是torch.gather()的paddle版本
- compute_advantage函数是用来计算优势(advantage)的
# 该函数是torch.gather()的paddle版本
# 函数功能:沿指定的轴(axis)收集值
def paddle_gather(x, axis, index):index_shape = index.shapeindex_flatten = index.flatten()if axis < 0:axis = len(x.shape) + axisnd_index = []for k in range(len(x.shape)):if k == axis:nd_index.append(index_flatten)else:reshape_shape = [1] * len(x.shape)reshape_shape[k] = x.shape[k]x_arange = paddle.arange(x.shape[k], dtype=index.dtype)x_arange = x_arange.reshape(reshape_shape)axis_index = paddle.expand(x_arange, index_shape).flatten()nd_index.append(axis_index)ind2 = paddle.transpose(paddle.stack(nd_index), [1, 0]).astype("int64")paddle_out = paddle.gather_nd(x, ind2).reshape(index_shape)return paddle_out
# 计算优势advantage
def compute_advantage(gamma, lmbda, td_delta):td_delta = td_delta.detach().numpy()advantage_list = []advantage = 0.0for delta in td_delta[::-1]:advantage = gamma * lmbda * advantage + deltaadvantage_list.append(advantage)advantage_list.reverse()return paddle.to_tensor(advantage_list, dtype='float32')
class PPO:''' PPO-clip,采用截断方式 '''def __init__(self, state_dim, hidden_dim, action_dim, actor_lr, critic_lr,lmbda,epochs, eps, gamma):self.actor = PolicyNet(state_dim, hidden_dim, action_dim)self.critic = ValueNet(state_dim, hidden_dim)self.actor_optimizer = paddle.optimizer.Adam(parameters=self.actor.parameters(),learning_rate=actor_lr)self.critic_optimizer = paddle.optimizer.Adam(parameters=self.critic.parameters(),learning_rate=critic_lr)self.gamma = gammaself.lmbda = lmbdaself.epochs = epochs # 一条序列的数据用于训练轮数self.eps = eps # PPO中截断范围的参数def take_action(self, state):state = paddle.to_tensor(state, dtype='float32')probs = self.actor(state)action_dist = paddle.distribution.Categorical(probs)action = action_dist.sample([1])return action.numpy()[0]def update(self, transition_dict):states = paddle.to_tensor(transition_dict['states'],dtype='float32')actions = paddle.to_tensor(transition_dict['actions']).reshape([-1, 1])rewards = paddle.to_tensor(transition_dict['rewards'],dtype='float32').reshape([-1, 1])next_states = paddle.to_tensor(transition_dict['next_states'],dtype='float32')dones = paddle.to_tensor(transition_dict['dones'],dtype='float32').reshape([-1, 1])td_target = rewards + self.gamma * self.critic(next_states) * (1 -dones)td_delta = td_target - self.critic(states)advantage = compute_advantage(self.gamma, self.lmbda,td_delta)old_log_probs = paddle.log(paddle_gather(self.actor(states),axis=1,index=actions)).detach()for _ in range(self.epochs):log_probs = paddle.log(paddle_gather(self.actor(states),axis=1, index=actions))ratio = paddle.exp(log_probs - old_log_probs)surr1 = ratio * advantagesurr2 = paddle.clip(ratio, 1 - self.eps,1 + self.eps) * advantage # 截断actor_loss = paddle.mean(-paddle.minimum(surr1, surr2)) # PPO损失函数critic_loss = paddle.mean(F.mse_loss(self.critic(states), td_target.detach()))self.actor_optimizer.clear_grad()self.critic_optimizer.clear_grad()actor_loss.backward()critic_loss.backward()self.actor_optimizer.step()self.critic_optimizer.step()def save(self):paddle.save(self.actor.state_dict(),'net.pdparams')def load(self):layer_state_dict = paddle.load("net.pdparams")self.actor.set_state_dict(layer_state_dict)
3.1.4 定义PPO智能体超参数
actor_lr = 1e-3 #策略网络的学习率
critic_lr = 1e-2 #价值网络的学习率
num_episodes = 100 # 训练的episode,不宜训练太长,否则性能下降
hidden_dim = 128 #网络隐藏层
gamma = 0.98 # 折扣因子
lmbda = 0.95 # 优势计算中的参数
epochs = 10  #每次更新时ppo的更新次数
eps = 0.2 # PPO中截断范围的参数env_name = 'CartPole-v0'
env = gym.make(env_name)
state_dim = env.observation_space.shape[0]
action_dim = env.action_space.n
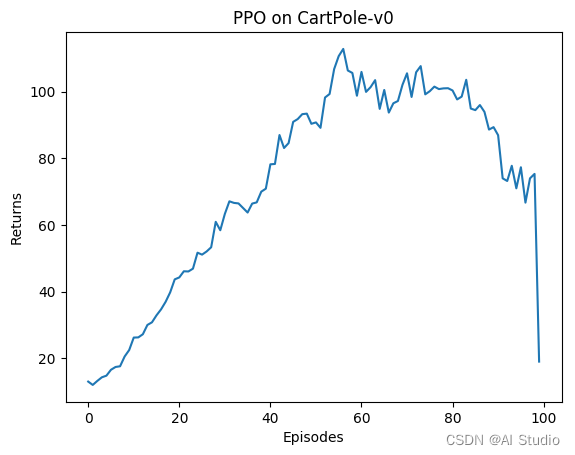
3.1.5 训练PPO智能体并绘制奖励曲线
def train_on_policy_agent(env, agent, num_episodes):return_list = []maxre=0for i in range(10):with tqdm(total=int(num_episodes/10), desc='Iteration %d' % i) as pbar:for i_episode in range(int(num_episodes/10)):episode_return = 0transition_dict = {'states': [], 'actions': [], 'next_states': [], 'rewards': [], 'dones': []}state = env.reset()done = Falsewhile not done:action = agent.take_action(state)next_state, reward, done, _ = env.step(action)transition_dict['states'].append(state)transition_dict['actions'].append(action)transition_dict['next_states'].append(next_state)transition_dict['rewards'].append(reward)transition_dict['dones'].append(done)state = next_stateepisode_return += reward# 保存最大epoisde奖励的参数if maxre<episode_return:maxre=episode_returnagent.save()return_list.append(episode_return)agent.update(transition_dict)if (i_episode+1) % 10 == 0:pbar.set_postfix({'episode': '%d' % (num_episodes/10 * i + i_episode+1), 'return': '%.3f' % np.mean(return_list[-10:])})pbar.update(1)#print("最大奖励:",maxre)return return_listppo_agent = PPO(state_dim, hidden_dim, action_dim, actor_lr, critic_lr, lmbda,epochs, eps, gamma)
return_list = train_on_policy_agent(env, ppo_agent, num_episodes)
W0119 12:05:02.487427   589 gpu_resources.cc:61] Please NOTE: device: 0, GPU Compute Capability: 7.0, Driver API Version: 11.2, Runtime API Version: 11.2
W0119 12:05:02.492107   589 gpu_resources.cc:91] device: 0, cuDNN Version: 8.2.
Iteration 0: 100%|██████████| 10/10 [00:01<00:00,  7.94it/s, episode=10, return=16.400]
Iteration 1: 100%|██████████| 10/10 [00:00<00:00, 25.17it/s, episode=20, return=34.700]
Iteration 2: 100%|██████████| 10/10 [00:00<00:00, 20.41it/s, episode=30, return=51.200]
Iteration 3: 100%|██████████| 10/10 [00:00<00:00, 17.10it/s, episode=40, return=70.500]
Iteration 4: 100%|██████████| 10/10 [00:00<00:00, 15.21it/s, episode=50, return=84.200]
Iteration 5: 100%|██████████| 10/10 [00:00<00:00, 13.46it/s, episode=60, return=98.300]
Iteration 6: 100%|██████████| 10/10 [00:00<00:00, 13.00it/s, episode=70, return=104.900]
Iteration 7: 100%|██████████| 10/10 [00:00<00:00, 13.67it/s, episode=80, return=98.400]
Iteration 8: 100%|██████████| 10/10 [00:00<00:00, 13.41it/s, episode=90, return=100.900]
Iteration 9: 100%|██████████| 10/10 [00:00<00:00, 17.09it/s, episode=100, return=70.800]
def moving_average(a, window_size):cumulative_sum = np.cumsum(np.insert(a, 0, 0)) middle = (cumulative_sum[window_size:] - cumulative_sum[:-window_size]) / window_sizer = np.arange(1, window_size-1, 2)begin = np.cumsum(a[:window_size-1])[::2] / rend = (np.cumsum(a[:-window_size:-1])[::2] / r)[::-1]return np.concatenate((begin, middle, end))episodes_list = list(range(len(return_list)))
mv_return = moving_average(return_list, 19)
plt.plot(episodes_list, mv_return)
plt.xlabel('Episodes')
plt.ylabel('Returns')
plt.title('PPO on {}'.format(env_name))
plt.show()
/opt/conda/envs/python35-paddle120-env/lib/python3.7/site-packages/matplotlib/cbook/__init__.py:2349: DeprecationWarning: Using or importing the ABCs from 'collections' instead of from 'collections.abc' is deprecated, and in 3.8 it will stop workingif isinstance(obj, collections.Iterator):
/opt/conda/envs/python35-paddle120-env/lib/python3.7/site-packages/matplotlib/cbook/__init__.py:2366: DeprecationWarning: Using or importing the ABCs from 'collections' instead of from 'collections.abc' is deprecated, and in 3.8 it will stop workingreturn list(data) if isinstance(data, collections.MappingView) else data
3.2 生成专家数据
def sample_expert_data(n_episode):states = []actions = []for episode in range(n_episode):state = env.reset()done = Falsewhile not done:action = ppo_agent.take_action(state)states.append(state)actions.append(action)next_state, reward, done, _ = env.step(action)state = next_statereturn np.array(states), np.array(actions)n_episode = 10
expert_s, expert_a = sample_expert_data(n_episode)n_samples = 30  # 采样30个数据
random_index = random.sample(range(expert_s.shape[0]), n_samples)
expert_s = expert_s[random_index]
expert_a = expert_a[random_index]
3.3 生成式对抗模仿学习的代码实践
3.3.1 定义判别器模型
- 其模型架构为一个两层的全连接网络,模型输入为一个状态动作对,输出一个概率标量。
class Discriminator(paddle.nn.Layer):def __init__(self, state_dim, hidden_dim, action_dim):super(Discriminator, self).__init__()self.fc1 = paddle.nn.Linear(state_dim + action_dim, hidden_dim)self.fc2 = paddle.nn.Linear(hidden_dim, 1)def forward(self, x, a):cat = paddle.concat([x, a], axis=1)x = F.relu(self.fc1(cat))return F.sigmoid(self.fc2(x))
3.3.2 定义 GAIL
每一轮迭代中,GAIL 中的策略和环境交互,采样新的状态动作对。基于专家数据和策略新采样的数据,首先训练判别器,然后将判别器的输出转换为策略的奖励信号,指导策略用 PPO 算法做训练。
class GAIL:def __init__(self, agent, state_dim, action_dim, hidden_dim, lr_d):self.discriminator = Discriminator(state_dim, hidden_dim, action_dim)self.discriminator_optimizer = paddle.optimizer.Adam(parameters=self.discriminator.parameters(),learning_rate=lr_d)self.agent = agentdef learn(self, expert_s, expert_a, agent_s, agent_a, next_s, dones):expert_states = paddle.to_tensor(expert_s, dtype='float32')expert_actions = paddle.to_tensor(expert_a)agent_states = paddle.to_tensor(agent_s, dtype='float32')agent_actions = paddle.to_tensor(agent_a)expert_actions = F.one_hot(expert_actions, num_classes=2)agent_actions = F.one_hot(agent_actions, num_classes=2)expert_prob = self.discriminator(expert_states, expert_actions)agent_prob = self.discriminator(agent_states, agent_actions)discriminator_loss = nn.BCELoss()(agent_prob, paddle.ones_like(agent_prob)) + nn.BCELoss()(expert_prob, paddle.zeros_like(expert_prob))self.discriminator_optimizer.clear_grad()discriminator_loss.backward()self.discriminator_optimizer.step()rewards = -paddle.log(agent_prob).detach().cpu().numpy()transition_dict = {'states': agent_s,'actions': agent_a,'rewards': rewards,'next_states': next_s,'dones': dones}self.agent.update(transition_dict)
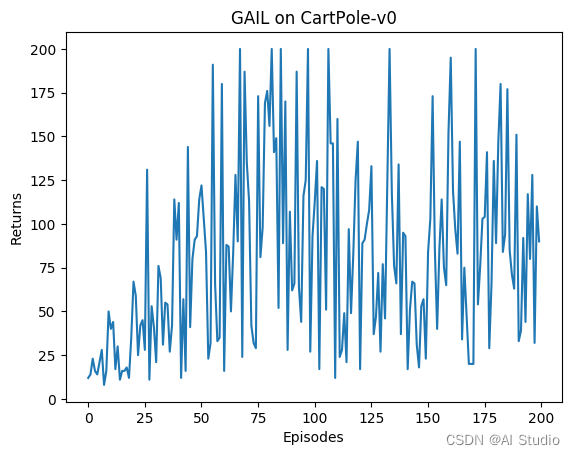
3.3.3 训练GAIL
lr_d = 1e-3
agent = PPO(state_dim, hidden_dim, action_dim, actor_lr, critic_lr, lmbda,epochs, eps, gamma)
gail = GAIL(agent, state_dim, action_dim, hidden_dim, lr_d)
n_episode = 200
return_list = []with tqdm(total=n_episode, desc="进度条") as pbar:for i in range(n_episode):episode_return = 0state = env.reset()done = Falsestate_list = []action_list = []next_state_list = []done_list = []while not done:action = agent.take_action(state)next_state, reward, done, _ = env.step(action)state_list.append(state)action_list.append(action)next_state_list.append(next_state)done_list.append(done)state = next_stateepisode_return += rewardreturn_list.append(episode_return)gail.learn(expert_s, expert_a, state_list, action_list,next_state_list, done_list)if (i + 1) % 10 == 0:pbar.set_postfix({'return': '%.3f' % np.mean(return_list[-10:])})pbar.update(1)#print("最大奖励:",max(return_list))
进度条: 100%|██████████| 200/200 [00:13<00:00, 14.32it/s, return=76.500]
3.2.3 绘制GAIL的奖励曲线
iteration_list = list(range(len(return_list)))
plt.plot(iteration_list, return_list)
plt.xlabel('Episodes')
plt.ylabel('Returns')
plt.title('GAIL on {}'.format(env_name))
plt.show()
4 总结
- 本项目简单介绍了一下生成式对抗模仿学习的概念,并给出了简单的代码示例。
- 本项目使用的专家是训练好的PPO算法网络中的策略网络
- 本项目使用的环境是
CartPole-v0。
声明:
① 本项目参考了一些网络资源,如有不妥,请及时联系,侵删。
② 本项目在整理中可能存在表述或者代码错误,如有发现,可留言,后续会修正。
③ 本人小白一只,欢迎大家一起交流有关强化学习的内容呀!!!