背景
折腾:
的过程中,需要去安装MySQLdb。
下载MySQLdb
去官网:
看到有1.2.4和1.2.3
所以去最新的1.2.4:
下载对应的编译好的版本:
得到1MB的
MySQL-python-1.2.4.win32-py2.7.exe
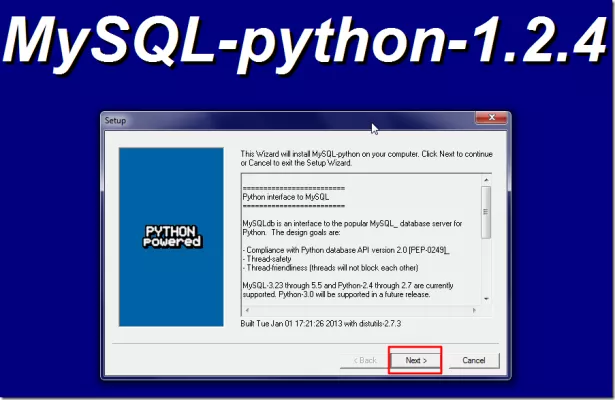
安装MySQLdb
双击安装:
结果出错:

看来此x86的exe,是不支持我的win7 x64。
所以只能去下载源码再去安装了。
下载源码:
然后再去解压和安装,结果果然出现
error: Unable to find vcvarsall.bat
的错误:
D:\tmp\dev_tools\python\mysql\MySQL-python-1.2.4\MySQL-python-1.2.4>setup.py install
Downloading http://pypi.python.org/packages/source/d/distribute/distribute-0.6.28.tar.gz
Extracting in c:\users\cli\appdata\local\temp\tmpkapo0l
Now working in c:\users\cli\appdata\local\temp\tmpkapo0l\distribute-0.6.28
Building a Distribute egg in D:\tmp\dev_tools\python\mysql\MySQL-python-1.2.4\MySQL-python-1.2.4
D:\tmp\dev_tools\python\mysql\MySQL-python-1.2.4\MySQL-python-1.2.4\distribute-0.6.28-py2.7.egg
running install
running bdist_egg
running egg_info
writing MySQL_python.egg-info\PKG-INFO
writing top-level names to MySQL_python.egg-info\top_level.txt
writing dependency_links to MySQL_python.egg-info\dependency_links.txt
writing MySQL_python.egg-info\PKG-INFO
writing top-level names to MySQL_python.egg-info\top_level.txt
writing dependency_links to MySQL_python.egg-info\dependency_links.txt
reading manifest file ‘MySQL_python.egg-info\SOURCES.txt’
reading manifest template ‘MANIFEST.in’
writing manifest file ‘MySQL_python.egg-info\SOURCES.txt’
installing library code to build\bdist.win-amd64\egg
running install_lib
running build_py
creating build
creating build\lib.win-amd64-2.7
copying _mysql_exceptions.py -> build\lib.win-amd64-2.7
creating build\lib.win-amd64-2.7\MySQLdb
copying MySQLdb\__init__.py -> build\lib.win-amd64-2.7\MySQLdb
copying MySQLdb\converters.py -> build\lib.win-amd64-2.7\MySQLdb
copying MySQLdb\connections.py -> build\lib.win-amd64-2.7\MySQLdb
copying MySQLdb\cursors.py -> build\lib.win-amd64-2.7\MySQLdb
copying MySQLdb\release.py -> build\lib.win-amd64-2.7\MySQLdb
copying MySQLdb\times.py -> build\lib.win-amd64-2.7\MySQLdb
creating build\lib.win-amd64-2.7\MySQLdb\constants
copying MySQLdb\constants\__init__.py -> build\lib.win-amd64-2.7\MySQLdb\constants
copying MySQLdb\constants\CR.py -> build\lib.win-amd64-2.7\MySQLdb\constants
copying MySQLdb\constants\FIELD_TYPE.py -> build\lib.win-amd64-2.7\MySQLdb\constants
copying MySQLdb\constants\ER.py -> build\lib.win-amd64-2.7\MySQLdb\constants
copying MySQLdb\constants\FLAG.py -> build\lib.win-amd64-2.7\MySQLdb\constants
copying MySQLdb\constants\REFRESH.py -> build\lib.win-amd64-2.7\MySQLdb\constants
copying MySQLdb\constants\CLIENT.py -> build\lib.win-amd64-2.7\MySQLdb\constants
running build_ext
building ‘_mysql’ extension
error: Unable to find vcvarsall.bat
D:\tmp\dev_tools\python\mysql\MySQL-python-1.2.4\MySQL-python-1.2.4>
然后参考之前的办法,结果还是出错:
D:\tmp\dev_tools\python\mysql\MySQL-python-1.2.4\MySQL-python-1.2.4>SET VS90COMNTOOLS=%VS100COMNTOOLS%
D:\tmp\dev_tools\python\mysql\MySQL-python-1.2.4\MySQL-python-1.2.4>setup.py install
running install
running bdist_egg
running egg_info
writing MySQL_python.egg-info\PKG-INFO
writing top-level names to MySQL_python.egg-info\top_level.txt
writing dependency_links to MySQL_python.egg-info\dependency_links.txt
writing MySQL_python.egg-info\PKG-INFO
writing top-level names to MySQL_python.egg-info\top_level.txt
writing dependency_links to MySQL_python.egg-info\dependency_links.txt
reading manifest file ‘MySQL_python.egg-info\SOURCES.txt’
reading manifest template ‘MANIFEST.in’
writing manifest file ‘MySQL_python.egg-info\SOURCES.txt’
installing library code to build\bdist.win-amd64\egg
running install_lib
running build_py
copying MySQLdb\release.py -> build\lib.win-amd64-2.7\MySQLdb
running build_ext
building ‘_mysql’ extension
creating build\temp.win-amd64-2.7
creating build\temp.win-amd64-2.7\Release
C:\Program Files (x86)\Microsoft Visual Studio 10.0\VC\BIN\amd64\cl.exe /c /nologo /Ox /MD /W3 /GS- /DNDEBUG -Dversion_info=(1,2,4,’final’,1) -D__version__=1.2.4 "-IC:\Program Files (x86)\MySQL\MySQL
Connector C 6.0.2\include" -ID:\tmp\dev_install_root\Python27_x64\include -ID:\tmp\dev_install_root\Python27_x64\PC /Tc_mysql.c /Fobuild\temp.win-amd64-2.7\Release\_mysql.obj /Zl
_mysql.c
_mysql.c(42) : fatal error C1083: Cannot open include file: ‘config-win.h’: No such file or directory
error: command ‘"C:\Program Files (x86)\Microsoft Visual Studio 10.0\VC\BIN\amd64\cl.exe"’ failed with exit status 2
D:\tmp\dev_tools\python\mysql\MySQL-python-1.2.4\MySQL-python-1.2.4>
然后再参考:
所说的:
1)问题 : _mysql.c(34) : fatal error C1083: Cannot open include file: ‘config-win.h’: No such file or directory
error: command ‘”C:/Program Files/Microsoft Visual Studio 9.0/VC/BIN/cl.exe”‘ failed with exit status 2
原因 :原因是安装MySQL的时候没有安装C语言库。
解决 :重新运行MySQL的安装程序,选择Modify,把“C Include Files / Lib Files”勾选上,并安装。
去重新安装mysql。
继续:
的折腾:
1.参考:
得知:
python的
此处的要安装x64还是x86,是取决于你所安装的Python的版本,而不是OS的版本。
所以此处去x64 win7中的cmd中确认一下python的版本:
C:\Users\CLi>python
Python 2.7.3 (default, Apr 10 2012, 23:24:47) [MSC v.1500 64 bit (AMD64)] on win32
Type "help", "copyright", "credits" or "license" for more information.
>>>
的确是x64的,所以的确要安装的是x64。
2.下载对应的:
结果链接失效:“File does not exist.”
3.从:
找到一堆的下载,但是结果都失效了。
4.参考:
结果最后找到的下载地址也是上面的那个失效的地址。
5.还是参考:
和
去自己编译吧。
6.然后还是同样错误:
D:\tmp\dev_tools\python\mysql\MySQL-python-1.2.4\MySQL-python-1.2.4>SET VS90COMNTOOLS=%VS100COMNTOOLS%
D:\tmp\dev_tools\python\mysql\MySQL-python-1.2.4\MySQL-python-1.2.4>setup.py install
running install
running bdist_egg
running egg_info
writing MySQL_python.egg-info\PKG-INFO
writing top-level names to MySQL_python.egg-info\top_level.txt
writing dependency_links to MySQL_python.egg-info\dependency_links.txt
writing MySQL_python.egg-info\PKG-INFO
writing top-level names to MySQL_python.egg-info\top_level.txt
writing dependency_links to MySQL_python.egg-info\dependency_links.txt
reading manifest file ‘MySQL_python.egg-info\SOURCES.txt’
reading manifest template ‘MANIFEST.in’
writing manifest file ‘MySQL_python.egg-info\SOURCES.txt’
installing library code to build\bdist.win-amd64\egg
running install_lib
running build_py
copying MySQLdb\release.py -> build\lib.win-amd64-2.7\MySQLdb
running build_ext
building ‘_mysql’ extension
C:\Program Files (x86)\Microsoft Visual Studio 10.0\VC\BIN\amd64\cl.exe /c /nologo /Ox /MD /W3 /GS- /DNDEBUG -Dversion_info=(1,2,4,’final’,1) -D__version__=1.2.4 "-IC:\Program File
s (x86)\MySQL\MySQL Connector C 6.0.2\include" -ID:\tmp\dev_install_root\Python27_x64\include -ID:\tmp\dev_install_root\Python27_x64\PC /Tc_mysql.c /Fobuild\temp.win-amd64-2.7\Rele
ase\_mysql.obj /Zl
_mysql.c
_mysql.c(42) : fatal error C1083: Cannot open include file: ‘config-win.h’: No such file or directory
error: command ‘"C:\Program Files (x86)\Microsoft Visual Studio 10.0\VC\BIN\amd64\cl.exe"’ failed with exit status 2
然后参考:
看到了site.cfg内容是:
1
2
3
4
5
6
7
8
9
10
11
12
13
14
15
16
17
[options]
# embedded: link against the embedded server library
# threadsafe: use the threadsafe client
# static: link against a static library (probably required for embedded)
embedded = False
threadsafe = True
static = False
# The path to mysql_config.
# Only use this if mysql_config is not on your PATH, or you have some weird
# setup that requires it.
#mysql_config = /usr/local/bin/mysql_config
# Windows connector libs for MySQL. You need a 32-bit connector for your 32-bit Python build.
connector = C:\Program Files (x86)\MySQL\MySQL Connector C 6.0.2
然后注意到了,上面的编译过程中的include的路径,就是此处的connector的值。
7.又在这里:
找到了一个已编译的版本的下载地址:
MySQL-python-1.2.3.win-amd64-py2.7.exe [1.1 Mb] [Python 2.7] [64 bit] [JUN 08, 2011]
然后去安装:


然后就可以写代码去测试是否工作了。
在Python中使用MySQLdb操作MySQL数据库
参考:
然后用:
1
2
3
4
5
6
7
8
9
10
11
12
13
14
15
16
17
18
19
20
21
22
23
24
25
26
27
28
29
30
31
32
33
34
35
36
#!/usr/bin/python
# -*- coding: utf-8 -*-
"""
-------------------------------------------------------------------------------
Function:
【记录】为Python安装MySQL数据库模块:MySQLdb
Autor: Crifan Li
Date: 2013-04-22
-------------------------------------------------------------------------------
"""
#---------------------------------import---------------------------------------
import MySQLdb
def python_mysql_test():
"""
try to use mysql in python
"""
try:
conn=MySQLdb.connect(host='localhost',user='root',passwd='xxx',db='wordpress',port=3306)
print "conn=",conn;
cur=conn.cursor()
print "cur=",cur;
cur.execute('select * from wp_users')
cur.close()
conn.close()
except MySQLdb.Error,e:
print "Mysql Error %d: %s" % (e.args[0], e.args[1])
###############################################################################
if __name__=="__main__":
python_mysql_test();
可以显示连接成功了:
D:\tmp\tmp_dev_root\python\tutorial_summary\python_mysql_test>python_mysql_test.py
conn= <_mysql.connection open to ‘localhost’ at 2a46ad8>
cur=
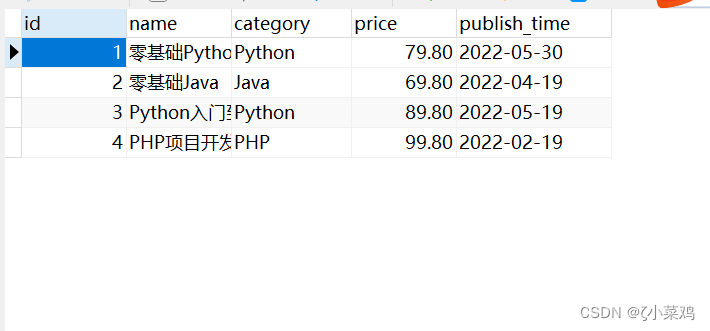
对应的wordpress的数据库是:

9.再去折腾新建数据项试试:
1
2
3
4
5
6
7
8
9
10
11
12
13
14
15
16
17
18
19
20
21
22
23
24
25
26
27
28
29
30
31
32
33
34
35
36
37
38
39
40
41
42
43
44
45
46
47
48
49
50
51
52
53
54
55
56
57
58
59
60
61
62
63
#!/usr/bin/python
# -*- coding: utf-8 -*-
"""
-------------------------------------------------------------------------------
Function:
【记录】为Python安装MySQL数据库模块:MySQLdb
Autor: Crifan Li
Date: 2013-04-22
-------------------------------------------------------------------------------
"""
#---------------------------------import---------------------------------------
import MySQLdb
def python_mysql_test():
"""
try to use mysql in python
"""
try:
conn=MySQLdb.connect(host='localhost',user='root',passwd='xxx',db='test',port=3306, charset='utf8')
print "conn=",conn;
cur=conn.cursor()
print "cur=",cur;
createdDb= cur.execute('create database if not exists pythonMysql')
print "createdDb=",createdDb;
selectedDb= conn.select_db('pythonMysql')
print "selectedDb=",selectedDb;
createdTable= cur.execute('create table test(id int,info varchar(20))')
print "createdTable=",createdTable;
value=[1,'hi rollen']
insertedValue= cur.execute('insert into test values(%s,%s)',value)
print "insertedValue=",insertedValue;
values=[]
for iin range(20):
values.append((i,'hi rollen'+str(i)))
insertedValues= cur.executemany('insert into test values(%s,%s)',values)
print "insertedValues=",insertedValues;
updatedInfo= cur.execute('update test set info="I am rollen" where id=3')
print "updatedInfo=",updatedInfo;
committed= conn.commit()
print "committed=",committed;
closedCur= cur.close()
print "closedCur=",closedCur;
closedConn= conn.close()
print "closedConn=",closedConn;
except MySQLdb.Error,e:
print "Mysql Error %d: %s" % (e.args[0], e.args[1])
###############################################################################
if __name__=="__main__":
python_mysql_test();
结果如下:
D:\tmp\tmp_dev_root\python\tutorial_summary\python_mysql_test>python_mysql_test.py
conn= <_mysql.connection open to ‘localhost’ at 2a46ad8>
cur=
D:\tmp\tmp_dev_root\python\tutorial_summary\python_mysql_test>python_mysql_test.py
conn= <_mysql.connection open to ‘localhost’ at 2be06a8>
cur=
createdDb= 1
selectedDb= None
createdTable= 0
insertedValue= 1
insertedValues= 20
updatedInfo= 1
committed= None
closedCur= None
closedConn= None
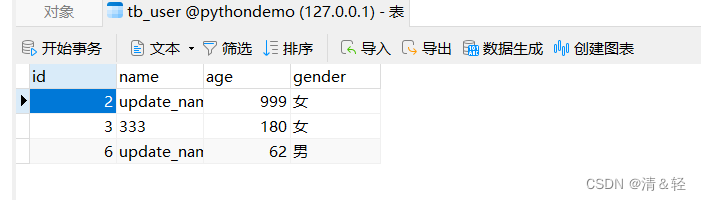
数据库中去看看结果:


都是可以正常工作的。
至此,简单的操作,到此结束。
以后就是针对要操作的数据,如何导入数据库,如何操作数据库了。
数据库操作:
坚持每天学一点,每天积累一点点,作为自己每天的业余收获,这个文章是我在吃饭的期间写的,利用自己零散的时间学了一下python操作MYSQL,所以整理一下。
我采用的是MySQLdb操作的MYSQL数据库。先来一个简单的例子吧:
1
2
3
4
5
6
7
8
9
10
import MySQLdb
try:
conn=MySQLdb.connect(host='localhost',user='root',passwd='root',db='test',port=3306)
cur=conn.cursor()
cur.execute('select * from user')
cur.close()
conn.close()
except MySQLdb.Error,e:
print "Mysql Error %d: %s" % (e.args[0], e.args[1])
请注意修改你的数据库,主机名,用户名,密码。
下面来大致演示一下插入数据,批量插入数据,更新数据的例子吧:
1
2
3
4
5
6
7
8
9
10
11
12
13
14
15
16
17
18
19
20
21
22
23
24
25
26
27
import MySQLdb
try:
conn=MySQLdb.connect(host='localhost',user='root',passwd='root',port=3306)
cur=conn.cursor()
cur.execute('create database if not exists python')
conn.select_db('python')
cur.execute('create table test(id int,info varchar(20))')
value=[1,'hi rollen']
cur.execute('insert into test values(%s,%s)',value)
values=[]
for iin range(20):
values.append((i,'hi rollen'+str(i)))
cur.executemany('insert into test values(%s,%s)',values)
cur.execute('update test set info="I am rollen" where id=3')
conn.commit()
cur.close()
conn.close()
except MySQLdb.Error,e:
print "Mysql Error %d: %s" % (e.args[0], e.args[1])
请注意一定要有conn.commit()这句来提交事务,要不然不能真正的插入数据。
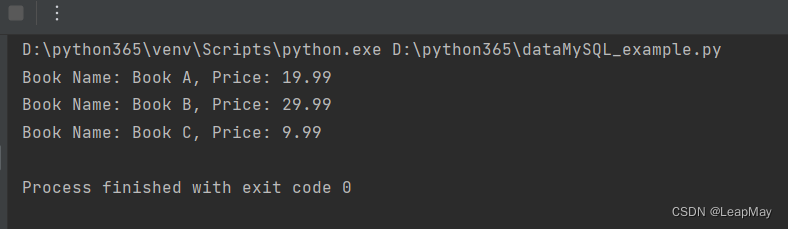
运行之后我的MySQL数据库的结果就不上图了。
1
2
3
4
5
6
7
8
9
10
11
12
13
14
15
16
17
18
19
20
21
22
23
24
25
26
27
28
29
30
31
32
33
import MySQLdb
try:
conn=MySQLdb.connect(host='localhost',user='root',passwd='root',port=3306)
cur=conn.cursor()
conn.select_db('python')
count=cur.execute('select * from test')
print 'there has %s rows record' % count
result=cur.fetchone()
print result
print 'ID: %s info %s' % result
results=cur.fetchmany(5)
for rin results:
print r
print '=='*10
cur.scroll(0,mode='absolute')
results=cur.fetchall()
for rin results:
print r[1]
conn.commit()
cur.close()
conn.close()
except MySQLdb.Error,e:
print "Mysql Error %d: %s" % (e.args[0], e.args[1])
运行结果就不贴了,太长了。
查询后中文会正确显示,但在数据库中却是乱码的。经过我从网上查找,发现用一个属性有可搞定:
在Python代码
conn = MySQLdb.Connect(host='localhost', user='root', passwd='root', db='python') 中加一个属性:
改为:
conn = MySQLdb.Connect(host='localhost', user='root', passwd='root', db='python',charset='utf8')
charset是要跟你数据库的编码一样,如果是数据库是gb2312 ,则写charset='gb2312'。
下面贴一下常用的函数:
然后,这个连接对象也提供了对事务操作的支持,标准的方法
commit() 提交
rollback() 回滚
cursor用来执行命令的方法:
callproc(self, procname, args):用来执行存储过程,接收的参数为存储过程名和参数列表,返回值为受影响的行数
execute(self, query, args):执行单条sql语句,接收的参数为sql语句本身和使用的参数列表,返回值为受影响的行数
executemany(self, query, args):执行单挑sql语句,但是重复执行参数列表里的参数,返回值为受影响的行数
nextset(self):移动到下一个结果集
cursor用来接收返回值的方法:
fetchall(self):接收全部的返回结果行.
fetchmany(self, size=None):接收size条返回结果行.如果size的值大于返回的结果行的数量,则会返回cursor.arraysize条数据.
fetchone(self):返回一条结果行.
scroll(self, value, mode='relative'):移动指针到某一行.如果mode='relative',则表示从当前所在行移动value条,如果 mode='absolute',则表示从结果集的第一行移动value条.