目录
一、介绍
1、Datax介绍
2、DataX 的设计
3、支持的数据源
4、框架设计
5、运行原理
六、优势
二、使用
1、从stream读取数据并打印到控制台
2、mysql同步到mysql
3、读取 DB2 的数据导入 MySQL
4、读取 SQLServer 的数据导入 MySQL
5、读取 MongoDB 的数据导入 MySQL
三、原理
1、程序入口
2、Task 切分逻辑
3.并发数的确定
4、调度
5、数据传输
6、限速的实现 (具体插件)
四、DataX 使用优化
速度控制
关键参数
一、提升每个 channel 的速度
二、提升 DataX Job 内 Channel 并发数
三、提高 JVM 堆内存
一、介绍
1、Datax介绍
DataX 是阿里巴巴开源的一个异构数据源离线同步工具,DataX 实现了包括 MySQL、Oracle、OceanBase、SqlServer、Postgre、HDFS、Hive、ADS、HBase、TableStore(OTS)、MaxCompute(ODPS)、Hologres、DRDS 等各种异构数据源之间高效的数据同步功能。
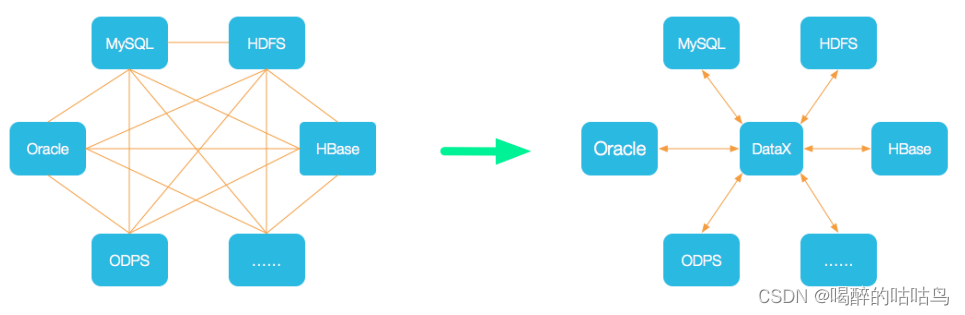
2、DataX 的设计
为了解决异构数据源同步问题,DataX 将复杂的网状的同步链路变成了星型数据链路, DataX 作为中间传输载体负责连接各种数据源。当需要接入一个新的数据源的时候,只需要 将此数据源对接到 DataX,便能跟已有的数据源做到无缝数据同步。
3、支持的数据源
DataX目前已经有了比较全面的插件体系,主流的RDBMS数据库、NOSQL、大数据计算系统都已经接入,目前支持数据如下图,详情请点击:DataX数据源参考指南
| 类型 | 数据源 | Reader(读) | Writer(写) | 文档 |
|---|---|---|---|---|
| RDBMS 关系型数据库 | MySQL | √ | √ | 读 、写 |
| Oracle | √ | √ | 读 、写 | |
| OceanBase | √ | √ | 读 、写 | |
| SQLServer | √ | √ | 读 、写 | |
| PostgreSQL | √ | √ | 读 、写 | |
| DRDS | √ | √ | 读 、写 | |
| Kingbase | √ | √ | 读 、写 | |
| 通用RDBMS(支持所有关系型数据库) | √ | √ | 读 、写 | |
| 阿里云数仓数据存储 | ODPS | √ | √ | 读 、写 |
| ADS | √ | 写 | ||
| OSS | √ | √ | 读 、写 | |
| OCS | √ | 写 | ||
| Hologres | √ | 写 | ||
| AnalyticDB For PostgreSQL | √ | 写 | ||
| 阿里云中间件 | datahub | √ | √ | 读 、写 |
| SLS | √ | √ | 读 、写 | |
| 阿里云图数据库 | GDB | √ | √ | 读 、写 |
| NoSQL数据存储 | OTS | √ | √ | 读 、写 |
| Hbase0.94 | √ | √ | 读 、写 | |
| Hbase1.1 | √ | √ | 读 、写 | |
| Phoenix4.x | √ | √ | 读 、写 | |
| Phoenix5.x | √ | √ | 读 、写 | |
| MongoDB | √ | √ | 读 、写 | |
| Cassandra | √ | √ | 读 、写 | |
| 数仓数据存储 | StarRocks | √ | √ | 读 、写 |
| ApacheDoris | √ | 写 | ||
| ClickHouse | √ | 写 | ||
| Hive | √ | √ | 读 、写 | |
| kudu | √ | 写 | ||
| 无结构化数据存储 | TxtFile | √ | √ | 读 、写 |
| FTP | √ | √ | 读 、写 | |
| HDFS | √ | √ | 读 、写 | |
| Elasticsearch | √ | 写 | ||
| 时间序列数据库 | OpenTSDB | √ | 读 | |
| TSDB | √ | √ | 读 、写 | |
| TDengine | √ | √ | 读 、写 |
目前DataX的已有能力已经全部融和进阿里云的数据集成,并且比DataX更加高效、安全,同时数据集成具备DataX不具备的其它高级特性和功能。可以理解为数据集成是DataX的全面升级的商业化用版本,为企业可以提供稳定、可靠、安全的数据传输服务。与DataX相比,数据集成主要有以下几大突出特点:
支持实时同步:
- 功能简介:实时同步能力说明
- 支持的数据源:实时同步支持的数据源
- 支持数据处理:配置数据过滤转换
离线同步数据源种类大幅度扩充:
- 新增比如:DB2、Kafka、Hologres、MetaQ、SAPHANA、达梦等等,持续扩充中
- 离线同步支持的数据源:支持的数据源与读写插件
- 具备同步解决方案:
- 解决方案系统:选择同步解决方案
- 一键全增量:一键实时同步至MaxCompute
- 整库迁移:整库迁移与批量上云
- 批量上云:批量上云操作步骤
- 更新更多能力请访问:数据集成概述
4、框架设计
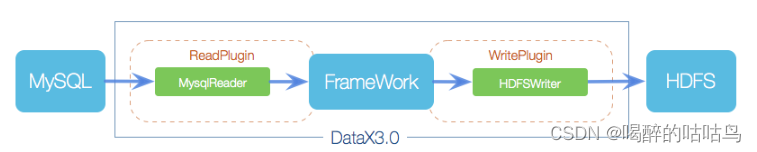
DataX本身作为离线数据同步框架,采用Framework + plugin架构构建。将数据源读取和写入抽象成为Reader/Writer插件,纳入到整个同步框架中。
- Reader:Reader 为数据采集模块,负责采集数据源的数据,将数据发送给Framework。
- Writer: Writer为数据写入模块,负责不断向Framework取数据,并将数据写入到目的端。
- Framework:Framework用于连接reader和writer,作为两者的数据传输通道,并处理缓冲,流控,并发,数据转换等核心技术问题。
5、运行原理
DataX 3.0 开源版本支持单机多线程模式完成同步作业运行,DataX作业生命周期的时序图,从整体架构设计非常简要说明DataX各个模块相互关系。

核心模块介绍:
- Job:单个作业的管理节点,负责数据清理、子任务划分、TaskGroup监控管理。
- Task:由Job切分而来,是DataX作业的最小单元,每个Task负责一部分数据的同步工作。
- Schedule:将Task组成TaskGroup,单个TaskGroup的并发数量为5。
- TaskGroup:负责启动Task。
DataX调度流程:
举例来说,用户提交了一个DataX作业,并且配置了20个并发,目的是将一个100张分表的mysql数据同步到odps里面。 DataX的调度决策思路是:
- DataXJob根据分库分表切分成了100个Task。
- 根据20个并发,DataX计算共需要分配4个TaskGroup。
- 4个TaskGroup平分切分好的100个Task,每一个TaskGroup负责以5个并发共计运行25个Task。
六、优势
-
可靠的数据质量监控
-
完美解决数据传输个别类型失真问题
DataX旧版对于部分数据类型(比如时间戳)传输一直存在毫秒阶段等数据失真情况,新版本DataX3.0已经做到支持所有的强数据类型,每一种插件都有自己的数据类型转换策略,让数据可以完整无损的传输到目的端。
-
提供作业全链路的流量、数据量 运行时监控
DataX3.0运行过程中可以将作业本身状态、数据流量、数据速度、执行进度等信息进行全面的展示,让用户可以实时了解作业状态。并可在作业执行过程中智能判断源端和目的端的速度对比情况,给予用户更多性能排查信息。
-
提供脏数据探测
在大量数据的传输过程中,必定会由于各种原因导致很多数据传输报错(比如类型转换错误),这种数据DataX认为就是脏数据。DataX目前可以实现脏数据精确过滤、识别、采集、展示,为用户提供多种的脏数据处理模式,让用户准确把控数据质量大关!
-
-
丰富的数据转换功能
DataX作为一个服务于大数据的ETL工具,除了提供数据快照搬迁功能之外,还提供了丰富数据转换的功能,让数据在传输过程中可以轻松完成数据脱敏,补全,过滤等数据转换功能,另外还提供了自动groovy函数,让用户自定义转换函数。详情请看DataX3的transformer详细介绍。
-
精准的速度控制
还在为同步过程对在线存储压力影响而担心吗?新版本DataX3.0提供了包括通道(并发)、记录流、字节流三种流控模式,可以随意控制你的作业速度,让你的作业在库可以承受的范围内达到最佳的同步速度。
"speed": { "channel": 5, "byte": 1048576, "record": 10000 } -
强劲的同步性能
DataX3.0每一种读插件都有一种或多种切分策略,都能将作业合理切分成多个Task并行执行,单机多线程执行模型可以让DataX速度随并发成线性增长。在源端和目的端性能都足够的情况下,单个作业一定可以打满网卡。另外,DataX团队对所有的已经接入的插件都做了极致的性能优化,并且做了完整的性能测试。性能测试相关详情可以参照每单个数据源的详细介绍:DataX数据源指南
-
健壮的容错机制
DataX作业是极易受外部因素的干扰,网络闪断、数据源不稳定等因素很容易让同步到一半的作业报错停止。因此稳定性是DataX的基本要求,在DataX 3.0的设计中,重点完善了框架和插件的稳定性。目前DataX3.0可以做到线程级别、进程级别(暂时未开放)、作业级别多层次局部/全局的重试,保证用户的作业稳定运行。
-
线程内部重试
DataX的核心插件都经过团队的全盘review,不同的网络交互方式都有不同的重试策略。
-
线程级别重试
目前DataX已经可以实现TaskFailover,针对于中间失败的Task,DataX框架可以做到整个Task级别的重新调度。
-
-
极简的使用体验
-
易用
下载即可用,支持linux和windows,只需要短短几步骤就可以完成数据的传输。请点击:Quick Start
-
详细
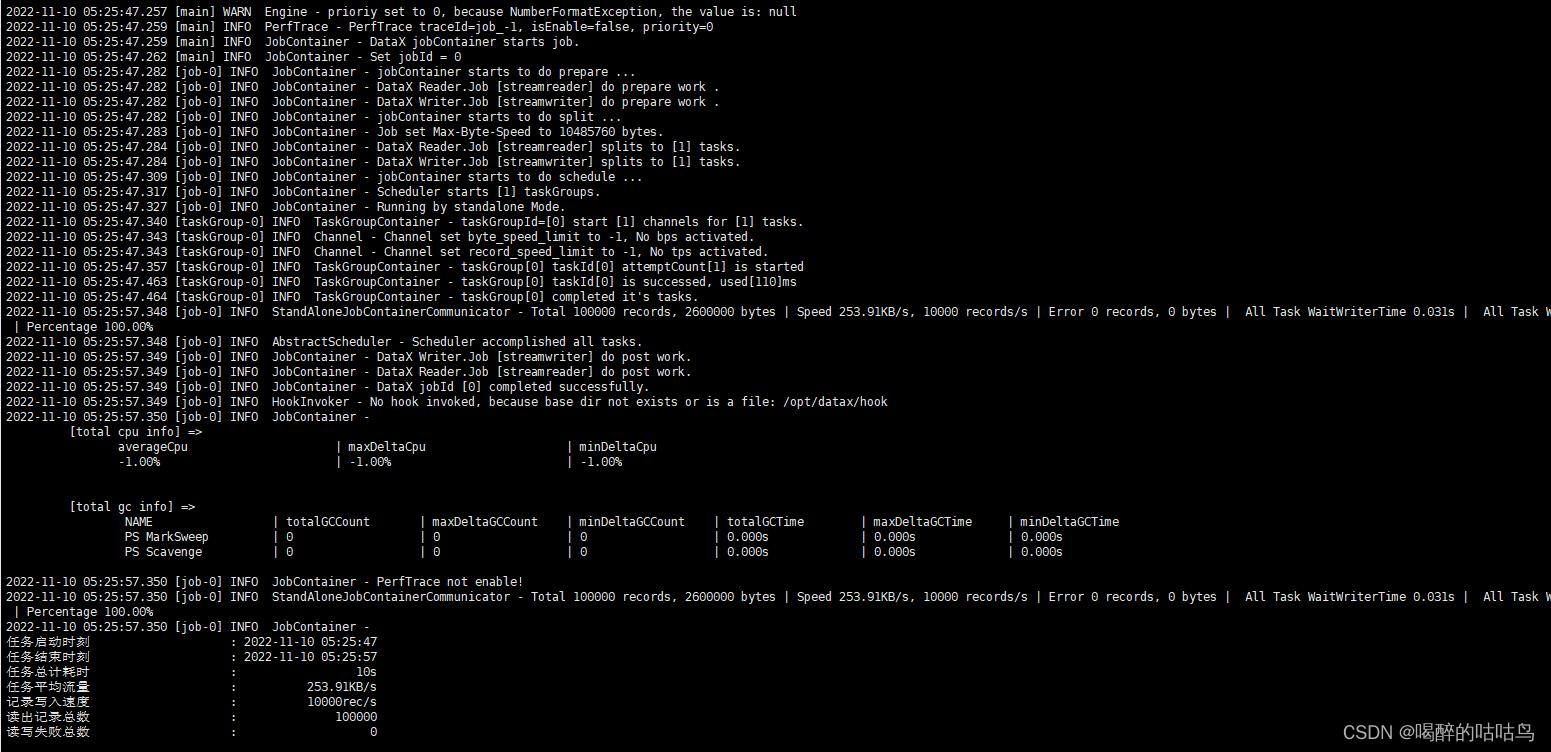
DataX在运行日志中打印了大量信息,其中包括传输速度,Reader、Writer性能,进程CPU,JVM和GC情况等等。
-
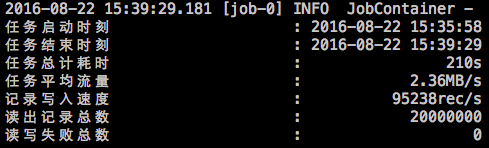
传输过程中打印传输速度、进度等

-
传输过程中会打印进程相关的CPU、JVM等

-
在任务结束之后,打印总体运行情况
-
-
二、使用
官方地址
下载地址:https://github.com/alibaba/DataX/archive/refs/tags/datax_v202210.tar.gzhttps://datax-opensource.oss-cn-hangzhou.aliyuncs.com/202210/datax.tar.gzhttps://github.com/alibaba/DataX/archive/refs/tags/datax_v202210.tar.gz
源码地址:GitHub - alibaba/DataX: DataX是阿里云DataWorks数据集成的开源版本。
wget http://datax-opensource.oss-cn-hangzhou.aliyuncs.com/datax.tar.gz
tar -zxvf datax.tar.gz -C /opt/
cd /opt/datax
bin/datax.py job/job.json
如果报错 插件[streamreader,streamwriter]加载失败,1s后重试
# 先进入安装目录
cd /opt/datax/
# 在进入插件目录
cd plugin/reader
# 删除
rm -rf ./._*
# 在进入插件目录
cd plugin/writer
# 删除
rm -rf ./._*
出现以下界面说明DataX安装成功
1、从stream读取数据并打印到控制台
查看官方json配置模板
python /opt/datax/bin/datax.py -r streamreader -w streamwriter
DataX (DATAX-OPENSOURCE-3.0), From Alibaba !
Copyright (C) 2010-2017, Alibaba Group. All Rights Reserved.
Please refer to the streamreader document:
https://github.com/alibaba/DataX/blob/master/streamreader/doc/streamreader.mdPlease refer to the streamwriter document:
https://github.com/alibaba/DataX/blob/master/streamwriter/doc/streamwriter.md
Please save the following configuration as a json file and use
python {DATAX_HOME}/bin/datax.py {JSON_FILE_NAME}.json
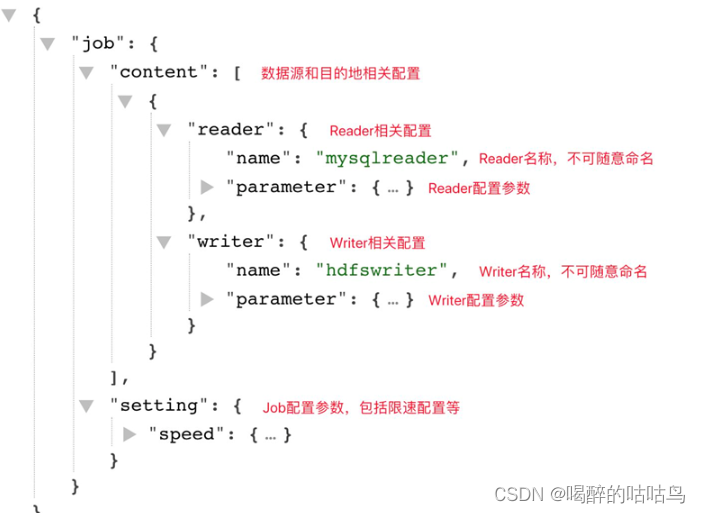
to run the job.{
"job": {
"content": [
{
"reader": {
"name": "streamreader",
"parameter": {
"column": [],
"sliceRecordCount": ""
}
},
"writer": {
"name": "streamwriter",
"parameter": {
"encoding": "",
"print": true
}
}
}
],
"setting": {
"speed": {
"channel": ""
}
}
}
}
根据模板编写json文件:
{"job": {"content": [{"reader": {"name": "streamreader","parameter": {"sliceRecordCount": 10,"column": [{"type": "long","value": "11110"},{"type": "string","value": "hello,你好,世界-DataX"}]}},"writer": {"name": "streamwriter","parameter": {"encoding": "UTF-8","print": true}}}],"setting": {"speed": {"channel": 5}}}
}
运行Job
/opt/datax/bin/datax.py ./stream2stream.json
2、mysql同步到mysql
{"job": {"content": [{"reader": {"name": "mysqlreader","parameter": {"password": "root","username": "root","connection": [{"jdbcUrl": ["jdbc:mysql://127.0.0.1:3306/test_dev"],"querySql": ["SELECT id, name FROM test_test"]}]}},"writer": {"name": "mysqlwriter","parameter": {"column": ["id", "name"],"password": "root","username": "root","writeMode": "insert","connection": [{"table": ["test_test_1"],"jdbcUrl": "jdbc:mysql://127.0.0.1:3306/test_dev"}]}}}],"setting": {"speed": {"channel": 1},"errorLimit": {"record": 0,"percentage": 0.02}}}
}
3、读取 DB2 的数据导入 MySQL
{"job": {"content": [{"reader": {"name": "rdbmsreader","parameter": {"column":["ID","NAME"],"password": "root","username": "root","connection": [{"jdbcUrl": ["jdbc:db2://127.0.0.1:50000/sample"],"table": ["STUDENT"]}]}},"writer": {"name": "mysqlwriter","parameter": {"column": ["*"],"password": "root","username": "root","writeMode": "insert","connection": [{"table": ["student"],"jdbcUrl": "jdbc:mysql://127.0.0.1:3306/datax"}]}}}],"setting": {"speed": {"channel": 1}}}
}
4、读取 SQLServer 的数据导入 MySQL
{"job": {"content": [{"reader": {"name": "sqlserverreader","parameter": {"column":["id","name"],"password": "root","username": "root","connection": [{"jdbcUrl": ["jdbc:sqlserver://127.0.0.1:1433;DatabaseName=datax"],"table": ["student"]}]}},"writer": {"name": "mysqlwriter","parameter": {"column": ["*"],"password": "root","username": "root","writeMode": "insert","connection": [{"table": ["student"],"jdbcUrl": "jdbc:mysql://127.0.0.1:3306/datax"}]}}}],"setting": {"speed": {"channel": 1}}}
}
5、读取 MongoDB 的数据导入 MySQL
{"job": {"content": [{"reader": {"name": "mongodbreader","parameter": {"address":["127.0.0.1:27017"]"collectionName":"t_user","column": [{"name":"name","type": "string"},{"name":"url","type": "string"}],"dbName": "test"}},"writer": {"name": "mysqlwriter","parameter": {"column": ["*"],"password": "root","username": "root","writeMode": "insert","connection": [{"table": ["t_user"],"jdbcUrl": "jdbc:mysql://127.0.0.1:3306/datax"}]}}}],"setting": {"speed": {"channel": 1}}}
}
三、原理
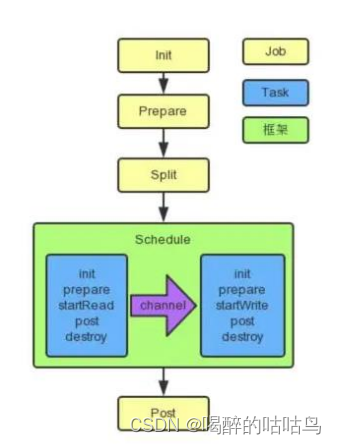
黄色: Job 部分的执行阶段, 蓝色: Task 部分的执行阶段, 绿色:框架执行阶段。
1、程序入口
datax.py
......
DEFAULT_PROPERTY_CONF = "-Dfile.encoding=UTF-8 -Dlogback.statusListenerClass=ch.qos.logback.core.status.NopStatusListener -Djava.security.egd=file:///dev/urandom -Ddatax.home=%s -Dlogback.configurationFile=%s" % (
DATAX_HOME, LOGBACK_FILE)
ENGINE_COMMAND = "java -server ${jvm} %s -classpath %s ${params} com.alibaba.datax.core.Engine -mode ${mode} -jobid ${jobid} -job ${job}" % (
DEFAULT_PROPERTY_CONF, CLASS_PATH)
REMOTE_DEBUG_CONFIG = "-Xdebug -Xrunjdwp:transport=dt_socket,server=y,address=9999"。。。。
Engine.java
package com.alibaba.datax.core;.............
/*** Engine是DataX入口类,该类负责初始化Job或者Task的运行容器,并运行插件的Job或者Task逻辑*/
public class Engine {private static final Logger LOG = LoggerFactory.getLogger(Engine.class);private static String RUNTIME_MODE;/* check job model (job/task) first */public void start(Configuration allConf) {// 绑定column转换信息ColumnCast.bind(allConf);/*** 初始化PluginLoader,可以获取各种插件配置*/LoadUtil.bind(allConf);boolean isJob = !("taskGroup".equalsIgnoreCase(allConf.getString(CoreConstant.DATAX_CORE_CONTAINER_MODEL)));//JobContainer会在schedule后再行进行设置和调整值int channelNumber =0;AbstractContainer container;long instanceId;int taskGroupId = -1;if (isJob) {allConf.set(CoreConstant.DATAX_CORE_CONTAINER_JOB_MODE, RUNTIME_MODE);//job容器container = new JobContainer(allConf);instanceId = allConf.getLong(CoreConstant.DATAX_CORE_CONTAINER_JOB_ID, 0);} else {//开始构建task容器container = new TaskGroupContainer(allConf);instanceId = allConf.getLong(CoreConstant.DATAX_CORE_CONTAINER_JOB_ID);taskGroupId = allConf.getInt(CoreConstant.DATAX_CORE_CONTAINER_TASKGROUP_ID);channelNumber = allConf.getInt(CoreConstant.DATAX_CORE_CONTAINER_TASKGROUP_CHANNEL);}//缺省打开perfTraceboolean traceEnable = allConf.getBool(CoreConstant.DATAX_CORE_CONTAINER_TRACE_ENABLE, true);boolean perfReportEnable = allConf.getBool(CoreConstant.DATAX_CORE_REPORT_DATAX_PERFLOG, true);//standalone模式的 datax shell任务不进行汇报if(instanceId == -1){perfReportEnable = false;}int priority = 0;try {priority = Integer.parseInt(System.getenv("SKYNET_PRIORITY"));}catch (NumberFormatException e){LOG.warn("prioriy set to 0, because NumberFormatException, the value is: "+System.getProperty("PROIORY"));}Configuration jobInfoConfig = allConf.getConfiguration(CoreConstant.DATAX_JOB_JOBINFO);//初始化PerfTracePerfTrace perfTrace = PerfTrace.getInstance(isJob, instanceId, taskGroupId, priority, traceEnable);perfTrace.setJobInfo(jobInfoConfig,perfReportEnable,channelNumber);//开启容器container.start();}
...........
JobContainer.java
/*** jobContainer主要负责的工作全部在start()里面,包括init、prepare、split、scheduler、* post以及destroy和statistics*/@Overridepublic void start() {LOG.info("DataX jobContainer starts job.");boolean hasException = false;boolean isDryRun = false;try {this.startTimeStamp = System.currentTimeMillis();isDryRun = configuration.getBool(CoreConstant.DATAX_JOB_SETTING_DRYRUN, false);if(isDryRun) {LOG.info("jobContainer starts to do preCheck ...");this.preCheck();} else {userConf = configuration.clone();LOG.debug("jobContainer starts to do preHandle ...");//Job 前置操作this.preHandle();LOG.debug("jobContainer starts to do init ...");//初始化 reader 和 writerthis.init();LOG.info("jobContainer starts to do prepare ...");//全局准备工作,比如 odpswriter 清空目标表this.prepare();LOG.info("jobContainer starts to do split ...");//拆分 Taskthis.totalStage = this.split();LOG.info("jobContainer starts to do schedule ...");//开始调度this.schedule();LOG.debug("jobContainer starts to do post ...");this.post();LOG.debug("jobContainer starts to do postHandle ...");//Job 后置操作this.postHandle();LOG.info("DataX jobId [{}] completed successfully.", this.jobId);this.invokeHooks();}} catch (Throwable e) {LOG.error("Exception when job run", e);hasException = true;if (e instanceof OutOfMemoryError) {this.destroy();System.gc();}if (super.getContainerCommunicator() == null) {// 由于 containerCollector 是在 scheduler() 中初始化的,所以当在 scheduler() 之前出现异常时,需要在此处对 containerCollector 进行初始化AbstractContainerCommunicator tempContainerCollector;// standalonetempContainerCollector = new StandAloneJobContainerCommunicator(configuration);super.setContainerCommunicator(tempContainerCollector);}Communication communication = super.getContainerCommunicator().collect();// 汇报前的状态,不需要手动进行设置// communication.setState(State.FAILED);communication.setThrowable(e);communication.setTimestamp(this.endTimeStamp);Communication tempComm = new Communication();tempComm.setTimestamp(this.startTransferTimeStamp);Communication reportCommunication = CommunicationTool.getReportCommunication(communication, tempComm, this.totalStage);super.getContainerCommunicator().report(reportCommunication);throw DataXException.asDataXException(FrameworkErrorCode.RUNTIME_ERROR, e);} finally {if(!isDryRun) {this.destroy();this.endTimeStamp = System.currentTimeMillis();if (!hasException) {//最后打印cpu的平均消耗,GC的统计VMInfo vmInfo = VMInfo.getVmInfo();if (vmInfo != null) {vmInfo.getDelta(false);LOG.info(vmInfo.totalString());}LOG.info(PerfTrace.getInstance().summarizeNoException());this.logStatistics();}}}}2、Task 切分逻辑
JobContainer.java
/*** 执行reader和writer最细粒度的切分,需要注意的是,writer的切分结果要参照reader的切分结果,* 达到切分后数目相等,才能满足1:1的通道模型,所以这里可以将reader和writer的配置整合到一起,* 然后,为避免顺序给读写端带来长尾影响,将整合的结果shuffler掉Task 切分逻辑*/private int split() {this.adjustChannelNumber();if (this.needChannelNumber <= 0) {this.needChannelNumber = 1;}List<Configuration> readerTaskConfigs = this.doReaderSplit(this.needChannelNumber);int taskNumber = readerTaskConfigs.size();List<Configuration> writerTaskConfigs = this.doWriterSplit(taskNumber);List<Configuration> transformerList = this.configuration.getListConfiguration(CoreConstant.DATAX_JOB_CONTENT_TRANSFORMER);LOG.debug("transformer configuration: "+ JSON.toJSONString(transformerList));/*** 输入是reader和writer的parameter list,输出是content下面元素的list*/List<Configuration> contentConfig = mergeReaderAndWriterTaskConfigs(readerTaskConfigs, writerTaskConfigs, transformerList);LOG.debug("contentConfig configuration: "+ JSON.toJSONString(contentConfig));this.configuration.set(CoreConstant.DATAX_JOB_CONTENT, contentConfig);return contentConfig.size();}3.并发数的确定
JobContainer.java
//并发数的确定private void adjustChannelNumber() {int needChannelNumberByByte = Integer.MAX_VALUE;int needChannelNumberByRecord = Integer.MAX_VALUE;boolean isByteLimit = (this.configuration.getInt(CoreConstant.DATAX_JOB_SETTING_SPEED_BYTE, 0) > 0);if (isByteLimit) {long globalLimitedByteSpeed = this.configuration.getInt(CoreConstant.DATAX_JOB_SETTING_SPEED_BYTE, 10 * 1024 * 1024);// 在byte流控情况下,单个Channel流量最大值必须设置,否则报错!Long channelLimitedByteSpeed = this.configuration.getLong(CoreConstant.DATAX_CORE_TRANSPORT_CHANNEL_SPEED_BYTE);if (channelLimitedByteSpeed == null || channelLimitedByteSpeed <= 0) {throw DataXException.asDataXException(FrameworkErrorCode.CONFIG_ERROR,"在有总bps限速条件下,单个channel的bps值不能为空,也不能为非正数");}needChannelNumberByByte =(int) (globalLimitedByteSpeed / channelLimitedByteSpeed);needChannelNumberByByte =needChannelNumberByByte > 0 ? needChannelNumberByByte : 1;LOG.info("Job set Max-Byte-Speed to " + globalLimitedByteSpeed + " bytes.");}boolean isRecordLimit = (this.configuration.getInt(CoreConstant.DATAX_JOB_SETTING_SPEED_RECORD, 0)) > 0;if (isRecordLimit) {long globalLimitedRecordSpeed = this.configuration.getInt(CoreConstant.DATAX_JOB_SETTING_SPEED_RECORD, 100000);Long channelLimitedRecordSpeed = this.configuration.getLong(CoreConstant.DATAX_CORE_TRANSPORT_CHANNEL_SPEED_RECORD);if (channelLimitedRecordSpeed == null || channelLimitedRecordSpeed <= 0) {throw DataXException.asDataXException(FrameworkErrorCode.CONFIG_ERROR,"在有总tps限速条件下,单个channel的tps值不能为空,也不能为非正数");}needChannelNumberByRecord =(int) (globalLimitedRecordSpeed / channelLimitedRecordSpeed);needChannelNumberByRecord =needChannelNumberByRecord > 0 ? needChannelNumberByRecord : 1;LOG.info("Job set Max-Record-Speed to " + globalLimitedRecordSpeed + " records.");}// 取较小值this.needChannelNumber = needChannelNumberByByte < needChannelNumberByRecord ?needChannelNumberByByte : needChannelNumberByRecord;// 如果从byte或record上设置了needChannelNumber则退出if (this.needChannelNumber < Integer.MAX_VALUE) {return;}boolean isChannelLimit = (this.configuration.getInt(CoreConstant.DATAX_JOB_SETTING_SPEED_CHANNEL, 0) > 0);if (isChannelLimit) {this.needChannelNumber = this.configuration.getInt(CoreConstant.DATAX_JOB_SETTING_SPEED_CHANNEL);LOG.info("Job set Channel-Number to " + this.needChannelNumber+ " channels.");return;}throw DataXException.asDataXException(FrameworkErrorCode.CONFIG_ERROR,"Job运行速度必须设置");}4、调度
/*** schedule首先完成的工作是把上一步reader和writer split的结果整合到具体taskGroupContainer中,* 同时不同的执行模式调用不同的调度策略,将所有任务调度起来*/private void schedule() {/*** 这里的全局speed和每个channel的速度设置为B/s*/int channelsPerTaskGroup = this.configuration.getInt(CoreConstant.DATAX_CORE_CONTAINER_TASKGROUP_CHANNEL, 5);int taskNumber = this.configuration.getList(CoreConstant.DATAX_JOB_CONTENT).size();this.needChannelNumber = Math.min(this.needChannelNumber, taskNumber);PerfTrace.getInstance().setChannelNumber(needChannelNumber);/*** 通过获取配置信息得到每个taskGroup需要运行哪些tasks任务*///确定组数和分组List<Configuration> taskGroupConfigs = JobAssignUtil.assignFairly(this.configuration,this.needChannelNumber, channelsPerTaskGroup);LOG.info("Scheduler starts [{}] taskGroups.", taskGroupConfigs.size());ExecuteMode executeMode = null;AbstractScheduler scheduler;try {executeMode = ExecuteMode.STANDALONE;scheduler = initStandaloneScheduler(this.configuration);//设置 executeModefor (Configuration taskGroupConfig : taskGroupConfigs) {taskGroupConfig.set(CoreConstant.DATAX_CORE_CONTAINER_JOB_MODE, executeMode.getValue());}if (executeMode == ExecuteMode.LOCAL || executeMode == ExecuteMode.DISTRIBUTE) {if (this.jobId <= 0) {throw DataXException.asDataXException(FrameworkErrorCode.RUNTIME_ERROR,"在[ local | distribute ]模式下必须设置jobId,并且其值 > 0 .");}}LOG.info("Running by {} Mode.", executeMode);this.startTransferTimeStamp = System.currentTimeMillis();//调度实现scheduler.schedule(taskGroupConfigs);this.endTransferTimeStamp = System.currentTimeMillis();} catch (Exception e) {LOG.error("运行scheduler 模式[{}]出错.", executeMode);this.endTransferTimeStamp = System.currentTimeMillis();throw DataXException.asDataXException(FrameworkErrorCode.RUNTIME_ERROR, e);}/*** 检查任务执行情况*/this.checkLimit();}
1.确定组数和分组:
JobAssignUtil:
/*** 公平的分配 task 到对应的 taskGroup 中。* 公平体现在:会考虑 task 中对资源负载作的 load 标识进行更均衡的作业分配操作。* TODO 具体文档举例说明1)确定 taskGroupNumber,2)做分组分配,3)做分组优化*/public static List<Configuration> assignFairly(Configuration configuration, int channelNumber, int channelsPerTaskGroup) {Validate.isTrue(configuration != null, "框架获得的 Job 不能为 null.");List<Configuration> contentConfig = configuration.getListConfiguration(CoreConstant.DATAX_JOB_CONTENT);Validate.isTrue(contentConfig.size() > 0, "框架获得的切分后的 Job 无内容.");Validate.isTrue(channelNumber > 0 && channelsPerTaskGroup > 0,"每个channel的平均task数[averTaskPerChannel],channel数目[channelNumber],每个taskGroup的平均channel数[channelsPerTaskGroup]都应该为正数");int taskGroupNumber = (int) Math.ceil(1.0 * channelNumber / channelsPerTaskGroup);Configuration aTaskConfig = contentConfig.get(0);String readerResourceMark = aTaskConfig.getString(CoreConstant.JOB_READER_PARAMETER + "." +CommonConstant.LOAD_BALANCE_RESOURCE_MARK);String writerResourceMark = aTaskConfig.getString(CoreConstant.JOB_WRITER_PARAMETER + "." +CommonConstant.LOAD_BALANCE_RESOURCE_MARK);boolean hasLoadBalanceResourceMark = StringUtils.isNotBlank(readerResourceMark) ||StringUtils.isNotBlank(writerResourceMark);if (!hasLoadBalanceResourceMark) {// fake 一个固定的 key 作为资源标识(在 reader 或者 writer 上均可,此处选择在 reader 上进行 fake)for (Configuration conf : contentConfig) {conf.set(CoreConstant.JOB_READER_PARAMETER + "." +CommonConstant.LOAD_BALANCE_RESOURCE_MARK, "aFakeResourceMarkForLoadBalance");}// 是为了避免某些插件没有设置 资源标识 而进行了一次随机打乱操作Collections.shuffle(contentConfig, new Random(System.currentTimeMillis()));}LinkedHashMap<String, List<Integer>> resourceMarkAndTaskIdMap = parseAndGetResourceMarkAndTaskIdMap(contentConfig);List<Configuration> taskGroupConfig = doAssign(resourceMarkAndTaskIdMap, configuration, taskGroupNumber);// 调整 每个 taskGroup 对应的 Channel 个数(属于优化范畴)adjustChannelNumPerTaskGroup(taskGroupConfig, channelNumber);return taskGroupConfig;}2.调度实现:
AbstractScheduler.java
public void schedule(List<Configuration> configurations) {Validate.notNull(configurations,"scheduler配置不能为空");int jobReportIntervalInMillSec = configurations.get(0).getInt(CoreConstant.DATAX_CORE_CONTAINER_JOB_REPORTINTERVAL, 30000);int jobSleepIntervalInMillSec = configurations.get(0).getInt(CoreConstant.DATAX_CORE_CONTAINER_JOB_SLEEPINTERVAL, 10000);this.jobId = configurations.get(0).getLong(CoreConstant.DATAX_CORE_CONTAINER_JOB_ID);errorLimit = new ErrorRecordChecker(configurations.get(0));/*** 给 taskGroupContainer 的 Communication 注册*/this.containerCommunicator.registerCommunication(configurations);int totalTasks = calculateTaskCount(configurations);startAllTaskGroup(configurations);Communication lastJobContainerCommunication = new Communication();long lastReportTimeStamp = System.currentTimeMillis();try {while (true) {/*** step 1: collect job stat* step 2: getReport info, then report it* step 3: errorLimit do check* step 4: dealSucceedStat();* step 5: dealKillingStat();* step 6: dealFailedStat();* step 7: refresh last job stat, and then sleep for next while** above steps, some ones should report info to DS**/Communication nowJobContainerCommunication = this.containerCommunicator.collect();nowJobContainerCommunication.setTimestamp(System.currentTimeMillis());LOG.debug(nowJobContainerCommunication.toString());//汇报周期long now = System.currentTimeMillis();if (now - lastReportTimeStamp > jobReportIntervalInMillSec) {Communication reportCommunication = CommunicationTool.getReportCommunication(nowJobContainerCommunication, lastJobContainerCommunication, totalTasks);this.containerCommunicator.report(reportCommunication);lastReportTimeStamp = now;lastJobContainerCommunication = nowJobContainerCommunication;}errorLimit.checkRecordLimit(nowJobContainerCommunication);if (nowJobContainerCommunication.getState() == State.SUCCEEDED) {LOG.info("Scheduler accomplished all tasks.");break;}if (isJobKilling(this.getJobId())) {dealKillingStat(this.containerCommunicator, totalTasks);} else if (nowJobContainerCommunication.getState() == State.FAILED) {dealFailedStat(this.containerCommunicator, nowJobContainerCommunication.getThrowable());}Thread.sleep(jobSleepIntervalInMillSec);}} catch (InterruptedException e) {// 以 failed 状态退出LOG.error("捕获到InterruptedException异常!", e);throw DataXException.asDataXException(FrameworkErrorCode.RUNTIME_ERROR, e);}}实现类:ProcessInnerScheduler、StandAloneScheduler
package com.alibaba.datax.core.job.scheduler.processinner;import com.alibaba.datax.common.exception.DataXException;
import com.alibaba.datax.common.util.Configuration;
import com.alibaba.datax.core.job.scheduler.AbstractScheduler;
import com.alibaba.datax.core.statistics.container.communicator.AbstractContainerCommunicator;
import com.alibaba.datax.core.taskgroup.TaskGroupContainer;
import com.alibaba.datax.core.taskgroup.runner.TaskGroupContainerRunner;
import com.alibaba.datax.core.util.FrameworkErrorCode;import java.util.List;
import java.util.concurrent.ExecutorService;
import java.util.concurrent.Executors;public abstract class ProcessInnerScheduler extends AbstractScheduler {private ExecutorService taskGroupContainerExecutorService;public ProcessInnerScheduler(AbstractContainerCommunicator containerCommunicator) {super(containerCommunicator);}@Overridepublic void startAllTaskGroup(List<Configuration> configurations) {this.taskGroupContainerExecutorService = Executors.newFixedThreadPool(configurations.size());for (Configuration taskGroupConfiguration : configurations) {TaskGroupContainerRunner taskGroupContainerRunner = newTaskGroupContainerRunner(taskGroupConfiguration);this.taskGroupContainerExecutorService.execute(taskGroupContainerRunner);}this.taskGroupContainerExecutorService.shutdown();}@Overridepublic void dealFailedStat(AbstractContainerCommunicator frameworkCollector, Throwable throwable) {this.taskGroupContainerExecutorService.shutdownNow();throw DataXException.asDataXException(FrameworkErrorCode.PLUGIN_RUNTIME_ERROR, throwable);}@Overridepublic void dealKillingStat(AbstractContainerCommunicator frameworkCollector, int totalTasks) {//通过进程退出返回码标示状态this.taskGroupContainerExecutorService.shutdownNow();throw DataXException.asDataXException(FrameworkErrorCode.KILLED_EXIT_VALUE,"job killed status");}private TaskGroupContainerRunner newTaskGroupContainerRunner(Configuration configuration) {TaskGroupContainer taskGroupContainer = new TaskGroupContainer(configuration);return new TaskGroupContainerRunner(taskGroupContainer);}}
package com.alibaba.datax.core.job.scheduler.processinner;import com.alibaba.datax.core.statistics.container.communicator.AbstractContainerCommunicator;/*** Created by hongjiao.hj on 2014/12/22.*/
public class StandAloneScheduler extends ProcessInnerScheduler{public StandAloneScheduler(AbstractContainerCommunicator containerCommunicator) {super(containerCommunicator);}@Overrideprotected boolean isJobKilling(Long jobId) {return false;}}
5、数据传输
TaskGroupContainer.start() -> taskExecutor.doStart() -->插件
    @Overridepublic void start() {try {/*** 状态check时间间隔,较短,可以把任务及时分发到对应channel中*/int sleepIntervalInMillSec = this.configuration.getInt(CoreConstant.DATAX_CORE_CONTAINER_TASKGROUP_SLEEPINTERVAL, 100);/*** 状态汇报时间间隔,稍长,避免大量汇报*/long reportIntervalInMillSec = this.configuration.getLong(CoreConstant.DATAX_CORE_CONTAINER_TASKGROUP_REPORTINTERVAL,10000);/*** 2分钟汇报一次性能统计*/// 获取channel数目int channelNumber = this.configuration.getInt(CoreConstant.DATAX_CORE_CONTAINER_TASKGROUP_CHANNEL);int taskMaxRetryTimes = this.configuration.getInt(CoreConstant.DATAX_CORE_CONTAINER_TASK_FAILOVER_MAXRETRYTIMES, 1);long taskRetryIntervalInMsec = this.configuration.getLong(CoreConstant.DATAX_CORE_CONTAINER_TASK_FAILOVER_RETRYINTERVALINMSEC, 10000);long taskMaxWaitInMsec = this.configuration.getLong(CoreConstant.DATAX_CORE_CONTAINER_TASK_FAILOVER_MAXWAITINMSEC, 60000);List<Configuration> taskConfigs = this.configuration.getListConfiguration(CoreConstant.DATAX_JOB_CONTENT);if(LOG.isDebugEnabled()) {LOG.debug("taskGroup[{}]'s task configs[{}]", this.taskGroupId,JSON.toJSONString(taskConfigs));}int taskCountInThisTaskGroup = taskConfigs.size();LOG.info(String.format("taskGroupId=[%d] start [%d] channels for [%d] tasks.",this.taskGroupId, channelNumber, taskCountInThisTaskGroup));this.containerCommunicator.registerCommunication(taskConfigs);Map<Integer, Configuration> taskConfigMap = buildTaskConfigMap(taskConfigs); //taskId与task配置List<Configuration> taskQueue = buildRemainTasks(taskConfigs); //待运行task列表Map<Integer, TaskExecutor> taskFailedExecutorMap = new HashMap<Integer, TaskExecutor>(); //taskId与上次失败实例List<TaskExecutor> runTasks = new ArrayList<TaskExecutor>(channelNumber); //正在运行taskMap<Integer, Long> taskStartTimeMap = new HashMap<Integer, Long>(); //任务开始时间long lastReportTimeStamp = 0;Communication lastTaskGroupContainerCommunication = new Communication();while (true) {//1.判断task状态boolean failedOrKilled = false;Map<Integer, Communication> communicationMap = containerCommunicator.getCommunicationMap();for(Map.Entry<Integer, Communication> entry : communicationMap.entrySet()){Integer taskId = entry.getKey();Communication taskCommunication = entry.getValue();if(!taskCommunication.isFinished()){continue;}TaskExecutor taskExecutor = removeTask(runTasks, taskId);//上面从runTasks里移除了,因此对应在monitor里移除taskMonitor.removeTask(taskId);//失败,看task是否支持failover,重试次数未超过最大限制if(taskCommunication.getState() == State.FAILED){taskFailedExecutorMap.put(taskId, taskExecutor);if(taskExecutor.supportFailOver() && taskExecutor.getAttemptCount() < taskMaxRetryTimes){taskExecutor.shutdown(); //关闭老的executorcontainerCommunicator.resetCommunication(taskId); //将task的状态重置Configuration taskConfig = taskConfigMap.get(taskId);taskQueue.add(taskConfig); //重新加入任务列表}else{failedOrKilled = true;break;}}else if(taskCommunication.getState() == State.KILLED){failedOrKilled = true;break;}else if(taskCommunication.getState() == State.SUCCEEDED){Long taskStartTime = taskStartTimeMap.get(taskId);if(taskStartTime != null){Long usedTime = System.currentTimeMillis() - taskStartTime;LOG.info("taskGroup[{}] taskId[{}] is successed, used[{}]ms",this.taskGroupId, taskId, usedTime);//usedTime*1000*1000 转换成PerfRecord记录的ns,这里主要是简单登记,进行最长任务的打印。因此增加特定静态方法PerfRecord.addPerfRecord(taskGroupId, taskId, PerfRecord.PHASE.TASK_TOTAL,taskStartTime, usedTime * 1000L * 1000L);taskStartTimeMap.remove(taskId);taskConfigMap.remove(taskId);}}}// 2.发现该taskGroup下taskExecutor的总状态失败则汇报错误if (failedOrKilled) {lastTaskGroupContainerCommunication = reportTaskGroupCommunication(lastTaskGroupContainerCommunication, taskCountInThisTaskGroup);throw DataXException.asDataXException(FrameworkErrorCode.PLUGIN_RUNTIME_ERROR, lastTaskGroupContainerCommunication.getThrowable());}//3.有任务未执行,且正在运行的任务数小于最大通道限制Iterator<Configuration> iterator = taskQueue.iterator();while(iterator.hasNext() && runTasks.size() < channelNumber){Configuration taskConfig = iterator.next();Integer taskId = taskConfig.getInt(CoreConstant.TASK_ID);int attemptCount = 1;TaskExecutor lastExecutor = taskFailedExecutorMap.get(taskId);if(lastExecutor!=null){attemptCount = lastExecutor.getAttemptCount() + 1;long now = System.currentTimeMillis();long failedTime = lastExecutor.getTimeStamp();if(now - failedTime < taskRetryIntervalInMsec){  //未到等待时间,继续留在队列continue;}if(!lastExecutor.isShutdown()){ //上次失败的task仍未结束if(now - failedTime > taskMaxWaitInMsec){markCommunicationFailed(taskId);reportTaskGroupCommunication(lastTaskGroupContainerCommunication, taskCountInThisTaskGroup);throw DataXException.asDataXException(CommonErrorCode.WAIT_TIME_EXCEED, "task failover等待超时");}else{lastExecutor.shutdown(); //再次尝试关闭continue;}}else{LOG.info("taskGroup[{}] taskId[{}] attemptCount[{}] has already shutdown",this.taskGroupId, taskId, lastExecutor.getAttemptCount());}}Configuration taskConfigForRun = taskMaxRetryTimes > 1 ? taskConfig.clone() : taskConfig;TaskExecutor taskExecutor = new TaskExecutor(taskConfigForRun, attemptCount);taskStartTimeMap.put(taskId, System.currentTimeMillis());taskExecutor.doStart();iterator.remove();runTasks.add(taskExecutor);//上面,增加task到runTasks列表,因此在monitor里注册。taskMonitor.registerTask(taskId, this.containerCommunicator.getCommunication(taskId));taskFailedExecutorMap.remove(taskId);LOG.info("taskGroup[{}] taskId[{}] attemptCount[{}] is started",this.taskGroupId, taskId, attemptCount);}//4.任务列表为空,executor已结束, 搜集状态为success--->成功if (taskQueue.isEmpty() && isAllTaskDone(runTasks) && containerCommunicator.collectState() == State.SUCCEEDED) {// 成功的情况下,也需要汇报一次。否则在任务结束非常快的情况下,采集的信息将会不准确lastTaskGroupContainerCommunication = reportTaskGroupCommunication(lastTaskGroupContainerCommunication, taskCountInThisTaskGroup);LOG.info("taskGroup[{}] completed it's tasks.", this.taskGroupId);break;}// 5.如果当前时间已经超出汇报时间的interval,那么我们需要马上汇报long now = System.currentTimeMillis();if (now - lastReportTimeStamp > reportIntervalInMillSec) {lastTaskGroupContainerCommunication = reportTaskGroupCommunication(lastTaskGroupContainerCommunication, taskCountInThisTaskGroup);lastReportTimeStamp = now;//taskMonitor对于正在运行的task,每reportIntervalInMillSec进行检查for(TaskExecutor taskExecutor:runTasks){taskMonitor.report(taskExecutor.getTaskId(),this.containerCommunicator.getCommunication(taskExecutor.getTaskId()));}}Thread.sleep(sleepIntervalInMillSec);}//6.最后还要汇报一次reportTaskGroupCommunication(lastTaskGroupContainerCommunication, taskCountInThisTaskGroup);} catch (Throwable e) {Communication nowTaskGroupContainerCommunication = this.containerCommunicator.collect();if (nowTaskGroupContainerCommunication.getThrowable() == null) {nowTaskGroupContainerCommunication.setThrowable(e);}nowTaskGroupContainerCommunication.setState(State.FAILED);this.containerCommunicator.report(nowTaskGroupContainerCommunication);throw DataXException.asDataXException(FrameworkErrorCode.RUNTIME_ERROR, e);}finally {if(!PerfTrace.getInstance().isJob()){//最后打印cpu的平均消耗,GC的统计VMInfo vmInfo = VMInfo.getVmInfo();if (vmInfo != null) {vmInfo.getDelta(false);LOG.info(vmInfo.totalString());}LOG.info(PerfTrace.getInstance().summarizeNoException());}}}private Map<Integer, Configuration> buildTaskConfigMap(List<Configuration> configurations){Map<Integer, Configuration> map = new HashMap<Integer, Configuration>();for(Configuration taskConfig : configurations){int taskId = taskConfig.getInt(CoreConstant.TASK_ID);map.put(taskId, taskConfig);}return map;}private List<Configuration> buildRemainTasks(List<Configuration> configurations){List<Configuration> remainTasks = new LinkedList<Configuration>();for(Configuration taskConfig : configurations){remainTasks.add(taskConfig);}return remainTasks;}private TaskExecutor removeTask(List<TaskExecutor> taskList, int taskId){Iterator<TaskExecutor> iterator = taskList.iterator();while(iterator.hasNext()){TaskExecutor taskExecutor = iterator.next();if(taskExecutor.getTaskId() == taskId){iterator.remove();return taskExecutor;}}return null;}private boolean isAllTaskDone(List<TaskExecutor> taskList){for(TaskExecutor taskExecutor : taskList){if(!taskExecutor.isTaskFinished()){return false;}}return true;}private Communication reportTaskGroupCommunication(Communication lastTaskGroupContainerCommunication, int taskCount){Communication nowTaskGroupContainerCommunication = this.containerCommunicator.collect();nowTaskGroupContainerCommunication.setTimestamp(System.currentTimeMillis());Communication reportCommunication = CommunicationTool.getReportCommunication(nowTaskGroupContainerCommunication,lastTaskGroupContainerCommunication, taskCount);this.containerCommunicator.report(reportCommunication);return reportCommunication;}private void markCommunicationFailed(Integer taskId){Communication communication = containerCommunicator.getCommunication(taskId);communication.setState(State.FAILED);}/*** TaskExecutor是一个完整task的执行器* 其中包括1:1的reader和writer*/class TaskExecutor {
private Configuration taskConfig;private int taskId;private int attemptCount;private Channel channel;private Thread readerThread;private Thread writerThread;private ReaderRunner readerRunner;private WriterRunner writerRunner;/*** 该处的taskCommunication在多处用到:* 1. channel* 2. readerRunner和writerRunner* 3. reader和writer的taskPluginCollector*/private Communication taskCommunication;public TaskExecutor(Configuration taskConf, int attemptCount) {// 获取该taskExecutor的配置this.taskConfig = taskConf;Validate.isTrue(null != this.taskConfig.getConfiguration(CoreConstant.JOB_READER)&& null != this.taskConfig.getConfiguration(CoreConstant.JOB_WRITER),"[reader|writer]的插件参数不能为空!");// 得到taskIdthis.taskId = this.taskConfig.getInt(CoreConstant.TASK_ID);this.attemptCount = attemptCount;/*** 由taskId得到该taskExecutor的Communication* 要传给readerRunner和writerRunner,同时要传给channel作统计用*/this.taskCommunication = containerCommunicator.getCommunication(taskId);Validate.notNull(this.taskCommunication,String.format("taskId[%d]的Communication没有注册过", taskId));this.channel = ClassUtil.instantiate(channelClazz,Channel.class, configuration);this.channel.setCommunication(this.taskCommunication);/*** 获取transformer的参数*/List<TransformerExecution> transformerInfoExecs = TransformerUtil.buildTransformerInfo(taskConfig);/*** 生成writerThread*/writerRunner = (WriterRunner) generateRunner(PluginType.WRITER);this.writerThread = new Thread(writerRunner,String.format("%d-%d-%d-writer",jobId, taskGroupId, this.taskId));//通过设置thread的contextClassLoader,即可实现同步和主程序不通的加载器this.writerThread.setContextClassLoader(LoadUtil.getJarLoader(PluginType.WRITER, this.taskConfig.getString(CoreConstant.JOB_WRITER_NAME)));/*** 生成readerThread*/readerRunner = (ReaderRunner) generateRunner(PluginType.READER,transformerInfoExecs);this.readerThread = new Thread(readerRunner,String.format("%d-%d-%d-reader",jobId, taskGroupId, this.taskId));/*** 通过设置thread的contextClassLoader,即可实现同步和主程序不通的加载器*/this.readerThread.setContextClassLoader(LoadUtil.getJarLoader(PluginType.READER, this.taskConfig.getString(CoreConstant.JOB_READER_NAME)));}public void doStart() {this.writerThread.start();// reader没有起来,writer不可能结束if (!this.writerThread.isAlive() || this.taskCommunication.getState() == State.FAILED) {throw DataXException.asDataXException(FrameworkErrorCode.RUNTIME_ERROR,this.taskCommunication.getThrowable());}this.readerThread.start();// 这里reader可能很快结束if (!this.readerThread.isAlive() && this.taskCommunication.getState() == State.FAILED) {// 这里有可能出现Reader线上启动即挂情况 对于这类情况 需要立刻抛出异常throw DataXException.asDataXException(FrameworkErrorCode.RUNTIME_ERROR,this.taskCommunication.getThrowable());}}private AbstractRunner generateRunner(PluginType pluginType) {return generateRunner(pluginType, null);}private AbstractRunner generateRunner(PluginType pluginType, List<TransformerExecution> transformerInfoExecs) {AbstractRunner newRunner = null;TaskPluginCollector pluginCollector;//插件类型switch (pluginType) {case READER:newRunner = LoadUtil.loadPluginRunner(pluginType,this.taskConfig.getString(CoreConstant.JOB_READER_NAME));newRunner.setJobConf(this.taskConfig.getConfiguration(CoreConstant.JOB_READER_PARAMETER));pluginCollector = ClassUtil.instantiate(taskCollectorClass, AbstractTaskPluginCollector.class,configuration, this.taskCommunication,PluginType.READER);RecordSender recordSender;if (transformerInfoExecs != null && transformerInfoExecs.size() > 0) {recordSender = new BufferedRecordTransformerExchanger(taskGroupId, this.taskId, this.channel,this.taskCommunication ,pluginCollector, transformerInfoExecs);} else {recordSender = new BufferedRecordExchanger(this.channel, pluginCollector);}((ReaderRunner) newRunner).setRecordSender(recordSender);/*** 设置taskPlugin的collector,用来处理脏数据和job/task通信*/newRunner.setTaskPluginCollector(pluginCollector);break;case WRITER:newRunner = LoadUtil.loadPluginRunner(pluginType,this.taskConfig.getString(CoreConstant.JOB_WRITER_NAME));newRunner.setJobConf(this.taskConfig.getConfiguration(CoreConstant.JOB_WRITER_PARAMETER));pluginCollector = ClassUtil.instantiate(taskCollectorClass, AbstractTaskPluginCollector.class,configuration, this.taskCommunication,PluginType.WRITER);((WriterRunner) newRunner).setRecordReceiver(new BufferedRecordExchanger(this.channel, pluginCollector));/*** 设置taskPlugin的collector,用来处理脏数据和job/task通信*/newRunner.setTaskPluginCollector(pluginCollector);break;default:throw DataXException.asDataXException(FrameworkErrorCode.ARGUMENT_ERROR, "Cant generateRunner for:" + pluginType);}newRunner.setTaskGroupId(taskGroupId);newRunner.setTaskId(this.taskId);newRunner.setRunnerCommunication(this.taskCommunication);return newRunner;}// 检查任务是否结束private boolean isTaskFinished() {// 如果reader 或 writer没有完成工作,那么直接返回工作没有完成if (readerThread.isAlive() || writerThread.isAlive()) {return false;}if(taskCommunication==null || !taskCommunication.isFinished()){return false;}return true;}private int getTaskId(){return taskId;}private long getTimeStamp(){return taskCommunication.getTimestamp();}private int getAttemptCount(){return attemptCount;}private boolean supportFailOver(){return writerRunner.supportFailOver();}private void shutdown(){writerRunner.shutdown();readerRunner.shutdown();if(writerThread.isAlive()){writerThread.interrupt();}if(readerThread.isAlive()){readerThread.interrupt();}}private boolean isShutdown(){return !readerThread.isAlive() && !writerThread.isAlive();}}
6、限速的实现 (具体插件)
比如:MysqlReader
MysqlReader -- startReader()
com.alibaba.datax.plugin.rdbms.reader.CommonRdbmsReader -- startRead() -- transportOneRecord() >> com.alibaba.datax.common.plugin.RecordSender -- sendToWriter() >> com.alibaba.datax.core.transport.exchanger.BufferedRecordExchanger --sendToWriter() -- flush() >> com.alibaba.datax.core.transport.channel.Channel -- pushAll() -- statPush()
private void statPush(long recordSize, long byteSize) {currentCommunication.increaseCounter(CommunicationTool.READ_SUCCEED_RECORDS,recordSize);currentCommunication.increaseCounter(CommunicationTool.READ_SUCCEED_BYTES,byteSize);//在读的时候进行统计waitCounter即可,因为写(pull)的时候可能正在阻塞,但读的时候已经能读到这个阻塞的counter数currentCommunication.setLongCounter(CommunicationTool.WAIT_READER_TIME, waitReaderTime);currentCommunication.setLongCounter(CommunicationTool.WAIT_WRITER_TIME, waitWriterTime);boolean isChannelByteSpeedLimit = (this.byteSpeed > 0);boolean isChannelRecordSpeedLimit = (this.recordSpeed > 0);if (!isChannelByteSpeedLimit && !isChannelRecordSpeedLimit) {return;}long lastTimestamp = lastCommunication.getTimestamp();long nowTimestamp = System.currentTimeMillis();long interval = nowTimestamp - lastTimestamp;if (interval - this.flowControlInterval >= 0) {long byteLimitSleepTime = 0;long recordLimitSleepTime = 0;if (isChannelByteSpeedLimit) {long currentByteSpeed = (CommunicationTool.getTotalReadBytes(currentCommunication) -CommunicationTool.getTotalReadBytes(lastCommunication)) * 1000 / interval;if (currentByteSpeed > this.byteSpeed) {// 计算根据byteLimit得到的休眠时间byteLimitSleepTime = currentByteSpeed * interval / this.byteSpeed- interval;}}if (isChannelRecordSpeedLimit) {long currentRecordSpeed = (CommunicationTool.getTotalReadRecords(currentCommunication) -CommunicationTool.getTotalReadRecords(lastCommunication)) * 1000 / interval;if (currentRecordSpeed > this.recordSpeed) {// 计算根据recordLimit得到的休眠时间recordLimitSleepTime = currentRecordSpeed * interval / this.recordSpeed- interval;}}// 休眠时间取较大值long sleepTime = byteLimitSleepTime < recordLimitSleepTime ?recordLimitSleepTime : byteLimitSleepTime;if (sleepTime > 0) {try {Thread.sleep(sleepTime);} catch (InterruptedException e) {Thread.currentThread().interrupt();}}lastCommunication.setLongCounter(CommunicationTool.READ_SUCCEED_BYTES,currentCommunication.getLongCounter(CommunicationTool.READ_SUCCEED_BYTES));lastCommunication.setLongCounter(CommunicationTool.READ_FAILED_BYTES,currentCommunication.getLongCounter(CommunicationTool.READ_FAILED_BYTES));lastCommunication.setLongCounter(CommunicationTool.READ_SUCCEED_RECORDS,currentCommunication.getLongCounter(CommunicationTool.READ_SUCCEED_RECORDS));lastCommunication.setLongCounter(CommunicationTool.READ_FAILED_RECORDS,currentCommunication.getLongCounter(CommunicationTool.READ_FAILED_RECORDS));lastCommunication.setTimestamp(nowTimestamp);}}四、插件开发
DataX为什么要使用插件机制?
应对不同数据源的差异、同时提供一致的同步原语和扩展能力,DataX自然而然地采用了框架 + 插件 的模式,
- 插件只需关心数据的读取或者写入本身。
- 而同步的共性问题,比如:类型转换、性能、统计,则交由框架来处理。
作为插件开发人员,则需要关注两个问题:
- 数据源本身的读写数据正确性。
- 如何与框架沟通、合理正确地使用框架。
DataX插件需要遵循统一的目录结构:
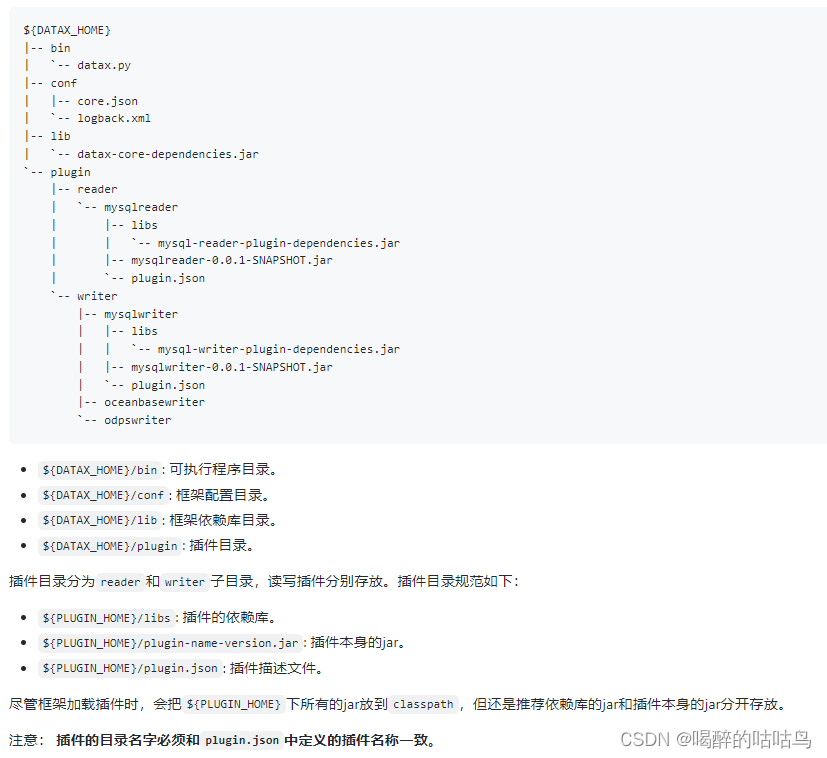
步骤文档
五、DataX 使用优化
速度控制
DataX3.0提供了包括通道(并发)、记录流、字节流三种流控模式,可以随意控制作业速度,让作业在数据库可以承受的范围内达到最佳的同步速度。
关键参数
➢ job.setting.speed.channel : channel 并发数
➢ job.setting.speed.record : 2 全局配置 channel 的 record 限速
➢ job.setting.speed.byte:全局配置 channel 的 byte 限速
➢ core.transport.channel.speed.record:单个 channel 的 record 限速
➢ core.transport.channel.speed.byte:单个 channel 的 byte 限速
一、提升每个 channel 的速度
在 DataX 内部对每个 Channel 会有严格的速度控制,分两种,一种是控制每秒同步的记 录数,另外一种是每秒同步的字节数,默认的速度限制是 1MB/s,可以根据具体硬件情况设 置这个 byte 速度或者 record 速度,一般设置 byte 速度,比如:我们可以把单个 Channel 的 速度上限配置为 5MB。
二、提升 DataX Job 内 Channel 并发数
并发数 = taskGroup 的数量 * 每个 TaskGroup 并发执行的 Task 数 (默认为 5)。 提升 job 内 Channel 并发有三种配置方式:
1、配置全局 Byte 限速以及单 Channel Byte 限速
Channel 个数 = 全局 Byte 限速 / 单 Channel Byte 限速
{
"core": {
"transport": {
"channel": {
"speed": {
"byte": 1048576
}
}
}
},
"job": {
"setting": {
"speed": {
"byte": 5242880
}
},
。。。
}
}
core.transport.channel.speed.byte=1048576,job.setting.speed.byte=5242880,所以 Channel 个数 = 全局 Byte 限速 / 单 Channel Byte 限速=5242880/1048576=5 个
2、配置全局 Record 限速以及单 Channel Record 限速
Channel 个数 = 全局 Record 限速 / 单 Channel Record 限速
{
"core": {
"transport": {
"channel": {
"speed": {
"record": 100
}
}
}
},
"job": {
"setting": {
"speed": {
"record": 500
}
},
...
}
}
core.transport.channel.speed.record=100 , job.setting.speed.record=500, 所 以 配 置 全 局 Record 限速以及单 Channel Record 限速,Channel 个数 = 全局 Record 限速 / 单 Channel Record 限速=500/100=5
3、直接配置 Channel 个数
只有在上面两种未设置才生效,上面两个同时设置是取值小的作为最终的 channel 数。
{
"job": {
"setting": {
"speed": {
"channel": 5
}
},
...
}
}
直接配置 job.setting.speed.channel=5,所以 job 内 Channel 并发=5 个
三、提高 JVM 堆内存
当提升 DataX Job 内 Channel 并发数时,内存的占用会显著增加,因为 DataX 作为数据 交换通道,在内存中会缓存较多的数据。例如 Channel 中会有一个 Buffer,作为临时的数据 交换的缓冲区,而在部分 Reader 和 Writer 的中,也会存在一些 Buffer,为了防止 OOM 等错 误,调大 JVM 的堆内存。
建议将内存设置为 4G 或者 8G,这个也可以根据实际情况来调整。
调整 JVM xms xmx 参数的两种方式:一种是直接更改 datax.py 脚本;另一种是在启动 的时候,加上对应的参数,如下:
python datax/bin/datax.py --jvm="-Xms8G -Xmx8G" XXX.json
参考源:
https://github.com/alibaba/DataX