本文适用于LVGL V8版本
LVGL simulator vs2019
官方工程 lv_sim_visual_studio
使用注意事项:
1、将官方工程从github上下载下来,最好使用git 将整个工程clone下来,因为工程内部有依赖,如果只是将工程Download下来,无法正常运行。
git clone --recurse-submodules https://github.com/lvgl/lv_sim_visual_studio.git
2、工程Clone下来后,需要根据不同的平台配置
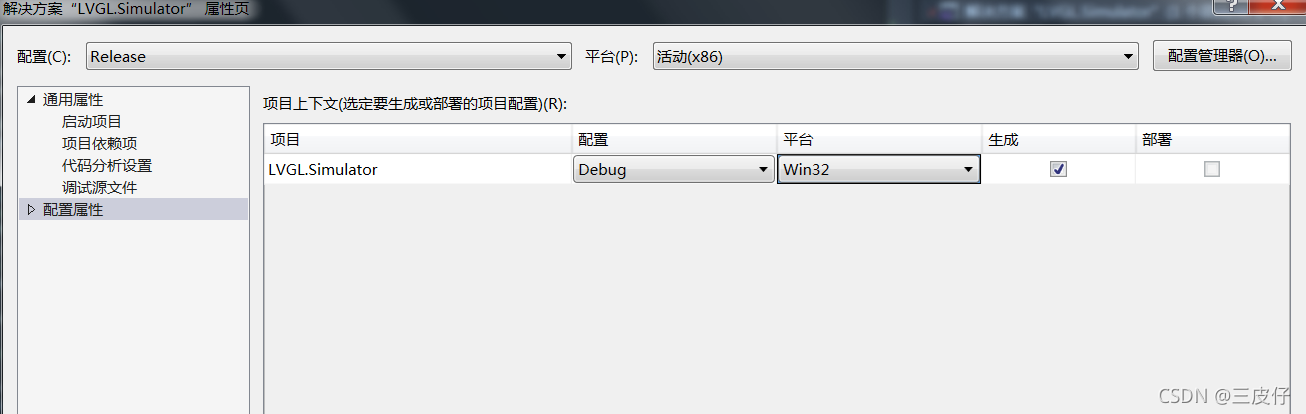
3、在点击生成时,总是需要很长时间,并提示无法下载数据包“VC-LTL”
解决办法:
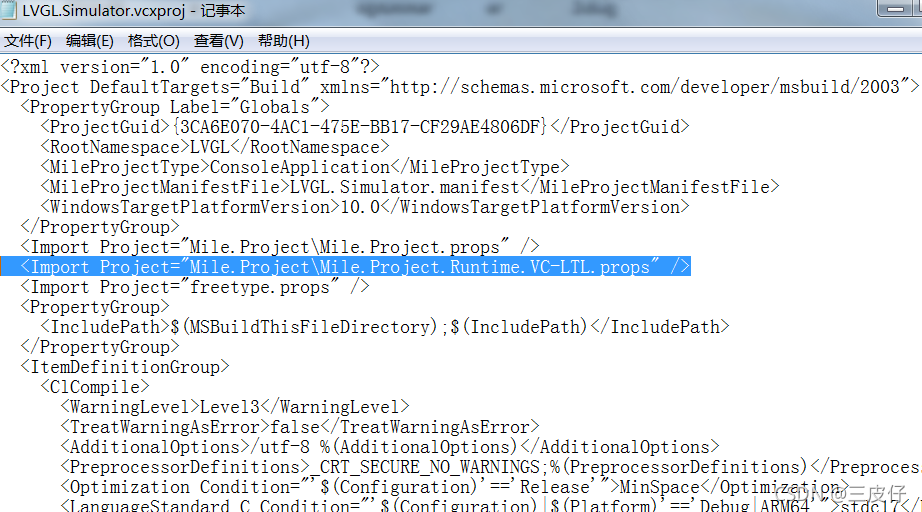
1、删除LVGL.Simulator.vcxproj中的(用记事本打开)
<Import Project="Mile.Project\Mile.Project.Runtime.VC-LTL.props" />
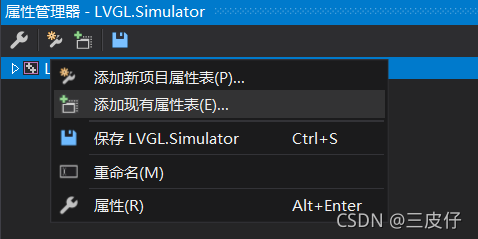
2、下载新的VC-LTL
VC-LTL
将VC-LTL Binary下载并解压至D:\Src\VC-LTL(具体位置无任何要求),双击D:\Src\VC-LTL\Install.cmd即可。
脚本会在HKCU\Code\VC-LTL创建注册表。
将属性表VC-LTL helper for Visual Studio.props复制到你的工程目录,你可以打开属性管理器(视图 - 属性管理器),然后Release配置上右键添加现有属性表,然后选择VC-LTL helper for Visual Studio.props即可
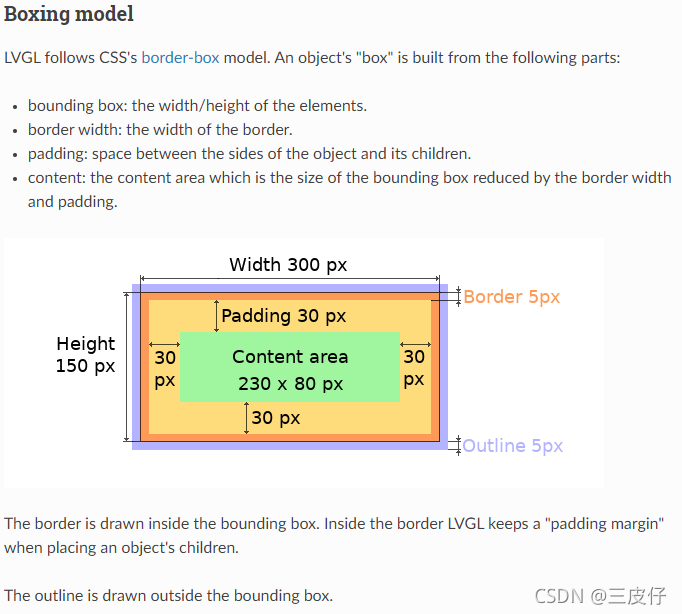
Boxing model
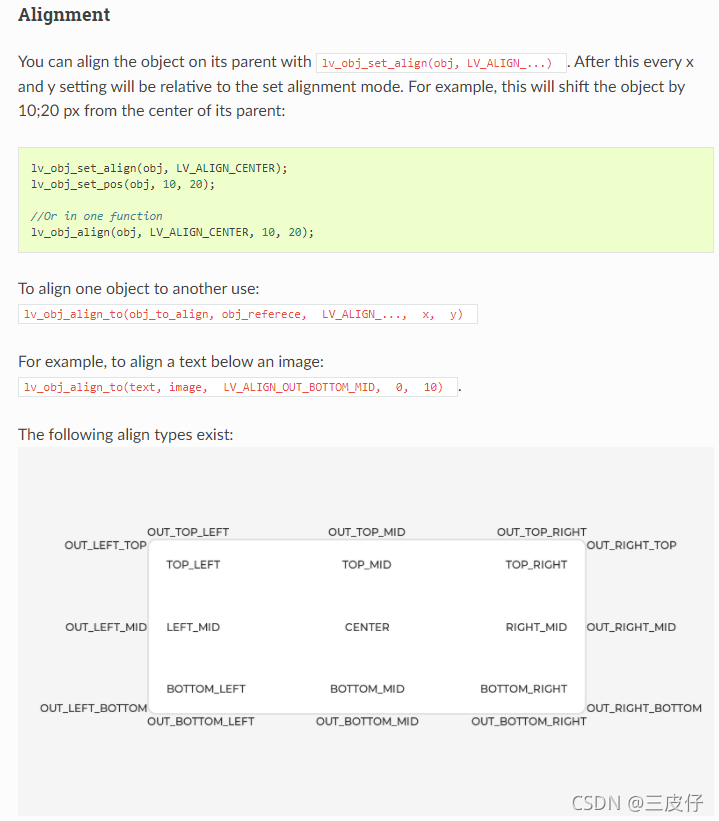
Alignment
字体
font awesome
Font Awesome
Font Awesome download
1001fonts
Monospaced Font 等宽字体
里飞网-LVGL
LvglFontTool V0.4在lvglv8中使用
emoji
OpenSansEmoji
图标
https://materialdesignicons.com/
https://fontello.com/
https://www.iconfont.cn/
https://www.softicons.com/
chart
通过lv_obj_set_style_size设置数据点的显示大小,设置为0,不显示。
lv_chart_set_type(chart1, LV_CHART_TYPE_LINE );/*Set point size to 0 so the lines are smooth */lv_obj_set_style_size(chart1, 0, LV_PART_INDICATOR);
通过lv_obj_set_style_pad_gap设置数据之间显示间隔(用于一个图表显示多个系列)
lv_chart_set_type(chart2, LV_CHART_TYPE_BAR);/* 设置同一x值之间的间距 */lv_obj_set_style_pad_gap(chart2, 0, LV_PART_ITEMS);/* 设置相邻x值之间的间距 */lv_obj_set_style_pad_gap(chart2, 2, LV_PART_MAIN);
设置X轴坐标,索引值是偶数的不显示
 lv_obj_add_event_cb(chart2, chart_event_cb, LV_EVENT_ALL, NULL);static void chart_event_cb(lv_event_t * e)
{lv_event_code_t code = lv_event_get_code(e);lv_obj_t * obj = lv_event_get_target(e);if(code == LV_EVENT_DRAW_PART_BEGIN) {lv_obj_draw_part_dsc_t * dsc = lv_event_get_param(e);/*Set the markers' text*/if(dsc->part == LV_PART_TICKS && dsc->id == LV_CHART_AXIS_PRIMARY_X) {if(lv_chart_get_type(obj) == LV_CHART_TYPE_BAR) {/* 设置X轴坐标,索引值是偶数的不显示 */if (dsc->value%2==0){lv_snprintf(dsc->text, dsc->text_length, "%s"," ");}//lv_snprintf(dsc->text, dsc->text_length, "%s", month[dsc->value]);} else {const char * month[] = {"Jan", "Febr", "March", "Apr", "May", "Jun", "July", "Aug", "Sept", "Oct", "Nov", "Dec"};lv_snprintf(dsc->text, dsc->text_length, "%s", month[dsc->value]);}}
CHART_AXIS
如果要显示坐标轴的值,必须为坐标轴留出显示空间,可通过grid设置。
lv_obj_t *chart1 = lv_chart_create( parent );chart1的空间只是用于显示图表并不包括坐标轴的显示
static lv_coord_t grid_chart_row_dsc[] = {40, LV_GRID_FR( 1 ), LV_GRID_TEMPLATE_LAST};
static lv_coord_t grid_chart_col_dsc[] = {80, LV_GRID_FR( 1 ),80, LV_GRID_TEMPLATE_LAST};lv_chart_set_axis_tick( chart1, LV_CHART_AXIS_PRIMARY_Y, 10, 5, 9, 2, true, 80 );lv_chart_set_axis_tick( chart1, LV_CHART_AXIS_SECONDARY_Y, 10, 5, 9, 2, true, 80 );
chart bar 大小设置
bar 的大小由lv_chart_set_point_count(chart, point_num);v_chart_set_zoom_x(chart, factor);lv_obj_set_style_pad_gap(chart2, 0, LV_PART_ITEMS);lv_obj_set_style_pad_gap(chart2, 2, LV_PART_MAIN);四者共同决定。
当chart大小设定后,如果不设置lv_chart_set_zoom_x,LVGL根据pad_gap的大小及point_count,平均分配每个bar的宽度。
当设定lv_chart_set_zoom_x后,相当于将chart的宽度放大,此时会出现滚动条,在point_count不变的情况下,bar的宽度会增大。
lable
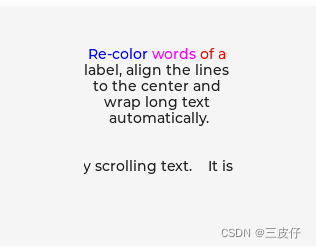
- Text recolor
In the text, you can use commands to recolor parts of the text. For example: “Write a #ff0000 red# word”. This feature can be enabled individually for each label by lv_label_set_recolor() function.
注意事项:
#ff0000之后必须留空格,否则无法识别指令,结束符#不用留空格
#include "../../lv_examples.h"
#if LV_USE_LABEL && LV_BUILD_EXAMPLES/*** Show line wrap, re-color, line align and text scrolling.*/
void lv_example_label_1(void)
{lv_obj_t * label1 = lv_label_create(lv_scr_act());lv_label_set_long_mode(label1, LV_LABEL_LONG_WRAP);     /*Break the long lines*/lv_label_set_recolor(label1, true);                      /*Enable re-coloring by commands in the text*/lv_label_set_text(label1, "#0000ff Re-color# #ff00ff words# #ff0000 of a# label, align the lines to the center ""and wrap long text automatically.");lv_obj_set_width(label1, 150);  /*Set smaller width to make the lines wrap*/lv_obj_set_style_text_align(label1, LV_TEXT_ALIGN_CENTER, 0);lv_obj_align(label1, LV_ALIGN_CENTER, 0, -40);lv_obj_t * label2 = lv_label_create(lv_scr_act());lv_label_set_long_mode(label2, LV_LABEL_LONG_SCROLL_CIRCULAR);     /*Circular scroll*/lv_obj_set_width(label2, 150);lv_label_set_text(label2, "It is a circularly scrolling text. ");lv_obj_align(label2, LV_ALIGN_CENTER, 0, 40);
}#endif
Text recolor
In the text, you can use commands to recolor parts of the text. For example: “Write a #ff0000 red# word”. This feature can be enabled individually for each label by lv_label_set_recolor() function.
textarea
ta = lv_textarea_create( lv_scr_act() );lv_obj_add_style( ta, &init_style, 0 );lv_obj_set_size( ta, SCR_TOTAL_HOR_RES, SCR_TOTAL_VER_RES );/* 修改光标的透明度 */lv_obj_set_style_bg_opa ( ta, LV_OPA_COVER, LV_PART_CURSOR );/* 修改光标的颜色 */lv_obj_set_style_bg_color( ta, lv_palette_lighten( LV_PALETTE_ORANGE, 1 ), LV_PART_CURSOR );lv_obj_set_style_bg_color( ta, SCR_BG_COLOR, LV_PART_MAIN );lv_obj_set_style_pad_all ( ta, 50, LV_PART_MAIN );lv_obj_set_style_pad_gap( ta, 10, LV_PART_MAIN );lv_obj_set_style_text_color( ta, lv_color_white(), LV_PART_MAIN );
lv_obj_set_align 、lv_obj_align、lv_obj_align_to区别
void lv_obj_set_align(struct _lv_obj_t * obj, lv_align_t align)用于设置obj在父控件中的对齐方式,没有偏移。
void lv_obj_align(struct _lv_obj_t * obj, lv_align_t align, lv_coord_t x_ofs, lv_coord_t y_ofs)=lv_obj_set_align(obj, align) + lv_obj_set_pos(obj, x_ofs, y_ofs),用于设置obj在父控件中的对齐方式及偏移值。
void lv_obj_align_to(struct _lv_obj_t * obj, const struct _lv_obj_t * base, lv_align_t align, lv_coord_t x_ofs, lv_coord_t y_ofs)用于设置obj相对base的对齐方式及偏移值。
/*** Change the alignment of an object.* @param obj       pointer to an object to align* @param align     type of alignment (see 'lv_align_t' enum) `LV_ALIGN_OUT_...` can't be used.*/
void lv_obj_set_align(struct _lv_obj_t * obj, lv_align_t align);/*** Change the alignment of an object and set new coordinates.* Equivalent to:* lv_obj_set_align(obj, align);* lv_obj_set_pos(obj, x_ofs, y_ofs);* @param obj       pointer to an object to align* @param align     type of alignment (see 'lv_align_t' enum) `LV_ALIGN_OUT_...` can't be used.* @param x_ofs     x coordinate offset after alignment* @param y_ofs     y coordinate offset after alignment*/
void lv_obj_align(struct _lv_obj_t * obj, lv_align_t align, lv_coord_t x_ofs, lv_coord_t y_ofs);/*** Align an object to an other object.* @param obj       pointer to an object to align* @param base      pointer to an other object (if NULL `obj`s parent is used). 'obj' will be aligned to it.* @param align     type of alignment (see 'lv_align_t' enum)* @param x_ofs     x coordinate offset after alignment* @param y_ofs     y coordinate offset after alignment* @note            if the position or size of `base` changes `obj` needs to be aligned manually again*/
void lv_obj_align_to(struct _lv_obj_t * obj, const struct _lv_obj_t * base, lv_align_t align, lv_coord_t x_ofs,lv_coord_t y_ofs);
lv_obj_set_style_pad_right
lv_obj_set_style_pad_right设置的是当前控件的孩子距离边框的偏移,如下代码表示:btn1的孩子距离按键右边框偏移为10,按键内部一般会有label,就是创建的label会距离右边框偏移为10。
lv_obj_set_style_pad_right(btn1,10,LV_PART_MAIN);
arc
  lv_obj_t *arc = lv_arc_create( parent );/* 设置arc大小 */lv_obj_set_size( arc, size, size );/* 设置背景arc颜色  */lv_obj_set_style_arc_color( arc, color, LV_PART_MAIN );/* 设置前景arc颜色 */lv_obj_set_style_arc_color( arc, color, LV_PART_INDICATOR );/* 设置背景arc宽度 */lv_obj_set_style_arc_width( arc, 5, LV_PART_MAIN );/* 设置前景arc宽度 */lv_obj_set_style_arc_width( arc, 5, LV_PART_INDICATOR );/* 设置前景arc开合角度 */lv_arc_set_angles( arc, 0, 310 );/* 设置背景arc开合角度 */lv_arc_set_bg_angles( arc, 0, 310 );/* 设置arc旋转角度 */lv_arc_set_rotation( arc, 25 );/* 删除knob显示 */lv_obj_remove_style( arc, NULL, LV_PART_KNOB ); /*Be sure the knob is not displayed*/
//  lv_obj_clear_flag(arc, LV_OBJ_FLAG_CLICKABLE);  /*To not allow adjusting by click*/lv_obj_align( arc, align, x_ofs, y_ofs );
Layouts
lv_obj_set_flex_flow(obj, flex_flow)
lv_obj_set_flex_flow用于设置obj的孩子是如何布局的,使用该函数会自动将obj的布局方式修改为LV_LAYOUT_FLEX,不需要手动设置lv_obj_set_layout布局方式。
/*
The possible values for flex_flow are:
LV_FLEX_FLOW_ROW Place the children in a row without wrapping
LV_FLEX_FLOW_COLUMN Place the children in a column without wrapping
LV_FLEX_FLOW_ROW_WRAP Place the children in a row with wrapping
LV_FLEX_FLOW_COLUMN_WRAP Place the children in a column with wrapping
LV_FLEX_FLOW_ROW_REVERSE Place the children in a row without wrapping but in reversed order
LV_FLEX_FLOW_COLUMN_REVERSE Place the children in a column without wrapping but in reversed order
LV_FLEX_FLOW_ROW_WRAP_REVERSE Place the children in a row with wrapping but in reversed order
LV_FLEX_FLOW_COLUMN_WRAP_REVERSE Place the children in a column with wrapping but in reversed order
*/
void lv_obj_set_flex_flow(lv_obj_t * obj, lv_flex_flow_t flow)
{lv_obj_set_style_flex_flow(obj, flow, 0);lv_obj_set_style_layout(obj, LV_LAYOUT_FLEX, 0);
}
速度优化
- 优化图像计算速度
开启 LV_USE_GPU_STM32_DMA2D,使用DMA2D硬件计算。
在lv_gpu_stm32_dma2d.c中,使能lv_gpu_stm32_dma2d_fill_mask - 优化数据传输速度
在my_disp_flush中使用DMA (MEM2MEM 模式)传输,替代for循环发送。
static void my_disp_flush( lv_disp_drv_t *disp, const lv_area_t *area, lv_color_t *color_p )
{int32_t x, y;/*It's a very slow but simple implementation.*`set_pixel` needs to be written by you to a set pixel on the screen*/lcd_block_write( area->x1, area->x2, area->y1, area->y2 );
//  for( y = area->y1; y <= area->y2; y++ )
//  {
//    for( x = area->x1; x <= area->x2; x++ )
//    {
      set_pixel( x, y, *color_p );
//      lcd_set_color( ( uint16_t )( color_p->full ) );
//      color_p++;
//    }
//  }HAL_DMA_Start( &hdma_memtomem_dma1_stream3, ( uint32_t )color_p, BANK1_LCD_DATA_REG, ( area->x2 - area->x1 + 1 ) * ( area->y2 - area->y1 + 1 ) );if( HAL_DMA_PollForTransfer( &hdma_memtomem_dma1_stream3, HAL_DMA_FULL_TRANSFER, 10 ) == HAL_OK ){lv_disp_flush_ready( disp );       /* Indicate you are ready with the flushing*/}//    lv_gpu_stm32_dma2d_copy((lv_color_t *)BANK1_LCD_DATA_REG,area->x2 - area->x1 + 1,color_p,area->x2 - area->x1 + 1,area->x2 - area->x1 + 1,area->y2 - area->y1 + 1);
//  MX_DMA2D_Init();
//  HAL_DMA2D_Start(&hdma2d, (uint32_t)color_p, BANK1_LCD_DATA_REG, area->x2 - area->x1 + 1, area->y2 - area->y1 + 1 );
//
//  if( HAL_DMA2D_PollForTransfer( &hdma2d, 10 ) == HAL_OK )
//  {
//    lv_disp_flush_ready( disp );       /* Indicate you are ready with the flushing*/
//  }
}
内存溢出
lvgl V7.7.2内存泄漏问题
当连续退出进入界面时,内存溢出
LVGL:Out of memory,can‘t allocate a new buffer (increase your LV_MEM_SIZE/heap size
内存溢出解决办法及设计
- 在退出页面时,使用lv_obj_clean删除页面所有的控件。如果不删除页面控件,连续多次退出进入界面后页面控件会不断的申请内存,内存会溢出。
- 在创建页面控件style时,先使用lv_style_reset复位style,再lv_style_init设置样式。如果直接使用lv_style_init创建,连续多次退出进入界面后lv_style_init会不断的申请内存,内存会溢出。
使用lv_obj_set_style_xx创建的为当前控件独有的Local style,会随着控件的删除而自动删除,不需要手动删除该style(local styles are allocated automatically, and freed when the object is deleted)
lv_table 内存泄漏
LVGL v8.1.0 lv_table 内存泄漏问题
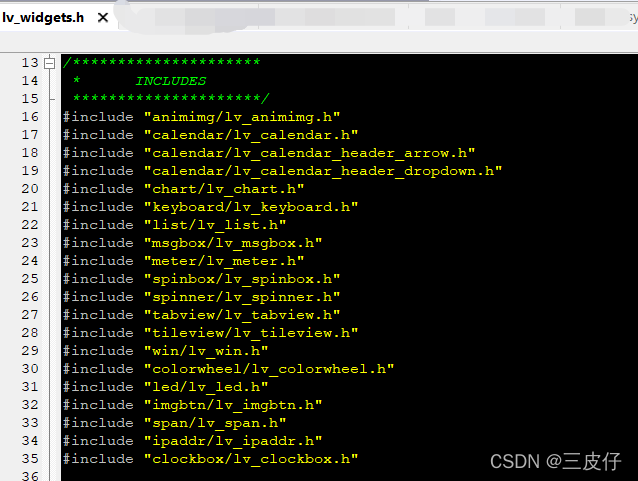
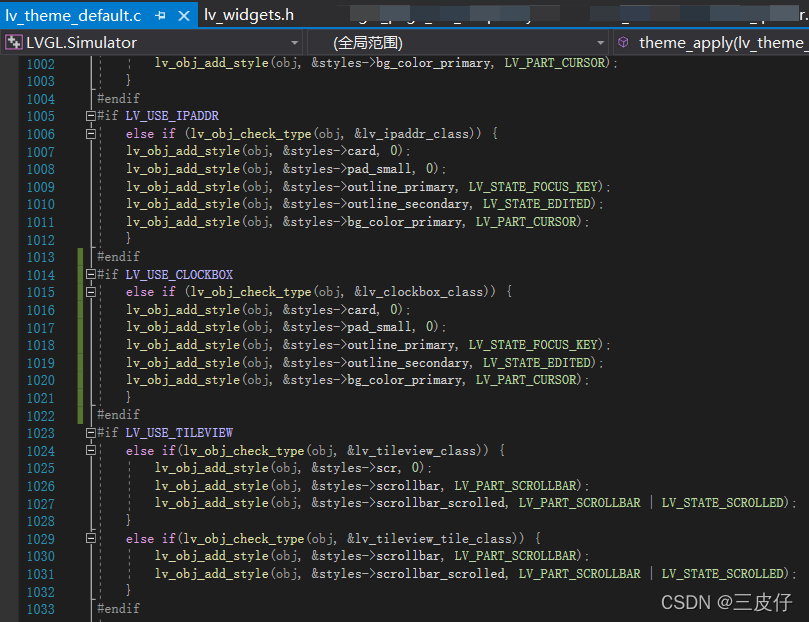
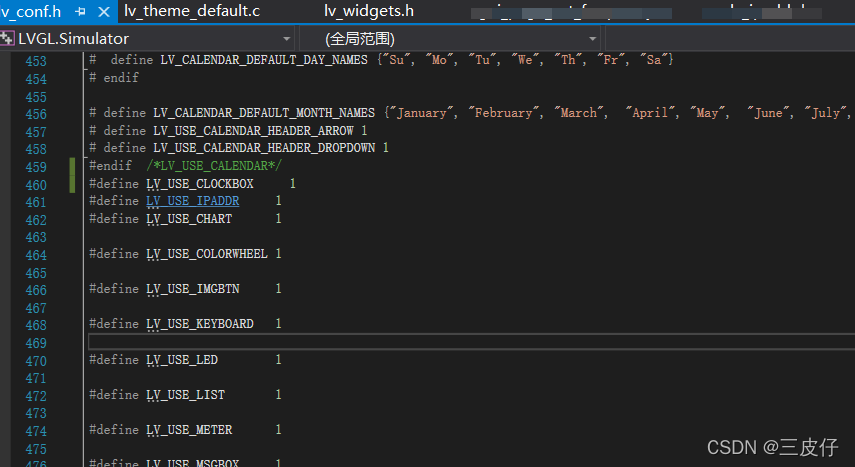
自定义控件
- 在“lv_widgets.h”中添加控件头文件位置
- 在“lv_theme_default.c”中添加控件初始样式
- 在“lv_conf.h”中添加控件使能配置
LVGL 样式
- 通用样式初始化
lv_disp_drv_register–>lv_theme_default_init–>style_init(使用lv_style_set_xxx给样式添加内容,此时只是初始化了样式,并没有将样式绑定到控件) - 绑定样式到控件(以textarea举例)
lv_textarea_create–>lv_obj_class_init_obj–>lv_theme_apply–>apply_theme–>theme.apply_cb–>theme_apply(lv_theme_default.c)(此时使用lv_obj_add_style给控件添加样式)
修改控件指定状态样式
lv_obj_set_style_XXX(xxx, xxx, LV_PART_XXX| LV_STATE_XXX);
LV_PART_XXX用来指示设置的是控件的哪个部分(LV_PART_MAIN表示控件本身)
LV_STATE_XXX用来指示设置的是何状态(如果不写,就是LV_STATE_DEFAULT)
The objects can be in the combination of the following states:LV_STATE_DEFAULT (0x0000) Normal, released stateLV_STATE_CHECKED (0x0001) Toggled or checked stateLV_STATE_FOCUSED (0x0002) Focused via keypad or encoder or clicked via touchpad/mouseLV_STATE_FOCUS_KEY (0x0004) Focused via keypad or encoder but not via touchpad/mouseLV_STATE_EDITED (0x0008) Edit by an encoderLV_STATE_HOVERED (0x0010) Hovered by mouse (not supported now)LV_STATE_PRESSED (0x0020) Being pressedLV_STATE_SCROLLED (0x0040) Being scrolledLV_STATE_DISABLED (0x0080) Disabled stateLV_STATE_USER_1 (0x1000) Custom stateLV_STATE_USER_2 (0x2000) Custom stateLV_STATE_USER_3 (0x4000) Custom stateLV_STATE_USER_4 (0x8000) Custom stateAn object can be in a combination of states such as being focused and pressed at the same time. This is represented as LV_STATE_FOCUSED | LV_STATE_PRESSED.
lv_obj_set_style_bg_color(slider, lv_color_red(), LV_PART_INDICATOR | LV_STATE_FOCUSED);
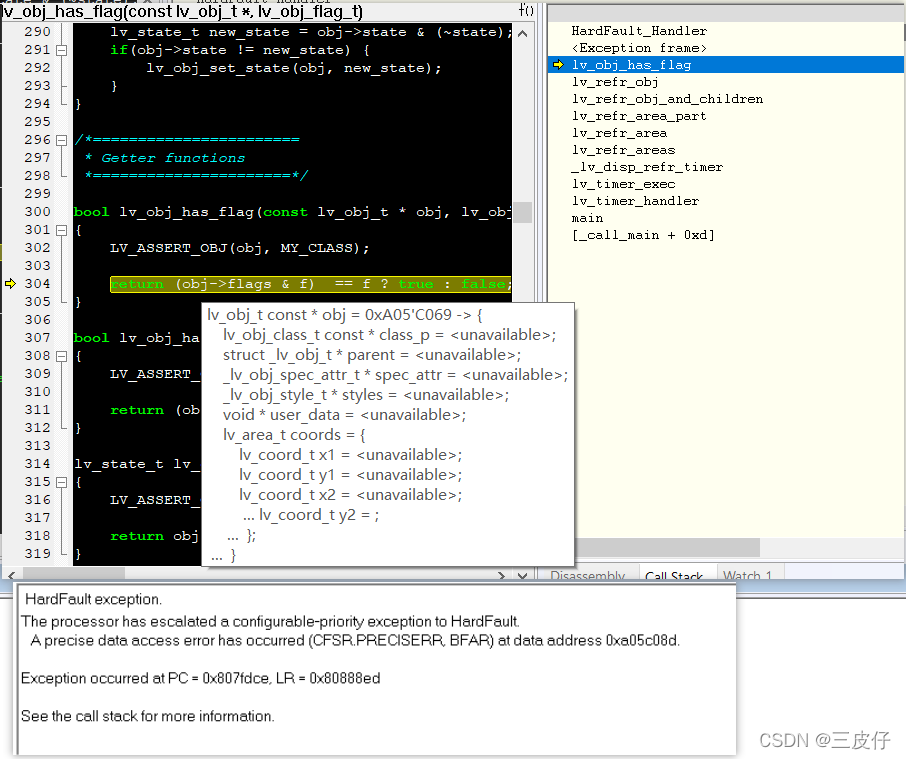
LVGL无法正常运行
LVGL在执行时,如果控件嵌套很多,LVGL的函数会递归调用,会大量使用stack,如果stack分配不足,会导致堆栈溢出
- 在使用FreeRTOS时,stack是由FreeRTOS已分配的内存来分配的,不受系统stack影响
osThreadDef( gui_task, gui_process_task, osPriorityAboveNormal, 0, 1000 );osThreadCreate( osThread( gui_task ), NULL );
- 使用裸机,不使用RTOS时,函数调用的堆栈是从系统stack分配的,此时需要加大系统stack,否则可能会出现堆栈溢出