第一步:在includes/modules/payment目录下创建名称为c_stripe的文件夹,用于存放stripe支付logo
第二步:在同includes/modules/payment目录下创建c_stripe.php文件,这个文件就是用于编写zencart支付插件,代码如下
<?php
//®
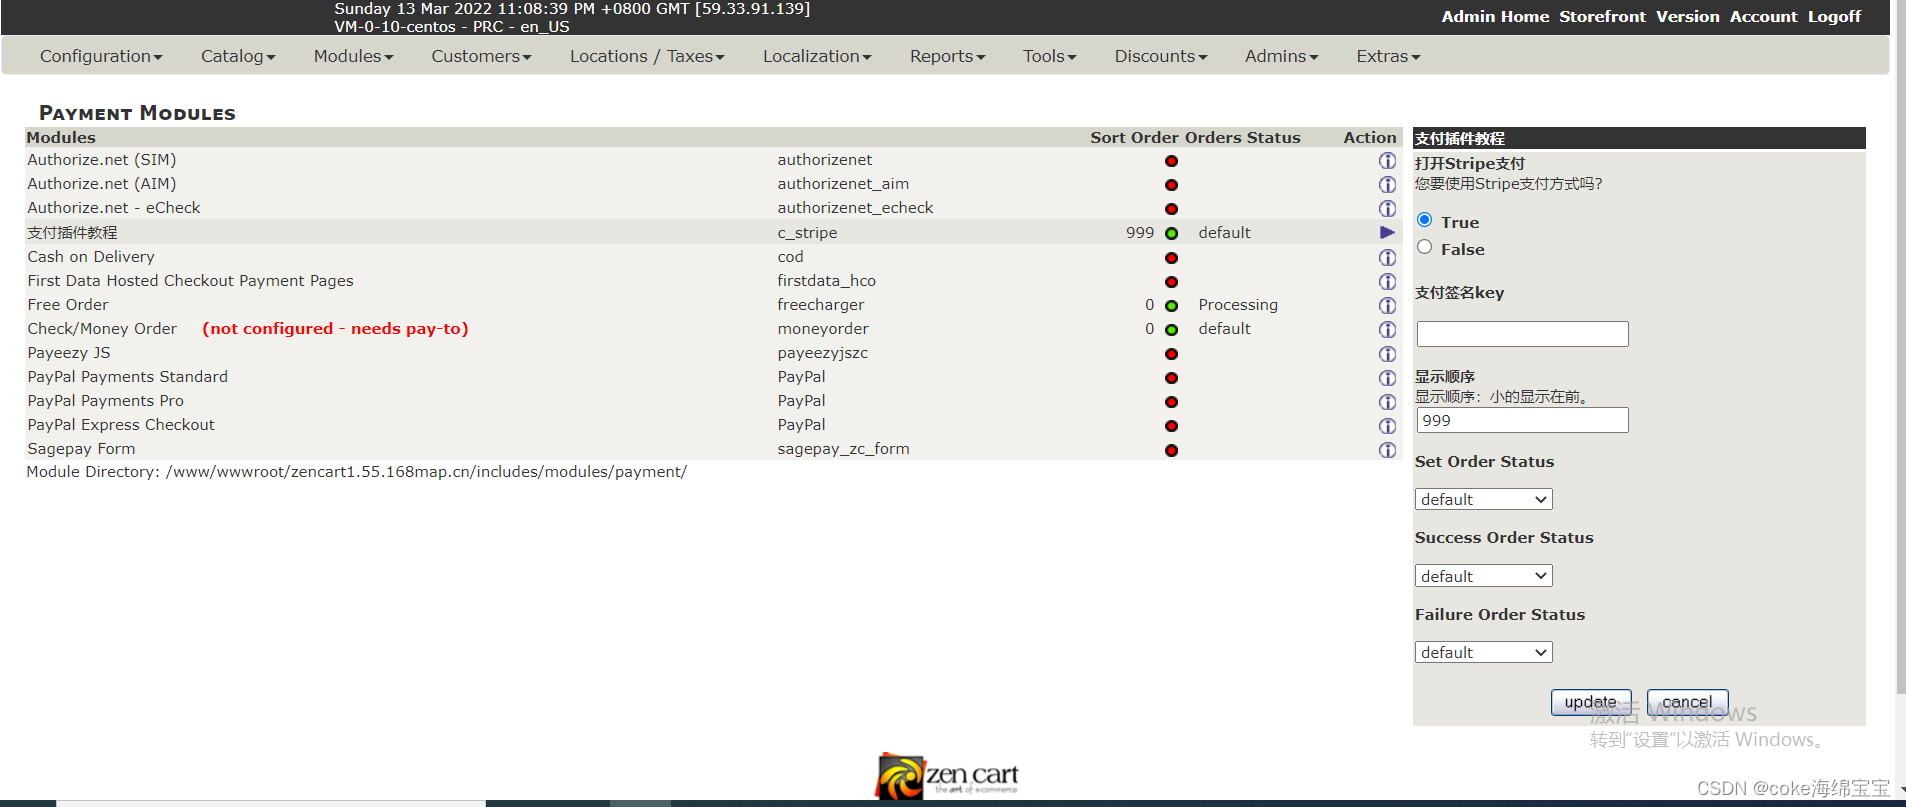
/*** @package money order payment module** @package paymentMethod* @copyright Copyright 2003-2010 Zen Cart Development Team* @copyright Portions Copyright 2003 osCommerce* @license http://www.zen-cart.com/license/2_0.txt GNU Public License V2.0* @version GIT: $Id: Author: DrByte Tue Jan 22 03:36:04 2013 -0500 Modified in v1.5.2 $*/define('MODULE_PAYMENT_PAYPAL_TAX_OVERRIDE', 'true');class c_stripe {var $code, $title, $description, $enabled,$context;// class constructorfunction c_stripe() {global $order;$this->code = 'c_stripe';$this->title = MODULE_PAYMENT_C_STRIPE_TEXT_TITLE;$this->description = MODULE_PAYMENT_C_STRIPE_TEXT_DESCRIPTION;$this->sort_order = MODULE_PAYMENT_C_STRIPE_SORT_ORDER;$this->enabled = ((MODULE_PAYMENT_C_STRIPE_STATUS == 'True') ? true : false);if ((int)MODULE_PAYMENT_C_STRIPE_ORDER_STATUS_ID > 0) {$this->order_status = MODULE_PAYMENT_C_STRIPE_ORDER_STATUS_ID;}if (is_object($order)) $this->update_status();$this->email_footer = MODULE_PAYMENT_C_STRIPE_TEXT_EMAIL_FOOTER;if ($this->enabled && $_SESSION['cart'] && ($_SESSION['cart']->show_total() > intval(MODULE_PAYMENT_C_STRIPE_MAX_AMOUNT) || $_SESSION['cart']->show_total() < intval(MODULE_PAYMENT_C_STRIPE_MIN_AMOUNT))) {$this->enabled = false;}}// class methodsfunction update_status() {global $order, $db ;if ($this->enabled && (int)MODULE_PAYMENT_C_STRIPE_ZONE > 0 && isset($order->billing['country']['id'])) {$check_flag = false;$check = $db->Execute("select zone_id from " . TABLE_ZONES_TO_GEO_ZONES . " where geo_zone_id = '" . MODULE_PAYMENT_C_STRIPE_ZONE . "' and zone_country_id = '" . $order->billing['country']['id'] . "' order by zone_id");while (!$check->EOF) {if ($check->fields['zone_id'] < 1) {$check_flag = true;break;} elseif ($check->fields['zone_id'] == $order->billing['zone_id']) {$check_flag = true;break;}$check->MoveNext();}if ($check_flag == false) {$this->enabled = false;}}}function javascript_validation() {return false;}function selection() {global $current_page_base,$template;$m_fieldsArray [] = array ('title' => '','field' =>'','tag' => '' );return array('id' => $this->code,'module' =>'<img src="./includes/modules/payment/c_stripe/stripe.png" style="height: 50px;vertical-align: middle;">','fields' =>$m_fieldsArray);}function pre_confirmation_check(){return false;}function check_checkout_pay() {global $db, $order, $order_totals, $order_total_modules,$messageStack,$currencies;if(isset($_SESSION['order_number_created']))$_SESSION['order_id'] = $_SESSION['order_number_created'];$order_id = $_SESSION['order_id'];date_default_timezone_set(date_default_timezone_get());$currency = $_SESSION['currency'];//due to zen cart bug,we should not do currency exchange with zen cart build in currency class,keep in mind$amount = zen_round($order->info['total'] * $currencies->currencies[$currency]['value'], $currencies->currencies[$currency]['decimal_places']);// 回调URL$strServerUrl = zen_href_link(FILENAME_CHECKOUT_SUCCESS, '', 'SSL');//支付成功后的回调地址$strNotifyUrl = zen_href_link('c_stripe_payment.php', '', 'SSL',false,false,true);$state = $order->customer['state'];$data = array('order_no'=>$order_id,'currency'=>$currency,'success_uri'=>$strServerUrl,'notify_url'=>$strNotifyUrl,'amount'=>$amount,'key' => MODULE_PAYMENT_C_STRIPE_API_USERNAME;);$_SESSION['payment_order'] = $data;zen_redirect(zen_href_link("checkout_stripe"));exit;}function confirmation() {return array('title' => MODULE_PAYMENT_C_STRIPE_TEXT_DESCRIPTION);}function process_button() {$process_button_string="";if(isset($this->orders_id)&&$this->orders_id!=""){$process_button_string .= zen_draw_hidden_field('orders_id', $this->orders_id); $process_button_string .= zen_draw_hidden_field('redirect_url',$this->redirect_url); $process_button_string .= zen_draw_hidden_field('fetch_url', $this->fetch_url); $process_button_string .= zen_draw_hidden_field('callback_url', $this->callback_url); }return $process_button_string;}function before_process() {return false;}function after_process() {$this->check_checkout_pay();return false;}function get_error() {return false;}function check() {global $db;if (!isset($this->_check)) {$check_query = $db->Execute("select configuration_value from " . TABLE_CONFIGURATION . " where configuration_key = 'MODULE_PAYMENT_C_STRIPE_STATUS'");$this->_check = $check_query->RecordCount();}return $this->_check;}function install() {global $db, $messageStack;$db->Execute("insert into " . TABLE_CONFIGURATION . " (configuration_title, configuration_key, configuration_value, configuration_description, configuration_group_id, sort_order, set_function, date_added) values ('打开Stripe支付', 'MODULE_PAYMENT_C_STRIPE_STATUS', 'True', '您要使用Stripe支付方式吗?', '6', '1', 'zen_cfg_select_option(array(\'True\', \'False\'), ', now())");$db->Execute("insert into " . TABLE_CONFIGURATION . " (configuration_title, configuration_key, configuration_value, configuration_description, configuration_group_id, sort_order, date_added) values ('支付签名key', 'MODULE_PAYMENT_C_STRIPE_API_USERNAME', '', '', '6', '0', now())");$db->Execute("insert into " . TABLE_CONFIGURATION . " (configuration_title, configuration_key, configuration_value, configuration_description, configuration_group_id, sort_order, date_added) values ('显示顺序', 'MODULE_PAYMENT_C_STRIPE_SORT_ORDER', '999', '显示顺序:小的显示在前。', '6', '0', now())");$db->Execute("insert into " . TABLE_CONFIGURATION . " (configuration_title, configuration_key, configuration_value, configuration_description, configuration_group_id, sort_order, set_function, use_function, date_added) values ('Set Order Status', 'MODULE_PAYMENT_C_STRIPE_ORDER_STATUS_ID', '7', '', '6', '0', 'zen_cfg_pull_down_order_statuses(', 'zen_get_order_status_name', now())");$db->Execute("insert into " . TABLE_CONFIGURATION . " (configuration_title, configuration_key, configuration_value, configuration_description, configuration_group_id, sort_order, set_function, use_function, date_added) values ('Success Order Status', 'MODULE_PAYMENT_C_STRIPE_ORDER_SUCCESS_STATUS_ID', '8', '', '6', '0', 'zen_cfg_pull_down_order_statuses(', 'zen_get_order_status_name', now())");$db->Execute("insert into " . TABLE_CONFIGURATION . " (configuration_title, configuration_key, configuration_value, configuration_description, configuration_group_id, sort_order, set_function, use_function, date_added) values ('Failure Order Status', 'MODULE_PAYMENT_C_STRIPE_ORDER_FAIL_STATUS_ID', '9', '', '6', '0', 'zen_cfg_pull_down_order_statuses(', 'zen_get_order_status_name', now())");}function remove() {global $db;$db->Execute("delete from " . TABLE_CONFIGURATION . " where configuration_key in ('" . implode("', '", $this->keys()) . "')");}function keys() {return array('MODULE_PAYMENT_C_STRIPE_STATUS','MODULE_PAYMENT_C_STRIPE_API_USERNAME','MODULE_PAYMENT_C_STRIPE_SORT_ORDER','MODULE_PAYMENT_C_STRIPE_ORDER_STATUS_ID','MODULE_PAYMENT_C_STRIPE_ORDER_SUCCESS_STATUS_ID','MODULE_PAYMENT_C_STRIPE_ORDER_FAIL_STATUS_ID');}}
以上就是主要的支付代码文件了
第三步:在includes/languages/english/modules/payment下创建c_stripe.php,这个文件主要是用于后台支付插件的标题等说明
<?php
//
// +----------------------------------------------------------------------+
// |zen-cart Open Source E-commerce                                       |
// +----------------------------------------------------------------------+
// | Copyright (c) 2003 The zen-cart developers                           |
// |                                                                      |
// | http://www.zen-cart.com/index.php                                    |
// |                                                                      |
// | Portions Copyright (c) 2003 osCommerce                               |
// +----------------------------------------------------------------------+
// | This source file is subject to version 2.0 of the GPL license,       |
// | that is bundled with this package in the file LICENSE, and is        |
// | available through the world-wide-web at the following url:           |
// | http://www.zen-cart.com/license/2_0.txt.                             |
// | If you did not receive a copy of the zen-cart license and are unable |
// | to obtain it through the world-wide-web, please send a note to       |
// | license@zen-cart.com so we can mail you a copy immediately.          |
// +----------------------------------------------------------------------+
// $Id: moneyorder.php 1969 2005-09-13 06:57:21Z drbyte $
//define('MODULE_PAYMENT_C_STRIPE_TEXT_TITLE', '支付插件教程');define('MODULE_PAYMENT_C_STRIPE_TEXT_DESCRIPTION', '');define('MODULE_PAYMENT_C_STRIPE_TEXT_EMAIL_FOOTER', '');define('MODULE_PAYMENT_C_STRIPE_PURCHASE_DESCRIPTION_TITLE', 'All the items in your shopping basket (see details in the store and on your store receipt).');?>
如果你有多个国家,同样复制修改对应的国家语言 字段即可
第四步:在includes\modules\pages创建checkout_stripe\header_php.php
<?php
/*** checkout_payresult header_php.php** @package page* @copyright Copyright 2003-2007 Zen Cart Development Team* @copyright Portions Copyright 2003 osCommerce* @license http://www.zen-cart.com/license/2_0.txt GNU Public License V2.0*/if (isset($_SESSION['payment_order']) && !empty($_SESSION['payment_order']))
{$paymentdata = $_SESSION['payment_order'];
}$breadcrumb->add("Checkout Stripe");
?>
第五步:在目录includes\templates\template_default\templates创建tpl_checkout_stripe_default.php支付页面
<php
$paymentdata = paymentdata;
?>
<!DOCTYPE html>
<html lang="en"><head><meta charset="utf-8" /><title>Accept a payment</title><meta name="description" content="A demo of a payment on Stripe" /><meta name="viewport" content="width=device-width, initial-scale=1" /><link rel="stylesheet" href="checkout.css" /><script src="https://js.stripe.com/v3/"></script><script src="checkout.js" defer></script></head><body><!-- Display a payment form --><form id="payment-form">
<input type="hidden" value="<?php eccho $paymentdata['金额']"><div id="payment-element"><!--Stripe.js injects the Payment Element--></div><button id="submit"><div class="spinner hidden" id="spinner"></div><span id="button-text">Pay now</span></button><div id="payment-message" class="hidden"></div></form></body>
</html>
备注:页面tpl_checkout_stripe_default.php接收到$paymentdata数据,使用<input type="hidden" value="<?php eccho $paymentdata['金额']">
请根据stripe自定义支付修改自己的php提交地址,直接复制stripe代码过来修改js对应的提交php文件就可以了。

如有不清楚的地方记得联系我