文章目录
- 一、了解Stripe支付
- 二、Stripe注册流程
- 三、Stripe API 特点
- 3.1 Apikey
- 3.2 Idempotent Requests 幂等请求
- 3.3 两种付款方式
- 四、Stripe 支付核心API
- 4.1 Token
- 4.2 Customer
- 4.3 Card
- 4.4 Source
- 4.5 charge
- 4.6 PaymentIntents
- 4.7 PaymentMethod
- 五、完整Stripe支付代码
一、了解Stripe支付
最近公司正在做一个国际版APP,涉及到海外支付,调研过Paypal、Skrill、BrainTree、Stripe(可参考海外移动支付方案对比),最终 选择了Stripe支付。Stripe特点如下:
- 收费规则简单透明,手续费就是收取订单总额的3.4 % + HK$2.35。没有月费、开户费、退款手续费,撤销付款费用手续费HK$85.00
- Stripe支持135+种货币创建付款(目前不支持中国大陆,只支持中国香港)。
- Stripe还支持其他付款方式,包括ACH信用转账、ACH借记转账、支付宝、Android Pay、Apple Pay、Bancontact、Bitcoin(比特币)、银行卡(Visa,Mastercard,American Express,Discover,Diners Club,JCB等)、Giropay、iDEAL、SEPA、SOFORT、微信支付等来自全球的热门支付方式。
- Stripe的开发文档清晰简单,集成友好。提供了IOS、Android的SDK,以及对各种语言的支持。
二、Stripe注册流程
和其他国内支付平台一样,首先需要注册Stripe账户。官网注册链接:
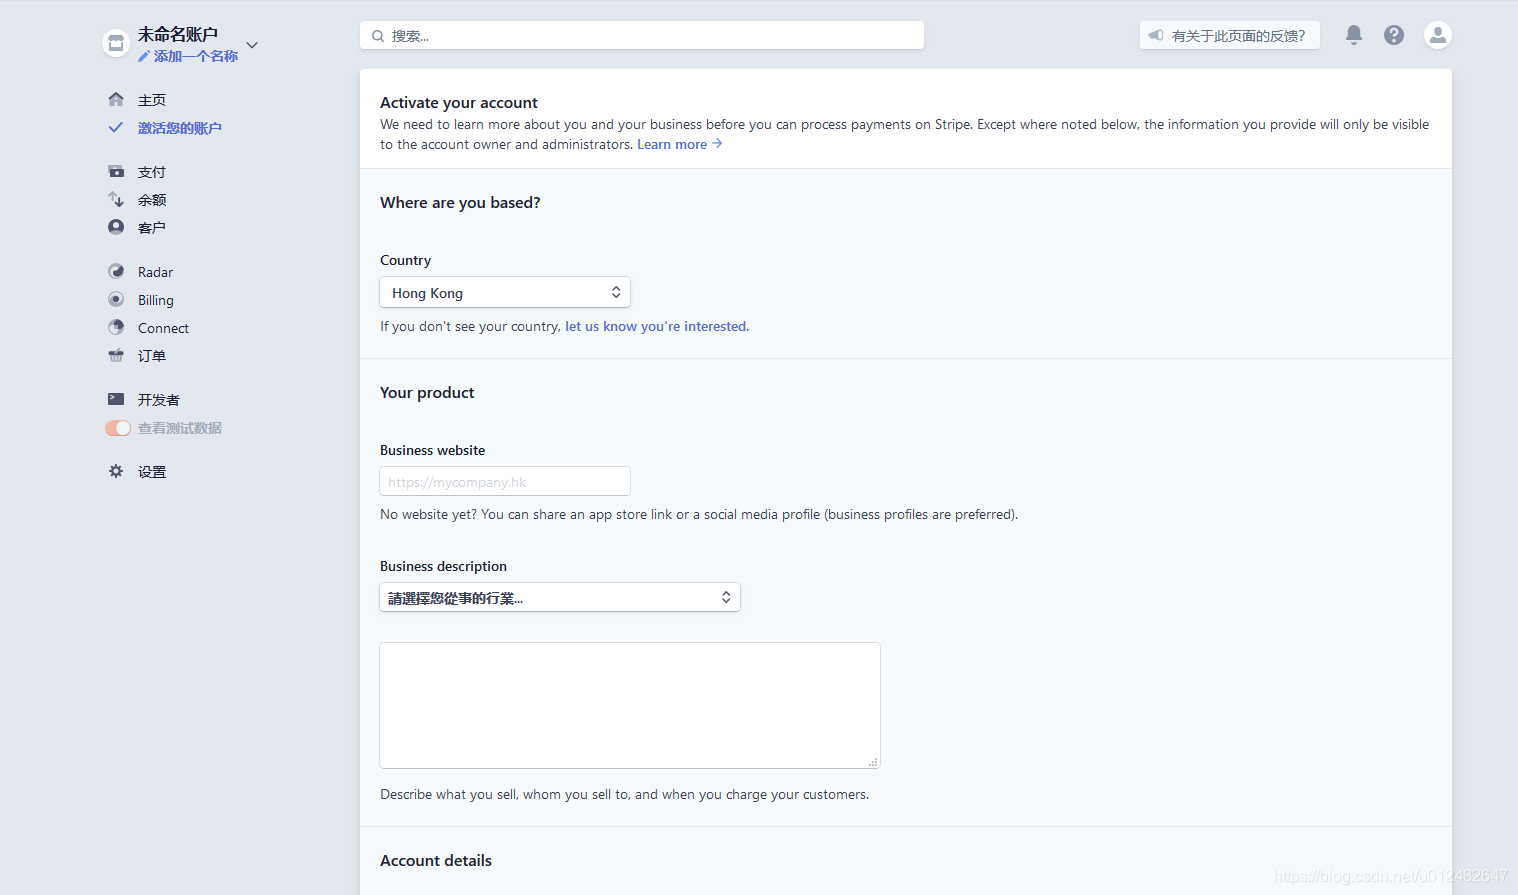
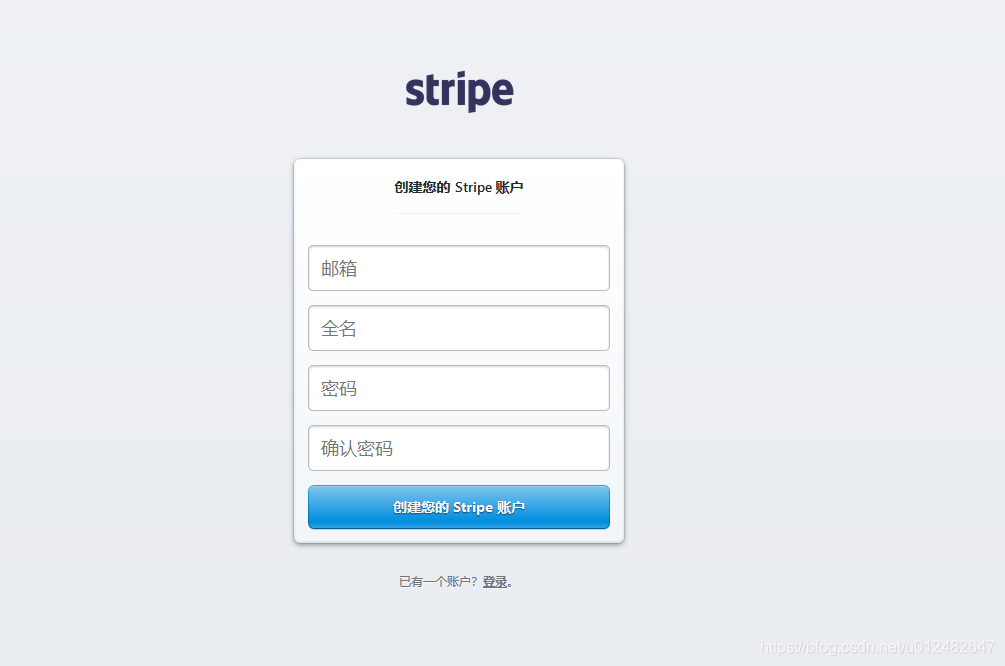 在注册页面中填写邮箱信息完成注册即可。进入了DashBoard,可以看到账户还没有被激活,在激活账户之前先验证电子邮件,然后点击激活账号:
 账户激活的时候,因为Stripe不支持中国,所以要用支持的国家注册商户,而你恰恰有这个国家的公司信息、银行卡信息之类的,最后一定要发送手机号码验证,要不然在调用API的时候,会报错,提示你没有完善信息。
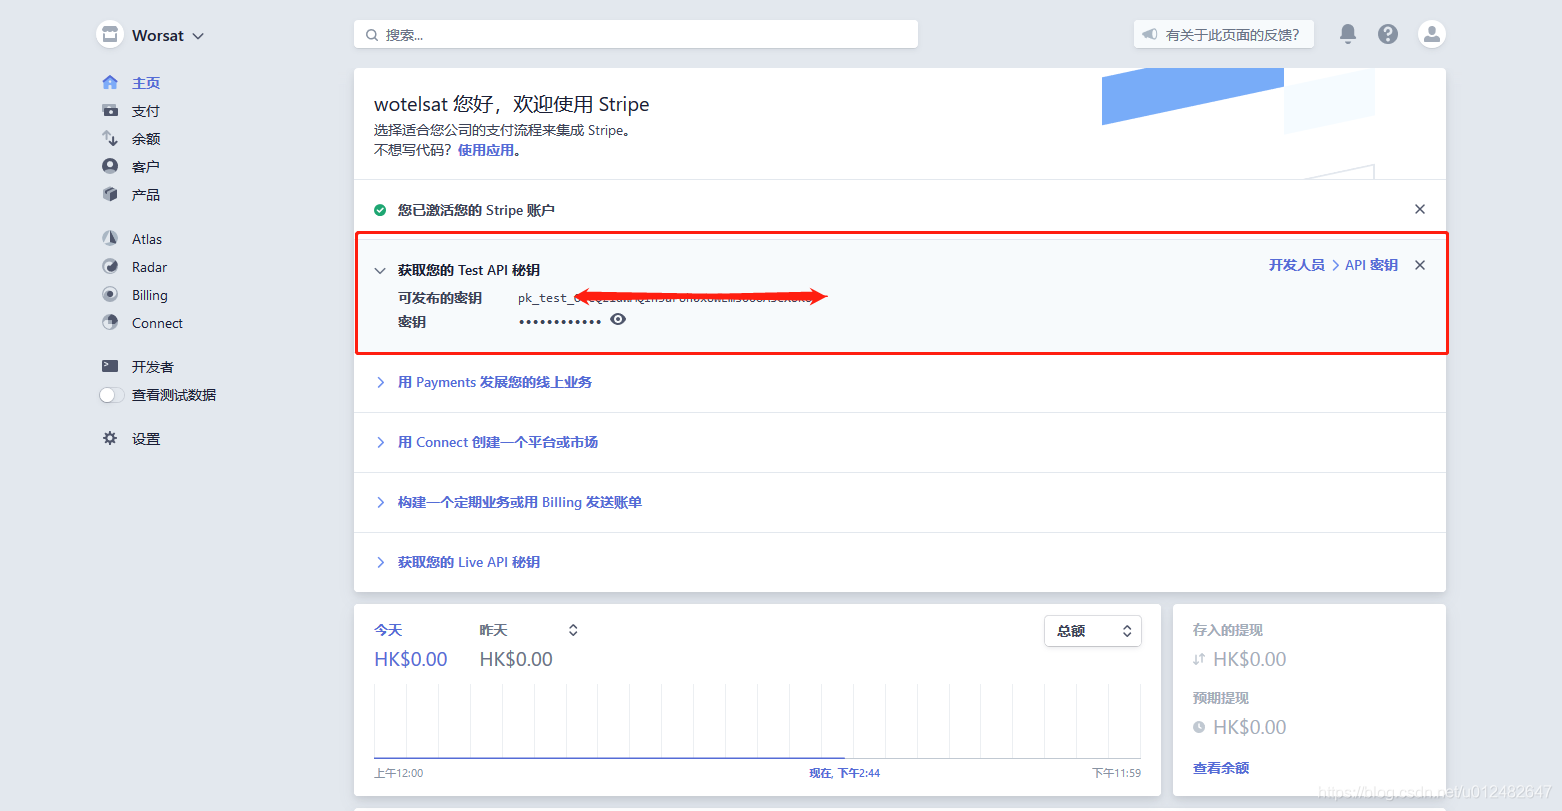
 我这是公司账号,使用公司在香港信息完成了账户激活。可以看到,出现了API 密钥的内容提示,说明我们完成激活,可以开始玩了。
三、Stripe API 特点
3.1 Apikey
Stripe.apiKey = "sk_test_*****************************";
Stripe API使用API密钥来验证请求,在控制台有两种密钥:测试密钥和生产密钥
测试模式密钥的前缀:sk_test_
生产模式密钥的前缀:sk_live_
在调用每个API的时候,要在每个请求中发送此密钥。
3.2 Idempotent Requests 幂等请求
Stripe API 支持Idempotentcy 来安全的重试请求,而不会意外的执行两次相同的操作。幂等性密钥是客户端生成的唯一值,服务器使用该值来识别同一个请求的重试。
3.3 两种付款方式
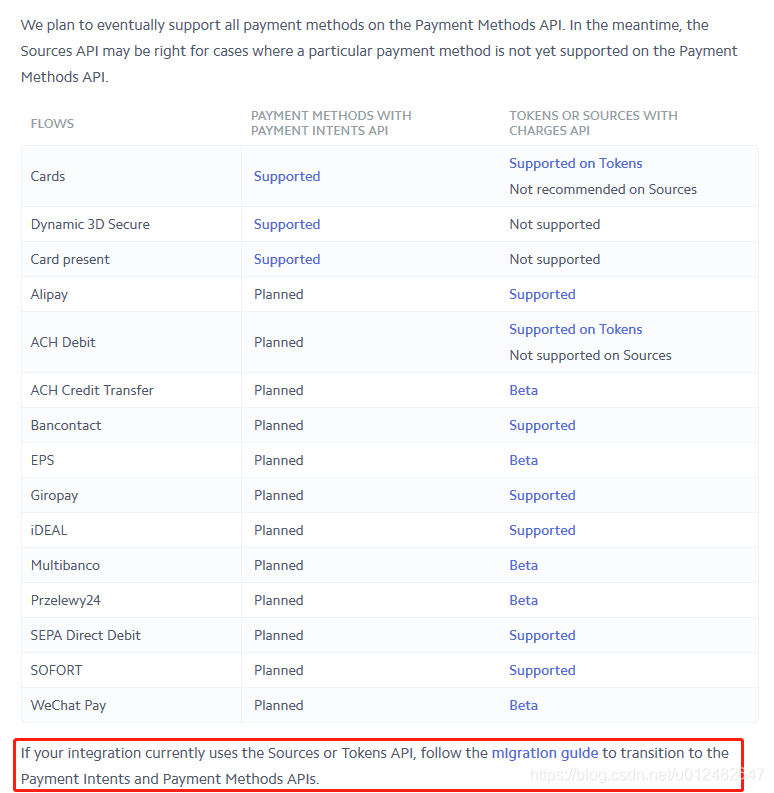
Stripe 现在提供两种方式的支付API:Payment Methods API 和 Tokens and SourcesAPIs
两者的区别在于Sources是通过status属性描述事物状态的。这意味着每个Source对象必须先转换为可收费状态才能用于付款,相反Payment Methods 是无状态的,依赖于PaymentIntent对象来表示给定支付的交易状态
如图所示,官方建议迁移到Payment Methods API
四、Stripe 支付核心API
Stripe 本身提供了大而全的东西,其核心的API,包括以下模块:
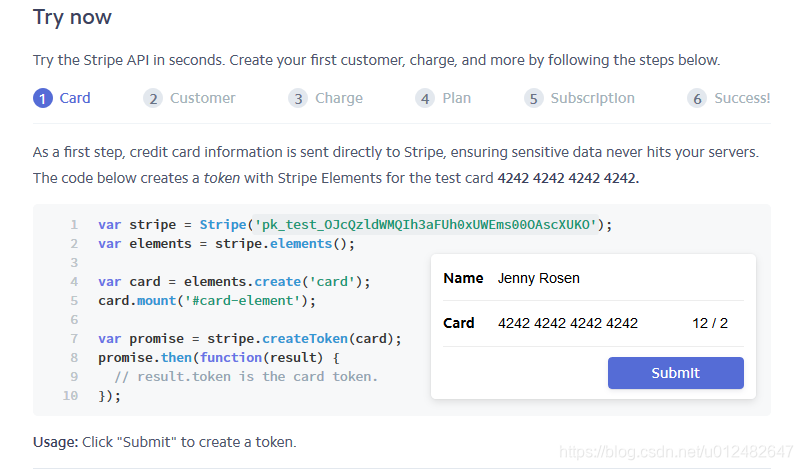
官网给出了一个支付过程的说明,只需要六步就能完成操作,收集Card信息、创建用户、支付、计划、订阅,完成支付,基本上第四部和第五步,我们不会使用。简单易上手。
我们自身业务关心的是Payment这块,所以核心的API也是集中在Payment这块儿说明,包括Token、Card、Customer、PaymentIntent、PaymentMethod、Source、Charge等,我们都使用创建API来挨个来了解一下。
4.1 Token
Token是Stripe用来客户收集敏感卡或者银行账户信息的过程,当用户填写了银行卡的卡号、过期年月、CVC等信息后,Stripe会生成过一个包含这些信息的Token,这样在传输过程中,确保没有敏感的卡数据和我们自己的服务器交互,降低客户真实信息丢失率。我们自身的服务器,取到token,进行支付即可 。
Token不能多次存储和使用,要存储卡的信息供以后使用,可以创建用户。将卡的信息添加给用户。
#创建TokenStripe.apiKey = "sk_test_your_key";Map<String, Object> tokenParams = new HashMap<String, Object>();Map<String, Object> cardParams = new HashMap<String, Object>();cardParams.put("number", "4242424242424242");cardParams.put("exp_month", 8);cardParams.put("exp_year", 2020);cardParams.put("cvc", "314");tokenParams.put("card", cardParams);Token.create(tokenParams);
4.2 Customer
Customer 允许执行与同一客户关联的重复费用,并跟踪多个费用。可以创建、删除和更新客户。也可以检索单个客户以及所有客户的列表。
Map<String, Object> customerParams = new HashMap<String, Object>();customerParams.put("description", "Customer for chao");customerParams.put("source", "tok_**********");Customer c = null;try {c = Customer.create(customerParams);System.out.println(c);} catch (StripeException e) {e.printStackTrace();}
4.3 Card
可以在一个客户上存储多张卡,向该客户收费。
Stripe.apiKey = "your_apikey";Customer customer = Customer.retrieve("cus_FfoCbKMV4SJ7je");Map<String, Object> params = new HashMap<String, Object>();params.put("source", "tok_mastercard");customer.getSources().create(params);
4.4 Source
Source代表接收各种付款方式,代表客户的支付工具。创建收费的时候,可以附加到客户。
Stripe.apiKey = "sk_test_1crNbJbtW30srR0CxeJHtFNF003Cuo2uSJ";Map<String, Object> sourceParams = new HashMap<String, Object>();
sourceParams.put("type", "ach_credit_transfer");
sourceParams.put("currency", "usd");
Map<String, Object> ownerParams = new HashMap<String, Object>();
ownerParams.put("email", "jenny.rosen@example.com");
sourceParams.put("owner", ownerParams);Source.create(sourceParams);
4.5 charge
对信用卡或者借记卡收费时,创建一个charge对象
Stripe.apiKey = "your_apikey";Map<String, Object> chargeParams = new HashMap<String, Object>();
chargeParams.put("amount", 2000);
chargeParams.put("currency", "hkd");
chargeParams.put("description", "Charge for jenny.rosen@example.com");
chargeParams.put("source", "tok_mastercard");Charge.create(chargeParams);
4.6 PaymentIntents
PaymentIntents 将指导你完成从客户处收款的过程,官方建议为系统中的每一个订单或者客户创建一个PaymentIntent。
Stripe.apiKey = "your_alikey";Map<String, Object> paymentIntentParams = new HashMap<>();
paymentIntentParams.put("amount", 2000);
paymentIntentParams.put("currency", "hkd");
ArrayList<String> paymentMethodTypes = new ArrayList<>();
paymentMethodTypes.add("card");
paymentIntentParams.put("payment_method_types", paymentMethodTypes);PaymentIntent.create(paymentIntentParams);
4.7 PaymentMethod
PaymentMethod代表客户的支付工具,和PaymentIntents一起使用 以收取付款或保存到客户对象。
Stripe.apiKey = "your_alikey";Map<String, Object> paymentmethodParams = new HashMap<String, Object>();
paymentmethodParams.put("type", "card");
Map<String, Object> cardParams = new HashMap<String, Object>();
cardParams.put("number", "4242424242424242");
cardParams.put("exp_month", 8);
cardParams.put("exp_year", 2020);
cardParams.put("cvc", "314");
paymentmethodParams.put("card", cardParams);PaymentMethod.create(paymentmethodParams);
五、完整Stripe支付代码
网上看了一大圈关于Stripe的支付,资料很少,要么是年代久远,要么是代码不完整。希望我的代码对你有所用。
我们的前端业务流程如图所示:
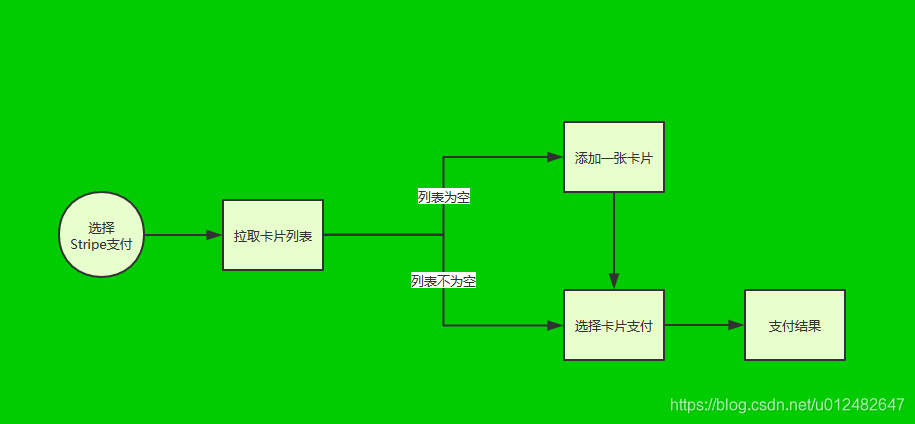
选择的支付方式是Token and Source API,控制器类StripeController 代码如下:
@Controller
@RequestMapping(value = "/stripe")
public class StripeController {@Resourceprivate StripePayService stripePayService;private static Logger logger = LoggerFactory.getLogger(StripeController.class);/*** 获取用户卡片列表** @return*/@RequestMapping(value = "/getCardList", method = RequestMethod.POST)@ResponseBodypublic Response getCardList(@RequestBody @Valid StripePayRequestVO stripePayRequestVO, BindingResult result) {return stripePayService.getCardList(stripePayRequestVO);}/*** 添加用户卡片* @return*/@RequestMapping(value = "/addCard", method = RequestMethod.POST)@ResponseBodypublic Response addCard(@RequestBody @Valid StripePayRequestVO stripePayRequestVO, BindingResult result) {logger.debug("购买套餐请求参数 {} = ", JsonUtil.INSTANCE.toJson(stripePayRequestVO));return stripePayService.addCard(stripePayRequestVO);}/*** 发起支付* @return*/@RequestMapping(value = "/charge", method = RequestMethod.POST)@ResponseBodypublic Response aliPay(@RequestBody @Valid StripePayRequestVO stripePayRequestVO, BindingResult result) {return stripePayService.charge(stripePayRequestVO);}
}
DAO层
public interface StripePayService {Response charge(StripePayRequestVO stripePayRequestVO);Response getCardList(StripePayRequestVO stripePayRequestVO);Response addCard(StripePayRequestVO stripePayRequestVO);}实现层
@Service("stripePayService")
public class StripePayServiceImpl implements StripePayService {@Overridepublic Response charge(StripePayRequestVO request) {try {Stripe.apiKey = "your_apikey";Map<String, Object> params = new HashMap<String, Object>();params.put("userId", request.getUserId());User user = this.get("from User where id=:userId", params);if (null == user) {return failure(ResponseEnum.USER_NOT_FOUND_FAILURE);}//无stripe账号,直接返回if (user.getStripeChargeId() == null || "".equals(user.getStripeChargeId())) {return success(ResponseEnum.USER_BAD_REQUEST_FAILURE);}// 业务订单数据,此处省略//发起支付Map<String, Object> payParams = new HashMap<>();payParams.put("amount", product.getPrice().intValue());payParams.put("currency", "usd");payParams.put("description", "Charge for " + user.getEmail());payParams.put("customer", user.getStripeChargeId());Charge charge = Charge.create(payParams);//charge  支付是同步通知if ("succeeded".equals(charge.getStatus())) {//交易成功后,需要更新我们的订单表,修改业务参数,此处省略return success(ResponseEnum.PAY_SUCCESS.getMessage());} else {return failure(ResponseEnum.PAY_ALIPAY_FAILURE);}} catch (StripeException e) {e.printStackTrace();}return failure(ResponseEnum.EVENT_SYSTEM_ERROR_FAILURE);}@Overridepublic Response getCardList(StripePayRequestVO stripePayRequestVO) {Stripe.apiKey = "your_alipay";Map<String, Object> params = new HashMap<String, Object>();params.put("userId", stripePayRequestVO.getUserId());User user = this.get("from User where id=:userId", params);if (null == user) {return failure(ResponseEnum.USER_NOT_FOUND_FAILURE);}List list = new ArrayList<StripeAddCardVO>();//如果没有这个stripe用户,就返回列表为空try {Map<String, Object> cardParams = new HashMap<String, Object>();cardParams.put("limit", 1);cardParams.put("object", "card");List<PaymentSource> cardList = Customer.retrieve(user.getStripeChargeId()).getSources().list(cardParams).getData();StripeCardVO stripeCardVO = new StripeCardVO();for (PaymentSource p : cardList) {Card c = (Card) p;stripeCardVO.setLast4(c.getLast4());stripeCardVO.setExpYear(c.getExpYear());stripeCardVO.setExpMonth(c.getExpMonth());list.add(stripeCardVO);}return success(list);} catch (StripeException e) {e.printStackTrace();}}@Overridepublic Response addCard(StripePayRequestVO stripePayRequestVO) {Stripe.apiKey = "your_alipay";Map<String, Object> params = new HashMap<String, Object>();params.put("userId", stripePayRequestVO.getUserId());User user = this.get("from User where id=:userId", params);if (null == user) {return failure(ResponseEnum.USER_NOT_FOUND_FAILURE);}//如果没有这个stripe用户,添加卡片就是创建用户if (user.getStripeChargeId() == null || "".equals(user.getStripeChargeId())) {Map<String, Object> customerParams = new HashMap<String, Object>();customerParams.put("description", "Customer for test");customerParams.put("source", stripePayRequestVO.getToken());Customer c = null;try {c = Customer.create(customerParams);user.setStripeChargeId(c.getId());this.saveOrUpdate(user);success("添加成功");} catch (StripeException e) {e.printStackTrace();}} else {//  有这个用户,就是修改他的唯一一张默认卡try {Customer c = Customer.retrieve(user.getStripeChargeId());System.out.println("给客户修改默认卡号");Map<String, Object> tokenParam = new HashMap<String, Object>();tokenParam.put("source", stripePayRequestVO.getToken());c.update(tokenParam);return success("修改成功");} catch (StripeException e) {System.out.println("异常了");System.out.println(e);e.printStackTrace();}}return failure(ResponseEnum.EVENT_SYSTEM_ERROR_FAILURE);}