文章目录
- 前言
- 工具
- 创建项目
- 简单控件即UI
- 一、界面显示与逻辑处理
- 二、文本
- 三、布局
- 四、按钮
- 五、控件综合训练(简易计算器)
- 六、Activity
- 七. 中级控件
- 八、综合案列(登录与找回密码)
- 数据存储
- 一、SharedPreferences
- 二、SQLite
- 九、外部存储空间
- 十、Jetpack Room
- 十一、正文字数太多,开启下一篇
前言
最近在有在持续学习Java的安卓开发,不断的把知识记录下。
工具
- Android Studio安装
[Studio安装][1]
[1]: https://developer.android.google.cn/studio “Studio安装”
- SDK下载
SDK即软件开发工具包,可将App源码编译成可执行的App应用
创建项目
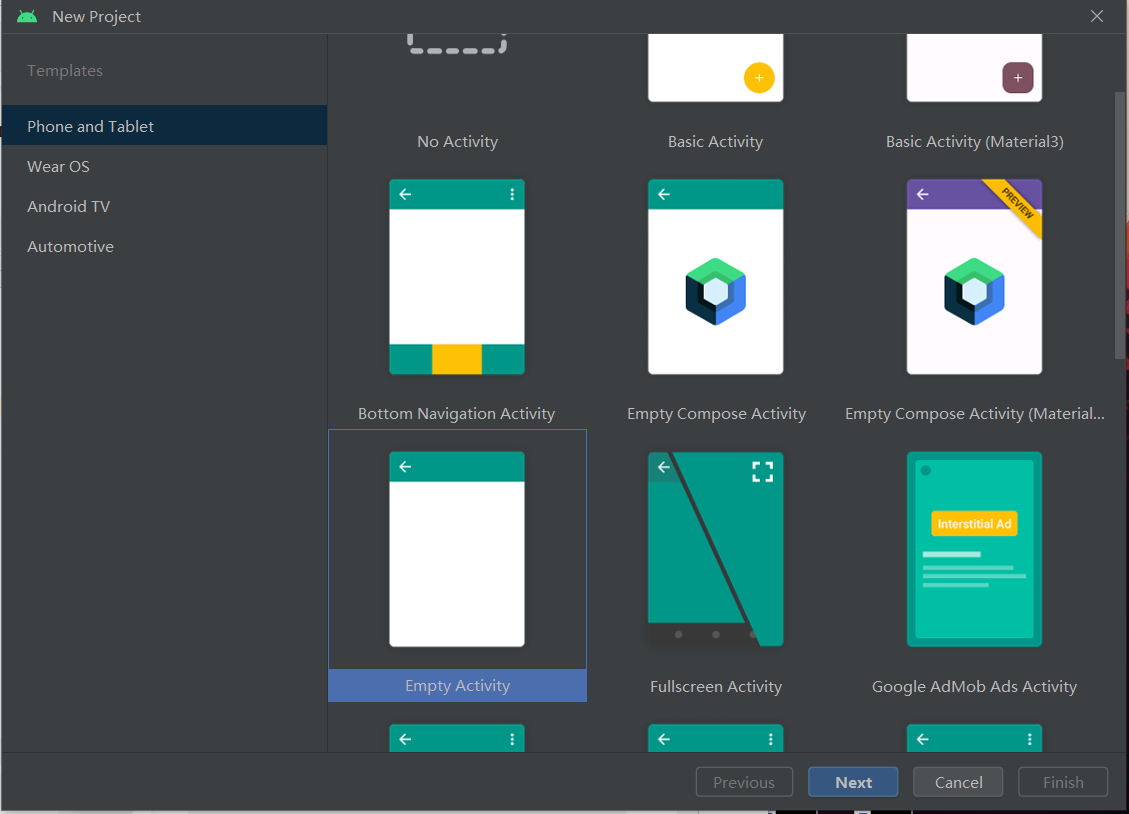
- 创建项目
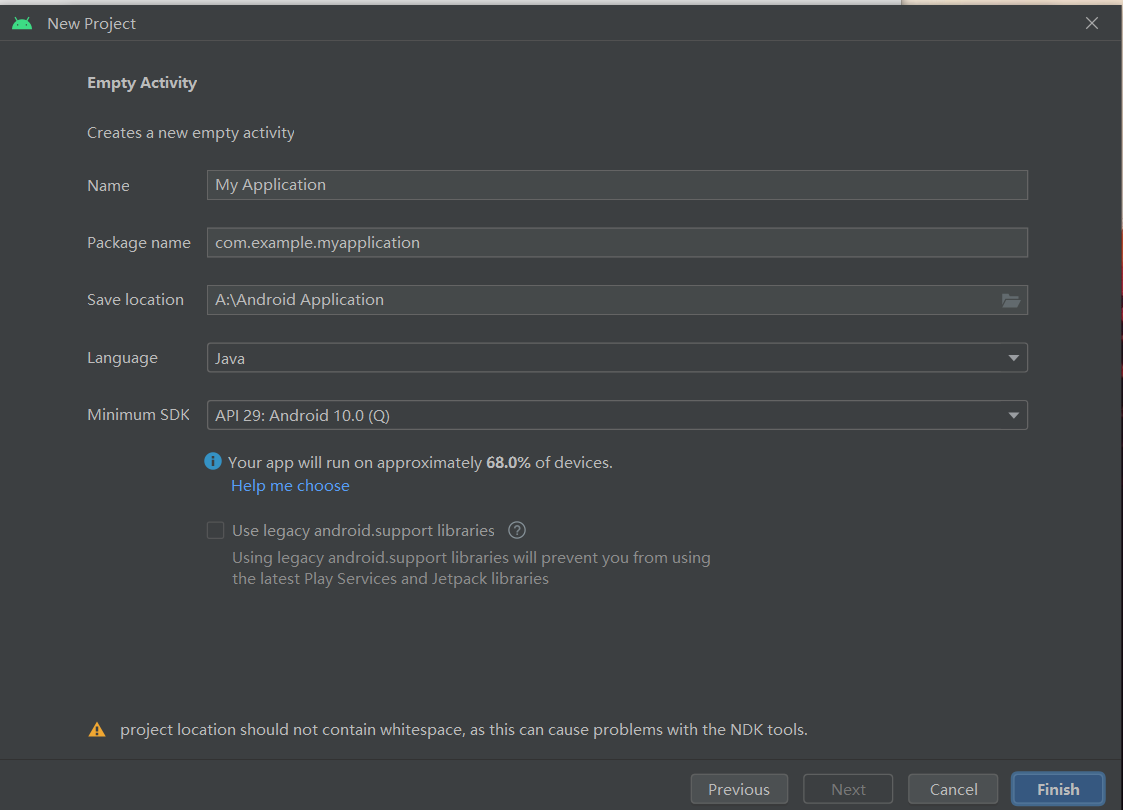
这里Minimum SDK后面指的是兼容到安卓几,表示你的应用支持的最低版本,看百分比选,一般目前的都是9.0-10.0。
- 内置模拟器
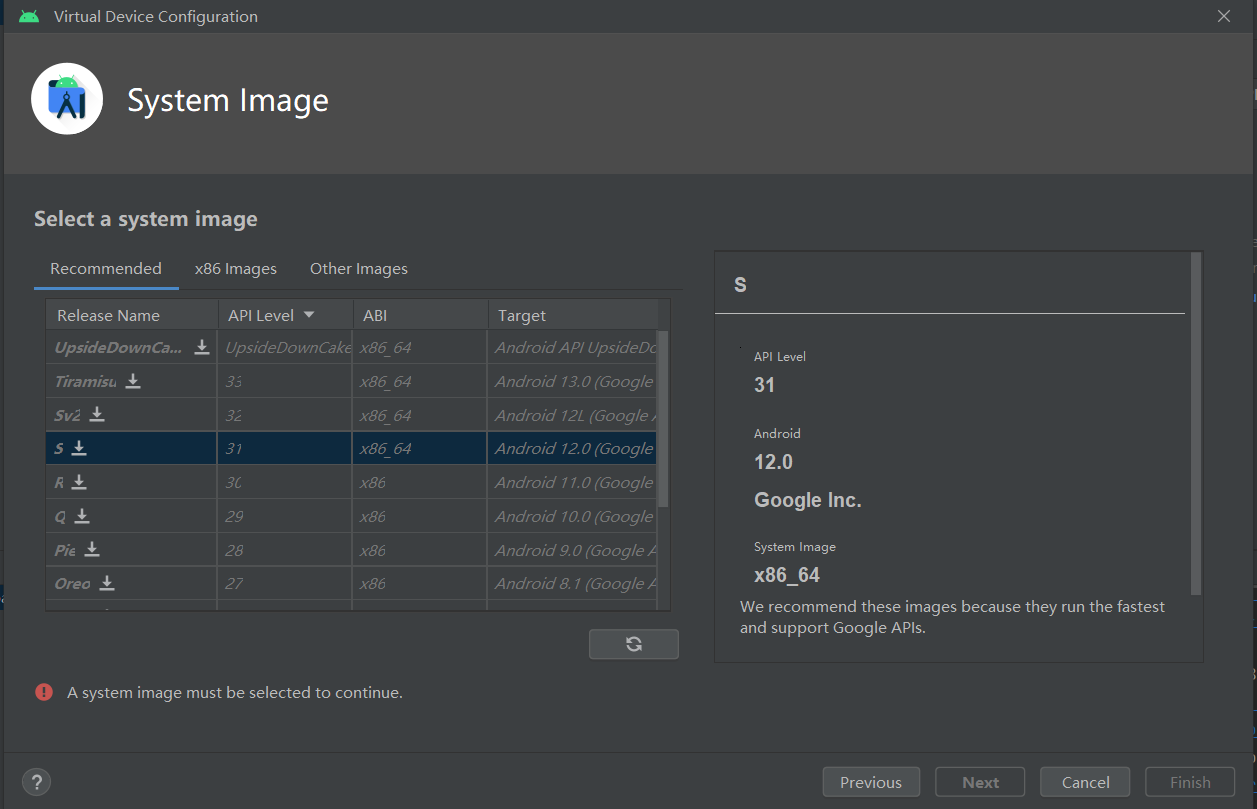
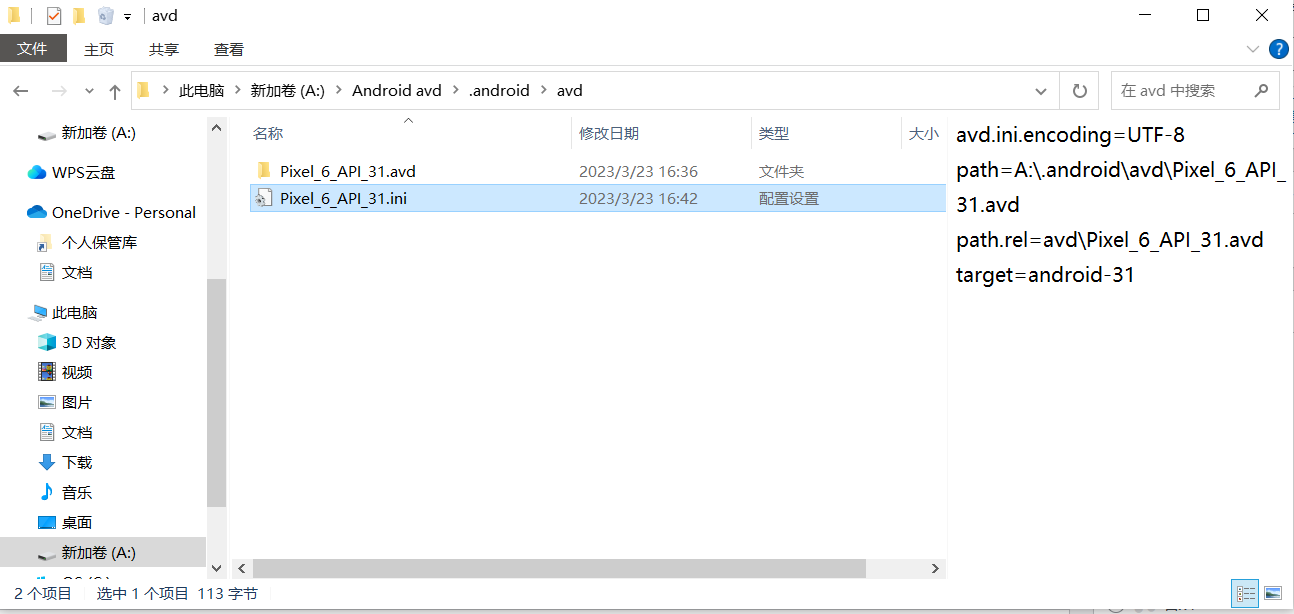
初始化Gradle要下载半小时,内置模拟器也有十多G,默认在C盘很不爽,可以移动,
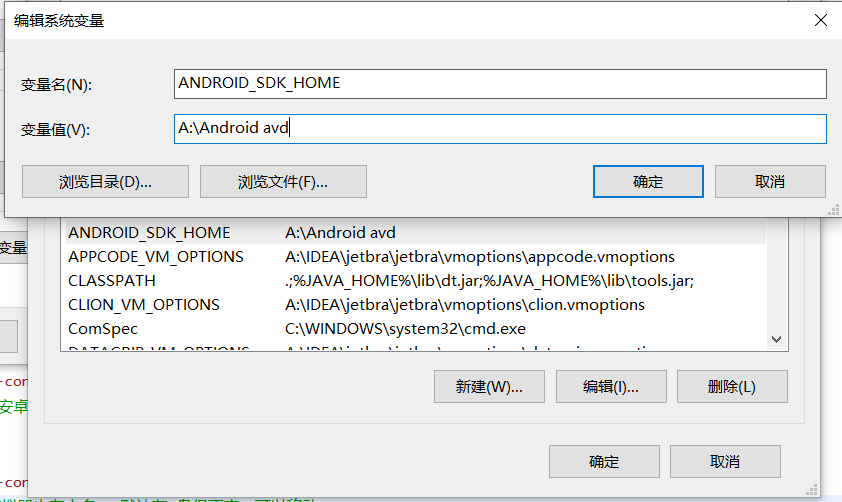
注册环境变量,然后修改下面的配置,直接把目录移动到想存的位置即可。
- 观察App运行日志
Android采用Log日志打印日志,各类日志划分:
Log.e 表示错误信息,可能导致程序崩溃
Log.w:表示警告信息
Log.i:表示一般消息
Log.d:表示调试信息,可把程序运行变量值打印,方便跟踪调试
Log.v:表示冗余信息
- 真机调试
1、使用数据库连接到电脑
2、电脑上会自动安装USB存储设备驱动
3、打开手机的开发者选项并开启USB调试
4、将连接的手机设备文件传输模式,并允许计算机进行USB调试
-
关于安卓开发语言
App开发分为两大技术路线,分别为原生开发和混合开发,官方的编程语言包括Java和Kotlin。
混合开发渲染性能没有原生开发好,但是混合开发可以跨平台,版本更新不需要重新下载API文件。
关于C和C++,Java是解释型语言,在处理图像和音视频时性能显然就有瓶颈,而C和C++是编译型语言,会
先翻译成机器语言,在图像和音视频处理时可以调用java的JNI接口调用C和C++程序进行处理,也称NDK。 -
目录结构
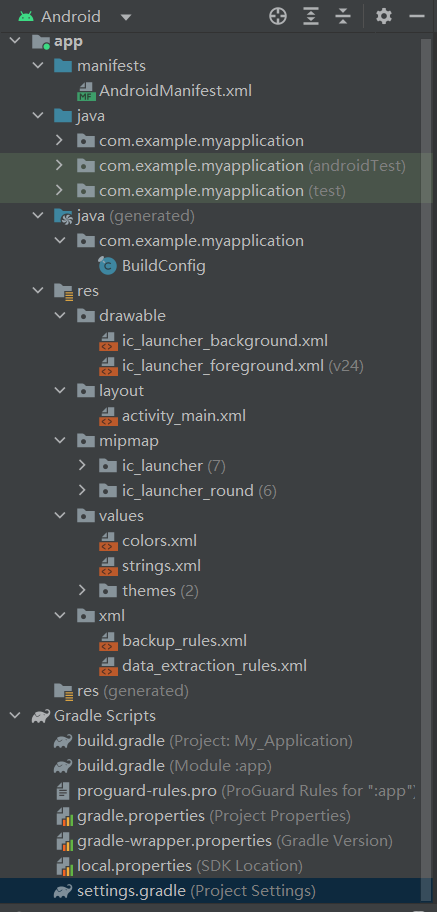
mainfests:App运行配置文件
java子目录:存放java源代码,后面两个包存放测试用的代码
res目录下:
drawable:存放图形描述和图片文件
Layout:App页面的布局文件
mipmap:App的启动图标
values:存放常量的文件,如样式风格等
Gradle Scripts目录下:
build.gradle:描述项目级和模块级的App工程编译规则
proguard-rules.pro:java代码的混淆规则,保证安全性
gradle.properties:用于编译工程的命令行参数
local.properties:本地配置文件,描述开发者电脑的环境配置
settings.gradle:配置了需要编译的模块
- build.gradle的文件概述解释
plugins {//使用的插件id 'com.android.application'
}android {namespace 'com.example.myapplication'compileSdk 33 //编译使用的SDK版本号,33表示使用Android13defaultConfig {// App的包名applicationId "com.example.myapplication"//指定App适合运行的最小的SDK版本号,28表示最小在Android9上运行minSdk 28//目标设备的版本号,表示App最希望在那个版本的Android上运行targetSdk 33//App的应用版本号versionCode 1versionName "1.0"testInstrumentationRunner "androidx.test.runner.AndroidJUnitRunner"}//跟单元测试相关buildTypes {release {minifyEnabled falseproguardFiles getDefaultProguardFile('proguard-android-optimize.txt'), 'proguard-rules.pro'}}compileOptions {sourceCompatibility JavaVersion.VERSION_1_8targetCompatibility JavaVersion.VERSION_1_8}
}
//指定App编译的依赖包信息
dependencies {//指定编译的Android高版本支持库implementation 'androidx.appcompat:appcompat:1.4.1'implementation 'com.google.android.material:material:1.5.0'implementation 'androidx.constraintlayout:constraintlayout:2.1.3'//指定单元测试编译用的junit版本号testImplementation 'junit:junit:4.13.2'androidTestImplementation 'androidx.test.ext:junit:1.1.3'androidTestImplementation 'androidx.test.espresso:espresso-core:3.4.0'
}
- 清单文件
<?xml version="1.0" encoding="utf-8"?>
<manifest xmlns:android="http://schemas.android.com/apk/res/android"xmlns:tools="http://schemas.android.com/tools"><applicationandroid:allowBackup="true"android:dataExtractionRules="@xml/data_extraction_rules"android:fullBackupContent="@xml/backup_rules"android:icon="@mipmap/ic_launcher"android:label="@string/app_name"android:supportsRtl="true"android:theme="@style/Theme.MyApplication"tools:targetApi="31"><activityandroid:name=".MainActivity"android:exported="true"><intent-filter><action android:name="android.intent.action.MAIN" /><category android:name="android.intent.category.LAUNCHER" /></intent-filter></activity></application></manifest>
android:icon:App手机屏幕显示的图标
android:label:App手机屏幕显示的名称
android:allowBackup:是否允许数据备份,数据丢失时恢复应用
android:theme:指定App显示的风格
android:supportsRtl:是否支持波斯语等从右向左的文字排列顺序语言
activity应用程序组件,提供屏幕,用来交互完成某项任务
android:exported:当前Activity是否可以被另一个Application的组件启动
android:name:启动应用首先启动那个Applicaiton
简单控件即UI
一、界面显示与逻辑处理
- 创建新的activity页面
<?xml version="1.0" encoding="utf-8"?>
<LinearLayoutxmlns:android="http://schemas.android.com/apk/res/android"android:layout_width="match_parent"android:layout_height="match_parent"android:orientation="vertical"android:gravity="center"><TextViewandroid:id="@+id/tv"android:layout_width="wrap_content"android:layout_height="wrap_content"android:text="@string/text2" /></LinearLayout>
- 创建新的MainActivity类,并将类加入Mainifest
package com.example.myapplication;import android.os.Bundle;import androidx.annotation.Nullable;
import androidx.appcompat.app.AppCompatActivity;public class MainActivity2 extends AppCompatActivity {@Overrideprotected void onCreate(@Nullable Bundle savedInstanceState) {super.onCreate(savedInstanceState);setContentView(R.layout.activity_main2);}
}
<activity android:name=".MainActivity2"/>
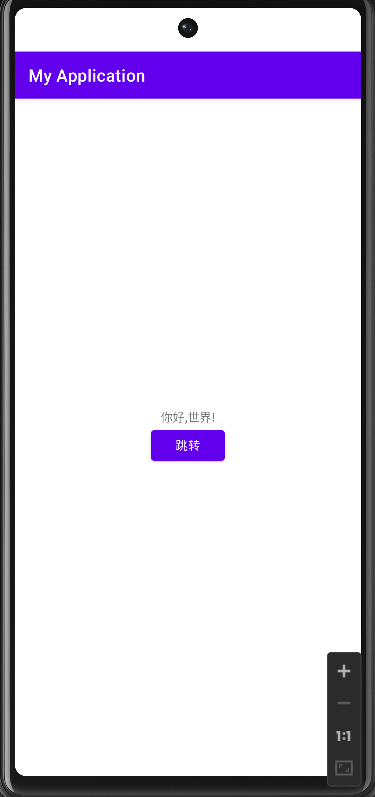
- 设置跳转按钮
<?xml version="1.0" encoding="utf-8"?>
<LinearLayoutxmlns:android="http://schemas.android.com/apk/res/android"android:layout_width="match_parent"android:layout_height="match_parent"android:orientation="vertical"android:gravity="center"><TextViewandroid:id="@+id/tv"android:layout_width="wrap_content"android:layout_height="wrap_content"android:text="Hello World!"/><Buttonandroid:id="@+id/button"android:layout_width="wrap_content"android:layout_height="wrap_content"android:text="跳转"/></LinearLayout>
- 写跳转方法
package com.example.myapplication;import androidx.appcompat.app.AppCompatActivity;import android.content.Intent;
import android.os.Bundle;
import android.util.Log;
import android.view.View;
import android.widget.Button;
import android.widget.TextView;public class MainActivity extends AppCompatActivity {@Overrideprotected void onCreate(Bundle savedInstanceState) {super.onCreate(savedInstanceState);setContentView(R.layout.activity_main);TextView tv=findViewById(R.id.tv);tv.setText("你好,世界!");Button button=findViewById(R.id.button);button.setOnClickListener(new View.OnClickListener() {@Overridepublic void onClick(View view) {Intent intent=new Intent();intent.setClass(MainActivity.this,MainActivity2.class);startActivity(intent);}});}
}
二、文本
- 文本大小
px :图像元素,跟随屏幕大小和像素数量关系变化。
resolution:屏幕垂直和水平方向的像素数量。
dpi:像素密度,指屏幕上每英寸距离中有多少个像素点。
Density:指定每平方英寸含有的像素点数量。
dip/dp:长度单位,同一个单位在不同设备中有不同显示效果。
sp:专门用于设置字体,大小会根据系统的字体大小改变而改变。
dip是开发中的长度单位,最后也要转换为px,px=dip*dpi/160
例:如 320*480分辨率 3.6寸的手机:
dpi=(3202+4802)^(1/2)/3.6=160 所以 1dp=1px
对于相同尺寸的手机,即使分辨率不同,占用屏幕比例也相同
- 设置文本颜色
设置文本的颜色一般可直接设置,也可以通过十六进制设置,如0xFFFFEEDD, 其中先
后十六进制顺序为透明度,红色,绿色,蓝色。
<?xml version="1.0" encoding="utf-8"?>
<LinearLayoutxmlns:android="http://schemas.android.com/apk/res/android"android:layout_width="match_parent"android:layout_height="match_parent"android:orientation="vertical"android:gravity="center"><TextViewandroid:id="@+id/text_color"android:layout_width="wrap_content"android:layout_height="wrap_content"android:textSize="30sp"android:text="直接设置文本颜色" /><TextViewandroid:id="@+id/text_hex_color"android:layout_width="wrap_content"android:layout_height="wrap_content"android:textSize="30sp"android:textColor="@color/purple_200"android:text="十六进制设置文本颜色"/><TextViewandroid:id="@+id/text_code_color"android:layout_width="wrap_content"android:layout_height="wrap_content"android:textSize="30sp"android:text="代码中设置文本颜色"/><TextViewandroid:id="@+id/text_background"android:layout_width="wrap_content"android:layout_height="wrap_content"android:textSize="30sp"android:text="设置文本背景颜色"android:background="#ff00ff00"/></LinearLayout>
public class MainTextActivity extends AppCompatActivity {@Overrideprotected void onCreate(Bundle savedInstanceState) {super.onCreate(savedInstanceState);setContentView(R.layout.activity_main_text);TextView text_color=findViewById(R.id.text_color);text_color.setTextColor(Color.GREEN);TextView text_code_color=findViewById(R.id.text_code_color);text_code_color.setTextColor(0xff00ff00);}
}
- 视图
wrap_content:自适应大小,刚好能包含内容
match_parent:当前控件的大小和父布局的大小一样
dp:自行设置dp大小
在代码中设置视图宽高。
调用控件对象getLayoutParams方法获取控件的布局参数。
调用控件对象的setLayoutParams方法,填入修改后布局参数使之生效。
public class ViewBorderActivity extends AppCompatActivity {@Overrideprotected void onCreate(Bundle savedInstanceState) {super.onCreate(savedInstanceState);setContentView(R.layout.activity_view_border);TextView text_borer=findViewById(R.id.text_view_border);ViewGroup.LayoutParams params=text_borer.getLayoutParams();params.width= Utils.dip2px(this,300);text_borer.setLayoutParams(params);}
}public class Utils {//根据分辨率dp转化为像素pxpublic static int dip2px(Context context, float dpValue){//获取当前像素密度,1个dp对应多少个像素float scale=context.getResources().getDisplayMetrics().density;return (int)(dpValue*scale+0.5f);}
}
三、布局
- 线性布局LinearLayout
orientation为horizontal,内部视图水平方向排列
oritentation为vertical,内部视图竖着排列
- 相对布局RelativeLayout
相对布局的下级视图位置由其他视图决定,确定位置参照物分两种:
(1)与该视图自身评级的视图
(2)该视图的上级视图
不设定,默认在左上角
<?xml version="1.0" encoding="utf-8"?>
<RelativeLayout xmlns:android="http://schemas.android.com/apk/res/android"android:layout_width="match_parent"android:layout_height="match_parent"><TextViewandroid:id="@+id/center"android:layout_width="wrap_content"android:layout_height="wrap_content"android:layout_centerInParent="true"android:background="#ffffff"android:text="我在中间"android:textColor="#000000"android:textSize="10sp" /><TextViewandroid:layout_width="wrap_content"android:layout_height="wrap_content"android:layout_alignParentLeft="true"android:background="#ffffff"android:text="我在上级左边中间"android:textColor="#000000"android:textSize="10sp" /><TextViewandroid:layout_width="wrap_content"android:layout_height="wrap_content"android:background="#ffffff"android:layout_alignParentBottom="true"android:text="我在上级底部对齐"android:textSize="10sp"android:textColor="#000000"/><TextViewandroid:layout_width="wrap_content"android:layout_height="wrap_content"android:layout_toLeftOf="@id/center"android:layout_alignTop="@id/center"android:background="#ffffff"android:text="我在中间左边"android:textColor="#000000"android:textSize="10sp" />
</RelativeLayout>
- 网格布局GridLayout,支持多行多列的表格排列
网格布局默认从左往右,从上到下,属性如下
columnCount,指定网格列数,即每行能放多少视图
rowCount,指定网格行数,每列能放多少个视图
<?xml version="1.0" encoding="utf-8"?>
<GridLayout xmlns:android="http://schemas.android.com/apk/res/android"android:layout_width="match_parent"android:layout_height="match_parent"android:columnCount="2"android:rowCount="2"><TextViewandroid:layout_width="0dp"android:layout_columnWeight="1"android:layout_height="60dp"android:text="红色"android:background="#ff0000"android:textSize="20sp"android:gravity="center"android:textColor="#000000"/><TextViewandroid:layout_width="0dp"android:layout_columnWeight="1"android:layout_height="60dp"android:text="橙色"android:background="#ffaa00"android:textSize="20sp"android:gravity="center"android:textColor="#000000"/><TextViewandroid:layout_width="0dp"android:layout_columnWeight="1"android:layout_height="60dp"android:text="绿色"android:background="#00ff00"android:textSize="20sp"android:gravity="center"android:textColor="#000000"/><TextViewandroid:layout_width="0dp"android:layout_columnWeight="1"android:layout_height="60dp"android:text="紫色"android:background="#660066"android:textSize="20sp"android:gravity="center"android:textColor="#000000"/></GridLayout>
- 滚动视图ScrollView
ScrollView,垂直方向滚动,垂直方向滚动时,layout_width属性值设置为math_parent,layout_height属性设置为wrap_content
HorizontalScrollView,水平方向滚动,layout_width属性值设置为wrap_content,layout_height属性设置为match_parent
<?xml version="1.0" encoding="utf-8"?>
<LinearLayout xmlns:android="http://schemas.android.com/apk/res/android"android:layout_width="match_parent"android:layout_height="match_parent"android:orientation="vertical"><HorizontalScrollViewandroid:layout_width="wrap_content"android:layout_height="200dp"><LinearLayoutandroid:layout_width="wrap_content"android:layout_height="match_parent"android:orientation="horizontal"><Viewandroid:layout_width="300dp"android:layout_height="match_parent"android:background="#00ff00"></View><Viewandroid:layout_width="300dp"android:layout_height="match_parent"android:background="#00aaff"></View></LinearLayout></HorizontalScrollView><ScrollViewandroid:layout_width="match_parent"android:layout_height="wrap_content"><LinearLayoutandroid:layout_width="wrap_content"android:layout_height="match_parent"android:orientation="vertical"><Viewandroid:layout_width="match_parent"android:layout_height="400dp"android:background="#ff0000"></View><Viewandroid:layout_width="match_parent"android:layout_height="400dp"android:background="#aa00ff"></View></LinearLayout></ScrollView></LinearLayout>
四、按钮
Button由TextView派生,区别在于:
Button拥有默认按钮背景(紫色),而TextView无背景。
Button的内部文本默认居中对齐。
Button会默认将英文字母转为大写,testAllCaps可以设置是否转换。
ImageButton显示图片的图像按钮,继承自ImageView
ImageButton只能显示图片,不能显示文本
ImageButton的图像可按比例缩放,Button背景设置的图像会拉伸变形
Button只能靠背景显示一张图片,ImageButton可在前景和背景显示图片,从而实现两张图片叠加效果
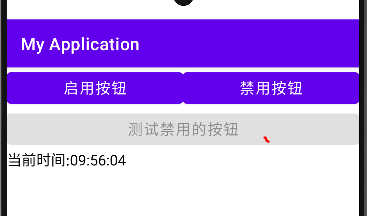
例子:设置三个按钮,分别启动和禁用第三个按钮,禁用按钮需要长按才能禁用,第三个按钮点击则显示时间。
<?xml version="1.0" encoding="utf-8"?>
<LinearLayout xmlns:android="http://schemas.android.com/apk/res/android"android:layout_width="match_parent"android:layout_height="match_parent"android:orientation="vertical"><LinearLayoutandroid:layout_width="match_parent"android:layout_height="wrap_content"android:orientation="horizontal"><Buttonandroid:id="@+id/button_begin_click"android:layout_width="0dp"android:layout_weight="1"android:layout_height="wrap_content"android:text="启用按钮"android:textSize="17sp"/><Buttonandroid:id="@+id/button_disable_click"android:layout_width="0dp"android:layout_height="wrap_content"android:layout_weight="1"android:text="禁用按钮"android:textSize="17sp" /></LinearLayout><Buttonandroid:id="@+id/button_test_click"android:layout_width="match_parent"android:layout_height="wrap_content"android:text="测试禁用的按钮"android:textSize="17sp"android:enabled="false"/><TextViewandroid:id="@+id/button_text_view"android:layout_width="wrap_content"android:layout_height="wrap_content"android:text="查看测试禁用按钮的结果"android:textSize="17sp"android:textColor="#000000"/></LinearLayout>
package com.example.myapplication.utils;import java.text.SimpleDateFormat;
import java.util.Date;public class DateTime {public static String getNowTime(){SimpleDateFormat simpleDateFormat=new SimpleDateFormat("HH:mm:ss");return  simpleDateFormat.format(new Date());}
}
package com.example.myapplication;import androidx.appcompat.app.AppCompatActivity;
import android.os.Bundle;
import android.view.View;
import android.widget.Button;
import android.widget.TextView;import com.example.myapplication.utils.DateTime;public class ButtonTextActivity extends AppCompatActivity {private Button button_test_click;private TextView button_view;@Overrideprotected void onCreate(Bundle savedInstanceState) {super.onCreate(savedInstanceState);setContentView(R.layout.activity_button_text);Button button_begin_click=findViewById(R.id.button_begin_click);Button button_disable_click= findViewById(R.id.button_disable_click);button_test_click = findViewById(R.id.button_test_click);button_view = findViewById(R.id.button_text_view);button_begin_click.setOnClickListener(new MyOnclickListener());button_test_click.setOnClickListener(new MyOnclickListener());button_disable_click.setOnLongClickListener(new MyOnclickLongListener());}class MyOnclickListener implements View.OnClickListener{@Overridepublic void onClick(View view) {switch (view.getId()){case R.id.button_begin_click:button_test_click.setEnabled(true);break;case R.id.button_test_click:String time=String.format("当前时间:%s", DateTime.getNowTime());button_view.setText(time);}}}class MyOnclickLongListener implements View.OnLongClickListener{@Overridepublic boolean onLongClick(View view) {button_test_click.setEnabled(false);return true;}}}
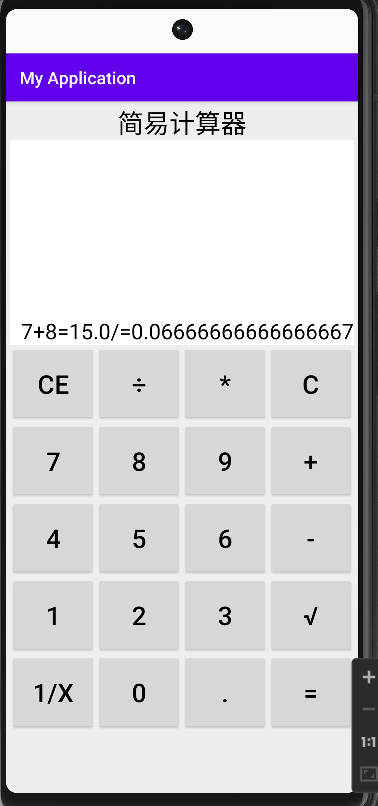
五、控件综合训练(简易计算器)
- Strings.xml
<resources><string name="app_name">My Application</string><string name="text2">Activity Main</string><string name="simple_calculator">简易计算器</string><string name="cancel">CE</string><string name="divide">÷</string><string name="clear">C</string><string name="multiply">+</string><string name="ride">*</string><string name="minus">-</string><string name="nine">9</string><string name="eight">8</string><string name="seven">7</string><string name="six">6</string><string name="five">5</string><string name="four">4</string><string name="three">3</string><string name="two">2</string><string name="one">1</string><string name="zero">0</string><string name="reciprocal">1/X</string><string name="doc">.</string><string name="equal">=</string><string name="root">√</string>
</resources>
- dimens.xml
<?xml version="1.0" encoding="utf-8"?>
<resources><dimen name="button_font_size">30sp</dimen><dimen name="button_height">90dp</dimen></resources>
- layout.xml
<?xml version="1.0" encoding="utf-8"?>
<LinearLayout xmlns:android="http://schemas.android.com/apk/res/android"android:layout_width="match_parent"android:layout_height="match_parent"android:background="#EEEEEE"android:orientation="vertical"android:padding="5dp"><ScrollViewandroid:layout_width="match_parent"android:layout_height="wrap_content"><LinearLayoutandroid:layout_width="match_parent"android:layout_height="wrap_content"android:orientation="vertical"><TextViewandroid:layout_width="match_parent"android:layout_height="wrap_content"android:text="@string/simple_calculator"android:textColor="@color/black"android:gravity="center"android:textSize="30sp"/><TextViewandroid:id="@+id/tv_result"android:layout_width="match_parent"android:layout_height="wrap_content"android:background="@color/white"android:text="0"android:textColor="@color/black"android:lines="8"android:textSize="25sp"android:gravity="right|bottom"/><GridLayoutandroid:layout_width="match_parent"android:layout_height="wrap_content"android:columnCount="4"android:rowCount="5"><Buttonandroid:id="@+id/btn_cancel"android:layout_width="0dp"android:layout_height="@dimen/button_height"android:layout_columnWeight="1"android:text="@string/cancel"android:textColor="@color/black"android:textSize="@dimen/button_font_size"/><Buttonandroid:id="@+id/btn_divide"android:layout_width="0dp"android:layout_height="@dimen/button_height"android:layout_columnWeight="1"android:text="@string/divide"android:textColor="@color/black"android:textSize="@dimen/button_font_size"/><Buttonandroid:id="@+id/btn_ride"android:layout_width="0dp"android:layout_height="@dimen/button_height"android:layout_columnWeight="1"android:text="@string/ride"android:textColor="@color/black"android:textSize="@dimen/button_font_size"/><Buttonandroid:id="@+id/btn_clear"android:layout_width="0dp"android:layout_height="@dimen/button_height"android:layout_columnWeight="1"android:text="@string/clear"android:textColor="@color/black"android:textSize="@dimen/button_font_size"/><Buttonandroid:id="@+id/btn_seven"android:layout_width="0dp"android:layout_height="@dimen/button_height"android:layout_columnWeight="1"android:text="@string/seven"android:textColor="@color/black"android:textSize="@dimen/button_font_size"/><Buttonandroid:id="@+id/btn_eight"android:layout_width="0dp"android:layout_height="@dimen/button_height"android:layout_columnWeight="1"android:text="@string/eight"android:textColor="@color/black"android:textSize="@dimen/button_font_size"/><Buttonandroid:id="@+id/btn_nine"android:layout_width="0dp"android:layout_height="@dimen/button_height"android:layout_columnWeight="1"android:text="@string/nine"android:textColor="@color/black"android:textSize="@dimen/button_font_size"/><Buttonandroid:id="@+id/btn_multi"android:layout_width="0dp"android:layout_height="@dimen/button_height"android:layout_columnWeight="1"android:text="@string/multiply"android:textColor="@color/black"android:textSize="@dimen/button_font_size"/><Buttonandroid:id="@+id/btn_four"android:layout_width="0dp"android:layout_height="@dimen/button_height"android:layout_columnWeight="1"android:text="@string/four"android:textColor="@color/black"android:textSize="@dimen/button_font_size"/><Buttonandroid:id="@+id/btn_five"android:layout_width="0dp"android:layout_height="@dimen/button_height"android:layout_columnWeight="1"android:text="@string/five"android:textColor="@color/black"android:textSize="@dimen/button_font_size"/><Buttonandroid:id="@+id/btn_six"android:layout_width="0dp"android:layout_height="@dimen/button_height"android:layout_columnWeight="1"android:text="@string/six"android:textColor="@color/black"android:textSize="@dimen/button_font_size"/><Buttonandroid:id="@+id/btn_minus"android:layout_width="0dp"android:layout_height="@dimen/button_height"android:layout_columnWeight="1"android:text="@string/minus"android:textColor="@color/black"android:textSize="@dimen/button_font_size"/><Buttonandroid:id="@+id/btn_one"android:layout_width="0dp"android:layout_height="@dimen/button_height"android:layout_columnWeight="1"android:text="@string/one"android:textColor="@color/black"android:textSize="@dimen/button_font_size"/><Buttonandroid:id="@+id/btn_two"android:layout_width="0dp"android:layout_height="@dimen/button_height"android:layout_columnWeight="1"android:text="@string/two"android:textColor="@color/black"android:textSize="@dimen/button_font_size"/><Buttonandroid:id="@+id/btn_three"android:layout_width="0dp"android:layout_height="@dimen/button_height"android:layout_columnWeight="1"android:text="@string/three"android:textColor="@color/black"android:textSize="@dimen/button_font_size"/><Buttonandroid:id="@+id/btn_root"android:layout_width="0dp"android:layout_height="@dimen/button_height"android:layout_columnWeight="1"android:text="@string/root"android:textColor="@color/black"android:textSize="@dimen/button_font_size"/><Buttonandroid:id="@+id/btn_reciprocal"android:layout_width="0dp"android:layout_height="@dimen/button_height"android:layout_columnWeight="1"android:text="@string/reciprocal"android:textColor="@color/black"android:textSize="@dimen/button_font_size"/><Buttonandroid:id="@+id/btn_zero"android:layout_width="0dp"android:layout_height="@dimen/button_height"android:layout_columnWeight="1"android:text="@string/zero"android:textColor="@color/black"android:textSize="@dimen/button_font_size"/><Buttonandroid:id="@+id/btn_doc"android:layout_width="0dp"android:layout_height="@dimen/button_height"android:layout_columnWeight="1"android:text="@string/doc"android:textColor="@color/black"android:textSize="@dimen/button_font_size"/><Buttonandroid:id="@+id/btn_equal"android:layout_width="0dp"android:layout_height="@dimen/button_height"android:layout_columnWeight="1"android:text="@string/equal"android:textColor="@color/black"android:textSize="@dimen/button_font_size"/></GridLayout></LinearLayout></ScrollView>
</LinearLayout>
- 主类
package com.example.myapplication;import androidx.appcompat.app.AppCompatActivity;import android.os.Bundle;
import android.view.View;
import android.widget.Button;
import android.widget.TextView;public class CalculatorActivity extends AppCompatActivity implements View.OnClickListener {private TextView tv_result;//第一个操作数private String firstNum="";//操作符号private String operator="";//第二个操作数private String secodeNum="";//计算结果private String result="";//显示的文本private String showText="";@Overrideprotected void onCreate(Bundle savedInstanceState) {super.onCreate(savedInstanceState);setContentView(R.layout.activity_calculator);tv_result = findViewById(R.id.tv_result);findViewById(R.id.btn_cancel).setOnClickListener(this);findViewById(R.id.btn_divide).setOnClickListener(this);findViewById(R.id.btn_ride).setOnClickListener(this);findViewById(R.id.btn_clear).setOnClickListener(this);findViewById(R.id.btn_seven).setOnClickListener(this);findViewById(R.id.btn_eight).setOnClickListener(this);findViewById(R.id.btn_nine).setOnClickListener(this);findViewById(R.id.btn_multi).setOnClickListener(this);findViewById(R.id.btn_four).setOnClickListener(this);findViewById(R.id.btn_five).setOnClickListener(this);findViewById(R.id.btn_six).setOnClickListener(this);findViewById(R.id.btn_minus).setOnClickListener(this);findViewById(R.id.btn_one).setOnClickListener(this);findViewById(R.id.btn_two).setOnClickListener(this);findViewById(R.id.btn_three).setOnClickListener(this);findViewById(R.id.btn_root).setOnClickListener(this);findViewById(R.id.btn_reciprocal).setOnClickListener(this);findViewById(R.id.btn_zero).setOnClickListener(this);findViewById(R.id.btn_doc).setOnClickListener(this);findViewById(R.id.btn_equal).setOnClickListener(this);}@Overridepublic void onClick(View view) {String inputText;inputText=((TextView) view).getText().toString();switch (view.getId()){case R.id.btn_cancel:if(operator.equals("")) {showText = showText.substring(0, showText.length() - 1);refreshOperate(showText);refreshText(showText);break;}if(secodeNum.equals("")&&!operator.equals("")){showText = showText.substring(0, showText.length() - 1);CE();refreshText(showText);break;}else{showText = showText.substring(0, showText.length() - 1);refreshOperate(showText);refreshText(result);break;}case R.id.btn_clear:clear();break;case R.id.btn_multi:case R.id.btn_divide:case R.id.btn_ride:case R.id.btn_minus:operator=inputText;refreshText(showText+operator);break;case R.id.btn_equal:double calculate_result=calculateFour();refreshOperate(String.valueOf(calculate_result));refreshText(showText+"="+result);break;//开根号case R.id.btn_root:double sqrt_result=Math.sqrt(Double.parseDouble(firstNum));refreshOperate(String.valueOf(sqrt_result));refreshText(showText+"√="+result);break;//求导数case R.id.btn_reciprocal:double reciprocal_result=1.0/Double.parseDouble(firstNum);refreshOperate(String.valueOf(reciprocal_result));refreshText(showText+"/="+result);break;default:if (result.length()>0&&operator.equals("")){clear();}if(operator.equals("")){firstNum=firstNum+inputText;}else{secodeNum=secodeNum+inputText;}if(showText.equals("0")&&!inputText.equals(".")){refreshText(inputText);}else {refreshText(showText + inputText);}break;}}private  void cancel(){}private void clear(){refreshOperate("");refreshText("");}private double calculateFour(){switch (operator){case "+":return Double.parseDouble(firstNum)+Double.parseDouble(secodeNum);case "-":return Double.parseDouble(firstNum)-Double.parseDouble(secodeNum);case "*":return Double.parseDouble(firstNum)*Double.parseDouble(secodeNum);default:return Double.parseDouble(firstNum)/Double.parseDouble(secodeNum);}}private void CE(){ //7+operator="";}private void refreshOperate(String new_result){result=new_result;firstNum=result;secodeNum="";operator="";}private void refreshText(String text){showText=text;tv_result.setText(showText);}
}
并非是什么完美计算器,仅是复习以上知识操作使用。
六、Activity
从当前页面跳转到新页面:
startActivity(new intent(源页面.this,目标页面.class))
当前页面返回上一个页面:
finish();
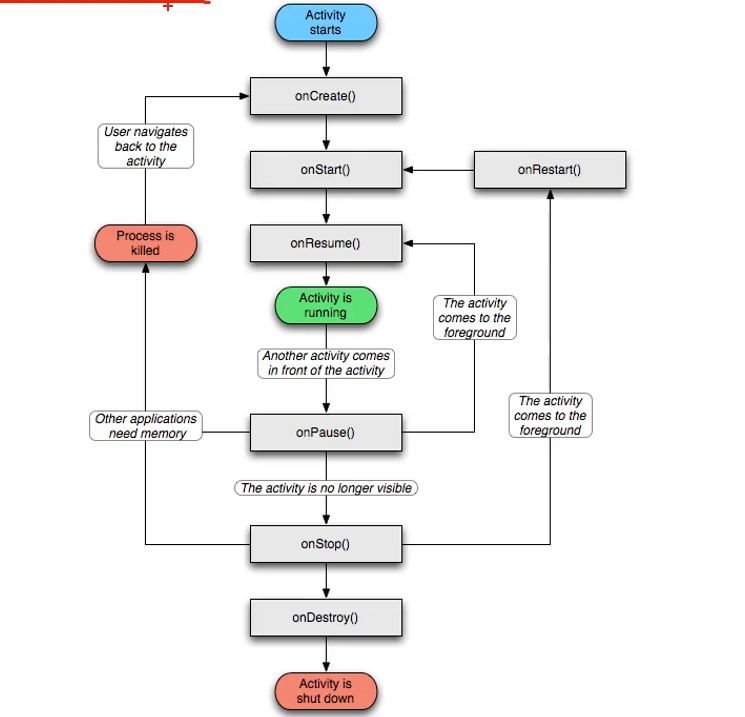
activity的生命周期:
onCreate 创建活动,把页面加载进内存,进入初始状态
onStart 开始活动,把活动页面显示到屏幕,就绪态
onResume 恢复活动,活动页面进入活跃状态
onPause 暂停活动,页面不能正常交互
onStop 停止活动,页面不在屏幕
onDestroy 销毁活动,回收系统资源,从内存清除
onRestart 重启活动,重新加载内存的页面数据
onNewIntent 重用已有的实例
Activity启动模式(栈)
默认启动模式standard,启动的Activity依照顺序被依次压入Task栈。
栈顶复用模式singleTop,栈顶Activity为我们新建的Activity,不会重新创建新的Activity。
栈内复用模式singleTask,栈内存在目标Activity实例,则将task内对应Activity实例之上的Activity出栈,并
将对应Activity置于栈顶。
全局唯一模式singleInstance,为目标Activity创建新的Task栈,新的Task栈只有这一个Activity,如
已经创建目标Activity,则不创建新的Task,将以前的Activity唤醒。
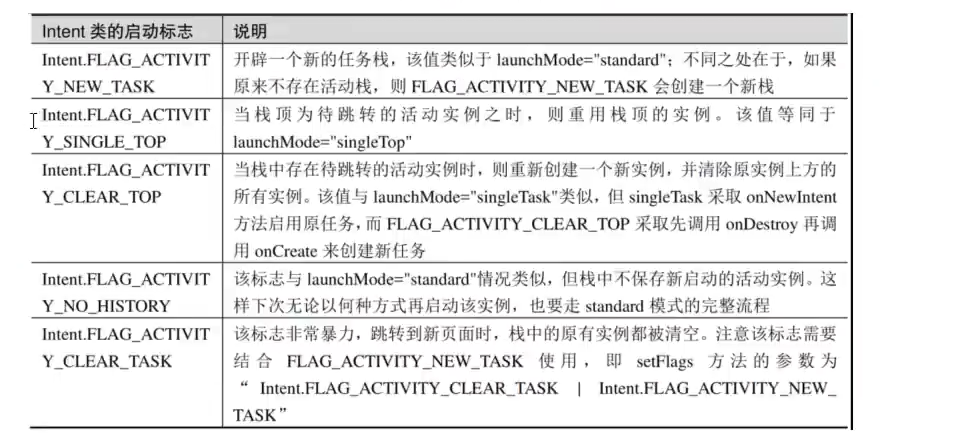
启动模式的设置:intent.setFlags()代码中启动,Mainfest.xml中动态设置launch。
例子:登录页面进行登录成功后,即使后退,也不能返回登录页面,而是直接退出程序。
package com.example.activity;import androidx.appcompat.app.AppCompatActivity;import android.content.Intent;
import android.os.Bundle;
import android.view.View;
import android.widget.Button;public class LoginInputActivity extends AppCompatActivity {@Overrideprotected void onCreate(Bundle savedInstanceState) {super.onCreate(savedInstanceState);setContentView(R.layout.activity_login_input);Button btn_login=findViewById(R.id.btn_login);btn_login.setOnClickListener(new MyOnclickListen());}class MyOnclickListen implements View.OnClickListener{@Overridepublic void onClick(View view) {Intent intent=new Intent(LoginInputActivity.this,LoginSuccessActivity.class);intent.setFlags(Intent.FLAG_ACTIVITY_CLEAR_TASK|Intent.FLAG_ACTIVITY_NEW_TASK);startActivity(intent);}}
}
通过设置启动模式来完成,一旦登录则会清空当前活动栈中的所有实例,然后再同时启动开辟新任务的活动栈,这样登录后,再点击返回则会直接退出程序。
- Intent
Intent各个组件之间信息沟通桥梁,用于组件之间通信,主要完成工作是本次通信请求从哪来,到哪去,要怎么走
发起方携带本次通信需要的数据,接收方从收到的意图中解析数据。
发起方若判断接收方处理结果,意图就要负责让接收方回应答数据。
显示Intent,直接指定来源活动与目标活动,精确匹配,三种方式
直接Intent函数中指定:new Intent()
调用意图对象:setClass()
调用意图对象setComponent()
隐式Intent,没有明确指定要跳转的目标活动,只给出一个动作字符串匹配,属于模糊匹配
通过setAction,url,setData()指定动作和数据
常见的隐式动作有:
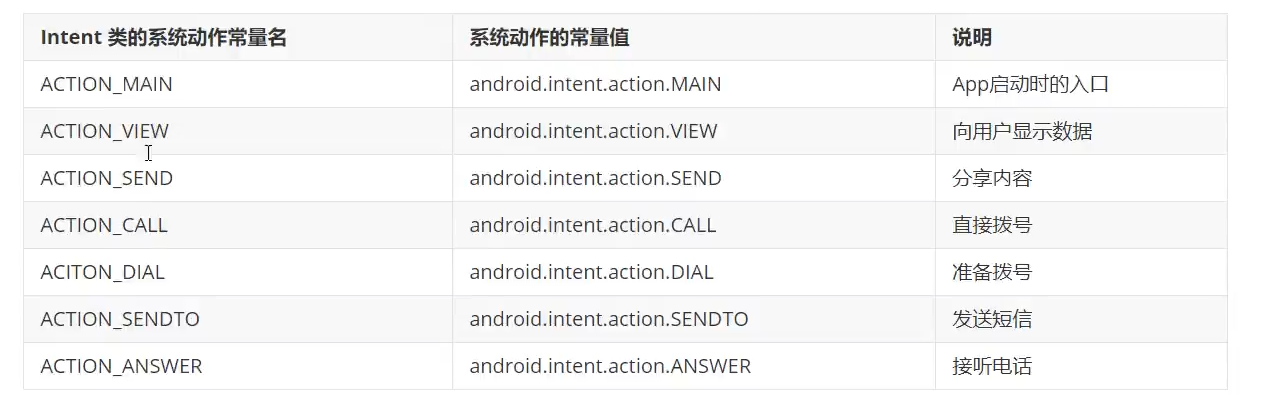
例子1:使用隐式Intent直接进行拨号,发送短信,或跳转到其它APP
package com.example.activity;import androidx.appcompat.app.AppCompatActivity;import android.content.Intent;
import android.net.Uri;
import android.os.Bundle;
import android.view.View;
import android.widget.Button;public class IntentActivity extends AppCompatActivity implements View.OnClickListener{@Overrideprotected void onCreate(Bundle savedInstanceState) {super.onCreate(savedInstanceState);setContentView(R.layout.activity_intent);Button btn_dail=findViewById(R.id.btn_dail);Button btn_cms=findViewById(R.id.btn_cms);Button btn_my=findViewById(R.id.btn_mypage);btn_dail.setOnClickListener(this);btn_cms.setOnClickListener(this);btn_my.setOnClickListener(this);}@Overridepublic void onClick(View view) {String phone="123456";Intent intent=new Intent();switch (view.getId()){case R.id.btn_dail:intent.setAction(Intent.ACTION_DIAL);Uri uri=Uri.parse("tel:"+phone);intent.setData(uri);startActivity(intent);break;case R.id.btn_cms:intent.setAction(Intent.ACTION_SENDTO);Uri uri2=Uri.parse("smsto:"+phone);intent.setData(uri2);startActivity(intent);break;case R.id.btn_mypage:intent.setAction("android.intent.action.Aiwin");intent.addCategory(Intent.CATEGORY_DEFAULT);startActivity(intent);break;}}
}<intent-filter><action android:name="android.intent.action.Aiwin" /><category android:name="android.intent.category.DEFAULT" /></intent-filter>
最后跳转自己的APP,需要在mainfestxml中添加intent-filter
例子2:A页面发送信息给B页面,B页面再返回回应信息给A页面,需要通过registerForActivityResult()
package com.example.activity;import androidx.activity.result.ActivityResult;
import androidx.activity.result.ActivityResultCallback;
import androidx.activity.result.ActivityResultLauncher;
import androidx.activity.result.contract.ActivityResultContract;
import androidx.activity.result.contract.ActivityResultContracts;
import androidx.appcompat.app.AppCompatActivity;import android.app.Activity;
import android.content.Intent;
import android.os.Bundle;
import android.view.View;
import android.widget.Button;
import android.widget.TextView;public class ActRequestActivity extends AppCompatActivity implements View.OnClickListener{private ActivityResultLauncher<Intent> register;@Overrideprotected void onCreate(Bundle savedInstanceState) {super.onCreate(savedInstanceState);setContentView(R.layout.activity_act_request);Button btn_send=findViewById(R.id.btn_request);TextView btn_receive=findViewById(R.id.btn_receive);btn_send.setOnClickListener(this);register = registerForActivityResult(new ActivityResultContracts.StartActivityForResult(), new ActivityResultCallback<ActivityResult>() {@Overridepublic void onActivityResult(ActivityResult result) {if(result!=null){Intent intent=result.getData();if(intent!=null&result.getResultCode()== Activity.RESULT_OK){Bundle bundle=intent.getExtras();String message=bundle.getString("response");btn_receive.setText(message);}}}});}@Overridepublic void onClick(View view) {Intent intent=new Intent(this,ActResponseActivity.class);Bundle bundle=new Bundle();bundle.putString("message","你睡了吗?");intent.putExtras(bundle);register.launch(intent);}
}
package com.example.activity;import androidx.appcompat.app.AppCompatActivity;import android.content.Intent;
import android.os.Bundle;
import android.view.View;
import android.widget.Button;
import android.widget.TextView;public class ActResponseActivity extends AppCompatActivity implements View.OnClickListener {@Overrideprotected void onCreate(Bundle savedInstanceState) {super.onCreate(savedInstanceState);setContentView(R.layout.activity_act_response);TextView request=findViewById(R.id.btn_request);Button btn_response=findViewById(R.id.btn_response);Bundle bundle=getIntent().getExtras();String request_content=bundle.getString("message");request.setText(request_content);btn_response.setOnClickListener(this);}@Overridepublic void onClick(View view) {Intent intent=new Intent();Bundle bundle=new Bundle();bundle.putString("response","我没睡,我爸妈不在家");intent.putExtras(bundle);setResult(ActRequestActivity.RESULT_OK,intent);finish();}
}
- 应用页面注册快捷方式
在安卓7以后,可以长按页面图标,弹出一些快捷方式,比如长按微信会弹出扫一扫,付款码等
点击即可直接跳转到该页面。
例子:在xml目录创建shortcuts.xml,先修改Mainfest.xml文件
<activityandroid:name=".ActStartActivity"android:exported="true"><intent-filter><action android:name="android.intent.action.MAIN" /><category android:name="android.intent.category.LAUNCHER" /></intent-filter><meta-dataandroid:name="android.app.shortcuts"android:resource="@xml/shortcuts" /></activity>
配置shortcuts.xml文件
<shortcuts xmlns:android="http://schemas.android.com/apk/res/android"><shortcutandroid:enabled="true"android:icon="@mipmap/ic_launcher"android:shortcutId="first"android:shortcutLongLabel="@string/shortcutLongLabel_first"android:shortcutShortLabel="@string/shortcutShortLabel_first"><!-- targetClass指定了点击该项菜单后要打开哪个活动页面 --><intentandroid:action="android.intent.action.VIEW"android:targetClass="com.example.activity.ActStartActivity"android:targetPackage="com.example.activity" /><categoriesandroid:name="android.shortcut.conversation" /></shortcut><shortcutandroid:enabled="true"android:icon="@mipmap/ic_launcher"android:shortcutId="second"android:shortcutLongLabel="@string/shortcutLongLabel_second"android:shortcutShortLabel="@string/shortcutShortLabel_second"><!-- targetClass指定了点击该项菜单后要打开哪个活动页面 --><intentandroid:action="android.intent.action.VIEW"android:targetClass="com.example.activity.ActStartActivity"android:targetPackage="com.example.activity" /><categoriesandroid:name="android.shortcut.conversation" /></shortcut></shortcuts>效果:

七. 中级控件
- Shape图
形状图形 Shape,形状图形的定义文件是以shape标签为根节点的XML描述文件,一般有四种类型的形状:
rectangle 矩形,默认值
oval 椭圆,corners节点失效
line 直线,必须设置stroke节点
ring 圆环
其中XML中能设置的有:size尺寸,stroker描边,corners圆角,solid填充,padding间隔,gradient渐变
如设置一个椭圆形:
<?xml version="1.0" encoding="utf-8"?>
<shape xmlns:android="http://schemas.android.com/apk/res/android"android:shape="oval"><solid android:color="#ff66aa"/><stroke android:width="1dp" android:color="#aaaaaa"/></shape>
- 九宫格图片
在Android Stdio中,可以直接把PNG图片转成九宫格图片,利用九宫格图片,能够使图片被拉伸但是不变形,
能够用于适应不同的手机屏幕。
- 状态列表图形
简单来说,就是按钮被按下和没被按下显示不同的颜色或者形状等,以便于用户区分按了哪一个按钮,可通过StateListDrawable完成。状态的取值常用的有pressed、checked、focused、selected
<?xml version="1.0" encoding="utf-8"?>
<selector xmlns:android="http://schemas.android.com/apk/res/android"><item android:state_pressed="true" android:drawable="@android:drawable/button_onoff_indicator_on"/><item android:drawable="@android:drawable/button_onoff_indicator_off"/></selector>
<?xml version="1.0" encoding="utf-8"?>
<LinearLayout xmlns:android="http://schemas.android.com/apk/res/android"android:layout_width="match_parent"android:layout_height="match_parent"android:orientation="vertical"android:gravity="center"><Buttonandroid:layout_width="wrap_content"android:layout_height="wrap_content"android:text="默认样式按钮"/><Buttonandroid:layout_width="wrap_content"android:layout_height="wrap_content"android:layout_marginTop="5dp"android:background="@drawable/drawable_nine_selector"android:padding="5dp"android:text="定制样式按钮"/></LinearLayout>

- checkbox
<?xml version="1.0" encoding="utf-8"?>
<LinearLayout xmlns:android="http://schemas.android.com/apk/res/android"android:layout_width="match_parent"android:layout_height="match_parent"android:orientation="vertical"android:padding="5dp"><CheckBoxandroid:id="@+id/ck_system"android:layout_width="match_parent"android:layout_height="wrap_content"android:padding="5dp"android:text="系统的CheckBox" /><CheckBoxandroid:id="@+id/ck_custom"android:layout_width="match_parent"android:layout_height="wrap_content"android:layout_marginTop="10dp"android:button="@drawable/checkbox_selector"android:padding="5dp"android:text="CheckBox换图标"/></LinearLayout>
package com.example.middlecontrolactivity;import androidx.appcompat.app.AppCompatActivity;import android.os.Bundle;
import android.widget.CheckBox;
import android.widget.CompoundButton;public class CheckBoxAcivity extends AppCompatActivity implements CompoundButton.OnCheckedChangeListener {@Overrideprotected void onCreate(Bundle savedInstanceState) {super.onCreate(savedInstanceState);setContentView(R.layout.activity_check_box_acivity);CheckBox ck_system=findViewById(R.id.ck_system);CheckBox ck_custom=findViewById(R.id.ck_custom);ck_system.setOnCheckedChangeListener(this);ck_custom.setOnCheckedChangeListener(this);}@Overridepublic void onCheckedChanged(CompoundButton compoundButton, boolean b) {String desc=String.format("您%s了这个CheckBox",b ? "勾选":"没勾选");compoundButton.setText(desc);}
}
- Switch
与checkbox使用是一致的,都是从Compuound类继承而来
textOn:设置右侧开启时文本
textOff:设置左侧关闭时文本
track:设置开关轨道的背景
thumb:设置开关标识图标
- RadioButton
一般单选按钮只允许选择一个,需要放在RadioGroup里面,对RadioGroup进行监听
<?xml version="1.0" encoding="utf-8"?>
<LinearLayout xmlns:android="http://schemas.android.com/apk/res/android"android:layout_width="match_parent"android:layout_height="match_parent"android:orientation="vertical"><TextViewandroid:layout_width="match_parent"android:layout_height="wrap_content"android:text="请选择你的性别"android:textColor="@color/black"android:textSize="17sp"/><RadioGroupandroid:id="@+id/rg_rb"android:layout_width="match_parent"android:layout_height="wrap_content"android:orientation="horizontal"><RadioButtonandroid:id="@+id/rb_male"android:layout_width="0dp"android:layout_weight="1"android:layout_height="wrap_content"android:text="男"/><RadioButtonandroid:id="@+id/rb_female"android:layout_width="0dp"android:layout_height="wrap_content"android:layout_weight="1"android:text="女"/></RadioGroup><TextViewandroid:id="@+id/tv_result"android:layout_width="wrap_content"android:layout_height="wrap_content"android:textSize="17sp"android:textColor="@color/black"/></LinearLayout>
package com.example.middlecontrolactivity;import androidx.appcompat.app.AppCompatActivity;import android.os.Bundle;
import android.widget.CompoundButton;
import android.widget.RadioGroup;
import android.widget.TextView;public class RadioButtonActivity extends AppCompatActivity implements RadioGroup.OnCheckedChangeListener {private TextView tv_result;@Overrideprotected void onCreate(Bundle savedInstanceState) {super.onCreate(savedInstanceState);setContentView(R.layout.activity_radio_button);RadioGroup rg_rb=findViewById(R.id.rg_rb);tv_result=findViewById(R.id.tv_result);rg_rb.setOnCheckedChangeListener(this);}@Overridepublic void onCheckedChanged(RadioGroup radioGroup, int i) {switch (i){case R.id.rb_male:tv_result.setText("你选择的是男性");break;case R.id.rb_female:tv_result.setText("你选择的女性");break;}}
}
- EditText、焦点变更事件、文本变化监听器
焦点变更事件可以对鼠标的焦点变更进行监听,比如登录要输入手机号+密码,可以对密码进行焦点监听,当输入密码时,检测手机号是否为11位,若不为,则不能输入密码。
文本变化监听器则可通过对EditText进行监听做出相应的动作,比如当手机号输够十一位后自动关闭键盘。
hint:指定提示文本的内容
maxLength:指定文件允许输入的最大长度
inputType:指定输入的文本类型
| 输入类型 | 说明 |
|---|---|
| text | 文本 |
| testPassword | 文本密码 |
| number | 整型数 |
| numberSigned | 带符号的数字 |
| numberDecimal | 带小数点的数字 |
| numberPassword | 数字密码 |
| datetime | 时间日期格式,数字,横线,斜杆,空格,冒号 |
| date | 日期格式,数字,横线,斜杠 |
| time | 时间格式 |
例子:简单的登录判断程序
<?xml version="1.0" encoding="utf-8"?>
<LinearLayout xmlns:android="http://schemas.android.com/apk/res/android"android:layout_width="match_parent"android:layout_height="match_parent"android:padding="5dp"android:orientation="vertical"><EditTextandroid:id="@+id/phone"android:layout_width="match_parent"android:layout_height="wrap_content"android:hint="请输入11位手机号"android:maxLength="11"android:inputType="phone"android:textColorHint="@color/black"
/><EditTextandroid:id="@+id/password"android:layout_width="match_parent"android:layout_height="wrap_content"android:hint="请输入密码"android:inputType="textPassword"android:textColorHint="@color/black"/><Buttonandroid:id="@+id/button"android:layout_width="match_parent"android:layout_height="wrap_content"android:text="提交"android:textSize="17sp"android:layout_gravity="right" /><TextViewandroid:id="@+id/text"android:layout_width="match_parent"android:layout_height="wrap_content"android:textSize="17sp"/></LinearLayout>
package com.example.middlecontrolactivity;import androidx.appcompat.app.AppCompatActivity;import android.os.Bundle;
import android.text.Editable;
import android.text.TextUtils;
import android.text.TextWatcher;
import android.view.View;
import android.widget.Button;
import android.widget.EditText;
import android.widget.TextView;
import android.widget.Toast;import com.example.middlecontrolactivity.util.ViewUtil;public class EditTextActivity extends AppCompatActivity implements View.OnClickListener, View.OnFocusChangeListener {private  EditText phone;private  EditText password;private TextView v;@Overrideprotected void onCreate(Bundle savedInstanceState) {super.onCreate(savedInstanceState);setContentView(R.layout.activity_edit_text);v=findViewById(R.id.text);Button button = findViewById(R.id.button);phone=findViewById(R.id.phone);password=findViewById(R.id.password);button.setOnClickListener(this);password.setOnFocusChangeListener(this);//焦点变更事件phone.addTextChangedListener(new HideTextWatcher(phone,11)); //输够位数则自动关闭键盘(文本监听)password.addTextChangedListener(new HideTextWatcher(phone,6));//输够位数则自动关闭键盘}@Overridepublic void onClick(View view) {String p=phone.getText().toString();String pass=password.getText().toString();if(p.equals("123456") && pass.equals("123456")){v.setText("登录成功");}else{v.setText("登录失败");}}@Overridepublic void onFocusChange(View view, boolean b) {if(b){String sure_phone=phone.getText().toString();if(TextUtils.isEmpty(sure_phone)||sure_phone.length()<11){phone.requestFocus();Toast.makeText(this,"请输入11位号码",Toast.LENGTH_SHORT).show();}}}private class HideTextWatcher implements  TextWatcher{private  EditText mView;private  int mMaxLength;public HideTextWatcher(EditText v, int maxLength) {mView=v;mMaxLength=maxLength;}@Overridepublic void beforeTextChanged(CharSequence charSequence, int i, int i1, int i2) {}@Overridepublic void onTextChanged(CharSequence charSequence, int i, int i1, int i2) {}@Overridepublic void afterTextChanged(Editable editable) {String str=editable.toString();if(str.length()==mMaxLength){ViewUtil.hideOneInputMethod(EditTextActivity.this,mView);}}}
}
package com.example.middlecontrolactivity.util;import android.app.Activity;
import android.content.Context;
import android.view.View;
import android.view.inputmethod.InputMethodManager;public class ViewUtil {public  static  void hideOneInputMethod(Activity act, View v){//从系统服务中获取到输入法管理器InputMethodManager imm= (InputMethodManager) act.getSystemService(Context.INPUT_METHOD_SERVICE);//通过token关闭屏幕上的输入法键盘imm.hideSoftInputFromWindow(v.getWindowToken(),0);}
}- 提醒对话框
就是类似于卸载手机应用时的弹出的框,选择确定或者取消,分别对不同的选择进行不同的监听。
package com.example.middlecontrolactivity;import androidx.appcompat.app.AlertDialog;
import androidx.appcompat.app.AppCompatActivity;import android.os.Bundle;
import android.view.View;
import android.widget.Button;
import android.widget.TextView;public class AlertDialogActivity extends AppCompatActivity implements View.OnClickListener {private  Button button;private TextView textView;@Overrideprotected void onCreate(Bundle savedInstanceState) {super.onCreate(savedInstanceState);setContentView(R.layout.activity_alert_dialog);button=findViewById(R.id.alert_btn);textView=findViewById(R.id.text);button.setOnClickListener(this);}@Overridepublic void onClick(View view) {AlertDialog.Builder builder=new AlertDialog.Builder(this);builder.setTitle("亲爱的用户");builder.setMessage("你真的要卸载吗?");builder.setPositiveButton("确定",(dialog,which)->{textView.setText("虽然依依不舍,但是终究离开");});builder.setNegativeButton("再想想",(dialog,which)->{textView.setText("我依旧会陪伴");});AlertDialog alertDialog=builder.create();alertDialog.show();}
}
- 日期、时间对话框
<?xml version="1.0" encoding="utf-8"?>
<LinearLayout xmlns:android="http://schemas.android.com/apk/res/android"android:layout_width="match_parent"android:layout_height="match_parent"android:orientation="vertical"android:padding="5dp"><Buttonandroid:id="@+id/btn_date"android:layout_width="match_parent"android:layout_height="wrap_content"android:text="请选择日期"/><DatePickerandroid:id="@+id/dp_date"android:layout_width="match_parent"android:layout_height="wrap_content"android:datePickerMode="spinner"android:calendarViewShown="false"/><Buttonandroid:id="@+id/btn_sure"android:layout_width="match_parent"android:layout_height="wrap_content"android:text="确定"/><TextViewandroid:id="@+id/date_text"android:layout_width="match_parent"android:layout_height="wrap_content"android:textSize="17sp"/>
</LinearLayout>
package com.example.middlecontrolactivity;import androidx.appcompat.app.AppCompatActivity;import android.app.Dialog;
import android.os.Bundle;
import android.view.View;
import android.widget.Button;
import android.widget.DatePicker;
import android.widget.TextView;import org.w3c.dom.Text;import java.util.Calendar;public class DatePickerDialog extends AppCompatActivity implements View.OnClickListener, android.app.DatePickerDialog.OnDateSetListener {private Button btn_date;private  Button btn_sure;private DatePicker dp_date;private  TextView date_text;@Overrideprotected void onCreate(Bundle savedInstanceState) {super.onCreate(savedInstanceState);setContentView(R.layout.activity_date_picker_dialog);btn_date=findViewById(R.id.btn_date);btn_sure=findViewById(R.id.btn_sure);dp_date=findViewById(R.id.dp_date);date_text=findViewById(R.id.date_text);btn_date.setOnClickListener(this);btn_sure.setOnClickListener(this);}@Overridepublic void onClick(View view) {switch (view.getId()){case R.id.btn_sure:String desc=String.format("你选择的日期是%s年%s月%s日",dp_date.getYear(),dp_date.getMonth()+1,dp_date.getDayOfMonth());date_text.setText(desc);break;case R.id.btn_date:Calendar calendar=Calendar.getInstance();int year= calendar.get(Calendar.YEAR);int month= calendar.get(Calendar.MONTH);int day= calendar.get(Calendar.DAY_OF_MONTH);android.app.DatePickerDialog dialog=new android.app.DatePickerDialog(this,this,year,month,day);dialog.show();break;}}@Overridepublic void onDateSet(DatePicker datePicker, int year, int month, int day) {String desc=String.format("你选择的日期是%s年%s月%s日",year,month+1,day);date_text.setText(desc);}
}
日期和时间所用的方式是一致的,只需将DatePicker改为TimePicker即可,同时DatePickerDialog改为TimePickerDialog即可。
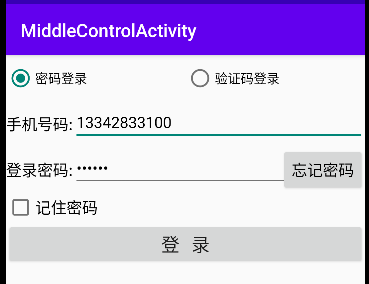
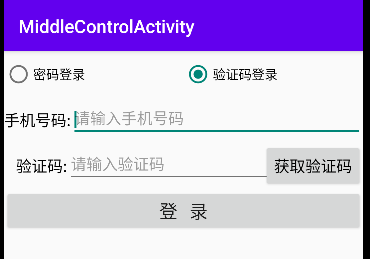
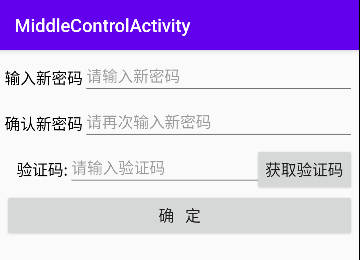
八、综合案列(登录与找回密码)
设置两个页面,通过两种方式登录,手机号与验证码登录,并且可以跳转到另外的页面找回密码,通过Intent包裹数据进行不同页面的传输和传回,
并对手机号和密码,验证码框进行监听,达到长度则撤销键盘,达不到长度或不正确弹出提醒对话框。
UI界面涉及:
login.xml:
<?xml version="1.0" encoding="utf-8"?>
<LinearLayout xmlns:android="http://schemas.android.com/apk/res/android"android:layout_width="match_parent"android:layout_height="match_parent"android:orientation="vertical"><RadioGroupandroid:id="@+id/rg_login"android:layout_width="match_parent"android:layout_height="@dimen/item_layout_height"android:orientation="horizontal"><RadioButtonandroid:id="@+id/rb_password"android:layout_width="0dp"android:layout_height="match_parent"android:layout_weight="1"android:text="@string/login_by_password"android:checked="true"/><RadioButtonandroid:id="@+id/rb_verifycode"android:layout_width="0dp"android:layout_height="match_parent"android:layout_weight="1"android:text="@string/login_by_verifycode"/></RadioGroup><LinearLayoutandroid:layout_width="match_parent"android:layout_height="@dimen/item_layout_height"android:orientation="horizontal"><TextViewandroid:layout_width="wrap_content"android:layout_height="match_parent"android:text="@string/phone_number"android:gravity="center"android:textColor="@color/black"android:textSize="@dimen/common_font_size"/><EditTextandroid:id="@+id/et_phone"android:layout_width="0dp"android:layout_height="match_parent"android:layout_weight="1"android:hint="@string/input_phone_number"android:layout_marginTop="5dp"android:layout_marginBottom="5dp"android:maxLength="11"android:textColor="@color/black"android:inputType="phone"android:textSize="@dimen/common_font_size"/></LinearLayout><LinearLayoutandroid:layout_width="match_parent"android:layout_height="@dimen/item_layout_height"android:orientation="horizontal"><TextViewandroid:id="@+id/tv_password"android:layout_width="wrap_content"android:layout_height="match_parent"android:text="@string/login_password"android:gravity="center"android:textColor="@color/black"android:textSize="@dimen/common_font_size"/><RelativeLayoutandroid:layout_width="0dp"android:layout_height="match_parent"android:layout_weight="1"><EditTextandroid:id="@+id/et_password"android:layout_width="match_parent"android:layout_height="match_parent"android:hint="@string/input_password"android:layout_marginTop="5dp"android:layout_marginBottom="5dp"android:maxLength="6"android:textColor="@color/black"android:inputType="numberPassword"android:textSize="@dimen/common_font_size"/><Buttonandroid:id="@+id/btn_forget"android:layout_width="wrap_content"android:layout_height="match_parent"android:layout_alignParentEnd="true"android:text="@string/forget_password"android:textColor="@color/black"android:textSize="@dimen/common_font_size" /></RelativeLayout></LinearLayout><CheckBoxandroid:id="@+id/ck_remember"android:layout_width="match_parent"android:layout_height="wrap_content"android:text="@string/remember_password"android:textColor="@color/black"android:textSize="@dimen/common_font_size"/><Buttonandroid:id="@+id/btn_login"android:layout_width="match_parent"android:layout_height="wrap_content"android:text="@string/login"android:textSize="20sp"/>
</LinearLayout>
forgetpassword.xml:
<?xml version="1.0" encoding="utf-8"?>
<LinearLayout xmlns:android="http://schemas.android.com/apk/res/android"android:layout_width="match_parent"android:layout_height="match_parent"android:orientation="vertical"android:padding="5dp"><LinearLayoutandroid:layout_width="match_parent"android:layout_height="@dimen/item_layout_height"android:orientation="horizontal"><TextViewandroid:layout_width="wrap_content"android:layout_height="match_parent"android:text="@string/input_new_pasword"android:gravity="center"android:textColor="@color/black"android:textSize="@dimen/common_font_size"/><EditTextandroid:id="@+id/et_password"android:layout_width="0dp"android:layout_height="match_parent"android:layout_weight="1"android:hint="@string/input_new_password"android:layout_marginTop="5dp"android:layout_marginBottom="5dp"android:maxLength="11"android:textColor="@color/black"android:inputType="phone"android:textSize="@dimen/common_font_size"/></LinearLayout><LinearLayoutandroid:layout_width="match_parent"android:layout_height="@dimen/item_layout_height"android:orientation="horizontal"><TextViewandroid:id="@+id/new_password"android:layout_width="wrap_content"android:layout_height="match_parent"android:text="@string/sure_new_password"android:gravity="center"android:textColor="@color/black"android:textSize="@dimen/common_font_size"/><EditTextandroid:id="@+id/sure_new_password"android:layout_width="match_parent"android:layout_height="match_parent"android:hint="@string/input_new_password_again"android:layout_marginTop="5dp"android:layout_marginBottom="5dp"android:maxLength="6"android:textColor="@color/black"android:inputType="numberPassword"android:textSize="@dimen/common_font_size"/></LinearLayout><LinearLayoutandroid:layout_width="match_parent"android:layout_height="@dimen/item_layout_height"android:orientation="horizontal"><TextViewandroid:layout_width="wrap_content"android:layout_height="match_parent"android:text="@string/verifycode"android:gravity="center"android:textColor="@color/black"android:textSize="@dimen/common_font_size"/><RelativeLayoutandroid:layout_width="match_parent"android:layout_height="wrap_content"><EditTextandroid:id="@+id/et_verifycode"android:layout_width="match_parent"android:layout_height="match_parent"android:hint="@string/input_verifycode"android:layout_marginTop="5dp"android:layout_marginBottom="5dp"android:maxLength="6"android:textColor="@color/black"android:inputType="numberPassword"android:textSize="@dimen/common_font_size"/><Buttonandroid:id="@+id/get_verifycode"android:layout_width="wrap_content"android:layout_height="match_parent"android:layout_alignParentEnd="true"android:textSize="@dimen/common_font_size"android:text="@string/get_verifycode"/></RelativeLayout></LinearLayout><Buttonandroid:id="@+id/confirm"android:layout_width="match_parent"android:layout_height="@dimen/item_layout_height"android:text="@string/done"android:textSize="@dimen/common_font_size"/>
</LinearLayout>
strings.xml:
<resources><string name="app_name">MiddleControlActivity</string><string name="login_by_password">密码登录</string><string name="login_by_verifycode">验证码登录</string><string name="phone_number">手机号码:</string><string name="input_phone_number">请输入手机号码</string><string name="login_password">登录密码:</string><string name="input_password">请输入密码</string><string name="forget_password">忘记密码</string><string name="remember_password">记住密码</string><string name="login">登   录</string><string name="input_new_pasword">输入新密码</string><string name="input_new_password">请输入新密码</string><string name="sure_new_password">确认新密码</string><string name="input_new_password_again">请再次输入新密码</string><string name="verifycode">   验证码:</string><string name="input_verifycode">请输入验证码</string><string name="get_verifycode">获取验证码</string><string name="done">确   定</string>
</resources>
dimens.xml:
<?xml version="1.0" encoding="utf-8"?>
<resources><dimen name="common_font_size">17sp</dimen><dimen name="button_font_size">20sp</dimen><dimen name="item_layout_height">50dp</dimen>
</resources>
登录逻辑:
package com.example.middlecontrolactivity;import androidx.activity.result.ActivityResult;
import androidx.activity.result.ActivityResultCallback;
import androidx.activity.result.ActivityResultLauncher;
import androidx.activity.result.contract.ActivityResultContracts;
import androidx.appcompat.app.AlertDialog;
import androidx.appcompat.app.AppCompatActivity;import android.annotation.SuppressLint;
import android.app.Activity;
import android.app.Dialog;
import android.content.DialogInterface;
import android.content.Intent;
import android.os.Bundle;
import android.text.Editable;
import android.text.TextWatcher;
import android.view.View;
import android.widget.Button;
import android.widget.CheckBox;
import android.widget.EditText;
import android.widget.RadioButton;
import android.widget.RadioGroup;
import android.widget.TextView;
import android.widget.Toast;import com.example.middlecontrolactivity.util.ViewUtil;import java.util.Random;public class LoginMainActivity extends AppCompatActivity implements RadioGroup.OnCheckedChangeListener, View.OnClickListener {private TextView tv_password;private EditText et_password;private Button btn_forget;private CheckBox ck_remember;private EditText et_phone;private RadioButton rb_password;private RadioButton rb_verifycode;private  ActivityResultLauncher<Intent> register;private  Button btn_login;private  String mPassword="123456";private  String mVerifyCode;@Overrideprotected void onCreate(Bundle savedInstanceState) {super.onCreate(savedInstanceState);setContentView(R.layout.activity_login_main);RadioGroup rb_login=findViewById(R.id.rg_login);et_phone = findViewById(R.id.et_phone);tv_password=findViewById(R.id.tv_password);et_password=findViewById(R.id.et_password);btn_forget=findViewById(R.id.btn_forget);ck_remember=findViewById(R.id.ck_remember);rb_password = findViewById(R.id.rb_password);rb_verifycode=findViewById(R.id.rb_verifycode);btn_login=findViewById(R.id.btn_login);btn_login.setOnClickListener(this);et_phone.addTextChangedListener(new HideTextWatcher(et_phone,11));et_password.addTextChangedListener(new HideTextWatcher(et_password,6));rb_login.setOnCheckedChangeListener(this);btn_forget.setOnClickListener(this);register = registerForActivityResult(new ActivityResultContracts.StartActivityForResult(), new ActivityResultCallback<ActivityResult>() {@Overridepublic void onActivityResult(ActivityResult result) {Intent intent=result.getData();if(intent!=null&&result.getResultCode()== Activity.RESULT_OK)    {mPassword=intent.getStringExtra("new_password");}}});}@SuppressLint("NonConstantResourceId")@Overridepublic void onCheckedChanged(RadioGroup radioGroup, int checkId) {switch (checkId){case R.id.rb_password:tv_password.setText(R.string.login_password);et_password.setHint(R.string.input_password);btn_forget.setText(R.string.forget_password);ck_remember.setVisibility(View.VISIBLE);break;case R.id.rb_verifycode:tv_password.setText(R.string.verifycode);et_password.setHint(R.string.input_verifycode);btn_forget.setText(R.string.get_verifycode);ck_remember.setVisibility(View.GONE);break;}}@SuppressLint({"DefaultLocale", "NonConstantResourceId"})@Overridepublic void onClick(View view) {String phone=et_phone.getText().toString();switch (view.getId()){case R.id.btn_forget:if(phone.length()<11){Toast.makeText(this,"请输入正确的手机号",Toast.LENGTH_SHORT).show();return ;}if(rb_password.isChecked()){//通过Intent包裹数据传递到忘记密码界面Intent intent=new Intent(this,ForgetPasswordActivity.class);intent.putExtra("phone",phone);register.launch(intent);}else if(rb_verifycode.isChecked()){//弹出对话框,提醒用户记住mVerifyCode=String.format("%06d",new Random().nextInt(999999));AlertDialog.Builder builder=new AlertDialog.Builder(this);builder.setTitle("请记住验证码");builder.setMessage("手机号"+phone+",本次验证码是"+mVerifyCode+",请输入验证码");builder.setPositiveButton("好的",null);AlertDialog dialog=builder.create();dialog.show();}break;case R.id.btn_login:if(rb_password.isChecked()){if(!mPassword.equals(et_password.getText().toString())){Toast.makeText(this,"请输入正确的密码",Toast.LENGTH_SHORT) .show();return ;}loginSuccess();}else if(rb_verifycode.isChecked()){if(!mVerifyCode.equals(et_password.getText().toString())){Toast.makeText(this,"请输入正确的验证码",Toast.LENGTH_SHORT);return;}loginSuccess()     ;}break;}}//EditText监听器,到达位数则自动关闭键盘private class HideTextWatcher implements TextWatcher {private EditText mView;private int mLength;public HideTextWatcher(EditText e, int MaxLength) {this.mView=e;this.mLength=MaxLength      ;}@Overridepublic void beforeTextChanged(CharSequence charSequence, int i, int i1, int i2) {}@Overridepublic void onTextChanged(CharSequence charSequence, int i, int i1, int i2) {}@Overridepublic void afterTextChanged(Editable editable) {if(editable.length()==mLength){ViewUtil.hideOneInputMethod(LoginMainActivity.this,mView);}}}private void loginSuccess(){String desc=String.format("您的手机号码是%s,恭喜你通过登录验证,点击确定返回",et_phone.getText().toString());AlertDialog.Builder builder=new AlertDialog.Builder(this) ;builder.setMessage(desc);builder.setPositiveButton("确定返回", (dialogInterface, i) -> {finish();});builder.setNegativeButton("我再看看",null);Dialog dialog=builder.create();dialog.show();}
}
找回密码逻辑:
package com.example.middlecontrolactivity;import androidx.appcompat.app.AlertDialog;
import androidx.appcompat.app.AppCompatActivity;import android.annotation.SuppressLint;
import android.app.Activity;
import android.content.Intent;
import android.os.Bundle;
import android.view.View;
import android.widget.EditText;
import android.widget.Toast;import java.util.Random;public class ForgetPasswordActivity extends AppCompatActivity implements View.OnClickListener {private String mPhone;private String mVerifyCode;private EditText et_password;private EditText sure_password;private  EditText et_verifycode;@Overrideprotected void onCreate(Bundle savedInstanceState) {super.onCreate(savedInstanceState);setContentView(R.layout.activity_forget_password);mPhone=getIntent().getStringExtra("phone");et_password=findViewById(R.id.et_password);sure_password=findViewById(R.id.sure_new_password);findViewById(R.id.get_verifycode).setOnClickListener(this);findViewById(R.id.confirm).setOnClickListener(this);et_verifycode=findViewById(R.id.et_verifycode);}@SuppressLint({"NonConstantResourceId", "DefaultLocale"})@Overridepublic void onClick(View view) {switch (view.getId()){case R.id.get_verifycode:mVerifyCode=String.format("%06d",new Random().nextInt(999999));AlertDialog.Builder builder=new AlertDialog.Builder(this);builder.setTitle("请记住验证码");builder.setMessage("手机号"+mPhone+",本次验证码是"+mVerifyCode+",请输入验证码");builder.setPositiveButton("好的",null);AlertDialog dialog=builder.create();dialog.show();break;case R.id.confirm:String password=et_password.getText().toString();String password_second=sure_password.getText().toString();String verifyCode=et_verifycode.getText().toString();if(password.length()<6){Toast.makeText(this,"请输入6位的密码",Toast.LENGTH_SHORT).show();return;}if(!password.equals(password_second)){Toast.makeText(this,"两次密码不一致",Toast.LENGTH_SHORT).show();return;}if(!verifyCode.equals(mVerifyCode)){Toast.makeText(this,"验证码不正确",Toast.LENGTH_SHORT).show();return ;}Toast.makeText(this,"密码修改成功",Toast.LENGTH_SHORT).show();Intent intent=new Intent();intent.putExtra("new_password",password);setResult(Activity.RESULT_OK,intent);finish();break;}}
}
数据存储
一、SharedPreferences
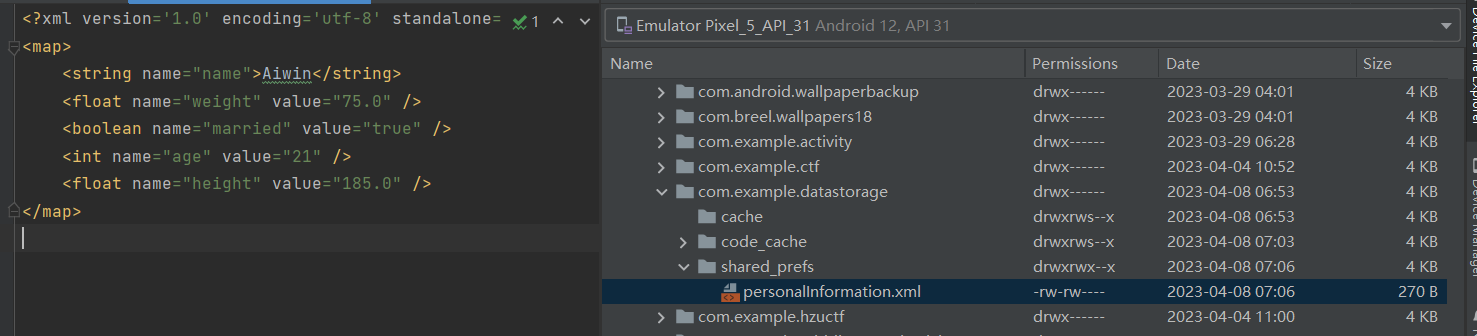
SharePreferences是Android的轻量级存储工具,采用存储结构是Key-Value的键值对方式,重量级存储的是SQLite数据库
共享参数的存储介质是符合XML规范的配置文件,保存路径是:/data/data/应用包名/shared_prefs/文件名.xml。
使用场景:
简单且孤立的数据,文本形式的数据,需持久化存储的数据(在App退出后再次启动,保存数据依旧有效),实际开发中,经常存储用户的个性化配置信息,行为信息,临时需要保存的片段信息等。
例子:一个页面用于提交个人的姓名,年龄,身高,体重,是否结婚的信息,提交后,关闭程序再次打开信息依旧能够显示。
可以使用sharedPreferences用于存储提交过的信息,存储在xml中,再应用程序再次打开时,通过getSharedPreferences从中获取,并设置edittext的内容即可。
<?xml version="1.0" encoding="utf-8"?>
<LinearLayout xmlns:android="http://schemas.android.com/apk/res/android"android:layout_width="match_parent"android:layout_height="match_parent"android:orientation="vertical"android:padding="5dp"><LinearLayoutandroid:layout_width="match_parent"android:layout_height="wrap_content"android:orientation="horizontal"><TextViewandroid:layout_width="wrap_content"android:layout_height="wrap_content"android:text="姓名:"android:textSize="17sp"android:textColor="@color/black"/><EditTextandroid:id="@+id/name"android:layout_width="match_parent"android:layout_height="wrap_content"android:hint="请输入你的姓名"android:textSize="17sp"android:textColor="@color/black"/></LinearLayout><LinearLayoutandroid:layout_width="match_parent"android:layout_height="wrap_content"android:orientation="horizontal"><TextViewandroid:layout_width="wrap_content"android:layout_height="wrap_content"android:text="年龄:"android:textSize="17sp"android:textColor="@color/black"/><EditTextandroid:id="@+id/age"android:layout_width="match_parent"android:layout_height="wrap_content"android:hint="请输入你的年龄"android:textSize="17sp"android:inputType="number"android:textColor="@color/black"/></LinearLayout><LinearLayoutandroid:layout_width="match_parent"android:layout_height="wrap_content"android:orientation="horizontal"><TextViewandroid:layout_width="wrap_content"android:layout_height="wrap_content"android:text="身高:"android:textSize="17sp"android:textColor="@color/black"/><EditTextandroid:id="@+id/height"android:layout_width="match_parent"android:layout_height="wrap_content"android:hint="请输入你的身高"android:textSize="17sp"android:inputType="number"android:textColor="@color/black"/></LinearLayout><LinearLayoutandroid:layout_width="match_parent"android:layout_height="wrap_content"android:orientation="horizontal"><TextViewandroid:layout_width="wrap_content"android:layout_height="wrap_content"android:text="体重:"android:textSize="17sp"android:textColor="@color/black"/><EditTextandroid:id="@+id/weight"android:layout_width="match_parent"android:layout_height="wrap_content"android:hint="请输入您的体重"android:inputType="number"android:textSize="17sp"android:textColor="@color/black"/></LinearLayout><CheckBoxandroid:id="@+id/married"android:layout_width="match_parent"android:layout_height="wrap_content"android:checked="false"android:textColor="@color/black"android:text="已婚"android:textSize="17sp" /><Buttonandroid:id="@+id/save"android:layout_width="match_parent"android:layout_height="wrap_content"android:text="保存到共享参数"android:textSize="17sp"android:textColor="@color/black"/>
</LinearLayout>
package com.example.datastorage;import androidx.appcompat.app.AppCompatActivity;import android.annotation.SuppressLint;
import android.content.SharedPreferences;
import android.os.Bundle;
import android.view.View;
import android.widget.Button;
import android.widget.CheckBox;
import android.widget.EditText;
import android.widget.Toast;public class ShareWriteActivity extends AppCompatActivity implements  View.OnClickListener {private EditText name;private EditText age;private EditText weight;private EditText height;private CheckBox married;private Button save;private  SharedPreferences sharedPreferences;@Overrideprotected void onCreate(Bundle savedInstanceState) {super.onCreate(savedInstanceState);setContentView(R.layout.activity_share_write);name=findViewById(R.id.name);age=findViewById(R.id.age);weight=findViewById(R.id.weight);height=findViewById(R.id.height);married=findViewById(R.id.married);save=findViewById(R.id.save);sharedPreferences = getSharedPreferences("personalInformation",MODE_PRIVATE);save.setOnClickListener(this);reload();}public void reload(){String re_name=sharedPreferences.getString("name",null);String re_age= String.valueOf(sharedPreferences.getInt("age",0));String re_weight= String.valueOf(sharedPreferences.getFloat("weight",0f));String re_height= String.valueOf(sharedPreferences.getFloat("height",0f));boolean re_married=sharedPreferences.getBoolean("married",false);name.setText(re_name);age.setText(re_age);weight.setText(re_weight);height.setText(re_height);married.setChecked(re_married);}@Overridepublic void onClick(View view) {String et_name=name.getText().toString();String et_age=age.getText().toString();String et_weight=weight.getText().toString();String et_height=height.getText().toString();boolean et_married=married.isChecked();@SuppressLint("CommitPrefEdits") SharedPreferences.Editor editor=sharedPreferences.edit();editor.putString("name",et_name);editor.putInt("age",Integer.parseInt(et_age));editor.putFloat("weight",Float.parseFloat(et_weight));editor.putFloat("height",Float.parseFloat(et_height));editor.putBoolean("married",et_married);editor.apply();Toast toast=Toast.makeText(this,"提交成功",Toast.LENGTH_SHORT);toast.show();}
}
可以看到在提交后,会在/data/data/应用程序名中生成一个xml文件。

二、SQLite
SQLite与mysql几乎一致,SQLite不支持boolean类型,当输出true和false时会自动转换成0和1.
- 数据库的打开和删除
package com.example.datastorage;import androidx.appcompat.app.AppCompatActivity;import android.annotation.SuppressLint;
import android.database.sqlite.SQLiteDatabase;
import android.os.Bundle;
import android.view.View;
import android.widget.Button;
import android.widget.TextView;public class CreateSqliteDatabase extends AppCompatActivity implements View.OnClickListener {private Button create;private Button delete;private TextView textView;private String DatabaseName;@SuppressLint("MissingInflatedId")@Overrideprotected void onCreate(Bundle savedInstanceState) {super.onCreate(savedInstanceState);setContentView(R.layout.activity_create_sqlite_database);create=findViewById(R.id.bt_create);delete=findViewById(R.id.bt_delete);textView=findViewById(R.id.text);create.setOnClickListener(this);delete.setOnClickListener(this);DatabaseName=getFilesDir()+"/test.db";}@SuppressLint("NonConstantResourceId")@Overridepublic void onClick(View view) {String desc;switch (view.getId()){case R.id.bt_create:SQLiteDatabase db=openOrCreateDatabase(DatabaseName,MODE_PRIVATE,null);desc=String.format("数据库%s创建%s",db.getPath(),(db!=null)?"成功":"失败");textView.setText(desc);break;case R.id.bt_delete:boolean result=deleteDatabase(DatabaseName);desc=String.format("数据库%s删除%s",DatabaseName,result?"成功":"失败");textView.setText(desc);break;}}
}
- 数据库的增删改查
DatabaseUserHelper.java
package com.example.datastorage.database;import android.content.ContentValues;
import android.content.Context;
import android.database.Cursor;
import android.database.sqlite.SQLiteDatabase;
import android.database.sqlite.SQLiteOpenHelper;import com.example.datastorage.entity.User;import java.util.ArrayList;
import java.util.List;public class DatabaseUserHelper extends SQLiteOpenHelper {private static final String DB_NAME="user.db";private static final String TABLE_NAME="user_info";private static final int DB_VERSION=1;private static DatabaseUserHelper databaseUserHelper=null;public DatabaseUserHelper(Context context) {super(context,DB_NAME,null,DB_VERSION);}//单例模式获取数据库实例public static  DatabaseUserHelper getInstance(Context context){if(databaseUserHelper==null){databaseUserHelper=new DatabaseUserHelper(context);}return databaseUserHelper;}@Overridepublic void onCreate(SQLiteDatabase sqLiteDatabase) {String sql= "CREATE TABLE IF NOT EXISTS "+TABLE_NAME+"(_id INTEGER PRIMARY KEY AUTOINCREMENT NOT NULL,name VARCHAR NOT NULL,age INTEGER NOT NULL,height LONG NOT NULL,weight float NOT NULL,married INTEGER NOT NULL);";sqLiteDatabase.execSQL(sql);}@Overridepublic void onUpgrade(SQLiteDatabase sqLiteDatabase, int i, int i1) {}public Long insert(User user){SQLiteDatabase db=databaseUserHelper.getWritableDatabase();ContentValues values=new ContentValues();values.put("name",user.name);values.put("age",user.age);values.put("weight",user.weight);values.put("height",user.height);values.put("married",user.married);//如果插入的数据是空的,nullColumnHack可以给予一列列名进行插入。return db.insert(TABLE_NAME,null,values);}public long deleteByName(String name){SQLiteDatabase db=databaseUserHelper.getWritableDatabase();return db.delete(TABLE_NAME, "name=?", new String[]{name});}public long update(User user) {ContentValues values=new ContentValues();values.put("name",user.name);values.put("age",user.age);values.put("weight",user.weight);values.put("height",user.height);values.put("married",user.married);SQLiteDatabase db = databaseUserHelper.getWritableDatabase();return db.update(TABLE_NAME,values,"name=?",new String[]{user.name});}public List<User> queryAll(){List<User> list=new ArrayList<>();SQLiteDatabase db=databaseUserHelper.getWritableDatabase();//返回一个游标Cursor cursor=db.query(TABLE_NAME,null,null,null,null,null,null);while(cursor.moveToNext()){User user=new User();user.id=cursor.getInt(0);user.name=cursor.getString(1);user.age=cursor.getInt(2);user.height=cursor.getLong(3);user.weight=cursor.getFloat(4);user.married= cursor.getInt(5) != 0;list.add(user);}return list;}
}
User.java类
package com.example.datastorage.entity;import androidx.annotation.NonNull;public class User {public int id;public String name;public int age;public long height;public float weight;public boolean married;public User(String name, int age, long height, float weight, boolean married) {this.name = name;this.age = age;this.height = height;this.weight = weight;this.married = married;}public User(){}@NonNull@Overridepublic String toString() {return "User{" +"id=" + id +", name='" + name + '\'' +", age=" + age +", height=" + height +", weight=" + weight +", married=" + married +'}';}
}
xml类:
<?xml version="1.0" encoding="utf-8"?>
<LinearLayout xmlns:android="http://schemas.android.com/apk/res/android"android:layout_width="match_parent"android:layout_height="match_parent"android:orientation="vertical"android:padding="5dp"><LinearLayoutandroid:layout_width="match_parent"android:layout_height="wrap_content"android:orientation="horizontal"><TextViewandroid:layout_width="wrap_content"android:layout_height="wrap_content"android:text="姓名:"android:textSize="17sp"android:textColor="@color/black"/><EditTextandroid:id="@+id/name"android:layout_width="match_parent"android:layout_height="wrap_content"android:hint="请输入你的姓名"android:textSize="17sp"android:textColor="@color/black"/></LinearLayout><LinearLayoutandroid:layout_width="match_parent"android:layout_height="wrap_content"android:orientation="horizontal"><TextViewandroid:layout_width="wrap_content"android:layout_height="wrap_content"android:text="年龄:"android:textSize="17sp"android:textColor="@color/black"/><EditTextandroid:id="@+id/age"android:layout_width="match_parent"android:layout_height="wrap_content"android:hint="请输入你的年龄"android:textSize="17sp"android:inputType="number"android:textColor="@color/black"/></LinearLayout><LinearLayoutandroid:layout_width="match_parent"android:layout_height="wrap_content"android:orientation="horizontal"><TextViewandroid:layout_width="wrap_content"android:layout_height="wrap_content"android:text="身高:"android:textSize="17sp"android:textColor="@color/black"/><EditTextandroid:id="@+id/height"android:layout_width="match_parent"android:layout_height="wrap_content"android:hint="请输入你的身高"android:textSize="17sp"android:inputType="number"android:textColor="@color/black"/></LinearLayout><LinearLayoutandroid:layout_width="match_parent"android:layout_height="wrap_content"android:orientation="horizontal"><TextViewandroid:layout_width="wrap_content"android:layout_height="wrap_content"android:text="体重:"android:textSize="17sp"android:textColor="@color/black"/><EditTextandroid:id="@+id/weight"android:layout_width="match_parent"android:layout_height="wrap_content"android:hint="请输入您的体重"android:inputType="number"android:textSize="17sp"android:textColor="@color/black"/></LinearLayout><CheckBoxandroid:id="@+id/married"android:layout_width="match_parent"android:layout_height="wrap_content"android:checked="false"android:textColor="@color/black"android:text="已婚"android:textSize="17sp" /><Buttonandroid:id="@+id/save"android:layout_width="match_parent"android:layout_height="wrap_content"android:text="添加"android:textSize="17sp"android:textColor="@color/black"/><Buttonandroid:id="@+id/delete"android:layout_width="match_parent"android:layout_height="wrap_content"android:text="删除"android:textSize="17sp"android:textColor="@color/black"/><Buttonandroid:id="@+id/update"android:layout_width="match_parent"android:layout_height="wrap_content"android:text="修改"android:textSize="17sp"android:textColor="@color/black"/><Buttonandroid:id="@+id/query"android:layout_width="match_parent"android:layout_height="wrap_content"android:text="查询"android:textSize="17sp"android:textColor="@color/black"/>
</LinearLayout>
Activity类:
package com.example.datastorage;import androidx.appcompat.app.AppCompatActivity;import android.annotation.SuppressLint;
import android.os.Bundle;
import android.util.Log;
import android.view.View;
import android.widget.Button;
import android.widget.CheckBox;
import android.widget.EditText;import com.example.datastorage.database.DatabaseUserHelper;
import com.example.datastorage.entity.User;
import com.example.datastorage.util.ToastUtil;import java.util.List;public class SQLiteHelperActivity extends AppCompatActivity implements View.OnClickListener {private EditText name;private EditText age;private EditText weight;private EditText height;private CheckBox married;private Button save;private Button delete;private Button update;private Button query;private DatabaseUserHelper databaseUserHelper;@Overrideprotected void onCreate(Bundle savedInstanceState) {super.onCreate(savedInstanceState);setContentView(R.layout.activity_sqlite_helper);name=findViewById(R.id.name);age=findViewById(R.id.age);weight=findViewById(R.id.weight);height=findViewById(R.id.height);married=findViewById(R.id.married);save=findViewById(R.id.save);delete=findViewById(R.id.delete);update=findViewById(R.id.update);query=findViewById(R.id.query);save.setOnClickListener(this);delete.setOnClickListener(this);update.setOnClickListener(this);query.setOnClickListener(this);}@Overrideprotected void onStart() {super.onStart();databaseUserHelper=DatabaseUserHelper.getInstance(this);}@Overrideprotected void onStop() {super.onStop();//关闭数据库连接databaseUserHelper.close();}@SuppressLint("NonConstantResourceId")@Overridepublic void onClick(View view) {String et_name=name.getText().toString();String et_age=age.getText().toString();String et_weight=weight.getText().toString();String et_height=height.getText().toString();User user=null;switch (view.getId()){case R.id.save:user=new User(et_name,Integer.parseInt(et_age),Long.parseLong(et_height),Long.parseLong(et_weight),married.isChecked());if(databaseUserHelper.insert(user)>0){ToastUtil.show(this,"添加成功");}break;case R.id.delete:if(databaseUserHelper.deleteByName(et_name)>0){ToastUtil.show(this,"删除成功");}case R.id.update:user=new User(et_name,Integer.parseInt(et_age),Long.parseLong(et_height),Long.parseLong(et_weight),married.isChecked());if(databaseUserHelper.update(user)>0){ToastUtil.show(this,"更新成功");}case R.id.query:List<User> list=databaseUserHelper.queryAll();for (User u :list){Log.d("query",u.toString());}break;}}
}
- 事务管理
事务类
beginTransaction:开始事务
setTransactionSuccessful:设置事务成功标志
endTransaction:结束事务
事务的作用就是保证数据的一致性和完整性(避免异常和错误等导致的数据信息异常),能让多个并发访问数据库的时候彼此不被干扰。
- Onupgrade方法
onupgrade方法在数据库版本更新的时候会被执行,即上文的DB_VERSION不为1的时候,数据库在运行的时候会自动比对,不一致则会被执行。
如将版本号变为2,在upgrade中为数据库新添加字段
@Overridepublic void onUpgrade(SQLiteDatabase sqLiteDatabase, int i, int i1) {String sql="ALTER TABLE "+TABLE_NAME+" ADD COLUMN phone VARCHAR";sqLiteDatabase.execSQL(sql);}

九、外部存储空间
Android把外部存储分成了两块区域,一块是所有应用均可访问的公共空间,另一块是只有应用自己才可以访问的存储空间,私有空间只要应用卸载了
就消失了,但是公共空间即使应用被卸载了,数据依旧会放在里面。
例子:将姓名,身高,年龄,体重,已婚分别保存到不同的外部存储空间,然后将其读取出来,卸载应用后会发现数据依旧存在外部存储空间。
package com.example.datastorage;import androidx.appcompat.app.AppCompatActivity;import android.annotation.SuppressLint;
import android.os.Bundle;
import android.os.Environment;
import android.util.Log;
import android.view.View;
import android.widget.Button;
import android.widget.CheckBox;
import android.widget.EditText;
import android.widget.TextView;import com.example.datastorage.util.FileUtil;
import com.example.datastorage.util.ToastUtil;import java.io.File;
import java.io.IOException;public class FileWriteActivity extends AppCompatActivity implements View.OnClickListener {private EditText name;private EditText age;private EditText weight;private EditText height;private CheckBox married;private TextView tv_text;private String path;@SuppressLint("MissingInflatedId")@Overrideprotected void onCreate(Bundle savedInstanceState) {super.onCreate(savedInstanceState);setContentView(R.layout.activity_file_write);name=findViewById(R.id.name);age=findViewById(R.id.age);weight=findViewById(R.id.weight);height=findViewById(R.id.height);married=findViewById(R.id.married);tv_text=findViewById(R.id.tv_text);Button save = findViewById(R.id.save);Button bt_read= findViewById(R.id.bt_read);save.setOnClickListener(this);bt_read.setOnClickListener(this);}@SuppressLint("NonConstantResourceId")@Overridepublic void onClick(View view) {switch (view.getId()){case R.id.save:String et_name=name.getText().toString();String et_age=age.getText().toString();String et_weight=weight.getText().toString();String et_height=height.getText().toString();boolean et_married=married.isChecked();String stringBuilder = "姓名:" + et_name +"年龄:" + et_age +"身高:" + et_height +"体重:" + et_weight +"婚否:" + (et_married ? "是" : "否");//外部私有存储空间String directory=null;String fileName=System.currentTimeMillis()+".txt";directory=getExternalFilesDir(Environment.DIRECTORY_DOCUMENTS).toString();path=directory+ File.separatorChar+fileName;//外部公共存储空间
//               directory=Environment.getExternalStoragePublicDirectory(Environment.DIRECTORY_DOCUMENTS).toString();
//                path=directory+ File.separatorChar+fileName;FileUtil.saveText(path, stringBuilder);ToastUtil.show(this,"保存成功");Log.d("路径:",path);break;case R.id.bt_read:tv_text.setText(FileUtil.queryText(path));break;}}
}
package com.example.datastorage.util;import java.io.BufferedReader;
import java.io.BufferedWriter;
import java.io.File;
import java.io.FileReader;
import java.io.FileWriter;
import java.io.IOException;public class FileUtil {public  static  void saveText(String path,String txt) {BufferedWriter os=null;try {os=new BufferedWriter(new FileWriter(path));os.write(txt);} catch (Exception e) {e.printStackTrace();}finally {if(os!=null){try{os.close();}catch (Exception e){e.printStackTrace();}}}}public static  String queryText(String path){BufferedReader is=null;StringBuilder stringBuilder=new StringBuilder();try{is=new BufferedReader(new FileReader(path));String line=null;while((line=is.readLine())!=null){stringBuilder.append(line);}} catch (IOException e) {e.printStackTrace();}return stringBuilder.toString();}
}
注意存到外部公共空间,需要在Mainifest.xml中加入权限。
<?xml version="1.0" encoding="utf-8"?>
<manifest xmlns:tools="http://schemas.android.com/tools"xmlns:android="http://schemas.android.com/apk/res/android"><uses-permission-sdk-23 android:name="android.permission.WRITE_EXTERNAL_STORAGE"/><uses-permission-sdk-23 android:name="android.permission.READ_EXTERNAL_STORAGE"/><applicationandroid:allowBackup="true"android:icon="@mipmap/ic_launcher"android:label="@string/app_name"android:supportsRtl="true"android:requestLegacyExternalStorage="true"android:theme="@style/Theme.MyApplication"><activityandroid:name=".FileWriteActivity"android:exported="true"><intent-filter><action android:name="android.intent.action.MAIN" /><category android:name="android.intent.category.LAUNCHER" /></intent-filter></activity></application></manifest>
- 存储卡中读取图片
Andorid的位图工具是Bitmap,App读写Bitmap可以使用性能更好的OuputStream和InputStream
Android还提供BitmapFactory工具用于读取各种来源图片,方法如下:
decodeResource:从资源文件中读取图片信息
decodeFile:该方法可将指定路径图片读取到Bitmap对象
decodeStream:从输入流中读取位图数据
例子:通过bitmap读取图片存储到存储卡中,然后读取到ImageView中显示。
    public static void saveImage(String path, Bitmap bitmap) {FileOutputStream outputStream=null;try {outputStream=new FileOutputStream(path);//通过bitmap压缩文件输出流bitmap.compress(Bitmap.CompressFormat.JPEG, 100, outputStream);}catch (Exception e){e.printStackTrace();}finally {if(outputStream!=null){try{outputStream.close();}catch (Exception e){e.printStackTrace();}}}}public static  Bitmap openImage(String path){FileInputStream inputStream=null;Bitmap bitmap=null;try{inputStream=new FileInputStream(path);bitmap= BitmapFactory.decodeStream(inputStream);}catch (Exception e){e.printStackTrace();}finally {if(inputStream!=null){try{inputStream.close();}catch (Exception e){e.printStackTrace();}}}return bitmap;}
}
package com.example.datastorage;import androidx.appcompat.app.AppCompatActivity;import android.annotation.SuppressLint;
import android.graphics.Bitmap;
import android.graphics.BitmapFactory;
import android.os.Bundle;
import android.os.Environment;
import android.util.Log;
import android.view.View;
import android.widget.Button;
import android.widget.ImageView;import com.example.datastorage.util.FileUtil;
import com.example.datastorage.util.ToastUtil;import java.io.File;public class ImageWriteActivity extends AppCompatActivity implements View.OnClickListener{private ImageView imageView;private String path;@SuppressLint("MissingInflatedId")protected void onCreate(Bundle savedInstanceState) {super.onCreate(savedInstanceState);setContentView(R.layout.activity_image_write);Button bt_read=findViewById(R.id.bt_read);Button bt_save=findViewById(R.id.bt_save);imageView=findViewById(R.id.bt_image);bt_read.setOnClickListener(this);bt_save.setOnClickListener(this);}@SuppressLint("NonConstantResourceId")@Overridepublic void onClick(View view) {switch (view.getId()){case R.id.bt_save:String filename=System.currentTimeMillis()+".jpeg";path=getExternalFilesDir(Environment.DIRECTORY_DOWNLOADS).toString() + File.separatorChar +filename;Log.d("图片保存路径",path);Bitmap bitmap= BitmapFactory.decodeResource(getResources(),R.drawable.image);FileUtil.saveImage(path,bitmap);ToastUtil.show(this,"保存成功");break;case R.id.bt_read:
// imageView.setImageBitmap(FileUtil.openImage(path));Bitmap bitmap1=BitmapFactory.decodeFile(path);imageView.setImageBitmap(bitmap1);break;}}
}
- Application
Application是Android的一大组件,在App的运行过程中有且只有一个Application对象,贯穿整个生命周期,创建在Acitivity之前。
Application有如下的三种方法:
onCreate(),启动程序时调用。
onTerminate(),App退出时调用,用于模拟环境测试,不会在真实产品中回调。
OnConfigurationChange(),配置改变时调用,如竖屏变横屏。
一般用于读取一些要频繁读取的小型数据,因为存放的位置是内存,因此不能放太多太大的数据。
例子:将一个人的信息存放到Application变量中。
MyApplication.java类:
package com.example.datastorage;import android.app.Application;
import android.util.Log;import java.util.HashMap;public class MyApplication  extends Application {private static  MyApplication application;public HashMap<String,String> stringHashMap=new HashMap<>();public static MyApplication getInstance(){return  application;}@Overridepublic void onCreate() {super.onCreate();application=this;Log.d("App状态:","App启动");}
}
package com.example.datastorage;import androidx.appcompat.app.AppCompatActivity;import android.os.Bundle;
import android.view.View;
import android.widget.Button;
import android.widget.CheckBox;
import android.widget.EditText;import java.util.Objects;public class AppWriteActivity extends AppCompatActivity implements View.OnClickListener {private EditText name;private EditText age;private EditText weight;private EditText height;private CheckBox married;private Button save;private MyApplication myApplication;@Overrideprotected void onCreate(Bundle savedInstanceState) {super.onCreate(savedInstanceState);setContentView(R.layout.activity_app_write);name=findViewById(R.id.name);age=findViewById(R.id.age);weight=findViewById(R.id.weight);height=findViewById(R.id.height);married=findViewById(R.id.married);save=findViewById(R.id.save);save.setOnClickListener(this);myApplication=MyApplication.getInstance();reload();}private void reload() {String app_name=myApplication.stringHashMap.get("name");if(app_name==null){return ;}String app_age= myApplication.stringHashMap.get("age");String app_weight=myApplication.stringHashMap.get("weight");String app_height=myApplication.stringHashMap.get("height");String app_married=myApplication.stringHashMap.get("married");name.setText(app_name);age.setText(app_age);weight.setText(app_weight);height.setText(app_height);if(Objects.equals(app_married, "是")){married.setChecked(true);}else{married.setChecked(false);}}@Overridepublic void onClick(View view) {String et_name=name.getText().toString();String et_age=age.getText().toString();String et_weight=weight.getText().toString();String et_height=height.getText().toString();boolean et_married=married.isChecked();myApplication.stringHashMap.put("name",et_name);myApplication.stringHashMap.put("age",et_age);myApplication.stringHashMap.put("weight",et_weight);myApplication.stringHashMap.put("height",et_height);myApplication.stringHashMap.put("married",et_married ?"是":"否");}
}
只要程序没有被关闭,Application存放的东西就依旧存在,程序关闭后,数据被回收就不存在了。
十、Jetpack Room
Room框架基于SQLite,通过注解技术极大的简化了数据库操作,减少了原来相当一部分的代码量,跟Java后端开发的Mybatis大致相同,就是可以直接使用注解完成数据库的操作。
使用Room之前要修改build.grandle模块文件,在dependencies中添加两行:
implementation 'androidx.room:room-runtime:2.5.1'
annotationProcessor 'androidx.room:room-compiler:2.5.1'
例子:写一个书籍数据库的增删改查
Room框架编码过程一般分为以下五步:
-
@Entity:编写书籍信息表对应的实体类
-
@Dao:编写书籍信息表对应的持久化类
-
@Database:编写书籍信息表对应的数据库类,由RoomDatabase派生
-
在自定义的Application类中声明数据库唯一实例
-
在操作书籍信息表的地方获取数据表的持久化对象
-
创建数据库实体类
package com.example.datastorage.entity;import androidx.room.Entity;
import androidx.room.PrimaryKey;@Entity
public class Book {@PrimaryKey(autoGenerate = true)public Integer id;public String name;public String author;public String press;public String price;public Integer getId() {return id;}public void setId(Integer id) {this.id = id;}public String getName() {return name;}public void setName(String name) {this.name = name;}public String getAuthor() {return author;}public void setAuthor(String author) {this.author = author;}public String getPress() {return press;}public void setPress(String press) {this.press = press;}public String getPrice() {return price;}public void setPrice(String price) {this.price = price;}@Overridepublic String toString() {return "Book{" +"id=" + id +", name='" + name + '\'' +", author='" + author + '\'' +", press='" + press + '\'' +", price='" + price + '\'' +'}';}}- 创建Dao接口
package com.example.datastorage.Dao;import androidx.room.Dao;
import androidx.room.Delete;
import androidx.room.Insert;
import androidx.room.Query;
import androidx.room.Update;import com.example.datastorage.entity.Book;import java.util.List;@Dao
public interface BookDao {@Insertvoid insert(Book... books);@Deletevoid delete(Book...books);@Query("DELETE FROM Book")void deleteAll();@Updateint update(Book...books);@Query("SELECT *FROM Book")List<Book> queryAll();@Query("SELECT *FROM Book where name=:name order by id desc limit 1")Book queryByName(String name);}- 持久化类
package com.example.datastorage.database;import androidx.room.Database;
import androidx.room.RoomDatabase;import com.example.datastorage.Dao.BookDao;
import com.example.datastorage.entity.Book;//exportSchema表示是否导出数据库信息的json串(便于检查调试),设为true需要gradle指定json的生成路径。
@Database(entities = {Book.class},version = 1,exportSchema = false)
public abstract  class BookDatabase  extends RoomDatabase {//获得数据库某张表的持久化对象public abstract BookDao bookDao();}
Application启动类:
package com.example.datastorage;import android.app.Application;
import android.util.Log;import androidx.room.Room;import com.example.datastorage.database.BookDatabase;import java.util.HashMap;public class MyApplication  extends Application {private static  MyApplication application;public HashMap<String,String> stringHashMap=new HashMap<>();public static MyApplication getInstance(){return  application;}private BookDatabase bookDatabase;@Overridepublic void onCreate() {super.onCreate();application=this;Log.d("App状态:","App启动");//构建书籍数据库实例,允许数据库迁移和主线程运行bookDatabase= Room.databaseBuilder(this,BookDatabase.class,"book").addMigrations().allowMainThreadQueries().build();}public BookDatabase getBookDB(){return bookDatabase;}
}- 使用类:
package com.example.datastorage;import androidx.appcompat.app.AppCompatActivity;import android.annotation.SuppressLint;
import android.os.Bundle;
import android.util.Log;
import android.view.View;
import android.widget.Button;
import android.widget.CheckBox;
import android.widget.EditText;
import android.widget.TextView;import com.example.datastorage.Dao.BookDao;
import com.example.datastorage.entity.Book;
import com.example.datastorage.util.ToastUtil;import java.util.List;public class RoomWriteActivity extends AppCompatActivity implements View.OnClickListener {private EditText name;private EditText Author;private EditText press;private EditText price;private BookDao bookDao;@SuppressLint("MissingInflatedId")@Overrideprotected void onCreate(Bundle savedInstanceState) {super.onCreate(savedInstanceState);setContentView(R.layout.activity_room_write);name=findViewById(R.id.bookName);Author=findViewById(R.id.author);press=findViewById(R.id.press);price=findViewById(R.id.price);Button bt_save=findViewById(R.id.save);Button bt_query=findViewById(R.id.query);Button bt_delete=findViewById(R.id.delete);Button bt_update=findViewById(R.id.update);bt_save.setOnClickListener(this);bt_query.setOnClickListener(this);bt_delete.setOnClickListener(this);bt_update.setOnClickListener(this);bookDao=MyApplication.getInstance().getBookDB().bookDao();}@SuppressLint("NonConstantResourceId")@Overridepublic void onClick(View view) {String put_name=name.getText().toString();String put_author=Author.getText().toString();String put_press=press.getText().toString();String put_price=price.getText().toString();switch (view.getId()){case R.id.save:Book book=new Book();book.setName(put_name);book.setAuthor(put_author);book.setPress(put_press);book.setPrice(put_price);bookDao.insert(book);ToastUtil.show(this,"保存成功");break;case R.id.delete:Book b2=new Book();b2.setId(2);bookDao.delete(b2);ToastUtil.show(this,"删除成功");break;case R.id.query:List<Book> list=bookDao.queryAll();for(Book b : list){Log.d("查询书籍:", b.toString());}break;case R.id.update:Book b4=bookDao.queryByName(put_name);Book b3=new Book();b3.setId(b4.getId());b3.setName(put_name);b3.setAuthor(put_author);b3.setPress(put_press);b3.setPrice(put_price);bookDao.update(b3);ToastUtil.show(this,"修改成功");break;}}
}