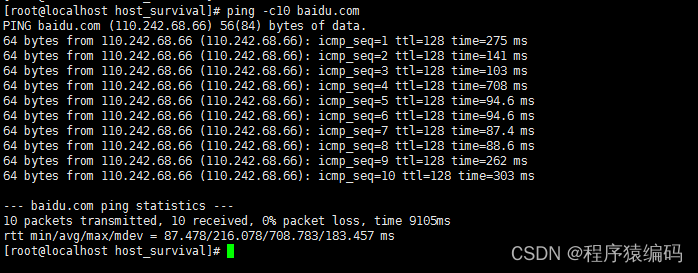
ping基本上是验证网络连接的最简单工具。我们可以验证专用或公共网络中任意两个设备之间的连接。但是今天我们要讲的是fping,因为fping是一个类似ping的程序,它使用Internet控制消息协议(ICMP)回显请求来确定目标主机是否正在响应。
fping与ping的不同之处在于,您可以在命令行上指定任意数量的目标,或者指定包含要ping的目标列表的文件。fping不会发送到一个目标直到超时或回复,而是发送一个ping数据包,然后以循环方式转到下一个目标。
在默认模式下,如果目标回复,则会将其标记并从要检查的目标列表中删除;如果目标在某个时间限制和/或重试限制内没有响应,则将其指定为不可访问。
fping 命令介绍
Usage: fping [options] [targets...]-a show targets that are alive-A show targets by address-b n amount of ping data to send, in bytes (default 56)-B f set exponential backoff factor to f-c n count of pings to send to each target (default 1)-C n same as -c, report results in verbose format-D print timestamp before each output line-e show elapsed time on return packets-f file read list of targets from a file ( - means stdin) (only if no -g specified)-g generate target list (only if no -f specified)(specify the start and end IP in the target list, or supply a IP netmask)(ex. fping -g 192.168.1.0 192.168.1.255 or fping -g 192.168.1.0/24)-H n Set the IP TTL value (Time To Live hops)-i n interval between sending ping packets (in millisec) (default 25)-I if bind to a particular interface-l loop sending pings forever-m ping multiple interfaces on target host-M set the Don't Fragment flag-n show targets by name (-d is equivalent)-N output compatible for netdata (-l -Q are required)-o show the accumulated outage time (lost packets * packet interval)-O n set the type of service (tos) flag on the ICMP packets-p n interval between ping packets to one target (in millisec)(in looping and counting modes, default 1000)-q quiet (don't show per-target/per-ping results)-Q n same as -q, but show summary every n seconds-r n number of retries (default 3)-R random packet data (to foil link data compression)-s print final stats-S addr set source address-t n individual target initial timeout (in millisec) (default 500)-T n ignored (for compatibility with fping 2.4)-u show targets that are unreachable-v show versiontargets list of targets to check (if no -f specified)1.检查www.baidu.com是否存在

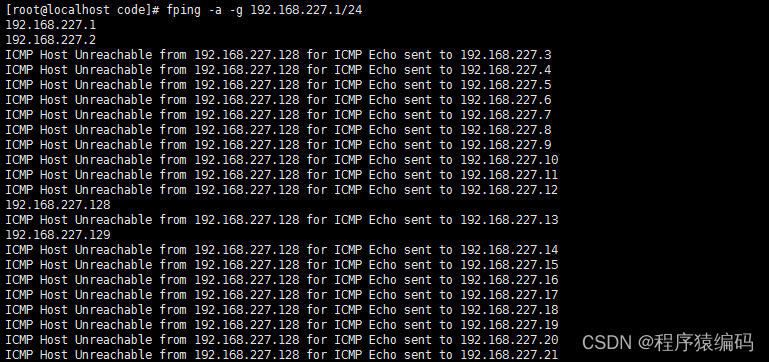
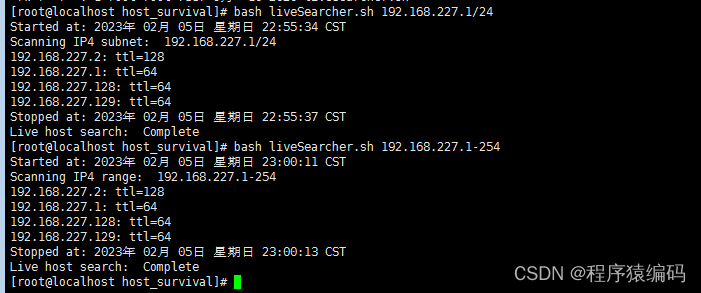
2. 检查192.168.227.1/24主机是否存在:
将同时显示多个IP地址,它将显示状态为活动或无法访问
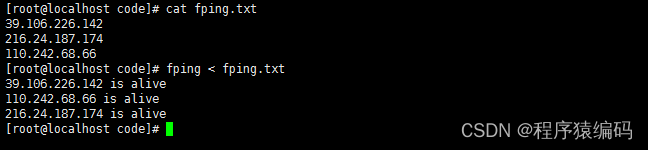
3.从文件中读取目标列表
我们创建了一个名为fping.txt的文件,其IP地址到fping
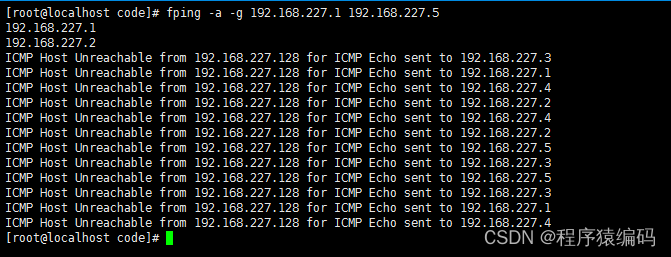
- 检查192.168.227.1到192.168.227.5之间的主机是否存在
shell脚本快速判断网段内主机存活数
ping 检测的时候会一般加上-c参数来指定请求次数,避免使用Ctrl+C结束命令执行
当要检测的主机较多时,直接使用ping命令搬砖有点力不从心,写个脚本方便点。
### Main ###
if [ $# -ne 1 ]; thenecho -e "Enter a single IPv4 addr, IPv4 range, or IPv4 addr with cidr.\n"echo "cmd example, bash liveSearcher.sh 172.16.0.0/16"echo "cmd example, bash liveSearcher.sh 192.18.1.0-1.254"    echo "cmd example, bash liveSearcher.sh 10.10.10.100"    elif [ $1 == "--help" -o  $1 == "-h" ]; thenecho -e "Enter a single IPv4 addr, IPv4 range, or IPv4 addr with cidr.\n"echo "cmd example, bash liveSearcher.sh 10.0.0.0/8"echo "cmd example, bash liveSearcher.sh 192.168.1.0-25.0.254"echo "cmd example, bash liveSearcher.sh 192.168.1.200"# single IPv4 ping
elif [[ $1 =~ ^[0-9]{1,3}\.[0-9]{1,3}\.[0-9]{1,3}\.[0-9]{1,3}$ ]]; thenecho -e "Scanning " $1 '\n'ping -c1 $1 2>/dev/null|egrep -i "bytes from " |cut -d" " -f4,6 echo -e "\nLive host search:  Complete"# range IPv4 sweep
elif [[ $1 =~ ^[0-9]{1,3}\.[0-9]{1,3}\.[0-9]{1,3}\.[0-9]{1,3}\-[0-9]{1,3}\.[0-9]{1,3}\.[0-9]{1,3}$ ]] || [[ $1 =~ ^[0-9]{1,3}\.[0-9]{1,3}\.[0-9]{1,3}\.[0-9]{1,3}\-[0-9]{1,3}\.[0-9]{1,3}$ ]] ||[[ $1 =~ ^[0-9]{1,3}\.[0-9]{1,3}\.[0-9]{1,3}\.[0-9]{1,3}\-[0-9]{1,3}$ ]] && [[ $RANGELENGTH -eq 0 && ${RANGECHECK[0]} -gt ${IPRCHECK[3]} ]] || [[ $RANGELENGTH -eq 1 && ${RANGECHECK[0]} -gt ${IPRCHECK[2]} ]] || [[ $RANGELENGTH -eq 2 && ${RANGECHECK[0]} -gt ${IPRCHECK[1]} ]] &&[[ ${RANGECHECK[0]} -le 255 && ${RANGECHECK[1]} -le 255 && ${RANGECHECK[2]} -le 255 ]] &&[[ ${IPRCHECK[0]} -le 255 && ${IPRCHECK[1]} -le 255 && ${IPRCHECK[2]} -le 255 && ${IPRCHECK[3]} -le 255 ]]; thenrange_sweep# subnet IPv4 sweep
elif [[ $CIDR =~ [0-9]{1,2} ]] && [ $CIDR -le 30 -a $CIDR -ge 8 ] && [[ $IP =~ ^[0-9]{1,3}\.[0-9]{1,3}\.[0-9]{1,3}\.[0-9]{1,3}$ ]] &&[[ ${IPCHECK[0]} -le 255 && ${IPCHECK[1]} -le 255 && ${IPCHECK[2]} -le 255 && ${IPCHECK[3]} -le 255 ]]; thensubnet_sweepelseecho -e "\nerror in user input"exit 1
fi
运行结果:
fping命令代码实现
int main( int argc, char **argv )
{...if(uid = getuid()) {seteuid( getuid() );}...while( ( c = getopt( argc, argv, "gedhlmnqusaAvDz:t:H:i:p:f:r:c:b:C:Q:B:S:I:T:O:" ) ) != EOF ){switch( c ){case 't':if( !( timeout = ( unsigned int )atoi( optarg ) * 100 ) )usage(1);break;case 'r':retry = ( unsigned int )atoi( optarg );break;case 'i':if( !( interval = ( unsigned int )atoi( optarg ) * 100 ) )usage(1);break;case 'p':if( !( perhost_interval = ( unsigned int )atoi( optarg ) * 100 ) )usage(1);break;case 'c':if( !( count = ( unsigned int )atoi( optarg ) ) )usage(1);count_flag = 1;break;case 'C':if( !( count = ( unsigned int )atoi( optarg ) ) )usage(1);count_flag = 1;report_all_rtts_flag = 1;break;case 'b':errno = 0;ping_data_size = (unsigned int) strtol(optarg, (char **)NULL, 10);if( errno )usage(1);break;case 'h':usage(0);break;case 'q':verbose_flag = 0;quiet_flag = 1;break;case 'Q':verbose_flag = 0;quiet_flag = 1;if( !( report_interval = ( unsigned int )atoi( optarg ) * 100000 ) )usage(1);break;case 'e':elapsed_flag = 1;break;case 'm':multif_flag = 1;break;case 'd': case 'n':name_flag = 1;break;case 'A':addr_flag = 1;break;case 'B':if( !( backoff = atof( optarg ) ) )usage(1);break;case 's':stats_flag = 1;break;case 'D':timestamp_flag = 1;break;case 'l':loop_flag = 1;backoff_flag = 0;break;case 'u':unreachable_flag = 1;break;case 'a':alive_flag = 1;break;case 'H':  if( !( ttl = ( u_int )atoi( optarg ) ))usage(1);break;  case 'v':printf( "%s: Version %s\n", argv[0], VERSION);printf( "%s: comments to %s\n", argv[0], EMAIL );exit( 0 );case 'f': filename = optarg;generate_flag = 0;break;case 'g':generate_flag = 1;break;case 'S':
#ifndef IPV6if( ! inet_pton( AF_INET, optarg, &src_addr ) )
#elseif( ! inet_pton( AF_INET6, optarg, &src_addr ) )
#endifusage(1);src_addr_present = 1;break;case 'I':printf( "%s: cant bind to a particular net interface since SO_BINDTODEVICE is not supported on your os.\n", argv[0] );break;case 'T':break;case 'O':if (sscanf(optarg,"%i",&tos)){if ( setsockopt(s, IPPROTO_IP, IP_TOS, &tos, sizeof(tos))) {perror("setting type of service octet IP_TOS");}}break;default:usage(1);break;}}...return 0;
}...
long timeval_diff( struct timeval *a, struct timeval *b )
{long sec_diff = a->tv_sec - b->tv_sec;if(sec_diff == 0) {return (a->tv_usec - b->tv_usec) / 10;}else if(sec_diff < 100) {return (sec_diff * 1000000 + a->tv_usec - b->tv_usec) / 10;}else {return sec_diff * 100000;}
}void timeval_add(struct timeval *a, long t_10u)
{t_10u *= 10;a->tv_sec += (t_10u + a->tv_usec) / 1000000;a->tv_usec = (t_10u + a->tv_usec) % 1000000;
}char * sprint_tm( int t )
{static char buf[10];if( t < 0 ) {/* negative (unexpected) */sprintf( buf, "%.2g", (double) t / 100 );}else if( t < 100 ) {/* <= 0.99 ms */sprintf( buf, "0.%02d", t );}else if( t < 1000 ){/* 1.00 - 9.99 ms */sprintf( buf, "%d.%02d", t / 100, t % 100 );}else if( t < 10000 ) {/* 10.0 - 99.9 ms */sprintf( buf, "%d.%d", t / 100, ( t % 100 ) / 10 );}else if( t < 100000000 ) {/* 100 - 1'000'000 ms */sprintf( buf, "%d", t / 100 );}else {sprintf( buf, "%.2e", (double) (t / 100) );}return buf ;
}
If you need the complete source code of fping, please add WeChat number (c17865354792)
总结
fping是一个小型命令行工具,用于向网络主机发送ICMP(Internet控制消息协议)回显请求,类似于ping,但在ping多个主机时性能更高。fping与ping的完全不同之处在于,您可以在命令行上定义任意数量的主机,或者使用要ping的IP地址或主机列表指定文件。
Welcome to follow WeChat official account【程序猿编码】