文章目录
- 预备知识
- 空洞卷积
- 1、DeepLab V1
- 1.1 基于VGG模型
- 1.2 总体架构
- 1.2.1 Fully Connected CRF(条件随机场)
- 1.3 DeepLab V1模型实验
- 2、DeepLab V2
- 2.1 整体架构
- 2.2 训练策略
- 2.2.1 学习率的调整
- 3、DeepLab V3
- 3.1 cascade形式的DeepLab V3
- 3.2 parallel形式的DeepLab V3
- 4、DeepLab V3+
- 4.1 深度可分离空洞卷积
- 4.2 Modified Xception
预备知识
空洞卷积
参考我之前写的博客:
CSDN链接 空洞卷积详解
1、DeepLab V1
其他图像分割模型如FCN和U-Net都使用了反卷积和pooling保持分别率不变,而只使用空洞卷积就可以实现反卷积和pooling的效果,而且空洞卷积还具有可学习的优点。
1.1 基于VGG模型
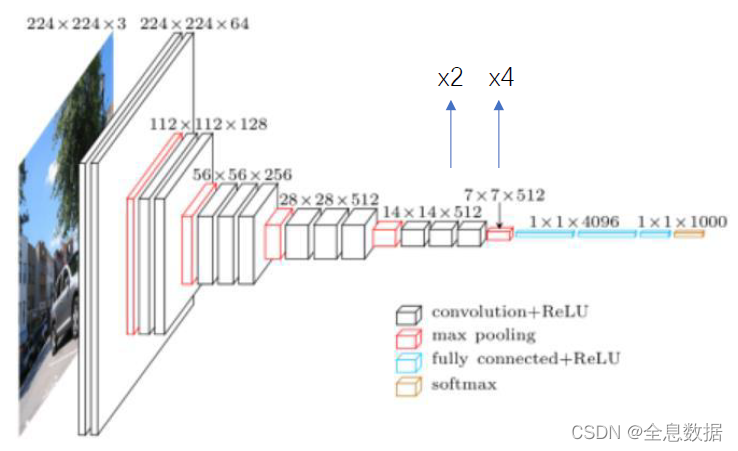
1、以VGG模型为基础,因为想利用VGG模型预训练的参数;
2、去除掉最后2个max pooling,并使用空洞卷积保持感受野一致,空洞卷积使用在原VGG模型最后2个max pooling之间;
3、最后3个FC层都换成3×3的卷积,所以输出feature size为28×28;
4、第3步使用3×3 的卷积输出的通道数换成1024,不影响效果而且也增加速度;
1.2 总体架构

1、基于VGG模型修改的结构在上图的第一行已完成;
2、第四步是对基于VGG修改模型输出的结果进行双线性插值,增加8倍还原成原feature size的大小;
3、使用了Fully Connected CRF(条件随机场)
1.2.1 Fully Connected CRF(条件随机场)
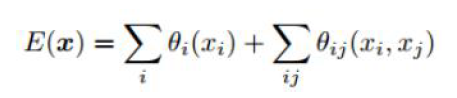
公式:
其中:

解释: 图像分割是对每一个像素点进行分类,而每一个像素之间的分类是有联系的,所以用到了条件随机场。优化 E ( x ) E(x) E(x),使其最小,所以可以使用梯度下降法来优化。
E ( x ) E(x) E(x):优化 E ( x ) E(x) E(x)使其最小;
θ i ( x i ) \theta_i(x_i) θi(xi):仔细看就会发现如果 P ( x i ) P(x_i) P(xi)越大则 θ i ( x i ) \theta_i(x_i) θi(xi)越小;
∑ i θ i ( x i ) \sum_{i}\theta_i(x_i) ∑iθi(xi):是各个像素概率的联合概率分布;
θ i , j ( x i , x j ) \theta_{i,j}(x_i,x_j) θi,j(xi,xj):是衡量像素与像素之间的概率分布;
∣ ∣ p i − p j ∣ ∣ 2 ||p_i-p_j||^2 ∣∣pi−pj∣∣2:像素之间的距离;
∣ ∣ I i − I j ∣ ∣ 2 ||I_i-I_j||^2 ∣∣Ii−Ij∣∣2:像素之间的灰度值;
σ \sigma σ:正态分布相关的参数;
ω \omega ω:待优化的参数;
1.3 DeepLab V1模型实验

总结:
1、增加CRF、通过设置较大的dilation增加感受野、以及多尺度输入可增加模型的效果;
2、所以根据上面所做的增加模型效果的实验,就诞生了DeepLab V2。

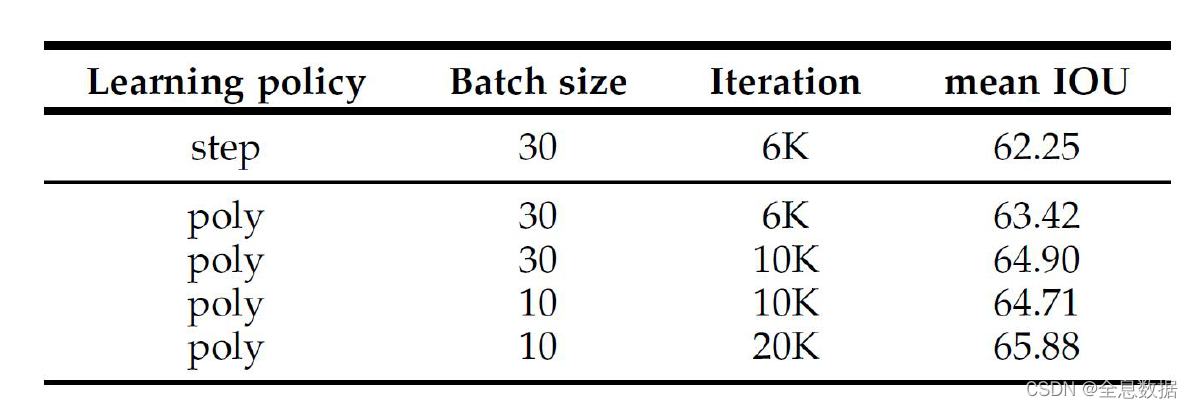
总结:
根据第一行和最后一行可知:在3*3的kernel size下,增加stride可增加模型的效果,而且还减少了参数量。
2、DeepLab V2
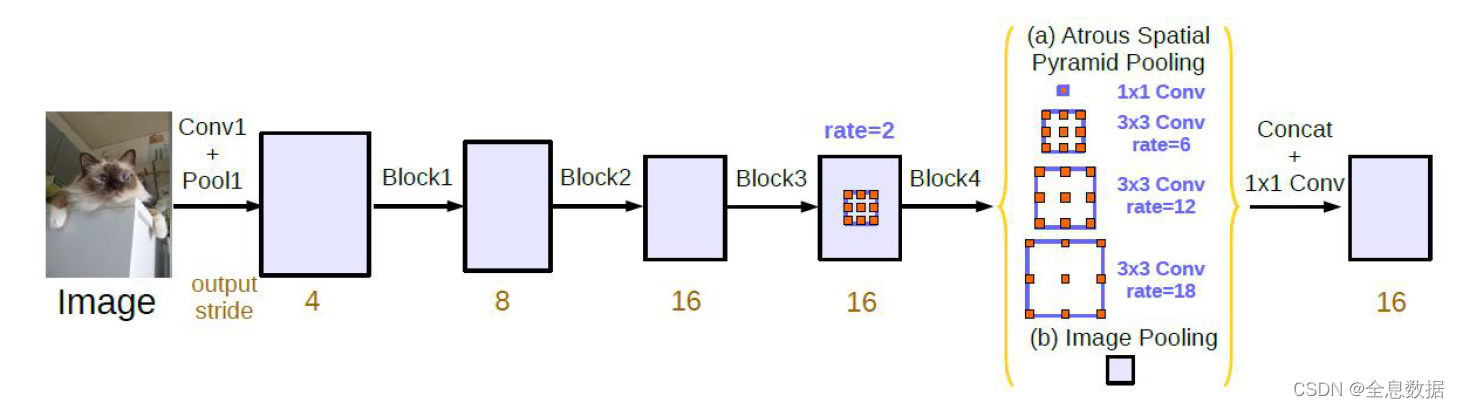
与V1版本的区别就是引入了ASPP,结合V1所做的实验,增加多尺度训练和较大的感受野可增加mIOU;
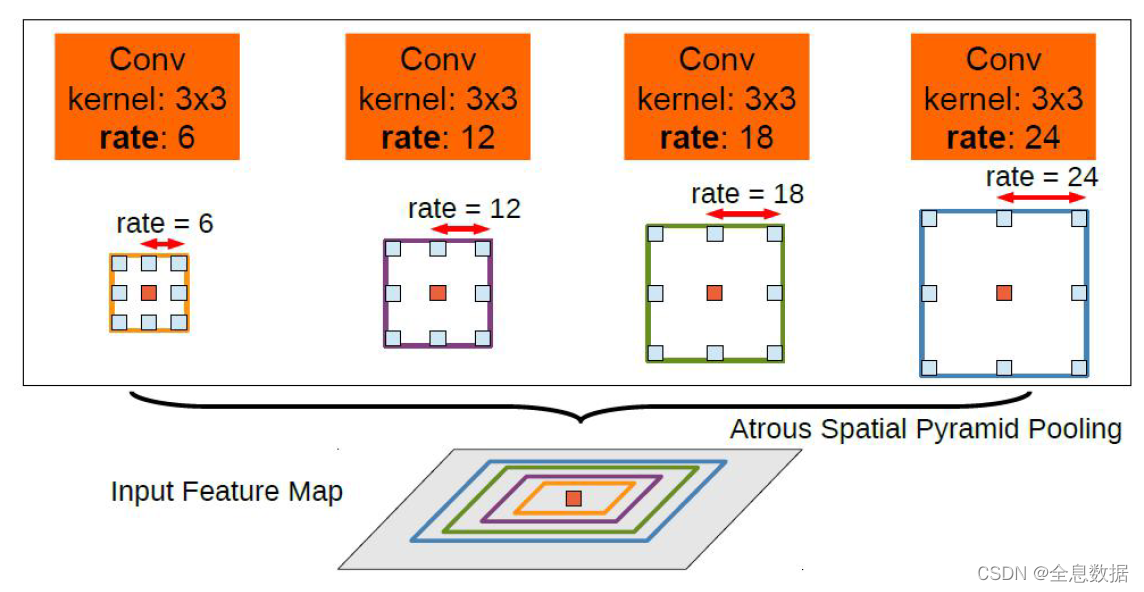
步骤:
1、对输入的feature map进行分组空洞卷积,rate为(6,12,18,24),此对应多尺度输入;
2、通过padding,使各个组输出的feature size与输入相同;
3、对各个组输出的feature map进行sum;
ASPP code:
import torch
from torch._C import Size
import torch.nn as nn
import torch.nn.functional as Fclass ASPP(nn.Module):"""空洞空间金字塔池化(Atrous Spatial Pyramid Pooling)在给定的输入上以不同采样率(dilation)的空洞卷积并行采样,相当于以多个比例捕捉图像的上下文。"""def __init__(self, in_chans, out_chans, rate=1):super(ASPP, self).__init__()# 以不同的采样率预制空洞卷积(通过调整dilation实现)# 1x1卷积——无空洞self.branch1 = nn.Sequential(nn.Conv2d(in_chans, out_chans, 1, 1, padding=0, dilation=rate, bias=True),nn.BatchNorm2d(out_chans),nn.ReLU(inplace=True))# 3x3卷积——空洞6self.branch2 = nn.Sequential(nn.Conv2d(in_chans, out_chans, 3, 1, padding=6 * rate, dilation=6 * rate, bias=True),nn.BatchNorm2d(out_chans),nn.ReLU(inplace=True))# 3x3卷积——空洞12self.branch3 = nn.Sequential(nn.Conv2d(in_chans, out_chans, 3, 1, padding=12 * rate, dilation=12 * rate, bias=True),nn.BatchNorm2d(out_chans),nn.ReLU(inplace=True))# 3x3卷积——空洞18self.branch4 = nn.Sequential(nn.Conv2d(in_chans, out_chans, 3, 1, padding=18 * rate, dilation=18 * rate, bias=True),nn.BatchNorm2d(out_chans),nn.ReLU(inplace=True))# 全局平均池化——获取图像层级特征,image pooling,self.branch5_avg = nn.AdaptiveAvgPool2d(1)  # 1:输出为1*1# 1x1的conv、bn、relu——用于处理平均池化所得的特征图self.branch5_conv = nn.Conv2d(in_chans, out_chans, 1, 1, 0, bias=True)self.branch5_bn = nn.BatchNorm2d(out_chans)self.branch5_relu = nn.ReLU(inplace=True)# 1x1的conv、bn、relu——用于处理concat所得的特征图self.conv_cat = nn.Sequential(nn.Conv2d(out_chans * 5, out_chans, 1, 1, padding=0, bias=True),nn.BatchNorm2d(out_chans),nn.ReLU(inplace=True))def forward(self, x):# 获取size——用于上采样的时候确定上采样到多大b, c, h, w = x.size()# 一个1x1的卷积conv1x1 = self.branch1(x)# 三个3x3的空洞卷积conv3x3_1 = self.branch2(x)conv3x3_2 = self.branch3(x)conv3x3_3 = self.branch4(x)# 一个平均池化global_feature = self.branch5_avg(x)# 对平均池化所得的特征图进行处理global_feature = self.branch5_relu(self.branch5_bn(self.branch5_conv(global_feature)))# 将平均池化+卷积处理后的特征图上采样到原始x的输入大小global_feature = F.interpolate(global_feature, (h, w), None, 'bilinear', True)# 把所有特征图cat在一起(包括1x1、三组3x3、平均池化+1x1),cat通道的维度feature_cat = torch.cat([conv1x1, conv3x3_1, conv3x3_2, conv3x3_3, global_feature], dim=1)# 最后再连一个1x1卷积,把cat翻了5倍之后的通道数缩减回来result = self.conv_cat(feature_cat)return result
2.1 整体架构

2.2 训练策略
总结:
通过调小batch size和增加训练的epoch可增加mIOU。
2.2.1 学习率的调整
随着训练epoch的增加,学习率应作适当减小,所以V2提出新的学习率的策略,公式为:
l r = l r ⋅ ( 1 − i t e r m a x _ i t e r ) p o w e r lr = lr\cdot(1-\frac{iter}{max\_iter})^{power} lr=lr⋅(1−max_iteriter)power
其中原论文 p o w e r power power设置的是:0.9;
3、DeepLab V3
DeepLab V3有cascade和parallel两种的形式,先介绍cascade;
3.1 cascade形式的DeepLab V3
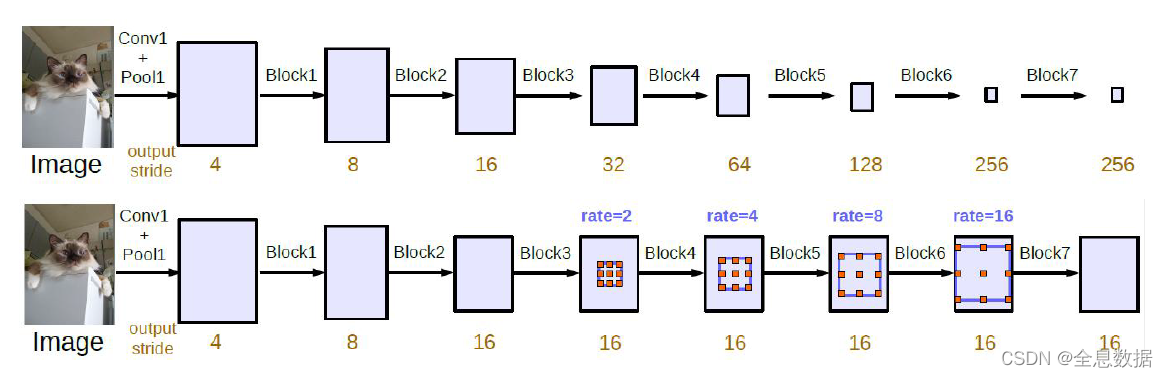
重要点:
1、output stride:输出的feature map为原输入的多少分之一,如:为 1 / 4 , 1 / 8 , 1 / 16 1/4,1/8,1/16 1/4,1/8,1/16;
2、通过做实验,output stride越大效果越不好,所以cascade形式采用下面一种;
3、 b l o c k 1 , 2 , 3 , 4... block_{1,2,3,4...} block1,2,3,4...为resnet50的block;
如何避免输出图片栅格化:
1、因为空洞卷积只涉及block4中的3×3的卷积,为了避免栅格化所以设置dilation rate为1,2,4,不能设置为同一个值;
2、上图中的rate的意思是: r a t e ⋅ ( 1 , 2 , 4 ) rate \sdot(1,2,4) rate⋅(1,2,4);
3.2 parallel形式的DeepLab V3
因为在cascade模型中,网络做的太深效果反而出现下降,所以就引用了ASPP。
4、DeepLab V3+

改进点:
1、借鉴了Encode和Decode的结合,进行了特征的concat;
2、使用了Modified Xception;
3、使用了深度可分离空洞卷积(Depthwise Separable Convolution);
4.1 深度可分离空洞卷积
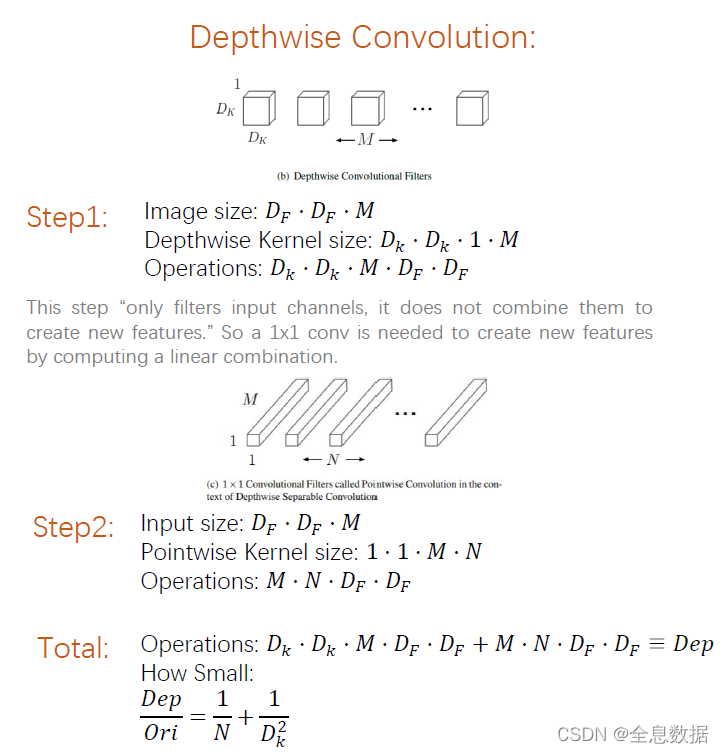
先说一下什么是Depthwise Convolution,它就是先对输入的feature map的每一个通道进行卷积,如果输入的feature map为 D F ⋅ D F ⋅ M D_F\sdot D_F\sdot M DF⋅DF⋅M,输出的feature map仍为 D F ⋅ D F ⋅ M D_F\sdot D_F\sdot M DF⋅DF⋅M,然后再进行 1 ∗ 1 ∗ M ∗ N 1 * 1 * M * N 1∗1∗M∗N的卷积,Operations的计算如上图,所以通过Depthwise Convolution后减少了计算量。
4.2 Modified Xception
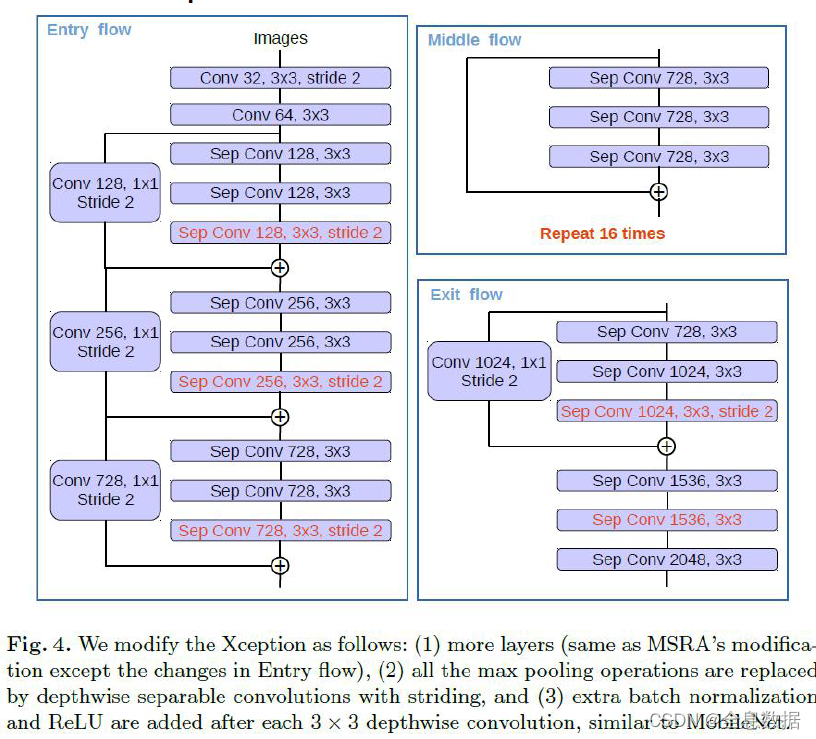
总结:
1、类似于resnet,但与resnet有很大的不同;
2、Modified Xception使用了Depthwise Separable Convolution;
DeepLab V3+ 代码:
"""
Attention:需要把上一个ASPP的代码和当前的代码放在同一目录下
"""
import torch
import torch.nn as nn
import torch.nn.functional as F
import torch.utils.model_zoo as model_zoobn_mom = 0.0003# 预先训练模型地址
model_urls = {'resnet18': 'https://download.pytorch.org/models/resnet18-5c106cde.pth','resnet34': 'https://download.pytorch.org/models/resnet34-333f7ec4.pth','resnet50': 'https://download.pytorch.org/models/resnet50-19c8e357.pth','resnet101': 'https://download.pytorch.org/models/resnet101-5d3b4d8f.pth'
}# same空洞卷积
# 对于k=3的卷积,通过设定padding=1*atrous,保证添加空洞后的3x3卷积,输入输出feature map同样大小
def conv3x3(in_planes, out_planes, stride=1, atrous=1):"""3x3 convolution with padding"""return nn.Conv2d(in_planes, out_planes, kernel_size=3, stride=stride,padding=1 * atrous, dilation=atrous, bias=False)# 通过 same 空洞卷积实现BasicBlock
class BasicBlock(nn.Module):expansion = 1def __init__(self, in_chans, out_chans, stride=1, atrous=1, downsample=None):super(BasicBlock, self).__init__()# 使用自定义的same 空洞卷积self.conv1 = conv3x3(in_chans, out_chans, stride, atrous)self.bn1 = nn.BatchNorm2d(out_chans)self.relu = nn.ReLU(inplace=True)self.conv2 = conv3x3(out_chans, out_chans)self.bn2 = nn.BatchNorm2d(out_chans)self.downsample = downsampleself.stride = stridedef forward(self, x):residual = xout = self.conv1(x)out = self.bn1(out)out = self.relu(out)out = self.conv2(out)out = self.bn2(out)if self.downsample is not None:residual = self.downsample(x)out += residualout = self.relu(out)return out# 实现带有空洞卷积的Bottleneck
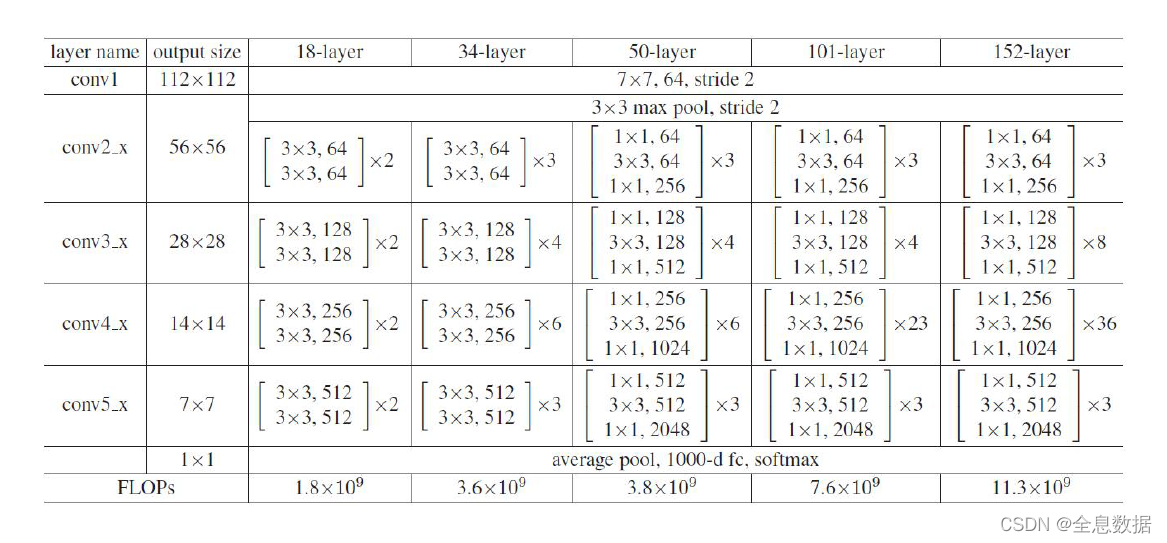
# 这个bottleneck结构,
# 在resnet 50的block1中串连使用了3个,block2中串连使用了4个,block3中串连使用了6个,block4中串连使用了3个。
# 在resnet 101的block1中串连使用了3个,block2中串连使用了4个,block3中串连使用了24个,block4中串连使用了3个。
# 在resnet 152的block1中串连使用了3个,block2中串连使用了8个,block3中串连使用了36个,block4中串连使用了3个。
# 所以,当我们定block1,block2,block3,block4分别为[3,4,6,3]时,就对应resnet50
# 所以,当我们定block1,block2,block3,block4分别为[3,4,24,3]时,就对应resnet101
# 所以,当我们定block1,block2,block3,block4分别为[3,8,36,3]时,就对应resnet152class Bottleneck(nn.Module):# bottleneck block中,有三个卷积层,分别是:C1:1x1conv,C2:3x3conv,C3:1x1conv# C1的输入featue map 的channel=4C,输处feature map 的channel=C# C2的输入featue map 的channel=C,输处feature map 的channel=C# C3的输入featue map 的channel=C,输处feature map 的channel=4C# expansion:定义瓶颈处的feature map,C2的输入输出feature map 的 channel是非瓶颈处的channel的1/4expansion = 4def __init__(self, in_chans, out_chans, stride=1, atrous=1, downsample=None):super(Bottleneck, self).__init__()# 这里in_chans是out_chans的4倍,在make_layer函数里有实现,大概在本代码164行左右self.conv1 = nn.Conv2d(in_chans, out_chans, kernel_size=1, bias=False)self.bn1 = nn.BatchNorm2d(out_chans)# same空洞卷积self.conv2 = nn.Conv2d(out_chans, out_chans, kernel_size=3, stride=stride,padding=1 * atrous, dilation=atrous, bias=False)self.bn2 = nn.BatchNorm2d(out_chans)self.conv3 = nn.Conv2d(out_chans, out_chans * self.expansion, kernel_size=1, bias=False)self.bn3 = nn.BatchNorm2d(out_chans * self.expansion)self.relu = nn.ReLU(inplace=True)self.downsample = downsampleself.stride = stridedef forward(self, x):residual = xout = self.conv1(x)out = self.bn1(out)out = self.relu(out)out = self.conv2(out)out = self.bn2(out)out = self.relu(out)out = self.conv3(out)out = self.bn3(out)if self.downsample is not None:residual = self.downsample(x)out += residualout = self.relu(out)return out# 定义完整的空洞残差网络
class ResNet_Atrous(nn.Module):# 当layers=[3,4,6,3]时,block为bottlenet时,就生成resnet50def __init__(self, block, layers, atrous=None, os=16):super(ResNet_Atrous, self).__init__()self.block = blockstride_list = Noneif os == 8:# 控制block2,block3,block4的第一个bottleneck的3x3卷积的stride# 这里指将block2内的第一个bottleneck的3x3卷集的stride设置为2# 这里指将block3内的第一个bottleneck的3x3卷集的stride设置为1# 这里指将block4内的第一个bottleneck的3x3卷集的stride设置为1stride_list = [2, 1, 1]elif os == 16:stride_list = [2, 2, 1]else:raise ValueError('resnet_atrous.py: output stride=%d is not supported.' % os)self.inplanes = 64self.conv1 = nn.Conv2d(3, 64, kernel_size=7, stride=2, padding=3,bias=False)self.bn1 = nn.BatchNorm2d(64)self.relu = nn.ReLU(inplace=True)self.maxpool = nn.MaxPool2d(kernel_size=3, stride=2, padding=1)# resnet的 block1self.layer1 = self._make_layer(block, 64, 64, layers[0])# resnet的 block2self.layer2 = self._make_layer(block, 64 * block.expansion, 128, layers[1], stride=stride_list[0])# resnet的 block3self.layer3 = self._make_layer(block, 128 * block.expansion, 256, layers[2], stride=stride_list[1],atrous=16 // os)# resnet的 block4,block4的atrous为列表,里面使用了multi-grid技术self.layer4 = self._make_layer(block, 256 * block.expansion, 512, layers[3], stride=stride_list[2],atrous=[item * 16 // os for item in atrous])self.layer5 = self._make_layer(block, 512 * block.expansion, 512, layers[3], stride=1,atrous=[item * 16 // os for item in atrous])self.layer6 = self._make_layer(block, 512 * block.expansion, 512, layers[3], stride=1,atrous=[item * 16 // os for item in atrous])self.layers = []for m in self.modules():if isinstance(m, nn.Conv2d):nn.init.kaiming_normal_(m.weight, mode='fan_out', nonlinearity='relu')elif isinstance(m, nn.BatchNorm2d):nn.init.constant_(m.weight, 1)nn.init.constant_(m.bias, 0)def _make_layer(self, block, in_chans, out_chans, blocks, stride=1, atrous=None):downsample = Noneif atrous == None:# 当没有设置atrous,blocks=3时,atrous=[1,1,1]# 此时表示resnet的block1,或者block2,或者block3,或者block4内的bottleneck中的3x3卷积的膨胀系数为1,# 膨胀系数为1,就表示没有膨胀,还是标准卷积。atrous = [1] * blockselif isinstance(atrous, int):# 当设置atrous=2,blocks=3时,atrous=[2,2,2]# 此时表示resnet的block1,或者block2,或者block3,或者block4内的bottleneck中的3x3卷积的膨胀系数为2atrous_list = [atrous] * blocksatrous = atrous_list# 如果atrous不是None,也不是一个整数,那么atrous被直接设定为[1,2,3]# 此时表示resnet的block1,或者block2,或者block3,或者block4内的bottleneck中的3个3x3卷积的膨胀系数分别为[1,2,3]if stride != 1 or in_chans != out_chans * block.expansion:downsample = nn.Sequential(nn.Conv2d(in_chans, out_chans * block.expansion,kernel_size=1, stride=stride, bias=False),nn.BatchNorm2d(out_chans * block.expansion),)layers = []layers.append(block(in_chans, out_chans, stride=stride, atrous=atrous[0], downsample=downsample))in_chans = out_chans * block.expansionfor i in range(1, blocks):layers.append(block(in_chans, out_chans, stride=1, atrous=atrous[i]))return nn.Sequential(*layers)def forward(self, x):layers_list = []x = self.conv1(x)x = self.bn1(x)x = self.relu(x)x = self.maxpool(x)x = self.layer1(x)# 此时x为4倍下采样layers_list.append(x)x = self.layer2(x)# 此时x为8倍下采样layers_list.append(x)x = self.layer3(x)# 此时x为8倍或者16倍下采样,由本代码的123,125行的 stride_list决定# stride_list[2,1,1]时,就是8倍下采样# stride_list[2,2,1]时,就是16倍下采样layers_list.append(x)x = self.layer4(x)x = self.layer5(x)x = self.layer6(x)# 此时x为8倍或者16倍下采样,由本代码的123,125行的 stride_list决定# stride_list[2,1,1]时,就是8倍下采样# stride_list[2,2,1]时,就是16倍下采样layers_list.append(x)# return 4个feature map,分别是block1,block2,block3,block6的feature mapreturn layers_listdef resnet34_atrous(pretrained=True, os=16, **kwargs):"""Constructs a atrous ResNet-34 model."""model = ResNet_Atrous(BasicBlock, [3, 4, 6, 3], atrous=[1, 2, 1], os=os, **kwargs)if pretrained:old_dict = model_zoo.load_url(model_urls['resnet34'])model_dict = model.state_dict()old_dict = {k: v for k, v in old_dict.items() if (k in model_dict)}model_dict.update(old_dict)model.load_state_dict(model_dict)return modeldef resnet50_atrous(pretrained=True, os=16, **kwargs):"""Constructs a atrous ResNet-50 model."""model = ResNet_Atrous(Bottleneck, [3, 4, 6, 3], atrous=[1, 2, 1], os=os, **kwargs)if pretrained:old_dict = model_zoo.load_url(model_urls['resnet50'])model_dict = model.state_dict()old_dict = {k: v for k, v in old_dict.items() if (k in model_dict)}model_dict.update(old_dict)model.load_state_dict(model_dict)return modeldef resnet101_atrous(pretrained=True, os=16, **kwargs):"""Constructs a atrous ResNet-101 model."""model = ResNet_Atrous(Bottleneck, [3, 4, 23, 3], atrous=[1, 2, 1], os=os, **kwargs)if pretrained:old_dict = model_zoo.load_url(model_urls['resnet101'])model_dict = model.state_dict()old_dict = {k: v for k, v in old_dict.items() if (k in model_dict)}model_dict.update(old_dict)model.load_state_dict(model_dict)return modelfrom aspp import ASPPclass Config(object):# 决定本代码的123,125行的 stride_list的取值OUTPUT_STRIDE = 16# 设定ASPP模块输出的channel数ASPP_OUTDIM = 256# Decoder中,shortcut的1x1卷积的channel数目SHORTCUT_DIM = 48# Decoder中,shortcut的卷积的核大小SHORTCUT_KERNEL = 1# 每个像素要被分类的类别数NUM_CLASSES = 21class DeeplabV3Plus(nn.Module):def __init__(self, cfg, backbone=resnet50_atrous):super(DeeplabV3Plus, self).__init__()self.backbone = backbone(pretrained=False, os=cfg.OUTPUT_STRIDE)input_channel = 512 * self.backbone.block.expansionself.aspp = ASPP(in_chans=input_channel, out_chans=cfg.ASPP_OUTDIM, rate=16 // cfg.OUTPUT_STRIDE)self.dropout1 = nn.Dropout(0.5)self.upsample4 = nn.UpsamplingBilinear2d(scale_factor=4)self.upsample_sub = nn.UpsamplingBilinear2d(scale_factor=cfg.OUTPUT_STRIDE // 4)indim = 64 * self.backbone.block.expansionself.shortcut_conv = nn.Sequential(nn.Conv2d(indim, cfg.SHORTCUT_DIM, cfg.SHORTCUT_KERNEL, 1, padding=cfg.SHORTCUT_KERNEL // 2, bias=False),nn.BatchNorm2d(cfg.SHORTCUT_DIM),nn.ReLU(inplace=True),)self.cat_conv = nn.Sequential(nn.Conv2d(cfg.ASPP_OUTDIM + cfg.SHORTCUT_DIM, cfg.ASPP_OUTDIM, 3, 1, padding=1, bias=False),nn.BatchNorm2d(cfg.ASPP_OUTDIM),nn.ReLU(inplace=True),nn.Dropout(0.5),nn.Conv2d(cfg.ASPP_OUTDIM, cfg.ASPP_OUTDIM, 3, 1, padding=1, bias=False),nn.BatchNorm2d(cfg.ASPP_OUTDIM),nn.ReLU(inplace=True),nn.Dropout(0.1),)self.cls_conv = nn.Conv2d(cfg.ASPP_OUTDIM, cfg.NUM_CLASSES, 1, 1, padding=0)for m in self.modules():if isinstance(m, nn.Conv2d):nn.init.kaiming_normal_(m.weight, mode='fan_out', nonlinearity='relu')elif isinstance(m, nn.BatchNorm2d):nn.init.constant_(m.weight, 1)nn.init.constant_(m.bias, 0)def forward(self, x):# 利用backbone生成block1,2,3,4,5,6,7的feature mapslayers = self.backbone(x)# layers[-1]是block7输出的feature map相对于原图下采样了16倍# 把block7的输出送入asppfeature_aspp = self.aspp(layers[-1])feature_aspp = self.dropout1(feature_aspp)# 双线行插值上采样4倍feature_aspp = self.upsample_sub(feature_aspp)# layers[0],是block1输出的featuremap,相对于原图下采样的4倍,我们将它送入1x1x48的卷积中feature_shallow = self.shortcut_conv(layers[0])# aspp上采样4倍,变成相对于原图下采样4倍,与featue _shallow 拼接融合feature_cat = torch.cat([feature_aspp, feature_shallow], 1)result = self.cat_conv(feature_cat)result = self.cls_conv(result)result = self.upsample4(result)return resultcfg = Config()
model = DeeplabV3Plus(cfg, backbone=resnet50_atrous)
x = torch.randn((2, 3, 128, 128), dtype=torch.float32)
y = model(x)
print(y.shape)