Unity的UGUI用TexturePacker全自动打图集,包括九宫格切图信息
- 前言
- 环境准备
- 实现过程
- 注意
- 总结
- 版权声明
前言
最近在学习UGUI的打图集,之前一直在用SpritePacker和Sprite Atlas打图集,现在记录下另一种打图集方式:TexturePacker
主要是讲如何自动打图集到Unity,并且不丢掉九宫格信息,以及一些参数的设置
环境准备
1.unity版本2019.4.10f1
2.TexturePacker安装官网,支持正版,支持正版,支持正版https://www.codeandweb.com/texturepacker
3.TexturePacker安装Po Jie 版本点击这下载
4.unity中安装TexturePacker Importer点击这下载,也可以在unity商店搜索TexturePacker Importer安装
5.了解一下TexturePacker的命令行参数:
打开命令行工具并CD到TexturePacker的安装目录,输入 TexturePacker –help,会出现该版本的TP的一些命令行参数。
实现过程
把要打图集的小图放到指定的文件夹,我是放在
打出来的图放在Assets/SheetsByTP这个文件夹下,打好的图集会放在Assets/TexturePacker/icon文件夹下。
写两个编辑器脚本,放在Editor文件夹下,废话不多说上代码:
#if UNITY_EDITOR
using System;
using UnityEngine;
using System.IO;
using UnityEditor;
using System.Text;
using System.Diagnostics;
using Debug = UnityEngine.Debug;public class CommandBuild : Editor
{[MenuItem("Tools/SpritesPacker/CommandBuild")]public static void BuildTexturePacker(){//选择并设置TP命令行的参数和参数值(包括强制生成2048*2048的图集 --width 2048 --height 2048)string commandText = " --sheet {0}.png --data {1}.xml --format sparrow --trim-mode None --pack-mode Best  --algorithm MaxRects --width 2048 --height 2048 --max-size 2048 --size-constraints POT  --disable-rotation --scale 1 {2}" ;string inputPath = string.Format ("{0}/Images", Application.dataPath);//小图目录string outputPath = string.Format ("{0}/TexturePacker", Application.dataPath);//用TP打包好的图集存放目录string[] imagePath = Directory.GetDirectories (inputPath); for (int i = 0; i < imagePath.Length; i++) {UnityEngine.Debug.Log (imagePath [i]);StringBuilder sb = new StringBuilder("");string[] fileName = Directory.GetFiles(imagePath[i]);for (int j = 0; j < fileName.Length; j++){string extenstion = Path.GetExtension(fileName[j]);if (extenstion == ".png"){sb.Append(fileName[j]);sb.Append("  ");}UnityEngine.Debug.Log("fileName [j]:" + fileName[j]);}string name = Path.GetFileName(imagePath [i]);string outputName = string.Format ("{0}/TexturePacker/{1}/{2}", Application.dataPath,name,name);string sheetName = string.Format("{0}/SheetsByTP/{1}", Application.dataPath, name);//执行命令行processCommand("E:\\Program Files (x86)\\CodeAndWeb\\TexturePacker\\bin\\TexturePacker.exe", string.Format(commandText, sheetName, sheetName, sb.ToString()));}AssetDatabase.Refresh();}private static void processCommand(string command, string argument){ProcessStartInfo start = new ProcessStartInfo(command);start.Arguments = argument;start.CreateNoWindow = false;start.ErrorDialog = true;start.UseShellExecute = false;if(start.UseShellExecute){start.RedirectStandardOutput = false;start.RedirectStandardError = false;start.RedirectStandardInput = false;} else{start.RedirectStandardOutput = true;start.RedirectStandardError = true;start.RedirectStandardInput = true;start.StandardOutputEncoding = System.Text.UTF8Encoding.UTF8;start.StandardErrorEncoding = System.Text.UTF8Encoding.UTF8;}Process p = Process.Start(start);if(!start.UseShellExecute){UnityEngine.Debug.Log(p.StandardOutput.ReadToEnd());UnityEngine.Debug.Log(p.StandardError.ReadToEnd());}p.WaitForExit();p.Close();}
}
#endif
添加第二个脚本在Editor下
#if UNITY_EDITOR
using UnityEngine;
using System;
using System.IO;
using UnityEditor;
using System.Collections.Generic;
using System.Xml;
public class MySpritesPacker : Editor
{[MenuItem("Tools/SpritesPacker/TexturePacker")]public static void BuildTexturePacker(){string inputPath = string.Format("{0}/SheetsByTP/", Application.dataPath);string[] imagePath = Directory.GetFiles(inputPath);foreach (string path in imagePath){if (Path.GetExtension(path) == ".png" || Path.GetExtension(path) == ".PNG"){string sheetPath = GetAssetPath(path);Texture2D texture = AssetDatabase.LoadAssetAtPath<Texture2D>(sheetPath);Debug.Log(texture.name);string rootPath = string.Format("{0}/TexturePacker/{1}", Application.dataPath,texture.name);string pngPath = rootPath + "/" + texture.name + ".png";TextureImporter asetImp = null;Dictionary<string, Vector4> tIpterMap = new Dictionary<string,Vector4>();if (Directory.Exists(rootPath)){if(File.Exists(pngPath)){Debug.Log("exite: " + pngPath);//asetImp = GetTextureIpter(pngPath);//SaveBoreder(tIpterMap, asetImp);File.Delete(pngPath);}File.Copy(inputPath + texture.name + ".png", pngPath);}else{Directory.CreateDirectory(rootPath);File.Copy(inputPath + texture.name + ".png", pngPath);}AssetDatabase.Refresh();FileStream fs = new FileStream(inputPath + texture.name + ".xml", FileMode.Open);StreamReader sr = new StreamReader(fs);string jText = sr.ReadToEnd();fs.Close();sr.Close();XmlDocument xml = new XmlDocument();xml.LoadXml(jText);XmlNodeList elemList = xml.GetElementsByTagName("SubTexture");WriteMeta(elemList, texture.name, tIpterMap);}}AssetDatabase.Refresh();}//如果这张图集已经拉好了9宫格,需要先保存起来static void SaveBoreder(Dictionary<string,Vector4> tIpterMap,TextureImporter tIpter){for(int i = 0,size = tIpter.spritesheet.Length; i < size; i++){tIpterMap.Add(tIpter.spritesheet[i].name, tIpter.spritesheet[i].border);}}static TextureImporter GetTextureIpter(Texture2D texture){TextureImporter textureIpter = null;string impPath = AssetDatabase.GetAssetPath(texture);textureIpter = TextureImporter.GetAtPath(impPath) as TextureImporter;return textureIpter;}static TextureImporter GetTextureIpter(string path){TextureImporter textureIpter = null;Texture2D textureOrg = AssetDatabase.LoadAssetAtPath<Texture2D>(GetAssetPath(path));string impPath = AssetDatabase.GetAssetPath(textureOrg);textureIpter =  TextureImporter.GetAtPath(impPath) as TextureImporter;return textureIpter;}//写信息到SpritesSheet里static void WriteMeta(XmlNodeList elemList, string sheetName,Dictionary<string,Vector4> borders){string path = string.Format("Assets/TexturePacker/{0}/{1}.png", sheetName, sheetName);Texture2D texture = AssetDatabase.LoadAssetAtPath <Texture2D>(path);string impPath = AssetDatabase.GetAssetPath(texture);TextureImporter asetImp = TextureImporter.GetAtPath(impPath) as TextureImporter;SpriteMetaData[] metaData = new SpriteMetaData[elemList.Count];for (int i = 0, size = elemList.Count; i < size; i++){XmlElement node = (XmlElement)elemList.Item(i);Rect rect = new Rect();rect.x = int.Parse(node.GetAttribute("x"));rect.y = texture.height - int.Parse(node.GetAttribute("y")) - int.Parse(node.GetAttribute("height"));rect.width = int.Parse(node.GetAttribute("width"));rect.height = int.Parse(node.GetAttribute("height"));metaData[i].rect = rect;metaData[i].pivot = new Vector2(0.5f, 0.5f);metaData[i].name = node.GetAttribute("name");//读取源文件的meta文件,获取spriteBorder九宫格信息,写进图集中string sourcePath= string.Format("{0}/Images/{1}/{2}.png", Application.dataPath,sheetName, node.GetAttribute("name"));Vector4 sourceBorder= GetTextureIpter(sourcePath).spriteBorder;Debug.Log("图片的路径"+sourcePath+"图片的border"+sourceBorder.ToString());metaData[i].border = sourceBorder;// if (borders.ContainsKey(metaData[i].name))// {//     metaData[i].border = borders[metaData[i].name];// }}asetImp.spritesheet = metaData;asetImp.textureType = TextureImporterType.Sprite;asetImp.spriteImportMode = SpriteImportMode.Multiple;asetImp.mipmapEnabled = false;asetImp.SaveAndReimport();}static string GetAssetPath(string path){string[] seperator = { "Assets" };string p = "Assets" + path.Split(seperator, StringSplitOptions.RemoveEmptyEntries)[1];return p;}}internal class TextureIpter
{public string spriteName = "";public Vector4 border = new Vector4();public TextureIpter() { }public TextureIpter(string spriteName, Vector4 border){this.spriteName = spriteName;this.border = border;}
}
#endif
按下Tools/SpritesPacker/CommandBuild
按下Tools/SpritesPacker/TexturePacker
图集就打好了
注意
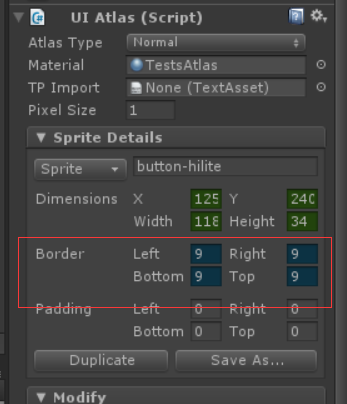
1.如果有九宫格信息,注意名字要一致,可以查看图片的Border来查看九宫格信息

2.各文件路径可以在脚本里自行修改,如果需要设置其他参数,可以在命令里面自行添加
总结
欢迎大佬多多来给萌新指正,欢迎大家来共同探讨。
如果各位看官觉得文章有点点帮助,跪求各位给点个“一键三连”,谢啦~
声明:本博文章若非特殊注明皆为原创原文链接
https://blog.csdn.net/Wrinkle2017/article/details/113618934
————————————————————————————————
版权声明
版权声明:本博客为非营利性个人原创
所刊登的所有作品的著作权均为本人所拥有
本人保留所有法定权利,违者必究!
对于需要复制、转载、链接和传播博客文章或内容的
请及时和本博主进行联系
对于经本博主明确授权和许可使用文章及内容的
使用时请注明文章或内容出处并注明网址
转载请附上原文出处链接及本声明