我们的产品: https://canvaslms.zut.edu.cn/
开始接到部署 Canvas-lms 这个开源教学平台 的任务时, 还不知道 Canvas-lms 是什么 , 网上关于他的介绍也比较少,上面只给了Canvas GitHub的源码地址和使用指南
Canvas-lms系统的代码:代码:https://github.com/instructure/canvas-lms
Canvas-lms有中文指南:指南:https://guides.instructure.com/
其他没有任何提示,就开始自己摸索,试过测试版(Quick Start),也试过生产版(Production Start),以及尝试 Docker部署, 整整七天, 做过无数次尝试,遇到过各种错误,几经奔溃边缘, 有解决的也有没解决的, 但幸运的是最终生产版成功了,恭喜各位付出过努力的人!!!
废话不多说,下面分享下部署全过程以及遇到的问题: 注意: 本文章参考Canvas官方(Production Start)部署教程, 加上自己的一些小经验,绝大部分内容来自 Canvas官方(Production Start)部署教程
部署开始:
首先介绍下我的部署环境,Ubuntu 14.04 LTS, 说点题外话(官方建议使用最新版的Ubuntu LTS, 但亲测最新版安装一些插件的时候插件版本跟要求的版本不太一致,会遇到很多问题, 所以建议用Ubuntu 14.04), 所有部署工作都在这台机器上完成, 另外,根据官方部署说明:
Canvas likes RAM. While it will run on smaller configurations, we recommend a server with at least 8GB RAM, especially if everything is being run on one server.
意思是这台机器的内存最好是8G以上
一. 安装Postgres, Canvas 使用的数据库
canvas@canvas-machine:~$ sudo apt-get install postgresql-9.5直接执行一般会遇到错误(Package 'postgresql-9.5' has no installation candidate),这个在测试版部署教程(Quick Start)根据不同系统有不同解决方案, 这里我只介绍Ubuntu14.04 LTS 的解决方案(两步):
1. 创建存储库文件 /etc/apt/sources.list.d/pgdg.list,并在该文件中添加下面这行
deb http://apt.postgresql.org/pub/repos/apt/ trusty-pgdg main2. 导入存储库签名密钥,并更新包列表, 执行下面命令即可实现
canvas@canvas-machine:~$ wget --quiet -O - https://www.postgresql.org/media/keys/ACCC4CF8.asc | sudo apt-key add -sudo apt-get update二. 配置Postgres
1. 为 Canvas 创建一个数据库普通用户canvas1(非超级用户,用户名可自定义,我这为 canvas1),并为canvas1用户创建一个数据库( canvas_production )执行以下命令即可
# 创建 canvas1 用户, 并设置用户密码
canvas@canvas-mechine:~$ sudo -u postgres createuser canvas1 --no-createdb --no-superuser --no-createrole --pwprompt
# 为 canvas1 创建数据库 canvas_production
canvas@canvas-mechine:~$ sudo -u postgres createdb canvas_production --owner=canvas1
2. 将系统用户名设置为 postgres 超级用户
canvas@canvas-mechine:~$ sudo -u postgres createuser $USER
canvas@canvas-mechine:~$ sudo -u postgres psql -c "alter user $USER with superuser" postgres
三. 获取Canvas 在 GitHub上 的源码
1. 安装Git
canvas@canvas-mechine:~$ sudo apt-get install git-core2. 获取Canvas的最新源代码, 官方建议我们将代码放在 /var 这个目录下,所以我们切到 /var目录, 并 clone 源码
canvas@canvas-mechine:~$ cd /var
canvas@canvas-mechine:/var$ sudo git clone https://github.com/instructure/canvas-lms.git canvas
canvas@canvas-mechine:/var$ cd canvas
canvas@canvas-mechine:/var/canvas$ git checkout stable
3. 将 /var/canvas 文件夹及其子文件 的所有者改为 当前系统用户 canvas, 因为我们所有部署工作都是通过 canvas 这个用户来完成的
canvas@canvas-mechine:/var$ sudo chown -R canvas /var/canvas四. 依赖安装
1. 首先,添加PPA以获取所需的Ruby版本,执行下面三条命令
canvas@canvas-mechine:~$ sudo apt-get install software-properties-common
canvas@canvas-mechine:~$ sudo add-apt-repository ppa:brightbox/ruby-ng
canvas@canvas-mechine:~$ sudo apt-get update
2. 安装 Ruby2.4 以及其他一些依赖
canvas@canvas-mechine:~$ sudo apt-get install ruby2.4 ruby2.4-dev zlib1g-dev libxml2-dev libsqlite3-dev postgresql libpq-dev libxmlsec1-dev curl make g++3. 安装 Node.js,执行下面两条命令
canvas@canvas-mechine:~$ curl -sL https://deb.nodesource.com/setup_8.x | sudo -E bash -
canvas@canvas-mechine:~$ sudo apt-get install nodejs
4. 安装 Bundler, Canvas的大部分依赖都是Ruby Gems。Ruby Gems是一个特定于Ruby的包管理系统, Canvas使用Bundler 作为 Ruby Gems 之上的附加层来管理版本化的依赖项
canvas@canvas-mechine:/var/canvas$ sudo gem install bundler --version 1.13.6
5. 通过 Bundler 安装其他一些依赖,此步可能会很长时间, 也较容易出错,如果出错,就再次执行这条命令, 一般两到三遍后就能执行成功, 如果执行多次还不成功, 执行这条命令: bundle update
若出错, 请参考我的博客: https://blog.csdn.net/zcf980/article/details/83714558
canvas@canvas-mechine:/var/canvas$ bundle install --path vendor/bundle五. 安装 yarn
官方解释: Canvas now prefers yarn instead of npm.(注意: 截至2018.9.15,所需的 yarn 版本为1.9.4)
1. 安装 yarn, 执行以下三条命令
canvas@canvas-mechine:/var/canvas$ curl -sS https://dl.yarnpkg.com/debian/pubkey.gpg | sudo apt-key add -
canvas@canvas-mechine:/var/canvas$ echo "deb https://dl.yarnpkg.com/debian/ stable main" | sudo tee /etc/apt/sources.list.d/yarn.list
canvas@canvas-mechine:/var/canvas$ sudo apt-get update && sudo apt-get install yarn=1.9.4-1
2. 安装 python
canvas@canvas-mechine:/var/canvas$ sudo apt-get install python
3. 安装 node 模块,Warn: 此步耗时较长,在最后一个点的时候需要很长时间(可能半小时以上), 请不要中断操作, 如果出错, 再次执行这条命令, 一般执行两到三遍后可执行成功
canvas@canvas-mechine:/var/canvas$ yarn install六. Canvas 配置
1. 默认配置: Rails 代码依赖于少量配置文件,我们用 Canvas 为我们提供的默认的 Rails 配置文件即可,我们只需要更改文件名即可,执行下面这条命令:
canvas@canvas-mechine:/var/canvas$ for config in amazon_s3 database \delayed_jobs domain file_store outgoing_mail security external_migration; \do cp config/$config.yml.example config/$config.yml; done2. 动态设置配置(官网谷歌翻译结果,不懂),反正就是Canvas 不使用 consul 集群的时候需要的配置文件,这里我们 只修改文件名,使这个文件成为一个配置文件即可, 不修改文件内容
canvas@canvas-mechine:/var/canvas$ cp config/dynamic_settings.yml.example config/dynamic_settings.yml# 下面的命令可不执行, nano 是 编辑文件的命令, 相当于 vim 和 gedit 不过这里的配置文件只能用这条命令修改, 用 vim 会出现无法输入, 或者 Readonly 的情况(超级用户也不行), 所以如果你有修改的需求,最好用 nano 编辑
canvas@canvas-mechine:/var/canvas$ nano config/dynamic_settings.yml
3. 数据库配置: 在config / database.yml中,修改 production 部分的 username 和 password 为第二步你设置的用户名和密码
canvas@canvas-mechine:/var/canvas$ cp config/database.yml.example config/database.yml
canvas@canvas-mechine:/var/canvas$ nano config/database.yml
文件原文如下:
# do not create a queue: section for your test environment
test:adapter: postgresqlencoding: utf8database: canvas_testhost: localhostusername: canvastimeout: 5000development:adapter: postgresqlencoding: utf8database: canvas_developmenttimeout: 5000production:adapter: postgresqlencoding: utf8database: canvas_productionhost: localhostusername: canvas # 第二步设置的用户名password: your_password # 第二步设置的密码timeout: 5000
4. 传出邮件配置, 配置外发邮件的SMTP服务器, 此配置用于配置一个账户,使canvas通过这个账户发送邮件给此canvas的用户
执行下面两条命令,复制 和 修改文件:
canvas@canvas-mechine:/var/canvas$ cp config/outgoing_mail.yml.example config/outgoing_mail.yml
canvas@canvas-mechine:/var/canvas$ nano config/outgoing_mail.yml修改后内容如下(只修改 production部分): 此演示的是网易邮箱,其他邮箱配置请参考相应的邮箱SMTP配置相关内容
development:address: "smtp.example.com"port: "25"user_name: "user"password: "password"authentication: "plain" # plain, login, or cram_md5domain: "example.com"outgoing_address: "canvas@example.com"default_name: "Instructure Canvas"# or to use sendmail --
#
# development:
#   delivery_method: "sendmail"test:delivery_method: "test"production:address: "smtp.126.com"  # 126的 smtp 地址port: "25"  # 126 默认端口user_name: "zcf" #  126 邮箱的账号,不带@126.com,实际发送会与下面domain拼接成zcf@126.compassword: "password" # 126邮箱设置的客户端授权密码authentication: "plain" # plain, login, or cram_md5domain: "126.com"outgoing_address: "canvas@126.com" # 用户收到canvas发送的邮件时, 邮件会显示此邮件来自outgoing_address# ssl: true  # 此配置官网未提供, 但官网配置腾讯smtp是发不了邮件的, 还需要加这句default_name: "Instructure Canvas"# If receiving mail from multiple inboxes (see incoming_mail.yml.example),
# you'll want to include those addresses in a reply_to_addresses array so
# Canvas will select the Reply-To field of outgoing messages from all of the
# incoming mailboxes.multiple_inboxes:address: "smtp.example.com"port: "25"user_name: "user"password: "password"authentication: "plain" # plain, login, or cram_md5domain: "example.com"outgoing_address: "canvas@example.com"default_name: "Instructure Canvas"reply_to_addresses:- "canvas1@example.com"- "canvas2@example.com"- "canvas3@example.com"- "canvas4@example.com"5. 可信URL配置, 只修改production部分
canvas@canvas-mechine:/var/canvas$ cp config/domain.yml.example config/domain.yml
canvas@canvas-mechine:/var/canvas$ nano config/domain.yml
配置文件内容如下:
test:domain: localhostdevelopment:domain: "localhost:3000"production:domain: "canvas.example.com" # 配置可信域名# whether this instance of canvas is served over ssl (https) or not# defaults to true for production, false for test/developmentssl: true# files_domain: "canvasfiles.example.com" # 配置此域名, 只有含此域名的请求才能上传文件6. 安全配置: 给 production 部分 的 encryption_key 设置一个至少20个字符的随机字符串(长度大于20即可)
canvas@canvas-mechine:/var/canvas$ cp config/security.yml.example config/security.yml
canvas@canvas-mechine:/var/canvas$ nano config/security.yml
七. 生成资源(初始化资源文件)
1. Canvas需要先构建一些资产才能正常工作。首先,创建将存储生成的文件的目录
canvas@canvas-mechine:/var/canvas$ cd /var/canvas
canvas@canvas-mechine:/var/canvas$ mkdir -p log tmp/pids public/assets app/stylesheets/brandable_css_brands
canvas@canvas-mechine:/var/canvas$ touch app/stylesheets/_brandable_variables_defaults_autogenerated.scss
canvas@canvas-mechine:/var/canvas$ touch Gemfile.lock
canvas@canvas-mechine:/var/canvas$ touch log/production.log
2. 再运行下面的命令(最后一条命令中的 canvasuser 为当前部署 canvas 的操作系统用户)
canvas@canvas-mechine:/var/canvas$ yarn install
canvas@canvas-mechine:/var/canvas$ RAILS_ENV=production bundle exec rake canvas:compile_assets
canvas@canvas-mechine:/var/canvas$ sudo chown -R canvasuser public/dist/brandable_css
3. 如果你修改了 cnavas 的 源码, 最好执行下面的这条命令,然后在启动项目, 才能让你的修改完全生效
canvas@canvas-mechine:/var/canvas$ RAILS_ENV=production bundle exec rake brand_configs:generate_and_upload_all八. 初始化数据库
1. 我们需要生成数据库表 并 在数据库中添加初始数据。在canvas安装根目录执行下面命令即可,执行命令后, 会要求你设置 canvas 默认管理员登录的电子邮件地址 和 登录密码, 还会设置一个登陆后的提示名称, 通常是您的组织名称,最后选择是否向canvas开发团队反馈使用信息:opt_in 所有信息,opt_out 不反馈任何信息 或 匿名反馈
canvas@canvas-mechine:/var/canvas$ RAILS_ENV=production bundle exec rake db:initial_setup九. 配置Apache
1. 安装apache和passenger软件包, 如果执行以下安装命令报错(如:找不到包):请参考以下官方链接
https://www.phusionpassenger.com/library/install/apache/install/oss/trusty/
canvas@canvas-mechine:/var/canvas$ sudo apt-get install passenger libapache2-mod-passenger apache22. 启用 mod_rewrite (a2enmod 是 apache-2.4-common 包下的一个工具)
canvas@canvas-mechine:/var/canvas$ sudo a2enmod rewrite3. 启用 passenger
canvas@canvas-mechine:/var/canvas$ sudo a2enmod passenger4. 配置 passenger ( libapache2-mod-passenger软件包应该将符号链接放在/ etc / apache2 / mods-enabled /中,名为passenger.conf 和 passenger.load ),
(1)修改 / etc / apache2 / mods-enabled / 下的 passenger.load , 修改后的文件内容
### Begin automatically installed Phusion Passenger load snippet ###
LoadModule passenger_module /usr/lib/apache2/modules/mod_passenger.so
PassengerRoot /usr
PassengerRuby /usr/bin/ruby
### End automatically installed Phusion Passenger load snippet ###
(2)修改 / etc / apache2 / mods-enabled / 下的 passenger.conf , 避免由于权限问题而无法启动应用程序, 修改后的 文件内容
### Begin automatically installed Phusion Passenger config snippet ###
<IfModule mod_passenger.c>PassengerRoot /usr/lib/ruby/vendor_ruby/phusion_passenger/locations.iniPassengerDefaultUser canvasPassengerDefaultRuby /usr/bin/passenger_free_ruby
</IfModule>
### End automatically installed Phusion Passenger config snippet ###
十. 配置 Apache 支持 SSL
1. 确保Apache配置支持SSL,Ubuntu默认情况下不会在启用SSL模块的情况下发布Apache
canvas@canvas-mechine:/var/canvas$ sudo a2enmod ssl十一. 配置 Canvas 使用 Apache 发布
1. 断开默认的站点(或删除这个文件)
canvas@canvas-mechine:/var/canvas$ sudo unlink /etc/apache2/sites-enabled/000-default.conf2. 新建 canvas 的站点,创建一个名为 / etc / apache2 / sites-available / canvas.conf 的新文件
<VirtualHost *:80>ServerName canvas.example.com # canvas 所在服务器地址或域名,在此填本机的地址或域名即可
#  ServerAlias canvasfiles.example.com # 服务器别名, 可不填ServerAdmin canvas@example.com # 这么填即可DocumentRoot /var/canvas/public # 将canvas安装路径下public目录放到apache web容器内,共用户访问RewriteEngine OnRewriteCond %{HTTP:X-Forwarded-Proto} !=httpsRewriteCond %{REQUEST_URI} !^/health_checkRewriteRule (.*) https://%{HTTP_HOST}%{REQUEST_URI} [L]  ErrorLog /var/log/apache2/canvas_errors.logLogLevel warnCustomLog /var/log/apache2/canvas_access.log combinedSetEnv RAILS_ENV production<Directory /var/canvas/public>Allow from allOptions -MultiViews</Directory>
</VirtualHost>
<VirtualHost *:443> # 此处配置同 <VirtualHost *:80> 配置一样即可ServerName canvas.example.comServerAlias canvasfiles.example.comServerAdmin youremail@example.comDocumentRoot /var/canvas/publicErrorLog /var/log/apache2/canvas_errors.logLogLevel warnCustomLog /var/log/apache2/canvas_ssl_access.log combinedSSLEngine onBrowserMatch "MSIE [17-9]" ssl-unclean-shutdown# the following ssl certificate files are generated for you from the ssl-cert package.SSLCertificateFile /etc/ssl/certs/ssl-cert-snakeoil.pemSSLCertificateKeyFile /etc/ssl/private/ssl-cert-snakeoil.keySetEnv RAILS_ENV production<Directory /var/canvas/public>Allow from allOptions -MultiViews</Directory>
</VirtualHost>
!!!!!!注意:Apache 2.4用户:刚才配置中的 <Directory /var/canvas/public> 配置已经改变。需要修改为如下内容,否则访问canvas时会报没有权限访问服务器( Forbidden You don't have permission to access / on this server. )的错误
<Directory /var/canvas/public>Options AllAllowOverride AllRequire all granted</Directory>3. 启用新的站点,执行下面的命令
canvas@canvas-mechine:/etc/apache2/sites-enabled$ sudo a2ensite canvas4. SSL证书的说明(也可使用默认的配置), 若不配置, 则可能会报不安全的网站的警告
该配置在 / etc / apache2 / sites-available / canvas.conf 文件中的以下 两项, 修改成自己的 pem 和 key文件即可
SSLCertificateFile /etc/ssl/certs/ssl-cert-snakeoil.pem
SSLCertificateKeyFile /etc/ssl/private/ssl-cert-snakeoil.key
十二. 优化文件下载
如果要在本地而不是在S3中存储上载的文件,则可以使用X-Sendfile标头(nginx中的X-Accel-Redirect)优化文件下载
1. 为 apache 安装并启用 mod_xsendfile 模块
canvas@canvas-mechine:/var/canvas$ sudo apt-get install libapache2-mod-xsendfile2. 使用以下命令确保 mod_xsendfile 模块启动并正确运行
canvas@canvas-mechine:/var/canvas$ sudo apachectl -M | sort3. 将 config/environments/production.rb 复制一份, 复制到 config/environments/production-local.rb 文件中, 并将其中的注释的行全部删掉, 只保留未注释的, 防止以后合并代码时出现错误。
4. 在 /etc/apache2/sites-available/canvas.conf 中添加优化下载的配置, 将下面两行加入到 <VirtualHost> 中
XSendFile On
XSendFilePath /var/canvas
十三. Redis 缓存配置
canvas 建议使用 redis 进行缓存, 所需 Redis 版本:redis 2.6.x或更高版本。
1. 使用 backport PPA 来确保安装最新的 Redis, 执行下面的命令即可
canvas@canvas-mechine:/var/canvas$ sudo add-apt-repository ppa:chris-lea/redis-server
canvas@canvas-mechine:/var/canvas$ sudo apt-get update
canvas@canvas-mechine:/var/canvas$ sudo apt-get install redis-server
2. 配置 Redis 在服务器引导时自动运行
(1). 首先, 执行以下命令,配置 cache_store.yml
canvas@canvas-mechine:/var/canvas$ cd /var/canvas/
canvas@canvas-mechine:/var/canvas$ cp config/cache_store.yml.example config/cache_store.yml
canvas@canvas-mechine:/var/canvas$ nano config/cache_store.yml
canvas@canvas-mechine:/var/canvas$ sudo chown canvas config/cache_store.yml
canvas@canvas-mechine:/var/canvas$ sudo chmod 400 config/cache_store.yml
将以下行添加到你的 config/cache_store.yml 文件中(以下行包含测试、开发、生产缓存配置)
test:cache_store: redis_store
development:cache_store: redis_store
production:cache_store: redis_store
(2). 执行以下命令,配置 redis.yml(倒数第二条命令中的 canvasuser 为当前部署 canvas 的操作系统用户)
canvas@canvas-mechine:/var/canvas$ cd /var/canvas/
canvas@canvas-mechine:/var/canvas$ cp config/redis.yml.example config/redis.yml
canvas@canvas-mechine:/var/canvas$ nano config/redis.yml
canvas@canvas-mechine:/var/canvas$ sudo chown canvasuser config/redis.yml
canvas@canvas-mechine:/var/canvas$ sudo chmod 400 config/redis.yml
在 config/redis.yml 找到下面几行, 取消掉注释,修改为如下内容
production:servers:
#   # list of redis servers to use in the ring- redis://localhost
十四. 安装QTIMigrationTool
具体作用我也没搞懂, 官方说是为了复制或导入测验内容
1.运行该工具需要先安装 lxml python库,否则导入课程报错: Couldn't convert QTI 1.2 to 2.1。运行以下命令即可完成安装
(或者使用 Python Package Index(pip),然后运行 pip install lxml)
canvas@canvas-mechine:/var/canvas$ apt-get install python-lxml2. 此工具需要安装在 canvas 安装目录下的 vender 目录下, 即 /var/canvas/vender 下, 执行以下命令下载源码并配置
canvas@canvas-mechine:/var/canvas$ cd /var/canvas/vendor
canvas@canvas-mechine:/var/canvas/vendor$ git clone https://github.com/instructure/QTIMigrationTool.git QTIMigrationTool
canvas@canvas-mechine:/var/canvas/vendor$ cd QTIMigrationTool
canvas@canvas-mechine:/var/canvas/vendor/QTIMigrationTool$ chmod +x migrate.py
3. 需要重新启动(或启动)延迟的作业守护程序
canvas@canvas-mechine:/var/canvas/vendor$ cd /var/canvas
canvas@canvas-mechine:/var/canvas$ script/delayed_job restart
十五. 自动化工作配置
Canvas有一些需要偶尔运行的自动化作业,例如电子邮件报告,统计信息收集和其他一些事情。如果不支持自动作业,您的Canvas安装将无法正常运行,因此我们也需要进行设置。 Canvas附带一个守护进程,可以监视和管理任何需要发生的自动化作业。 我们需要做的: 安装此守护进程,首先将 /var/canvas/script/canvas_init 中的符号链接添加到 /etc/init.d/canvas_init,然后将此脚本配置为运行在有效的运行级别, 运行以下命令即可
canvas@canvas-mechine:/var/canvas$ sudo ln -s /var/canvas/script/canvas_init /etc/init.d/canvas_init
canvas@canvas-mechine:/var/canvas$ sudo update-rc.d canvas_init defaults
canvas@canvas-mechine:/var/canvas$ sudo /etc/init.d/canvas_init start
配置完成预备,准备,开始!!!!!!
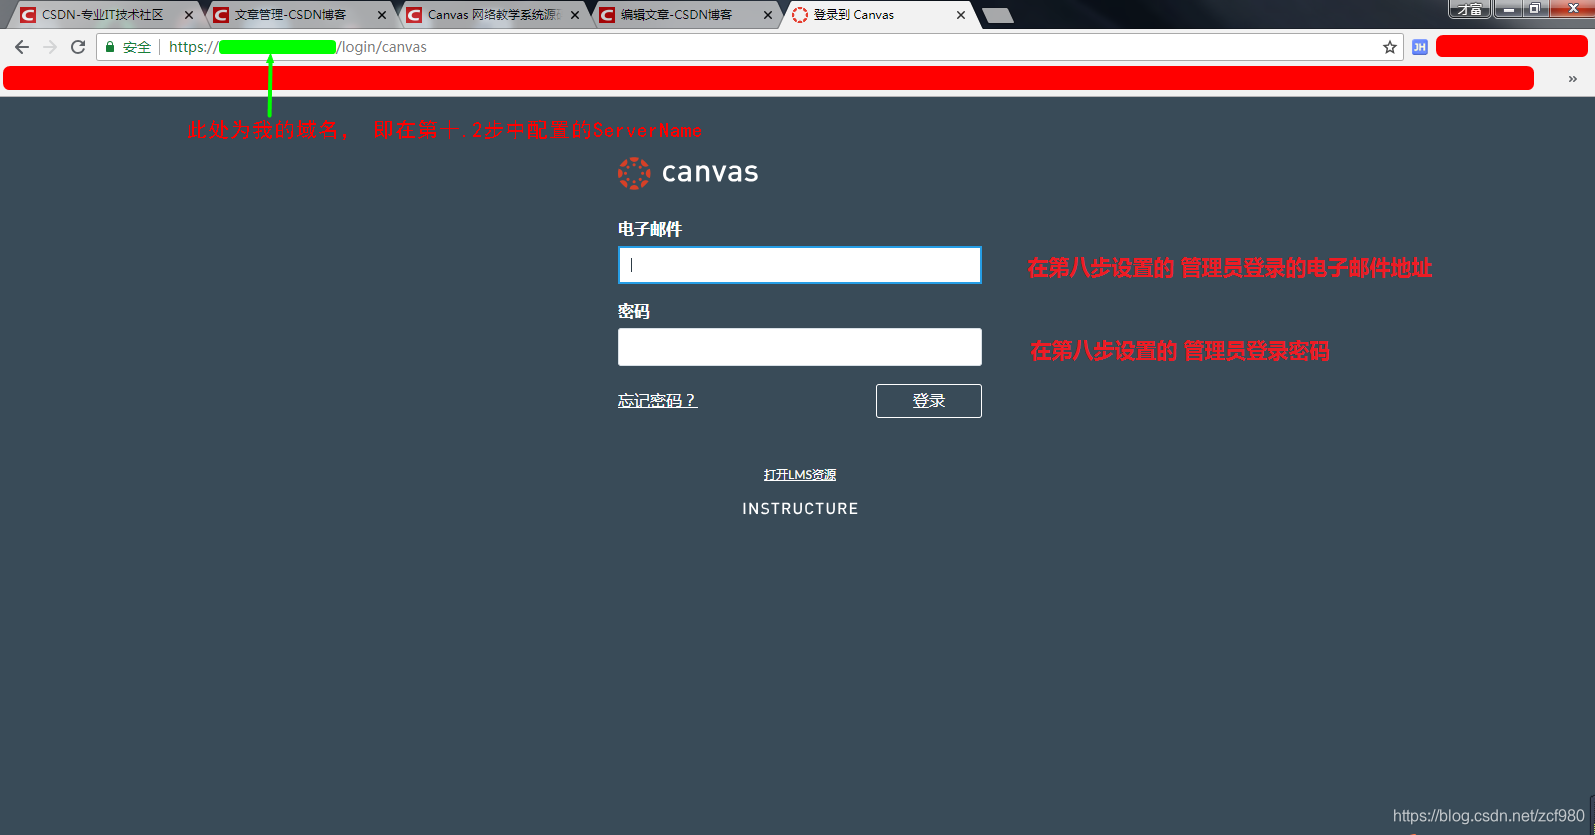
sudo /etc/init.d/apache2 restart在浏览器中输入 https://canvas.example.com ( canvas.example.com 是你在第十.2步配置的 ServerName )或直接输 ip 即可出来登录页面
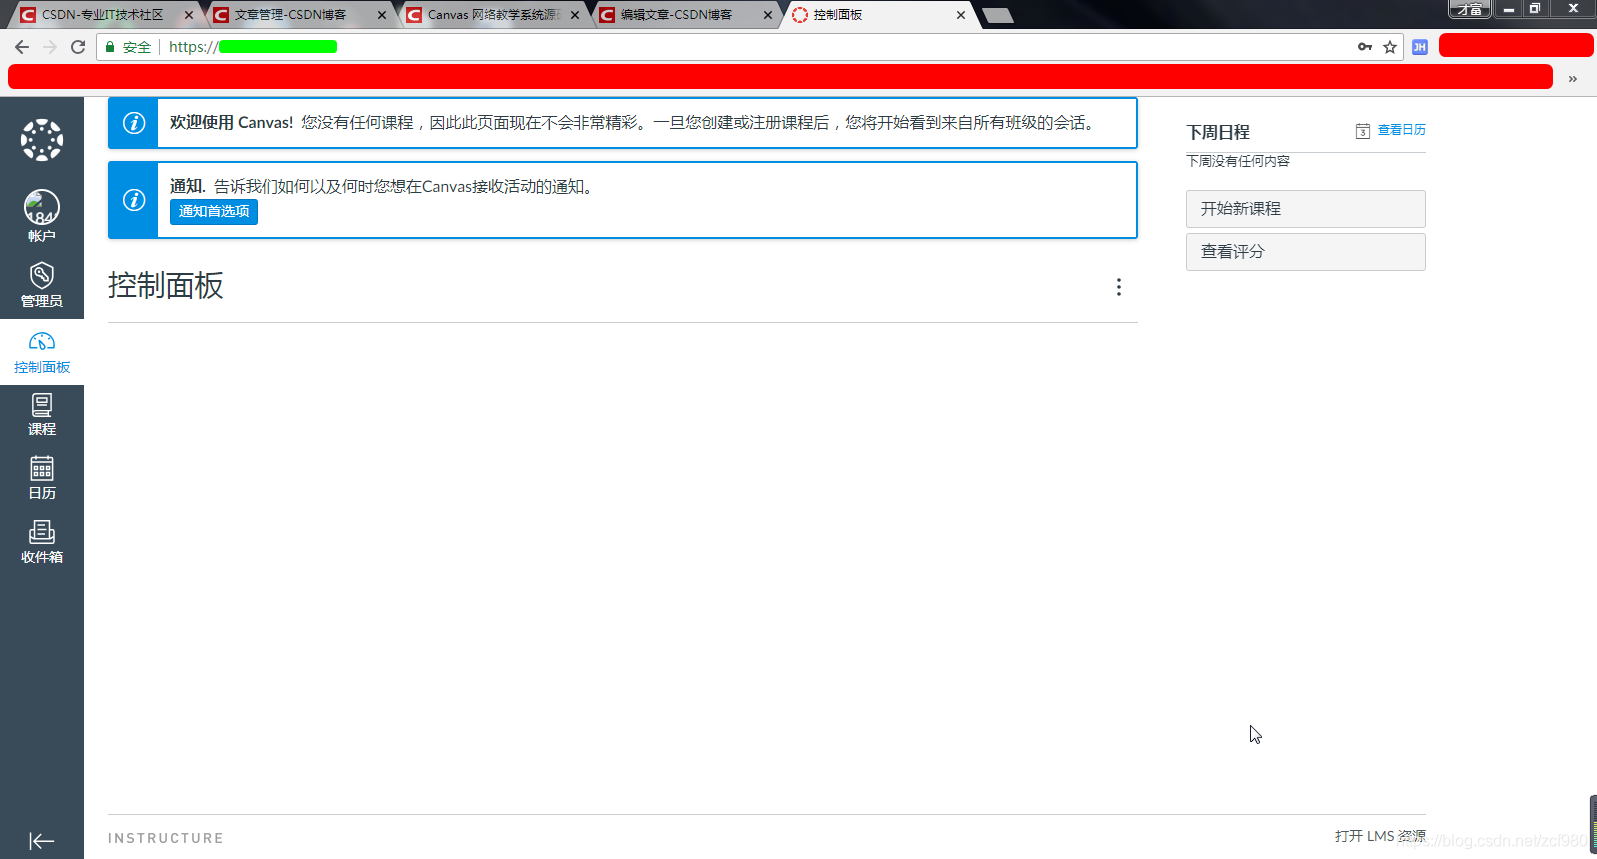
主界面
我们的产品: https://canvaslms.zut.edu.cn/


![[Python从零到壹] 十五.文本挖掘之数据预处理、Jieba工具和文本聚类万字详解](https://img-blog.csdnimg.cn/20210623125327751.png#pic_center)