随机森林回归实验
文章目录
- 随机森林回归实验
- 实验说明
- 实验步骤
- 可视化
实验说明
sklearn包里已经实现了随机森林回归模型,导入使用即可。
数据集我们使用的是 sklearn包中自带的波士顿房价数据集。
- 实验环境:Anaconda3+VScode
- Python版本:3.7
- 需要的第三方库:sklearn、matplotlib、numpy
实验步骤
一个简单的随机森林回归实验同样分为六个步骤:
- 加载数据集
- 拆分数据集
- 创建模型
- 在训练集学习得到模型
- 模型预测
- 模型评测
关于训练集和测试集的划分我们使用的是留出法,最后的结果我们使用四项指标来进行评估:
- 平均绝对误差
- 均方误差
- 解释方差分
- R2得分
这一步用到的第三方库是 sklearn。
代码如下:
from sklearn.datasets import load_boston
from sklearn.model_selection import train_test_split
from sklearn.ensemble import RandomForestRegressor
from sklearn.metrics import mean_absolute_error
from sklearn.metrics import mean_squared_error
from sklearn.metrics import explained_variance_score
from sklearn.metrics import r2_score
#1.加载数据集
boston_data = load_boston()
# print(boston_data)
#2.拆分数据集
x = boston_data.data
y = boston_data.target
x_train, x_test, y_train, y_test = train_test_split(x, y, test_size=0.2, random_state=10);
#3.创建模型
rfr = RandomForestRegressor(random_state=10, max_depth=8)
#4.获取在训练集的模型
rfr.fit(x_train, y_train)
#5.预测结果
rfr_predict = rfr.predict(x_test)
#6.模型评测
mae = mean_absolute_error(y_test, rfr_predict)
mse = mean_squared_error(y_test, rfr_predict)
evs = explained_variance_score(y_test, rfr_predict)
r2 = r2_score(y_test, rfr_predict)
print("平均绝对误差MAE:{}".format(mae))
print("均方误差MSE:{}".format(mse))
print("解释方差分EVS:{}".format(evs))
print("R2得分:{}".format(r2))
可以看到,得到的四项指标为:平均绝对误差为2.78,均方误差为14.24,解释方差分为0.86,R2得分为0.86

可视化
我们将刚才训练的随机森林,借助散点图进行可视化。
这一步需要的第三方库是 sklearn、matplotlib、numpy。
代码如下:
from sklearn.datasets import load_boston
from sklearn.model_selection import train_test_split
from sklearn.ensemble import RandomForestRegressor
from sklearn.metrics import mean_absolute_error
from sklearn.metrics import mean_squared_error
from sklearn.metrics import explained_variance_score
from sklearn.metrics import r2_score
import matplotlib.pyplot as plt
from matplotlib.colors import ListedColormap
import numpy as np
#1.加载数据集
boston_data = load_boston()
# print(boston_data)
#2.拆分数据集
x = boston_data.data
y = boston_data.target
x_train, x_test, y_train, y_test = train_test_split(x, y, test_size=0.2, random_state=10)
#3.创建模型
rfr = RandomForestRegressor(random_state=10, max_depth=8)
#4.获取在训练集的模型
rfr.fit(x_train, y_train)
#5.预测结果
rfr_predict = rfr.predict(x_test)
#6.模型评测
mae = mean_absolute_error(y_test, rfr_predict)
mse = mean_squared_error(y_test, rfr_predict)
evs = explained_variance_score(y_test, rfr_predict)
r2 = r2_score(y_test, rfr_predict)
print("平均绝对误差MAE:{}".format(mae))
print("均方误差MSE:{}".format(mse))
print("解释方差分EVS:{}".format(evs))
print("R2得分:{}".format(r2))
# 设置散点颜色
point_color = ListedColormap(['#FF0000', '#00FF00'])
# 设置坐标轴
y_min, y_max = y_test.min()-1,y_test.max()+1
xx = np.arange(0,102,1)
yy = y_test
yy.sort()
z = rfr_predict
z.sort()
# print(xx.shape)
# print(yy.shape)
# print(z.shape)# 创建图片
plt.figure()
plt.scatter(xx, yy, cmap=point_color, edgecolors='black')
plt.scatter(xx, z, cmap=point_color, edgecolors='black')
# 绘制刻度
plt.xlim(xx.min(), xx.max())
plt.ylim(yy.min(), yy.max())
# 设置标题
plt.title("RandomForestRegressor")
# 展示图表
plt.grid(True)
plt.show()
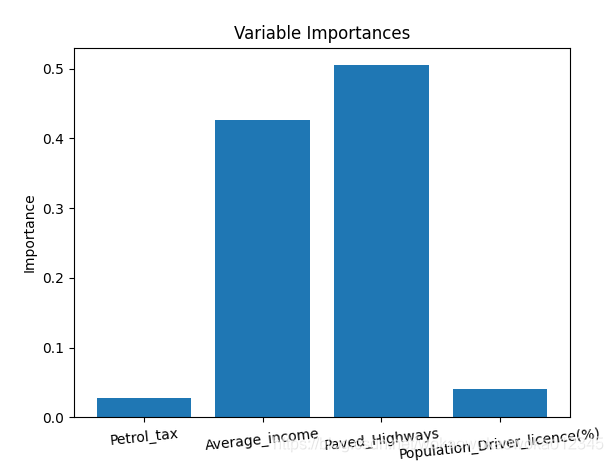
散点图展示:

可以看到,散点的分布位置贴合较近,模型训练得还不错。


![DS和[address]](https://img-blog.csdnimg.cn/20200202162712584.png)