文章の目录
- 1、什么是 vue 生命周期
- 2、生命周期钩子函数
- 2.1、beforeCreate(创建前)
- 2.2、created(创建后)
- 2.3、beforeMount(挂载前)
- 2.4、mounted(挂载后)
- 2.5、beforeUpdate(更新前)
- 2.6、updated(更新后)
- 2.7、beforeDestroy(销毁前)
- 2.8、destroyed(销毁后)
- 2.9、activated(激活)
- 2.10、deactivated(失活)
- 3、示例
- 3.1、不包含动态组件的生命周期
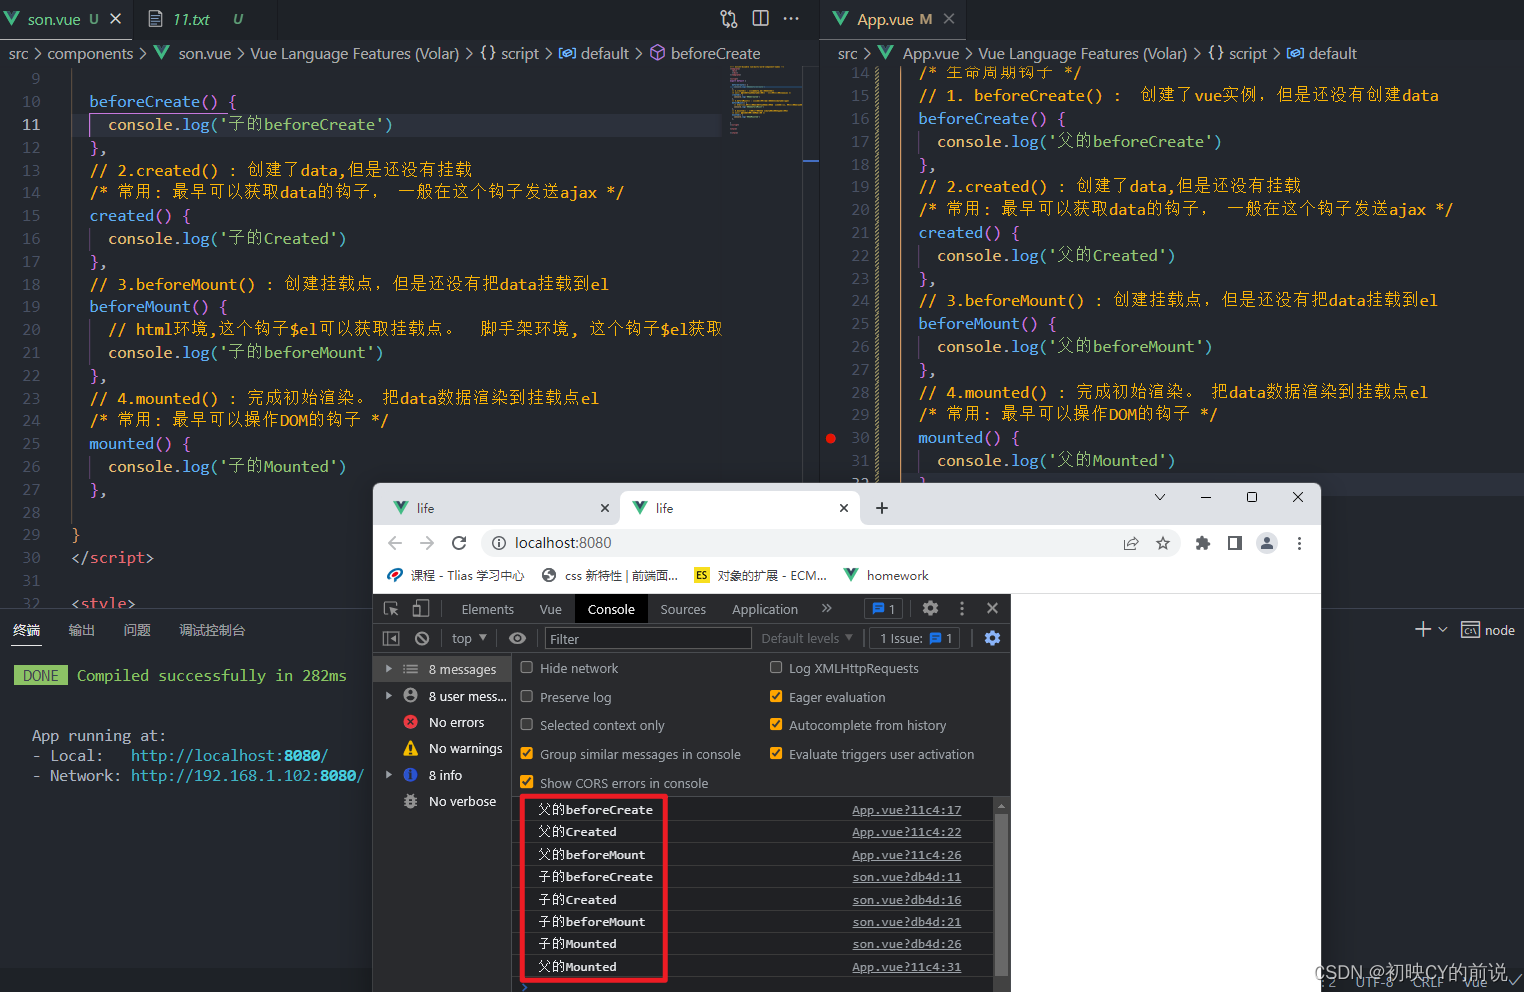
- 3.1.1、父子组件加载的顺序如下图
- 3.1.2、父子组件更新的顺序如下图
- 3.1.3、父子组件销毁的顺序如下图
- 3.2、包含动态组件的生命周期
- 3.2.1、父子组件加载的顺序如下图
- 3.2.2、切换动态组件的顺序如下图
- 3.2.3、切换的组件都已加载完再次执行切换的顺序如下图
- 3.2.4、父子组件的销毁顺序如下图
- 写在最后
随着对 vue 的不断了解,会越来越发现它生命周期的重要性,只有了解了它的生命周期,才能在开发项目的时候,在逻辑上很好的判断什么时候该发生什么事件,即很好的控制页面。
1、什么是 vue 生命周期
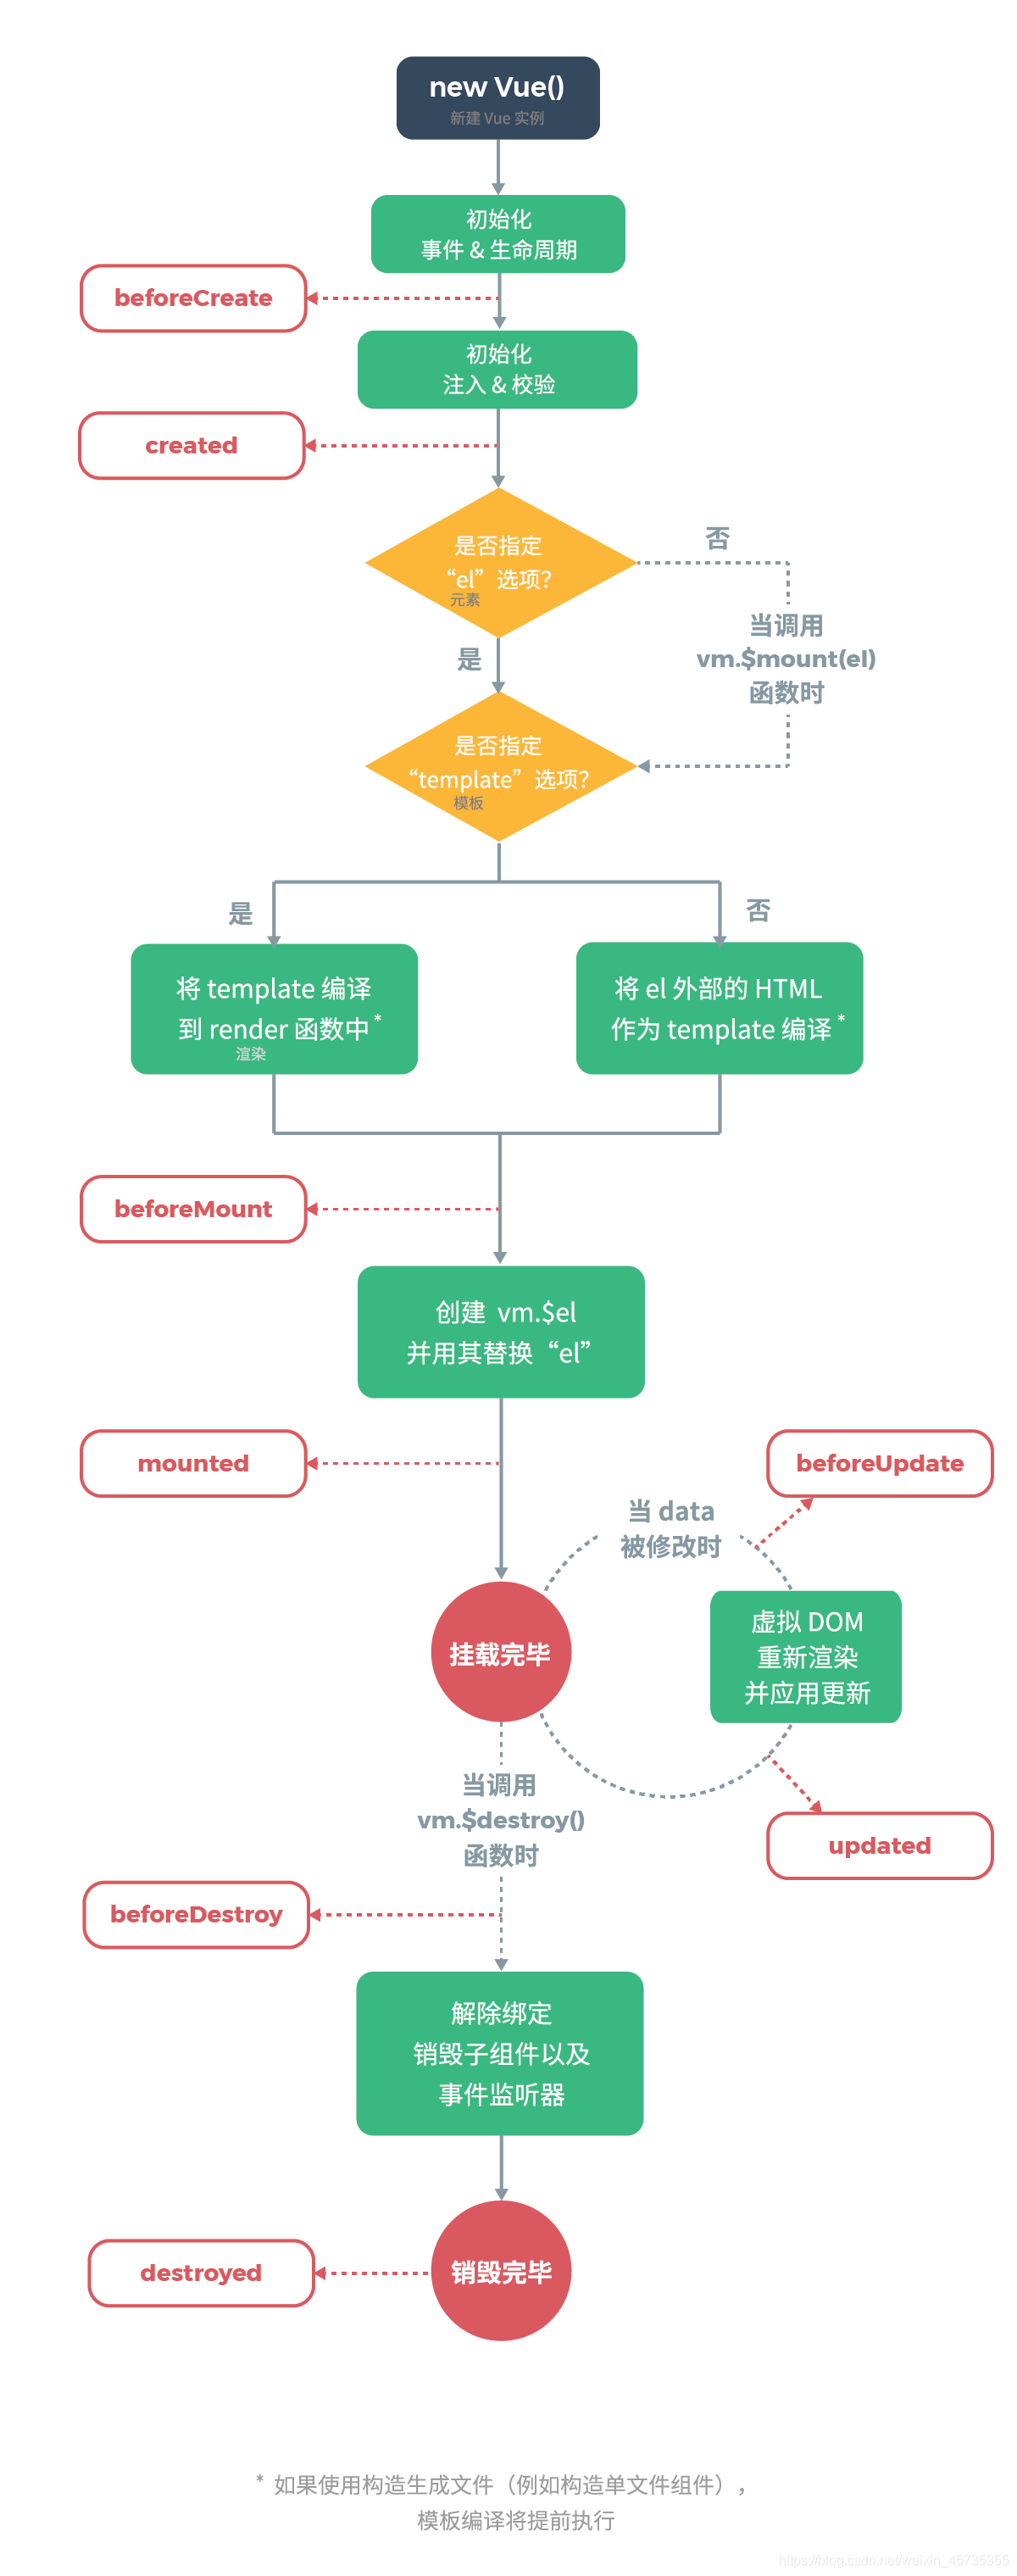
Vue 实例从创建到销毁的过程,就是生命周期。也就是说从开始创建、初始化数据、编译模板、挂载DOM→渲染、更新→渲染、卸载等一系列过程,我们称这是 Vue 的生命周期。下面是官网中的生命周期图片:

2、生命周期钩子函数
2.1、beforeCreate(创建前)
在实例初始化之后,进行数据侦听和事件/侦听器的配置之前同步调用。此时组件的选项对象还未创建,el 和 data 并未初始化,因此无法访问 methods, data, computed 等上的方法和数据,一般在开发中很少使用。
2.2、created(创建后)
在实例创建完成后被立即同步调用。在这一步中,实例已完成对选项的处理,意味着以下内容已被配置完毕:数据侦听、计算属性、方法、事件/侦听器的回调函数。然而,挂载阶段还没开始,且 $el property 目前尚不可用,这是一个常用的生命周期,因为你可以调用 methods 中的方法,改变 data 中的数据,并且修改可以通过 vue 的响应式绑定体现在页面上,获取 computed 中的计算属性等等,通常我们可以在这里对实例进行预处理,也有一些 gym 喜欢在这里发 ajax 请求,值得注意的是,这个周期中是没有什么方法来对实例化过程进行拦截的,因此假如有某些数据必须获取才允许进入页面的话,并不适合在这个方法发请求,建议在组件路由钩子 beforeRouteEnter 中完成。
2.3、beforeMount(挂载前)
在挂载开始之前被调用:相关的 render 函数首次被调用。实例已完成以下的配置: 编译模板,把 data 里面的数据和模板生成 html,完成了 el 和 data 初始化,注意此时还没有挂在 html 到页面上。
该钩子在服务器端渲染期间不被调用。
2.4、mounted(挂载后)
实例被挂载后调用,这时 el 被新创建的 vm.$el 替换了。如果根实例挂载到了一个文档内的元素上,当 mounted 被调用时 vm.$el 也在文档内。换句话说,挂在完成,也就是模板中的HTML渲染到HTML页面中,此时一般可以做一些 ajax 操作,mounted 只会执行一次。
注意:mounted 不会保证所有的子组件也都被挂载完成。如果你希望等到整个视图都渲染完毕再执行某些操作,可以在 mounted 内部使用 vm.$nextTick
该钩子在服务器端渲染期间不被调用。
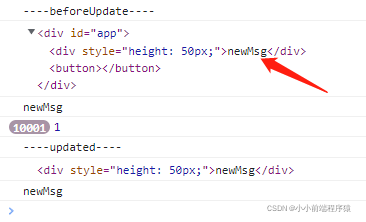
2.5、beforeUpdate(更新前)
在数据发生改变后,DOM 被更新之前被调用。这里适合在现有 DOM 将要被更新之前访问它,比如移除手动添加的事件监听器。
该钩子在服务器端渲染期间不被调用,因为只有初次渲染会在服务器端进行。
2.6、updated(更新后)
在数据更改导致的虚拟 DOM 重新渲染和更新完毕之后被调用。
当这个钩子被调用时,组件 DOM 已经更新,所以你现在可以执行依赖于 DOM 的操作。然而在大多数情况下,你应该避免在此期间更改状态。如果要相应状态改变,通常最好使用计算属性或 watcher 取而代之。
注意,updated 不会保证所有的子组件也都被重新渲染完毕。如果你希望等到整个视图都渲染完毕,可以在 updated 里使用 vm.$nextTick
该钩子在服务器端渲染期间不被调用。
2.7、beforeDestroy(销毁前)
实例销毁之前调用。在这一步,实例仍然完全可用。
- 这一步还可以用 this 来获取实例;
- 一般在这一步做一些重置的操作,比如清除掉组件中的定时器和监听的 DOM 事件;
该钩子在服务器端渲染期间不被调用。
2.8、destroyed(销毁后)
实例销毁后调用。该钩子被调用后,对应 Vue 实例的所有指令都被解绑,所有的事件监听器被移除,所有的子实例也都被销毁。
该钩子在服务器端渲染期间不被调用。
在动态组件和异步组件中还有如下两个生命周期:
2.9、activated(激活)
被 keep-alive 缓存的组件激活时调用。
该钩子在服务器端渲染期间不被调用。
2.10、deactivated(失活)
被 keep-alive 缓存的组件失活时调用。
该钩子在服务器端渲染期间不被调用。
3、示例
3.1、不包含动态组件的生命周期
父组件
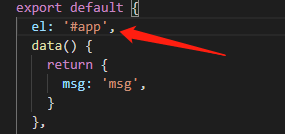
<template><div style="border: 1px solid red"><h1>GrandFather{{cname}}</h1><!-- <keep-alive><component v-bind:is="cname"></component></keep-alive> --><father v-if="isShow"></father><button @click="updateData">修改</button></div>
</template><script>
import Father from './Father.vue'
import Son from './Son.vue'export default {components: {Father,Son},data () {return {cname: 'grandfather',isShow: true}},beforeCreate () {console.log("beforeCreate")},created () {console.log("created")},beforeMount () {console.log("beforeMount")},mounted () {console.log('mounted')},beforeUpdate () {console.log('beforeUpdate')},updated () {console.log('updated')},activated () {console.log('activated')},deactivated () {console.log('deactivated')},beforeDestroy () {console.log('beforeDestroy')},destroyed () {console.log('destroyed')},errorCaptured () {console.log('errorCaptured')},methods: {updateData () {// this.cname = 'son'this.isShow = !this.isShow}}}
</script><style scoped>
</style>
子组件
<template><div style="border: 4px solid green"><h2>Father{{cname}}</h2><button @click="update">更新数据</button></div>
</template><script>export default {data () {return {cname: 'father'}},components: {},beforeCreate () {console.log("beforeCreate")},created () {console.log("created")},beforeMount () {console.log("beforeMount")},mounted () {console.log('mounted')},beforeUpdate () {console.log('beforeUpdate')},updated () {console.log('updated')},activated () {console.log('activated')},deactivated () {console.log('deactivated')},beforeDestroy () {console.log('beforeDestroy')},destroyed () {console.log('destroyed')},methods: {update () {this.cname = 'update father'this.$parent.cname = 'update grandfather'}}}
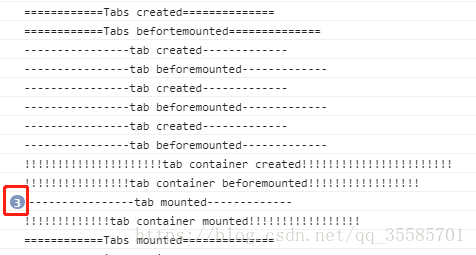
</script><style scoped></style>3.1.1、父子组件加载的顺序如下图

3.1.2、父子组件更新的顺序如下图

3.1.3、父子组件销毁的顺序如下图

3.2、包含动态组件的生命周期
父组件
<template><div style="border: 1px solid red"><h1>GrandFather{{cname}}</h1><keep-alive><component v-bind:is="cname"></component></keep-alive><button @click="updateData">修改</button></div>
</template><script>
import Father from './Father.vue'
import Son from './Son.vue'export default {components: {Father,Son},data () {return {cname: 'father',isShow: true}},beforeCreate () {console.log("beforeCreate")},created () {console.log("created")},beforeMount () {console.log("beforeMount")},mounted () {console.log('mounted')},beforeUpdate () {console.log('beforeUpdate')},updated () {console.log('updated')},activated () {console.log('activated')},deactivated () {console.log('deactivated')},beforeDestroy () {console.log('beforeDestroy')},destroyed () {console.log('destroyed')},errorCaptured () {console.log('errorCaptured')},methods: {updateData () {this.cname = this.cname === 'son' ? 'father' : 'son'}}}
</script><style scoped>
</style>
子组件①
<template><div style="border: 4px solid green"><h2>Father{{cname}}</h2><button @click="update">更新数据</button></div>
</template><script>export default {data () {return {cname: 'father'}},components: {},beforeCreate () {console.log("beforeCreate")},created () {console.log("created")},beforeMount () {console.log("beforeMount")},mounted () {console.log('mounted')},beforeUpdate () {console.log('beforeUpdate')},updated () {console.log('updated')},activated () {console.log('activated')},deactivated () {console.log('deactivated')},beforeDestroy () {console.log('beforeDestroy')},destroyed () {console.log('destroyed')},methods: {update () {this.cname = 'update father'this.$parent.cname = 'update grandfather'}}}
</script><style scoped></style>
子组件②
<template><div style="border: 1px solid blue"><h3>Son</h3></div>
</template><script>export default {data () {return {}},beforeCreate () {console.log("beforeCreate")},created () {console.log("created")},beforeMount () {console.log("beforeMount")},mounted () {console.log('mounted')},beforeUpdate () {console.log('beforeUpdate')},updated () {console.log('updated')},activated () {console.log('activated')},deactivated () {console.log('deactivated')},beforeDestroy () {console.log('beforeDestroy')},destroyed () {console.log('destroyed')},methods: {}}
</script><style lang="scss" scoped>
</style>
3.2.1、父子组件加载的顺序如下图

如果没有指定动态组件,动态组件的相关生命周期是不走的。
3.2.2、切换动态组件的顺序如下图

外层组件进行更新操作,内层组件在切换的组件处于挂载前阶段时,要被替换的组件才执行deactivated,然后才执行切换的组件的后续生命周期。
3.2.3、切换的组件都已加载完再次执行切换的顺序如下图

3.2.4、父子组件的销毁顺序如下图

当前的先销毁,已经被替换的依次执行销毁。
写在最后
如果你感觉文章不咋地
//(ㄒoㄒ)//,就在评论处留言,作者继续改进;o_O???
如果你觉得该文章有一点点用处,可以给作者点个赞;\\*^o^*//
如果你想要和作者一起进步,可以微信扫描二维码,关注前端老L;~~~///(^v^)\\\~~~
谢谢各位读者们啦(^_^)∠※!!!