来源:尚硅谷视频教程 - 张天禹
一、React简介
1 react特点
React:用于构建用户界面的javascript库。是一个将数据渲染为HTML视图的开源JavaScript库。
react的特点:
1.采用组件化模式、声明式编码,提高开发效率及组件复用率。
2.在React Native中可以使用React语法进行移动端开发。
3.使用虚拟DOM+优秀的Diffing算法,尽量减少与真实DOM的交互。
2 react基本使用
2.1 相关js库
- react.js:React核心库。
- react-dom.js:提供操作DOM的react扩展库。
- babel.min.js:解析JSX语法代码转为JS代码的库。
- prop-types.js:用于对组件标签属性进行限制
2.2 创建虚拟DOM的两种方式
- 纯JS方式(一般不用)
- JSX方式
2.3 虚拟DOM与真实DOM
- 本质是Object类型的对象(一般对象)
- 虚拟DOM比较“轻”,真实DOM比较“重”,因为虚拟DOM是React内部在使用,无需真实DOM上那么多属性。
- 虚拟DOM最终会被React转化成真实DOM,呈现在页面上
2.4 jsx语法规则
1.介绍
(1)全称: JavaScript XML
(2)react定义的一种类似于XML的JS扩展语法: JS + XML本质是 React.createElement(component, props, ...children)方法的语法糖
(3)作用: 用来简化创建虚拟DOM
2.规则
(1)定义虚拟dom时,不要写引号
(2)标签中混入JS表达式时要用{}
(3)样式的类名要用className
(4)内联样式要用style={{}}的形式去写
(5)只有一个根标签
(6)标签必须闭合
(7)标签首字母
A.若小写字母开头,则将该标签转为html中同名标签,若html中无该标签对应的
同名的元素,则报错。
B.若大写字母开头,react就去渲染对应的组件,若组件没有定义,则报错。
const myID = 'aTguigu'
const myData = 'hello,React'
const VDOM = (<div><h2 className="title" id={myID.toLowerCase()}><span style={{color:'white',fontSize:'30px'}}>{myData.toUpperCase()}</span></h2><h2 className="title" id={myID.toLowerCase() + '2'}><span style={{color:'white',fontSize:'30px'}}>{myData.toUpperCase()}</span></h2></div>
)
ReactDOM.render(VDOM,document.getElementById('test'))
额外知识:
1. 区分js表达式和js语句
(1)js表达式:一个表达式会产生一个值,可以放在任何一个需要值的地方
例如:a 、a+b、demo()、arr.map()、function test()
(2)js语法(代码):
例如:if语句、for循环、switch语句
2.react的jsx语法里的{},可以自动遍历数组,不能遍历obj
3.react定义一个数组,如需遍历生成<li></li>,使用data.map()
const data = ['Angular','React','Vue']
const VDOM = (<h1>前端js框架列表</h1><ul>{data.map((item,index) =>{return <li key={index}>{item}</li>})}</ul>
)
2.5 模块与组件、模块化与组件化的理解
1.模块
(1)理解:向外提供特定功能的js程序,一般就是一个js文件
(2)为什么要拆成模块:随着业务逻辑的增加,代码越来越多且复杂
(3)作用:复用js,简化js的编写,提高js的效率
2.组件
(1)理解:用来实现局部功能效果的代码和资源的集合
(2)为什么:一个界面的功能更复杂
(3)作用:复用编码,简化项目编码,提高运行效率
3.模块化
当应用的js都已模块来编写,这个应用就是一个模块化的应用
4.组件化
当应用是以多组件的方式实现,这个应用就是一个组件化的应用
二、react面向组件编程
1 基本理解和使用
(1)使用react开发者工具调试
(2)组件的定义
A.函数式组件:
ReactDOM.render(<Demo/>......)之后发生了什么:
① React解析组件标签,找到了Demo组件
② 发现组件是使用函数定义的,调用该函数,将返回的虚拟DOM转为真实DOM
function Demo(){console.log(this) //此处的this是underfined,因为babel编译后开启了严格模式return <h2>我是用函数定义的组件(适用于【简单组件】的定义)</h2>
}
ReactDOM.render(<Demo/>,document.getElementById('test'))
B.类式组件
ReactDOM.render(<Demo/>......)之后发生了什么:
① React解析组件标签,找到了Demo组件
② 发现组件是使用类定义的,随后new出来该类的实例,并通过该实例调用到原型 上的render方法。将render返回的虚拟DOM转为真实DOM,呈现在页面上。
class Demo extends React.Commonent {render(){// render 是放在哪里的?    -- Demo的原型对象上,供实例使用// render中的this是谁?     -- Demo的实例对象 return <h2>我是用类定义的组件(适用于【复杂组件】的定义)</h2>}
}
ReactDOM.render(<Demo/>,document.getElementById('test'))
2 组件实例的三大核心属性:state
2.1 理解
(1)state是组件对象最重要的属性,值是对象(可以包含多个key-value的组合)
(2)组件被成为“状态机”,通过更改state来更新对应的页面的显示(重新渲染组件)
2.2 注意
(1)组件中的render方法中的this为组件实例对象
(2)组件自定义的方法中this为underfined,如何解决?
a.强制绑定this,通过函数对象的bind()
b.箭头函数
(3)状态数据,不能直接修改或更新
class Weather extends React.Component {constructor(props){super(props)// 初始化状态this.state = {isHot:true}// 解决changeWeather中this指向问题  this.changeWeather = this.changeWeather.bind(this)}render(){console.log(this)return <h1 onClick={this.changeWeather} className='title'>今天天气很{this.state.isHot ? '炎热' : '寒冷'}</h1>}changeWeather(){// changeWeather放在哪里? -- Weather的原型对象上,供实例使用// 由于changeWeather是作为onClick的回调,所以changeWeather不是通过实例调用,是直接调用// 类中的方法默认开启了局部的严格模式,所以changeWeather中的this为underfined// 获取原来的isHot值const isHot = this.state.isHot// 严重注意:状态(state)不可直接更改,要借助一个setState去更改// setState更改是合并state的值,不是替换this.setState({isHot:!isHot})}
}
ReactDOM.render(<Weather/>,document.getElementById('test'))
class Weather extends React.Component {state = {isHot:true}render(){return <h1 onClick={this.changeWeather} className='title'>今天天气很{this.state.isHot ? '炎热' : '寒冷'}</h1>}// 自定义方法 -- 要用赋值语句的形式 + 箭头函数changeWeather = ()=>{const isHot = this.state.isHotthis.setState({isHot:!isHot})}
}
ReactDOM.render(<Weather/>,document.getElementById('test'))3 组件实例的三大核心属性:props
3.1 实例中使用props(类式组件)
class Person extends React.Component{render(){const {name,age,sex} = this.propsreturn(<ul><li>姓名:{name}</li><li>性别:{sex}</li><li>年龄:{age}</li></ul>)}
}
//对标签属性类型进行类型、必要性的限制
Person.propTypes = {name:PropTypes.string.isRequired, //限制name属性为字符串,并且必传sex:PropTypes.string, //限制name属性为字符串age:PropTypes.number, //限制name属性为数值speak:PropTypes.func //限制name属性为函数
}
//指定默认的标签属性值
Person.defaultProps = {sex:'男',age:18
}
ReactDOM.render(<Person name='jerry' speak={speak} />,document.getElementById('test1'))
ReactDOM.render(<Person name='tom' age={18} sex='女' />,document.getElementById('test2'))const p = {name:'老刘',age:18,sex:'女'}
ReactDOM.render(<Person {...p} />,document.getElementById('test3'))function speak(){console.log('我说话了')
}
class Person extends React.Component{static propTypes = {name:PropTypes.string.isRequired, sex:PropTypes.string, age:PropTypes.number,speak:PropTypes.func}static defaultProps = {sex:'男',age:18}state = {}render(){const {name,age,sex} = this.propsreturn(<ul><li>姓名:{name}</li><li>性别:{sex}</li><li>年龄:{age}</li></ul>)}
}ReactDOM.render(<Person name='jerry' speak={speak} />,document.getElementById('test1'))
ReactDOM.render(<Person name='tom' age={18} sex='女' />,document.getElementById('test2'))const p = {name:'老刘',age:18,sex:'女'}
ReactDOM.render(<Person {...p} />,document.getElementById('test3'))function speak(){console.log('我说话了')
}注意:类中写构造器的情况,只有在构造器需要用到this.props访问props才写。
类中构造器可以不写的情况下尽量不写。
构造器是否接收props,是否传递给super,取决于:是佛希望在构造器中通过this访问props
class Person extends React.Component{constructor(props){super(props)console.log('constructor',this.props)}
}
3.2 函数式组件中使用props
function Person(props){
const {name,age,sex} = propsreturn(<ul><li>姓名:{name}</li><li>性别:{sex}</li><li>年龄:{age}</li></ul>)
}
Person.propTypes = {name:PropTypes.string.isRequired, sex:PropTypes.string, age:PropTypes.number,speak:PropTypes.func
}
Person.defaultProps = {sex:'男',age:18
}
ReactDOM.render(<Person name='jerry' age={19} sex='男' />,document.getElementById('test'))
3.3 理解和作用
(1)每个组件对象都会有props(properties的简写)属性
(2)组件标签的所有属性都保存在props中
(3)通过标签属性从组件外向组件内传递变化的数据
(4)注意:组件内部不要修改props数据
4 组件实例的三大核心属性:refs
4.1 字符串形式的refs(被弃用)
<input ref="input1" type="text" placeholder="点击按钮提示数据" />4.2 函数回调形式的refs
(1)内联形式的函数回调(大多数情况下使用这种方式)
<input ref={c => this.input1 = c;console.log('@',c)} type="text" placeholder="点击按钮提示数据" />注意:在更新过程中函数会被执行两次,第一次传入参数null,第二次传入DOM元素,即
第一次输出@,=null;第二次输出@,DOM元素
原因:在每一次渲染时会创建一个新的函数实例,所以React清空旧的ref并设置新的。
(2)class的绑定函数(解决更新过程中被执行两次)
<input ref={this.saveRef} type="text" placeholder="点击按钮提示数据" />saveRef = (c)=>{this.input1 = c;console.log('@',c)
}
3.3 React.createRef(官网推荐使用)
class Demo extends React.Component{myRef = React.createRef()myRef2 = React.createRef()render(){return(<div><input ref={this.myRef} type="text" placeholder="点击按钮提示数据" /><button onClick={this.showData}>点我提示左侧的数据</button><input onBlur={this.showData2} ref={this.myRef2} type="text" placeholder="失去焦点提示数据" /></div>)}showData = ()=>{alert(this.myRef.current.value)}showData2 = ()=>{alert(this.myRef2.current.value)}
}
ReactDOM.render(<Demo/>,document.getElementById('test'))
注意:React.createRef调用后可以返回一个容器,该容器可以存储被ref所标识的节点,
该容器是“专人专用”,一个ref标识只能创建有一个容器。
5 事件处理
(1)通过onXxx属性指定事件处理函数(注意大小写)
1.React使用的是自定义(合成事件),而不是使用的原生DOM事件 -- 为了更好的兼容性
2.React中的事件是通过事件委托方式处理的(委托给组件最外层的元素) -- 为了高效
(2)通过event.target得到发生事件的Dom元素对象 -- 不要过度使用ref
class Demo extends React.Component{
myRef = React.createRef()
render(){return(<div><input ref={this.myRef} type="text" placeholder="点击按钮提示数据" /><button onClick={this.showData}>点我提示左侧的数据</button><input onBlur={this.showData2} type="text" placeholder="失去焦点提示数据" /></div>)
}
showData = ()=>{alert(this.myRef.current.value)
}
showData2 = (event)=>{alert(event.target.value)
}
}
ReactDOM.render(<Demo/>,document.getElementById('test'))
6 收集表单数据 - 阶函数与函数柯里化
(1)高阶函数:如果一个函数符合下面2个规范中的任何一个,那该函数就是高阶函数
1.若A函数,接收的参数是一个函数,那么A就可以称之为高阶函数
2.若A函数,调用的返回值依然是一个函数,那么A就可以称之为高阶函数
(2)函数的柯里化:通过函数调用继续返回函数的方式,实现多次接收参数最后统一处理的函数 编码形式
(3)函数柯里化写法:
 class Demo extends React.Component{state = {username:'',password:''}handleSubmit = (event)=>{event.preventDefault()alert(`用户名是:${this.state.username},密码是:${this.state.password}`)}saveFormData = (dataType)=>{return (event) => {this.setState({[dataType]:event.target.value})}}render(){return(<form onSubmit={this.handleSubmit}>用户名:<input onChange={this.saveFormData('username')} type="text" name="username" />密码<input onChange={this.saveFormData('password')} type="password" name="password" /><button>提交</button></form>)}
}
ReactDOM.render(<Demo/>,document.getElementById('test'))
(4)不用函数柯里化写法:
class Demo extends React.Component{state = {username:'',password:''}handleSubmit = (event)=>{event.preventDefault()alert(`用户名是:${this.state.username},密码是:${this.state.password}`)}saveFormData = (dataType,event)=>{this.setState({[dataType]:event.target.value})}render(){return(<form onSubmit={this.handleSubmit}>用户名:<input onChange={ event => this.saveFormData('username',event) } type="text" name="username" />密码<input onChange={ event => this.saveFormData('password',event) } type="password" name="password" /><button>提交</button></form>)}
}
ReactDOM.render(<Demo/>,document.getElementById('test'))
7 生命周期
1.组件从创建到死亡会经历一些特定的阶段
2.React组件中包含一系列钩子函数,会在特定的时期调用
3.我们在定义组件时,会在特定的声明周期回调函数中做特定的事情

三、react脚手架
1 初始化脚手架
npm i create-react-app -g
create-react-app 项目名
2 todoList案例

(1)app.js
import React, { Component } from 'react'
import Header from './components/Header'
import List from './components/List'
import Footer from './components/Footer'
import './App.css'export default class App extends Component {//状态在哪里,操作状态的方法就在哪里//初始化状态state = {todos:[{id:'001',name:'吃饭',done:true},{id:'002',name:'睡觉',done:true},{id:'003',name:'打代码',done:false},{id:'004',name:'逛街',done:false}]}//addTodo用于添加一个todo,接收的参数是todo对象addTodo = (todoObj)=>{//获取原todosconst {todos} = this.state//追加一个todoconst newTodos = [todoObj,...todos]//更新状态this.setState({todos:newTodos})}//updateTodo用于更新一个todo对象updateTodo = (id,done)=>{//获取状态中的todosconst {todos} = this.state//匹配处理数据const newTodos = todos.map((todoObj)=>{if(todoObj.id === id) return {...todoObj,done}else return todoObj})this.setState({todos:newTodos})}//deleteTodo用于删除一个todo对象deleteTodo = (id)=>{//获取原来的todosconst {todos} = this.state//删除指定id的todo对象const newTodos = todos.filter((todoObj)=>{return todoObj.id !== id})//更新状态this.setState({todos:newTodos})}//checkAllTodo用于全选checkAllTodo = (done)=>{//获取原来的todosconst {todos} = this.state//加工数据const newTodos = todos.map((todoObj)=>{return {...todoObj,done}})//更新状态this.setState({todos:newTodos})}//clearAllDone用于清除所有已完成的clearAllDone = ()=>{//获取原来的todosconst {todos} = this.state//过滤数据const newTodos = todos.filter((todoObj)=>{return !todoObj.done})//更新状态this.setState({todos:newTodos})}render() {const {todos} = this.statereturn (<div className="todo-container"><div className="todo-wrap"><Header addTodo={this.addTodo}/><List todos={todos} updateTodo={this.updateTodo} deleteTodo={this.deleteTodo}/><Footer todos={todos} checkAllTodo={this.checkAllTodo} clearAllDone={this.clearAllDone}/></div></div>)}
}
(2)Header组件
import React, { Component } from 'react'
import PropTypes from 'prop-types'
import {nanoid} from 'nanoid'
import './index.css'export default class Header extends Component {//对接收的props进行:类型、必要性的限制static propTypes = {addTodo:PropTypes.func.isRequired}//键盘事件的回调handleKeyUp = (event)=>{//解构赋值获取keyCode,targetconst {keyCode,target} = event//判断是否是回车按键if(keyCode !== 13) return//添加的todo名字不能为空if(target.value.trim() === ''){alert('输入不能为空')return}//准备好一个todo对象const todoObj = {id:nanoid(),name:target.value,done:false}//将todoObj传递给Appthis.props.addTodo(todoObj)//清空输入target.value = ''}render() {return (<div className="todo-header"><input onKeyUp={this.handleKeyUp} type="text" placeholder="请输入你的任务名称,按回车键确认"/></div>)}
}
(3)List组件
import React, { Component } from 'react'
import PropTypes from 'prop-types'
import Item from '../Item'
import './index.css'export default class List extends Component {//对接收的props进行:类型、必要性的限制static propTypes = {todos:PropTypes.array.isRequired,updateTodo:PropTypes.func.isRequired,deleteTodo:PropTypes.func.isRequired,}render() {const {todos,updateTodo,deleteTodo} = this.propsreturn (<ul className="todo-main">{todos.map( todo =>{return <Item key={todo.id} {...todo} updateTodo={updateTodo} deleteTodo={deleteTodo}/>})}</ul>)}
}
(4)Item组件
import React, { Component } from 'react'
import './index.css'export default class Item extends Component {state = {mouse:false} //标识鼠标移入、移出//鼠标移入、移出的回调handleMouse = (flag)=>{return ()=>{this.setState({mouse:flag})}}//勾选、取消勾选某一个todo的回调handleCheck = (id)=>{return (event)=>{this.props.updateTodo(id,event.target.checked)}}//删除一个todo的回调handleDelete = (id)=>{if(window.confirm('确定删除吗?')){this.props.deleteTodo(id)}}render() {const {id,name,done} = this.propsconst {mouse} = this.statereturn (<li style={{backgroundColor:mouse ? '#ddd' : 'white'}} onMouseEnter={this.handleMouse(true)} onMouseLeave={this.handleMouse(false)}><label><input type="checkbox" checked={done} onChange={this.handleCheck(id)}/><span>{name}</span></label><button onClick={()=> this.handleDelete(id) } className="btn btn-danger" style={{display:mouse?'block':'none'}}>删除</button></li>)}
}
(5)Footer组件
import React, { Component } from 'react'
import './index.css'export default class Footer extends Component {//全选checkbox的回调handleCheckAll = (event)=>{this.props.checkAllTodo(event.target.checked)}//清除已完成任务的回调handleClearAllDone = ()=>{this.props.clearAllDone()}render() {const {todos} = this.props//已完成的个数const doneCount = todos.reduce((pre,todo)=> pre + (todo.done ? 1 : 0),0)//总数const total = todos.lengthreturn (<div className="todo-footer"><label><input type="checkbox" onChange={this.handleCheckAll} checked={doneCount === total && total !== 0 ? true : false}/></label><span><span>已完成{doneCount}</span> / 全部{total}</span><button onClick={this.handleClearAllDone} className="btn btn-danger">清除已完成任务</button></div>)}
}
四、React AJAX
1 理解
(1)前置说明
1. React本身只关注页面,并不包含发送ajax请求的代码
2. 前端应用需要通过ajax请求与后台进行交互
3. react应用中需要集成第三方ajax库(或自己封装)
(2)常用的ajax请求库
1. Jqyery:比较重,如果需要另外引入,不建议使用
2. axios:轻量级,建议使用
a. 封装XmlHttpRequest对象的ajax
b. promise风格
c. 可以在浏览器端和node服务器端
2 react配置proxy代理
(1)方法一:在package.json中追加配置:
"proxy":"http://localhost:5000"说明:
1. 优点:配置简单,前端请求资源时可以不加任何前缀。
2. 缺点:不能配置多个代理。
3. 工作方式:上述方式配置代理,当请求了3000不存在的资源时,那么该请求会转发给5000 (优先匹配前端资源)
(2)方法二
1. 第一步:创建代理配置文件 -- 在src下创建配置文件:src/setupProxy.js
2. 编写setupProxy.js配置具体代理规则:
const proxy = require('http-proxy-middleware')module.exports = function(app) {app.use(proxy('/api1', { //api1是需要转发的请求(所有带有/api1前缀的请求都会转发给5000)target: 'http://localhost:5000', //配置转发目标地址(能返回数据的服务器地址)changeOrigin: true, //控制服务器接收到的请求头中host字段的值/*changeOrigin设置为true时,服务器收到的请求头中的host为:localhost:5000changeOrigin设置为false时,服务器收到的请求头中的host为:localhost:3000changeOrigin默认值为false,但我们一般将changeOrigin值设为true*/pathRewrite: {'^/api1': ''} //去除请求前缀,保证交给后台服务器的是正常请求地址(必须配置)}),proxy('/api2', { target: 'http://localhost:5001',changeOrigin: true,pathRewrite: {'^/api2': ''}}))}说明:
1. 优点:可以配置多个代理,可以灵活的控制请求是否走代理。
2. 缺点:配置繁琐,前端请求资源时必须加前缀。
3 axios发送请求
search = ()=>{//获取用户的输入(连续解构赋值+重命名)const {keyWordElement:{value:keyWord}} = this//发送请求前通知App更新状态this.props.updateAppState({isFirst:false,isLoading:true})//发送网络请求axios.get(`/api1/search/users?q=${keyWord}`).then(response => {//请求成功后通知App更新状态this.props.updateAppState({isLoading:false,users:response.data.items})},error => {//请求失败后通知App更新状态this.props.updateAppState({isLoading:false,err:error.message})})}4 fetch发送请求
search = async ()=>{try {const response= await fetch(`/api1/search/users2?q=${keyWord}`)const data = await response.json()console.log(data);PubSub.publish('atguigu',{isLoading:false,users:data.items})} catch (error) {console.log('请求出错',error);PubSub.publish('atguigu',{isLoading:false,err:error.message})}}五 react路由
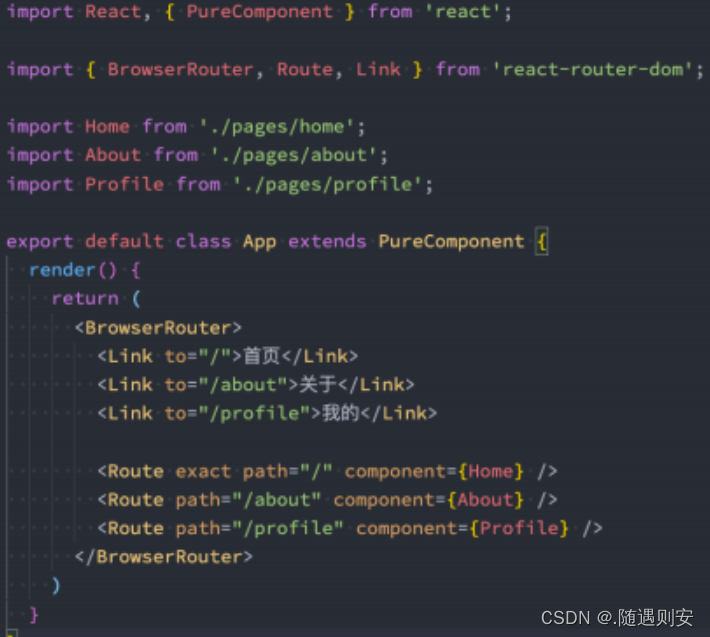
1 路由基本使用
注意:由于react-router-dom在2021年11月升级到6版本,而教程使用的是5版本
npm i react-router-dom@51.明确好界面中的导航区、展示区
2.导航区的a标签改为Link标签
<Link to="/xxxxx">Demo</Link>3.展示区写Route标签进行路径的匹配
<Route path='/xxxx' component={Demo}/>4.<App>的最外侧包裹了一个<BrowserRouter>或<HashRouter>
ReactDOM.render(<BrowserRouter><App/></BrowserRouter>,document.getElementById('root')
)
export default class App extends Component {render() {return (<div><div className="row"><div className="col-xs-offset-2 col-xs-8"><div className="page-header"><h2>React Router Demo</h2></div></div></div><div className="row"><div className="col-xs-2 col-xs-offset-2"><div className="list-group">{/* 原生html中,靠<a>跳转不同的页面 */}{/* <a className="list-group-item" href="./about.html">About</a><a className="list-group-item active" href="./home.html">Home</a> */}{/* 在React中靠路由链接实现切换组件--编写路由链接 */}<Link className="list-group-item" to="/about">About</Link><Link className="list-group-item" to="/home">Home</Link></div></div><div className="col-xs-6"><div className="panel"><div className="panel-body">{/* 注册路由 */}<Route path="/about" component={About}/><Route path="/home" component={Home}/></div></div></div></div></div>)}
}2 路由组件与一般组件
1.写法不同:
一般组件:<Demo/>
路由组件:<Route path="/demo" component={Demo}/>
2.存放位置不同:
一般组件:components
路由组件:pages
3.接收到的props不同:
一般组件:写组件标签时传递了什么,就能收到什么
路由组件:接收到三个固定的属性
history:go: ƒ go(n)goBack: ƒ goBack()goForward: ƒ goForward()push: ƒ push(path, state)replace: ƒ replace(path, state)
location:pathname: "/about"search: ""state: undefined
match:params: {}path: "/about"url: "/about"
3 NavLink与封装NavLink
1. NavLink可以实现路由链接的高亮,通过activeClassName指定样式名
.atguigu{color:red
}<NavLink activeClassName="atguigu" className="list-group-item" to="/about">About</NavLink>
2. 封装NavLink
import React, { Component } from 'react'
import {NavLink} from 'react-router-dom'export default class MyNavLink extends Component {render() {// console.log(this.props);return (<NavLink activeClassName="atguigu" className="list-group-item" {...this.props}/>)}
}
<MyNavLink to="/about">About</MyNavLink>
<MyNavLink to="/home">Home</MyNavLink>3. 标签体内容是一个特殊的标签属性
4. 通过this.props.children可以获取标签体内容
4 Switch的使用 -- 改用Routers
1.通常情况下,path和component是一一对应的关系。
2.Switch可以提高路由匹配效率(单一匹配)。
3.两个以上的路由就使用Switch包裹路由
<Switch><Route path="/about" component={About}/><Route path="/home" component={Home}/><Route path="/home" component={Test}/>
</Switch>
5 解决多级路径刷新页面样式丢失的问题
<MyNavLink to="/api/about">About</MyNavLink>1.public/index.html 中 引入样式时不写 ./ 写 / (常用)
2.public/index.html 中 引入样式时不写 ./ 写 %PUBLIC_URL% (常用)-- 只适用脚手架
3.使用HashRouter
6 路由的严格匹配与模糊匹配
1.默认使用的是模糊匹配(简单记:【输入的路径】必须包含要【匹配的路径】,且顺序要一致)
2.开启严格匹配:
<Route exact={true} path="/about" component={About}/>3.严格匹配不要随便开启,需要再开,有些时候开启会导致无法继续匹配二级路由
7 Redirect的使用
1.一般写在所有路由注册的最下方,当所有路由都无法匹配时,跳转到Redirect指定的路由
2.具体编码:
<Switch><Route path="/about" component={About}/><Route path="/home" component={Home}/><Redirect to="/about"/></Switch>8 嵌套路由
1.注册子路由时要写上父路由的path值
2.路由的匹配是按照注册路由的顺序进行的

export default class Home extends Component {render() {return (<div><h3>我是Home的内容</h3><div><ul className="nav nav-tabs"><li><MyNavLink to="/home/news">News</MyNavLink></li><li><MyNavLink to="/home/message">Message</MyNavLink></li></ul>{/* 注册路由 */}<Switch><Route path="/home/news" component={News}/><Route path="/home/message" component={Message}/><Redirect to="/home/news"/></Switch></div></div>)}
}
9 向路由组件传递参数
(1)params参数
a. 路由链接(携带参数):
<Link to='/demo/test/tom/18'}>详情</Link>b. 注册路由(声明接收):
<Route path="/demo/test/:name/:age" component={Test}/>c. 接收参数:
this.props.match.params
export default class Message extends Component {state = {messageArr:[{id:'01',title:'消息1'},{id:'02',title:'消息2'},{id:'03',title:'消息3'},]}render() {const {messageArr} = this.statereturn (<div><ul>{messageArr.map((msgObj)=>{return (<li key={msgObj.id}>{/* 向路由组件传递params参数 */}<Link to={`/home/message/detail/${msgObj.id}/${msgObj.title}`}>{msgObj.title}</Link></li>)})}</ul><hr/>{/* 声明接收params参数 */}<Route path="/home/message/detail/:id/:title" component={Detail}/></div>)}
}
const DetailData = [{id:'01',content:'你好,中国'},{id:'02',content:'你好,尚硅谷'},{id:'03',content:'你好,未来的自己'}
]
export default class Detail extends Component {render() {console.log(this.props);// 接收params参数const {id,title} = this.props.match.paramsconst findResult = DetailData.find((detailObj)=>{return detailObj.id === id})return (<ul><li>ID:{id}</li><li>TITLE:{title}</li><li>CONTENT:{findResult.content}</li></ul>)}
}
(2)search参数
路由链接(携带参数):
<Link to='/demo/test?name=tom&age=18'}>详情</Link>注册路由(无需声明,正常注册即可):
<Route path="/demo/test" component={Test}/>接收参数:
this.props.location.search备注:获取到的search是urlencoded编码字符串,需要借助querystring解析
export default class Message extends Component {state = {messageArr:[{id:'01',title:'消息1'},{id:'02',title:'消息2'},{id:'03',title:'消息3'},]}render() {const {messageArr} = this.statereturn (<div><ul>{messageArr.map((msgObj)=>{return (<li key={msgObj.id}>{/* 向路由组件传递search参数 */}<Link to={`/home/message/detail/?id=${msgObj.id}&title=${msgObj.title}`}>{msgObj.title}</Link></li>)})}</ul><hr/>{/* search参数无需声明接收,正常注册路由即可 */}<Route path="/home/message/detail" component={Detail}/></div>)}
}
import React, { Component } from 'react'
import qs from 'querystring'const DetailData = [{id:'01',content:'你好,中国'},{id:'02',content:'你好,尚硅谷'},{id:'03',content:'你好,未来的自己'}
]
export default class Detail extends Component {render() {console.log(this.props);// 接收search参数const {search} = this.props.locationconst {id,title} = qs.parse(search.slice(1))const findResult = DetailData.find((detailObj)=>{return detailObj.id === id})return (<ul><li>ID:{id}</li><li>TITLE:{title}</li><li>CONTENT:{findResult.content}</li></ul>)}
}(3)state参数
路由链接(携带参数):
<Link to={{pathname:'/demo/test',state:{name:'tom',age:18}}}>详情</Link>注册路由(无需声明,正常注册即可):
<Route path="/demo/test" component={Test}/>接收参数:
this.props.location.state备注:刷新也可以保留住参数
export default class Message extends Component {state = {messageArr:[{id:'01',title:'消息1'},{id:'02',title:'消息2'},{id:'03',title:'消息3'},]}render() {const {messageArr} = this.statereturn (<div><ul>{messageArr.map((msgObj)=>{return (<li key={msgObj.id}>{/* 向路由组件传递state参数 */}<Link to={{pathname:'/home/message/detail',state:{id:msgObj.id,title:msgObj.title}}}>{msgObj.title}</Link></li>)})}</ul><hr/>{/* state参数无需声明接收,正常注册路由即可 */}<Route path="/home/message/detail" component={Detail}/></div>)}
}
const DetailData = [{id:'01',content:'你好,中国'},{id:'02',content:'你好,尚硅谷'},{id:'03',content:'你好,未来的自己'}
]
export default class Detail extends Component {render() {console.log(this.props);// 接收state参数const {id,title} = this.props.location.state || {}const findResult = DetailData.find((detailObj)=>{return detailObj.id === id}) || {}return (<ul><li>ID:{id}</li><li>TITLE:{title}</li><li>CONTENT:{findResult.content}</li></ul>)}
}10 编程式路由导航
借助this.props.history对象上的API对操作路由跳转、前进、后退
-this.props.history.push()
-this.props.history.replace()
-this.props.history.goBack()
-this.props.history.goForward()
-this.props.history.go()
export default class Message extends Component {state = {messageArr:[{id:'01',title:'消息1'},{id:'02',title:'消息2'},{id:'03',title:'消息3'},]}replaceShow = (id,title)=>{//replace跳转+携带params参数//this.props.history.replace(`/home/message/detail/${id}/${title}`)//replace跳转+携带search参数// this.props.history.replace(`/home/message/detail?id=${id}&title=${title}`)//replace跳转+携带state参数this.props.history.replace(`/home/message/detail`,{id,title})}pushShow = (id,title)=>{//push跳转+携带params参数// this.props.history.push(`/home/message/detail/${id}/${title}`)//push跳转+携带search参数// this.props.history.push(`/home/message/detail?id=${id}&title=${title}`)//push跳转+携带state参数this.props.history.push(`/home/message/detail`,{id,title})}back = ()=>{this.props.history.goBack()}forward = ()=>{this.props.history.goForward()}go = ()=>{this.props.history.go(-2)}render() {const {messageArr} = this.statereturn (<div><ul>{messageArr.map((msgObj)=>{return (<li key={msgObj.id}>{/* 向路由组件传递params参数 */}{/* <Link to={`/home/message/detail/${msgObj.id}/${msgObj.title}`}>{msgObj.title}</Link> */}{/* 向路由组件传递search参数 */}{/* <Link to={`/home/message/detail/?id=${msgObj.id}&title=${msgObj.title}`}>{msgObj.title}</Link> */}{/* 向路由组件传递state参数 */}<Link to={{pathname:'/home/message/detail',state:{id:msgObj.id,title:msgObj.title}}}>{msgObj.title}</Link> <button onClick={()=> this.pushShow(msgObj.id,msgObj.title)}>push查看</button> <button onClick={()=> this.replaceShow(msgObj.id,msgObj.title)}>replace查看</button></li>)})}</ul><hr/>{/* 声明接收params参数 */}{/* <Route path="/home/message/detail/:id/:title" component={Detail}/> */}{/* search参数无需声明接收,正常注册路由即可 */}{/* <Route path="/home/message/detail" component={Detail}/> */}{/* state参数无需声明接收,正常注册路由即可 */}<Route path="/home/message/detail" component={Detail}/><button onClick={this.back}>回退</button> <button onClick={this.forward}>前进</button> <button onClick={this.go}>go</button></div>)}
}const DetailData = [{id:'01',content:'你好,中国'},{id:'02',content:'你好,尚硅谷'},{id:'03',content:'你好,未来的自己'}
]
export default class Detail extends Component {render() {console.log(this.props);// 接收params参数// const {id,title} = this.props.match.params // 接收search参数// const {search} = this.props.location// const {id,title} = qs.parse(search.slice(1))// 接收state参数const {id,title} = this.props.location.state || {}const findResult = DetailData.find((detailObj)=>{return detailObj.id === id}) || {}return (<ul><li>ID:{id}</li><li>TITLE:{title}</li><li>CONTENT:{findResult.content}</li></ul>)}
}11 withRouter的使用
withRouter可以加工一般组件,让一般组件具备路由组件所特有的API
withRouter返回的是一个新组件
import React, { Component } from 'react'
import {withRouter} from 'react-router-dom'class Header extends Component {back = ()=>{this.props.history.goBack()}forward = ()=>{this.props.history.goForward()}go = ()=>{this.props.history.go(-2)}render() {console.log('Header组件收到的props是',this.props);return (<div className="page-header"><h2>React Router Demo</h2><button onClick={this.back}>回退</button> <button onClick={this.forward}>前进</button> <button onClick={this.go}>go</button></div>)}
}export default withRouter(Header)12 BrowserRouter与HashRouter的区别
1.底层原理不一样:
BrowserRouter使用的是H5的history API,不兼容IE9及以下版本。
HashRouter使用的是URL的哈希值。
2.path表现形式不一样
BrowserRouter的路径中没有#,例如:localhost:3000/demo/test
HashRouter的路径包含#,例如:localhost:3000/#/demo/test
3.刷新后对路由state参数的影响
(1).BrowserRouter没有任何影响,因为state保存在history对象中。
(2).HashRouter刷新后会导致路由state参数的丢失!!!
4.备注:HashRouter可以用于解决一些路径错误相关的问题。
六 redux
1 redux简介
(1)redux是什么
1. redux是一个专门用做状态管理的js库
2. 它可以用在react,angular,vue等项目中,但基本和react配合使用
3. 作用:集中式管理react应用中多个组件共享的状态
(2)什么情况下用redux
1. 某个状态的状态,需要让其他组件可以随时拿到(共享)
2. 一个组件需要改变另一个组件的状态(通信)
3. 总体原则:能不用就不用,如果不用比较吃力才使用
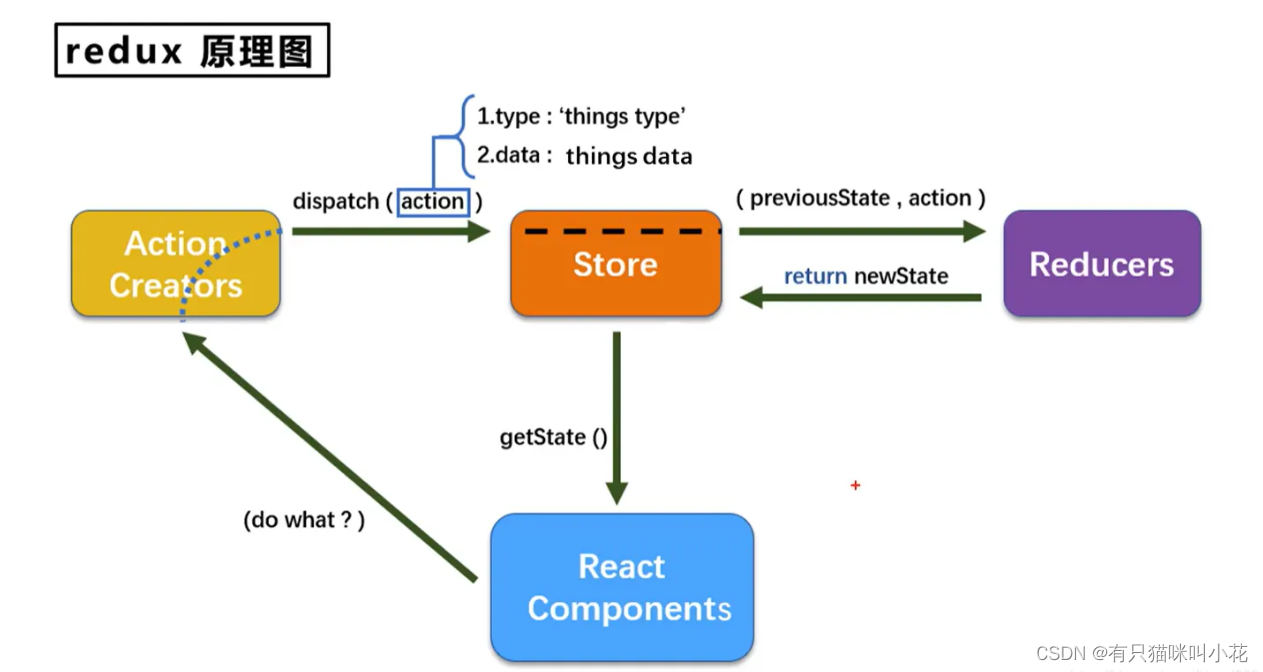
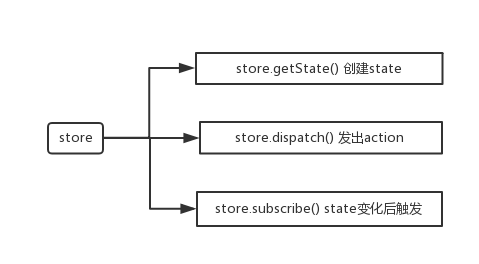
2 redux原理

3 redux的使用
3.1 同步action

1. store.js
1).引入redux中的createStore函数,创建一个store
2).createStore调用时要传入一个为其服务的reducer
3).记得暴露store对象
新版本使用这种方式引入store
import { legacy_createStore as createStore} from 'redux'/* 该文件专门用于暴露一个store对象,整个应用只有一个store对象
*///引入createStore,专门用于创建redux中最为核心的store对象
import {createStore} from 'redux'
//引入为Count组件服务的reducer
import countReducer from './count_reducer'
//暴露store
export default createStore(countReducer)2.count_reducer.js
1).reducer的本质是一个函数,接收:preState,action,返回加工后的状态
2).reducer有两个作用:初始化状态,加工状态
3).reducer被第一次调用时,是store自动触发的,
传递的preState是undefined,
传递的action是:{type:'@@REDUX/INIT_a.2.b.4}
/* 1.该文件是用于创建一个为Count组件服务的reducer,reducer的本质就是一个函数2.reducer函数会接到两个参数,分别为:之前的状态(preState),动作对象(action)
*/
import {INCREMENT,DECREMENT} from './constant'const initState = 0 //初始化状态
export default function countReducer(preState=initState,action){// console.log(preState);//从action对象中获取:type、dataconst {type,data} = action//根据type决定如何加工数据switch (type) {case INCREMENT: //如果是加return preState + datacase DECREMENT: //若果是减return preState - datadefault:return preState}
}
3.count_action.js
专门用于创建action对象
/* 该文件专门为Count组件生成action对象
*/
import {INCREMENT,DECREMENT} from './constant'export const createIncrementAction = data => ({type:INCREMENT,data})
export const createDecrementAction = data => ({type:DECREMENT,data})
4.constant.js
放置容易写错的type值
/* 该模块是用于定义action对象中type类型的常量值,目的只有一个:便于管理的同时防止程序员单词写错
*/
export const INCREMENT = 'increment'
export const DECREMENT = 'decrement'
5.index.js
import React from 'react'
import ReactDOM from 'react-dom'
import App from './App'
import store from './redux/store'ReactDOM.render(<App/>,document.getElementById('root'))store.subscribe(()=>{ReactDOM.render(<App/>,document.getElementById('root'))
})
3.2 异步action

1. store.js
/* 该文件专门用于暴露一个store对象,整个应用只有一个store对象
*///引入createStore,专门用于创建redux中最为核心的store对象
import {createStore,applyMiddleware} from 'redux'
//引入为Count组件服务的reducer
import countReducer from './count_reducer'
//引入redux-thunk,用于支持异步action
import thunk from 'redux-thunk'
//暴露store
export default createStore(countReducer,applyMiddleware(thunk))
2.count_reducer.js
/* 1.该文件是用于创建一个为Count组件服务的reducer,reducer的本质就是一个函数2.reducer函数会接到两个参数,分别为:之前的状态(preState),动作对象(action)
*/
import {INCREMENT,DECREMENT} from './constant'const initState = 0 //初始化状态
export default function countReducer(preState=initState,action){// console.log(preState);//从action对象中获取:type、dataconst {type,data} = action//根据type决定如何加工数据switch (type) {case INCREMENT: //如果是加return preState + datacase DECREMENT: //若果是减return preState - datadefault:return preState}
}
3.count_action.js
/* 该文件专门为Count组件生成action对象
*/
import {INCREMENT,DECREMENT} from './constant'//同步action,就是指action的值为Object类型的一般对象
export const createIncrementAction = data => ({type:INCREMENT,data})
export const createDecrementAction = data => ({type:DECREMENT,data})//异步action,就是指action的值为函数,异步action中一般都会调用同步action,异步action不是必须要用的。
export const createIncrementAsyncAction = (data,time) => {return (dispatch)=>{setTimeout(()=>{dispatch(createIncrementAction(data))},time)}
}
4.constant.js
/* 该模块是用于定义action对象中type类型的常量值,目的只有一个:便于管理的同时防止程序员单词写错
*/
export const INCREMENT = 'increment'
export const DECREMENT = 'decrement'
5.count组件
import React, { Component } from 'react'
//引入store,用于获取redux中保存状态
import store from '../../redux/store'
//引入actionCreator,专门用于创建action对象
import {createIncrementAction,createDecrementAction,createIncrementAsyncAction
} from '../../redux/count_action'export default class Count extends Component {state = {carName:'奔驰c63'}/* componentDidMount(){//检测redux中状态的变化,只要变化,就调用renderstore.subscribe(()=>{this.setState({})})} *///加法increment = ()=>{const {value} = this.selectNumberstore.dispatch(createIncrementAction(value*1))}//减法decrement = ()=>{const {value} = this.selectNumberstore.dispatch(createDecrementAction(value*1))}//奇数再加incrementIfOdd = ()=>{const {value} = this.selectNumberconst count = store.getState()if(count % 2 !== 0){store.dispatch(createIncrementAction(value*1))}}//异步加incrementAsync = ()=>{const {value} = this.selectNumber// setTimeout(()=>{store.dispatch(createIncrementAsyncAction(value*1,500))// },500)}render() {return (<div><h1>当前求和为:{store.getState()}</h1><select ref={c => this.selectNumber = c}><option value="1">1</option><option value="2">2</option><option value="3">3</option></select> <button onClick={this.increment}>+</button> <button onClick={this.decrement}>-</button> <button onClick={this.incrementIfOdd}>当前求和为奇数再加</button> <button onClick={this.incrementAsync}>异步加</button> </div>)七 react-redux


7.1 完整写法
1. index.js
import React from 'react'
import ReactDOM from 'react-dom'
import App from './App'
import store from './redux/store'ReactDOM.render(<App/>,document.getElementById('root'))//监测redux中状态的改变,如redux的状态发生了改变,那么重新渲染App组件
store.subscribe(()=>{ReactDOM.render(<App/>,document.getElementById('root'))
})
2.app.jsx
import React, { Component } from 'react'
import Count from './containers/Count'
import store from './redux/store'export default class App extends Component {render() {return (<div>{/* 给容器组件传递store */}<Count store={store} /></div>)}
3.store.js
/* 该文件专门用于暴露一个store对象,整个应用只有一个store对象
*///引入createStore,专门用于创建redux中最为核心的store对象
import {createStore,applyMiddleware} from 'redux'
//引入为Count组件服务的reducer
import countReducer from './count_reducer'
//引入redux-thunk,用于支持异步action
import thunk from 'redux-thunk'
//暴露store
export default createStore(countReducer,applyMiddleware(thunk))
4. count_reducer.js
/* 1.该文件是用于创建一个为Count组件服务的reducer,reducer的本质就是一个函数2.reducer函数会接到两个参数,分别为:之前的状态(preState),动作对象(action)
*/
import {INCREMENT,DECREMENT} from './constant'const initState = 0 //初始化状态
export default function countReducer(preState=initState,action){// console.log(preState);//从action对象中获取:type、dataconst {type,data} = action//根据type决定如何加工数据switch (type) {case INCREMENT: //如果是加return preState + datacase DECREMENT: //若果是减return preState - datadefault:return preState}
}
5. constant.js
/* 该模块是用于定义action对象中type类型的常量值,目的只有一个:便于管理的同时防止程序员单词写错
*/
export const INCREMENT = 'increment'
export const DECREMENT = 'decrement'
6. count/-action.js
/* 该文件专门为Count组件生成action对象
*/
import {INCREMENT,DECREMENT} from './constant'//同步action,就是指action的值为Object类型的一般对象
export const createIncrementAction = data => ({type:INCREMENT,data})
export const createDecrementAction = data => ({type:DECREMENT,data})//异步action,就是指action的值为函数,异步action中一般都会调用同步action,异步action不是必须要用的。
export const createIncrementAsyncAction = (data,time) => {return (dispatch)=>{setTimeout(()=>{dispatch(createIncrementAction(data))},time)}
}
7. containers\Count
//引入Count的UI组件
import CountUI from '../../components/Count'
//引入action
import {createIncrementAction,createDecrementAction,createIncrementAsyncAction
} from '../../redux/count_action'//引入connect用于连接UI组件与redux
import {connect} from 'react-redux'/* 1.mapStateToProps函数返回的是一个对象;2.返回的对象中的key就作为传递给UI组件props的key,value就作为传递给UI组件props的value3.mapStateToProps用于传递状态
*/
function mapStateToProps(state){return {count:state}
}/* 1.mapDispatchToProps函数返回的是一个对象;2.返回的对象中的key就作为传递给UI组件props的key,value就作为传递给UI组件props的value3.mapDispatchToProps用于传递操作状态的方法
*/
function mapDispatchToProps(dispatch){return {jia:number => dispatch(createIncrementAction(number)),jian:number => dispatch(createDecrementAction(number)),jiaAsync:(number,time) => dispatch(createIncrementAsyncAction(number,time)),}
}//使用connect()()创建并暴露一个Count的容器组件
export default connect(mapStateToProps,mapDispatchToProps)(CountUI)
8. components\Count
import React, { Component } from 'react'export default class Count extends Component {state = {carName:'奔驰c63'}//加法increment = ()=>{const {value} = this.selectNumberthis.props.jia(value*1)}//减法decrement = ()=>{const {value} = this.selectNumberthis.props.jian(value*1)}//奇数再加incrementIfOdd = ()=>{const {value} = this.selectNumberif(this.props.count % 2 !== 0){this.props.jia(value*1)}}//异步加incrementAsync = ()=>{const {value} = this.selectNumberthis.props.jiaAsync(value*1,500)}render() {//console.log('UI组件接收到的props是',this.props);return (<div><h1>当前求和为:{this.props.count}</h1><select ref={c => this.selectNumber = c}><option value="1">1</option><option value="2">2</option><option value="3">3</option></select> <button onClick={this.increment}>+</button> <button onClick={this.decrement}>-</button> <button onClick={this.incrementIfOdd}>当前求和为奇数再加</button> <button onClick={this.incrementAsync}>异步加</button> </div>)}
}
7,2 containers\Count的简化
import React, { Component } from 'react'
//引入action
import {createIncrementAction,createDecrementAction,createIncrementAsyncAction
} from '../../redux/count_action'
//引入connect用于连接UI组件与redux
import {connect} from 'react-redux'//定义UI组件
class Count extends Component {state = {carName:'奔驰c63'}//加法increment = ()=>{const {value} = this.selectNumberthis.props.jia(value*1)}//减法decrement = ()=>{const {value} = this.selectNumberthis.props.jian(value*1)}//奇数再加incrementIfOdd = ()=>{const {value} = this.selectNumberif(this.props.count % 2 !== 0){this.props.jia(value*1)}}//异步加incrementAsync = ()=>{const {value} = this.selectNumberthis.props.jiaAsync(value*1,500)}render() {//console.log('UI组件接收到的props是',this.props);return (<div><h1>当前求和为:{this.props.count}</h1><select ref={c => this.selectNumber = c}><option value="1">1</option><option value="2">2</option><option value="3">3</option></select> <button onClick={this.increment}>+</button> <button onClick={this.decrement}>-</button> <button onClick={this.incrementIfOdd}>当前求和为奇数再加</button> <button onClick={this.incrementAsync}>异步加</button> </div>)}
}//使用connect()()创建并暴露一个Count的容器组件
export default connect(state => ({count:state}),//mapDispatchToProps的一般写法/* dispatch => ({jia:number => dispatch(createIncrementAction(number)),jian:number => dispatch(createDecrementAction(number)),jiaAsync:(number,time) => dispatch(createIncrementAsyncAction(number,time)),}) *///mapDispatchToProps的简写{jia:createIncrementAction,jian:createDecrementAction,jiaAsync:createIncrementAsyncAction,}
)(Count)7.3 react-redux优化
(1).容器组件和UI组件整合一个文件
(2).无需自己给容器组件传递store,给<App/>包裹一个<Provider store={store}>即可。
(3).使用了react-redux后也不用再自己检测redux中状态的改变了,容器组件可以自动完成这个工作。
(4).mapDispatchToProps也可以简单的写成一个对象
(5).一个组件要和redux“打交道”要经过哪几步?
(1).定义好UI组件---不暴露
(2).引入connect生成一个容器组件,并暴露,写法如下:
connect(
state => ({key:value}), //映射状态
{key:xxxxxAction} //映射操作状态的方法
)(UI组件)
(4).在UI组件中通过this.props.xxxxxxx读取和操作状态
1. index.js -- 使用Provider传递 store、不用使用store.subscribe
import React from 'react'
import ReactDOM from 'react-dom'
import App from './App'
import store from './redux/store'
import {Provider} from 'react-redux'ReactDOM.render(<Provider store={store}><App/></Provider>,document.getElementById('root')
)
2. app.js -- 不用传递store
import React, { Component } from 'react'
import Count from './containers/Count'export default class App extends Component {render() {return (<div><Count/></div>)}
}
3. containers\ Conut
import React, { Component } from 'react'
//引入action
import {createIncrementAction,createDecrementAction,createIncrementAsyncAction
} from '../../redux/count_action'
//引入connect用于连接UI组件与redux
import {connect} from 'react-redux'//定义UI组件
class Count extends Component {state = {carName:'奔驰c63'}//加法increment = ()=>{const {value} = this.selectNumberthis.props.jia(value*1)}//减法decrement = ()=>{const {value} = this.selectNumberthis.props.jian(value*1)}//奇数再加incrementIfOdd = ()=>{const {value} = this.selectNumberif(this.props.count % 2 !== 0){this.props.jia(value*1)}}//异步加incrementAsync = ()=>{const {value} = this.selectNumberthis.props.jiaAsync(value*1,500)}render() {//console.log('UI组件接收到的props是',this.props);return (<div><h1>当前求和为:{this.props.count}</h1><select ref={c => this.selectNumber = c}><option value="1">1</option><option value="2">2</option><option value="3">3</option></select> <button onClick={this.increment}>+</button> <button onClick={this.decrement}>-</button> <button onClick={this.incrementIfOdd}>当前求和为奇数再加</button> <button onClick={this.incrementAsync}>异步加</button> </div>)}
}//使用connect()()创建并暴露一个Count的容器组件
export default connect(state => ({count:state}),//mapDispatchToProps的一般写法/* dispatch => ({jia:number => dispatch(createIncrementAction(number)),jian:number => dispatch(createDecrementAction(number)),jiaAsync:(number,time) => dispatch(createIncrementAsyncAction(number,time)),}) *///mapDispatchToProps的简写{jia:createIncrementAction,jian:createDecrementAction,jiaAsync:createIncrementAsyncAction,}
)(Count)7.4 数据共享版

1.index.js
import React from 'react'
import ReactDOM from 'react-dom'
import App from './App'
import store from './redux/store'
import {Provider} from 'react-redux'ReactDOM.render(<Provider store={store}><App/></Provider>,document.getElementById('root')
)
2. app.js
import React, { Component } from 'react'
import Count from './containers/Count'
import Person from './containers/Person'export default class App extends Component {render() {return (<div><Count/><hr/><Person/></div>)}
}
2.redux/actions
(1)count.js
/* 该文件专门为Count组件生成action对象
*/
import {INCREMENT,DECREMENT} from '../constant'//同步action,就是指action的值为Object类型的一般对象
export const createIncrementAction = data => ({type:INCREMENT,data})
export const createDecrementAction = data => ({type:DECREMENT,data})//异步action,就是指action的值为函数,异步action中一般都会调用同步action,异步action不是必须要用的。
export const createIncrementAsyncAction = (data,time) => {return (dispatch)=>{setTimeout(()=>{dispatch(createIncrementAction(data))},time)}
}
(2)person.js
import {ADD_PERSON} from '../constant'//创建增加一个人的action动作对象
export const createAddPersonAction = personObj => ({type:ADD_PERSON,data:personObj})
3. redux/reducers
(1)count.js
/* 1.该文件是用于创建一个为Count组件服务的reducer,reducer的本质就是一个函数2.reducer函数会接到两个参数,分别为:之前的状态(preState),动作对象(action)
*/
import {INCREMENT,DECREMENT} from '../constant'const initState = 0 //初始化状态
export default function countReducer(preState=initState,action){// console.log('countReducer@#@#@#');//从action对象中获取:type、dataconst {type,data} = action//根据type决定如何加工数据switch (type) {case INCREMENT: //如果是加return preState + datacase DECREMENT: //若果是减return preState - datadefault:return preState}
}
(2)person.js
import {ADD_PERSON} from '../constant'//初始化人的列表
const initState = [{id:'001',name:'tom',age:18}]export default function personReducer(preState=initState,action){// console.log('personReducer@#@#@#');const {type,data} = actionswitch (type) {case ADD_PERSON: //若是添加一个人return [data,...preState]default:return preState}
}
4. redux/constant.js
/* 该模块是用于定义action对象中type类型的常量值,目的只有一个:便于管理的同时防止程序员单词写错
*/
export const INCREMENT = 'increment'
export const DECREMENT = 'decrement'
export const ADD_PERSON = 'add_person'
5. redux/store.js
/* 该文件专门用于暴露一个store对象,整个应用只有一个store对象
*///引入createStore,专门用于创建redux中最为核心的store对象
import {createStore,applyMiddleware,combineReducers} from 'redux'
//引入为Count组件服务的reducer
import countReducer from './reducers/count'
//引入为Count组件服务的reducer
import personReducer from './reducers/person'
//引入redux-thunk,用于支持异步action
import thunk from 'redux-thunk'//汇总所有的reducer变为一个总的reducer
const allReducer = combineReducers({he:countReducer,rens:personReducer
})//暴露store
export default createStore(allReducer,applyMiddleware(thunk))
6.containers/Count/index.jsx
import React, { Component } from 'react'
//引入action
import {createIncrementAction,createDecrementAction,createIncrementAsyncAction
} from '../../redux/actions/count'
//引入connect用于连接UI组件与redux
import {connect} from 'react-redux'//定义UI组件
class Count extends Component {state = {carName:'奔驰c63'}//加法increment = ()=>{const {value} = this.selectNumberthis.props.jia(value*1)}//减法decrement = ()=>{const {value} = this.selectNumberthis.props.jian(value*1)}//奇数再加incrementIfOdd = ()=>{const {value} = this.selectNumberif(this.props.count % 2 !== 0){this.props.jia(value*1)}}//异步加incrementAsync = ()=>{const {value} = this.selectNumberthis.props.jiaAsync(value*1,500)}render() {//console.log('UI组件接收到的props是',this.props);return (<div><h2>我是Count组件,下方组件总人数为:{this.props.renshu}</h2><h4>当前求和为:{this.props.count}</h4><select ref={c => this.selectNumber = c}><option value="1">1</option><option value="2">2</option><option value="3">3</option></select> <button onClick={this.increment}>+</button> <button onClick={this.decrement}>-</button> <button onClick={this.incrementIfOdd}>当前求和为奇数再加</button> <button onClick={this.incrementAsync}>异步加</button> </div>)}
}//使用connect()()创建并暴露一个Count的容器组件
export default connect(state => ({count:state.he,renshu:state.rens.length}),{jia:createIncrementAction,jian:createDecrementAction,jiaAsync:createIncrementAsyncAction,}
)(Count)7. containers/Person/index.jsx
import React, { Component } from 'react'
import {nanoid} from 'nanoid'
import {connect} from 'react-redux'
import {createAddPersonAction} from '../../redux/actions/person'class Person extends Component {addPerson = ()=>{const name = this.nameNode.valueconst age = this.ageNode.valueconst personObj = {id:nanoid(),name,age}this.props.jiaYiRen(personObj)this.nameNode.value = ''this.ageNode.value = ''}render() {return (<div><h2>我是Person组件,上方组件求和为{this.props.he}</h2><input ref={c=>this.nameNode = c} type="text" placeholder="输入名字"/><input ref={c=>this.ageNode = c} type="text" placeholder="输入年龄"/><button onClick={this.addPerson}>添加</button><ul>{this.props.yiduiren.map((p)=>{return <li key={p.id}>{p.name}--{p.age}</li>})}</ul></div>)}
}export default connect(state => ({yiduiren:state.rens,he:state.he}),//映射状态{jiaYiRen:createAddPersonAction}//映射操作状态的方法
)(Person)
7.5 纯函数 -- redux的reducer函数必须是一个纯函数
1.一类特别的函数:只要是同样的输入(实参),必定得到同样的输出(返回)
2. 必须遵守以下一些束缚:
(1)不得改写参数数据
(2)不会产生任何副作用,例如网络请求,输入和输出设备
(3)不能调用Date.now()或者Math.random()等不纯的函数
所以使用return [data,...preState]
而不是perState.unshift(data)等修改原数组的方法
import {ADD_PERSON} from '../constant'//初始化人的列表
const initState = [{id:'001',name:'tom',age:18}]export default function personReducer(preState=initState,action){// console.log('personReducer@#@#@#');const {type,data} = actionswitch (type) {case ADD_PERSON: //若是添加一个人return [data,...preState]default:return preState}
}7.6 redux开发者工具
(1).安装插件
yarn add redux-devtools-extension(2).store中进行配置
import {composeWithDevTools} from 'redux-devtools-extension'const store = createStore(allReducer,composeWithDevTools(applyMiddleware(thunk)))(3)谷歌浏览器安装插件 -- Redux DevTools
八 项目打包运行
1. 打包
npm run build
2. 准备服务器并测试运行
npm i serve -g
serve build(文件夹根目录)
九 react扩展
1 setState
(1). setState(stateChange, [callback])------对象式的setState
1.stateChange为状态改变对象(该对象可以体现出状态的更改)
2.callback是可选的回调函数, 它在状态更新完毕、界面也更新后(render调用后)才被调用
this.setState({count:count+1},()=>{console.log(this.state.count);
})
(2). setState(updater, [callback])------函数式的setState
1.updater为返回stateChange对象的函数。
2.updater可以接收到state和props。
4.callback是可选的回调函数, 它在状态更新、界面也更新后(render调用后)才被调用。
this.setState((state,props) => {return {count:state.count+1}
})
总结:
1.对象式的setState是函数式的setState的简写方式(语法糖)
2.使用原则:
(1).如果新状态不依赖于原状态 ===> 使用对象方式
(2).如果新状态依赖于原状态 ===> 使用函数方式
(3).如果需要在setState()执行后获取最新的状态数据,
要在第二个callback函数中读取
2 lazyLoad
(1)通过React的lazy函数配合import()函数动态加载路由组件 ===> 路由组件代码会被分开打包
const Login = lazy(()=>import('@/pages/Login'))(2)通过<Suspense>指定在加载得到路由打包文件前显示一个自定义loading界面
<Suspense fallback={<h1>loading.....</h1>}><Switch><Route path="/xxx" component={Xxxx}/><Redirect to="/login"/></Switch></Suspense>3 Hooks -- 三个常用的Hook
3.1 State Hook
(1). State Hook让函数组件也可以有state状态, 并进行状态数据的读写操作
(2). 语法: const [xxx, setXxx] = React.useState(initValue)
(3). useState()说明:
参数: 第一次初始化指定的值在内部作缓存
返回值: 包含2个元素的数组, 第1个为内部当前状态值, 第2个为更新状态值的函数
(4). setXxx()2种写法:
setXxx(newValue): 参数为非函数值, 直接指定新的状态值, 内部用其覆盖原来的状态值
setXxx(value => newValue): 参数为函数, 接收原本的状态值, 返回新的状态值, 内部用其覆盖原来的状态值
function Demo(){const [count,setCount] = React.useState(0)const [name,setName] = React.useState('tom')function add(){// setCount(count+1) 第一种写法setCount(count => count+1)}function changeName(){setName('zhangsan')}return(<div><h2>当前求和为:{count}</h2><h2>我的名字是:{name}</h2><button onClick={add}>点我+1</button><button onClick={changeName}>点我改名</button></div>)
}
3.2 Effect Hook
(1). Effect Hook 可以让你在函数组件中执行副作用操作(用于模拟类组件中的生命周期钩子)
(2). React中的副作用操作:
发ajax请求数据获取
设置订阅 / 启动定时器
手动更改真实DOM
(3). 语法和说明:
useEffect(() => {
// 在此可以执行任何带副作用操作
return () => { // 在组件卸载前执行
// 在此做一些收尾工作, 比如清除定时器/取消订阅等
}
}, [stateValue]) // 如果指定的是[], 回调函数只会在第一次render()后执行
(4). 可以把 useEffect Hook 看做如下三个函数的组合
componentDidMount()
componentDidUpdate()
componentWillUnmount()
function Demo(){const [count,setCount] = React.useState(0)React.useEffect(()=>{let timer = setInterval(()=>{setCount(count => count+1 )},1000)return ()=>{clearInterval(timer)}},[])function add(){setCount(count => count+1)}//卸载组件的回调function unmount(){ReactDOM.unmountComponentAtNode(document.getElementById('root'))}return(<div><h2>当前求和为:{count}</h2><button onClick={add}>点我+1</button><button onClick={unmount}>卸载组件</button></div>)
}
3.3 Ref Hook
(1). Ref Hook可以在函数组件中存储/查找组件内的标签或任意其它数据
(2). 语法: const refContainer = useRef()
(3). 作用:保存标签对象,功能与React.createRef()一样
import React from 'react'
import ReactDOM from 'react-dom'//类式组件
/* class Demo extends React.Component {state = {count:0}myRef = React.createRef()add = ()=>{this.setState(state => ({count:state.count+1}))}unmount = ()=>{ReactDOM.unmountComponentAtNode(document.getElementById('root'))}show = ()=>{alert(this.myRef.current.value)}componentDidMount(){this.timer = setInterval(()=>{this.setState( state => ({count:state.count+1}))},1000)}componentWillUnmount(){clearInterval(this.timer)}render() {return (<div><input type="text" ref={this.myRef}/><h2>当前求和为{this.state.count}</h2><button onClick={this.add}>点我+1</button><button onClick={this.unmount}>卸载组件</button><button onClick={this.show}>点击提示数据</button></div>)}
} */function Demo(){//console.log('Demo');const [count,setCount] = React.useState(0)const myRef = React.useRef()React.useEffect(()=>{let timer = setInterval(()=>{setCount(count => count+1 )},1000)return ()=>{clearInterval(timer)}},[])//加的回调function add(){//setCount(count+1) //第一种写法setCount(count => count+1 )}//提示输入的回调function show(){alert(myRef.current.value)}//卸载组件的回调function unmount(){ReactDOM.unmountComponentAtNode(document.getElementById('root'))}return (<div><input type="text" ref={myRef}/><h2>当前求和为:{count}</h2><button onClick={add}>点我+1</button><button onClick={unmount}>卸载组件</button><button onClick={show}>点我提示数据</button></div>)
}export default Demo
4 Fragment
<Fragment><Fragment>
<></>
import React, { Component,Fragment } from 'react'export default class Demo extends Component {render() {return (<Fragment key={1}><input type="text"/><input type="text"/></Fragment>)}
}
import React, { Component,Fragment } from 'react'export default class Demo extends Component {render() {return (<><input type="text"/><input type="text"/></>)}
}5 Context
一种组件间通信方式, 常用于【祖组件】与【后代组件】间通信
使用:
1. 创建Context容器对象:
const XxxContext = React.createContext() 2. 渲染子组时,外面包裹xxxContext.Provider, 通过value属性给后代组件传递数据:
<xxxContext.Provider value={数据}>子组件</xxxContext.Provider>3. 后代组件读取数据:
(1)第一种方式:仅适用于类组件
static contextType = xxxContext // 声明接收contextthis.context // 读取context中的value数据(2)第二种方式: 函数组件与类组件都可以 -- 官网使用useContext,以官网为主
<xxxContext.Consumer>{value => ( // value就是context中的value数据要显示的内容)}</xxxContext.Consumer>注意:
在应用开发中一般不用context, 一般都它的封装react插件
import React, { Component } from 'react'
import './index.css'//创建Context对象
const MyContext = React.createContext()
const {Provider,Consumer} = MyContext
export default class A extends Component {state = {username:'tom',age:18}render() {const {username,age} = this.statereturn (<div className="parent"><h3>我是A组件</h3><h4>我的用户名是:{username}</h4><Provider value={{username,age}}><B/></Provider></div>)}
}class B extends Component {render() {return (<div className="child"><h3>我是B组件</h3><C/></div>)}
}/* class C extends Component {//声明接收contextstatic contextType = MyContextrender() {const {username,age} = this.contextreturn (<div className="grand"><h3>我是C组件</h3><h4>我从A组件接收到的用户名:{username},年龄是{age}</h4></div>)}
} */function C(){return (<div className="grand"><h3>我是C组件</h3><h4>我从A组件接收到的用户名:<Consumer>{value => `${value.username},年龄是${value.age}`}</Consumer></h4></div>)
}
6 Component的2个问题
1. 只要执行setState(),即使不改变状态数据, 组件也会重新render()
2. 只当前组件重新render(), 就会自动重新render子组件 ==> 效率低
效率高的做法:只有当组件的state或props数据发生改变时才重新render()
原因:Component中的shouldComponentUpdate()总是返回true
解决:
(1)办法1:
重写shouldComponentUpdate()方法
比较新旧state或props数据, 如果有变化才返回true, 如果没有返回false
(2)办法2:
使用PureComponent
PureComponent重写了shouldComponentUpdate(), 只有state或props数据有变化才返回true
注意:
A. 只是进行state和props数据的浅比较, 如果只是数据对象内部数据变了, 返回false
B. 不要直接修改state数据, 而是要产生新数据
C. 项目中一般使用PureComponent来优化
import React, { PureComponent } from 'react'
import './index.css'export default class Parent extends PureComponent {state = {carName:"奔驰c36",stus:['小张','小李','小王']}addStu = ()=>{/* const {stus} = this.statestus.unshift('小刘')this.setState({stus}) */const {stus} = this.statethis.setState({stus:['小刘',...stus]})}changeCar = ()=>{//this.setState({carName:'迈巴赫'})const obj = this.stateobj.carName = '迈巴赫'console.log(obj === this.state);this.setState(obj)}/* shouldComponentUpdate(nextProps,nextState){// console.log(this.props,this.state); //目前的props和state// console.log(nextProps,nextState); //接下要变化的目标props,目标statereturn !this.state.carName === nextState.carName} */render() {console.log('Parent---render');const {carName} = this.statereturn (<div className="parent"><h3>我是Parent组件</h3>{this.state.stus} <span>我的车名字是:{carName}</span><br/><button onClick={this.changeCar}>点我换车</button><button onClick={this.addStu}>添加一个小刘</button><Child carName="奥拓"/></div>)}
}class Child extends PureComponent {/* shouldComponentUpdate(nextProps,nextState){console.log(this.props,this.state); //目前的props和stateconsole.log(nextProps,nextState); //接下要变化的目标props,目标statereturn !this.props.carName === nextProps.carName} */render() {console.log('Child---render');return (<div className="child"><h3>我是Child组件</h3><span>我接到的车是:{this.props.carName}</span></div>)}
}
7 render props
1. 如何向组件内部动态传入带内容的结构(标签)?
Vue中:
使用slot技术, 也就是通过组件标签体传入结构 <AA><BB/></AA>
React中:
使用children props: 通过组件标签体传入结构
使用render props: 通过组件标签属性传入结构, 一般用render函数属性
2. children props
<A><B>xxxx</B>
</A>{this.props.children}
问题: 如果B组件需要A组件内的数据, ==> 做不到
3. render props
<A render={(data) => <C data={data}></C>}></A>
A组件: {this.props.render(内部state数据)}
C组件: 读取A组件传入的数据显示 {this.props.data}
import React, { Component } from 'react'
import './index.css'
import C from '../1_setState'export default class Parent extends Component {render() {return (<div className="parent"><h3>我是Parent组件</h3><A render={(name)=><C name={name}/>}/></div>)}
}class A extends Component {state = {name:'tom'}render() {console.log(this.props);const {name} = this.statereturn (<div className="a"><h3>我是A组件</h3>{this.props.render(name)}</div>)}
}class B extends Component {render() {console.log('B--render');return (<div className="b"><h3>我是B组件,{this.props.name}</h3></div>)}
}
8 错误边界
错误边界:用来捕获后代组件错误,渲染出备用页面
特点:只能捕获后代组件生命周期产生的错误,不能捕获自己组件产生的错误和其他组件
在合成事件、定时器中产生的错误。
使用方式:getDerivedStateFromError配合componentDidCatch
// 生命周期函数,一旦后台组件报错,就会触发
static getDerivedStateFromError(error) {console.log(error);// 在render之前触发// 返回新的statereturn {hasError: true,};
}componentDidCatch(error, info) {// 统计页面的错误。发送请求发送到后台去console.log(error, info);
}
9 组件通信方式总结
9.1 方式
props:
(1).children props
(2).render props
消息订阅-发布:pubs-sub、event等等
集中式管理:redux、dva等等
conText:生产者-消费者模式
9.2 组件间的关系
父子组件:props
兄弟组件(非嵌套组件):消息订阅-发布、集中式管理
祖孙组件(跨级组件):消息订阅-发布、集中式管理、conText(用的少)
十 React Router6
1 概述
1. React Router以三个不同的包发布到npm上,它们分别是:
1. react-router:路由的核心库,提供了很多的:组件、钩子。
2. react-router-dom:包含react-router所有内容,并添加一些专门用于DOM的组件,例如:
<BrowserRouter>等
3. react-router-native:包括react-router所有内容,并添加一些专门用于ReactNative的Api, 例如:<NativeRouter>等
2. 与React Router5版本相比,改变了什么?
1. 内置组件的变化:移除<Switch>,新增<Routers>等
2. 语法的变化:component={About /}变为element={<About/>}等
3. 新增多个hook:useParams、useNavigate、useMatch等
4. 官方明确推荐函数式组件
2 Component
1. <BrowerRouter>
2. <HashRouter>
3. <Routes /> 与<Route/>
1. v6版本中移除了先前的<Switch>,引入了新的替代者<Routes>
2. <Routes>和<Route>要配合使用,且必须要用<Routes>包裹<Route>
3. <Route>相当于一个if语句,如果其路径与当前URL匹配,则呈现其对应的组件
4. <Routes caseSensitive>属性用于指定:匹配时是否区分大小写(默认为false)
5. 当URL发生变化时,<Routes>都会查看其所有子<Routes>元素
以找到最佳匹配并呈现组件
6. <Route>也可以嵌套使用,且可配合useRoutes()配置路由表,
但需要通过<Outlet>组件来渲染子路由
import React from 'react'
import { NavLink,Routes,Route,Navigate } from 'react-router-dom'
import About from './pages/About'
import Home from './pages/Home'export default function App() {return (<div><div className="row"><div className="col-xs-offset-2 col-xs-8"><div className="page-header"><h2>React Router Demo</h2></div></div></div><div className="row"><div className="col-xs-2 col-xs-offset-2"><div className="list-group">{/* 路由导航 */}<NavLink className="list-group-item" to="/about">About</NavLink><NavLink className="list-group-item" to="/home">Home</NavLink></div></div><div className="col-xs-6"><div className="panel"><div className="panel-body">{/* 注册路由 */}<Routes><Route path="/about" element={<About/>} /><Route path="/home" element={<Home/>} /><Route path="/" element={<Navigate to="/about" />} /></Routes></div></div></div></div></div>)
}
4. NavLink高亮效果
1. App.css
.activeClass{background: orange;color: aliceblue;
}
2. app.jsx
function computedClassName({isActive}){return isActive ? 'list-group-item activeClass' : 'list-group-item'
}<NavLink className={computedClassName} to="/about">About</NavLink>
<NavLink className={computedClassName} to="/home">Home</NavLink>
5 useRoutes路由表使用
1. 新建routes文件夹,新建index.js
import About from '../pages/About'
import Home from '../pages/Home'
import {Navigate} from 'react-router-dom'const routes = [{path:'/about',element:<About/>},{path:'/home',element:<Home/>},{path:'/',element:<Navigate to="/about"/>}
]export default routes
2. app.jsx使用
import React from 'react'
import { NavLink,useRoutes } from 'react-router-dom'
import routes from './routes'export default function App() {// 根据路由表生成对应的路由规则const element = useRoutes(routes)return (<div><div className="row"><div className="col-xs-offset-2 col-xs-8"><div className="page-header"><h2>React Router Demo</h2></div></div></div><div className="row"><div className="col-xs-2 col-xs-offset-2"><div className="list-group">{/* 路由导航 */}<NavLink className="list-group-item" to="/about">About</NavLink><NavLink className="list-group-item" to="/home">Home</NavLink></div></div><div className="col-xs-6"><div className="panel"><div className="panel-body">{element}</div></div></div></div></div>)
}
6 嵌套路由
1. routes/index.js
import About from '../pages/About'
import Home from '../pages/Home'
import Message from '../pages/Message'
import News from '../pages/News'
import { Navigate } from 'react-router-dom'const routes = [{path: '/about',element: <About />},{path: '/home',element: <Home />,children: [{path: 'news',element: <News />,},{path: 'message',element: <Message />,}]},{path: '/',element: <Navigate to="/about" />}
]export default routes
2.Home.jsx
import React from 'react'
import { NavLink,Outlet } from 'react-router-dom'
export default function Home() {return (<div><h2>Home组件内容</h2><div><ul className="nav nav-tabs"><li><NavLink className="list-group-item" to="/home/news">News</NavLink></li><li><NavLink className="list-group-item" to="/home/message">Message</NavLink></li></ul>{/* 指定路由组件呈现的位置 */}<Outlet/></div></div>)
}
7 路由Params传参
1. routes/index.js占位
{path: 'message',element: <Message />,children: [{path: 'detail/:id/:title/:content',element: <Detail />,}]}2. Message.jsx传值
<Link to={`detail/${m.id}/${m.title}/${m.content}`}>{m.title}</Link>3. Detail.jsx接收参数 -- useParams
import React from 'react'
import { useParams, useMatch } from 'react-router-dom'export default function Detail() {const { id, title, content } = useParams()// const x = useMatch('/home/message/detail/:id/:title/:content')return (<ul><li>消息编号:{id}</li><li>消息标题:{title}</li><li>消息内容:{content}</li></ul>)
}
8 路由search传参
1. message.jsx传递参数
<Link to={`detail?id=${m.id}&title=${m.title}&content=${m.content}`}>{m.title}</Link>2. Detail.jsx接收参数
import React from 'react'
import { useSearchParams,useLocation } from 'react-router-dom'export default function Detail() {const [search,setSearch] = useSearchParams()const id = search.get('id')const title = search.get('title')const content = search.get('content')const x = useLocation ()console.log(x)return (<ul><li><button onClick={()=>{setSearch('id=005&title=哈哈&content=嘻嘻')}}>点我更新收到的search参数</button></li><li>消息编号:{id}</li><li>消息标题:{title}</li><li>消息内容:{content}</li></ul>)
}
9 路由state传参
1. Message.jsx传参
<Link to="detail"state={{id:m.id,title:m.title,content:m.content}}
>{m.title}</Link>
2.Detail.jsx接收参数
import React from 'react'
import { useLocation } from 'react-router-dom'
export default function Detail() {const {state} = useLocation()return (<ul><li>消息编号:{state.id}</li><li>消息标题:{state.title}</li><li>消息内容:{state.content}</li></ul>)
}
10 编程式路由导航 -- useNavigate
1.使用
import React, { useState } from 'react'
import{Link,Outlet} from 'react-router-dom'
import { useNavigate } from 'react-router-dom'export default function Message() {const [messages] = useState([{ id: '001', title: '消息1', content: '消息1的内容' },{ id: '002', title: '消息2', content: '消息2的内容' },{ id: '003', title: '消息3', content: '消息3的内容' },{ id: '004', title: '消息4', content: '消息4的内容' }])const navigate = useNavigate()function showDetail(m){navigate('detail',{replace:false,state:{id:m.id,title:m.title,content:m.content}})}return (<div><ul>{messages.map((m) => {return (<li key={m.id}><Link to="detail"state={{id:m.id,title:m.title,content:m.content}}>{m.title}</Link><button onClick={()=>{showDetail(m)}}>查看详情</button></li>)})}</ul><hr/><Outlet /></div>)
}
2. 前进后退
import React from 'react'
import { useNavigate } from 'react-router-dom'export default function Header() {const navigate = useNavigate()function back(){navigate(-1)}function forward(){navigate(1)}return (<div className="col-xs-offset-2 col-xs-8"><div className="page-header"><h2>React Router Demo</h2></div><button onClick={back}>后退</button><button onClick={forward}>前进</button></div>)
}
11 useInRouterContext()
作用:如果组件在<Router>的上下文中呈现,则useInRouterContext钩子返回true,否则返回false
12 useNavigationType()
1. 作用:返回当前的导航类型(用户是如何来到当前页面的)
2. 返回值:POP、PUSH、REPLACE
3. 备注:POP是指在浏览器中直接打开了这个路由的文件(刷新页面)
13 useOutlet()
1. 作用:用来呈现当前组件中渲染的嵌套路由
const result = useOutlet()
console.log(result)//如果嵌套的路由没有挂载,则result为null
//如果嵌套的路由已经挂载,则展示嵌套的路由对象
14 useResolvePath()
作用:给定一个URL值,解析其中的:path、search、hash值

