前端HTML篇
硬核!一篇文章教你阅遍html。
声明:本篇文章只是一个刚开始学习后端开发的菜鸟汇总完成的 JavaWeb学习前导html篇,所以专业性肯定不如前端人员,但用于学习后端开发足够了,刚接触html的童鞋拿来快速了解html也是很nice的。
文章目录
- 前端HTML篇
- HTML部分
- 一、基础标签
- 1.标题标签
- 2.段落标签
- 3.换行标签
- 4.图片标签
- 5.无序列表
- 6.有序列表
- 7.定义列表
- 8.超链接
- 9.锚链接
- 10.表格
- 11.表单(重点)
- 12.扩展
- 二、HTML5新特性
- 定义文档类型
- 新增语义化标签
- 新增表单内容
- css部分
- 一、CSS 定义
- 二、各种选择器
- 1.通配符选择器
- 2.基本选择器
- 3.群组选择器
- 4.派生选择器
- 5.属性选择器
- 6.锚伪类
- 三、样式的优先级(外部css文件的引入)
- 四、常用样式
- 五、盒子模型
- 1.div边距、居中
- 2.相对定位
- 3.绝对定位
- 4.固定定位
- 5.浮动
- Javascript部分
- 一、Javascript基础
- 1.什么是Javascript
- 2.引入外部js文件
- 3.基本数据类型
- 4.基本数据类型的特点
- 5.数组、流程控制语句
- 6.函数
- 二、DOM
- 1.操作元素
- 2.DOM事件
- 三、BOM
- 1.window的属性和函数(含重点)
- 2.弹框
- 3.定时器(重点)
- 4.Cookie(重点)
- 5.JS对象
HTML部分
HTML(英文Hyper Text Markup Language的缩写)中文译为“超文本标记语言”
一、基础标签
1.标题标签
<!--标题标签:h1~h6
h7和文本内容一样 -->
<h1>内容</h1>
2.段落标签
<p>天生吾族,岂可轻弃</p>
3.换行标签
<!--换行标签是单标签
换行标签:br
分隔标签:hr  -->
天生吾族
<br />
岂可轻弃
<hr />
4.图片标签
<!--
图片标签:img
src-图片资源
width:宽度(px-像素	%-浏览器的宽度百分比)
height:高度
alt:图片加载失败后展示的内容  -->
<img src="img/柯南.jpg" width="10%" alt="加载失败	"/>
5.无序列表
<!--
无序列表:ul
type:样式(circle-空心圆 disc-实心圆 square-实心方块)
li:项  -->
<ul type="square"><li>无序1</li><li>无序2</li><li>无序3</li>
</ul>
6.有序列表
<!--
有序列表:ol
type:样式(1-数字 a-小写字母 A-大写字母 i-小写罗马数字 I-大写罗马数字)
li:项  -->
<ol type="I"><li>有序1</li><li>有序2</li>
</ol>
7.定义列表
<!--
定义列表:dl
dt:列表标签
dd:列表内容
-->
<dl><dt>基德</dt><dd>出生于1998年1月1日,三岁精通HTML,五岁精通Java,八岁删库跑路</dd>
</dl>
8.超链接
<!--
超链接标签:a
href:链接地址
target:目标(_self-当前页面  _blank-新增页面)
-->
<a href="http网址" target="_self">百度一下,你就知道</a>
<!--超链接也可以跳转自己的项目文件 -->
<a href="08_列表案例.html" target="_blank">列表案例</a>
<!--将图片作为超链接 -->
<a href="http网址" target="_blank"><img src="img/百度.jpg" width="10%"/>
</a>
9.锚链接
<a href="#new01">法制</a>
<a href="#new02">国际</a>
<a href="#new03">娱乐</a>
<!--多写点h1标签才好看出效果 -->
<a name="new01"></a><!--锚点-->
<h1>法制新闻</h1>
<a name="new02"></a><!--锚点-->
<h1>国际新闻</h1>
<h1>国际新闻</h1>
<a name="new03"></a><!--锚点-->
<h1>娱乐新闻</h1>
10.表格
<!--
table - 表格
border="1" - 有边框
tr - 行
th - 列(居中加粗)
td - 列
rowspan="2" - 占两行
colspan="2" - 占两列
-->
<table border="1" width="30%"><tr><th>C</th><th>-></th><th>+</th><th>-</th></tr><tr><th>7</th><th>8</th><th>9</th><th>*</th></tr><tr><th>4</th><th>5</th><th>6</th><th>/</th></tr><tr><th>1</th><th>2</th><th>3</th><th rowspan="2">=</th></tr><tr><th colspan="2">0</th><th>.</th></tr>
</table>
11.表单(重点)
<!--以下内容均在body中 -->
<!--  form - 表单  -->
<form action="服务器地址" method="post">输入框:<input type="text" name="username" placeholder="输入框"/><br />密码框:<input type="password" name="password" placeholder="密码框" /><br /><!-- 单选框、多选框:默认选中 - checked="checked"  -->单选框:<input type="radio" name="sex" value="man" checked="checked"/>男<input type="radio" name="sex" value="woman"/>女<br />多选框:<input type="checkbox" name="hobby" value="football" checked="checked"/>足球<input type="checkbox" name="hobby" value="basketball"/>篮球<input type="checkbox" name="hobby" value="shop"/>购物<br /><!-- 下拉列表:默认选中- selected="selected" -->下拉列表:<select name="province"><option value="sc">四川</option><option value="jx" selected="selected">江西</option><option value="hn">湖南</option><option value="hb">湖北</option></select>省<select name="city"><option value="cd">成都</option><option value="zg">自贡</option><option value="ya">雅安</option><option value="ls">乐山</option><option value="ms">眉山</option><option value="my">绵阳</option></select>市<br /><!-- 提交按钮和图片按钮 功能一样 --><input type="button" value="普通按钮" onclick="fun01()"/><input type="submit" value="提交按钮" /><input type="reset" value="重置按钮" /><input type="image" src="img/图片按钮.jpg" width="10%"/><br /><br /><!--textarea文本域rows高度cols宽度required必填项readonly只读  --><textarea rows="10" cols="20" required="required" readonly="readonly">协议:xxxxxxxxxxx</textarea>
</form><script type="text/javascript">function fun01(){alert("柯南死神小学生");}
</script>
12.扩展
图标,百度网页最上方的头部标签
<head><meta charset="utf-8" /><title>百度一下,你就知道</title><link rel="shortcut icon" href="img/favicon.ico" />
</head>
二、HTML5新特性
定义文档类型
在文件的开头总是会有一个标签
| 语言 | 文档类型声明方式 |
|---|---|
| html4 | < !DOCTYPE HTML PUBLIC “-//W3C//DTD HTML 4.01//EN” “http://www.w3.org/TR/html4/strict.dtd”> |
| html5 | < !DOCTYPE html> |
新增语义化标签
| 标签 | 描述 |
|---|---|
| < header > | 头部标签 |
| < nav > | 导航标签 |
| < article > | 内容标签 |
| < section > | 块级标签 |
| < aside > | 侧边栏标签 |
| < footer > | 尾部标签 |
<body>		<style type="text/css">header,nav,article,aside,footer,section{background-color: #87A442;text-align: center;border: black 1px solid;border-radius:20px;margin: 10px;padding: 10px;}header{height: 120px;}nav{height: 50px;}article{width: 46%;height: 120px;float: left;}aside{width: 46%;height: 120px;float: right;yu}footer{clear: both;height: 120px;}section{height: 70px;}</style><header>头部标签 - header</header><nav>导航标签 - nav</nav><div><article>内容标签 - article<section>块级标签 - section</section></article><aside>侧边栏标签 - aside</aside></div><footer>尾部标签 - footer</footer>
</body>
新增表单内容
<form action="#" method="post">日期选择器:<input type="date"/><br/>时间选择器:<input type="time"/><br/>邮箱输入框:<input type="email"/><br/>数字输入框:<input type="number" value="50" min="10" max="100" step="5"/><br/>URL输入框: <input type="url" list="url_list"/><datalist id="url_list"><option label="W3School" value="http网址1" /><option label="谷歌" value="http网址2" /><option label="百度一下" value="http网址3" /></datalist><br/><input type="submit" value="提交"/>
</form>
css部分
一、CSS 定义
CSS 指层叠样式表 (Cascading Style Sheets)
样式定义如何显示 HTML 元素,是为了解决内容与表现分离的问题
多个样式定义可层叠为一,样式通常存储在样式表中
二、各种选择器
1.通配符选择器
<head><meta charset="UTF-8"><title></title><style type="text/css">*{color: red;}</style>
</head>
<body><h1>一级标签</h1><h6>六级标签</h6><p>段落标签1</p><p>段落标签2</p>
</body>
2.基本选择器
基本选择器的优先级别:ID > CLASS > 标签
<head><style type="text/css">/*基本选择器 - 标签选择器*/p{color: red;}/*基本选择器 - 类选择器*/.myClass{color: green;}/*基本选择器 - id选择器注意:项目中id都是唯一的*/#myId{color: blue;}</style>
</head>
<body><h1 class="myClass">一级标签</h1><h2 id="myId">二级标签</h2><h3 class="myClass">三级标签</h3><h4>四级标签</h4><p>段落标签1</p><p>段落标签2</p>
</body>
3.群组选择器
<head><style type="text/css">/*群组选择器*/h1,h3,p{color: red;}
</style></head>
4.派生选择器
<head><style type="text/css">/* 派生选择器、上下文关系选择器:* 后代选择器:ul a{color: red;}* 子代选择器:li>a{color: red;}* 相邻兄弟选择器:a+a{color: red;}* (注意:效果作用在后者)*/
</style></head>
<body><ul><li><a href="#">超链接1</a></li><li><a href="#">超链接2</a></li></ul><ul><li><a href="#">超链接3</a></li><li><a href="#">超链接4</a></li><li><a href="#">超链接5</a></li></ul><a href="#">超链接6</a><a href="#">超链接7</a><a href="#">超链接8</a>
</body>
5.属性选择器
<style type="text/css">/*	包含标题(title)的所有元素变为红色*[title] {color:red;}只对有 href 属性的锚(a 元素)应用样式a[href] {color:red;}只对同时有 href 和title属性的锚(a 元素)应用样式a[href][title] {color:red;}只对type='text'、name='username1'的input生效input[type='text'][name='username1']{color: red;}*/
</style>
6.锚伪类
<head><style type="text/css">/*锚伪类:记录各个状态*/a:link {color:#FFB6C1}	/* 未访问的链接 */a:visited {color:#000000;}/* 已访问的链接 */a:hover {color:#00FFFF}/* 鼠标移动到链接上 */a:active {color:#B22222}/* 选定的链接 */</style>
</head>
<body><a href="http网址">网址</a>
</body>
三、样式的优先级(外部css文件的引入)
<head><meta charset="UTF-8"><title></title><!-- 样式的优先级别:行内样式表 >(内部样式和外部样式看加载顺序) --><!--内部样式表--><style type="text/css">p{color: red;}</style><!--外部样式表--><link rel="stylesheet" type="text/css" href="../css/new_file.css"/>
</head>
<body><!--行内样式表--><p style="color: blue;">段落标签</p>
</body>
四、常用样式
1.字体属性
属性名称
font-family(字体)
font-size(大小)
font-style(风格)
---- normal标准样式
---- italic斜体
---- oblique倾斜
---- inherit从父类继承的字体样式
font-weight(字体加粗)
----normal标准样式
----bold粗体
----bolder更粗
----lighter更细
2.文本属性
属性名称
letter-spacing(字母间隔)
text-decoration(划线修饰)
text-align(文本对齐方式)
text-indent(文本缩进)
line-height(行高)
3.背景
属性名称
background-color
background-image
background-repeat
4.边框
属性名称
border-bottom
solid(实线)
dashed(虚线)
double(双实线)
5.圆角、阴影
<style type="text/css">#btn{width: 100px;height: 50px;color: white;font-weight: bolder;background-color: orange;border-radius: 10px;/*圆角属性*/box-shadow: 10px 10px 5px gainsboro;/*添加按钮阴影 X轴偏移量 Y轴偏移量 阴影模糊半径*/text-shadow: 5px 5px 5px black;/*添加文本阴影 X轴偏移量 Y轴偏移量 阴影模糊半径*/}
</style>
五、盒子模型
1.div边距、居中
能用外边距就用外边距
<head><style type="text/css">div{border: 1px red solid;width: 200px;height: 200px;margin: 0 auto;/*居中*//*设置外边距*//*margin-top: 50px;上外边距margin-left: 50px;左外边距margin-right: 50px;右外边距margin-bottom: 50px;下外边距margin: 50px;上下左右外边距*//*设置内边距*//*padding-top: 50px;上内边距padding-left: 50px;左内边距padding-right: 50px;右内边距padding-bottom: 50px;下内边距padding: 50px;上下左右内边距*/}</style></head>
2.相对定位
<head><style type="text/css">#manager{border: orange 1px solid;margin-top: 80px;}#box01{width: 100px;height: 100px;border: red 1px solid;}#box02{width: 100px;height: 100px;border: green 1px solid;position: relative;/*相对定位:保留原有位置,针对于原有位置进行移位*/top: 10px;left: 10px;}#box03{width: 100px;height: 100px;border: blue 1px solid;}</style></head>
<body><div id="manager"><div id="box01"></div><div id="box02"></div><div id="box03"></div></div>
</body>
3.绝对定位
<head><style type="text/css">#manager{border: orange 1px solid;margin-top: 80px;position: relative;}#box01{width: 100px;height: 100px;border: red 1px solid;}#box02{width: 100px;height: 100px;border: green 1px solid;position: absolute;/*绝对定位:不保留原有位置,向上找父级标签,查看是否有position的属性,如果没有再向上找,直到找到body标签*/top: 10px;left: 10px;}#box03{width: 100px;height: 100px;border: blue 1px solid;}</style></head>
<body><div id="manager"><div id="box01"></div><div id="box02"></div><div id="box03"></div></div>
</body>
4.固定定位
<head><style type="text/css">div{position: fixed;/*固定定位*/top: 70%;left: 90%;}</style></head>
<body><div><a href="#new01">置顶</a></div><a name="new01"></a><!--锚点--><h1>法制新闻</h1><h1>国际新闻</h1><h1>娱乐新闻</h1><!--多写点h1标签方便观察-->
</body>
5.浮动
浮动虽然可以帮我们将原本竖着排的div横着排,但也会造成脱离父级标签的束缚,使得父级标签无法撑开,所以一定要加.clear{clear: both;}清除浮动
<head><style type="text/css">#manager{border: orange 1px solid;margin-top: 80px;}#box01{width: 100px;height: 100px;border: red 1px solid;/*控制是靠左还是靠右*/float: left;}#box02{width: 100px;height: 100px;border: green 1px solid;float: left;}/*清除浮动*/.clear{clear: both;}</style></head>
<body><div id="manager"><div id="box01"></div><div id="box02"></div><div class="clear"></div></div>
</body>
Javascript部分
一、Javascript基础
1.什么是Javascript
Javascript是基于对象和事件驱动的脚本语言,主要是嵌入到HTML中,应用在客户端,动态操作网页元素,也可以作用于服务端。
特点:交互性(表单校验,信息提示,动态数据图表,ajax异步提交,解析服务端响应数据等等)
安全性(不可以直接访问本地硬盘)
跨平台性(由浏览器解析执行,和平台无关)
2.引入外部js文件
一个html里边可以在 head 和 body标签里放多个 script 标签
<script type="text/javascript" src="out.js"></script>
<!--src是文件相对路径,不是文件名 -->
<!--内部写js代码 -->
<script type="text/javascript">alert("HelloWorld...3");//弹框console.log("HelloWorld...333");//在控制台中打印数据
</script>
3.基本数据类型
五大基本数据类型:number、string、boolean、undefined(未定义类型)、null
<script type="text/javascript">/*var - 变量*/var v = 123;v = 123.01;console.log(v);v = "abc";v = true;var v4;console.log(v4);v4 = undefined;console.log(v4);var v5 = null;console.log(v5);
</script>
4.基本数据类型的特点
<script type="text/javascript">//JS的基本数据类型:number、string、boolean、undefined(未定义类型)、null//number的特殊点:(Infinity 表示无穷大)console.log(Infinity + (-Infinity));//NaN:Not a Number//string的特殊点:var v1 = "12";var v2 = "3";console.log(v1 + v2);//做拼接console.log(parseInt(v1) + parseInt(v2));//parseFloat(v1)console.log(v1 - v2);//9console.log(v1 * v2);//36console.log(v1 / v2);//4console.log(v1 % v2);//0//boolean的特殊点:0、""、undefined、null、NaN都表示falseif(null){console.log("true");}else{console.log("false");}//undefined vs nullvar v1;console.log(typeof v1);//undefinedvar v2 = null;console.log(typeof v2);//object(空对象)// == vs ===	var v1 = 123;var v2 = "123";console.log(v1 == v2);//true:只判断值console.log(v1 === v2);//false:既判断值,也判断类型//NaN == NaN 吗?答案是falseconsole.log(NaN == NaN);
</script>
5.数组、流程控制语句
在Javascript中,可以直接用java的流程语句,虽然这两个语言并没有一毛钱关系。
<script type="text/javascript">var a = [[1,2,3],[4,5,6]];//在网页打印三角形for(var i = 0;i<5;i++){for(var j = 0;j<=i;j++){document.write("*");}document.write("<br/>");}
</script>
6.函数
系统提供的预定义函数:
parseInt():试图将其收到的任何输入值转换成整数类型,转换失败则返回NaN
parseFloat():同上类似
isNaN(xxx):判断是否为非数字
isFinite(xxxx):判断输入的是否是一个既非Infinity也非NaN的数字
eval():会将其输入的字符串当作javascript代码来执行
自定义函数:
<script type="text/javascript">//无返回值无参数的方法function fun01(){alert("aaa");}fun01();//有参数的方法(参数不用写var)function fun02(a,b){alert(a+b);}fun02("10","20");//有返回值的方法function fun03(a,b){return a+b;}var v = fun03("10","20");alert(v);
</script>
二、DOM
当网页被加载时,浏览器会创建页面的文档对象模型(Document Object Model)。
HTML DOM 模型被构造为对象的树。
拿到document就可以对html网页为所欲为,DOM是非常强大的一个功能。
HTML DOM 树:

1.操作元素
-
查找元素
<body><p id="p_id01" class="p_class">段落标签1</p> <p id="p_id02" class="p_class">段落标签2</p> <input type="text" name="text"/><br /><input type="text" name="text"/><script type="text/javascript">//通过id查找的元素 - 获取的是对象//var pId01 = document.getElementById("p_id01");//pId01.onclick = function(){// this.innerText = "奋斗到感动自己,拼搏到无能为力";//}//通过class查找的元素 - 获取的是数组//var p1 = document.getElementsByClassName("p_class")[0];//p1.onclick = function(){// this.innerText = "奋斗到感动自己,拼搏到无能为力";//}//通过标签查找的元素 - 获取的是数组//var p1 =document.getElementsByTagName("p")[0];//p1.onclick = function(){// this.innerText = "奋斗到感动自己,拼搏到无能为力";//}//通过name查找的元素 - 获取的是数组var text01 = document.getElementsByName("text")[0];text01.onclick = function(){this.style.color = "red";}//如果觉得上面这么写麻烦,是可以像下面一样写的//document.getElementsByName("text")[0].onclick = function(){ 代码块 }</script> </body> -
操作内容
<body><p>段落标签</p><script type="text/javascript">document.getElementsByTagName("p")[0].onclick = function(){//获取内容//var text = this.innerText;//alert(text);//天生吾族 var text = this.innerHTML;alert(text);//<h1>天生吾族</h1>//设置内容//this.innerText = "<h1>天生吾族</h1>";this.innerHTML = "<h1>天生吾族</h1>";//认为内容是html代码}</script></body> -
操作属性
<body><img src="img/天生吾族.jpg" width="10%" height="10%"/><script type="text/javascript">var img = document.getElementsByTagName("img")[0];img.onclick = function(){//获取属性1//console.log(this.width);//13//console.log(this.height);//18//获取属性2 //console.log(this.getAttribute("width"));//10% //console.log(this.getAttribute("height"));//10%//设置属性1//this.width = "200";//像素//this.height = "200";//设置属性2this.setAttribute("width","20%");this.setAttribute("height","20%");}</script></body> -
操作样式
<body><input type="button" value="显示图片" onclick="fun01()" /><input type="button" value="隐藏图片" onclick="fun02()" /><br /><img src="img/天生吾族.jpg" width="10%" height="10%"/><script type="text/javascript">var img = document.getElementsByTagName("img")[0];function fun01(){//获取样式console.log(img.style.backgroundColor)//设置样式//visibility资源是否可见,visible可见,hidden不可见img.style.visibility = "visible";}function fun02(){img.style.visibility = "hidden";}</script></body>
2.DOM事件
-
单击事件
<body><h1 onclick="this.innerText='岂可轻弃'">天生吾族</h1><h1 onclick="fun01(this)">天生吾族</h1><input type="button" value="使第3个h1标签改变内容" onclick="fun02()"/><h1>天生吾族</h1><input type="button" value="使第4个h1标签改变内容"/><h1>天生吾族</h1><script type="text/javascript">function fun01(obj){obj.innerText = "岂可轻弃";}function fun02(){document.getElementsByTagName("h1")[2].innerText = "岂可轻弃";}document.getElementsByTagName("input")[1].onclick = function(){document.getElementsByTagName("h1")[3].innerText = "岂可轻弃";}</script> </body> -
页面加载事件
<body><input type="button" value="使h1标签改变内容" /><h1>天生吾族</h1><script type="text/javascript">//onload事件:叫做页面加载事件,等页面的标签和图片资源加载完毕后才调用的事件window.onload = function(){document.getElementsByTagName("input")[0].onclick = function(){ var h1 = document.getElementsByTagName("h1")[0];h1.innerText = "岂可轻弃"}}</script></body> -
键盘事件
<body><input type="text" onkeydown="down01()"onkeypress="press01()"onkeyup="up01()"/><script type="text/javascript">function down01(){console.log("键盘按下事件");}function press01(){console.log("键盘持续事件");}function up01(){console.log("键盘松开事件");}</script></body> -
鼠标事件
<body><img src="img/天生吾族.jpg" width="40%" onmousedown="down01()"onmouseup="up01()"onmousemove="move01()"onmouseover="over01()"onmouseout="out01()"/> <script type="text/javascript">function down01(){console.log("鼠标按下事件");}function up01(){console.log("鼠标松开事件");}function move01(){console.log("鼠标移动事件");}function over01(){console.log("鼠标移进事件");}function out01(){console.log("鼠标移出事件");}</script></body>案列:
<body><img src="../img/tx1.jpg" width="100px" onmouseover="over01(this)" onmouseout="out01(this)"/> <img src="../img/tx2.jpg" width="100px" onmouseover="over01(this)" onmouseout="out01(this)"/> <img src="../img/tx3.jpg" width="100px" onmouseover="over01(this)" onmouseout="out01(this)"/> <script type="text/javascript">function over01(obj){obj.style.opacity = 1;//设置透明度:1完全不透明 0完全太透明}function out01(obj){obj.style.opacity = 0.4;}</script></body> -
焦点事件
<body>账号:<input type="text" value="请输入账号" onfocus="focus01()" onblur="blur01()"/><script type="text/javascript">function focus01(){console.log("获取焦点事件");}function blur01(){console.log("失去焦点事件");}</script></body> -
操作节点
<body><input type="button" value="新增段落标签" onclick="addP()"/><input type="button" value="新增图片标签" onclick="addImg()"/><input type="button" value="克隆图片标签" onclick="cloneImg()"/><input type="button" value="删除图片标签" onclick="deleteImg()"/><div id="manager"><p>段落标签</p></div><script type="text/javascript">var manager = document.getElementById("manager");function addP(){//创建节点var p = document.createElement("p");//<p></p>//创建内容var text = document.createTextNode("新增段落标签");//新增段落标签//将内容添加到p标签中p.appendChild(text);//<p>新增段落标签</p>//将p标签添加到div标签中manager.appendChild(p);}function addImg(){//创建节点var img = document.createElement("img");//设置属性img.setAttribute("width","100px");img.setAttribute("height","100px");img.setAttribute("src","../img/tx2.jpg");//将img标签添加到div标签中manager.appendChild(img);//创建节点var br = document.createElement("br");//将br标签添加到div标签中manager.appendChild(br);}function cloneImg(){//获取img标签var img = document.getElementsByTagName("img")[0];//克隆标签var newImg = img.cloneNode(true);//true-深入克隆//将newImg标签添加到div标签中manager.appendChild(newImg);//获取br标签var br = document.getElementsByTagName("br")[0];//克隆标签var newBr = br.cloneNode(true);//true-深入克隆//将newBr标签添加到div标签中manager.appendChild(newBr);}function deleteImg(){var img = document.getElementsByTagName("img")[0];var br = document.getElementsByTagName("br")[0];manager.removeChild(img);manager.removeChild(br);}</script>
</body>
三、BOM
浏览器对象模型 (BOM) 使 JavaScript 有能力与浏览器“对话”。
Browser Object Model
1.window的属性和函数(含重点)
Window 对象
所有浏览器都支持 window 对象。它表示浏览器窗口。
所有 JavaScript 全局对象、函数以及变量均自动成为 window 对象的成员。
HTML DOM 的 document 也是 window 对象的属性之一
-
window.location(重点重点重点)
前端能向服务器发送请求的有:超链接、表单、location
实现当前页面的跳转
window.location.href = “http网址”;
window.location = “http网址”;
重新加载页面
location.reload(); -
window.history
history.back() 上一页
history.forward() 下一页
history.go(-1) 上一页
histroy.go(1) 下一页
histroy.go(0) 刷新
histroy.go(number) 随number改变上下几页,一般也就一页
-
window.open
弹出页面(流氓广告)
window.open(“http网址”);有些浏览器是可以屏蔽open函数的(可以自己设置),为的就是防止一直恶意弹出页面,搞蹦服务器。
2.弹框
<script type="text/javascript">function fun01(){alert("警告框"); //确认-true	取消-falsevar bool = confirm("确认框");	console.log(bool);//返回输入内容var v = prompt("提示框","默认值");console.log(v);}
</script>
3.定时器(重点)
语法:
var t=setTimeout(“javascript语句”,毫秒) —一次定时
clearTimeout(setTimeout_variable) —取消定时
setInterval(code,millisec) —循环定时,code是执行的代码,millisec是间隔的时间。循环定时是不会停止的,直到你调用了clearTimeout
<script type="text/javascript">var img = document.getElementsByTagName("img")[0];//定时器 setTimeout :过3000毫秒就触发函数var timeout = setTimeout(function(){img.src = "../../img/不可描述.jpg";},3000);//定时器:每过1000毫秒就触发函数var timeout1 = setInterval(function(){console.log("xxx");},1000);//取消定时 clearTimeoutfunction fun01(){clearTimeout(timeout1);}</script>
案例:时钟(当前时间显示)
<body><h1></h1><script type="text/javascript">var h1 = document.getElementsByTagName("h1")[0];function setTime(){//创建日期对象var date = new Date();//获取日期信息var hour = date.getHours();var minute = date.getMinutes();var second = date.getSeconds()var time = hour + ":" + minute + ":" + second;//设置h1.innerText = time;}setTime();setInterval(function(){setTime();},1000);</script></body>
4.Cookie(重点)
有可能和后面服务器的Session搞混,所以一定要注意
cookie是以键值对的形式保存的,即key=value的格式。各个cookie之间一般是以“;”分隔。
cookie是存于用户硬盘的一个文件,这个文件通常对应一个域名,当浏览器再次访问这个域名时,便使这个cookie可用。因此,cookie可以跨越一个域名下的多个网页,但不能跨域名使用。
cookie是存在浏览器里边的,不能跨浏览器使用。
Cookie可以做什么?
1,保存用户的登录状态
2,定制页面,如换肤,选择所在地区等等
3,购物车的实现(苏宁易购)(淘宝以前也是,现在在数据库了)
4,记录用户的浏览历史记录
Cookie的缺点:
1,cookie可能被禁用
2,cookie是与游览器相关的,即使访问同一个页面,不同的浏览器保存的cookie也是不能互相访问的
3,cookie可能被删除,因为cookie实际就是硬盘上的一个文件
4,cookie的安全性不够高,所有的cookie都是以纯文本的形式记录于文件中。
Cookie的增删查改:
<body><input type="button" value="添加Cookie" onclick="fun01()" /><input type="button" value="删除Cookie" onclick="fun02()" /><input type="button" value="修改Cookie" onclick="fun03()" /><input type="button" value="查询Cookie" onclick="fun04()" /><script type="text/javascript">function fun01(){updateCookie("username","hh",1000*60*60*24*30);updateCookie("password","123123",1000*60*60*24*30);}function fun02(){updateCookie("username","",-1);updateCookie("password","",-1);}function fun03(){updateCookie("username","wx",1000*60*60*24*30);updateCookie("password","666888",1000*60*60*24*30);}function fun04(){//alert(document.cookie);var username = queryCookie("username");var password = queryCookie("password");alert(username + " -- " + password);}function queryCookie(key){var cs = document.cookie.split(";");for(var i =0;i<cs.length;i++){var k = cs[i].trim().split("=")[0];var v = cs[i].trim().split("=")[1];if(k == key){return v;}}}function updateCookie(key,value,time){var date=new Date(); date.setTime(date.getTime() + time);document.cookie = key + "=" + value + "; expires=" + date.toGMTString();}</script></body>
5.JS对象
JavaScript中的所有事物都是对象:字符串、数值、数组、函数…
此外,JavaScript 允许自定义对象。
但是在JavaScript 没有类的概念
<body><script type="text/javascript">//自定义对象//创建对象var stu = new Object();//设置属性stu.name = "柯南";stu.age = 18;//设置函数stu.printInfo = function(){alert(this.name + " -- " + this.age);}stu.printInfo();</script></body>
<body><script type="text/javascript">//自定义对象 - json格式//创建对象var stu = {name:"柯南",age:18,printInfo:function(){alert(this.name + " -- " + this.age);}};stu.printInfo();</script></body>
<body><script type="text/javascript">//自定义对象 - 使用构造器函数//构造器function Student(name,age){this.name = name;this.age = age;}//创建对象var stu = new Student("柯南",18);//for_in遍历对象中所有的属性和方法for(var v in stu){console.log(v);}//原型:在之前的基础上添加内容Student.prototype.printInfo = function(){alert(stu.name + " --- " + stu.age);}stu.printInfo();</script></body>
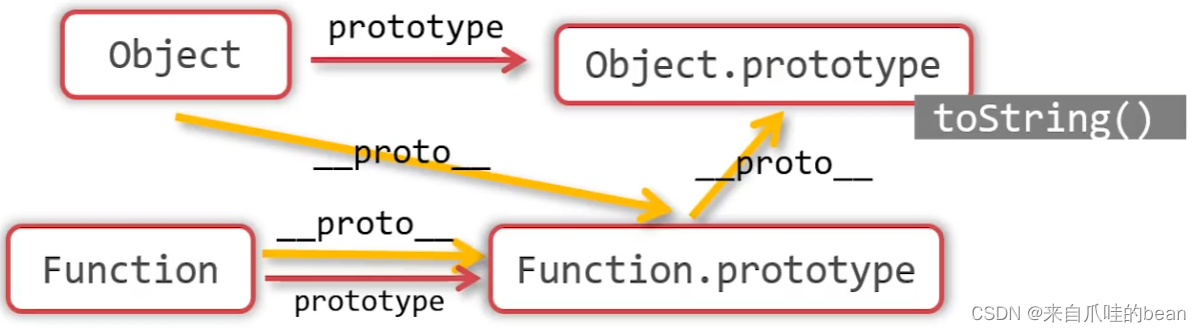
JavaScript 基于 prototype(原型),而不是基于类的。
注:汇总资料来源于hhy老师,汇总编写:cat_lkh