文章目录
- 前言
- 一、效果图
- 二、实现思路
- 1. 新建 tags-view.js
- 2. 在Vuex里面引入 tags-view.js
- 3. 新建 tabsView 组件
- 4. 新建 ScrollPane 组件
- 5. 引入 tabsView 组件
- 6. 使用 keep-alive 组件,进行页签的缓存
- 总结
前言
基本上后台管理系统都需要有多页签的功能,但是因为一些脚手架项目基本都把这个功能给集成好了,导致在学习或者修改的时候不知道该如何下手。今天这篇文章就来聊一聊,vue-element-admin项目是如何实现多页签功能的。
一、效果图
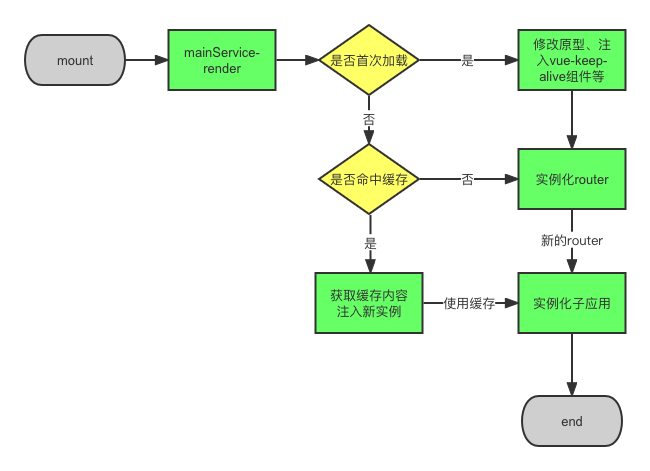
实现之后的效果如下图所示,点击左边的不同的菜单会打开多个页签,并且右键页签可以操作关闭页签。
二、实现思路
利用Vue的内置组件keepalive和routeLink解决,数据是通过vuex进行管理。
1. 新建 tags-view.js
在…\store\modules文件夹下新建一个tags-view.js,里面定义相关标签新建、关闭的操作方法,代码如下(示例):
const state = {// 用户访问过的页面 就是标签栏导航显示的一个个 tag 数组集合visitedViews: [],// 实际 keep-alive 的路由。可以在配置路由的时候通过 meta.noCache 来设置是否需要缓存这个路由 默认都缓存。cachedViews: []
}const mutations = {// 添加标签ADD_VISITED_VIEW: (state, view) => {// 如果标签跳转的路由存在就不添加,否则就添加进标签组if (state.visitedViews.some(v => v.path === view.path)) returnstate.visitedViews.push(Object.assign({}, view, {title: view.meta.title || 'no-name'}))},// 添加缓存标签ADD_CACHED_VIEW: (state, view) => {// 已存在缓存就不缓存了if (state.cachedViews.includes(view.name)) returnif (view.meta && !view.meta.noCache) {state.cachedViews.push(view.name)}},// 删除选择的标签DEL_VISITED_VIEW: (state, view) => {for (const [i, v] of state.visitedViews.entries()) {if (v.path === view.path) {state.visitedViews.splice(i, 1)break}}},// 删除缓存标签DEL_CACHED_VIEW: (state, view) => {const index = state.cachedViews.indexOf(view.name)index > -1 && state.cachedViews.splice(index, 1)},// 删除其它标签DEL_OTHERS_VISITED_VIEWS: (state, view) => {state.visitedViews = state.visitedViews.filter(v => {return v.meta.affix || v.path === view.path})},// 删除其它缓存标签DEL_OTHERS_CACHED_VIEWS: (state, view) => {const index = state.cachedViews.indexOf(view.name)if (index > -1) {state.cachedViews = state.cachedViews.slice(index, index + 1)} else {state.cachedViews = []}},// 删除所有标签DEL_ALL_VISITED_VIEWS: state => {// 过滤出固定的标签,只保留固定标签const affixTags = state.visitedViews.filter(tag => tag.meta.affix)state.visitedViews = affixTags},// 删除所有缓存标签DEL_ALL_CACHED_VIEWS: state => {state.cachedViews = []},UPDATE_VISITED_VIEW: (state, view) => {for (let v of state.visitedViews) {if (v.path === view.path) {v = Object.assign(v, view)break}}},// 删除右侧标签DEL_RIGHT_VIEWS: (state, view) => {const index = state.visitedViews.findIndex(v => v.path === view.path)if (index === -1) {return}state.visitedViews = state.visitedViews.filter((item, idx) => {if (idx <= index || (item.meta && item.meta.affix)) {return true}const i = state.cachedViews.indexOf(item.name)if (i > -1) {state.cachedViews.splice(i, 1)}return false})},// 删除左侧标签DEL_LEFT_VIEWS: (state, view) => {const index = state.visitedViews.findIndex(v => v.path === view.path)if (index === -1) {return}state.visitedViews = state.visitedViews.filter((item, idx) => {if (idx >= index || (item.meta && item.meta.affix)) {return true}const i = state.cachedViews.indexOf(item.name)if (i > -1) {state.cachedViews.splice(i, 1)}return false})}
}const actions = {// 新增当前路由标签和标签缓存addView({ dispatch }, view) {dispatch('addVisitedView', view)dispatch('addCachedView', view)},// 新增当前路由标签addVisitedView({ commit }, view) {commit('ADD_VISITED_VIEW', view)},// 新增当前路由标签缓存addCachedView({ commit }, view) {commit('ADD_CACHED_VIEW', view)},// 删除当前路由标签和标签缓存delView({ dispatch, state }, view) {return new Promise(resolve => {dispatch('delVisitedView', view)dispatch('delCachedView', view)resolve({visitedViews: [...state.visitedViews],cachedViews: [...state.cachedViews]})})},// 删除当前路由标签delVisitedView({ commit, state }, view) {return new Promise(resolve => {commit('DEL_VISITED_VIEW', view)resolve([...state.visitedViews])})},// 删除当前路由标签缓存delCachedView({ commit, state }, view) {return new Promise(resolve => {commit('DEL_CACHED_VIEW', view)resolve([...state.cachedViews])})},// 删除其他路由标签和标签缓存delOthersViews({ dispatch, state }, view) {return new Promise(resolve => {dispatch('delOthersVisitedViews', view)dispatch('delOthersCachedViews', view)resolve({visitedViews: [...state.visitedViews],cachedViews: [...state.cachedViews]})})},// 删除其他路由标签delOthersVisitedViews({ commit, state }, view) {return new Promise(resolve => {commit('DEL_OTHERS_VISITED_VIEWS', view)resolve([...state.visitedViews])})},// 删除其他路由标签缓存delOthersCachedViews({ commit, state }, view) {return new Promise(resolve => {commit('DEL_OTHERS_CACHED_VIEWS', view)resolve([...state.cachedViews])})},// 删除所有路由标签和标签缓存delAllViews({ dispatch, state }, view) {return new Promise(resolve => {dispatch('delAllVisitedViews', view)dispatch('delAllCachedViews', view)resolve({visitedViews: [...state.visitedViews],cachedViews: [...state.cachedViews]})})},// 删除所有路由标签delAllVisitedViews({ commit, state }) {return new Promise(resolve => {commit('DEL_ALL_VISITED_VIEWS')resolve([...state.visitedViews])})},// 删除所有路由标签缓存delAllCachedViews({ commit, state }) {return new Promise(resolve => {commit('DEL_ALL_CACHED_VIEWS')resolve([...state.cachedViews])})},updateVisitedView({ commit }, view) {commit('UPDATE_VISITED_VIEW', view)},// 删除右侧路由标签缓存delRightTags({ commit }, view) {return new Promise(resolve => {commit('DEL_RIGHT_VIEWS', view)resolve([...state.visitedViews])})},// 删除左侧路由标签缓存delLeftTags({ commit }, view) {return new Promise(resolve => {commit('DEL_LEFT_VIEWS', view)resolve([...state.visitedViews])})},
}export default {namespaced: true,state,mutations,actions
}
2. 在Vuex里面引入 tags-view.js
在store 目录下 index.js 文件修改,代码如下(示例):
import Vue from 'vue'
import Vuex from 'vuex'
...
// 新加
import tagsView from './modules/tags-view'Vue.use(Vuex)const store = new Vuex.Store({modules: {...// 新加tagsView},getters
})export default store
3. 新建 tabsView 组件
在 layout/components 目录下新建目录 TabsView,在该目录下新建 index.vue 文件,代码如下(示例):
<template><div id="tags-view-container" class="tags-view-container"><!-- 路由标签显示区域(滚动)组件 --><scroll-pane ref="scrollPane" class="tags-view-wrapper" @scroll="handleScroll"><router-linkv-for="tag in visitedViews"ref="tag":key="tag.path":class="isActive(tag)?'active':''":to="{ path: tag.path, query: tag.query, fullPath: tag.fullPath }"tag="span"class="tags-view-item":style="activeStyle(tag)"@click.middle.native="!isAffix(tag)?closeSelectedTag(tag):''"@contextmenu.prevent.native="openMenu(tag,$event)">{{ tag.title }}<!-- 这个地方一定要click加个stop阻止,不然会因为事件冒泡一直触发父元素的点击事件,无法跳转另一个路由 --><span v-if="!isAffix(tag)" class="el-icon-close" @click.prevent.stop="closeSelectedTag(tag)" /></router-link></scroll-pane><ul v-show="visible" :style="{left:left+'px',top:top+'px'}" class="contextmenu"><li @click="refreshSelectedTag(selectedTag)"><i class="el-icon-refresh-right"></i> 刷新页面</li><li v-if="!isAffix(selectedTag)" @click="closeSelectedTag(selectedTag)"><i class="el-icon-close"></i> 关闭当前</li><li @click="closeOthersTags"><i class="el-icon-circle-close"></i> 关闭其他</li><li v-if="!isFirstView()" @click="closeLeftTags"><i class="el-icon-back"></i> 关闭左侧</li><li v-if="!isLastView()" @click="closeRightTags"><i class="el-icon-right"></i> 关闭右侧</li><li @click="closeAllTags(selectedTag)"><i class="el-icon-circle-close"></i> 全部关闭</li></ul></div>
</template><script>import ScrollPane from './ScrollPane'import path from 'path'export default {components: { ScrollPane },data() {return {// 右键菜单隐藏对应布尔值visible: false,//右键菜单对应位置top: 0,left: 0,// 选择的标签selectedTag: {},// 固钉标签,不可删除affixTags: []}},// 计算属性computed: {visitedViews() {return this.$store.state.tagsView.visitedViews},routes() {return this.$store.state.permission.routes},},// 监听watch: {// 监听路由变化$route() {this.addTags()this.moveToCurrentTag()},//监听右键菜单的值是否为true,如果是就创建全局监听点击事件,触发closeMenu事件隐藏菜单,如果是false就删除监听visible(value) {if (value) {document.body.addEventListener('click', this.closeMenu)} else {document.body.removeEventListener('click', this.closeMenu)}}},// 页面渲染后初始化mounted() {this.initTags()this.addTags()},methods: {isActive(route) {return route.path === this.$route.path},activeStyle(tag) {if (!this.isActive(tag)) return {};return {"background-color": this.theme,"border-color": this.theme};},isAffix(tag) {return tag.meta && tag.meta.affix},isFirstView() {try {return this.selectedTag.fullPath === this.visitedViews[1].fullPath || this.selectedTag.fullPath === '/index'} catch (err) {return false}},isLastView() {try {return this.selectedTag.fullPath === this.visitedViews[this.visitedViews.length - 1].fullPath} catch (err) {return false}},filterAffixTags(routes, basePath = '/') {let tags = []routes.forEach(route => {if (route.meta && route.meta.affix) {const tagPath = path.resolve(basePath, route.path)tags.push({fullPath: tagPath,path: tagPath,name: route.name,meta: { ...route.meta }})}if (route.children) {const tempTags = this.filterAffixTags(route.children, route.path)if (tempTags.length >= 1) {tags = [...tags, ...tempTags]}}})return tags},initTags() {const affixTags = this.affixTags = this.filterAffixTags(this.routes)for (const tag of affixTags) {// Must have tag nameif (tag.name) {this.$store.dispatch('tagsView/addVisitedView', tag)}}},/* 添加页签 */addTags() {const { name } = this.$routeif (name) {this.$store.dispatch('tagsView/addView', this.$route)}return false},/* 移动到当前页签 */moveToCurrentTag() {const tags = this.$refs.tagthis.$nextTick(() => {for (const tag of tags) {if (tag.to.path === this.$route.path) {this.$refs.scrollPane.moveToTarget(tag)// when query is different then updateif (tag.to.fullPath !== this.$route.fullPath) {this.$store.dispatch('tagsView/updateVisitedView', this.$route)}break}}})},refreshSelectedTag(view) {this.$store.dispatch('tagsView/delCachedView', view).then(() => {const { fullPath } = viewthis.$nextTick(() => {this.$router.replace({path: '/redirect' + fullPath})})})},closeSelectedTag(view) {this.$store.dispatch('tagsView/delView', view).then(({ visitedViews }) => {if (this.isActive(view)) {this.toLastView(visitedViews, view)}})},closeRightTags() {this.$store.dispatch('tagsView/delRightTags', this.selectedTag).then(visitedViews => {if (!visitedViews.find(i => i.fullPath === this.$route.fullPath)) {this.toLastView(visitedViews)}})},closeLeftTags() {this.$store.dispatch('tagsView/delLeftTags', this.selectedTag).then(visitedViews => {if (!visitedViews.find(i => i.fullPath === this.$route.fullPath)) {this.toLastView(visitedViews)}})},closeOthersTags() {this.$router.push(this.selectedTag)this.$store.dispatch('tagsView/delOthersViews', this.selectedTag).then(() => {this.moveToCurrentTag()})},closeAllTags(view) {this.$store.dispatch('tagsView/delAllViews').then(({ visitedViews }) => {if (this.affixTags.some(tag => tag.path === this.$route.path)) {return}this.toLastView(visitedViews, view)})},toLastView(visitedViews, view) {const latestView = visitedViews.slice(-1)[0]if (latestView) {this.$router.push(latestView.fullPath)} else {// now the default is to redirect to the home page if there is no tags-view,// you can adjust it according to your needs.if (view.name === 'Dashboard') {// to reload home pagethis.$router.replace({ path: '/redirect' + view.fullPath })} else {this.$router.push('/')}}},openMenu(tag, e) {const menuMinWidth = 105const offsetLeft = this.$el.getBoundingClientRect().left // container margin leftconst offsetWidth = this.$el.offsetWidth // container widthconst maxLeft = offsetWidth - menuMinWidth // left boundaryconst left = e.clientX - offsetLeft + 15 // 15: margin rightif (left > maxLeft) {this.left = maxLeft} else {this.left = left}this.top = e.clientYthis.visible = truethis.selectedTag = tag},closeMenu() {this.visible = false},handleScroll() {this.closeMenu()}}}
</script><style lang="scss" scoped>.tags-view-container {height: 34px;width: 100%;background: #fff;border-bottom: 1px solid #d8dce5;box-shadow: 0 1px 3px 0 rgba(0, 0, 0, .12), 0 0 3px 0 rgba(0, 0, 0, .04);.tags-view-wrapper {.tags-view-item {display: inline-block;position: relative;cursor: pointer;height: 26px;line-height: 26px;border: 1px solid #d8dce5;color: #495060;background: #fff;padding: 0 8px;font-size: 12px;margin-left: 5px;margin-top: 4px;&:first-of-type {margin-left: 15px;}&:last-of-type {margin-right: 15px;}&.active {background-color: #42b983;color: #fff;border-color: #42b983;&::before {content: '';background: #fff;display: inline-block;width: 8px;height: 8px;border-radius: 50%;position: relative;margin-right: 2px;}}}}.contextmenu {margin: 0;background: #fff;z-index: 3000;position: absolute;list-style-type: none;padding: 5px 0;border-radius: 4px;font-size: 12px;font-weight: 400;color: #333;box-shadow: 2px 2px 3px 0 rgba(0, 0, 0, .3);li {margin: 0;padding: 7px 16px;cursor: pointer;&:hover {background: #eee;}}}}
</style><style lang="scss">//reset element css of el-icon-close.tags-view-wrapper {.tags-view-item {.el-icon-close {width: 16px;height: 16px;vertical-align: 2px;border-radius: 50%;text-align: center;transition: all .3s cubic-bezier(.645, .045, .355, 1);transform-origin: 100% 50%;&:before {transform: scale(.6);display: inline-block;vertical-align: -3px;}&:hover {background-color: #b4bccc;color: #fff;}}}}
</style>
4. 新建 ScrollPane 组件
这个组件主要是控制路由标签长度超出时左右按钮的滚动功能。 在 TabsView 目录下,新建 ScrollPane.vue 文件,代码如下(示例):
<template><el-scrollbar ref="scrollContainer" :vertical="false" class="scroll-container" @wheel.native.prevent="handleScroll"><slot /></el-scrollbar>
</template><script>
const tagAndTagSpacing = 4 // tagAndTagSpacingexport default {name: 'ScrollPane',data() {return {left: 0}},computed: {scrollWrapper() {return this.$refs.scrollContainer.$refs.wrap}},mounted() {this.scrollWrapper.addEventListener('scroll', this.emitScroll, true)},beforeDestroy() {this.scrollWrapper.removeEventListener('scroll', this.emitScroll)},methods: {handleScroll(e) {const eventDelta = e.wheelDelta || -e.deltaY * 40const $scrollWrapper = this.scrollWrapper$scrollWrapper.scrollLeft = $scrollWrapper.scrollLeft + eventDelta / 4},emitScroll() {this.$emit('scroll')},moveToTarget(currentTag) {const $container = this.$refs.scrollContainer.$elconst $containerWidth = $container.offsetWidthconst $scrollWrapper = this.scrollWrapperconst tagList = this.$parent.$refs.taglet firstTag = nulllet lastTag = null// find first tag and last tagif (tagList.length > 0) {firstTag = tagList[0]lastTag = tagList[tagList.length - 1]}if (firstTag === currentTag) {$scrollWrapper.scrollLeft = 0} else if (lastTag === currentTag) {$scrollWrapper.scrollLeft = $scrollWrapper.scrollWidth - $containerWidth} else {// find preTag and nextTagconst currentIndex = tagList.findIndex(item => item === currentTag)const prevTag = tagList[currentIndex - 1]const nextTag = tagList[currentIndex + 1]// the tag's offsetLeft after of nextTagconst afterNextTagOffsetLeft = nextTag.$el.offsetLeft + nextTag.$el.offsetWidth + tagAndTagSpacing// the tag's offsetLeft before of prevTagconst beforePrevTagOffsetLeft = prevTag.$el.offsetLeft - tagAndTagSpacingif (afterNextTagOffsetLeft > $scrollWrapper.scrollLeft + $containerWidth) {$scrollWrapper.scrollLeft = afterNextTagOffsetLeft - $containerWidth} else if (beforePrevTagOffsetLeft < $scrollWrapper.scrollLeft) {$scrollWrapper.scrollLeft = beforePrevTagOffsetLeft}}}}
}
</script><style lang="scss" scoped>
.scroll-container {white-space: nowrap;position: relative;overflow: hidden;width: 100%;::v-deep {.el-scrollbar__bar {bottom: 0px;}.el-scrollbar__wrap {height: 49px;}}
}
</style>
5. 引入 tabsView 组件
修改 layout/components/index.js 文件,引入组件,代码如下(示例):
export { default as TagsView } from './TagsView/index.vue'
修改 layout/index.vue 文件,使用 tabsView 组件,代码如下(示例):
<template><div :class="classObj" class="app-wrapper"><div v-if="device==='mobile'&&sidebar.opened" class="drawer-bg" @click="handleClickOutside" /><!-- 左侧侧边栏菜单 --><sidebar class="sidebar-container" /><div class="main-container"><div :class="{'fixed-header':fixedHeader}"><navbar /><!--多页签导航栏--><tags-view v-if="needTagsView" /></div><app-main /></div></div>
</template><script>
import { Navbar, Sidebar, AppMain, TagsView } from './components'
import ResizeMixin from './mixin/ResizeHandler'export default {name: 'Layout',components: {Navbar,Sidebar,AppMain,TagsView},mixins: [ResizeMixin],computed: {needTagsView() {return true},...},methods: {handleClickOutside() {this.$store.dispatch('app/closeSideBar', { withoutAnimation: false })}}
}
</script>
6. 使用 keep-alive 组件,进行页签的缓存
修改 layout/components/AppMain.vue 文件,使用 keep-alive 组件,进行页签的缓存,代码如下(示例):
<template><section class="app-main"><transition name="fade-transform" mode="out-in"><keep-alive :include="cachedViews"><router-view :key="key" /></keep-alive></transition></section>
</template><script>
export default {name: 'AppMain',computed: {cachedViews() {return this.$store.state.tagsView.cachedViews},key() {return this.$route.path}}
}
</script><style scoped>
.app-main {/*50 = navbar  */min-height: calc(100vh - 50px);width: 100%;position: relative;overflow: hidden;
}
.fixed-header+.app-main {padding-top: 50px;
}
</style><style lang="scss">
// fix css style bug in open el-dialog
.el-popup-parent--hidden {.fixed-header {padding-right: 15px;}
}
</style>
总结
好了,以上就是本篇文章的全部内容了,本文梳理了一下vue-element-admin项目实现多页签功能的整体步骤,若觉得本文对您有帮助的话,还不忘点赞评论关注,支持一波哟~