博客系统url : 链接
项目已上传gitee : 链接
前言
之前笔者已经使用Servlet结合MySQL实现了第一版的个人博客。在这一版的博客系统中,将进行以下功能的升级:
- 框架升级:SSM版本,即(Spring + SpringMVC + MyBatis) ,结合MySQL、Redis以及JQuery。
- 密码升级:明文存储/md5存储—>加盐处理。
- 用户登录状态持久化升级:将session持久化到Redis。
- 功能升级:实现分页功能。
- 使用拦截器升级用户登录验证。
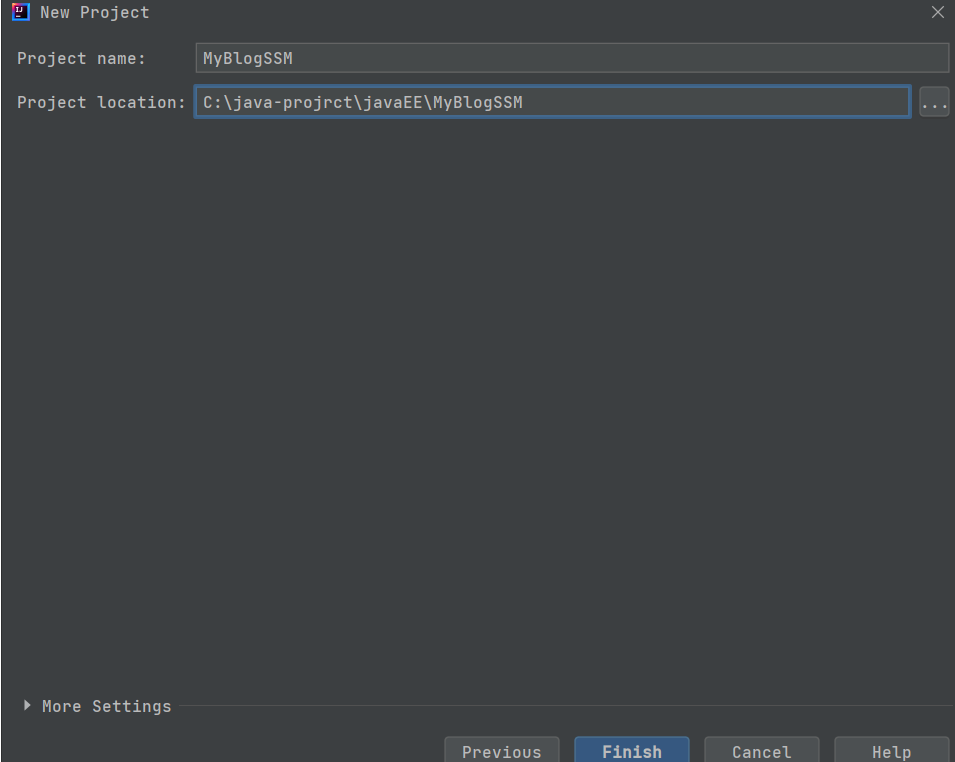
一:新建项目
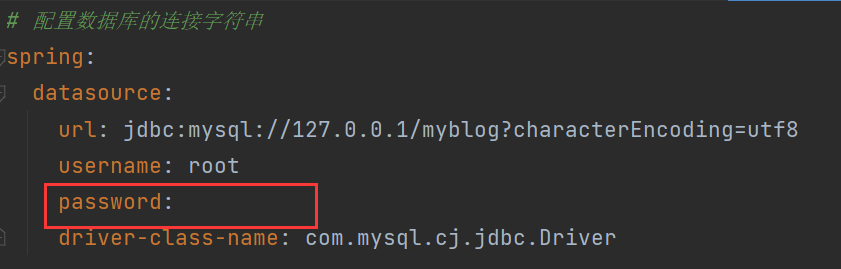
配置applicaiton.yml文件:
# 配置数据库的连接字符串
spring:datasource:url: jdbc:mysql://127.0.0.1/myblog?characterEncoding=utf8username: rootpassword: 111111driver-class-name: com.mysql.cj.jdbc.Driver
# 设置 Mybatis 的 xml 保存路径
mybatis:mapper-locations: classpath:mapper/**Mapper.xmlconfiguration: # 配置打印 MyBatis 执行的 SQLlog-impl: org.apache.ibatis.logging.stdout.StdOutImpl
# 配置打印 MyBatis 执行的 SQL
logging:level:com:example:demo: debug
二:搭建项目框架
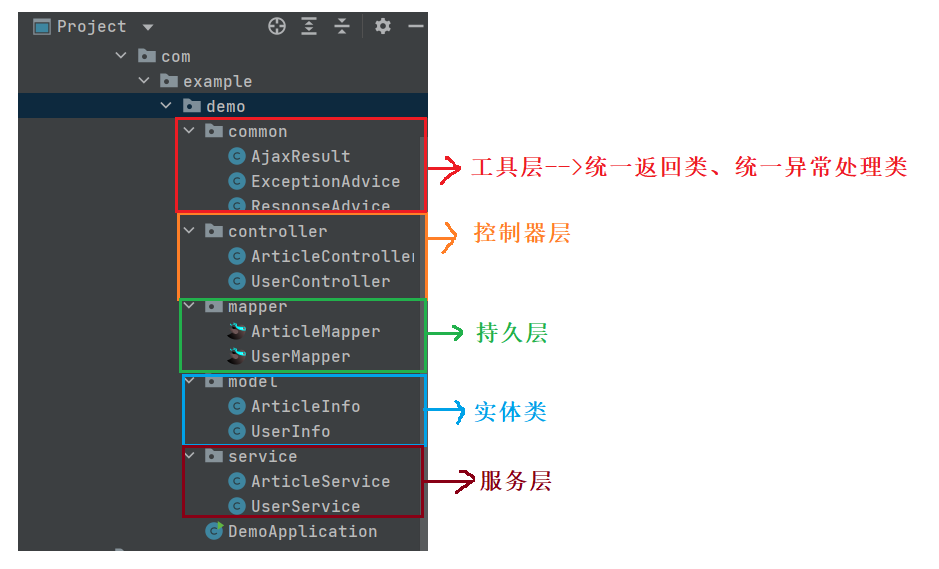
实体类 :
ArticleInfo
package com.example.demo.model;import com.fasterxml.jackson.annotation.JsonFormat;
import lombok.Data;import java.util.Date;@Data
public class ArticleInfo {private int id; //文章编号private String title;private String content;@JsonFormat(shape= JsonFormat.Shape.STRING,pattern="yyyy-MM-dd HH:mm:ss",timezone="GMT+8")private Date createtime;private Date updatetime;private int uid; //作者编号private int rcount; // 访问量private int state; // 状态(预览字段)
}
UserInfo
package com.example.demo.model;
import lombok.Data;
import java.io.Serializable;
import java.util.Date;@Data
public class UserInfo implements Serializable {private int id;private String username;private String password;private String photo;private Date createtime;private Date updatetime;private int state;
}
三:引入前端的页面
前端页面和上一版博客系统差别不大,此处直接引入即可。

置于static目录下即可。
四:实现前后端交互功能
4.1 统一数据格式返回
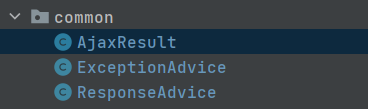
AjaxResult
package com.example.demo.common;import java.util.HashMap;/*** 自定义的统一返回对象*/
public class AjaxResult {/*** 业务执行成功时进行返回的方法* @param data* @return*/public static HashMap<String,Object> success(Object data) {HashMap<String,Object> result = new HashMap<>();result.put("code",200);result.put("msg","");result.put("data",data);return result;}public static HashMap<String,Object> success(String msg, Object data) {HashMap<String,Object> result = new HashMap<>();result.put("code",200);result.put("msg",msg);result.put("data",data);return result;}/*** 业务执行失败时进行返回的方法* @param code* @param msg* @return*/public static HashMap<String,Object> fail(String msg,int code) {HashMap<String,Object> result = new HashMap<>();result.put("code",code);result.put("msg",msg);result.put("data","");return result;}
}
ExceptionAdvice
package com.example.demo.common;import org.springframework.web.bind.annotation.ControllerAdvice;
import org.springframework.web.bind.annotation.ExceptionHandler;
import org.springframework.web.bind.annotation.ResponseBody;/*** 异常类的统一处理*/
@ControllerAdvice // 控制器通知类
@ResponseBody
public class ExceptionAdvice {@ExceptionHandler(Exception.class) // 异常处理器public Object exceptionAdvice(Exception e) {return AjaxResult.fail(e.getMessage(),-1);}
}
ResponseAdvice
package com.example.demo.common;import com.fasterxml.jackson.core.JsonProcessingException;
import com.fasterxml.jackson.databind.ObjectMapper;
import org.springframework.core.MethodParameter;
import org.springframework.http.MediaType;
import org.springframework.http.server.ServerHttpRequest;
import org.springframework.http.server.ServerHttpResponse;
import org.springframework.web.bind.annotation.ControllerAdvice;
import org.springframework.web.servlet.mvc.method.annotation.ResponseBodyAdvice;import java.util.HashMap;/*** 统一数据返回封装*/
@ControllerAdvice
public class ResponseAdvice implements ResponseBodyAdvice {@Overridepublic boolean supports(MethodParameter returnType, Class converterType) {return true;}@Overridepublic Object beforeBodyWrite(Object body, MethodParameter returnType, MediaType selectedContentType, Class selectedConverterType, ServerHttpRequest request, ServerHttpResponse response) {if(body instanceof HashMap) {// 已经是封装好的对象return body;}if(body instanceof String) {// 返回对象是String类型(特殊)ObjectMapper objectMapper = new ObjectMapper();try {return objectMapper.writeValueAsString(AjaxResult.success(body));} catch (JsonProcessingException e) {e.printStackTrace();}}return AjaxResult.success(body);}
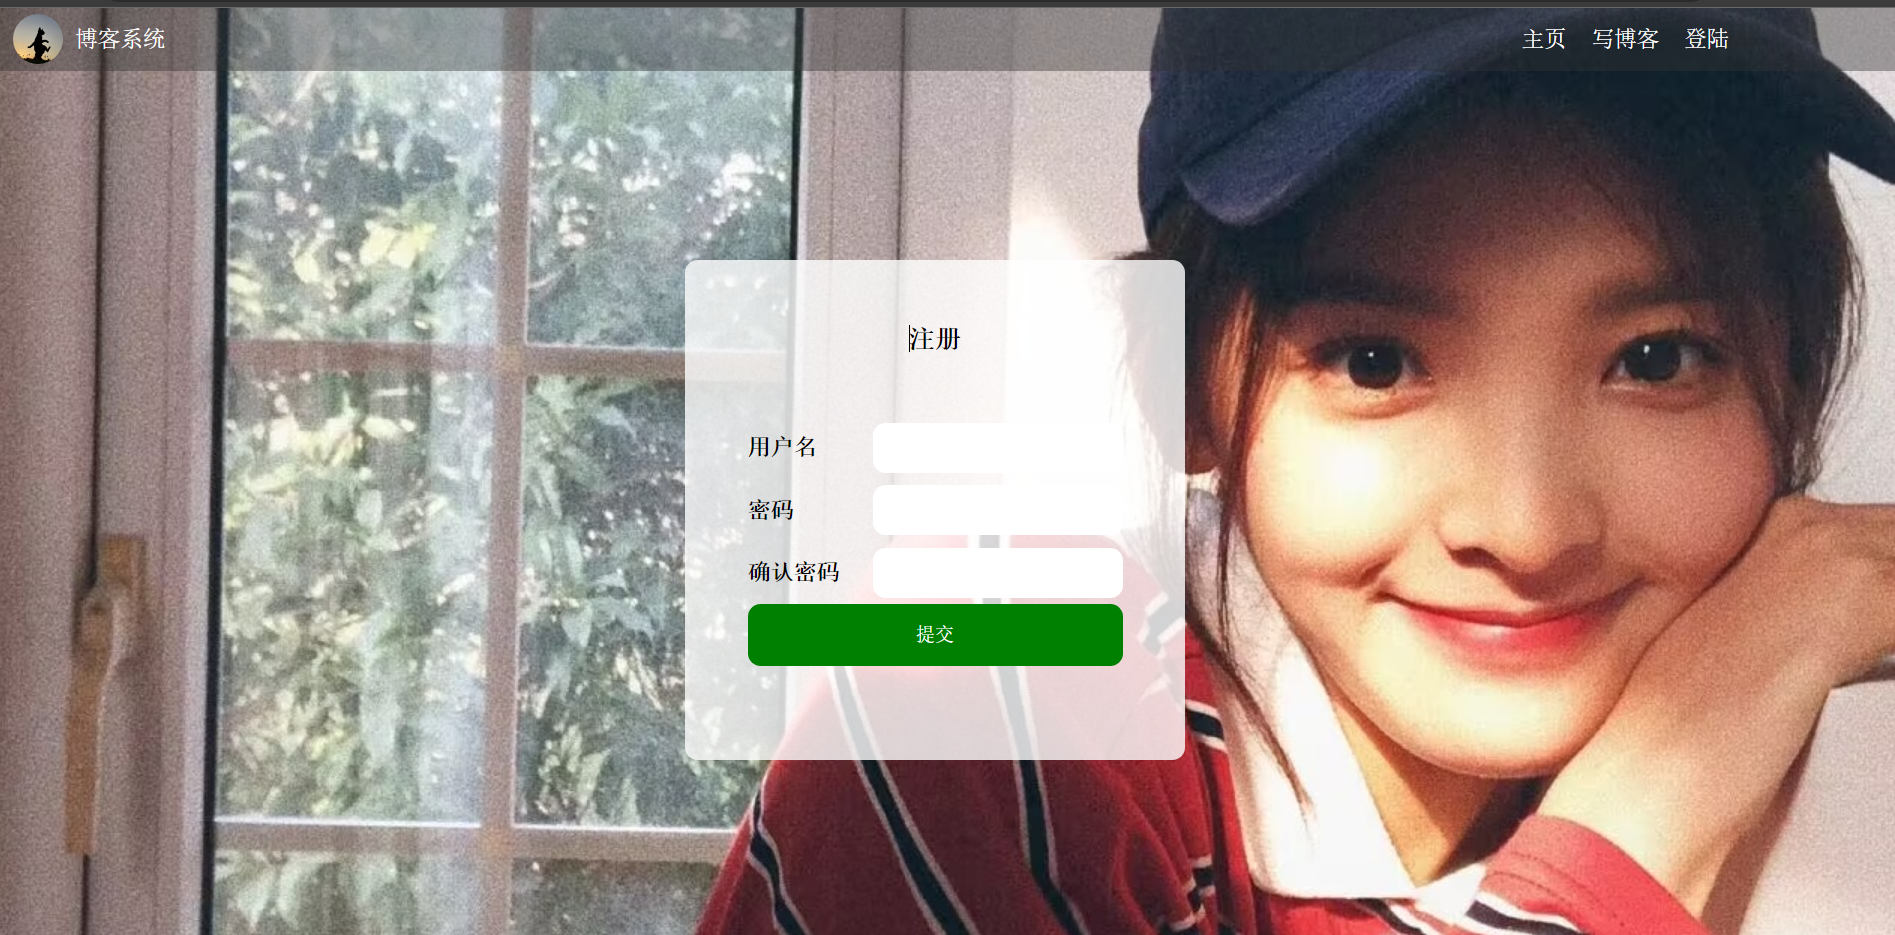
}4.2 注册功能
注册前端页面如下:
<!DOCTYPE html>
<html lang="en"><head><meta charset="UTF-8"><meta http-equiv="X-UA-Compatible" content="IE=edge"><meta name="viewport" content="width=device-width, initial-scale=1.0"><title>注册页面</title><link rel="stylesheet" href="css/conmmon.css"><link rel="stylesheet" href="css/login.css"></head><body><!-- 导航栏 --><div class="nav"><img src="img/logo2.jpg" alt=""><span class="title">我的博客系统</span><!-- 用来占据中间位置 --><span class="spacer"></span><a href="blog_list.html">主页</a><a href="blog_edit.html">写博客</a><a href="login.html">登录</a><!-- <a href="#">注销</a> --></div><!-- 版心 --><div class="login-container"><!-- 中间的注册框 --><div class="login-dialog"><h3>注册</h3><div class="row"><span>用户名</span><input type="text" id="username"></div><div class="row"><span>密码</span><input type="password" id="password"></div><div class="row"><span>确认密码</span><input type="password" id="password2"></div><div class="row"><button id="submit">提交</button></div></div></div>
</body></html>
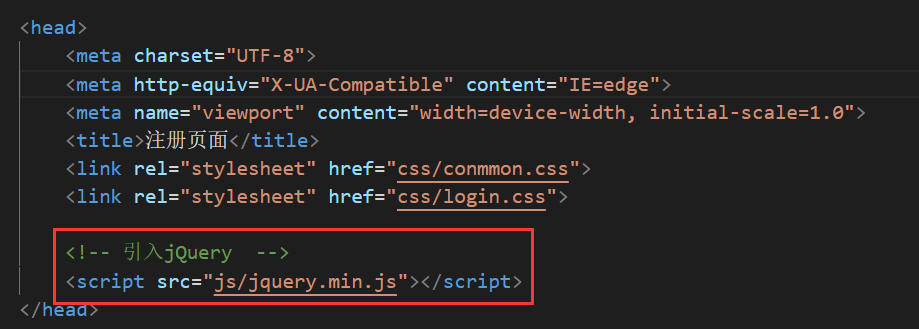
Step1:引入jQuery
jQuery教程
Step2:编写前端代码
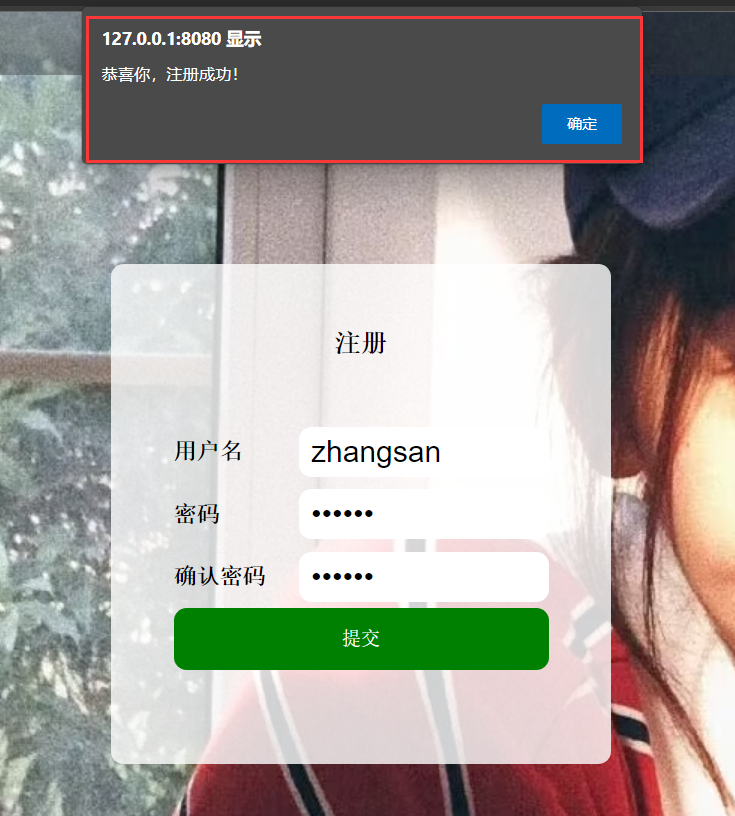
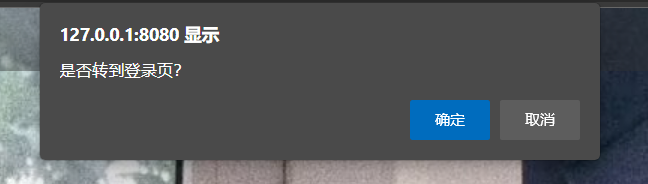
  <button id="submit" onclick="mysub()">提交</button><script>function mysub() {//1.非空校验var username = jQuery("#username");var password = jQuery("#password");var password2 = jQuery("#password2");if(username.val() == "") {alert("请输入用户名!");username.focus(); // 将光标移动到username的输入框处return false;}if(password.val() == "") {alert("请输入密码!");password.focus(); // 将光标移动到password的输入框处return false;}if(password2.val() == "") {alert("请再次确认密码!");password2.focus(); // 将光标移动到password2的输入框处return false;}if(password.val() != password2.val()) {alert("两次密码输入不一致,请重新输入!");password.focus();return false;}//2.发送ajax请求给后端jQuery.ajax({url:"/user/reg",type:"POST",data:{username:username.val(),password:password.val()},success:function(result) {if(result.code == 200 && result.data == 1) {alert("恭喜你,注册成功!");if(confirm("是否转到登录页?")) {location.href = "login.html";} }else {alert("注册失败,请稍后再试!");}}});}
</script>
Step3:编写后端代码
UserController
package com.example.demo.controller;import com.example.demo.common.AjaxResult;
import com.example.demo.service.UserService;
import org.springframework.beans.factory.annotation.Autowired;
import org.springframework.util.StringUtils;
import org.springframework.web.bind.annotation.RequestMapping;
import org.springframework.web.bind.annotation.RestController;/*** 用户控制器*/
@RestController// 返回页面不是数据
@RequestMapping("/user")
public class UserController {@Autowiredprivate UserService userService;@RequestMapping("/reg")public Object reg(String username,String password) {//1.非空校验if(!StringUtils.hasLength(username) || !StringUtils.hasLength(password)) {return AjaxResult.fail(-1,"非法的参数请求");}//2.进行添加操作int result = userService.add(username,password);if(result == 1) {return AjaxResult.success("添加成功!",1);} else {return AjaxResult.fail("数据库添加出错!",-1);}}
}
UserService
package com.example.demo.service;import com.example.demo.mapper.UserMapper;
import org.springframework.beans.factory.annotation.Autowired;
import org.springframework.stereotype.Service;/*** 用户表服务层*/
@Service
public class UserService {@Autowiredprivate UserMapper userMapper;public int add(String username,String password) {return userMapper.add(username,password);}
}
UserMapper
package com.example.demo.mapper;import org.apache.ibatis.annotations.Mapper;
import org.apache.ibatis.annotations.Param;/*** 用户表mapper*/
@Mapper
public interface UserMapper {public int add(@Param("username") String username,@Param("password") String password);
}
UserMapper.xml
<?xml version="1.0" encoding="UTF-8"?>
<!DOCTYPE mapper PUBLIC "-//mybatis.org//DTD Mapper 3.0//EN" "http://mybatis.org/dtd/mybatis-3-mapper.dtd">
<mapper namespace="com.example.demo.mapper.UserMapper">
<insert id = "add">insert into userinfo(username,password)values(#{username},#{password})
</insert>
</mapper>
查看数据库中的数据:

进行添加操作:
点击提交:
点击确认:
点击确认:
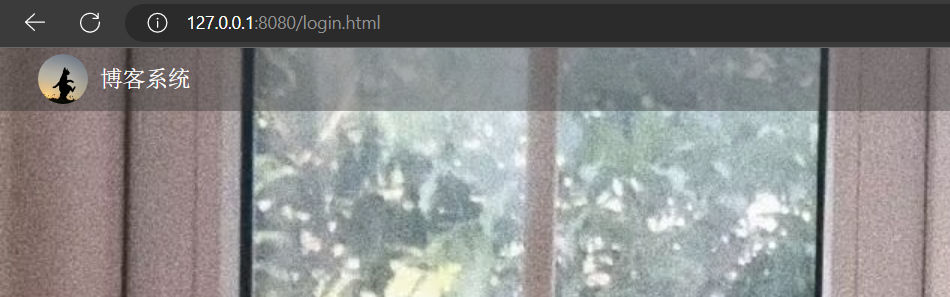
跳转到登录页。
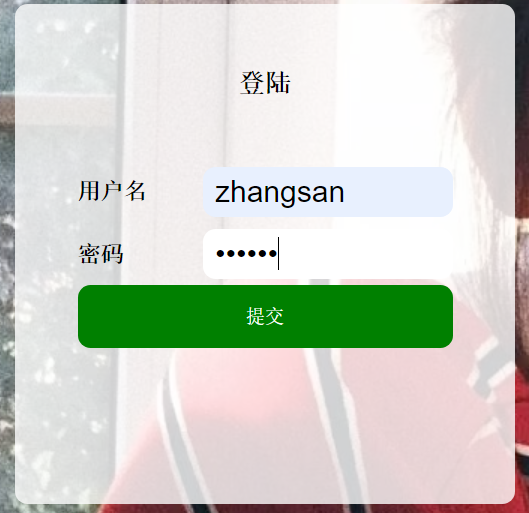
4.3 登录功能
登录前端页面如下:

<!DOCTYPE html>
<html lang="en"><head><meta charset="UTF-8"><meta http-equiv="X-UA-Compatible" content="IE=edge"><meta name="viewport" content="width=device-width, initial-scale=1.0"><title>登陆页面</title><link rel="stylesheet" href="css/conmmon.css"><link rel="stylesheet" href="css/login.css">
</head><body><!-- 导航栏 --><div class="nav"><img src="img/logo2.jpg" alt=""><span class="title">博客系统</span><!-- 用来占据中间位置 --><span class="spacer"></span><a href="blog_list.html">主页</a><a href="blog_edit.html">写博客</a><a href="login.html">登录</a><!-- <a href="#">注销</a> --></div><!-- 版心 --><div class="login-container"><!-- 中间的登陆框 --><div class="login-dialog"><h3>登陆</h3><div class="row"><span>用户名</span><input type="text" id="username"></div><div class="row"><span>密码</span><input type="password" id="password"></div><div class="row"><button id="submit">提交</button></div></div></div>
</body></html>
Step1:引入jQuery
<script src="js/jquery.min.js"></script>
Step2:编写前端代码
<button id="submit" onclick="mysub()">提交</button><script>function mysub(){// 1.先进行非空效验var username = jQuery("#username");var password = jQuery("#password");if(username.val()==""){alert("请先输入用户名!");username.focus();return false;}if(password.val()==""){alert("请先输入密码!");password.focus();return false;}// 2.发送请求给后端jQuery.ajax({url:"/user/login",type:"POST",data:{"username":username.val(),"password":password.val()},success:function(result){if(result.code==200 && result.data==1){alert("登录成功!");location.href = "myblog_list.html";     }else{alert("用户名或密码错误,请重新输入!");username.focus();}}});}
</script>
Step3:编写后端代码
UserController
@RequestMapping("/login")public int login(HttpServletRequest request, String username, String password) {// 1.非空效验if (!StringUtils.hasLength(username) || !StringUtils.hasLength(password)) {return 0;}// 2. 进行查询操作UserInfo userInfo = userService.login(username, password);if (userInfo == null || userInfo.getId() <= 0) {// 用户名或密码错误,userInfo无效return -1;} else {//用户名和密码正确,将userInfo保存到session中HttpSession session = request.getSession();session.setAttribute(Constant.SESSION_USERINFO_KEY, userInfo);return 1;}}UserService
public UserInfo login(String username, String password) {return userMapper.login(username, password);}
UserMapper
public UserInfo login(@Param("username") String username,@Param("password") String password);
UserMapper.xml
<select id="login" resultType="com.example.demo.model.UserInfo">select * from userinfo whereusername=#{username} and password=#{password}
</select>
进行登录操作:
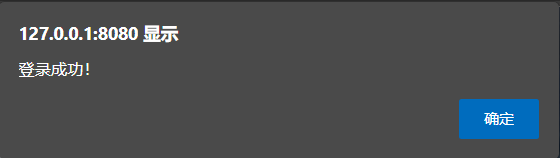
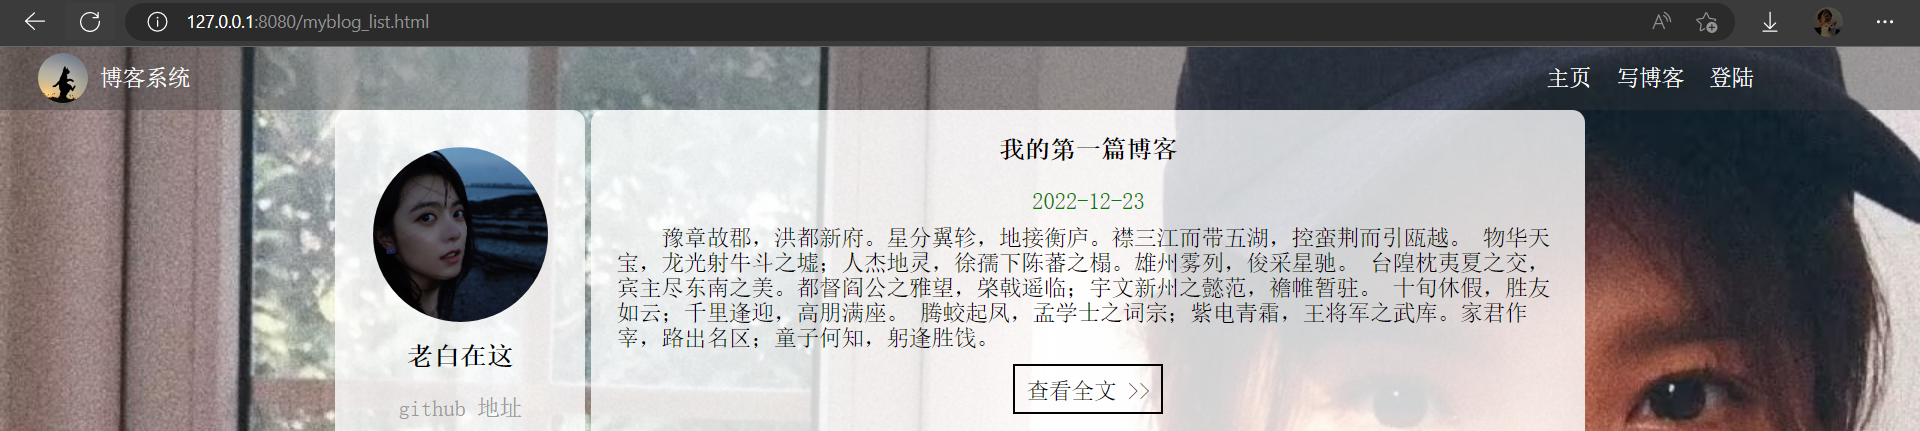
点击确认,跳转到列表详情页。
4.4 统一用户登录权限验证
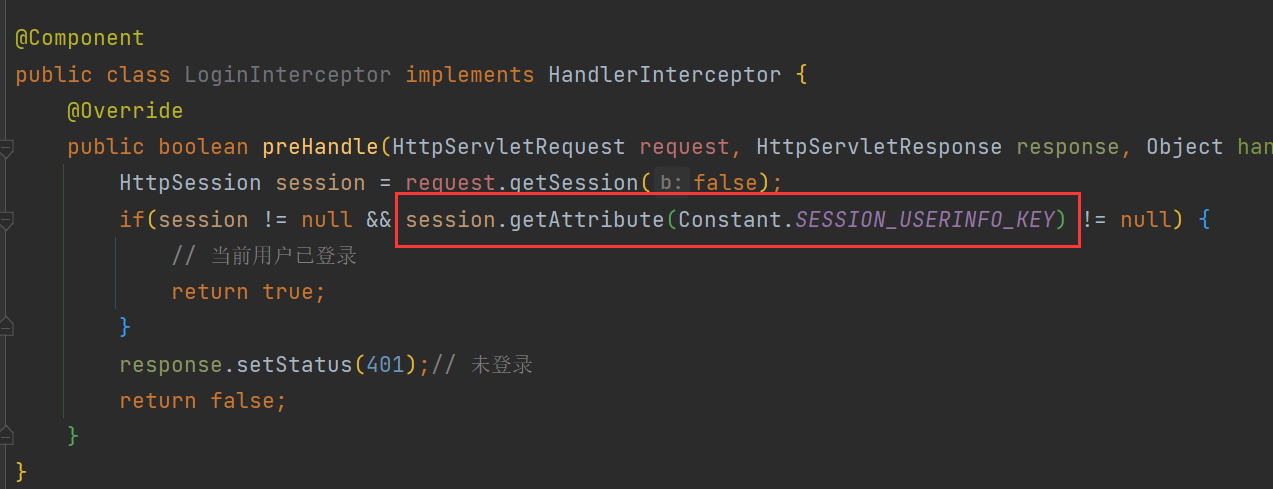
1.创建自定义拦截器,实现 HandlerInterceptor 接口的 preHandle(执行具体方法之前的预处理) 方法。
LoginInterceptor
package com.example.demo.common;import org.springframework.stereotype.Component;
import org.springframework.web.servlet.HandlerInterceptor;import javax.servlet.http.HttpServletRequest;
import javax.servlet.http.HttpServletResponse;
import javax.servlet.http.HttpSession;@Component
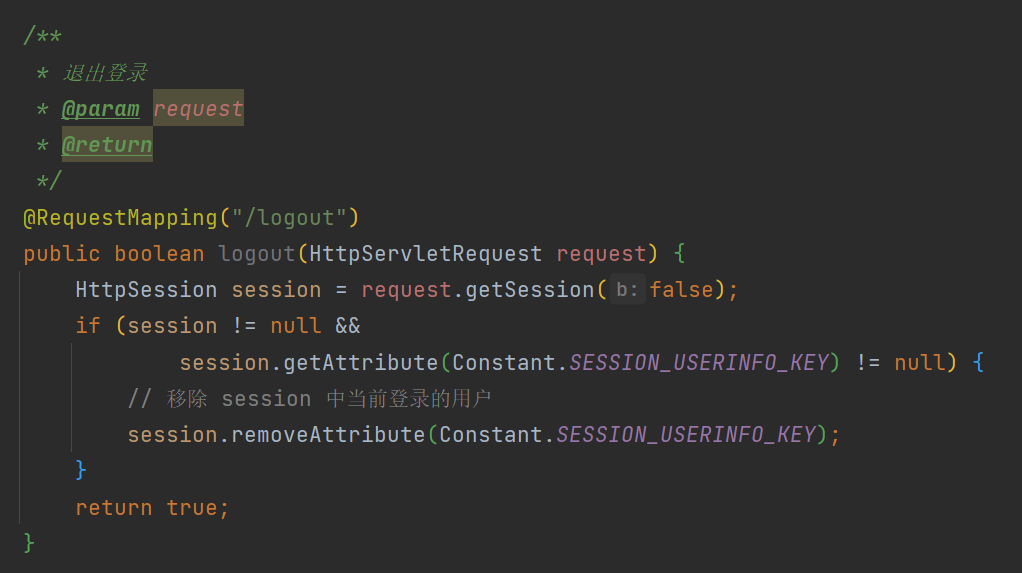
public class LoginInterceptor implements HandlerInterceptor {@Overridepublic boolean preHandle(HttpServletRequest request, HttpServletResponse response, Object handler) throws Exception {HttpSession session = request.getSession(false);if(session != null && session.getAttribute(Constant.SESSION_USERINFO_KEY) != null) {// 当前用户已登录return true;}response.setStatus(401);// 未登录return false;}
}Q : 为什么session中的key值都一样 , 却能够区分不同的登录用户身份呢 ?
A :
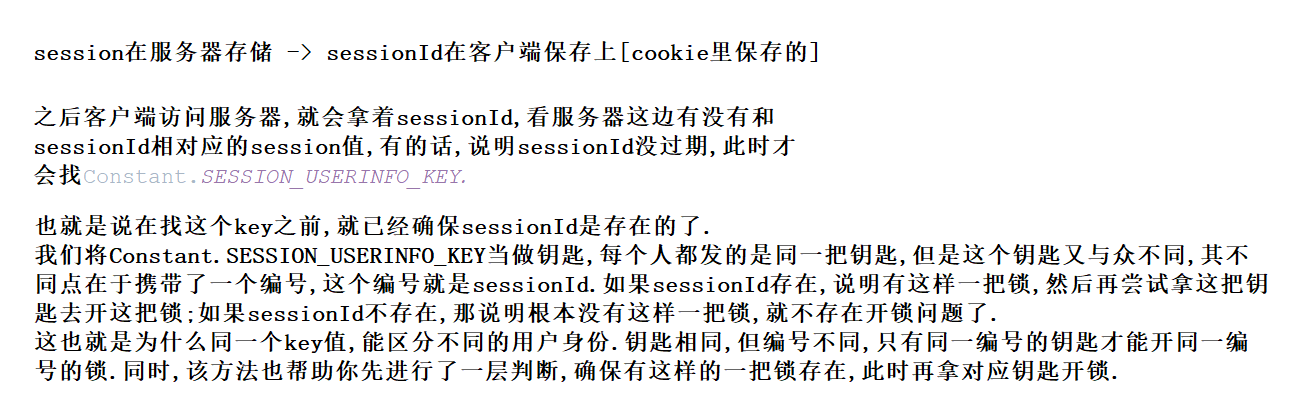
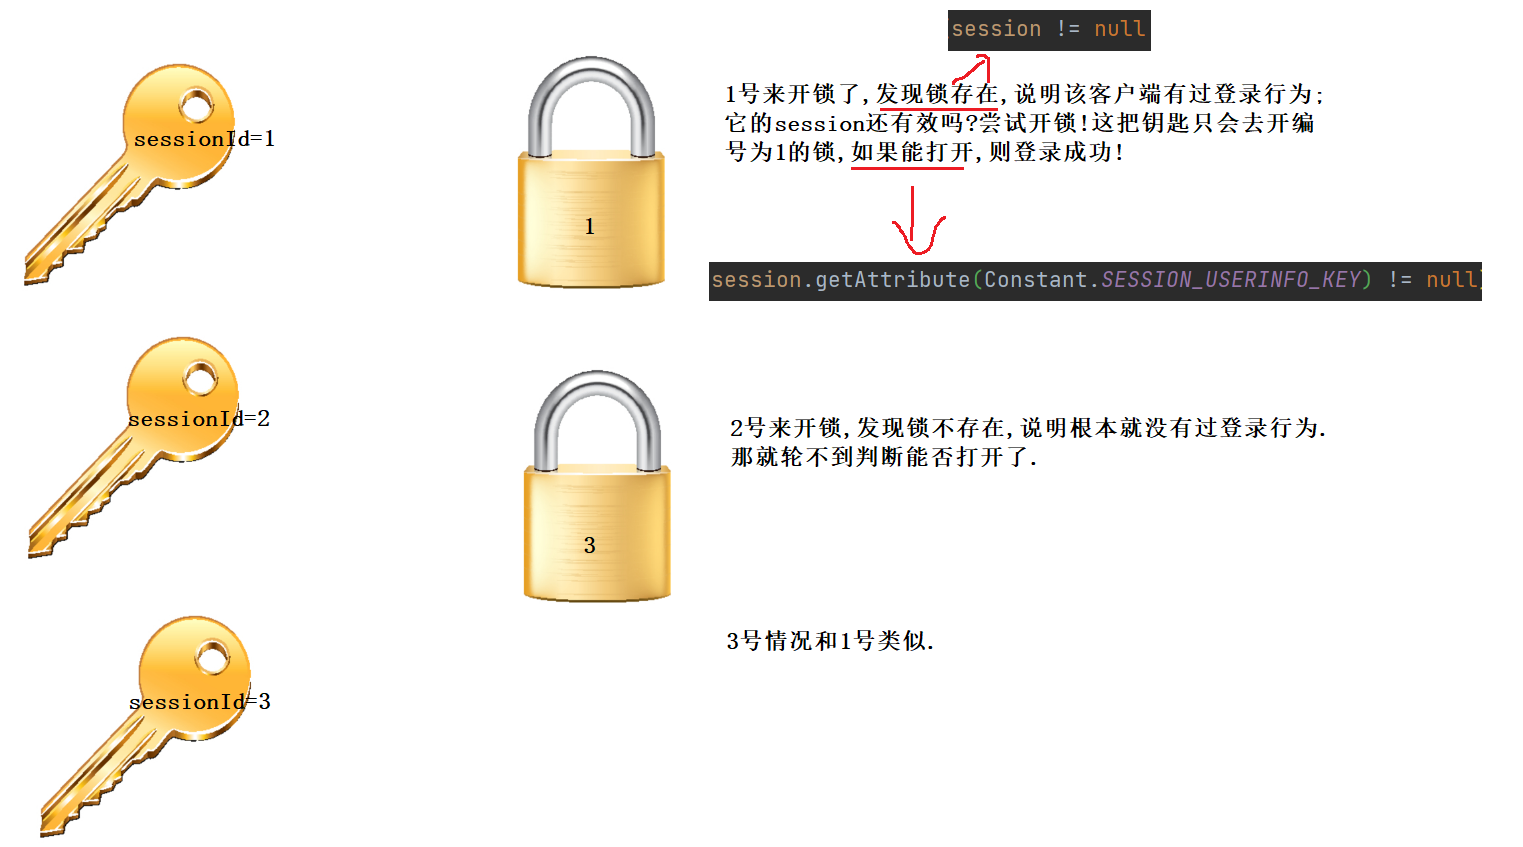
session!=null意味着sessionId不为空 , 而sessionId不为空 , 只能说明该客户端有过登录行为 , 而其session是否还有效 , 就要根据session.getAttribute()!=null来判断了.
2.将自定义拦截器加入 WebMvcConfigurer 的 addInterceptors 方法中。
package com.example.demo.common;import org.springframework.beans.factory.annotation.Autowired;
import org.springframework.context.annotation.Configuration;
import org.springframework.web.servlet.config.annotation.InterceptorRegistration;
import org.springframework.web.servlet.config.annotation.InterceptorRegistry;
import org.springframework.web.servlet.config.annotation.WebMvcConfigurer;
import java.util.ArrayList;
import java.util.List;/*** 自定义拦截规则*/
@Configuration
public class AppConfig implements WebMvcConfigurer {//不拦截的url集合List<String> excludes = new ArrayList<String>(){{add("/js/**");// "/js/**"表示放行js路径下的所有文件add("/editor.md/**");add("/css/**");add("/img/**");add("/user/login");// 放行登录接口add("/user/reg");// 放行注册接口add("/art/setrcount");//  放行访问量设置接口add("/art/list");//  放行文章分页列表add("/art/totalpage");// 放行总页面数接口add("/login.html");add("/blog_list.html");add("/myblog_list.html");add("/reg.html");}};@Autowiredprivate LoginInterceptor loginInterceptor;// 导入拦截器@Overridepublic void addInterceptors(InterceptorRegistry registry) {//配置拦截器InterceptorRegistration registration =registry.addInterceptor(loginInterceptor);registration.addPathPatterns("/**");registration.excludePathPatterns(excludes);}
}
4.5 列表页
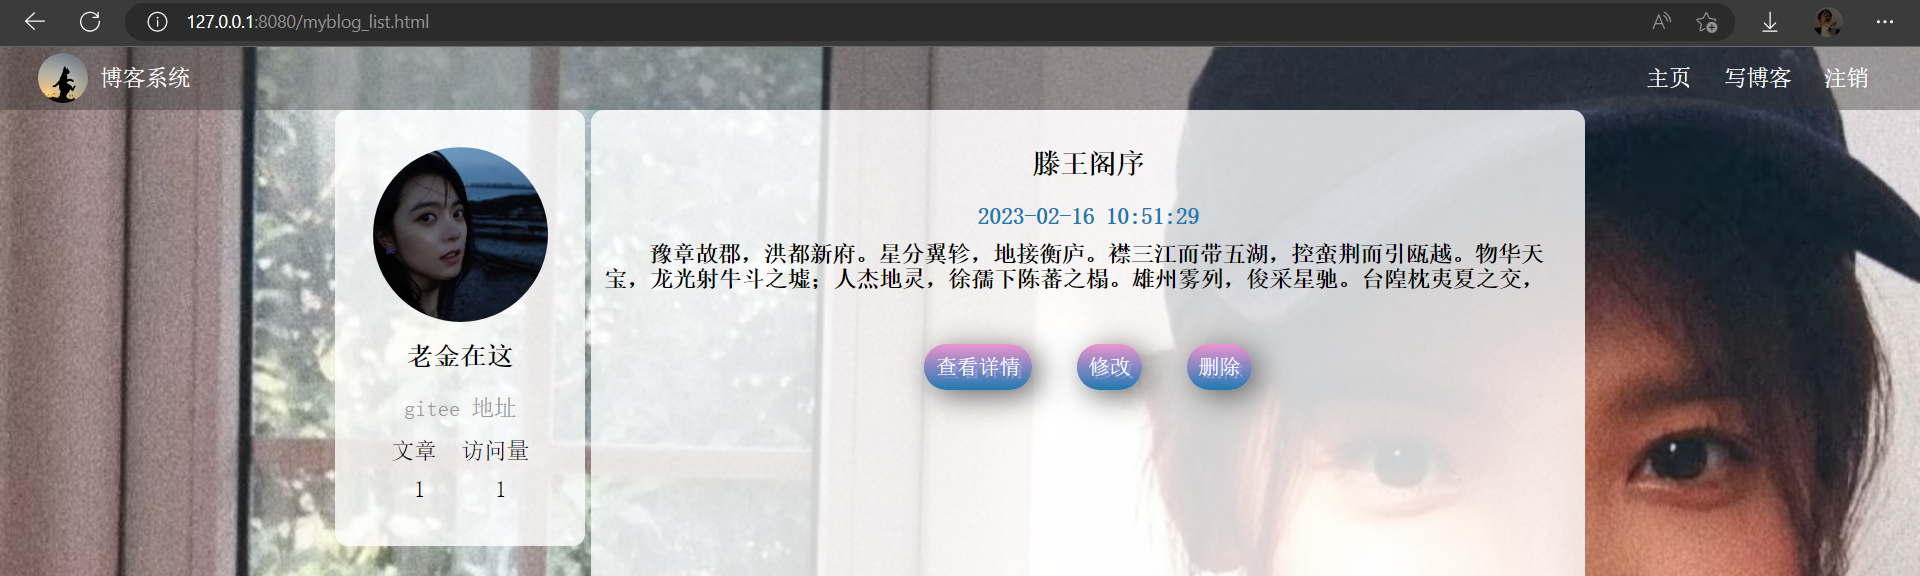
列表页前端页面如下 :
<!DOCTYPE html>
<html lang="en"><head><meta charset="UTF-8"><meta http-equiv="X-UA-Compatible" content="IE=edge"><meta name="viewport" content="width=device-width, initial-scale=1.0"><title>博客列表</title><link rel="stylesheet" href="css/conmmon.css"><link rel="stylesheet" href="css/blog_list.css"><script src="js/jquery.min.js"></script></head><body><!-- 导航栏 --><div class="nav"><img src="img/logo2.jpg" alt=""><span class="title">博客系统</span><!-- 用来占据中间位置 --><span class="spacer"></span><a href="blog_list.html">主页</a><a href="blog_edit.html">写博客</a><a href="javascript:onExit()">注销</a></div><!-- 版心 --><div class="container"><!-- 左侧个人信息 --><div class="container-left" ><div class="card"><img src="img/touxiang.jpg" class="avtar" alt=""><h3 id="username"></h3><a href="https://gitee.com/">gitee 地址</a><div class="counter"><span>文章</span><span>访问量</span></div><div class="counter"><span id="articleCount">0</span><span id="totalRcount">0</span></div></div></div><!-- 右侧内容详情 --><div class="container-right" id="artlistDiv"></div></div>
</body>
</html>
Step1.引入jQuery
<script src="js/jquery.min.js"></script>
Step2:编写前后端代码
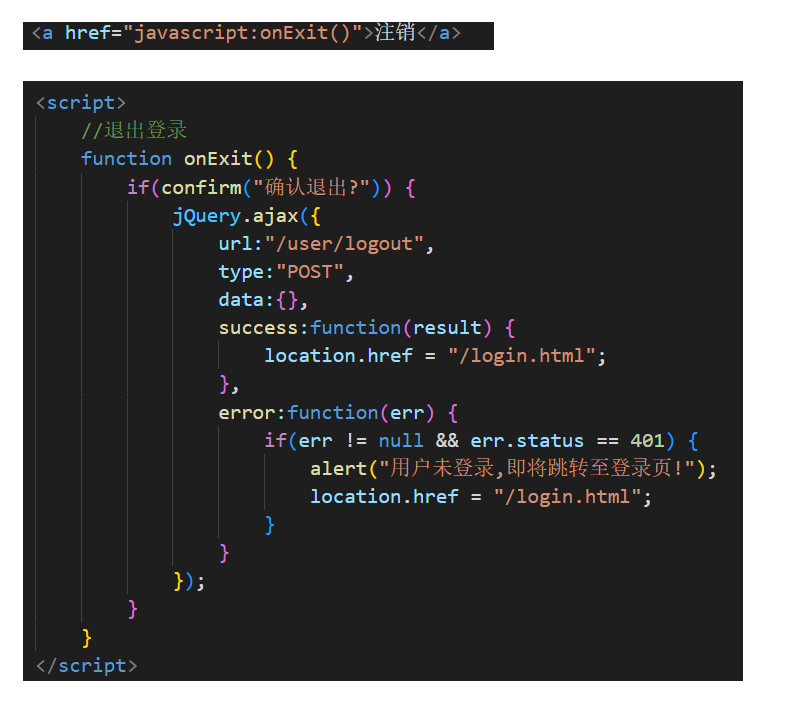
4.5.1 注销功能
4.5.2 显示所有文章
显示文章 , 只需将原来页面中的文章div用数据库中查询出的数据进行替换即可 . 实现步骤如下 :
myblog_list.html
var descLength = 80; // 简介最大长度// 字符串截取,将文章正文截取成简介function mySubstr(content){if(content.length>descLength){return content.substr(0,descLength);}return content;}// 初始化个人列表信息function initList(){jQuery.ajax({url:"/art/mylist",type:"POST",data:{},success:function(result){getArticleCount(result.data[0].uid); //获取文章数getTotalRcount(result.data[0].uid); //获取访问量if(result.code==200 && result.data!=null && result.data.length>0){// 此人发表文章了var html="";result.data.forEach(function(item){html+='<div class="blog">';html+='<div class="title">'+item.title+'</div>';html+='<div class="date">'+item.createtime+'</div>'html+='<div class="desc">'+mySubstr(item.content)+' </div>';html+='<div style="text-align: center;margin-top: 50px;">';html+='<a id="clickIt" href="blog_content.html?id='+item.id+'">查看详情</a> ';html+='<a id="clickIt" href="blog_update.html?id='+item.id+'">修改</a> 'html+='<a id="clickIt" href="javascript:myDel('+item.id+')">删除</a></div>' +'</div>'; }); jQuery("#artlistDiv").html(html); }else{// 此人未发表任何文章jQuery("#artlistDiv").html("<h1>暂无数据</h1>");}},error:function(err){if(err!=null && err.status==401){alert("用户未登录,即将跳转到登录页!");// 已经被拦截器拦截了,未登录location.href = "/login.html";}}});}initList(); // 当浏览器渲染引擎执行到此行的时候就会调用 initList() 方法后端部分 :
ArticleController
/*** 返回文章信息* @param request* @return*/@RequestMapping("mylist")public List<ArticleInfo> myList(HttpServletRequest request) {UserInfo userInfo = SessionUtil.getLoginUser(request);if(userInfo != null) {return articleService.getMyList(userInfo.getId());}return null;}
SessionUtil
package com.example.demo.common;
import com.example.demo.model.UserInfo;
import javax.servlet.http.HttpServletRequest;
import javax.servlet.http.HttpSession;public class SessionUtil {/*** 查询当前登录用户的session* @param request* @return*/public static UserInfo getLoginUser(HttpServletRequest request) {HttpSession session = request.getSession(false);if (session != null &&session.getAttribute(Constant.SESSION_USERINFO_KEY) != null) {return (UserInfo) session.getAttribute(Constant.SESSION_USERINFO_KEY);}return null;}}
ArticleService
package com.example.demo.service;
import com.example.demo.mapper.ArticleMapper;
import com.example.demo.model.ArticleInfo;
import org.springframework.beans.factory.annotation.Autowired;
import org.springframework.stereotype.Service;
import java.util.List;/***文章表服务层*/
@Service
public class ArticleService {@Autowiredprivate ArticleMapper articleMapper;public List<ArticleInfo> getMyList(Integer uid) {return articleMapper.getMyList(uid);}
}
ArticleMapper
package com.example.demo.mapper;
import com.example.demo.model.ArticleInfo;
import org.apache.ibatis.annotations.Mapper;
import org.apache.ibatis.annotations.Param;
import java.util.List;/*** 文章表mapper*/
@Mapper
public interface ArticleMapper {public List<ArticleInfo> getMyList(@Param("uid") Integer uid);
}
ArticleMapper.xml
<select id="getMyList" resultType="com.example.demo.model.ArticleInfo">select * from articleinfo where uid=#{uid}
</select>
运行结果 :
因为进行了统一的数据格式返回封装 , 所以返回的格式非常清晰 , 当状态码code为200时 , 证明后端成功查询并返回了数据 , 此时前端需要做的 , 就是将后端返回的数据显示在页面上 .
在获取全部文章并显示在页面上同时 , 需要将该作者的文章数和访问量获取到 , 并显示在个人信息栏 . 其代码分别如下 :
前端代码 :
//获取文章数function getArticleCount(uid) {var articleCount = 0;jQuery.ajax({url:"/art/getarticlecount",type:"POST",data:{"uid":uid},success:function(result) {if(result.code == 200 && result.data != null) {jQuery("#articleCount").text(result.data);}},error:function(err) {}});}//获取作者总访问量function getTotalRcount(uid) {jQuery.ajax({url:"/art/gettotalrcount",type:"POST",data:{"uid":uid},success:function(result) {jQuery("#totalRcount").text(result.data);}});}
后端代码 :
ArticleController
/*** 获取总访问量* @return*/@RequestMapping("/gettotalrcount")public Integer getTotalRcount(Integer uid) {return articleService.getTotalRcount(uid);}/*** 获取文章数* @param uid* @return*/@RequestMapping("/getarticlecount")public Integer getArticleCount(Integer uid) {return articleService.getArticleCount(uid);}
ArticleService
/*** 获取总访问量* @return*/public Integer getTotalRcount(Integer uid) {return articleMapper.getTotalRcount(uid);}/*** 获取文章数* @param id* @return*/public Integer getArticleCount(Integer id) {return articleMapper.getArticleCount(id);}
ArticleMapper
//获取当前登录用户文章数public Integer getArticleCount(@Param("uid") Integer uid);//获取总访问量public Integer getTotalRcount(@Param("uid") Integer uid);
ArticleMapper.xml
<!--    获取当前登录用户文章数--><select id="getArticleCount" resultType="java.lang.Integer">select count(*) from articleinfo where uid=#{uid}</select><!--    获取总访问量-->
<select id="getTotalRcount" resultType="java.lang.Integer">select sum(rcount) from articleinfo where uid=#{uid};
</select>
4.5.3 初始化侧边栏
在第二步中 , 已经获取到了当前用户的文章数和访问量 , 只需获取到用户名并加载到页面上即可 .
前端代码 :
// 获取个人信息function myInfo(){jQuery.ajax({url:"/user/myinfo",type:"POST",data:{},success:function(result){if(result.code==200 && result.data!=null){jQuery("#username").text(result.data.username);}},error:function(err){}});}myInfo();
后端代码 :
UserController
/*** 获取当前登录用户列表页* @param request* @return*/@RequestMapping("/myinfo")public UserInfo myInfo(HttpServletRequest request) {HttpSession session = request.getSession(false);if (session != null &&session.getAttribute(Constant.SESSION_USERINFO_KEY) != null) {return (UserInfo) session.getAttribute(Constant.SESSION_USERINFO_KEY);}return null;}
4.5.4 编辑页
点击写博客 , 跳转至博客编辑页 , 编写编辑页代码 .
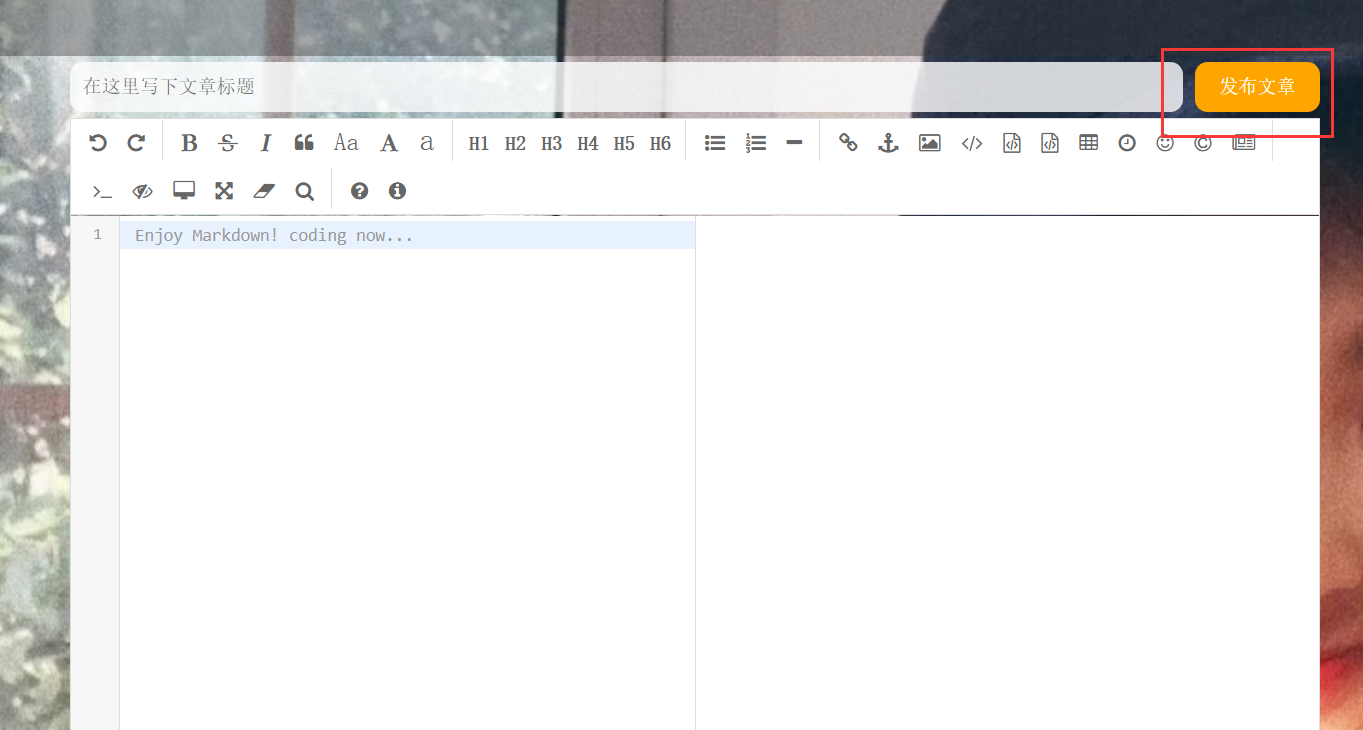
关键操作在于点击"发布文章" , 前端将标题和正文返回给后端 , 后端将该篇文章存储到数据库中 .
前端代码 :
<!DOCTYPE html>
<html lang="en"><head><meta charset="UTF-8"><meta http-equiv="X-UA-Compatible" content="IE=edge"><meta name="viewport" content="width=device-width, initial-scale=1.0"><title>博客编辑</title><!-- 引入自己写的样式 --><link rel="stylesheet" href="css/conmmon.css"><link rel="stylesheet" href="css/blog_edit.css"><!-- 引入 editor.md 的依赖 --><link rel="stylesheet" href="editor.md/css/editormd.min.css" /><script src="js/jquery.min.js"></script><script src="editor.md/editormd.js"></script>
</head><body><!-- 导航栏 --><div class="nav"><img src="img/logo2.jpg" alt=""><span class="title">博客系统</span><!-- 用来占据中间位置 --><span class="spacer"></span><a href="blog_list.html">主页</a><!-- <a href="blog_edit.html">写博客</a> --><a href="login.html">登录</a><!-- <a href="#">注销</a> --></div><!-- 编辑框容器 --><div class="blog-edit-container"><!-- 标题编辑区 --><div class="title"><input id="title" type="text" placeholder="在这里写下文章标题"><button onclick="mysub()">发布文章</button></div><!-- 创建编辑器标签 --><div id="editorDiv"><textarea id="editor-markdown" style="display:none;"></textarea></div></div><script>var editor;function initEdit(md){// 编辑器设置editor = editormd("editorDiv", {// 这里的尺寸必须在这里设置. 设置样式会被 editormd 自动覆盖掉. width: "100%",// 高度 100% 意思是和父元素一样高. 要在父元素的基础上去掉标题编辑区的高度height: "calc(100% - 50px)",// 编辑器中的初始内容markdown: md,// 指定 editor.md 依赖的插件路径path: "editor.md/lib/",saveHTMLToTextarea: true // });}initEdit(""); // 初始化编译器的值// 提交function mysub(){var title = jQuery("#title");var content = editor.getValue();// 非空效验if(title.val()==""){title.focus();alert("请先输入标题!");return false;}if(content==""){content.focus();alert("请先输入正文!");return false;}jQuery.ajax({url:"/art/edit",type:"POST",data:{"title":title.val(),"content":content},success:function(result){if(result.code==200 && result.data>0){alert("恭喜:发布成功!");location.href = "myblog_list.html";}else{alert("抱歉:发布失败,请重试!");}},error:function(err){if(err!=null && err.status==401){alert("用户未登录,即将跳转到登录页!");// 已经被拦截器拦截了,未登录location.href = "/login.html";}}});}</script>
</body></html>
后端代码 :
ArticleController
//编辑文章@RequestMapping("/edit")public int edit(HttpServletRequest request,String title, String content) {if (!StringUtils.hasLength(title) || !StringUtils.hasLength(content)) {return 0;}UserInfo userInfo = SessionUtil.getLoginUser(request);if (userInfo != null && userInfo.getId() > 0) {return articleService.edit(title, content,userInfo.getId());}return 0;}
ArticleService
//编辑文章public int edit(String title, String content,Integer uid) {return articleMapper.edit(title, content, uid);}
ArticleMapper
//编辑文章public int edit(@Param("title") String title,@Param("content") String content,@Param("uid") Integer uid);
ArticleMapper.xml
<!-- 编辑文章--><insert id="edit" >insert into articleinfo(title,content,uid) values(#{title},#{content},#{uid})</insert>
4.5.5 主页 [ 分页功能 ]
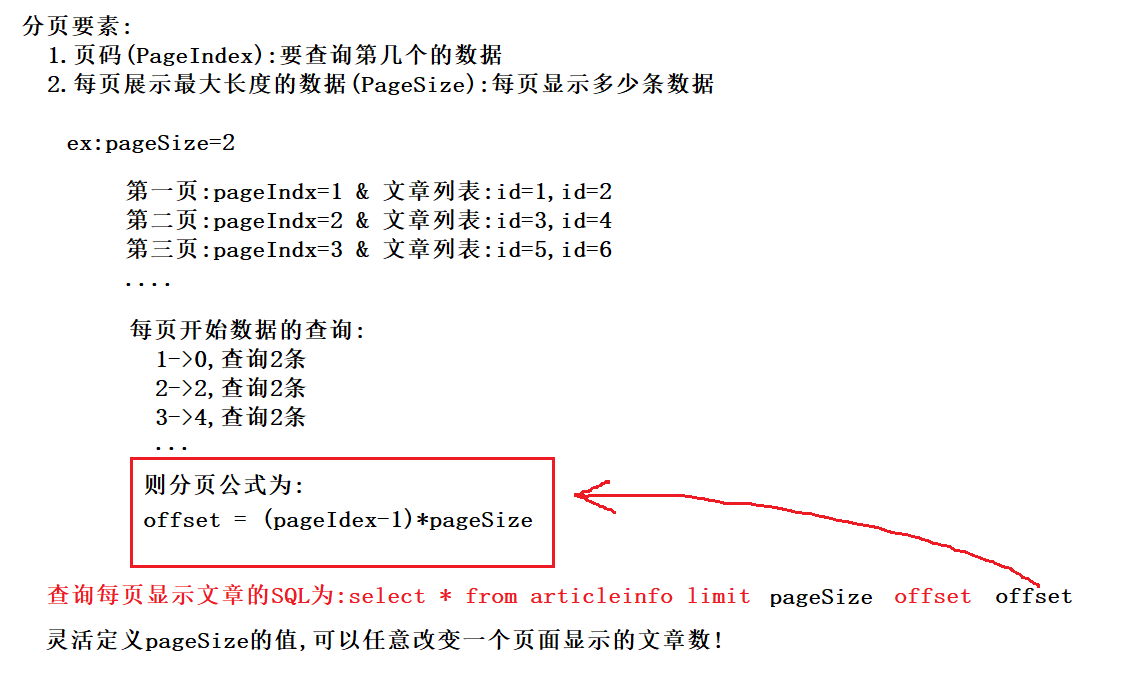
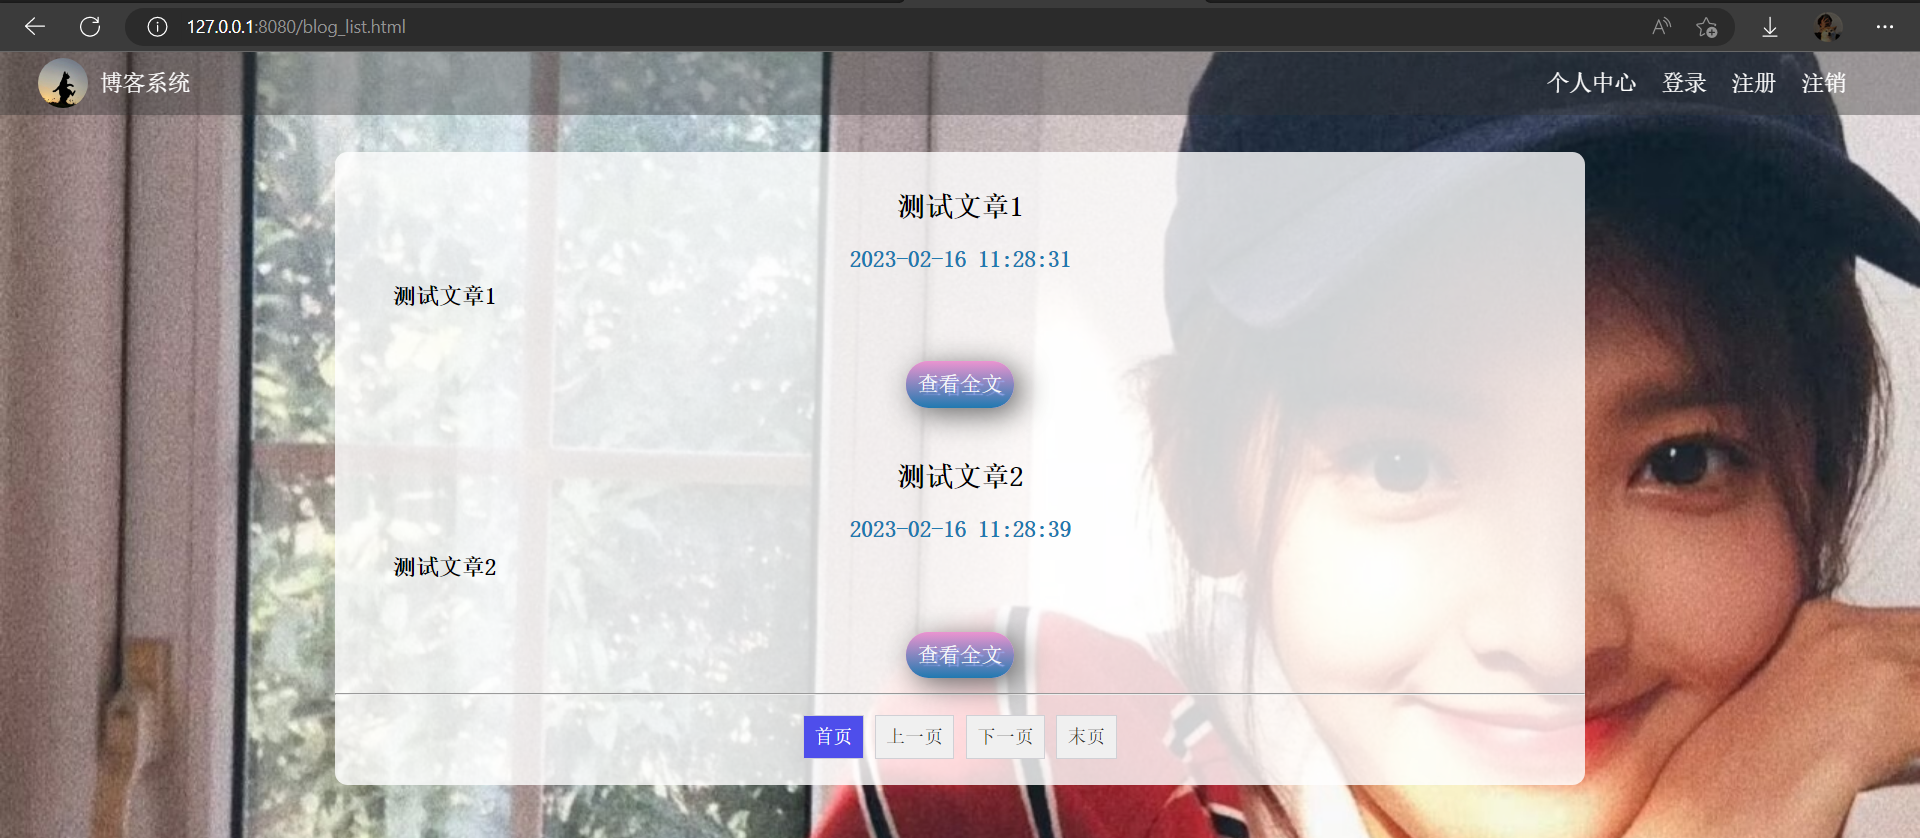
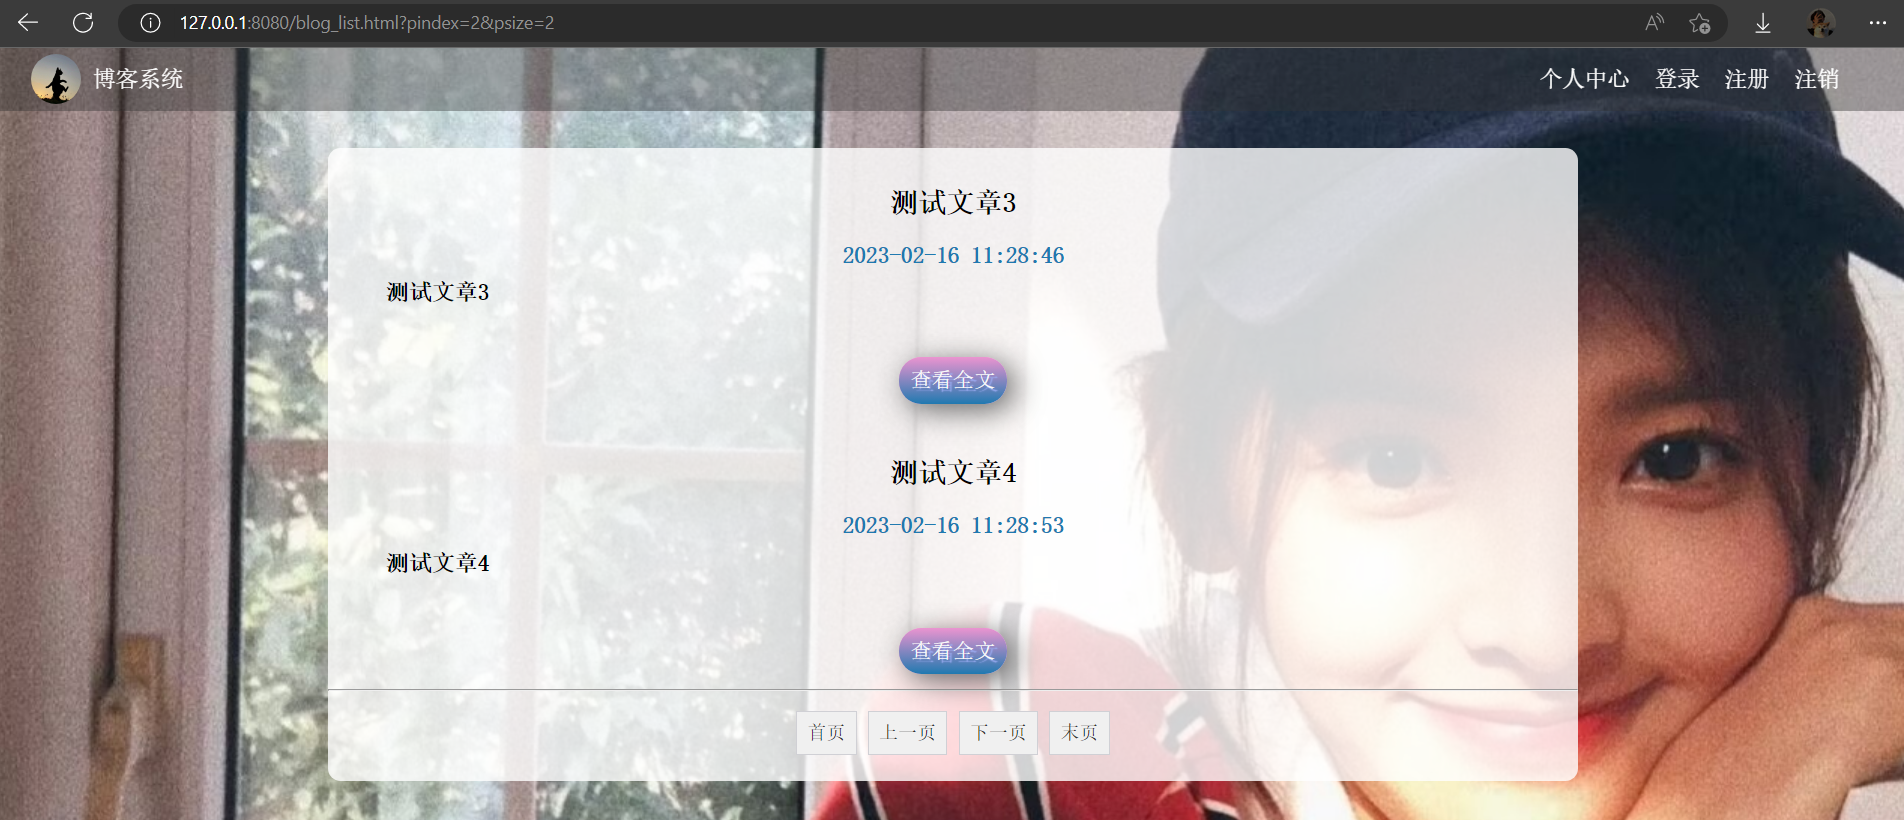
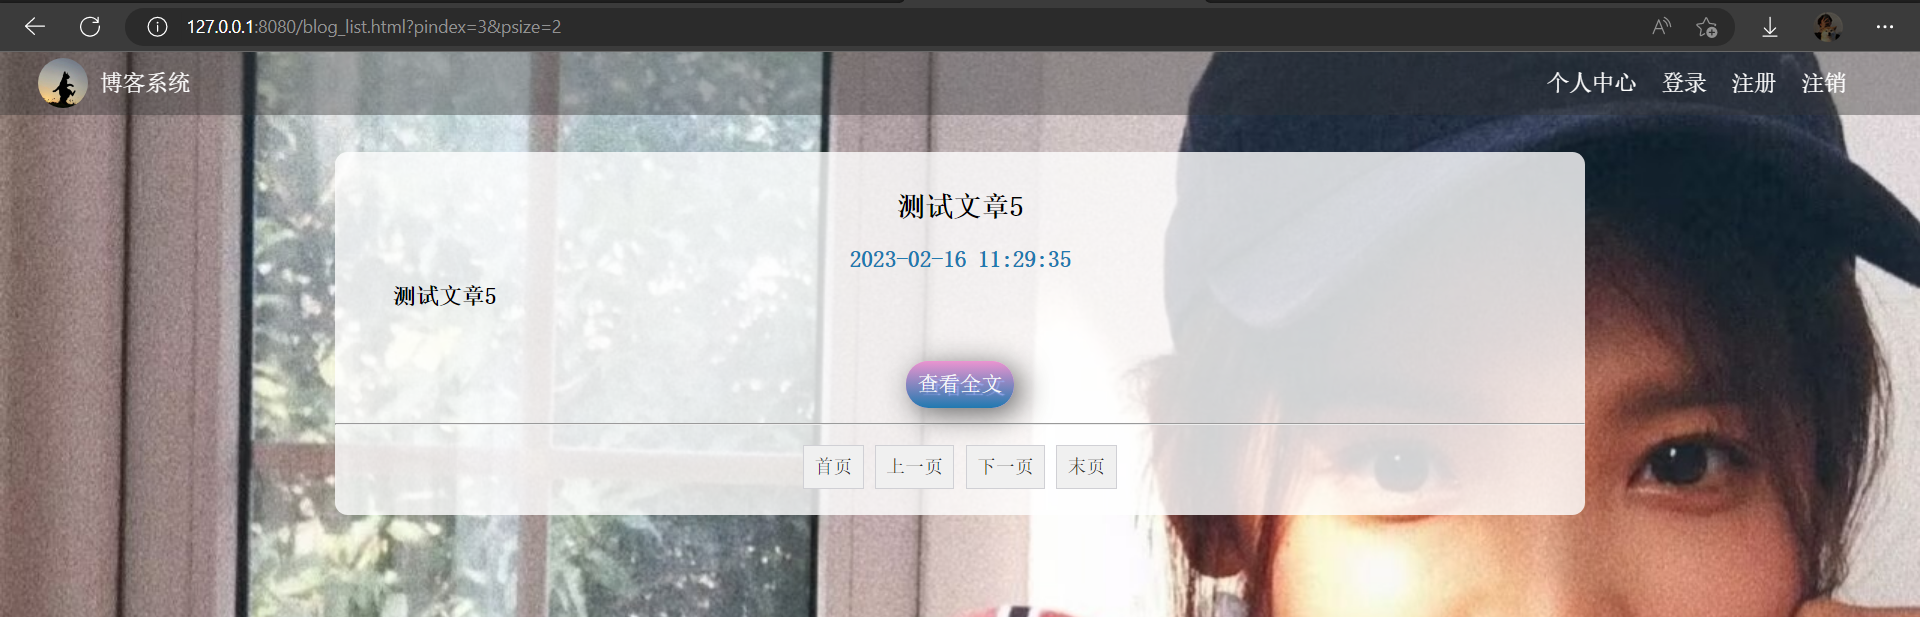
点击主页 , 跳转至博客列表主页 , 这个页面包括所有用户的文章 . 同时在该页面中 , 实现了分页功能 , 同一页面只显示2篇文章 . 分页功能的原理如下 :
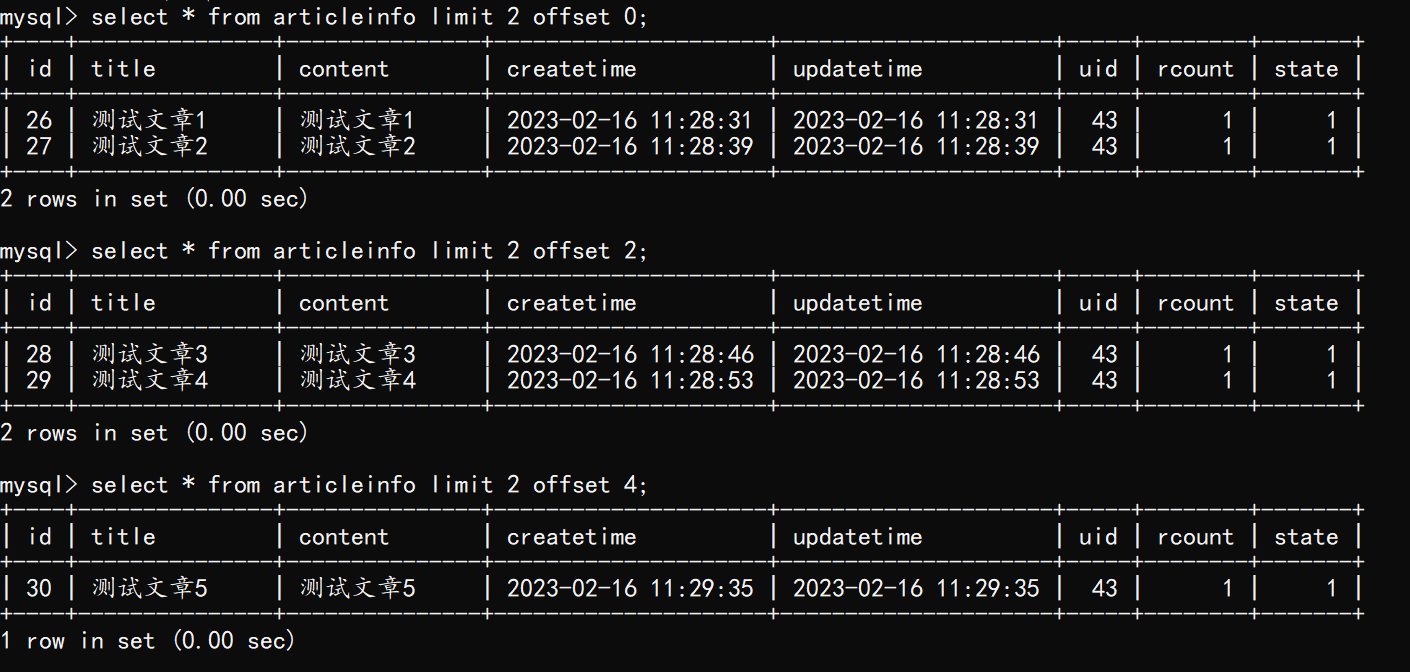
删除原有文章 , 插入5篇测试文章 , 显示查询效果 :
前端代码 :
<!DOCTYPE html>
<html lang="en"><head><meta charset="UTF-8"><meta http-equiv="X-UA-Compatible" content="IE=edge"><meta name="viewport" content="width=device-width, initial-scale=1.0"><title>博客列表</title><link rel="stylesheet" href="css/list.css"><link rel="stylesheet" href="css/blog_list.css"><link rel="stylesheet" href="css/homepage.css"><script src="js/jquery.min.js"></script><script src="js/tools.js"></script>
</head><body><!-- 导航栏 --><div class="nav"><img src="img/logo2.jpg" alt=""><span class="title">博客系统</span><!-- 用来占据中间位置 --><span class="spacer"></span><a href="myblog_list.html">个人中心</a><a href="login.html">登录</a><a href="reg.html">注册</a><a href="javascript:onExit()">注销</a></div><!-- 版心 --><div class="container"><!-- 右侧内容详情 --><div class="container-right" style="width: 100%;"><div id="listDiv"></div><hr><div class="blog-pagnation-wrapper"><button class="blog-pagnation-item" onclick="firstClick()">首页</button> <button class="blog-pagnation-item" onclick="beforeClick()">上一页</button>  <button class="blog-pagnation-item" onclick="nextClick()">下一页</button><button class="blog-pagnation-item" onclick="lastClick()">末页</button></div></div></div><script>var descLength = 80; // 简介最大长度// 字符串截取,将文章正文截取成简介function mySubstr(content){if(content.length>descLength){return content.substr(0,descLength);}return content;}var pindex = 1; // 当前的页码var psize = 2; // 每页显示的条数信息var totalpage = 1; // 总共多少页// 初始化分页的参数,尝试从 url 中获取 pindex 和 psizefunction initPageParam(){var pi = getUrlParam("pindex");     if(pi!=""){pindex=pi;}var pz = getUrlParam("psize");     if(pz!=""){psize=pz;}}initPageParam();// 查询总共有多少页的数据function getTotalPage(){jQuery.ajax({url:"/art/totalpage",type:"GET",data:{"psize":psize},success:function(result){if(result.code==200 && result.data!=null){totalpage=result.data; }}});}getTotalPage();// 查询分页数据function getList(){jQuery.ajax({url:"/art/list",type:"GET",data:{"pindex":pindex,"psize":psize},success:function(result){if(result.code==200 && result.data!=null && result.data.length>0){// 循环拼接数据到 documentvar finalHtml="";for(var i=0;i<result.data.length;i++){var item = result.data[i];finalHtml+='<div class="blog">';finalHtml+='<div class="title">'+item.title+'</div>';finalHtml+='<div class="date">'+item.createtime+'</div>';finalHtml+='<div class="desc">'+mySubstr(item.content)+'</div>';finalHtml+='<div style="text-align: center;margin-top: 50px;">';finalHtml+='<p style="text-align: center">';finalHtml+='<a id="clickIt" href="blog_content.html?id='+item.id+'">查看全文</a></p></div>';finalHtml+='</div>';}jQuery("#listDiv").html(finalHtml);}}});}getList();// 首页function firstClick(){location.href = "blog_list.html";}// 上一页function beforeClick(){if(pindex<=1){//alert("当前已是第一页!");location.reload();return false;}pindex = parseInt(pindex)-1;location.href = "blog_list.html?pindex="+pindex+"&psize="+psize;}// 下一页function nextClick(){pindex = parseInt(pindex)+1;if(pindex>totalpage){location.reload();// 已经在最后一页了//alert("当前已是最后一页!");return false;}location.href = "blog_list.html?pindex="+pindex+"&psize="+psize;}// 末页function lastClick(){pindex = totalpage;location.href = "blog_list.html?pindex="+pindex+"&psize="+psize;}// 退出登录function onExit(){if(confirm("确认退出?")){// ajax 请求后端进行退出操作jQuery.ajax({url:"/user/logout",type:"POST",data:{},success:function(result){location.href = "/login.html";},error:function(err){if(err!=null && err.status==401){alert("用户未登录,即将跳转到登录页!");// 已经被拦截器拦截了,未登录location.href = "/login.html";}}});}}</script>
</body>
</html>
前端部分涉及一个方法 , 即获取URL中某个参数的方法 :
//获取当前url中某个参数的方法function getUrlParam(key) {var params = location.search;if(params.indexOf('?') >= 0) {params = params.substring(1);var paramArr = params.split('&');for (var i =0; i <paramArr.length;i++) {var namevalues = paramArr[i].split("=");if(namevalues[0] == key) {return namevalues[1];}}} else {return "";}}
后端代码 :
ArticleController
//获取总页数@RequestMapping("/totalpage")public Integer totalPage(Integer psize) {if (psize != null) {// 参数有效int totalCount = articleService.getTotalCount();// 总页数int totalPage = (int) Math.ceil(totalCount * 1.0 / psize);return totalPage;}return null;}//获取分页@RequestMapping("/list")public List<ArticleInfo> getList(Integer pindex, Integer psize) {if (pindex == null || psize == null) {return null;}// 分页公式,计算偏移量int offset = (pindex - 1) * psize;return articleService.getList(psize, offset);}
ArticleService
//获取总页数public int getTotalCount() {return articleMapper.getTotalCount();}//获取分页public List<ArticleInfo> getList(Integer psize, Integer offset) {return articleMapper.getList(psize, offset);}
ArticleMapper
//获取总页数public int getTotalCount();//获取分页public List<ArticleInfo> getList(@Param("psize") Integer psize,@Param("offset") Integer offset);
ArticleController.xml
<!-- 获取总页数--><select id="getTotalCount" resultType="java.lang.Integer">select count(*) from articleinfo</select><!-- 获取分页--><select id="getList" resultType="com.example.demo.model.ArticleInfo">select * from articleinfo limit #{psize} offset #{offset}</select>
点击首页 :
点击下一页 :
点击末页 :
4.5.6 查看详情
前端代码 :
前端只需发送一个ajax请求 , 携带文章id , 后端在数据库中查询出文章标题和正文 , 返回给前端即可 . 每次查看该篇文章 , 我们需要将访问量 + 1 ,所以还需发送一个ajax请求 , 用于设置访问量 + 1 . 同理 , 在显示所有人文章的主页 , 点击查看全文 , 我们也应该设置访问量 + 1 . 综上所述 , 只要访问blog_content页面 , 就使访问量 + 1 .
//获取文章详细信息function getArticleDetail() {if(aid != null && aid > 0) {//访问后端,更新访问量jQuery.ajax({url:"/art/setrcount",type:"POST",data:{"aid":aid},success:function(result) {}});//访问后端查询文章详情jQuery.ajax({url:"/art/detail",type:"POST",data:{"aid":aid},success:function(result) {if(result.code == 200 && result.data != null) {var art = result.data;jQuery("#title").text(art.title);jQuery("#date").text(art.createtime);jQuery("#rcount").text(art.rcount);editormd = editormd.markdownToHTML("editorDiv",{markdown : art.content});myInfo(art.uid);getArticleCount(art.uid);getTotalRcount(art.uid);//侧边栏访问量信息}}});}}getArticleDetail();
后端代码 :
ArticleController
//设置访问量@RequestMapping("/setrcount")public int setRcount(Integer aid) {return articleService.setRcount(aid);}//blog_content页面获取文章详情@RequestMapping("/detail")public Object getDetail(Integer aid) {if(aid != null && aid > 0) {return AjaxResult.success(articleService.getDetail(aid));}return AjaxResult.fail(-1,"查询失败");}
ArticleService
//设置访问量public int setRcount(Integer aid) {return articleMapper.setRcount(aid);}//获取文章内容public ArticleInfo getDetail(Integer aid) {return articleMapper.getDetail(aid);}
ArticleMapper
//设置访问量public int setRcount(@Param("aid") Integer aid);//获取文章内容public ArticleInfo getDetail(@Param("aid") Integer aid);
ArticleController.xml
<!-- 设置访问量--><update id="setRcount">update articleinfo set rcount=rcount+1 where id=#{aid}</update><!-- 根据文章编号查询文章信息--><select id="getDetail" resultType="com.example.demo.model.ArticleInfo">select * from articleinfo where id=#{aid}</select>
4.5.7 修改文章
当我们点击修改时 , 首先要显示整篇文章 , 这需要前端向后端请求数据 , 并且通过ajax请求传递当前文章的id . 其次 , 发送一个更新文章的ajax请求 , 这可以完全参考文章编辑页的做法 . 代码如下 :
前端代码 :
<!DOCTYPE html>
<html lang="en"><head><meta charset="UTF-8"><meta http-equiv="X-UA-Compatible" content="IE=edge"><meta name="viewport" content="width=device-width, initial-scale=1.0"><title>博客编辑</title><!-- 引入自己写的样式 --><link rel="stylesheet" href="css/conmmon.css"><link rel="stylesheet" href="css/blog_edit.css"><!-- 引入 editor.md 的依赖 --><link rel="stylesheet" href="editor.md/css/editormd.min.css" /><script src="js/jquery.min.js"></script><script src="editor.md/editormd.js"></script><script src="js/tools.js"></script>
</head><body><!-- 导航栏 --><div class="nav"><img src="img/logo2.jpg" alt=""><span class="title">博客系统</span><!-- 用来占据中间位置 --><span class="spacer"></span><a href="blog_list.html">主页</a><a href="blog_edit.html">写博客</a><a href="javascript:onExit()">注销</a></div><!-- 编辑框容器 --><div class="blog-edit-container"><!-- 标题编辑区 --><div class="title"><input id="title" type="text" placeholder="在这里写下文章标题"><button onclick="mysub()">修改文章</button></div><!-- 创建编辑器标签 --><div id="editorDiv"><textarea id="editor-markdown" style="display:none;"></textarea></div></div><script>var editor;function initEdit(md){// 编辑器设置editor = editormd("editorDiv", {// 这里的尺寸必须在这里设置. 设置样式会被 editormd 自动覆盖掉. width: "100%",// 高度 100% 意思是和父元素一样高. 要在父元素的基础上去掉标题编辑区的高度height: "calc(100% - 50px)",// 编辑器中的初始内容markdown: md,// 指定 editor.md 依赖的插件路径path: "editor.md/lib/",saveHTMLToTextarea: true // });}// 提交
function mysub(){var title = jQuery("#title");var content = editor.getValue();// 非空效验if(title.val()==""){title.focus();alert("请先输入标题!");return false;}if(content==""){title.focus();alert("请先输入正文!");return false;}jQuery.ajax({url:"/art/update",type:"POST",data:{"aid":aid,"title":title.val(),"content":content},success:function(result){if(result.code==200 && result.data>0){alert("恭喜:修改成功!");location.href = "myblog_list.html";}else{alert("抱歉:修改失败,请重试!");}},error:function(err){if(err!=null && err.status==401){alert("用户未登录,即将跳转到登录页!");// 已经被拦截器拦截了,未登录location.href = "/login.html";}}});}// 查询文章详情并展现function showArt(){// 从 url 中获取文章 idaid=getUrlParam("id");if(aid!=null && aid>0){// 访问后端查询文章详情jQuery.ajax({url:"/art/detailbyid",type:"POST",data:{"aid":aid},success:function(result){if(result.code==200 && result.data!=null){var art = result.data;jQuery("#title").val(art.title);initEdit(art.content);}else{alert("查询失败,请重试!");}},error:function(err){if(err!=null && err.status==401){alert("用户未登录,即将跳转到登录页!");// 已经被拦截器拦截了,未登录location.href = "/login.html";}}});}}showArt();// 退出登录function onExit(){if(confirm("确认退出?")){// ajax 请求后端进行退出操作jQuery.ajax({url:"/user/logout",type:"POST",data:{},success:function(result){location.href = "/login.html";},error:function(err){if(err!=null && err.status==401){alert("用户未登录,即将跳转到登录页!");// 已经被拦截器拦截了,未登录location.href = "/login.html";}}});}}</script>
</body></html>
后端代码 :
ArticleController
//根据文章id查询文章@RequestMapping("/detailbyid")public Object getDetilById(HttpServletRequest request, Integer aid) {if (aid != null && aid > 0) {// 根据文章查询文章的详情ArticleInfo articleInfo = articleService.getDetail(aid);// 文章的归属人验证UserInfo userInfo = SessionUtil.getLoginUser(request);if (userInfo != null && articleInfo != null &&userInfo.getId() == articleInfo.getUid()) { // 文章归属人是正确的return AjaxResult.success(articleInfo);}}return AjaxResult.fail(-1, "查询失败");}//更新文章@RequestMapping("/update")public int update(HttpServletRequest request, Integer aid, String title, String content) {if (!StringUtils.hasLength(title) || !StringUtils.hasLength(content)) {return 0;}UserInfo userInfo = SessionUtil.getLoginUser(request);if (userInfo != null && userInfo.getId() > 0) {return articleService.update(aid, userInfo.getId(), title, content);}return 0;}
ArticleService
//获取文章内容public ArticleInfo getDetail(Integer aid) {return articleMapper.getDetail(aid);}//更新文章public int update(Integer aid, Integer uid, String title, String content) {return articleMapper.update(aid, uid, title, content);}
ArticleMapper
//获取文章内容public ArticleInfo getDetail(@Param("aid") Integer aid);//更新文章public int update(@Param("aid") Integer aid,@Param("uid") Integer uid,@Param("title") String title,@Param("content") String content);
ArticleController.xml
<!-- 根据文章编号查询文章信息--><select id="getDetail" resultType="com.example.demo.model.ArticleInfo">select * from articleinfo where id=#{aid}</select><!-- 修改文章--><update id="update">update articleinfo set title=#{title},content=#{content}where id=#{aid} and uid=#{uid}</update>
4.5.8 删除文章
删除文章 , 直接将该篇文章从数据库中删除即可 , 前端只需向后端传递表示该篇文章的唯一参数 —> 文章id .
前端代码 :
//删除文章function myDel(id){if(confirm("确认要删除该文章吗?")){jQuery.ajax({url:"/art/mydel",type:"POST",data:{"id" : id},success:function(result) {if(result.code==200 && result.data!=null) {alert("删除成功!");location.href = "myblog_list.html";}},error:function(err){if(err != null) {alert("删除失败,请重试!");}}});}}
后端代码 :
ArticleController
//删除文章@RequestMapping("/mydel")public boolean delete(Integer id) {if(id == null) {return false;}return articleService.delete(id);}
ArticleService
//删除文章public boolean delete(Integer id) {return articleMapper.delete(id);}
ArticleMapper
//删除文章public boolean delete(@Param("id") Integer id);
ArticleController.xml
<!-- 删除文章--><delete id="delete">delete from articleinfo where id=#{id}</delete>
五 : 密码加盐
存储密码的方式 , 主要有以下几种 :
1.明文 , 显然明文存储是最不安全的 ;
2.MD5加密 , 即MD5消息摘要算法,属Hash算法一类。MD5算法对输入任意长度的消息进行运行,产生一个128位的消息摘要(32位的数字字母混合码)。
MD5主要特点 : 不可逆,相同数据的MD5值肯定一样,不同数据的MD5值不一样 . 那这个时候 , 我如果搞一个对照表 , 就可以进行暴力破解了 , 比如 :
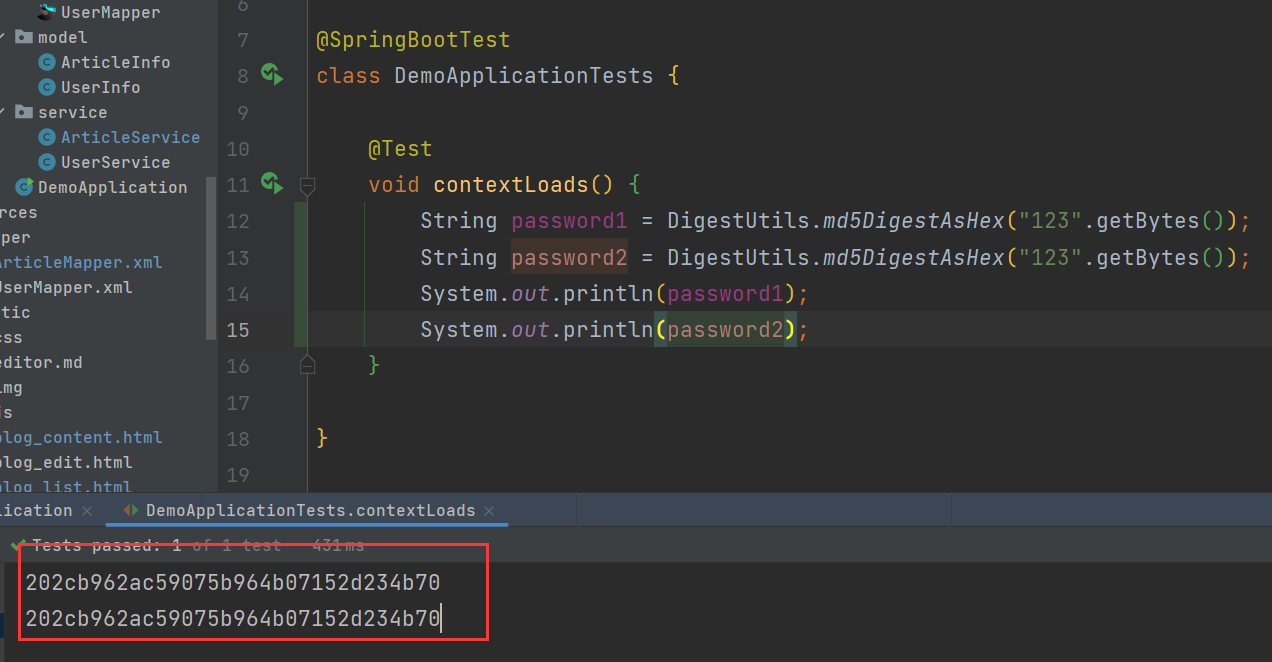
我们对"123"这个字符串加密两次 , 发现加密结果是一致的 . 在任何时间 , 任何地点 , 对"123"字符串的MD5加密都是这个结果 . 那么 , 如果我有一张对照表 , key值是MD5加密结果 , value值是原字符串 , 我就可以通过遍历的方式通过key拿value . 所以MD5仅仅提供了最基础的加密功能 .
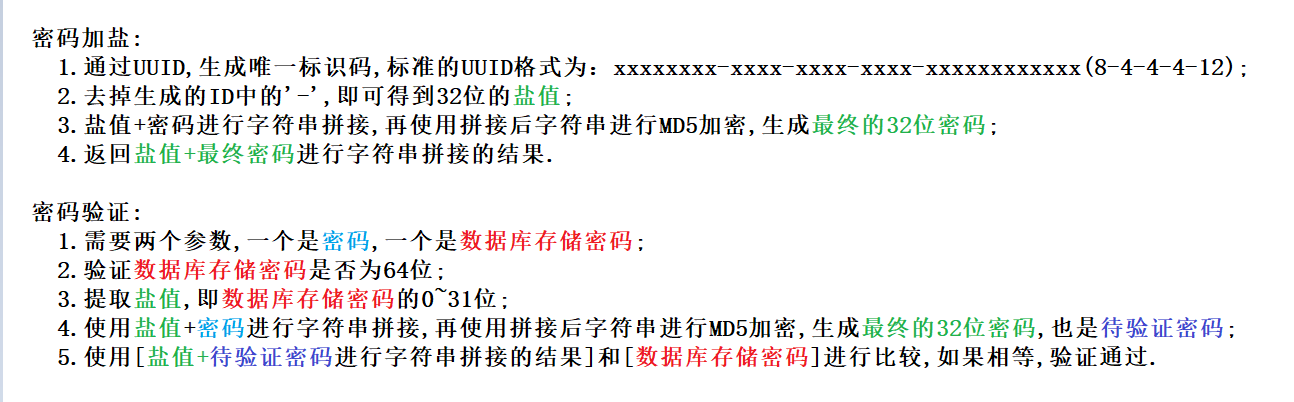
3.加盐算法 , 每次在进行加密时 , 给该密码加一个盐值 , 并且每次生成的盐值都不同 .
代码如下 :
package com.example.demo.common;import org.springframework.util.DigestUtils;
import org.springframework.util.StringUtils;import java.util.UUID;/*** 加盐加密类*/
public class SecurityUtil {//加盐加密public static String encrypt(String password) {//1.每次生成32位的不同盐值String salt = UUID.randomUUID().toString().replace("-","");//2.盐值+密码生成最终的32位密码String finalPassword = DigestUtils.md5DigestAsHex((salt + password).getBytes());//3.同时返回盐值+最终密码return salt + finalPassword;}//密码验证public static boolean decrypt(String password,String databasePassword) {//1.非空校验if(!StringUtils.hasLength(password) || !StringUtils.hasLength(databasePassword)) {return false;}//2.验证数据库存储密码是否为64位if(databasePassword.length() != 64) {return false;}//3.提取盐值String salt = databasePassword.substring(0,32);//4.生成待验证密码String securityPassword = DigestUtils.md5DigestAsHex((salt+password).getBytes());//5.返回密码验证的结果return (salt + securityPassword).equals(databasePassword);}
}
六 : 部署
6.1 建库建表
连接数据库 :
mysql -uroot
建立数据库 :
create database myblog;
建表 :
-- 创建文章表
drop table if exists  userinfo;
create table articleinfo(id int primary key auto_increment,title varchar(100) not null,content text not null,createtime timestamp default now(),uid int not null,rcount int not null default 0,state int default 1
)default charset 'utf8mb4';-- 创建表[用户表]
drop table if exists  userinfo;
create table userinfo(id int primary key auto_increment,username varchar(100) not null,password varchar(64) not null,photo varchar(500) default '',createtime timestamp default now(),`state` int default 1
) default charset 'utf8mb4';
注意 : 此处为简便处理 , 将创建文章时间和更新文章时间合成了一个字段 , 即createtime .
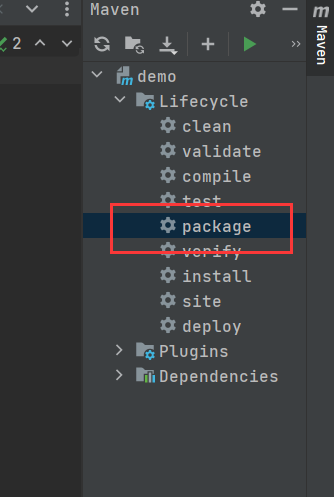
6.2 打包
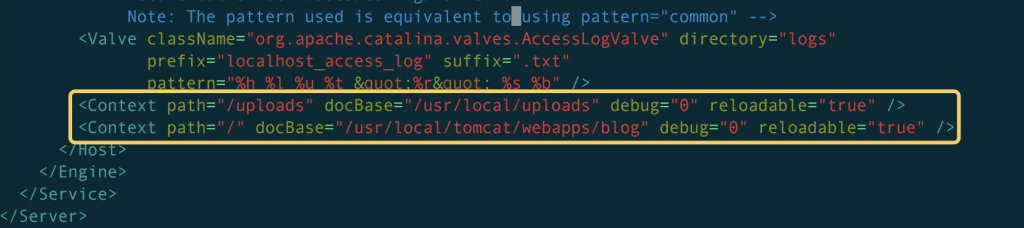
首先修改配置信息 , linux上数据库密码默认为空 .
设置打包后的包名 :

双击package进行打包 :
将jar包拷贝到云服务器上 ;

6.3 运行
//nohup java -jar myblog.jar &
nohup java -jar myblog.jar --server.port=8001 &
博客系统url : 链接
本文到此结束 !


![博客系统[Java]](https://img-blog.csdnimg.cn/fecef19f0772451f90ee8244cdbaf5fa.png)