Thymeleaf
目标
- Thymeleaf的介绍
- Thymeleaf的入门
- Thymeleaf的语法及标签
- 搜索页面渲染
- 商品详情页静态化功能实现
1.Thymeleaf介绍
1动态页面:
通过执行asp、php、jsp和.net等程序生成客户端网页代码的网页。通常可以通过网站后台管理系统对网站的内容进行更新管理。发布新闻,发布公司产品,交流互动,博客,网上调查等,这都是动态网站的一些功能。也是我们常见的。 常见的扩展名有:.asp、php、jsp、cgi和aspx 等。 注意:动态页面的“动态”是网站与客户端用户互动的意思,而非网页上有动画的就是动态页面。
A.交互性好。
B.动态网页的信息都需要从数据库中读取,每打开一个一面就需要去获取一次数据库,如果访问人数很多,也就会对服务器增加很大的荷载,从而影响这个网站的运行速度。
2静态页面:
最早的时候,网站内容是通过在主机空间中放置大量的静态网页实现的。为了方便对这些分散在不同目录的静态网页的管理,(一般是通过FTP),象frontpage/dreamweaver这样软件甚至直接提供了向主页空间以FTP方式直接访问文件的功能。以静态网页为主的网站最大的困难在于对网页的管理,在这种框架里,网页框架和网页中的内容混杂在一起,很大程度地加大了内容管理的难度。为了减轻这种管理的成本,发展出了一系列的技术,甚至连css本身,原本也是针对这种乱七八糟的网页维护而设计的,目的就是把网页表达的框架和内容本身抽象分离出来。
A.静态网页的内容稳定,页面加载速度快。
B.静态网页的没有数据库支持,在网站制作和维护方面的工作量较大。
C.静态网页的交互性差,有很大的局限性。
3为什么需要动态页面静态化:
- 搜索引擎的优化
尽管搜索机器人有点讨厌,各个网站不但不会再象从前一样把它封起来,反而热情无比地搞SEO,所谓的面向搜索引擎的优化,其中就包括访问地址的改写,令动态网页看上去是静态网页,以便更多更大量地被搜索引擎收录,从而最大限度地提高自已的内容被目标接收的机会。但是,在完全以动态技术开发的网站,转眼中要求变换成静态网页提供,同时,无论如何,动态网页的内容管理功能也是必须保留的;就如同一辆飞驶的奔驰忽然要求180度转弯,要付出的成本代价是非常大的,是否真的值得,也确实让人怀疑。
- 提高程序性能
很多大型网站,进去的时候看它很复杂的页面,但是加载也没有耗费多长时间,除了其它必要原因以外,静态化也是其中必需考虑的技术之一。
先于用户获取资源或数据库数据进而通过静态化处理,生成静态页面,所有人都访问这一个静态页面,而静态化处理的页面本身的访问速度要较动态页面快很多倍,因此程序性能会有大大的提升。
静态化在页面上的体现为:访问速度加快,用户体验性明显提升;在后台体现为:访问脱离数据库,减轻了数据库访问压力。
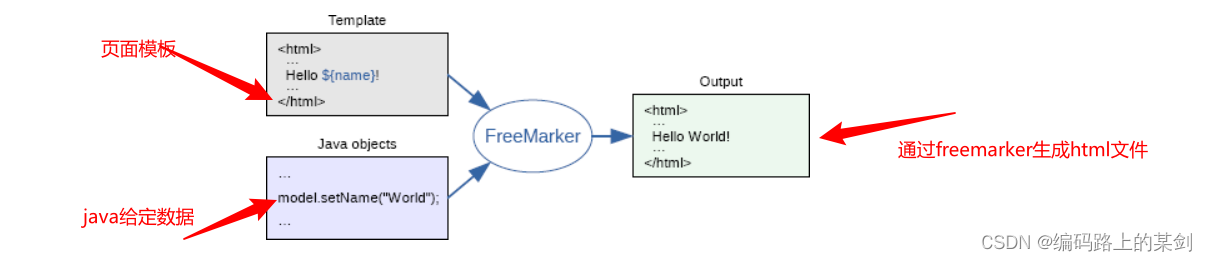
模板+数据=文本
thymeleaf是一个XML/XHTML/HTML5模板引擎,可用于Web与非Web环境中的应用开发。它是一个开源的Java库,基于Apache License 2.0许可,由Daniel Fernández创建,该作者还是Java加密库Jasypt的作者。
Thymeleaf提供了一个用于整合Spring MVC的可选模块,在应用开发中,你可以使用Thymeleaf来完全代替JSP或其他模板引擎,如Velocity、FreeMarker等。Thymeleaf的主要目标在于提供一种可被浏览器正确显示的、格式良好的模板创建方式,因此也可以用作静态建模。你可以使用它创建经过验证的XML与HTML模板。相对于编写逻辑或代码,开发者只需将标签属性添加到模板中即可。接下来,这些标签属性就会在DOM(文档对象模型)上执行预先制定好的逻辑。
它的特点便是:开箱即用,Thymeleaf允许您处理六种模板,每种模板称为模板模式:
- XML
- 有效的XML
- XHTML
- 有效的XHTML
- HTML5
- 旧版HTML5
所有这些模式都指的是格式良好的XML文件,但Legacy HTML5模式除外,它允许您处理HTML5文件,其中包含独立(非关闭)标记,没有值的标记属性或不在引号之间写入的标记属性。为了在这种特定模式下处理文件,Thymeleaf将首先执行转换,将您的文件转换为格式良好的XML文件,这些文件仍然是完全有效的HTML5(实际上是创建HTML5代码的推荐方法)1。
另请注意,验证仅适用于XML和XHTML模板。
然而,这些并不是Thymeleaf可以处理的唯一模板类型,并且用户始终能够通过指定在此模式下解析模板的方法和编写结果的方式来定义他/她自己的模式。这样,任何可以建模为DOM树(无论是否为XML)的东西都可以被Thymeleaf有效地作为模板处理。
4Thymeleaf介绍
1概念:XML/XHTML/HTML5模板引擎。
2其他模板引擎:Velocity、FreeMarker、jsp
3为什么使用它:springboot内置支持
4特点:开箱即用,Thymeleaf允许您处理六种模板,每种模板称为模板模式:
- XML
- 有效的XML
- XHTML
- 有效的XHTML
- HTML5
- 旧版HTML5
2.Springboot整合thymeleaf
使用springboot 来集成使用Thymeleaf可以大大减少单纯使用thymleaf的代码量,所以我们接下来使用springboot集成使用thymeleaf.
实现的步骤为:
- 创建一个sprinboot项目
- 添加thymeleaf的起步依赖
- 添加spring web的起步依赖
- 编写html 使用thymleaf的语法获取变量对应后台传递的值
- 编写controller 设置变量的值到model中
(1)创建工程
创建一个独立的工程springboot-thymeleaf,该工程为案例工程,不需要放到changgou工程中。
pom.xml依赖
<?xml version="1.0" encoding="UTF-8"?>
<project xmlns="http://maven.apache.org/POM/4.0.0"xmlns:xsi="http://www.w3.org/2001/XMLSchema-instance"xsi:schemaLocation="http://maven.apache.org/POM/4.0.0 http://maven.apache.org/xsd/maven-4.0.0.xsd"><modelVersion>4.0.0</modelVersion><groupId>com.itheima</groupId><artifactId>springboot-thymeleaf</artifactId><version>1.0-SNAPSHOT</version><parent><groupId>org.springframework.boot</groupId><artifactId>spring-boot-starter-parent</artifactId><version>2.1.4.RELEASE</version></parent><dependencies><!--web起步依赖--><dependency><groupId>org.springframework.boot</groupId><artifactId>spring-boot-starter-web</artifactId></dependency><!--thymeleaf配置--><dependency><groupId>org.springframework.boot</groupId><artifactId>spring-boot-starter-thymeleaf</artifactId></dependency></dependencies>
</project>
(2)创建包com.itheima.thymeleaf.并创建启动类ThymeleafApplication
@SpringBootApplication
public class ThymeleafApplication {public static void main(String[] args) {SpringApplication.run(ThymeleafApplication.class,args);}
}
(3)创建application.yml
设置thymeleaf的缓存设置,设置为false。默认加缓存的,用于测试。
spring:thymeleaf:cache: false
(4)控制层
创建controller用于测试后台 设置数据到model中。
创建com.itheima.controller.TestController,代码如下:
@Controller
@RequestMapping("/test")
public class TestController {/**** 访问/test/hello  跳转到demo1页面* @param model* @return*/@RequestMapping("/hello")public String hello(Model model){model.addAttribute("hello","hello welcome");return "demo";}
}
(2)创建html
在resources中创建templates目录,在templates目录创建 demo.html,代码如下:
<!DOCTYPE html>
<html xmlns:th="http://www.thymeleaf.org">
<head><title>Thymeleaf的入门</title><meta http-equiv="Content-Type" content="text/html; charset=UTF-8"/>
</head>
<body>
<!--输出hello数据-->
<p th:text="${hello}"></p>
</body>
</html>
解释:
``:这句声明使用thymeleaf标签
:这句使用 th:text="${变量名}" 表示 使用thymeleaf获取文本数据,类似于EL表达式。(5)测试
启动系统,并在浏览器访问
http://localhost:8080/test/hello

3 Thymeleaf基本语法
(1)th:action
定义后台控制器路径,类似标签的action属性。
例如:
<form th:action="@{/demo/test}"><input th:type="text" th:name="id"><button>提交</button>
</form>
action
public String test(Model model,String id){    System.out.println(id);
}
(2)th:each
对象遍历,功能类似jstl中的<c:forEach>标签。
创建com.itheima.model.User,代码如下:
public class User {
private Integer id;
private String name;
private String address;
getter and settrt
}
Controller添加数据
List<User> userList=new ArrayList<>();userList.add(new User(1, "a", "bj"));userList.add(new User(2, "b", "tj"));userList.add(new User(3, "c", "nj"));model.addAttribute("userList", userList);
demo.html
<table><tr><td>下标</td><td>编号</td><td>姓名</td><td>住址</td></tr><tr th:each="user,userStat:${userList}"><td th:text="${userStat.index}"></td><td th:text="${user.id}"></td><td th:text="${user.name}"></td><td th:text="${user.address}"></td></tr>
</table>
测试效果

(3) map取值
1action
Map<String,Object> dataMap=new HashMap<>();dataMap.put("No", "123");dataMap.put("address", "bj");model.addAttribute("dataMap", dataMap);
2 demo.html
<div th:each="map,mapStat:${dataMap}"><div th:text="${map}"></div>key:<span th:text="${mapStat.current.key}"></span><br>value:<span th:text="${mapStat.current.value}"></span><br>====================================
</div>
3测试 启动工程 访问 http://localhost:8080/demo/hello
测试效果

(4)数组遍历
1action
String[] names={"张三","李四","王五"};
model.addAttribute("names",names );
2demo.html
<div th:each="nm,nmStat:${names}"><span th:text="${nmStat.count}"></span><br><span th:text="${nm}"></span><br>====================================
</div>
3测试 启动工程 访问 http://localhost:8080/demo/test
测试效果

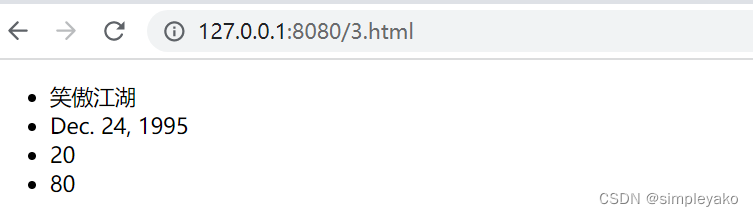
(5)Date输出
1action
model.addAttribute("now", new Date());
2demo.html
<div>    <span th:text="${#dates.format(now,'yyyy-MM-dd hh:mm:ss')}"></span>
</div>
测试效果

(6)th:if条件
1action
model.addAttribute("age", 15);
2demo.html
<div>    <span th:if="${(age>=18)}">终于成年了</span>
</div>
测试效果

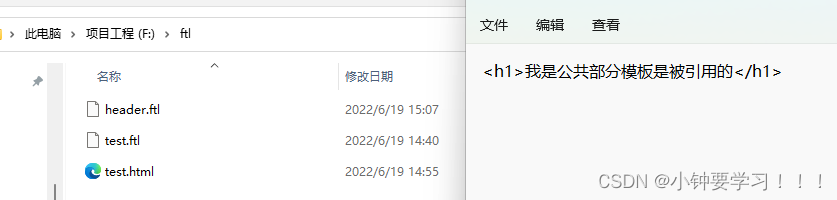
(7)th:fragment 模块声明与页面包含
1 新建footer.html
<!DOCTYPE html>
<html xmlns:th="http://www.thymeleaf.org">
<head><meta charset="UTF-8"><title>fragment</title>
</head>
<body>
<div id="C" th:fragment="copy">关于我们<br/>
</div>
</body>
</html>
2 demo.html
<div id="W" th:include="footer::copy"></div>
效果如下:

4 搜索页面渲染
4.1 搜索分析
打开chapter01 框架搭建/资源/静态原型/前台/search.html

搜索页面要显示的内容主要分为3块。
1)搜索的数据结果
2)筛选出的数据搜索条件
3)用户已经勾选的数据条件
4.2 搜索实现

搜索的业务流程如上图,用户每次搜索的时候,先经过搜索业务工程,搜索业务工程调用搜索微服务工程。
4.2.1 搜索工程搭建
(1)search搜索服务 添加依赖
在changgou-service_search工程中的pom.xml中引入如下依赖
<dependency><groupId>org.springframework.boot</groupId><artifactId>spring-boot-starter-thymeleaf</artifactId></dependency>
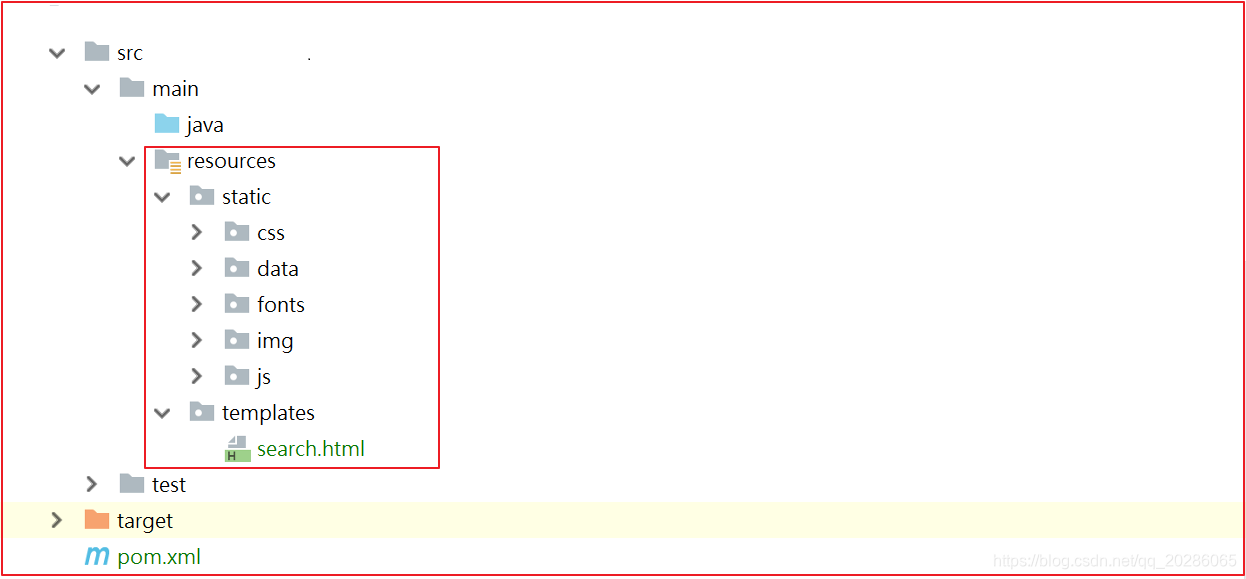
(2)静态资源导入
将资源中的页面资源/所有内容拷贝到工程的resources目录下如下图:
(3) 更改配置文件,在spring下添加内容
spring.thymeleaf.cache: false
4.2.1 基础数据渲染
需求:以前前端json,前端渲染。现在跳转到项目页面,服务器端页面渲染出来。
(1)com.changgou.search.controller添加方法
@GetMapping("/list")
public String list(@RequestParam Map<String,String> searchMap,Model model){//特殊符号处理this.handleSearchMap(searchMap);//获取查询结果Map resultMap = searchService.search(searchMap);model.addAttribute("result",resultMap);model.addAttribute("searchMap",searchMap);return "search";
}
类注解改为Controller,sear方法添加ResponseBody
浏览器访问 http://localhost:9009/search/list
(2) 搜索结果页面渲染

(2.1)用户选择条件回显
2 <html xmlns:th="http://www.thymeleaf.org">
470 <li class="active"><span th:text="${searchMap.keywords}"></span></li>
475 <li class="with-x" th:if="${#maps.containsKey(searchMap,'brand')}">品牌:<span th:text="${searchMap.brand}"></span><a th:href="@{${#strings.replace(url,'&brand='+searchMap.brand,'')}}">×</a></li><li class="with-x" th:if="${#maps.containsKey(searchMap,'price')}">价格:<span th:text="${searchMap.price}"></span><a th:href="@{${#strings.replace(url,'&price='+searchMap.price,'')}}">×</a></li><!--规格--><li class="with-x" th:each="sm:${searchMap}" th:if="${#strings.startsWith(sm.key,'spec_')}"><span th:text="${#strings.replace(sm.key,'spec_','')}"></span> : <span th:text="${#strings.replace(sm.value,'%2B','+')}"></span><a th:href="@{${#strings.replace(url,'&'+sm.key+'='+sm.value,'')}}">×</a></li>
3测试 访问 http://localhost:9009/search/list?keywords=手机&brand=华为&spec_网络制式=移动4G
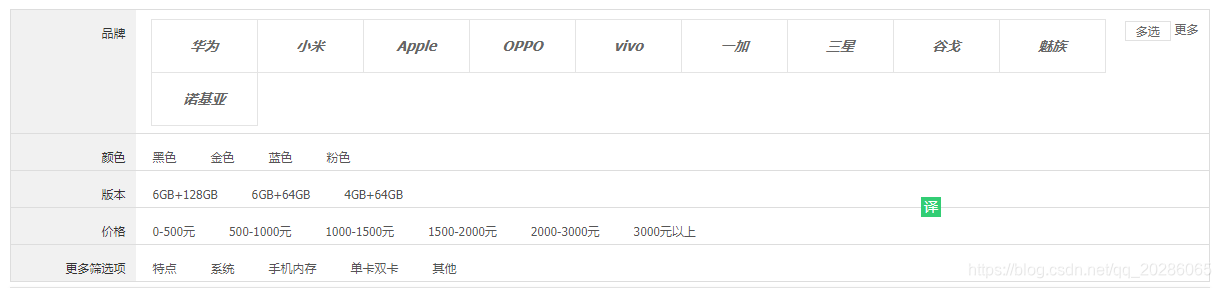
(2.2)品牌信息显示
1需求:实现下图功能

2修改search.html页面
498 <div class="type-wrap logo" th:unless="${#maps.containsKey(searchMap,'brand')}"><div class="fl key brand">品牌</div><div class="value logos"><ul class="logo-list"><li th:each="brand,brandSate:${result.brandList}"><a th:text="${brand}" th:href="@{${url}(brand=${brand})}"></a></li></ul></div><div class="ext"><a href="javascript:void(0);" class="sui-btn">多选</a><a href="javascript:void(0);">更多</a></div></div>
3 测试 访问 http://localhost:9009/search/list?keywords=手机
访问 http://localhost:9009/search/list?keywords=手机&brand=华为
(2.3)规格信息数据转换
1需求访问规格接口 http://localhost:9009/search?keywords=手机&spec_颜色=红色
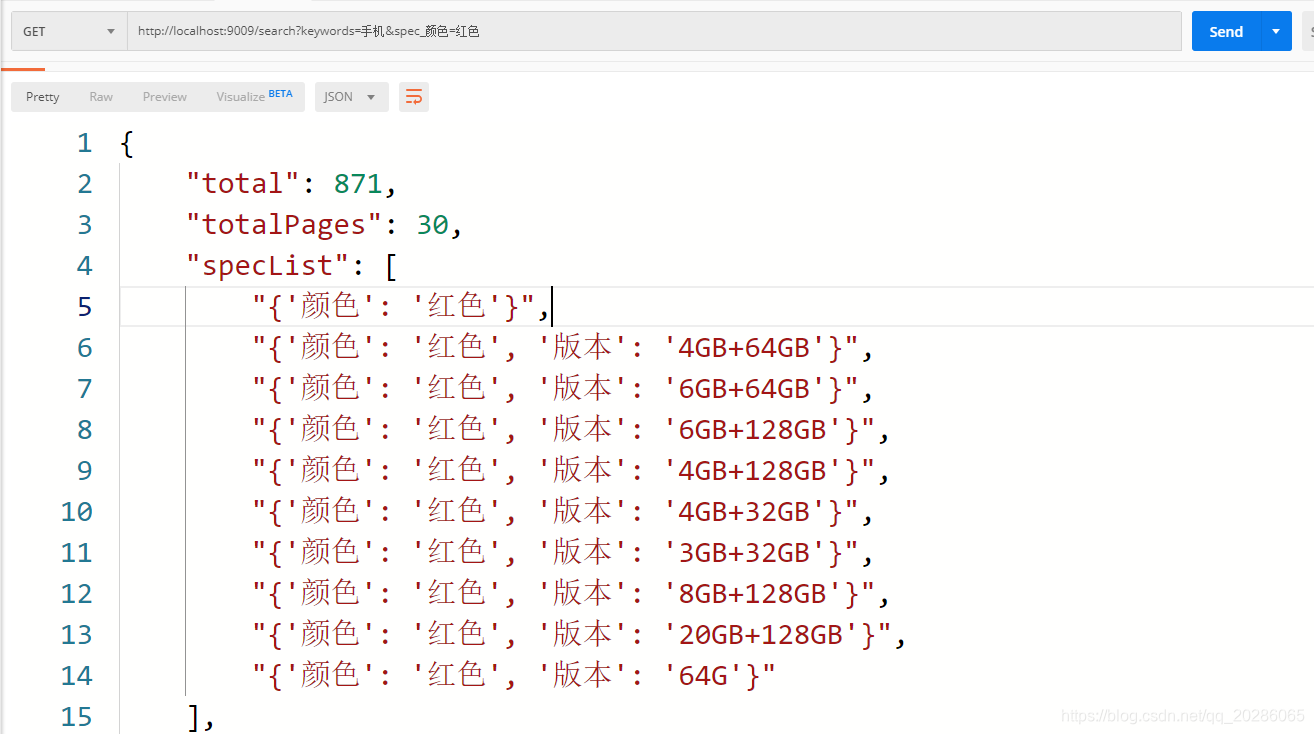
规格数据不好在前端展示。所以要转成map。
颜色:红色 黑色蓝色
版本:3+32 4+32 20=128
2 SearchServiceImpl 增加方法
public Map<String, Set<String>> formartSpec(List<String> specList) {//1定义返回mapMap<String, Set<String>> resultMap = new HashMap<>();//2遍历specListif (specList != null && specList.size() > 0) {for (String specJsonString : specList) {// 将json转为mapMap<String, String> specMap = JSON.parseObject(specJsonString, Map.class);//遍历每个商品的规格名字for (String specKey : specMap.keySet()) {//看返回map中有此规格没有Set<String> specSet = resultMap.get(specKey);if (specSet == null) {specSet = new HashSet<>();}//将此条数据中的规格放入setspecSet.add(specMap.get(specKey));//将set放入返回mapresultMap.put(specKey, specSet);}}}return resultMap;}
3在封装规格信息时,调用
resultMap.put("specList", this.formartSpec(specList));
(2.4)规格与价格显示
1修改search.html页面 规格
512-586<div class="type-wrap" th:each="spec,specStat:${result.specList}" th:unless="${#maps.containsKey(searchMap,'spec_'+spec.key)}"><div class="fl key" th:text="${spec.key}"></div><div class="fl value"><ul class="type-list"><li th:each="op,opstat:${spec.value}"><a th:text="${op}" th:href="@{${url}('spec_'+${spec.key}=${op})}"></a></li></ul></div><div class="fl ext"></div></div>
2修改search.html页面 价格
525-551
<div class="type-wrap" th:unless="${#maps.containsKey(searchMap,'price')}"><div class="fl key">价格</div><div class="fl value"><ul class="type-list"><li><a th:text="0-500元" th:href="@{${url}(price='0-500')}"></a></li><li><a th:text="500-1000元" th:href="@{${url}(price='500-1000')}"></a></li><li><a th:text="1000-1500元" th:href="@{${url}(price='1000-1500')}"></a></li><li><a th:text="1500-2000元" th:href="@{${url}(price='1500-2000')}"></a></li><li><a th:text="2000-3000元" th:href="@{${url}(price='2000-3000')}"></a></li><li><a th:text="3000元以上" th:href="@{${url}(price='3000')}"></a></li></ul></div><div class="fl ext"></div></div>
3测试: http://localhost:9009/search/list?keywords=手机
http://localhost:9009/search/list?keywords=电视
(2.5)数据列表展示
1需求:显示下列内容
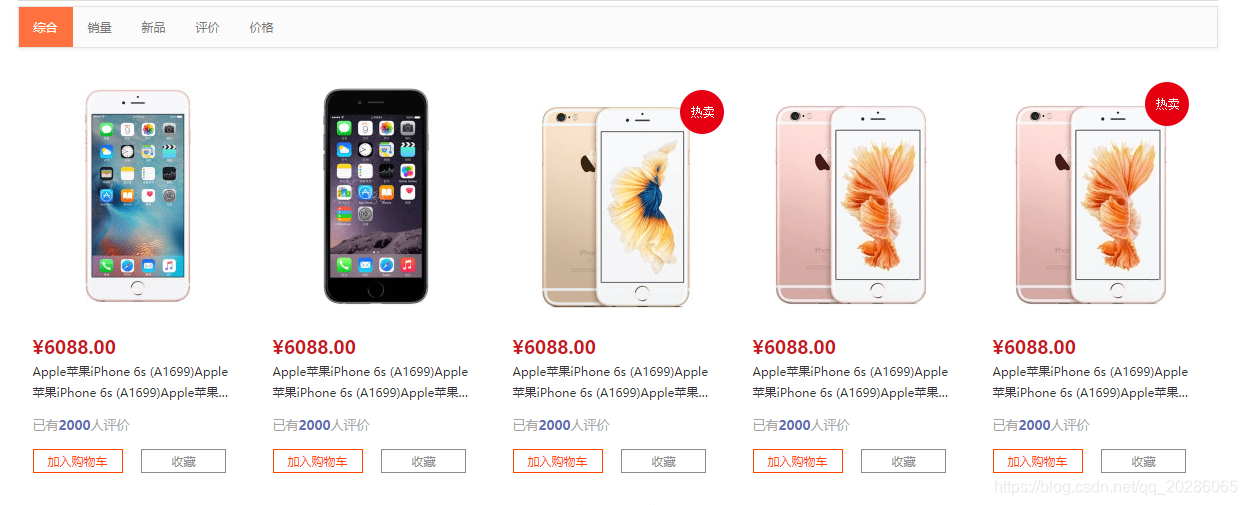
2 修改search.html页面
603-832
<li class="yui3-u-1-5" th:each="sku,skuStat:${result.rows}"><div class="list-wrap"><div class="p-img"><!--<a th:href="'http://192.168.200.128:8081/'+${sku.spuId}+'.html'"  target="_blank"><img th:src="${sku.image}" /></a>--><a th:href="'http://192.168.200.128:8081/10000000616300.html'"  target="_blank"><img th:src="${sku.image}" /></a></div><div class="price"><strong><em>¥</em><i th:text="${sku.price}"></i></strong></div><div class="attr"><a target="_blank" th:href="'http://192.168.200.128:8081/10000000616300.html'" th:title="${sku.spec}" th:utext="${sku.name}"></a></div><div class="commit"><i class="command">已有<span>2000</span>人评价</i></div><div class="operate"><a href="success-cart.html" target="_blank" class="sui-btn btn-bordered btn-danger">加入购物车</a><a href="javascript:void(0);" class="sui-btn btn-bordered">收藏</a></div></div></li>
3测试:http://localhost:9009/search/list?keywords=电视
4.3 关键字搜索
1需求:用户输入关键字,查询。回显。

2 修改search.html页面
55-61<form th:action="@{/search/list}" class="sui-form form-inline"><div class="input-append"><input th:type="text" id="autocomplete" name="keywords" th:value="${searchMap.keywords}" class="input-error input-xxlarge" /><button class="sui-btn btn-xlarge btn-danger" th:type="submit">搜索</button></div></form>
3测试:http://localhost:9009/search/list?keywords=电视
修改输入框
4.4 条件搜索实现
1需求:

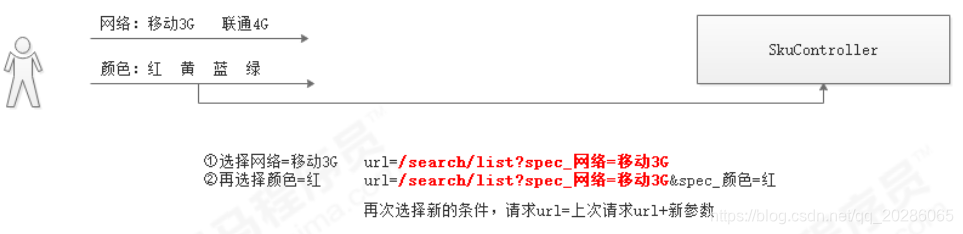
- 用户搜索:拼接url /search/list?keywords=手机
- 点击新规格:拼接 “url /search/list?keywords=手机&spec_网络=移动3G”+spec__颜色=红色
(1)后台记录搜索URL
com.changgou.search.controller SearchController list方法中新增
//拼接urlStringBuilder url = new StringBuilder("/search/list");// 如果有搜索条件if (searchMap != null && searchMap.size() > 0) {url.append("?");//拼接for (String paramKey : searchMap.keySet()) {//排除特殊情况if(!"sortRule".equals(paramKey)&&!"sortField".equals(paramKey)&&!"pageNum".equals(paramKey)){url.append(paramKey).append("=").append(searchMap.get(paramKey)).append("&");}}String urlString = url.toString();//除去最后的&urlString=urlString.substring(0,urlString.length()-1);model.addAttribute("url", urlString);}else {model.addAttribute("url", url);}
(2)前端url拼接跳转
1需求:
用户点击相应品牌、规格、价格,跳转请求后端接口。
2修改search.html页面
502 <a th:text="${brand}" th:href="@{${url}(brand=${brand})}"></a>
518 <a th:text="${op}" th:href="@{${url}('spec_'+${spec.key}=${op})}"></a>
529等 <a th:text="0-500元" th:href="@{${url}(price='0-500')}"></a>
3测试:http://localhost:9009/search/list?keywords=手机
依次点击品牌、规格、价格信息
4.5 移除搜索条件
1需求:

用户点击X去除刚才的搜索条件。
2修改search.html页面
574-486<li class="with-x" th:if="${#maps.containsKey(searchMap,'brand')}">品牌:<span th:text="${searchMap.brand}"></span><a th:href="@{${#strings.replace(url,'&brand='+searchMap.brand,'')}}">×</a></li><li class="with-x" th:if="${#maps.containsKey(searchMap,'price')}">价格:<span th:text="${searchMap.price}"></span><a th:href="@{${#strings.replace(url,'&price='+searchMap.price,'')}}">×</a></li><!--规格--><li class="with-x" th:each="sm:${searchMap}" th:if="${#strings.startsWith(sm.key,'spec_')}"><span th:text="${#strings.replace(sm.key,'spec_','')}"></span> : <span th:text="${#strings.replace(sm.value,'%2B','+')}"></span><a th:href="@{${#strings.replace(url,'&'+sm.key+'='+sm.value,'')}}">×</a></li>
3测试:http://localhost:9009/search/list?keywords=手机
添加搜索条件,去除搜索条件。
4.6 排序
1需求:

用户点击排序字段,返回排序好的内容。
2修改search.html页面
593-595<li><a th:href="@{${url}(sortRule='ASC',sortField='price')}">价格↑</a></li><li><a th:href="@{${url}(sortRule='DESC',sortField='price')}">价格↓</a></li>
3测试:http://localhost:9009/search/list?keywords=手机
点击价格升序、降序查看结果
4.7 分页
真实的分页应该像百度那样,如下图:


分页后端实现
1需求:

分页。
2将资料Page.java 放到common工程entity下
3com.changgou.search.controller SearchController list方法中新增
// 封装分页数据,并返回//总记录数// 当前页// 每页几条Page<SkuInfo> page = new Page<>(Long.parseLong(String.valueOf(resultMap.get("total"))),Integer.parseInt(String.valueOf(resultMap.get("pageNum"))),Page.pageSize);model.addAttribute("page", page);
分页前端实现
1修改search.html页面
633-657<ul><li class="prev disabled"><a th:href="@{${url}(pageNum=${page.upper})}">«上一页</a></li><li th:each="i:${#numbers.sequence(page.lpage,page.rpage)}" th:class="${i}==${page.currentpage}?'active':''"><a th:href="@{${url}(pageNum=${i})}" th:text="${i}"></a></li><li class="next"><a th:href="@{${url}(pageNum=${page.next})}">下一页»</a></li></ul><div><span>共<i th:text="${page.last}"></i>页 </span><span>共<i th:text="${page.total}"></i>个商品 </span></div>
2测试:http://localhost:9009/search/list?keywords=手机
分页 上一页下一页
5.畅购商品详情页
5.1 需求分析
当系统审核完成商品,需要将商品详情页进行展示,那么采用静态页面生成的方式生成,并部署到高性能的web服务器中进行访问是比较合适的。所以,开发流程如下图所示:

此处MQ我们使用Rabbitmq即可。
流程:
1商品上架->商品服务发送spuid->mq
2mq->静态页服务
3静态页服务->调商品服务获取spu->生成静态页面
5.2 商品静态化微服务创建
5.2.1 需求分析
该微服务只用于生成商品静态页,不做其他事情。
5.2.2 搭建项目
1 创建 静态页服务changgou_service_page
2依赖
<!--公共模块--><dependency><groupId>com.changgou</groupId><artifactId>changgou_common</artifactId><version>1.0-SNAPSHOT</version></dependency><!--thymeleaf--><dependency><groupId>org.springframework.boot</groupId><artifactId>spring-boot-starter-thymeleaf</artifactId></dependency><!--mq--><dependency><groupId>org.springframework.boot</groupId><artifactId>spring-boot-starter-amqp</artifactId></dependency><!--goods feigh--><dependency><groupId>com.changgou</groupId><artifactId>changgou_service_goods_api</artifactId><version>1.0-SNAPSHOT</version></dependency>
3配置文件application.yml
server:port: 9011
spring:application:name: pagerabbitmq:host: 192.168.200.128main:allow-bean-definition-overriding: true #当遇到同样名字的时候,是否允许覆盖注册
eureka:client:service-url:defaultZone: http://127.0.0.1:6868/eurekainstance:prefer-ip-address: true
feign:hystrix:enabled: falseclient:config:default:   #配置全局的feign的调用超时时间  如果 有指定的服务配置 默认的配置不会生效connectTimeout: 600000 # 指定的是 消费者 连接服务提供者的连接超时时间 是否能连接  单位是毫秒readTimeout: 600000  # 指定的是调用服务提供者的 服务 的超时时间()  单位是毫秒
#hystrix 配置
hystrix:command:default:execution:timeout:#如果enabled设置为false,则请求超时交给ribbon控制enabled: trueisolation:strategy: SEMAPHORE
#生成静态页的位置
pagepath: D:\items
4启动类 com.changgou.page.PageApplication
@SpringBootApplication
@EnableEurekaClient
@EnableFeignClients(basePackages = {"com.changgou.goods.feign"})
public class PageApplication {
public static void main(String[] args) {SpringApplication.run(PageApplication.class,args);
}
}
5.3 生成静态页
5.3.1 需求分析
页面发送请求,传递要生成的静态页的商品的SpuID.后台controller 接收请求,调用thyemleaf的原生API生成商品静态页。
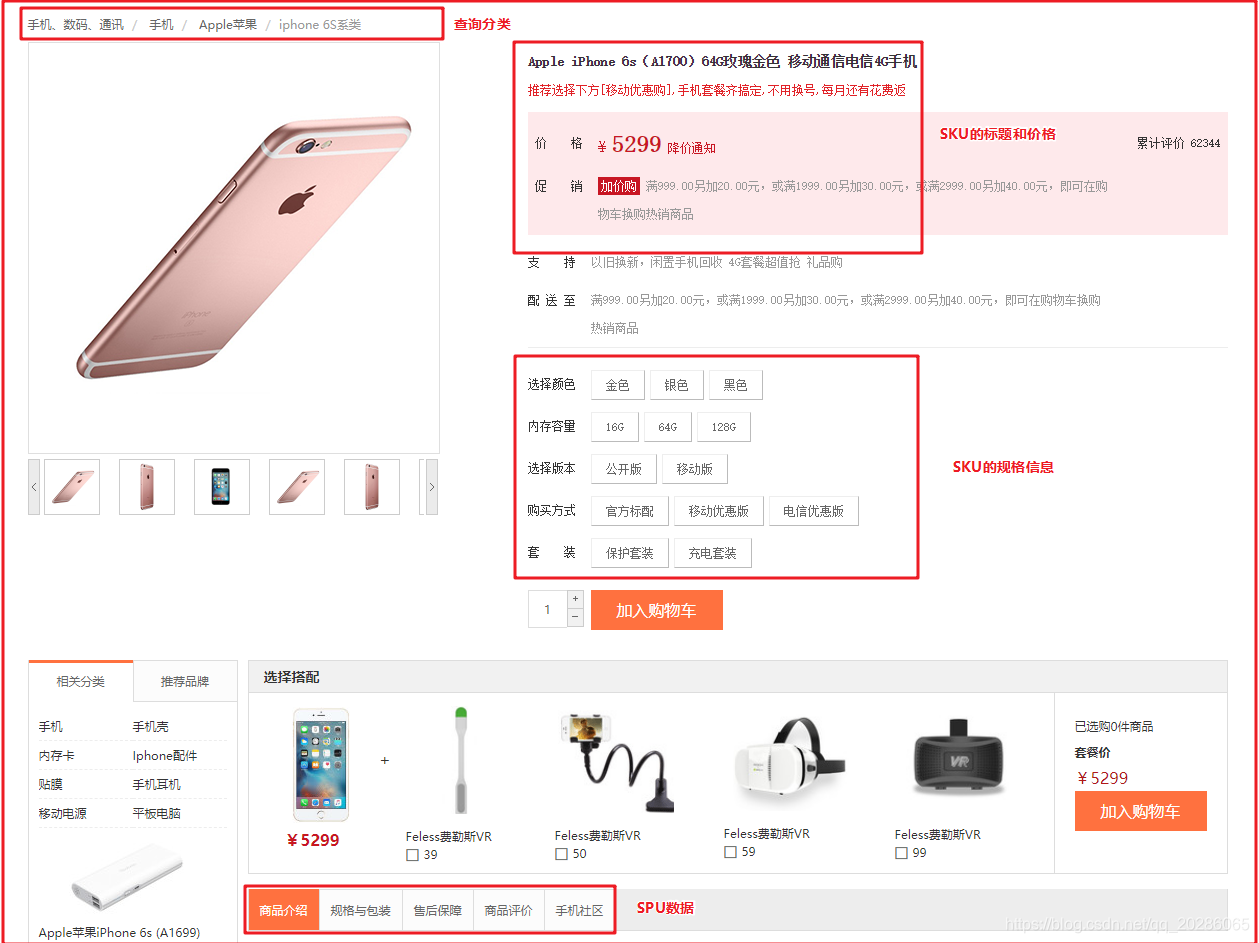
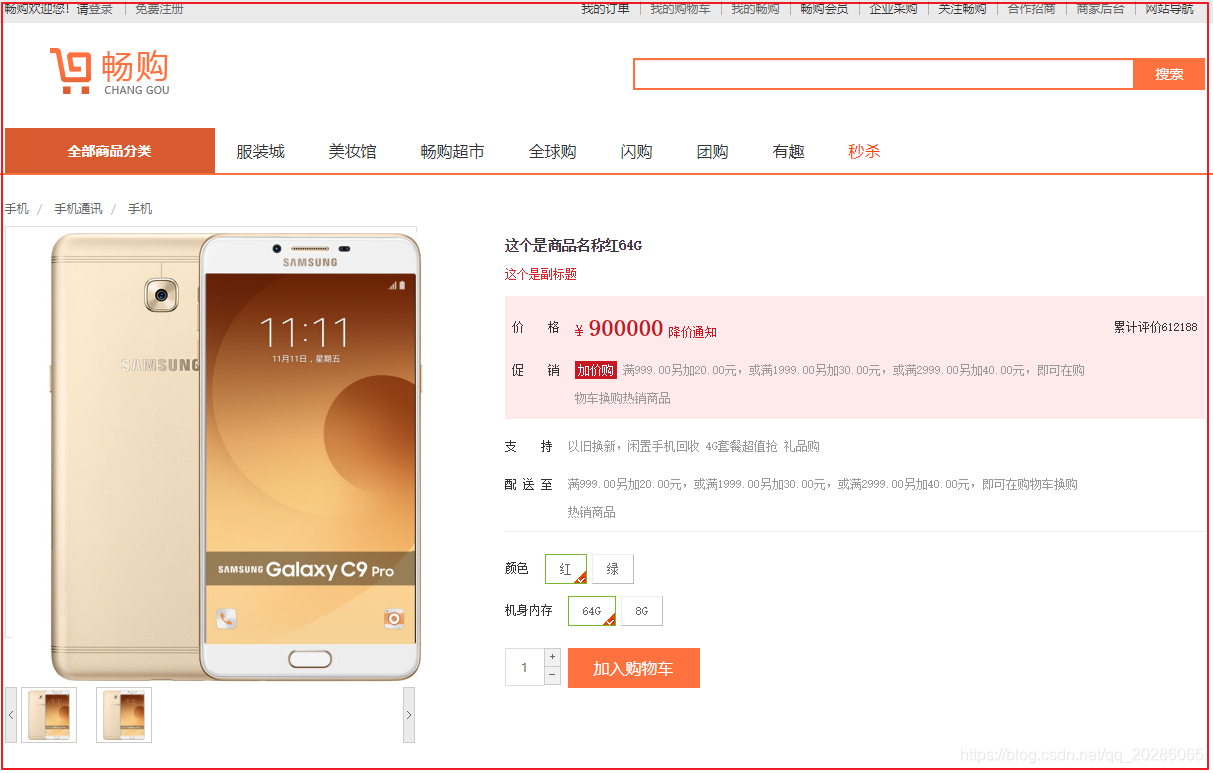
上图是要生成的商品详情页,从图片上可以看出需要查询SPU的3个分类作为面包屑显示,同时还需要查询SKU和SPU信息。
5.3.2 Feign创建
需求:查出3部分数据 资源/静态原型/前台/item.html
- 分类
- spu
- sku
1goods-api中 com.changgou.goods.feign
@FeignClient(name = "goods")
public interface CategoryFeign {@GetMapping("/category/{id}")public Result<Category> findById(@PathVariable("id") Integer id);
}
2goods服务 spuController添加
@GetMapping("/findSpuById/{id}")
public Result<Spu> findSpuById(@PathVariable("id") String id){Spu spu = spuService.findById(id);return new Result(true,StatusCode.OK,"查询成功",spu);
}
3com.changgou.goods.feign
@FeignClient(name = "goods")
public interface SpuFeign {
@GetMapping("/spu/findSpuById/{id}")
public Result<Spu> findSpuById(@PathVariable("id") String id);
}
5.3.3 静态页生成代码-重点掌握

thymleaf页面静态化 数据+模板=静态html
1将资料的item.html放到项目templates下。作为详情页模板。
2page模块 service层 com.changgou.page.service
public interface PageService {//生成静态化页面void generateHtml(String spuId);
}
3 实现类 com.changgou.page.service.impl
@Service
public class PageServiceImpl implements PageService {
@Value("${pagepath}")
String pagepath;@Autowired
TemplateEngine templateEngine;@Override
public void generateHtml(String spuId) {//1获取context对象,存储商品相关数据Context context = new Context();//1.1获取静态化页面相关数据Map<String, Object> itemData = this.getItemData(spuId);context.setVariables(itemData);//2获取商品详情页存储位置File dir = new File(pagepath);//3判断当前存储位置文件夹是否存在,不存在创建if (!dir.exists()) {dir.mkdirs();}//4定义输出流,完成文件生成File file = new File(dir + "/" + spuId + ".html");Writer out = null;try {out = new PrintWriter(file);//生成静态化页面内容/*** 1 模板名称* 2 content* 3 输出流*/templateEngine.process("item", context, out);} catch (Exception e) {} finally {//5关闭流try {out.close();} catch (IOException e) {e.printStackTrace();}}}@Autowired
SpuFeign spuFeign;
@Autowired
CategoryFeign categoryFeign;
@Autowired
SkuFeign skuFeign;// 获取静态化页面相关数据
private Map<String, Object> getItemData(String spuId) {//0 构建返回mapMap<String, Object> resultMap = new HashMap<>();// 1获取spuSpu spu = spuFeign.findSpuById(spuId).getData();resultMap.put("spu", spu);// 2获取图片信息if (spu != null) {if (StringUtils.isNotEmpty(spu.getImages())) {resultMap.put("imageList", spu.getImages().split(","));}}// 3获取商品分类信息Category category1 = categoryFeign.findById(spu.getCategory1Id()).getData();resultMap.put("category1", category1);Category category2 = categoryFeign.findById(spu.getCategory2Id()).getData();resultMap.put("category2", category2);Category category3 = categoryFeign.findById(spu.getCategory3Id()).getData();resultMap.put("category3", category3);// 4获取sku信息List<Sku> skuList = skuFeign.findSkuListBySpuId(spuId);resultMap.put("skuList", skuList);return resultMap;}
}
静态页服务监听
1com.changgou.page.config 粘贴canal服务中的配置
public static final String PAGE_CREATE_QUEUE="page_create_queue";
@Bean(PAGE_CREATE_QUEUE)
public Queue PAGE_CREATE_QUEUE(){return new Queue(PAGE_CREATE_QUEUE);
}
@Bean
public Binding PAGE_CREATE_QUEUE_BINDING(@Qualifier(PAGE_CREATE_QUEUE)Queue queue,@Qualifier(GOODS_UP_EXCHANGE)Exchange exchange){return BindingBuilder.bind(queue).to(exchange).with("").noargs();
}
2 com.changgou.page.listener
@Component
public class PageListener {
@Autowired
private PageService pageService;@RabbitListener(queues = RabbitMQConfig.PAGE_CREATE_QUEUE)
public void receiveMessage(String spuId){System.out.println("获取静态化页面的商品id,id的值为:   "+spuId);//条用业务层完成静态化页面生成pageService.generateHtml(spuId);
}
}
数据监控服务
1RabbitMQConfig 拷贝page服务配置
2SpuListener 新增
//获取最新审核通过商品 status 0->1if("0".equals(oldData.get("status"))&&"1".equals(newData.get("status"))){//发送spuId到mqrabbitTemplate.convertAndSend(RabbitMQConfig.GOODS_UP_EXCHANGE, "", newData.get("id"));}
5.3.4 模板填充
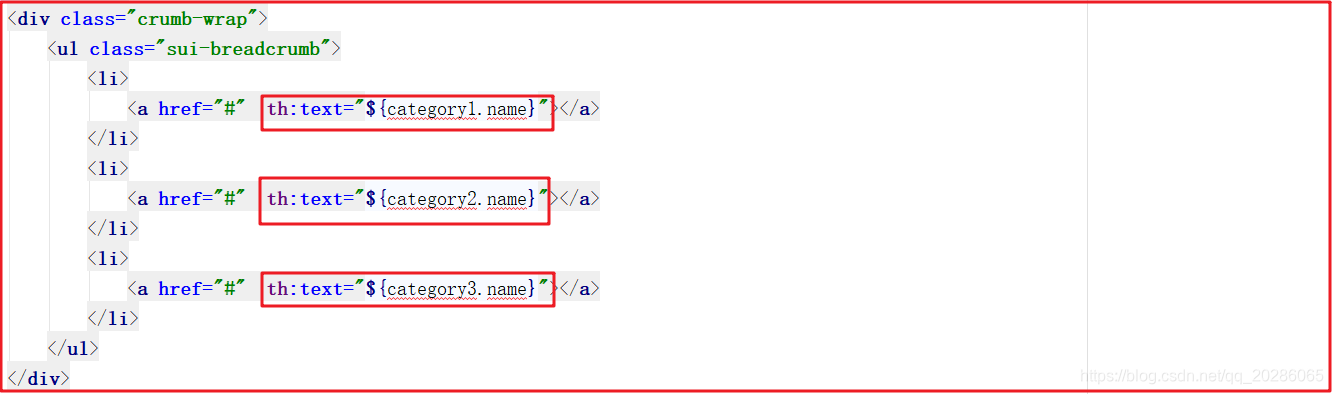
(1)面包屑数据
修改item.html,填充三个分类数据作为面包屑,代码如下:
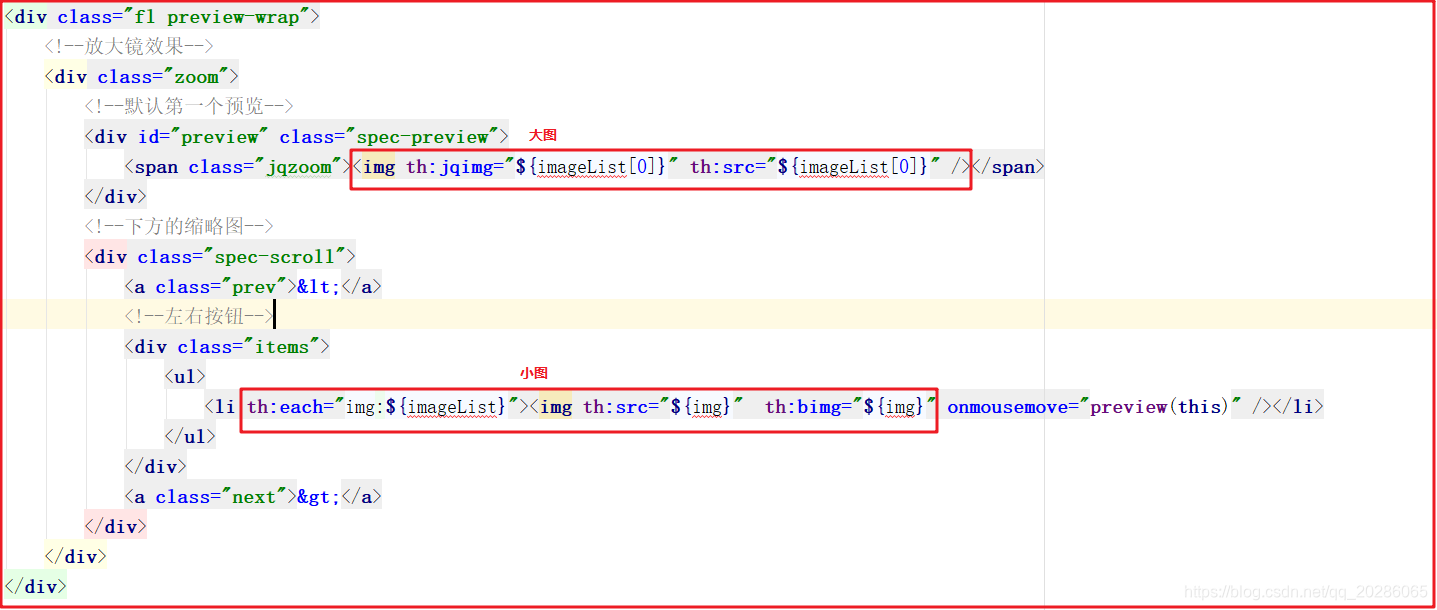
(2)商品图片
修改item.html,将商品图片信息输出,在真实工作中需要做空判断,代码如下:
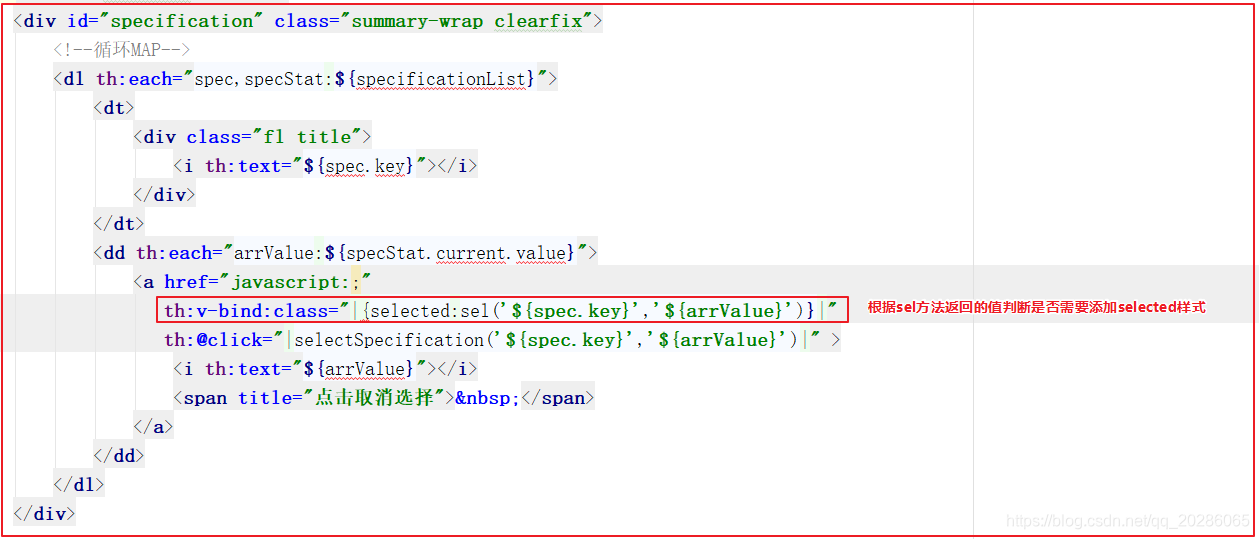
(3)规格输出

(4)默认SKU显示
静态页生成后,需要显示默认的Sku,我们这里默认显示第1个Sku即可,这里可以结合着Vue一起实现。可以先定义一个集合,再定义一个spec和sku,用来存储当前选中的Sku信息和Sku的规格,代码如下:

页面显示默认的Sku信息

(5)记录选中的Sku
在当前Spu的所有Sku中spec值是唯一的,我们可以根据spec来判断用户选中的是哪个Sku,我们可以在Vue中添加代码来实现,代码如下:
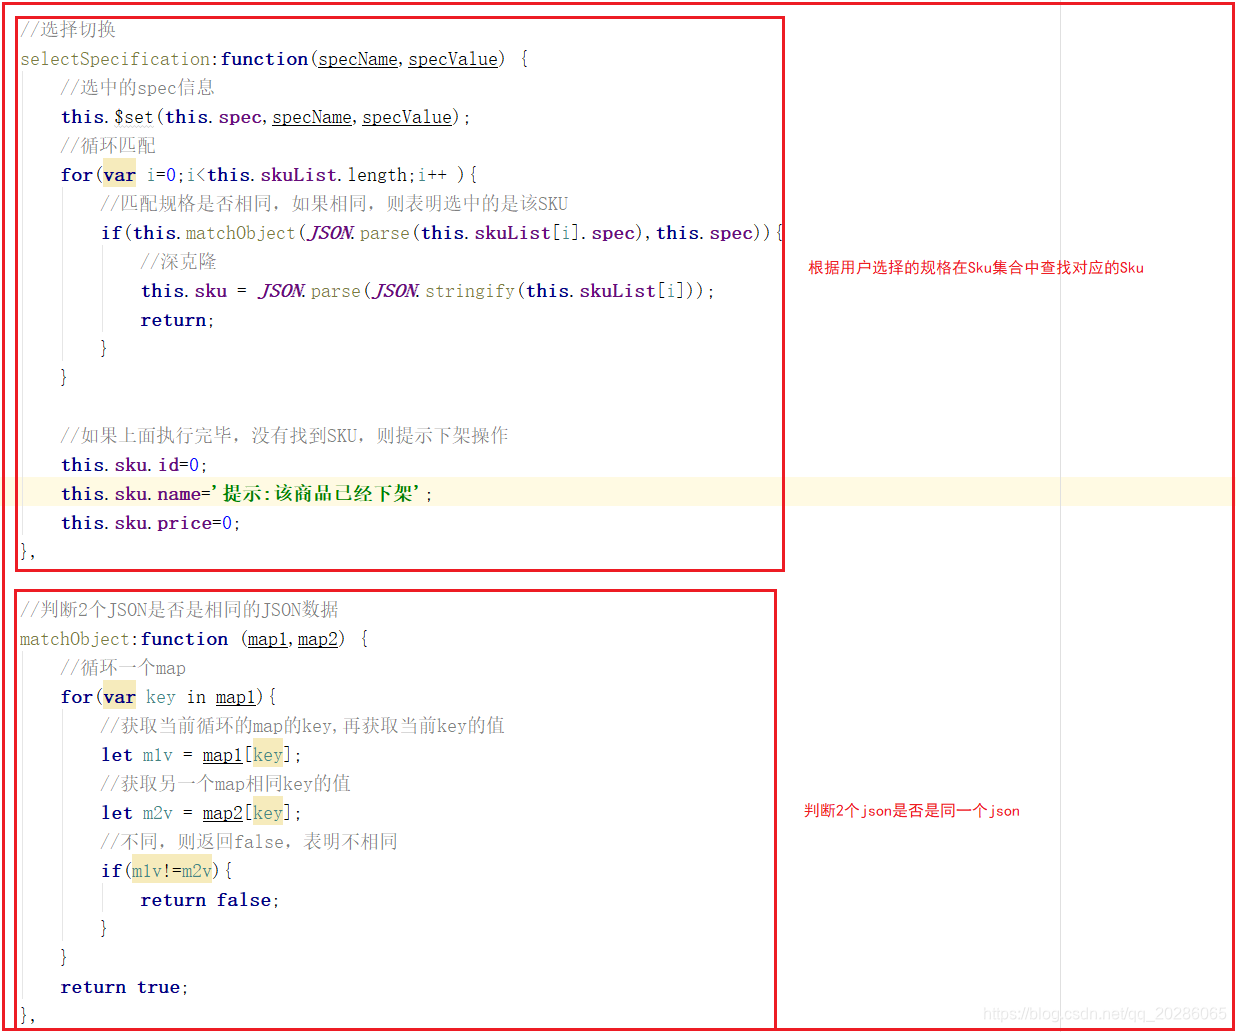
添加规格点击事件

(6)样式切换
点击不同规格后,实现样式选中,我们可以根据每个规格判断该规格是否在当前选中的Sku规格中,如果在,则返回true添加selected样式,否则返回false不添加selected样式。
Vue添加代码:

页面添加样式绑定,代码如下:
5.3.5 启动测试
1page 服务com.changgou.page.service.impl.PageServiceImpl类getItemData方法中新增
// 5获取商品规格信息
resultMap.put("specificationList", JSON.parseObject(spu.getSpecItems(),Map.class));
2测试启动所有服务 修改goods表中一条数据 status 0->1
3生成文件 D:/items/10000000616300.h tml
4打开有数据,没样式
5将静态原型中的css,js,image,data,fonts包拷贝至D盘,刷新页面。
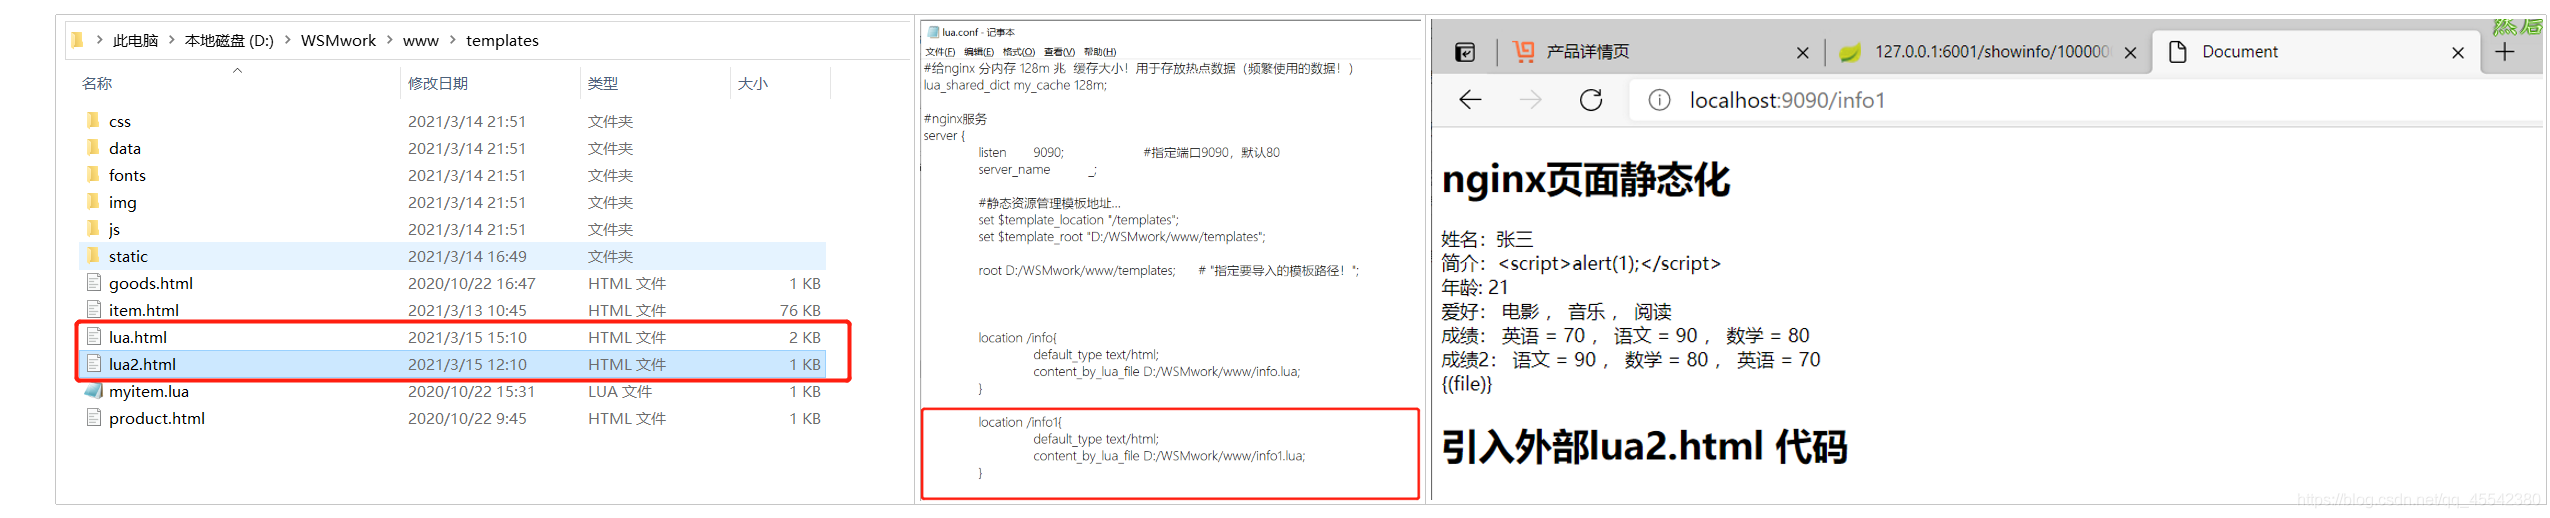
5.3.6 基于nginx完成静态页访问
1将10000000616300.html页面放入ngixn下。
/usr/local/openresty/nginx/html/10000000616300.html
2重启ngixn
./ngixn -s -reload
3访问 http://192.168.200.128/10000000616300.html
4修改search服务中的search.html
608-609
<!--<a th:href="'http://192.168.200.128:8081/'+${sku.spuId}+'.html'"  target="_blank"><img th:src="${sku.image}" /></a>--><a th:href="'http://192.168.200.128/10000000616300.html'"  target="_blank"><img th:src="${sku.image}" /></a>
618 <a target="_blank" th:href="'http://192.168.200.128/10000000616300.html'" th:title="${sku.spec}" th:utext="${sku.name}"></a>
5 访问搜索页面http://localhost:9009/search/list?keywords=电视
点击图片或名称都可以跳转至详情页。