目录:
- 1. 项目背景
- 2. 环境
- 3. Jlink Comander使用
- 3.1 建立连接
- 3.2 查看帮助
- 4. 通过Jlink Comander读取芯片ID
- 5. 通过BAT脚本读取
- 5.1 jlink文件
- 5.2 bat 文件
- 5.3 结果文件 chip_id.txt
- 5.4 运行界面
- 6. 写在最后
1. 项目背景
公司有一款产品需要在生产时通过读取它的芯片ID来生成一个二维码,用于后续问题追踪。
2. 环境
- Windows
- Jlink.exe
- Jlink连接器
- 开发板 AMA3B2KK-KBR
接下来我们会通过两种方式读取芯片ID,使用Jlink Comander工具和通过BAT脚本读取。
3. Jlink Comander使用
Jlink Comander是jlink的命令行工具,可以直接在里面输入命令。
打开Jlink Comander的第一个界面是这样的:
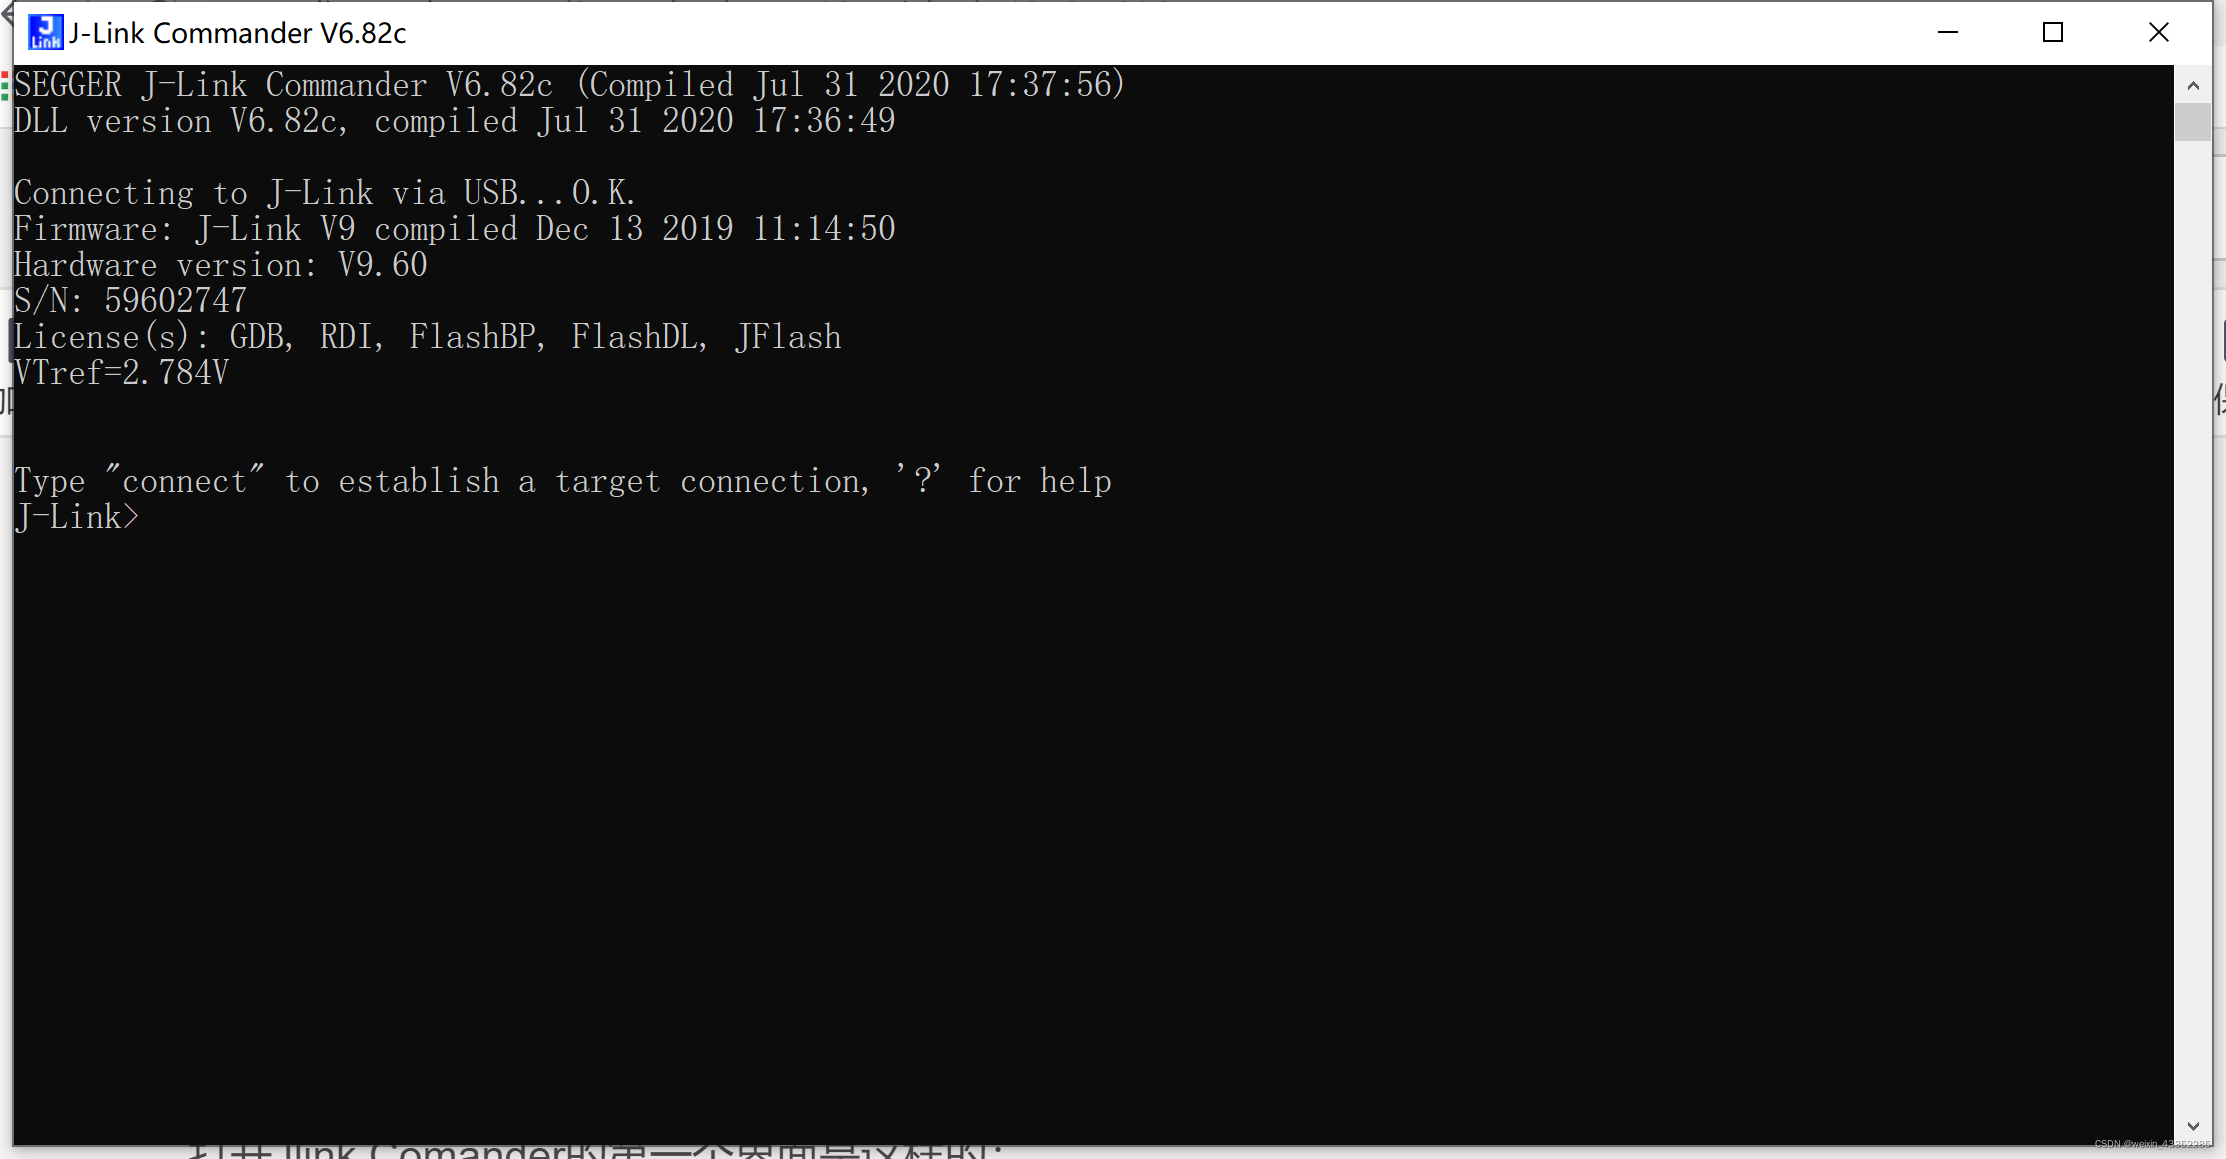
打开会去自动识别Jlink,如果识别成功的话,可以显示出它的序列号,如上图的S/N: 59602747。
根据提示,输入“connect”可建立连接,输入“?”查看帮助。
3.1 建立连接
输入connect,识别到了芯片的类型"AMA3B2KK-KBR"。接着选择连接方式 J S T,最后选择通讯速度。

3.2 查看帮助
输入“?”,可以看到支持哪些命令。
J-Link>?Available commands are:
----------------------
f          Firmware info
h          halt
IsHalted   Returns the current CPU state (halted / running)
WaitHalt   Waits until the CPU is halted or the given timeout is exceeded.Syntax: WaitHalt <TimeoutMs>  Default timeout is 1000 ms
g          go
Sleep      Waits the given time (in milliseconds). Syntax: Sleep <delay>
s          Single step the target chipSyntax: s [<NumSteps (dec)>]
st         Show hardware status
hwinfo     Show hardware info
mem        Read memory. Syntax: mem  [<Zone>:]<Addr>, <NumBytes> (hex)
mem8       Read  8-bit items. Syntax: mem8  [<Zone>:]<Addr>, <NumBytes> (hex)
mem16      Read 16-bit items. Syntax: mem16 [<Zone>:]<Addr>, <NumItems> (hex)
mem32      Read 32-bit items. Syntax: mem32 [<Zone>:]<Addr>, <NumItems> (hex)
w1         Write  8-bit items. Syntax: w1 [<Zone>:]<Addr>, <Data> (hex)
w2         Write 16-bit items. Syntax: w2 [<Zone>:]<Addr>, <Data> (hex)
w4         Write 32-bit items. Syntax: w4 [<Zone>:]<Addr>, <Data> (hex)
erase      Erase internal flash of selected device. Syntax: Erase
wm         Write test words. Syntax: wm <NumWords>
is         Identify length of scan chain select register
ms         Measure length of scan chain. Syntax: ms <Scan chain>
mr         Measure RTCK react time. Syntax: mr
q          Quit
qc         Close JLink connection and quit
eoe        Exit on errorSyntax: eoe <1/0>
r          Reset target         (RESET)
rx         Reset target         (RESET). Syntax: rx <DelayAfterReset>
RSetType   Set the current reset type. Syntax: RSetType <type>
Regs       Display contents of registers
wreg       Write register.   Syntax: wreg <RegName>, <Value>
moe        Shows mode-of-entry, meaning: Reason why CPU is halted
SetBP      Set breakpoint.   Syntax: SetBP <addr> [A/T] [S/H]
SetWP      Set Watchpoint. Syntax: <Addr> [R/W] [<Data> [<D-Mask>] [A-Mask]]
ClrBP      Clear breakpoint. Syntax: ClrBP  <BP_Handle>
ClrWP      Clear watchpoint. Syntax: ClrWP  <WP_Handle>
VCatch     Write vector catch. Syntax: VCatch <Value>
loadfile   Load data file into target memory.Syntax: loadfile <filename>, [<addr>]Supported extensions: *.bin, *.mot, *.hex, *.srec<addr> is needed for bin files only.
loadbin    Load *.bin file into target memory.Syntax: loadbin <filename>, <addr>
savebin    Saves target memory into binary file.Syntax: savebin <filename>, <addr>, <NumBytes>
verifybin  Verfies if the specified binary is already in the target memory at the specified address.Syntax: verifybin <filename>, <addr>
SetPC      Set the PC to specified value. Syntax: SetPC <Addr>
le         Change to little endian mode
be         Change to big endian mode
log        Enables log to file.  Syntax: log <filename>
unlock     Unlocks a device. Syntax: unlock <DeviceName>Type unlock without <DeviceName> to get a listof supported device names.nRESET has to be connected
term       Test command to visualize printf output from the target device,using DCC (SEGGER DCC handler running on target)
ReadAP     Reads a CoreSight AP register.Note: First read returns the data of the previous read.An additional read of DP reg 3 is necessary to get the data.
ReadDP     Reads a CoreSight DP register.Note: For SWD data is returned immediately.For JTAG the data of the previous read is returned.An additional read of DP reg 3 is necessary to get the data.
WriteAP    Writes a CoreSight AP register.
WriteDP    Writes a CoreSight DP register.
SWDSelect  Selects SWD as interface and outputsthe JTAG -> SWD switching sequence.
SWDReadAP  Reads a CoreSight AP register via SWD.Note: First read returns the data of the previous read.An additional read of DP reg 3 is necessary to get the data.
SWDReadDP  Reads a CoreSight DP register via SWD.Note: Correct data is returned immediately.
SWDWriteAP Writes a CoreSight AP register via SWD.
SWDWriteDP Writes a CoreSight DP register via SWD.
Device     Selects a specific device J-Link shall connect toand performs a reconnect.In most cases explicit selection of the device is not necessary.Selecting a device enables the user to make use of the J-Linkflash programming functionality as well as using unlimitedbreakpoints in flash memory.For some devices explicit device selection is mandatory in orderto allow the DLL to perform special handling needed by the device.
ExpDevList Exports the device names from the DLL internaldevice list to a text fileSyntax: ExpDevList <Filename>
ExpDevListXML Exports the device names from the DLL internaldevice list to a text file in XML formatSyntax: ExpDevListXML <Filename>
PowerTrace Perform power trace (not supported by all models)
Syntax: PowerTrace <LogFile> [<ChannelMask> <RefCountSel>]
<LogFile>: File to store power trace data to
<ChannelMask>: 32-bit mask to specify what channels shall be enabled
<SampleFreq>: Sampling frequency in Hz (0 == max)
<RefCountSel>:       0: No reference count1: Number of bytes transmitted on SWO
---- CP15 ------------
rce        Read CP15.  Syntax: rce <Op1>, <CRn>, <CRm>, <Op2>
wce        Write CP15. Syntax: wce <Op1>, <CRn>, <CRm>, <Op2>, <Data>
---- ICE -------------
Ice        Show state of the embedded ice macrocell (ICE breaker)
ri         Read Ice reg.  Syntax: ri <RegIndex>(hex)
wi         Write Ice reg. Syntax: wi <RegIndex>, <Data>(hex)
---- TRACE -----------
TClear     TRACE - Clear buffer
TSetSize   TRACE - Set Size of trace buffer
TSetFormat TRACE - SetFormat
TSR        TRACE - Show Regions (and analyze trace buffer)
TStart     TRACE - Start
TStop      TRACE - Stop
---- SWO -------------
SWOSpeed   SWO - Show supported speeds
SWOStart   SWO - Start
SWOStop    SWO - Stop
SWOStat    SWO - Display SWO status
SWORead    SWO - Read and display SWO data
SWOShow    SWO - Read and analyze SWO data
SWOFlush   SWO - Flush data
SWOView    SWO - View terminal data
---- PERIODIC --------
PERConf    PERIODIC - Configure
PERStart   PERIODIC - Start
PERStop    PERIODIC - Stop
PERStat    PERIODIC - Display status
PERRead    PERIODIC - Read and display data
PERShow    PERIODIC - Read and analyze data
---- File I/O --------
fwrite     Write file to emulator
fread      Read file from emulator
fshow      Read and display file from emulator
fdelete    Delete file on emulator
fsize      Display size of file on emulator
flist      List directory on emulator
SecureArea Creates/Removes secure area on probe
---- Test ------------
TestHaltGo   Run go/halt 1000 times
TestStep     Run step 1000 times
TestCSpeed   Measure CPU speed.Parameters: [<RAMAddr>]
TestWSpeed   Measure download speed into target memory.Parameters:  [<Addr> [<Size>]]
TestRSpeed   Measure upload speed from target memory.Parameters: [<Addr> [<Size>] [<NumBlocks>]]
TestNWSpeed  Measure network download speed.Parameters: [<NumBytes> [<NumReps>]]
TestNRSpeed  Measure network upload speed.Parameters: [<NumBytes> [<NumReps>]]
---- JTAG ------------
JTAGConf   Set number of IR/DR bits before ARM device.Syntax: Config <IRpre>, <DRpre>
speed      Set target interface speed. Syntax: speed <freq>|auto|adaptive, e.g. speed 2000, speed a
i          Read JTAG Id (Host CPU)
wjc        Write JTAG command (IR). Syntax: wjc <Data>(hex)
wjd        Write JTAG data (DR). Syntax: wjd <Data64>(hex), <NumBits>(dec)
RTAP       Reset TAP Controller using state machine (111110)
wjraw      Write Raw JTAG data. Syntax: wjraw <NumBits(dec)>, <tms>, <tdi>
rt         Reset TAP Controller (nTRST)
---- JTAG-Hardware ---
c00        Create clock with TDI = TMS = 0
c          Clock
tck0       Clear TCK
tck1       Set   TCK
0          Clear TDI
1          Set   TDI
t0         Clear TMS
t1         Set   TMS
trst0      Clear TRST
trst1      Set   TRST
r0         Clear RESET
r1         Set   RESET
---- Connection ------
usb        Connect to J-Link via USB.  Syntax: usb <port>, where port is 0..3
ip         Connect to J-Link ARM Pro or J-Link TCP/IP Server via TCP/IP.Syntax: ip <ip_addr>
---- Configuration ---
si         Select target interface. Syntax: si <Interface>,where <Interface> can be any supported target interface (e.g SWD, JTAG, ICSP, FINE, ...
power      Switch power supply for target. Syntax: power <State> [perm],where State is either On or Off. Example: power on perm
wconf      Write configuration byte. Syntax: wconf <offset>, <data>
rconf      Read configuration bytes. Syntax: rconf
license    Shows a list of all available license commands
ipaddr     Show/Assign IP address and subnetmask of/to the connected J-Link.
gwaddr     Show/Assign network gateway address of/to the connected J-Link.
dnsaddr    Show/Assign network DNS server address of/to the connected J-Link.
conf       Show configuration of the connected J-Link.
calibrate  Calibrate the target current measurement.
selemu     Select a emulator to communicate with,from a list of all emulators which are connected to the hostThe interfaces to search on, can be specifiedSyntax: selemu [<Interface0> <Interface1> ...]
ShowEmuList Shows a list of all emulators which are connected to the host.The interfaces to search on, can be specified.Syntax: ShowEmuList [<Interface0> <Interface1> ...]
VCOM        enable/disable VCOM. Takes effect after power cycle of the J-LinkSyntax: VCOM <enable|disable>
VTREF       Sets a fixed value for VTref on J-Link.Syntax: VTREF <ValuemV>
----------------------
4. 通过Jlink Comander读取芯片ID
从帮助里面可以看出,mem 是读取内存的命令。AMA3B2KK-KBR的芯片ID的寄存器地址是0x40020004。
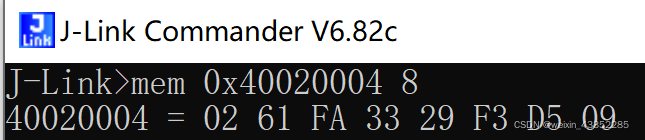
以上命令成功读取到的芯片ID,其中0x40020004代表起始地址,8代表读取的长度,单位是字节。
5. 通过BAT脚本读取
Jlink命令需要放在一个*.jlink文件里面,所以我们在实践中是在一个批处理文件里面去调用它。读取到的芯片ID存储到chip_id.txt中。

话不多说,直接上代码。
5.1 jlink文件
si SWD
Device AMA3B2KK-KBR
speed 4000mem 0x40020004 8q
5.2 bat 文件
@echo off
SET ids=59602747:LOOP
pause
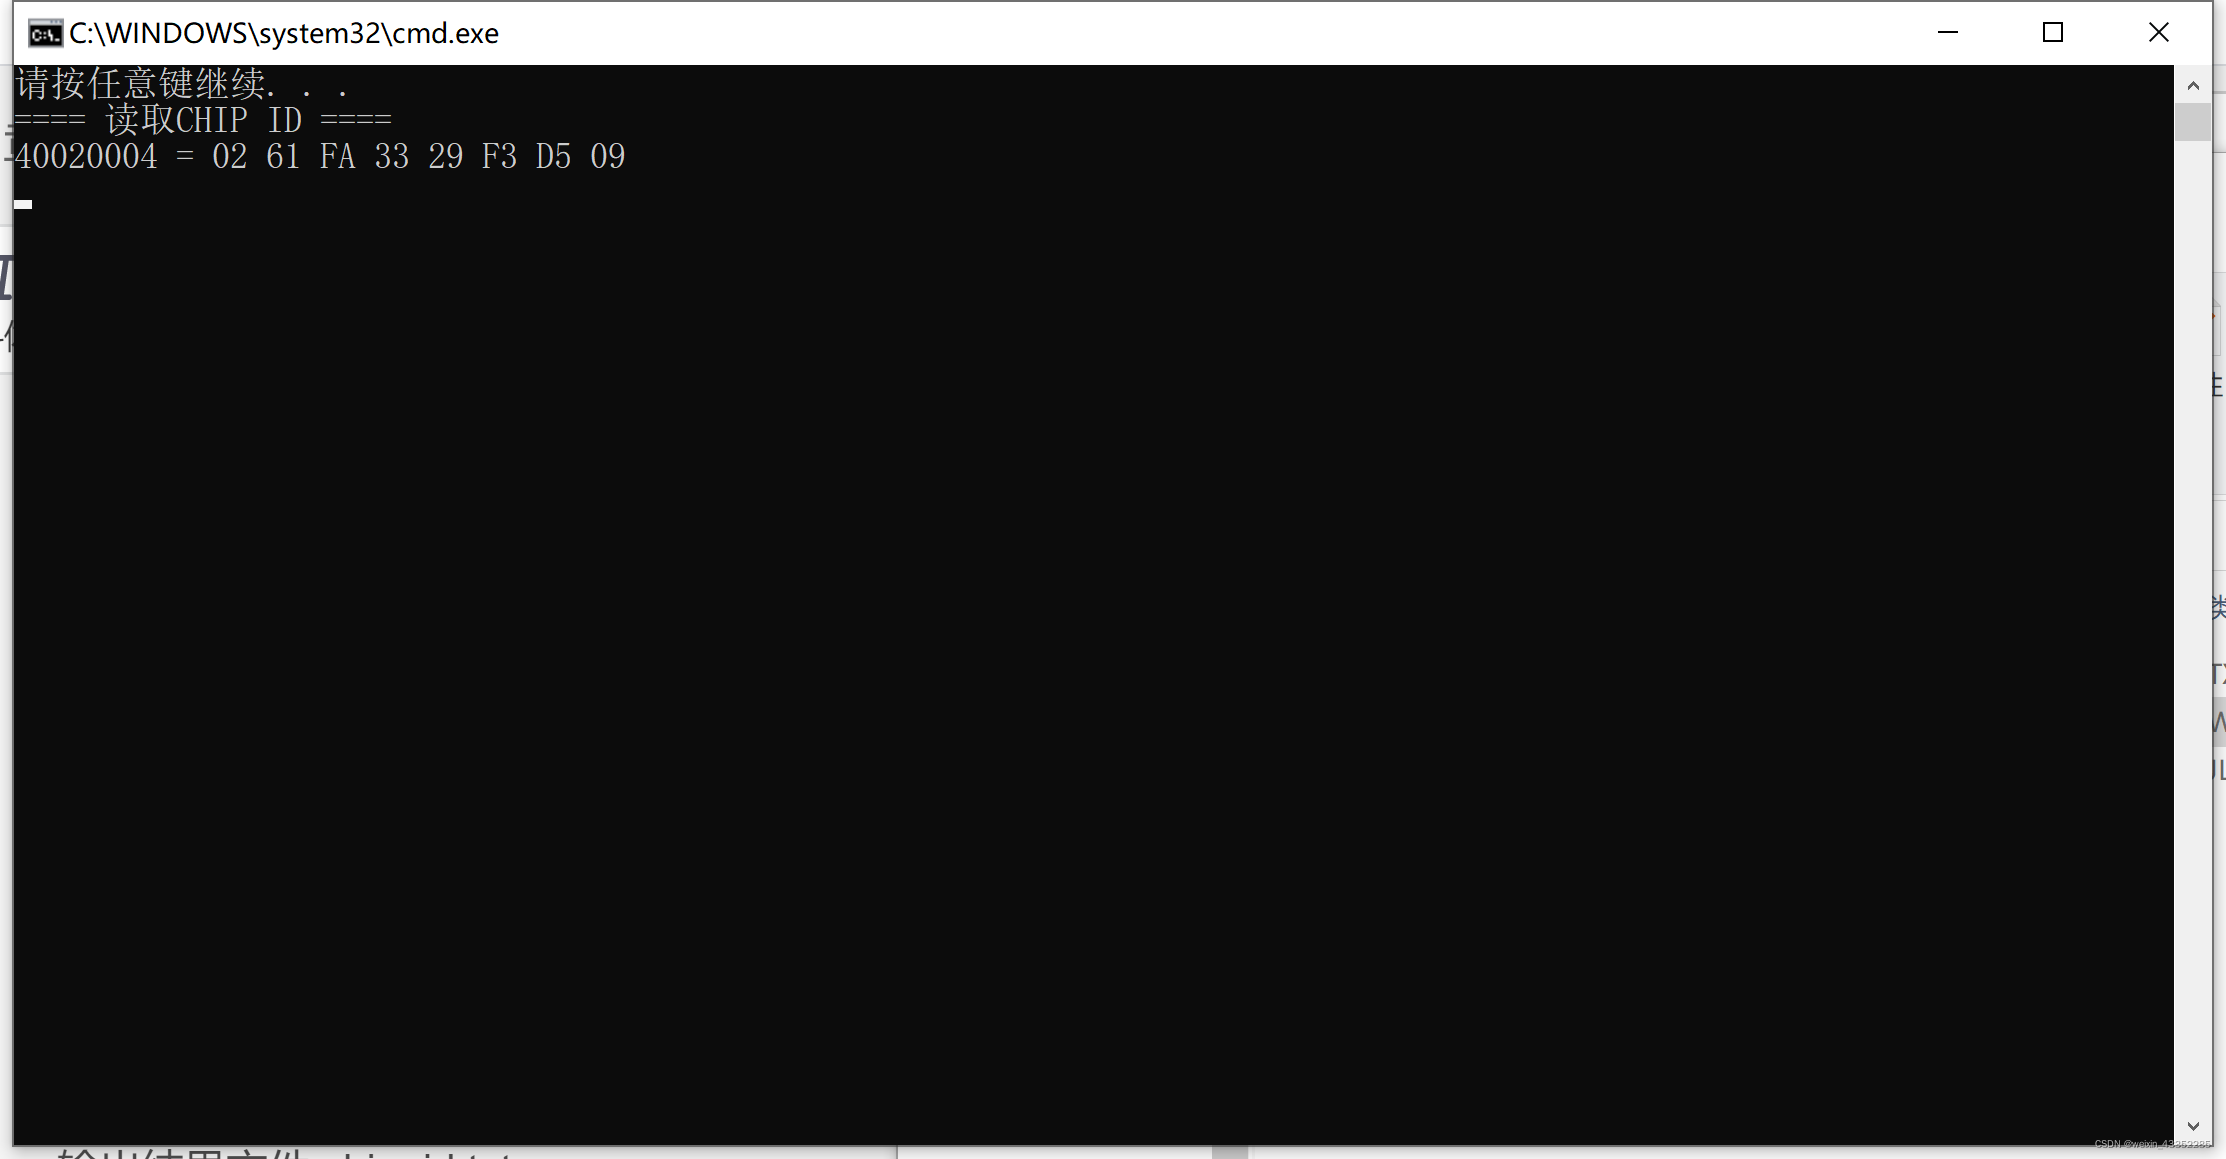
echo ==== 读取CHIP ID ====C:\Keil_v5\ARM\Segger\JLink.exe usb %ids% Read_chipid.jlink > temp.txtfindstr "40020004" temp.txt > chip_id.txt
type chip_id.txt
::equ == neq !=
::0 ok else error
if %errorlevel% neq 0 (
color 04
echo 读取失败!
)::del chip_id.txt
del temp.txt
ping 127.0.0.1 -n 3 >nul
clsgoto LOOP
5.3 结果文件 chip_id.txt
40020004 = 02 61 FA 33 29 F3 D5 09
5.4 运行界面
6. 写在最后
Jlink的功能很强大,大家可多试试帮助里面的命令。本文通过读取ID来介绍,希望能起到以小见大的作用。
如对以上内容有疑问请在评论区留言,我们会尽快回复。