SoundPool
一、SoundPool简介
MediaPlayer虽然也能播放音频,但是它有资源占用量较高、延迟时间较长、不支持多个音频同时播放等缺点。这些缺点决定了MediaPlayer在某些场合的使用情况不会很理想,例如在对时间精准度要求相对较高的场景。而SoundPool一般用来播放密集、急促而又短暂的音效,比如:“滴滴- -下,马上出发"。
SoundPool还可以一次加载完很多音频数据,提前进行解码操作,之后要播放时直接使用。
二、SoundPool使用方法
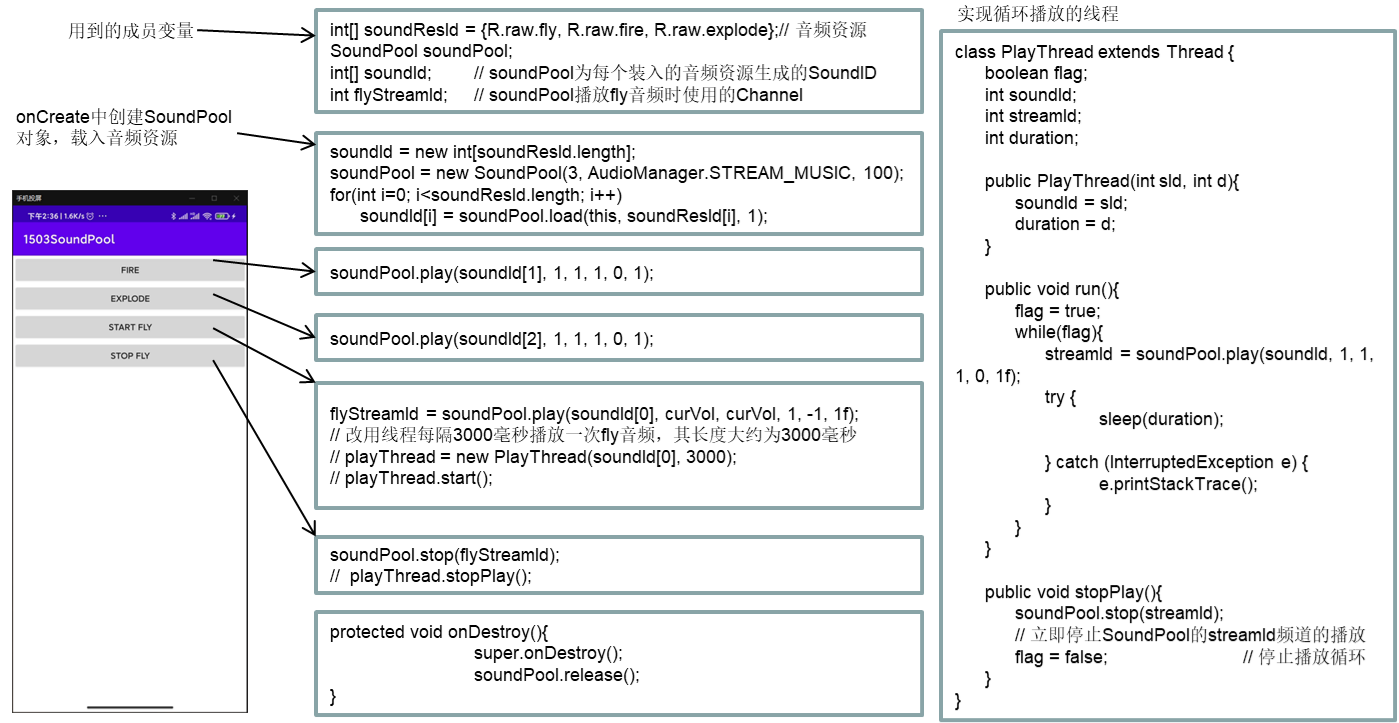
- 创建一个SoundPool (构造函数)
public SoundPool(int maxStream, int streamType, int srcQuality)
maxStream —— 同时播放的流的最大数量
streamType —— 流的类型,一般为STREAM_MUSIC(具体在AudioManager类中列出)
srcQuality —— 采样率转化质量,当前无效果,使用0作为默认值
SoundPool soundPool = new SoundPool(5, AudioManager.STREAM_MUSIC, 0);
SoundPool soundPool = new SoundPool.Builder().setMaxStream(5).build();
创建了一个最多支持5个流同时播放的,类型标记为音乐的SoundPool(现在一般采用SoundPool的构建者模式)。
- 载音频资源
可以通过四种途径来记载一个音频资源:
int load(AssetFileDescriptor afd, int priority)
通过一个AssetFileDescriptor对象
int load(Context context, int resId, int priority)
通过一个资源ID
int load(String path, int priority)
通过指定的路径加载
int load(FileDescriptor fd, long offset, long length, int priority)
通过FileDescriptor加载
API中指出,其中的priority参数目前没有效果,建议设置为1。
一个SoundPool能同时管理多个音频,所以可以通过多次调用load函数来加载,如果**加载成功将返回一个非0的soundID **,用于播放时指定特定的音频。
流的加载过程是一个将音频解压为原始16位PCM数据的过程,由一个后台线程来进行处理异步,所以初始化后不能立即播放,需要等待一点时间。
mSoundPool.setOnLoadCompleteListener(new SoundPool.OnLoadCompleteListener() {@Overridepublic void onLoadComplete(SoundPool soundPool, int sampleId, int status) {Toast.makeText(MainActivity.this,"加特技准备完毕~",Toast.LENGTH_SHORT).show();}
});
- 播放控制
有以下几个函数可用于控制播放:
final int play(int soundID, float leftVolume, float rightVolume, int priority, int loop, float rate)
播放指定音频的音效,并返回一个streamID 。
priority —— 流的优先级,值越大优先级高,影响当同时播放数量超出了最大支持数时SoundPool对该流的处理;
loop —— 循环播放的次数,0为值播放一次,-1为无限循环,其他值为播放loop+1次(例如,3为一共播放4次).
rate —— 播放的速率,范围0.5-2.0(0.5为一半速率,1.0为正常速率,2.0为两倍速率)
final void pause(int streamID)
暂停指定播放流的音效(streamID 应通过play()返回)。
final void resume(int streamID)
继续播放指定播放流的音效(streamID 应通过play()返回)。
final void stop(int streamID)
终止指定播放流的音效(streamID 应通过play()返回)。
这里需要注意的是,
1.play()函数传递的是一个load()返回的soundID——指向一个被记载的音频资源 ,如果播放成功则返回一个非0的streamID——指向一个成功播放的流 ;同一个soundID 可以通过多次调用play()而获得多个不同的streamID (只要不超出同时播放的最大数量);
2.pause()、resume()和stop()是针对播放流操作的,传递的是play()返回的streamID ;
3.play()中的priority参数,只在同时播放的流的数量超过了预先设定的最大数量是起作用,管理器将自动终止优先级低的播放流。如果存在多个同样优先级的流,再进一步根据其创建事件来处理,新创建的流的年龄是最小的,将被终止;
4.无论如何,程序退出时,手动终止播放并释放资源是必要的。
-
更多属性设置
其实就是paly()中的一些参数的独立设置:
final void setLoop(int streamID, int loop)
设置指定播放流的循环.
final void setVolume(int streamID, float leftVolume, float rightVolume)
设置指定播放流的音量.
final void setPriority(int streamID, int priority)
设置指定播放流的优先级,上面已说明priority的作用.
final void setRate(int streamID, float rate)
设置指定播放流的速率,0.5-2.0.
-
释放资源
可操作的函数有:
final boolean unload(int soundID)
卸载一个指定的音频资源.
final void release()
释放SoundPool中的所有音频资源.

soundPool.unload(map.get(1));
soundPool.unload(map.get(2));
soundPool.unload(map.get(3));soundPool.release();
三、SoundPool源码解析
(1)创建SoundPool实例
frameworks/base/media/java/android/media/SoundPool.java
public SoundPool(int maxStreams, int streamType, int srcQuality) {if(native_setup(new WeakReference(this), maxStreams, streamType, srcQuality) !=0) {throw newRuntimeException("Native setup failed");}
}
frameworks/base/media/jni/soundpool/android_media_SoundPool.cpp
static jint android_media_SoundPool_native_setup(JNIEnv *env, jobjectthiz, jobject weakRef, jint maxChannels, jint streamType, jint srcQuality)
{ALOGV("android_media_SoundPool_native_setup");SoundPool *ap = new SoundPool(maxChannels, (audio_stream_type_t) streamType, srcQuality);
}
SoundPool.cpp的构造方法中,仅仅初始化了mChannelPool,即多个SoundChannel类, 并放入了mChannels指针列表中,并且为每个SoundPool新建一个decode解码线程(即SoundPoolThread)
frameworks/av/media/libmedia/SoundPool.cpp
SoundPool::SoundPool(int maxChannels, audio_stream_type_tstreamType, int srcQuality){// check limitsmMaxChannels =maxChannels;if (mMaxChannels< 1) {mMaxChannels =1;}else if(mMaxChannels > 32) {mMaxChannels =32;}mChannelPool = newSoundChannel[mMaxChannels];for (int i = 0; i< mMaxChannels; ++i) {mChannelPool[i].init(this);mChannels.push_back(&mChannelPool[i]);}// start decodethreadstartThreads();}bool SoundPool::startThreads(){createThreadEtc(beginThread, this, "SoundPool");if (mDecodeThread== NULL)mDecodeThread= new SoundPoolThread(this);returnmDecodeThread != NULL;}
当SoundPool在native的初始化完成以后,我们有了一些SoundChannel,和一个SoundPoolThread解码线程。
(2)SoundPool load加载音频文件(其实就是利用MediaPlayer对音频文件进行解码成PCM数据的操作)
public int load(String path, int priority){// passnetwork streams to playerif(path.startsWith("http:"))return_load(path, priority);// try localpathint id = 0;try {File f =new File(path);ParcelFileDescriptor fd = ParcelFileDescriptor.open(f,ParcelFileDescriptor.MODE_READ_ONLY);if (fd !=null) {id =_load(fd.getFileDescriptor(), 0, f.length(), priority);fd.close();}} catch(java.io.IOException e) {Log.e(TAG,"error loading " + path);}return id;}static int android_media_SoundPool_load_FD(JNIEnv *env, jobject thiz,jobject fileDescriptor,jlong offset,jlong length, jint priority){ALOGV("android_media_SoundPool_load_FD");SoundPool *ap =MusterSoundPool(env, thiz);if (ap == NULL)return 0;returnap->load(jniGetFDFromFileDescriptor(env, fileDescriptor),int64_t(offset), int64_t(length), int(priority));}然后会调用SoundPool.cpp里面的load()方法,在load函数中,首先会新建一个名叫sample的类且跟上两个参数,sample的id号,以及加载文件路径,并且将这个新建的类保存在mapping列表mSamples中,即每一个需加载的文件有一个Sample类对应,索引号即为其id号。接下来就是加载的过程了,具体看doLoad函数。
int SoundPool::load(const char* path, int priority){sp<Sample>sample = new Sample(++mNextSampleID, path);mSamples.add(sample->sampleID(), sample);doLoad(sample);returnsample->sampleID();}
void SoundPool::doLoad(sp<Sample>& sample){sample->startLoad();mDecodeThread->loadSample(sample->sampleID());}void startLoad() { mState = LOADING; }void SoundPoolThread::loadSample(int sampleID) {write(SoundPoolMsg(SoundPoolMsg::LOAD_SAMPLE, sampleID));}void SoundPoolThread::write(SoundPoolMsg msg) {Mutex::Autolocklock(&mLock);while(mMsgQueue.size() >= maxMessages) {mCondition.wait(mLock);}// if thread isquitting, don't add to queueif (mRunning) {mMsgQueue.push(msg);mCondition.signal();}}int SoundPoolThread::run() {ALOGV("run");for (;;) {SoundPoolMsgmsg = read();switch(msg.mMessageType) {caseSoundPoolMsg::LOAD_SAMPLE:doLoadSample(msg.mData);break;default:ALOGW("run: Unrecognized message %d\n",msg.mMessageType);break;}}}首先调用Sample类中的startLoad()函数来设置当前sample的状态,这里即LOADING状态。在loadSample函数中会将当前的sampleid号打包成一个消息并调用write函数写到消息队列中,如果消息队列满了会稍微等等,如果还没满则会加入队列并通知取消息的线程(这里的线程就是我们之前创建的mDecodeThread解码线程)。在这个线程中会读取消息的类型,这里为LOAD_SAMPLE,并调用doLoadSample函数,参数即为sampleid号
void SoundPoolThread::doLoadSample(int sampleID) {sp <Sample>sample = mSoundPool->findSample(sampleID);status_t status =-1;if (sample != 0) {status = sample->doLoad();}//通知load加载完成给onLoadCompletedListenermSoundPool->notify(SoundPoolEvent(SoundPoolEvent::SAMPLE_LOADED,sampleID, status));}
status_t Sample::doLoad(){ALOGV("Startdecode");if (mUrl) {p = MediaPlayer::decode(mUrl, &sampleRate, &numChannels, &format);} else {p = MediaPlayer::decode(mFd, mOffset, mLength, &sampleRate, &numChannels,&format);ALOGV("close(%d)", mFd);::close(mFd);mFd = -1;}if (p == 0) {ALOGE("Unable to load sample: %s", mUrl);return -1;}ALOGV("pointer = %p, size = %u, sampleRate = %u, numChannels =%d",p->pointer(), p->size(), sampleRate, numChannels);if (sampleRate> kMaxSampleRate) {ALOGE("Sample rate (%u) out of range", sampleRate);return - 1;}if ((numChannels< 1) || (numChannels > 2)) {ALOGE("Sample channel count (%d) out of range", numChannels);return - 1;}mData = p;mSize = p->size();
这个函数有点长,但是也没做很多事。首先他会通过MediaPlayer进行decode即解码文件成波形文件,可以理解为wav文件纯数据。(预加载以备播放,SoundPool的好处之一)。这里还做了些判断,比如采样率不能大于48000,声道数不能小于1或者大于2,然后就保存了这个加载数据。加载完数据后还会通过调用notify函数来调用之前设置的回调函数通知上层已加载完毕,具体实现用户可以自己实现。
整个load加载音频文件的过程:
**java层SoundPool.java#load() **
–> android_media_SoundPool.cpp#android_media_SoundPool_load_FD()
–> SoundPool.cpp#load(),主要为每个音频文件new Sample(++mNextSampleID, path),后面的操作可以理解成在loadSample函数中会将当前的sampleid号打包成一个消息并调用write函数写到消息队列中,并通知SoundPoolThread解码线程来处理消息队列中的消息
–> SoundPoolThread#doLoadSample(),从SoundPoolThread从消息队列中取得相应的Sample,然后交给MediaPlayer进行decode解码操作,最后还会调用notify()函数通知上层数据已加载完毕。
(3)SoundPool play()播放音频过程
frameworks/base/media/java/android/media/SoundPool.javapublic native final int play(int soundID, float leftVolume,float rightVolume,intpriority, int loop, float rate);frameworks/base/media/jni/soundpool/android_media_SoundPool.cppandroid_media_SoundPool_play(JNIEnv *env, jobject thiz, jintsampleID,jfloatleftVolume, jfloat rightVolume, jint priority, jint loop,jfloat rate){SoundPool *ap =MusterSoundPool(env, thiz);return ap->play(sampleID,leftVolume, rightVolume, priority, loop, rate);我们一路从java层调用到c++,中间的native只是打打酱油,我们具体看c++层的play函数。这里我们会看到一个新东西Channel,这个东西你可以暂时理解只是为播放用的,可以把它比作是大炮,sample就是炮弹,想听声音就打炮。
首先函数会找炮弹,即用sampleid号找sample,找到了sample就意味着我们有了音频数据。之后会调用allocateChannel_l并有个权限的参数。
frameworks/av/media/libmedia/SoundPool.cppint SoundPool::play(int sampleID, float leftVolume, floatrightVolume,int priority,int loop, float rate){// 根据sampleID找到Sample炮弹sample =findSample(sampleID);// allocate achannelchannel =allocateChannel_l(priority);// no channelallocated - return 0if (!channel) {ALOGV("Nochannel allocated");return 0;}channelID =++mNextChannelID;channel->play(sample, channelID, leftVolume, rightVolume, priority,loop, rate);return channelID;}这个函数其实就是一个算法用来更新channel的,它首先会判断我们传进来的权限值,并找到最接近的那个channel(小于等于)作为返回值,然后再找到最接近的另一个channel(大于等于),并插在它后面。这里的mChannels是我们创建SoundPool时一并初始化的列表(可以理解为我们有几门打炮)。找到了适合弹药口径的打炮,就需要开炮了
SoundChannel* SoundPool::allocateChannel_l(int priority){List<SoundChannel*>::iterator iter;SoundChannel* channel= NULL;// allocate achannelif(!mChannels.empty()) {iter =mChannels.begin();if (priority>= (*iter)->priority()) {channel =*iter;mChannels.erase(iter);ALOGV("Allocated active channel");}}// update priorityand put it back in the listif (channel) {channel->setPriority(priority);for (iter =mChannels.begin(); iter != mChannels.end(); ++iter) {if(priority < (*iter)->priority()) {break;}}mChannels.insert(iter, channel);}return channel;}
看下channel的play函数,SoundChannel.cpp为底层关于播放等实现,主要利用了AudioTrack来实现播放
// call with sound pool lock heldvoid SoundChannel::play(const sp<Sample>& sample,int nextChannelID, float leftVolume,floatrightVolume, int priority, int loop, float rate){AudioTrack*oldTrack;AudioTrack*newTrack;status_t status;{ // scope for thelockMutex::Autolock lock(&mLock);// if not idle,this voice is being stolenif (mState !=IDLE) {ALOGV("channel %d stolen - event queued for channel %d",channelID(), nextChannelID);mNextEvent.set(sample, nextChannelID, leftVolume, rightVolume, priority,loop, rate);stop_l();return;}intnumChannels = sample->numChannels();// do notcreate a new audio track if current track is compatible with sample parameters#ifdef USE_SHARED_MEM_BUFFERnewTrack = new AudioTrack(streamType, sampleRate, sample->format(),channels, sample->getIMemory(), AUDIO_OUTPUT_FLAG_NONE, callback,userData);#elsenewTrack = new AudioTrack(streamType, sampleRate, sample->format(),channels, frameCount,AUDIO_OUTPUT_FLAG_FAST, callback, userData,bufferFrames);#endifoldTrack =mAudioTrack;mAudioTrack->start();}exit:ALOGV("deleteoldTrack %p", oldTrack);delete oldTrack;if (status !=NO_ERROR) {deletenewTrack;mAudioTrack =NULL;}}// call with lock held and sound pool lock heldvoid SoundChannel::stop_l(){if (doStop_l()) {mSoundPool->done_l(this);}}// call with lock heldbool SoundChannel::doStop_l(){if (mState !=IDLE) {setVolume_l(0,0);mAudioTrack->stop();return true;}return false;}
所有sample在播放时都有个soundChannel会返回给应用层,所以停止、暂时基本上就是调用那个channel的stop和pause函数,接着对AudioTrack进行函数调用操作
四、总结
1.管理多个音频资源,通过load()函数,成功则返回非0的soundID;
2.同时播放多个音频,通过play()函数,成功则返回非0的streamID;
3.pause()、resume()和stop()等操作是针对streamID(播放流)的;
4.当设置为无限循环时,需要手动调用stop()来终止播放;
5.播放流的优先级(play()中的priority参数),只在同时播放数超过设定的最大数时起作用;
6.android系统一个设备只允许同时有32个音效文件播放,所以要你在程序中控制同时播放的音频数。并且在Activity被覆盖到下面或者锁屏时对资源进行回收
7.每个音频文件大小要小于100k;可以修改音频码率来压缩音频大小,把 128kbps改成32kbps
在SoundPool初始化中仅仅初始化了一个多个SoundChannel类,以及创建了SoundPoolThread解码线程;
在load()方法中为每个音频文件new Sample,并将当前的sampleid号打包成一个消息并调用write函数写到消息队列中,并通知SoundPoolThread解码线程来处理消息队列中的消息,主要利用MediaPlayer进行decode操作;
在play()、pause()、stop()等方法中,主要通过sampleID找到Sample炮弹,然后调用SoundChannel大炮里面的play()、pause()、stop()方法,里面实质是对AudioTrack进行相应的操作。

