目录
- 说明
- 基础操作
- JPA Buddy
- EasyCode
说明
- 使用IDEA版本为 2022.2.1。由于IDEA版本或插件版本的不同,操作界面可能略有不同。
- 了解了JPA Buddy和EasyCode,个人更倾向于JPA Buddy,功能更强大,操作简单。
JPA Buddy通过以下方式简化了开发过程:
- 引入丰富的代码生成功能
- 数据模型
- 数据接口
- 数据库迁移(Liquibase, Flyway)
- 逆向工程
- 集成智能检查
- 通过以数据为中心的项目视图提供更好的导航
- 提供全面的编码辅助功能
基础操作
1.创建Maven项目

2.导入依赖
<parent><groupId>org.springframework.boot</groupId><artifactId>spring-boot-starter-parent</artifactId><version>2.5.0</version></parent><dependencies><dependency><groupId>org.springframework.boot</groupId><artifactId>spring-boot-starter-web</artifactId></dependency><!--mybatis-plus--><dependency><groupId>com.baomidou</groupId><artifactId>mybatis-plus-boot-starter</artifactId><version>3.4.3</version></dependency><dependency><groupId>mysql</groupId><artifactId>mysql-connector-java</artifactId></dependency><!--JPA 使用idea JPA插件--><dependency><groupId>org.springframework.boot</groupId><artifactId>spring-boot-starter-data-jpa</artifactId></dependency><dependency><groupId>org.springframework.boot</groupId><artifactId>spring-boot-starter-test</artifactId></dependency><dependency><groupId>org.projectlombok</groupId><artifactId>lombok</artifactId></dependency></dependencies>
3.安装插件
- JPA Buddy

4.创建启动类App.class
package com.lingfei;import org.springframework.boot.SpringApplication;
import org.springframework.boot.autoconfigure.SpringBootApplication;@SpringBootApplication
public class App {public static void main(String[] args) {SpringApplication.run(App.class, args);}
}
5.创建配置文件application.yml
server:port: 10001spring:datasource:driver-class-name: com.mysql.cj.jdbc.Driverurl: jdbc:mysql://localhost:3306/jpa_easycode?useUnicode=true&characterEncoding=utf-8username: rootpassword: xxx
6.创建测试Controller
package com.lingfei.controller;import org.springframework.http.ResponseEntity;
import org.springframework.web.bind.annotation.GetMapping;
import org.springframework.web.bind.annotation.RequestMapping;
import org.springframework.web.bind.annotation.RestController;@RestController
@RequestMapping("/user")
public class UserController {@GetMapping("/test")private ResponseEntity test(){return ResponseEntity.ok("hello");}
}
测试接口 http://localhost:10001/user/test

7.IDEA连接数据库


JPA Buddy
jpa buddy官网对jpa buddy做了详细的说明,感兴趣的可以去学习。
JPA Buddy是一个免费的IntelliJ插件,有一些功能是付费版。
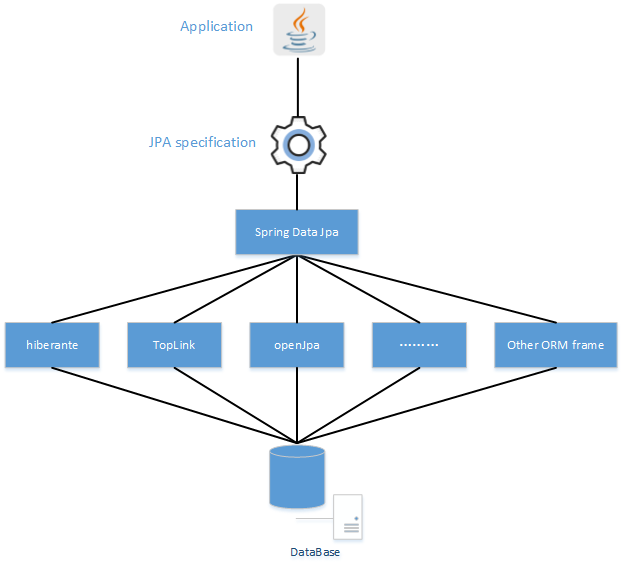
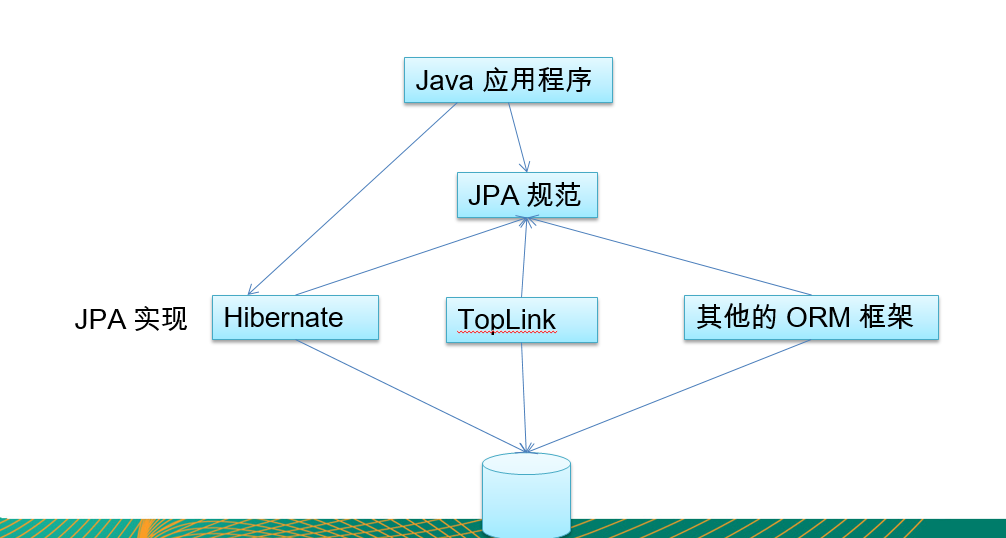
JPA Buddy为新开发人员提供了一个简单的开始,并为更有经验的开发人员加速了开发过程。它还指导两种类型的开发人员遵循使用JPA的最佳实践。使用可视化设计器和丰富的代码生成功能,让使用Hibernate、EclipseLink、Spring Data JPA、MapStruct、Lombok、Liquibase和Flyway更容易。
JPA Buddy:管理JPA数据模型的最先进的IntelliJ插件
- 快速创建JPA实体和数据相关对象
- 轻松管理数据库迁移
- 从数据库中的现有表生成实体
- 确保代码在运行时不会失败
1.配置文件加入jpa配置
server:port: 10001spring:datasource:driver-class-name: com.mysql.cj.jdbc.Driverurl: jdbc:mysql://localhost:3306/jpa_easycode?useUnicode=true&characterEncoding=utf-8username: rootpassword: xiejijpa:show-sql: true # 显示sql查询hibernate:ddl-auto: update #如果不存在,就新建,如果存在只更新
2.创建JPA entity


以下可略😊
默认User只有一个id属性,打开User.java,选择JPA Buddy工具栏,可以在上面操作添加新的属性,或者直接自己coding
双击Baseic Type 添加属性名:
索引管理:
重写equals()、hashCode()、toString()方法:
lombok支持:


package com.lingfei.model;import lombok.Data;
import org.hibernate.Hibernate;import javax.persistence.*;
import java.util.Objects;@Data
@Entity
@Table(name = "user")
public class User {@Id@GeneratedValue(strategy = GenerationType.AUTO)@Column(name = "id", nullable = false)private Long id;private String name;private String phone;private Integer age;@Column(name = "address")private String address;@Overridepublic boolean equals(Object o) {if (this == o) return true;if (o == null || Hibernate.getClass(this) != Hibernate.getClass(o)) return false;User user = (User) o;return id != null && Objects.equals(id, user.id);}@Overridepublic int hashCode() {return getClass().hashCode();}
}
通过启动类启动项目,成功启动,自动生成数据库表:

3.创建接口Repository,操作数据库
右击User,new 选择 Spring Data Reposiyory
输入接口名称,选择路径
自动生成UserRepository接口


package com.lingfei.dao;import com.lingfei.model.User;
import org.springframework.data.jpa.repository.JpaRepository;public interface UserRepository extends JpaRepository<User, Long> {
}
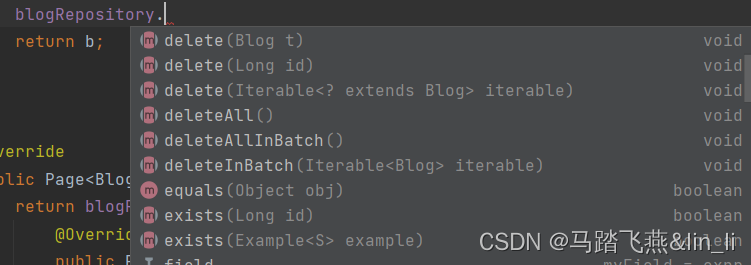
4.动态生成Repository接口方法
选中User某一属性,右击Show Context Actions或直接alt+enter
以Method和以Query开头的方法生成方式,如选择Method Find Instance
该方法配置工具栏,可以设置多种条件,具体可操作查看:
点击OK,在刚刚生成的接口中自动添加了 User findByNameIgnoreCase(String name); 方法


5.新增测试接口testGetAll、getInstance, 测试UserRepository
package com.lingfei.controller;import com.lingfei.dao.UserRepository;
import com.lingfei.model.User;
import org.springframework.beans.factory.annotation.Autowired;
import org.springframework.http.ResponseEntity;
import org.springframework.web.bind.annotation.GetMapping;
import org.springframework.web.bind.annotation.RequestMapping;
import org.springframework.web.bind.annotation.RestController;import java.util.List;@RestController
@RequestMapping("/user")
public class UserController {@Autowiredprivate UserRepository userRepository;@GetMapping("/testGetAll")private ResponseEntity testGetAll() {List<User> all = userRepository.findAll();return ResponseEntity.ok(all);}@GetMapping("/getInstance/{name}")private ResponseEntity getInstance(@PathVariable("name") String name) {User user = userRepository.findByNameIgnoreCase(name);return ResponseEntity.ok(user);}
}

EasyCode
- 插件安装

选中对应数据库表,右击选中EasyCode,点击Generate Code
选择代码文件生成路径,选择模板类型,此处选择了MybatisPlus,勾选所有,OK
生成文件:
相对较JPA,还是更加倾向JPA。