1.微信自带组件
样式:

wxml
<view class="close" bindtap="close">拒绝</view>
js
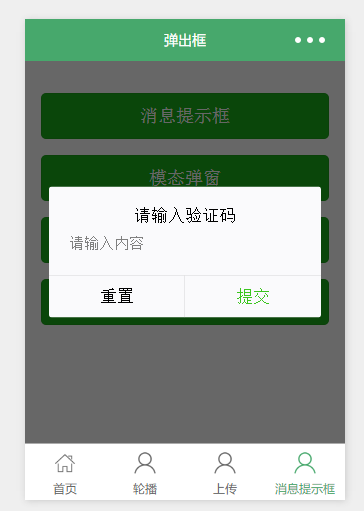
Page({//拒绝close(e) {wx.showModal({editable:true,//显示输入框placeholderText:'输入拒绝原因',//显示输入框提示信息success: res => {if (res.confirm) { //点击了确认console.log(res.content)//用户输入的值} else {console.log('用户点击了取消')}}})},
})
详见:wx.showModal(Object object) | 微信开放文档
2.自定义组件
样式:

wxml
<view class="close" bindtap="close">拒绝</view><!--点击拒绝弹出-->
<block wx:if="{{isShowConfirm}}"><view class='toast-box'><view class='toastbg'></view><view class='showToast'><view class='toast-main'><view class='toast-input'><input type='text'  bindinput='setValue' placeholder="请输入拒绝原因" data-name='stuEidtName'></input></view></view><view class='toast-button'><view class='button1'><view catchtap='cancel'>取消</view></view> <view class='button2'><view  catchtap='confirmAcceptance'>确定</view></view></view></view></view></block>
wxss
/* 弹出窗 */
.toast-box {width: 100%;height: 100%;opacity: 1;position: fixed;top: 0px;left: 0px;
}
.toastbg {opacity: 0.5;background-color: black;position: absolute;width: 100%;min-height: 100vh;
}.showToast {position: absolute;opacity: 1;width: 80%;margin-left: 10%;margin-top: 70%;
}
.toast-main {padding-top: 2vh;padding-bottom: 2vh;background-color: white;text-align: center;border-top-left-radius: 16rpx;border-top-right-radius: 16rpx;
}.toast-input {margin-left: 5%;margin-right: 5%;margin-top:10%;margin-bottom:10%;background-color: rgb(240, 240, 240);padding-left: 2vh;padding-right: 2vh;padding-top: 1vh;padding-bottom: 1vh;
}
.toast-input input{background-color: rgb(240, 240, 240);
}
.toast-button {display: flex;background-color: white;height:50px;width:100%;border-radius: 0px;border-bottom-left-radius: 16rpx;border-bottom-right-radius: 16rpx;border-top:1px solid rgb(211, 211, 211);
}.button1 {width: 50%;display: flex;align-items: center;justify-content: center;border-radius: 0px;border-bottom-left-radius: 16rpx;
}.button2 {width: 50%;border-left:1px solid rgb(211, 211, 211);display: flex;align-items: center;justify-content: center;color:#40A4D6;
}
js
Page({data: {isShowConfirm:false},//输入框中的值setValue: function (e) {this.setData({walletPsd: e.detail.value})},//点击取消按钮cancel: function () {var that = thisthat.setData({isShowConfirm: false,})},//点击确认按钮confirmAcceptance:function(){var that = thisthat.setData({isShowConfirm: false,})},//拒绝close(e) {this.setData({isShowConfirm: true,}) },
})
3.多文本框
样式:

wxml
<view class="update" bindtap="update" data-statu="open">修改</view>
<!--弹出框-->
<view class="drawer_screen" bindtap="update" data-statu="close" wx:if="{{showModalStatus}}"></view>
<!--content-->
<!--使用animation属性指定需要执行的动画-->
<view class="animation_position"><view animation="{{animationData}}" class="drawer_box" wx:if="{{showModalStatus}}"><!--drawer content--><view class="drawer_title">修改信息</view><view class="drawer_content"><view class="grid"><label class="title col-0">报修人员:</label><input class="input_base input_h30 col-1" bindblur="name" placeholder="请输入报修人员姓名"></input></view><view class="grid"><label class="title col-0">联系电话:</label><input class="input_base input_h30 col-1" bindblur="phone" placeholder="请输入报修人员电话"></input></view><view class="grid"><label class="title col-0">维修产品:</label><input class="input_base input_h30 col-1" bindblur="product" placeholder="请输入维修产品名称"></input></view><view class="grid"><label class="title col-0">故障类型:</label><input class="input_base input_h30 col-1" bindblur="type" placeholder="请输入故障类型"></input></view><view class="bottom grid"><label class="title col-0">故障地点:</label><input class="input_base input_h30 col-1" bindblur="address" placeholder="请输入地点"></input></view><view class="bottom grid"><label class="title col-0">故障描述:</label><input class="input_base input_h30 col-1" bindblur="description" placeholder="请输入故障描述"></input></view></view><view class="btn_ok" bindtap="update" data-statu="close">确定</view></view></view>
wxss
/* 隐藏内容样式 */
/*mask*/
.drawer_screen {width: 100%;height: 100%;position: fixed;top: 0;left: 0;z-index: 1000;background: #000;opacity: 0.5;overflow: hidden;
}
/*content*/
.animation_position{display: flex;width:100%;justify-content: center;
}
.drawer_box{overflow: hidden;position: fixed;/* top:80px; */bottom:90px;z-index: 1001;background: #FAFAFA;border-radius: 3px;width: 90%;
}
.drawer_title {padding: 15px;font: 20px "microsoft yahei";text-align: center;
}
.drawer_content {overflow-y: scroll;/*超出父盒子高度可滚动*/
}
.btn_ok {margin-top:5%;padding: 10px;font: 20px "microsoft yahei";text-align: center;border-top: 1px solid #E8E8EA;color: #40A4D6;
}
.bottom {padding-bottom: 8px;
}
.title {display: flex;align-items: center;justify-content: center;width: 25%;margin:5% 0 0 0;border-bottom: 2rpx solid #ccc;
}
.input_base {width:75%;margin:5% 0 0 0;padding-left:5%;border-bottom: 2rpx solid #ccc;
}
input {font: 15px "microsoft yahei";background: #fff;color: #000;
}
.grid {display: flex;margin:20px;
}
js
const app = getApp()
let id = ''
let name = ''
let phone = ''
let product = ''
let type = ''
let address = ''
let description = ''
Page({data: {showModalStatus: false,}, //信息修改//获取用户输入信息name(event) { //获取报修人员姓名name = event.detail.valueconsole.log("name", name)},phone(event) { //获取手机号phone = event.detail.valueconsole.log("phone", phone)},product(event) { //维修产品product = event.detail.valueconsole.log("produc", product)},type(event) { //故障类型type = event.detail.valueconsole.log("type", type)},address(event) { //地址address = event.detail.valueconsole.log("address", address)},description(event) { //描述description = event.detail.valueconsole.log("description", description)},update: function (e) {var currentStatu = e.currentTarget.dataset.statu;this.util(currentStatu)},util: function (currentStatu) {/* 动画部分 */// 第1步:创建动画实例  var animation = wx.createAnimation({duration: 200, //动画时长 timingFunction: "linear", //线性 delay: 0 //0则不延迟 });// 第2步:这个动画实例赋给当前的动画实例 this.animation = animation;// 第3步:执行第一组动画 animation.opacity(0).rotateX(-100).step();// 第4步:导出动画对象赋给数据对象储存 this.setData({animationData: animation.export()})// 第5步:设置定时器到指定时候后,执行第二组动画 setTimeout(function () {// 执行第二组动画 animation.opacity(1).rotateX(0).step();// 给数据对象储存的第一组动画,更替为执行完第二组动画的动画对象 this.setData({animationData: animation})//关闭 if (currentStatu == "close") {this.setData({showModalStatus: false});}}.bind(this), 200)// 显示 if (currentStatu == "open") {this.setData({showModalStatus: true});}},
})