netty框架的学习
- 1.netty环境的搭建
- 2.netty的特点
- 2.1什么是netty
- 2.2为什么要使用netty
- 3.netty框架的搭建
- 3.1创建一个maven项目
- 3.2导入依赖
- 3.3搭建框架
之前几天的话开始稍微熟悉了一点maven和Springboot框架,从今天开始要正式的开始学习netty框架了。
1.netty环境的搭建
要开始学习netty框架的开发的话,首先第一步就是要进行环境的搭建了,搭建netty开发环境很简单,只需要在maven项目中,导入下面这行依赖即可。
<dependency><groupId>io.netty</groupId><artifactId>netty-all</artifactId><version>4.1.16.Final</version>
</dependency>
2.netty的特点
环境搭建好了之后,我现在还不能够正式的开始写程序,因为现在我对netty可以说是完全不了解,所以我们得先去了解netty。
2.1什么是netty
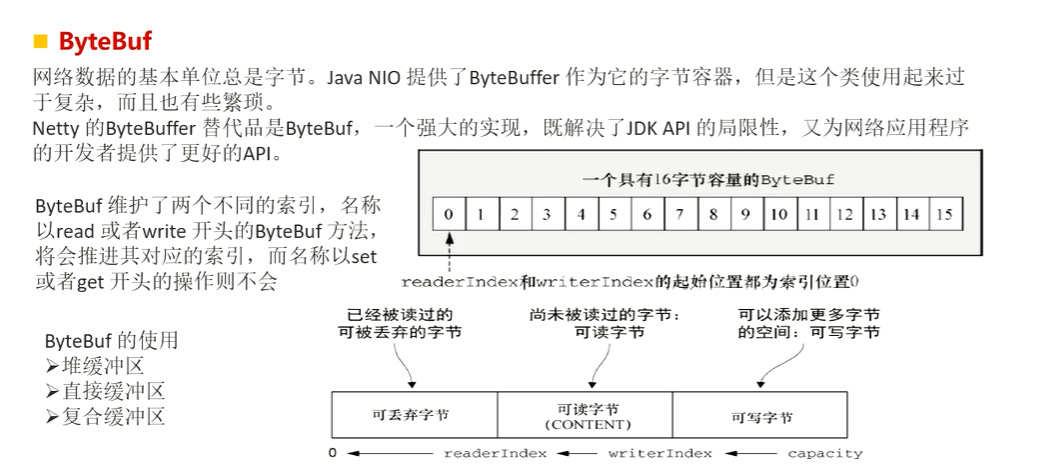
Netty是由JBOSS提供的一个java开源框架,现为 Github上的独立项目。Netty提供异步的、事件驱动的网络应用程序框架和工具,用以快速开发高性能、高可靠性的网络服务器和客户端程序。
也就是说,Netty 是一个基于NIO的客户、服务器端编程框架,使用Netty 可以确保你快速和简单的开发出一个网络应用,例如实现了某种协议的客户、服务端应用。Netty相当于简化和流线化了网络应用的编程开发过程,例如:基于TCP和UDP的socket服务开发。
2.2为什么要使用netty
Netty有很多重要的特性,主要特性如下:
- 优雅的设计
- 统一的API接口,支持多种传输类型,例如OIO,NIO
- 简单而强大的线程模型
- 丰富的文档
- 卓越的性能
- 拥有比原生Java API 更高的性能与更低的延迟
- 基于池化和复用技术,使资源消耗更低
- 安全性
- 完整的SSL/TLS以及StartTLS支持
- 可用于受限环境,如Applet以及OSGI
3.netty框架的搭建
3.1创建一个maven项目
因为楼主后期主要是使用Springboot框架进行程序开发,所以这儿我们就直接创建一个maven项目来搭建测试netty,具体如何创建一个maven项目我们就不进行过多的一个赘述了。

然后在启动类的同级目录下创建一个包,包名称可以取名叫server,在这个包下面创建三个文件夹,用于存放netty相关配置类,一个是NettyTcpServer.Java,一个是ServerChannelHandler.java,这个里面就写netty的握手相关操作,一个是ServerChannelInitial.java。
最后创建的项目结构如图所示
这里项目报错应该是开发环境的原因,具体是哪里的原因我也还没找到,但是项目内部并没有报错。
这里我是将启动类的名称改掉了的。

3.2导入依赖
我们知道maven项目是需要导入外部依赖才能够正常运行的,这儿就直接贴出pom.xml文件里面的代码
<groupId>com.example.test</groupId>
<artifactId>netty</artifactId>
<version>0.0.1-SNAPSHOT</version>
<packaging>jar</packaging><parent><groupId>org.springframework.boot</groupId><artifactId>spring-boot-starter-parent</artifactId><version>2.0.1.RELEASE</version><relativePath /> <!-- lookup parent from repository -->
</parent><properties><project.build.sourceEncoding>UTF-8</project.build.sourceEncoding><project.reporting.outputEncoding>UTF-8</project.reporting.outputEncoding><java.version>1.8</java.version>
</properties><dependencies><dependency><groupId>io.netty</groupId><artifactId>netty-all</artifactId><version>5.0.0.Alpha2</version><!-- <version>4.1.24.Final</version> --></dependency><dependency><groupId>org.springframework.boot</groupId><artifactId>spring-boot-starter-web</artifactId></dependency><dependency><groupId>org.springframework.boot</groupId><artifactId>spring-boot-starter-test</artifactId><scope>test</scope></dependency><dependency><groupId>org.mybatis.spring.boot</groupId><artifactId>mybatis-spring-boot-starter</artifactId><version>1.3.2</version></dependency><dependency><groupId>junit</groupId><artifactId>junit</artifactId><scope>test</scope></dependency>
</dependencies><build><plugins><plugin><groupId>org.springframework.boot</groupId><artifactId>spring-boot-maven-plugin</artifactId></plugin></plugins>
</build>
3.3搭建框架
这是我的启动类代码
package com.example.test.netty;import org.springframework.boot.CommandLineRunner;
import org.springframework.boot.SpringApplication;
import org.springframework.boot.autoconfigure.SpringBootApplication;
import org.springframework.boot.autoconfigure.jdbc.DataSourceAutoConfiguration;import com.example.test.netty.server.NettyTcpServer;import io.netty.channel.ChannelFuture;/*** Hello world!**/
@SpringBootApplication(exclude = {DataSourceAutoConfiguration.class})
public class NettyApplication implements CommandLineRunner
{final NettyTcpServer nettyTcpServer;public NettyApplication(NettyTcpServer nettyTcpServer){this.nettyTcpServer = nettyTcpServer;}public static void main( String[] args ){SpringApplication.run(NettyApplication.class, args);}public void run(String... args) throws Exception {// TODO Auto-generated method stubChannelFuture startPLC = nettyTcpServer.start();startPLC.channel().closeFuture().syncUninterruptibly();}
}
NettyTcpServer.Java`
package com.example.test.netty.server;import java.util.Map;
import java.util.concurrent.ConcurrentHashMap;import javax.annotation.PreDestroy;import org.slf4j.Logger;
import org.slf4j.LoggerFactory;
import org.springframework.stereotype.Component;import io.netty.bootstrap.ServerBootstrap;
import io.netty.channel.Channel;
import io.netty.channel.ChannelFuture;
import io.netty.channel.ChannelOption;
import io.netty.channel.EventLoopGroup;
import io.netty.channel.nio.NioEventLoopGroup;
import io.netty.channel.socket.nio.NioServerSocketChannel;
import io.netty.util.concurrent.Future;@Component
public class NettyTcpServer {private static final Logger log = LoggerFactory.getLogger(NettyTcpServer.class);//boss事件轮询线程组    用来接收进来的连接private EventLoopGroup boss = new NioEventLoopGroup(1);//worker事件轮询线程组     用来处理已经被接收的连接private EventLoopGroup worker = new NioEventLoopGroup();private Integer portPLC=8083;private Channel channel;/*** 存储client的channel* key:ip,value:Channel*/public static Map<String, Channel> map = new ConcurrentHashMap<String, Channel>();public static Map<String, Channel>  getChannes() {return map;}public ChannelFuture start() {// TODO Auto-generated method stub//启动类ServerBootstrap serverBootstrap = new ServerBootstrap();//组配置,初始化ServerBootstrap的线程组serverBootstrap.group(boss, worker)///构造channel通道工厂//bossGroup的通道,只是负责连接.channel(NioServerSocketChannel.class)//设置通道处理者ChannelHandlerworkerGroup的处理器.childHandler(new ServerChannelInitializer())//socket参数,当服务器请求处理程全满时,用于临时存放已完成三次握手请求的队列的最大长度。如果未设置或所设置的值小于1,Java将使用默认值50。.option(ChannelOption.SO_BACKLOG, 1024)//启用心跳保活机制,tcp,默认2小时发一次心跳.childOption(ChannelOption.SO_KEEPALIVE, true);//Future:异步任务的生命周期,可用来获取任务结果//绑定端口,开启监听,同步等待ChannelFuture channelFuture = serverBootstrap.bind(portPLC).syncUninterruptibly();if (channelFuture != null && channelFuture.isSuccess()) {//获取通道channel = channelFuture.channel();log.info("PLC server start success, port = {}", portPLC);} else {log.error("PLC server start fail");}return channelFuture;}@PreDestroypublic void destroy() {if (channel != null) {channel.close();}try {Future<?> future = worker.shutdownGracefully().await();if (!future.isSuccess()) {log.error("PLC workerGroup shutdown fail, {}", future.cause());}Future<?> future1 = boss.shutdownGracefully().await();if (!future1.isSuccess()) {log.error("PLC bossGroup shutdown fail, {}", future1.cause());}} catch (InterruptedException e) {e.printStackTrace();}log.info("PLC server shutdown success");}}
ServerChannelHandler.java
package com.example.test.netty.server;import org.slf4j.Logger;
import org.slf4j.LoggerFactory;import io.netty.channel.ChannelHandler;
import io.netty.channel.ChannelHandlerContext;
import io.netty.channel.ChannelPromise;
import io.netty.channel.SimpleChannelInboundHandler;@ChannelHandler.Sharable
public  class ServerChannelHandler extends SimpleChannelInboundHandler<Object>{private static final Logger log = LoggerFactory.getLogger(ServerChannelHandler.class);@Overridepublic void channelRead(ChannelHandlerContext ctx, Object arg) throws Exception {log.info("tcp client " + ctx.channel().remoteAddress().toString() + "info:" + arg);}@Overridepublic void channelActive(ChannelHandlerContext ctx) throws Exception {super.channelActive(ctx);log.info("tcp client " + ctx.channel().remoteAddress().toString() + " connect success");}@Overridepublic void close(ChannelHandlerContext ctx, ChannelPromise promise) throws Exception {// TODO Auto-generated method stubsuper.close(ctx, promise);}@Overrideprotected void messageReceived(ChannelHandlerContext arg0, Object arg1) throws Exception {// TODO Auto-generated method stub}
}
ServerChannelInitializer.java
package com.example.test.netty.server;import java.util.concurrent.TimeUnit;import io.netty.buffer.ByteBuf;
import io.netty.buffer.Unpooled;
import io.netty.channel.ChannelInitializer;
import io.netty.channel.ChannelPipeline;
import io.netty.channel.socket.SocketChannel;
import io.netty.handler.codec.DelimiterBasedFrameDecoder;
import io.netty.handler.codec.string.StringDecoder;
import io.netty.handler.codec.string.StringEncoder;
import io.netty.handler.timeout.IdleStateHandler;public class ServerChannelInitializer extends ChannelInitializer<SocketChannel>  {@Overrideprotected void initChannel(SocketChannel socketChannel) throws Exception {ChannelPipeline pipeline = socketChannel.pipeline();//ByteBuf delimiter = Unpooled.copiedBuffer("\r\n".getBytes());//pipeline.addFirst(new DelimiterBasedFrameDecoder(2048*10, delimiter));//IdleStateHandler心跳机制,如果超时触发Handle中userEventTrigger()方法pipeline.addLast("idleStateHandler", new IdleStateHandler(15, 0, 0, TimeUnit.MINUTES));//字符串解码器pipeline.addLast(new StringDecoder() ,new StringEncoder());//自定义Handlerpipeline.addLast(new ServerChannelHandler());}
}
代码添加完之后运行启动类

控制台出现如上,说明服务端启动成功。
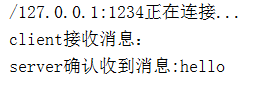
然后用调试工具进行客户端的测试

在调试工具中输入ip和端口点击打开,然后看开发工具控制台,如果有输出,就证明客户端成功连接。

上图就说明我这个项目客户端已经连接成功了。
然后我们再来测试一下,用客户端向服务端发送数据,看服务端能不能接收到数据。
我们在测试工具中,发送信息那一栏随便输入一点东西,然后点击发送

发送之后然后查看控制台有没有接收到打印出来

可以看到我这边控制台是打印出来了的。
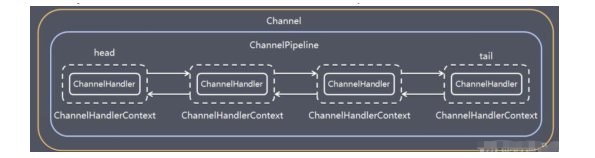
这样差不多netty框架就搭建好了,在这里面就可以实现用户端与服务端之间数据的传导。如果我们以后要使用这个框架进行数据的处理的话,就可以直接在ServerChannelHandler.java里面的 channelRead和channelActive方法进行数据的处理。

差不多一个简单的netty框架就搭建好了。