文章目录
- 前言
- 思路
- 代码
- gym环境
- DDPG算法
- 测试代码
- 结果
- 一只犬一只羊的情况
- 回报收敛的趋势图
- 羊的逃逸路径
- 犬的追捕极角
- 羊的逃逸极角
- 羊的逃逸半径
- 两只犬一只羊的情况
- 回报收敛的趋势图
- 羊的逃逸路径
- 羊的逃逸极角
- 羊的逃逸半径
- 犬1的追捕极角
- 犬2的追捕极角
- conda环境配置
前言
此次拿深圳杯作为数学建模国赛的模拟测试,感觉对于国赛本身来说是没有任何帮助的(笑死)
但是在这个过程中感觉还是学到了非常多的知识,主要是强化学习和运动学建模这一块
下面就简单的分享一下吧
思路
思路就是利用DDPG算法(可以处理连续动作空间)来对羊进行强化学习训练,使得羊领悟出逃出圆形草地的方法
具体思路看代码就懂了(talk is cheap,show you code)
这是整个算法的流程图

代码
gym环境
'''
自己设置的环境类
智能体:羊
环境:羊、犬和圆形草地,犬采用最优围堵策略围堵羊,若羊在一段时间内逃出圈则胜利,这段时间内没逃出或者被犬抓到则失败;
状态空间:整个圆组成的点集,是二维的;
动作空间:羊每一步可采取的动作的集合
回报的设计:参照pendulum-v0游戏环境源码中的回报的设计方案。
'''
import gym
from gym import spaces
import numpy as np
import math
import random
from gym.envs.classic_control import renderingsigma=10# 将弧度转换为角度
def trans(tmp):return 360*(tmp/(2*np.pi))# 更新犬的状态
def change_dog_state(thetaP,thetaE,delta_theta):new_thetaP=thetaPclockwise = (thetaP - delta_theta + 2 * np.pi) % (2 * np.pi)  # 顺时针counterclockwise = (thetaP + delta_theta + 2 * np.pi) % (2 * np.pi)  # 逆时针if thetaE > thetaP:if thetaE - thetaP >= np.pi:new_thetaP = clockwiseelse:new_thetaP = counterclockwiseelif thetaE < thetaP:if thetaP - thetaE >= np.pi:new_thetaP = counterclockwiseelse:new_thetaP = clockwisereturn new_thetaP# 计算夹角
def cal_angel(theta1,theta2):ans=0if theta1 > theta2:ans = theta1 - theta2if ans > np.pi:ans = 2 * np.pi - ans  # (补)角else:ans = theta2 - theta1if ans > np.pi:ans = 2 * np.pi - ansreturn ans# 判断羊是否给抓住
def catch(R,theta1,theta2,theta3):x=R*np.cos(theta1)y=R*np.sin(theta1)a=R*np.cos(theta2)b=R*np.sin(theta2)A=R*np.cos(theta3)B=R*np.sin(theta3)len1=math.sqrt((x-a)*(x-a)+(y-b)*(y-b))len2=math.sqrt((x-A)*(x-A)+(y-B)*(y-B))if len1 <= sigma and len2 <= sigma:return Trueelse:return Falseclass dogSheepEnv(gym.Env):def __init__(self):# self.dt = 0.2  # 采样时间self.dt=0.2# self.thetaP=np.pi/2# 狗的极坐标self.thetaP = random.uniform(0, 2 * np.pi)# 狗1的极坐标self.wP=np.pi/5# 狗的角速度self.thetaP2=random.uniform(0, 2 * np.pi)# 狗1的极坐标self.vE=32# 羊的速度self.thetaE=np.pi/2# 羊的极坐标self.radiusE=0# 羊的极坐标半径self.R=100# 圆的半径self.state=np.array([self.thetaE,self.radiusE,self.thetaP,self.thetaP2])# 环境的初始状态self.viewer = rendering.Viewer(400, 400)# 画板self.lambda1=0.07# reward的参数1self.lambda2=3.1# reward的参数2self.lambda3=3.1self.lambda4=6.2# 自定义动作空间,观察空间self.action_space = spaces.Box(# 羊的动作空间即为转动的角度,会根据当前位置进行变化# 由于怕出现low比high还大的情况,我们的action_space就不做周期处理,用的时候取余2pi就行low=0, high=2*np.pi, shape=(1,), dtype=np.float32)self.observation_space = spaces.Box(# 状态空间为 theta_E,R_E,theta_Plow=np.array([0,0,0,0]),high=np.array([2*np.pi,self.R,2*np.pi,2*np.pi]),dtype=np.float32)'''羊接受一个动作进行位移: 使用PG算法的choose_action犬沿劣弧进行位移接着判断游戏是否结束评价这个动作的回报'''def step(self, action):# u为action# print('action: ',action)# 根据action(即θ_E'来计算新的状态)self.state = self._get_observation(action)reward = self._get_reward()done = self._get_done()if done:# 如果逃脱失败,给予惩罚if catch(self.R,self.state[0],self.state[2],self.state[3]):reward=reward-1000print('be catched')else:reward=0print('no be catched')return self.state,reward,done# 获取reward,根据action作用之后的state来计算rewarddef _get_reward(self):# thetaP=self.state[2]# thetaP2=self.state[3]# thetaE=self.state[0]thetaE,thetaP,thetaP2=self.state[0],self.state[2],self.state[3]delta_theta1=cal_angel(thetaE,thetaP)# 羊与犬1的夹角delta_theta2=cal_angel(thetaE,thetaP2)# 羊与犬2的夹角delta_theta3=cal_angel(thetaP,thetaP2)# 两犬之间的夹角# a=self.state[1]# b=self.R# distance=math.sqrt(a*a+b*b-2*a*b*np.cos(delta_theta))# 羊距圆周越近越好(radiusE越大越好),羊与犬的夹角越大越好,羊离犬越远越好# print('r1: ',self.lambda1 * abs(self.R - self.state[1]))# print('r2: ',self.lambda2 * abs(np.pi-delta_theta1))# print('r3: ',self.lambda3 * abs(np.pi-delta_theta2))# print('r4: ',self.lambda4 * abs(delta_theta3))return -(# 想要趋近于零self.lambda1 * abs(self.R - self.state[1])# 范围 [0-2*R(200)]+ self.lambda2 * abs(np.pi-delta_theta1) # 范围 [0-100]+ self.lambda3 * abs(np.pi-delta_theta2) # 范围 [0-100]+ self.lambda4 * abs(delta_theta3)   # 范围 [0-100])# 判断游戏是否结束def _get_done(self):if self.state[1]>=self.R:return Trueelse:return False# 根据action修改环境,改变状态def _get_observation(self,action):# 已知现在的位置,首先计算位移后羊的极坐标xb=self.state[1]*np.cos(self.state[0])+self.vE*self.dt*np.cos(action)yb=self.state[1]*np.sin(self.state[0])+self.vE*self.dt*np.sin(action)new_radiusE=math.sqrt(xb*xb+yb*yb)# 由xb和yb进行θ转换,# 返回弧度pinew_thetaE=math.atan2(yb,xb)new_thetaE=(new_thetaE+2*np.pi)%(2*np.pi)# 根据羊的action,选择狼的位移方向并位移delta_theta=self.wP*self.dtthetaE = self.state[0]# 修改犬1的状态thetaP = self.state[2]# 犬1的原状态new_thetaP=change_dog_state(thetaP,thetaE,delta_theta)# 犬1的新状态# 修改犬2的状态thetaP2 = self.state[3]  # 犬1的原状态new_thetaP2 = change_dog_state(thetaP2, thetaE, delta_theta)  # 犬1的新状态# 相等的话就保持原状态return np.array([new_thetaE,new_radiusE,new_thetaP,new_thetaP2])# 重置羊和犬的状态def reset(self):thetaE=random.uniform(0, 2 * np.pi)thetaE2=(thetaE+np.pi)%(2*np.pi)self.state=np.array([0,0,thetaE,thetaE2],dtype=float)return np.array(self.state)# 画画显示犬和羊的状态def render(self):# 清空轨迹# self.viewer.geoms.clear()# 绘制大圆ring = rendering.make_circle(radius=self.R,res=50,filled=False)transform1 = rendering.Transform(translation=(200, 200))  # 相对偏移ring.add_attr(transform1)# 让圆添加平移这个属性self.viewer.add_geom(ring)# 绘制犬1xP,yP=self.R*np.cos(self.state[2]),self.R*np.sin(self.state[2])ringP = rendering.make_circle(radius=2, res=50, filled=True)ringP.set_color(0,0,1)transform_P = rendering.Transform(translation=(200+xP, 200+yP))  # 相对偏移ringP.add_attr(transform_P)  # 让圆添加平移这个属性self.viewer.add_geom(ringP)# 绘制犬2xP2, yP2 = self.R * np.cos(self.state[3]), self.R * np.sin(self.state[3])ringP2 = rendering.make_circle(radius=2, res=50, filled=True)ringP2.set_color(0, 0, 1)transform_P2 = rendering.Transform(translation=(200 + xP2, 200 + yP2))  # 相对偏移ringP2.add_attr(transform_P2)  # 让圆添加平移这个属性self.viewer.add_geom(ringP2)# 绘制羊xE, yE = self.state[1] * np.cos(self.state[0]), self.state[1] * np.sin(self.state[0])ringE = rendering.make_circle(radius=2, res=50, filled=True)ringE.set_color(1, 0, 0)transform_E = rendering.Transform(translation=(200+xE, 200+yE))  # 相对偏移ringE.add_attr(transform_E)  # 让圆添加平移这个属性self.viewer.add_geom(ringE)return self.viewer.render()# env = dogSheepEnv()
# while True:
#     env.reset()
#     for _ in range(2000):
#         env.render()
#         action=random.uniform(0,2*np.pi)
#         action=np.clip(action,env.state[0]-np.pi/2,env.state[0]+np.pi/2)
#         action=(action+2*np.pi)%(2*np.pi)
#         state, reward, done = env.step(action) # 和环境交互
#         if done:
#             break
DDPG算法
import tensorflow as tf
import numpy as np#####################  超参数 ####################LR_A = 0.001    # learning rate for actor
LR_C = 0.001    # learning rate for critic
GAMMA = 0.9     # reward discount
TAU = 0.01      # soft replacement
MEMORY_CAPACITY = 10000
BATCH_SIZE = 32class DDPG(object):def __init__(self, a_dim, s_dim, a_bound,):self.memory = np.zeros((MEMORY_CAPACITY, s_dim * 2 + a_dim + 1), dtype=np.float32)self.pointer = 0self.memory_full = Falseself.sess = tf.Session()self.a_replace_counter, self.c_replace_counter = 0, 0# self.a_dim, self.s_dim, self.a_bound = a_dim, s_dim, a_bound[1]self.a_dim, self.s_dim, self.a_bound = a_dim, s_dim, a_boundself.S = tf.placeholder(tf.float32, [None, s_dim], 's')self.S_ = tf.placeholder(tf.float32, [None, s_dim], 's_')self.R = tf.placeholder(tf.float32, [None, 1], 'r')with tf.variable_scope('Actor'):self.a = self._build_a(self.S, scope='eval', trainable=True)a_ = self._build_a(self.S_, scope='target', trainable=False)with tf.variable_scope('Critic'):# assign self.a = a in memory when calculating q for td_error,# otherwise the self.a is from Actor when updating Actorq = self._build_c(self.S, self.a, scope='eval', trainable=True)q_ = self._build_c(self.S_, a_, scope='target', trainable=False)# networks parametersself.ae_params = tf.get_collection(tf.GraphKeys.GLOBAL_VARIABLES, scope='Actor/eval')self.at_params = tf.get_collection(tf.GraphKeys.GLOBAL_VARIABLES, scope='Actor/target')self.ce_params = tf.get_collection(tf.GraphKeys.GLOBAL_VARIABLES, scope='Critic/eval')self.ct_params = tf.get_collection(tf.GraphKeys.GLOBAL_VARIABLES, scope='Critic/target')# target net replacementself.soft_replace = [[tf.assign(ta, (1 - TAU) * ta + TAU * ea), tf.assign(tc, (1 - TAU) * tc + TAU * ec)]for ta, ea, tc, ec in zip(self.at_params, self.ae_params, self.ct_params, self.ce_params)]q_target = self.R + GAMMA * q_# in the feed_dic for the td_error, the self.a should change to actions in memorytd_error = tf.losses.mean_squared_error(labels=q_target, predictions=q)self.ctrain = tf.train.AdamOptimizer(LR_C).minimize(td_error, var_list=self.ce_params)a_loss = - tf.reduce_mean(q)    # maximize the qself.atrain = tf.train.AdamOptimizer(LR_A).minimize(a_loss, var_list=self.ae_params)self.sess.run(tf.global_variables_initializer())def choose_action(self, s):return self.sess.run(self.a, {self.S: s[None, :]})[0]def learn(self):# soft target replacementself.sess.run(self.soft_replace)indices = np.random.choice(MEMORY_CAPACITY, size=BATCH_SIZE)bt = self.memory[indices, :]bs = bt[:, :self.s_dim]ba = bt[:, self.s_dim: self.s_dim + self.a_dim]br = bt[:, -self.s_dim - 1: -self.s_dim]bs_ = bt[:, -self.s_dim:]self.sess.run(self.atrain, {self.S: bs})self.sess.run(self.ctrain, {self.S: bs, self.a: ba, self.R: br, self.S_: bs_})def store_transition(self, s, a, r, s_):transition = np.hstack((s, a, [r], s_))index = self.pointer % MEMORY_CAPACITY  # replace the old memory with new memoryself.memory[index, :] = transitionself.pointer += 1if self.pointer > MEMORY_CAPACITY:      # indicator for learningself.memory_full = Truedef _build_a(self, s, scope, trainable):with tf.variable_scope(scope):net = tf.layers.dense(s, 100, activation=tf.nn.relu, name='l1', trainable=trainable)a = tf.layers.dense(net, self.a_dim, activation=tf.nn.tanh, name='a', trainable=trainable)return tf.multiply(a, self.a_bound, name='scaled_a')def _build_c(self, s, a, scope, trainable):with tf.variable_scope(scope):n_l1 = 100w1_s = tf.get_variable('w1_s', [self.s_dim, n_l1], trainable=trainable)w1_a = tf.get_variable('w1_a', [self.a_dim, n_l1], trainable=trainable)b1 = tf.get_variable('b1', [1, n_l1], trainable=trainable)net = tf.nn.relu(tf.matmul(s, w1_s) + tf.matmul(a, w1_a) + b1)return tf.layers.dense(net, 1, trainable=trainable)  # Q(s,a)def save(self):saver = tf.train.Saver()saver.save(self.sess, './params', write_meta_graph=False)def restore(self):saver = tf.train.Saver()saver.restore(self.sess, './params')
测试代码
import mathimport numpy as npfrom env import dogSheepEnv
from rl import DDPG
import matplotlib.pyplot as plt
import timeMAX_EPISODES = 200# 比赛次数
MAX_EP_STEPS = 2000# 每把比赛的步数
ON_TRAIN = False# 控制程序是进行训练还是进行测试
sigma=10 # 碰撞精度# reward_list=[]# 准备画图
# ep_reward_list=[]
thetaP_list=[]
thetaP2_list=[]
thetaE_list=[]
rE_list=[]# 设置环境
env = dogSheepEnv()
# 设置维度
state_dim = env.observation_space.shape[0]
action_dim = env.action_space.shape[0]
action_bound = env.action_space.high# 设置强化学习模型
rl = DDPG(action_dim, state_dim, action_bound)# 判断羊是否给抓住
def catch(R,theta1,theta2,theta3):x=R*np.cos(theta1)y=R*np.sin(theta1)a=R*np.cos(theta2)b=R*np.sin(theta2)A=R*np.cos(theta3)B=R*np.sin(theta3)len1=math.sqrt((x-a)*(x-a)+(y-b)*(y-b))len2=math.sqrt((x-A)*(x-A)+(y-B)*(y-B))if len1 <= sigma and len2 <= sigma:return Trueelse:return Falsedef trans(tmp):return 360*(tmp/(2*np.pi))# def dis(R,theta1,theta2):
#     x=R*np.cos(theta1)
#     y=R*np.sin(theta1)
#     a=R*np.cos(theta2)
#     b=R*np.sin(theta2)
#     len=math.sqrt((x-a)*(x-a)+(y-b)*(y-b))
#     if len <= sigma:
#         return False
#     else:
#         return True# 训练过程
'''
env和算法的交互
传state
将一次学习的经历装进记忆库rl模型一直将学习经历填进记忆库,直到记忆库满了才开始学习
填充记忆库的过程中,环境不断地交互
'''
def train():for i in range(MAX_EPISODES):print('i: ',i)state = env.reset()ep_reward = 0.# 单局比赛的总rewardfor j in range(MAX_EP_STEPS):env.render()# 画图action = rl.choose_action(state)# 算法预测下一个动作action=np.random.normal(action,scale=0.01) # 随机一下# 这里限制一下动作空间action=np.clip(action,env.state[0]-np.pi/2,env.state[0]+np.pi/2)action=(action+2*np.pi)%(2*np.pi)_state, reward, done = env.step(action) # 和环境交互# reward_list.append(reward)# print('reward: ',reward)# print('i: ',i,' choose_action: ', trans(action[0]),' reward: ',reward,' state: ',_state)rl.store_transition(state, action, reward, _state)# 把这次经历装进记忆库ep_reward += reward# 记忆模块填完之后算法开始学习if rl.memory_full:rl.learn()state = _state# time.sleep(0.2)if done or j == MAX_EP_STEPS-1: # 结束# if env.state[1] >= env.R and dis(env.R,env.state[0],env.state[2]):if (env.state[1] >= env.R) and (not catch(env.R, env.state[0], env.state[2],env.state[3])):print('sheep win')else:print('dog win')# ep_reward_list.append(ep_reward)print('Ep: %i | %s | ep_r: %.1f | steps: %i' % (i, '---' if not done else 'done', ep_reward, j))breakrl.save() # 保存模型# 测试
def eval():rl.restore()# 提取模型# env.render()# env.viewer.set_vsync(True)# while True:#     # print('新的一次')#     state = env.reset()#     for _ in range(1000):#         env.render()#         action = rl.choose_action(state)#         action = np.random.normal(action, scale=0.01)  # 随机一下#         # 这里限制一下动作空间#         action = np.clip(action, env.state[0] - np.pi / 2, env.state[0] + np.pi / 2)#         action = (action + 2 * np.pi) % (2 * np.pi)#         # print('choose action: ',action,'state: ',env.state)#         state, reward, done = env.step(action)#         thetaE_list.append(state[0])#         rE_list.append(state[1])#         thetaP_list.append(state[2])#         if done:#             if env.state[1] >= env.R and dis(env.R,env.state[0],env.state[2]):#                 print('sheep win')#             else:#                 print('dog win')#             breakstate = env.reset()print('thetaP: ',state[2])print('thetaP2: ', state[3])for _ in range(1000):env.render()action = rl.choose_action(state)# 这里限制一下动作空间action = np.clip(action, env.state[0] - np.pi / 2, env.state[0] + np.pi / 2)action = (action + 2 * np.pi) % (2 * np.pi)state, reward, done = env.step(action)thetaE_list.append(state[0])rE_list.append(state[1])thetaP_list.append(state[2])thetaP2_list.append(state[3])# print('choose action: ', action,' reward: ',reward, 'state: ', env.state)if done:breakinput('input: ')if ON_TRAIN:train()
else:eval()# 画reward图
# plt.figure()
# len2=len(ep_reward_list)
# plt.plot(list(range(len2)),ep_reward_list)
# plt.title('reward convergence trend ')
# plt.xlabel('steps')
# plt.ylabel("reward")
# plt.show()# 画犬1的图
plt.figure()
plt.plot(list(range(len(thetaP_list))),thetaP_list)
plt.title('pursuer1 theta')
plt.xlabel('steps')
plt.ylabel("theta")
plt.show()# 画犬2的图
plt.figure()
plt.plot(list(range(len(thetaP2_list))),thetaP2_list)
plt.title('pursuer2 theta')
plt.xlabel('steps')
plt.ylabel("theta")
plt.show()# 画羊的极角
plt.figure()
plt.plot(list(range(len(thetaE_list))),thetaE_list)
plt.title('escaper theta')
plt.xlabel('steps')
plt.ylabel("theta")
plt.show()# 画羊的极径
plt.figure()
plt.plot(list(range(len(rE_list))),rE_list)
plt.title('escaper radius')
plt.xlabel('steps')
plt.ylabel("radius")
plt.show()
结果
一只犬一只羊的情况
回报收敛的趋势图

羊的逃逸路径

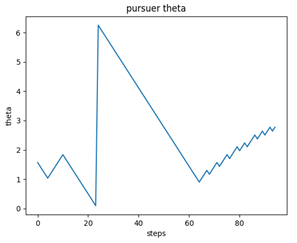
犬的追捕极角
羊的逃逸极角

羊的逃逸半径

两只犬一只羊的情况
回报收敛的趋势图

羊的逃逸路径

羊的逃逸极角

羊的逃逸半径

犬1的追捕极角

犬2的追捕极角

conda环境配置
absl-py                   0.13.0                   pypi_0    pypi
astor                     0.8.1                    pypi_0    pypi
astunparse                1.6.3                    pypi_0    pypi
atari-py                  0.2.9                    pypi_0    pypi
ca-certificates           2021.5.30            h5b45459_0    conda-forge
cached-property           1.5.2                    pypi_0    pypi
cachetools                4.2.2                    pypi_0    pypi
certifi                   2021.5.30        py37h03978a9_0    conda-forge
charset-normalizer        2.0.4                    pypi_0    pypi
clang                     5.0                      pypi_0    pypi
cloudpickle               1.6.0                    pypi_0    pypi
cycler                    0.10.0                   pypi_0    pypi
flatbuffers               1.12                     pypi_0    pypi
gast                      0.4.0                    pypi_0    pypi
google-auth               1.35.0                   pypi_0    pypi
google-auth-oauthlib      0.4.5                    pypi_0    pypi
google-pasta              0.2.0                    pypi_0    pypi
grpcio                    1.39.0                   pypi_0    pypi
gym                       0.18.3                   pypi_0    pypi
h5py                      3.1.0                    pypi_0    pypi
idna                      3.2                      pypi_0    pypi
importlib-metadata        4.6.4                    pypi_0    pypi
joblib                    1.0.1                    pypi_0    pypi
keras                     2.6.0                    pypi_0    pypi
keras-applications        1.0.8                    pypi_0    pypi
keras-preprocessing       1.1.2                    pypi_0    pypi
kiwisolver                1.3.1                    pypi_0    pypi
markdown                  3.3.4                    pypi_0    pypi
matplotlib                3.4.3                    pypi_0    pypi
mpi4py                    3.1.1                    pypi_0    pypi
numpy                     1.19.5                   pypi_0    pypi
oauthlib                  3.1.1                    pypi_0    pypi
opencv-python             4.5.3.56                 pypi_0    pypi
openssl                   1.1.1k               h8ffe710_0    conda-forge
opt-einsum                3.3.0                    pypi_0    pypi
pandas                    1.3.2                    pypi_0    pypi
pillow                    8.2.0                    pypi_0    pypi
pip                       21.2.1             pyhd8ed1ab_0    conda-forge
protobuf                  3.17.3                   pypi_0    pypi
pyasn1                    0.4.8                    pypi_0    pypi
pyasn1-modules            0.2.8                    pypi_0    pypi
pyglet                    1.5.15                   pypi_0    pypi
pyparsing                 2.4.7                    pypi_0    pypi
python                    3.7.10          h7840368_100_cpython    conda-forge
python-dateutil           2.8.2                    pypi_0    pypi
python_abi                3.7                     2_cp37m    conda-forge
pytz                      2021.1                   pypi_0    pypi
requests                  2.26.0                   pypi_0    pypi
requests-oauthlib         1.3.0                    pypi_0    pypi
rsa                       4.7.2                    pypi_0    pypi
scipy                     1.7.0                    pypi_0    pypi
setuptools                49.6.0           py37h03978a9_3    conda-forge
six                       1.15.0                   pypi_0    pypi
sqlite                    3.36.0               h8ffe710_0    conda-forge
stable-baselines          2.10.0                   pypi_0    pypi
tensorboard               1.14.0                   pypi_0    pypi
tensorboard-data-server   0.6.1                    pypi_0    pypi
tensorboard-plugin-wit    1.8.0                    pypi_0    pypi
tensorflow                1.14.0                   pypi_0    pypi
tensorflow-estimator      1.14.0                   pypi_0    pypi
termcolor                 1.1.0                    pypi_0    pypi
typing-extensions         3.7.4.3                  pypi_0    pypi
ucrt                      10.0.20348.0         h57928b3_0    conda-forge
urllib3                   1.26.6                   pypi_0    pypi
vc                        14.2                 hb210afc_5    conda-forge
vs2015_runtime            14.29.30037          h902a5da_5    conda-forge
werkzeug                  2.0.1                    pypi_0    pypi
wheel                     0.36.2             pyhd3deb0d_0    conda-forge
wincertstore              0.2             py37h03978a9_1006    conda-forge
wrapt                     1.12.1                   pypi_0    pypi
zipp                      3.5.0                    pypi_0    pypi